We will be learning about level editing in this chapter, which is a subset of a larger field called tools programming. A simple review of the employment statistics reveals this truth: tools programmers are among the highest paid people in the game industry, commanding salaries far greater than that of game designers, gameplay programmers, and even engine programmers. So, what does a tools programmer do? This is a high-demand skill set simply because it is not taught in schools, and few programmers have found a need to develop this particular type of skill in their daily activities. A “tool” in this context is any program or script that is needed during the game development process. Examples include Max and Maya scripts, file format converters, workflow pipeline programs, automated build scripts, and yes, even level editors.
We are going to focus on the level editing aspect of tools programming in this chapter. You will learn how to build a simple tilemap level editor. The level or “game world” defines the rules of the game and presents the player with all of the obstacles that must be overcome to complete the game. Although the world is the most important aspect of a game, it is not always given the proper attention when a game is being designed. This chapter provides an introduction to world building, or more specifically, map editing. You learn to create the game world for Dungeon Crawler, as well as levels for your own games, using a custom level editor. We will explore the features of this level editor to gain some insights and inspiration for creating our game levels.
Here’s what we’ll cover in this chapter:
Designing our own level editor
Building the editor
Creating a new tilemap level
Loading and saving level files
A tilemap is a two-dimensional array of tiles with a set width and height that resembles a tiled floor. Perhaps you have a tiled floor or know someone who has a house with tile? The concept behind a tiled floor is similar to a tilemap used for a video game. But, unlike a real tiled floor, in a video game we use many different tiles to make up the “ground” for a game. To create a tilemap for a game, you need a map editor, which is the purpose of this chapter.
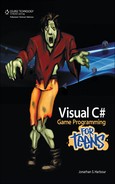
We’re going to build a custom level editor for the Dungeon Crawler game so that we have full control over the tile format. One of the most popular tilemap editors used by professionals and hobbyists alike over the years has been an editor called Mappy (http://www.tilemap.co.uk). Mappy works well, especially for handheld game systems like Nintendo GBA and DS—see Figure 6.1. But, despite the usefulness of Mappy, it will never meet the needs of a custom game project quite like a custom editor. We need a level editor to save tilemap data in such a way that it can be loaded into the game without too much effort. Mappy supports several of its own file formats that we could load into our game, but a custom level editor also sets boundaries for a game level that cannot be done with Mappy (such as the maximum size of the level).
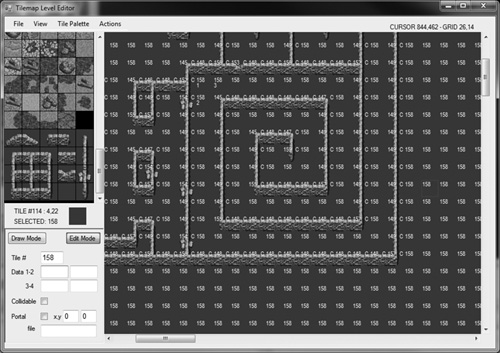
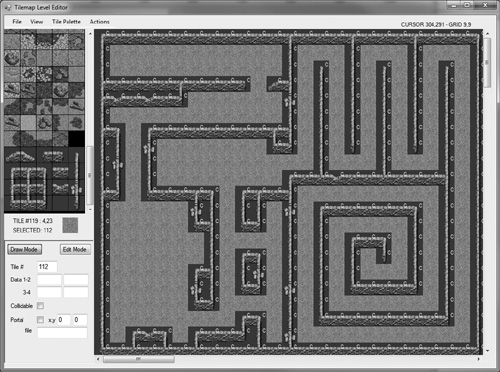
So, let me explain the editor a bit. This is a new editor, created just for this game, not some recycled level editor from another project. (Similar gameplay is found in the sister book covering Visual Basic.) Since we’re building the editor from scratch in Visual C#, we also have the ability to make changes to the editor over time to meet future needs—another thing that cannot be said of Mappy. Nothing in this creative industry is ever finished, but we can make a solid effort to make the editor as useful as possible with the understanding that it can be modified if new features are needed. It is shown in Figure 6.2.

The key to a level editor is making it possible to edit the tiles that make up a game level. The tiles themselves are represented by a single field—the tile identifier or tile ID. When you “draw” tiles onto the tilemap with the mouse, what you’re doing is setting the tile ID value to the number of the tile that has been selected in the tile palette. Referring back to Figure 6.2 again, note that the tile palette is on the left side in a scrolling area. That is just the beginning! After that, we can add as many additional fields to the editor as we want, it’s just a matter of designing the graphical user interface (GUI) to support the tile data. In the level editor, I’ve used the lower-left corner of the GUI for tile data, as you can see in Figure 6.2. The level editor uses XML—Extensible Markup Language—to store tilemap levels. So, our game will also need to be able to read the .xml files. To make the editor seem a little more, well, professional, the tilemap files have an extension of .level—but they just contain XML data.
So, how does the editor store data for each tile? We could use the Mappy approach by giving each tile several generic data fields that can be used in any game. An editor with just two or three fields per tile would be sufficient to make almost any kind of game. But why limit ourselves? We want to make some tiles solid so the player can’t walk through them, so we need a Collision field. We will want to allow the player to teleport to new areas of the map or to completely different levels so we also need a Portal field. These can be defined in the editor directly without the need to convert generic fields into our desired tile properties.
For things such as item drops—where we want to assign a sprite to show up in the game world at a certain location automatically by the game engine—we can use one of the four Data fields. The .xml file format can handle as many fields as we want to use, so there’s no need to limit the design of the level editor due to file concerns. Even 100 properties for each tile would not cause the game to slow down any. But, the fact is, we don’t need that many fields. The four generic data fields store strings so you can put any data you want there—whole numbers, decimal numbers, text descriptions, etc. You could use one as a searchable item name field and then add an item to the game world at that tile location, or even something as exotic as a script function name. Here are the data fields for each tile:
Tile palette number
Collidable (flag)
Data 1
Data 2
Data 3
Data 4
Portal (flag)
Portal X
Portal Y
Portal file
This may not seem like very many tile properties to be used for a large and complex RPG, but believe it or not, this is more than enough! In fact, we could get by with just the four data fields alone but the others make editing and programming more convenient.
Before getting into the development of the editor, we’ll first learn how to use it. The following will explain the GUI and menus of the level editor with included figures for reference.
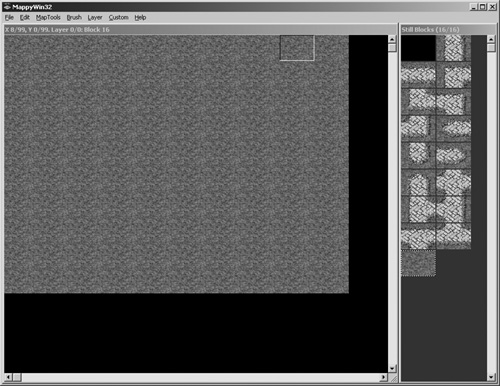
One of the most obvious requirements of any editor is the ability to start over with a fresh, new canvas (or file). Within the File menu, shown in Figure 6.3, is the option New Tilemap. When you select this, the tilemap and all data will be wiped clean from the editor so that you can start working on a new tilemap from scratch.
Under the File menu (shown in Figure 6.3) is the Load Tilemap menu item, used to load an existing tilemap editor file. The Save Tilemap item will save any current tilemap file being edited (without user prompt). The Save Tilemap As option will prompt for a filename, and is especially useful if you want to make a quick backup of a level before making changes to the main level file you are working on. Designing a very large level can take many hours, so it would be tragic to lose all of that hard work—save often!
The tilemap level files are saved in .xml format. XML is similar to HTML (the language used for websites), in that it is a text format that you can open and read with a simple text editor. The following listing shows the first and last tiles in the tilemap.xml file saved by the level editor. Every tile is contained in a tag called “tiles,” with an opening tag, <tiles>, and closing tag, </tiles>.
<?xml version="1.0" standalone="yes"?>
<DocumentElement>
  <tiles>
    <tile>0</tile>
    <value>145</value>
    <data1 />
    <data2 />
    <data3 />
    <data4 />
    <collidable>true</collidable>
    <portal>false</portal>
    <portalx>0</portalx>
    <portaly>0</portaly>
    <portalfile />
  </tiles>
.
.
.
  <tiles>
    <tile>16383</tile>
    <value>158</value>
    <data1 />
    <data2 />
    <data3 />
    <data4 />
    <collidable>false</collidable>
    <portal>false</portal>
    <portalx>0</portalx>
    <portaly>0</portaly>
    <portalfile />
  </tiles>
</DocumentElement>
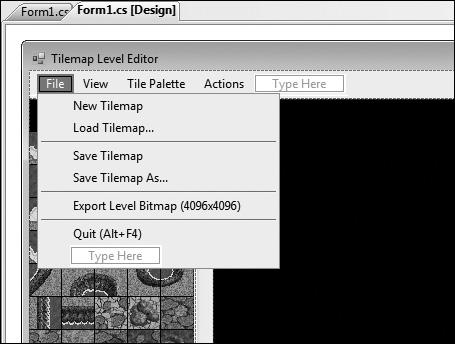
Also under the File menu is an option called Export Level Bitmap. This menu item will cause the entire tilemap to be saved as a single huge bitmap! This is a pretty interesting option that lets you see the whole game level as one huge image—suitable for framing, perhaps? I’m not sure if it’s very useful in a game since it’s so large, but there are some interesting uses for it (such as being used in a game manual or tutorial). The dimensions of the complete tilemap are 4096x4096 pixels, which is 65 MB of memory in an uncompressed bitmap! See Figure 6.4.
The View menu, shown in Figure 6.5, can be used to toggle several options that affect what is shown in the editor window.
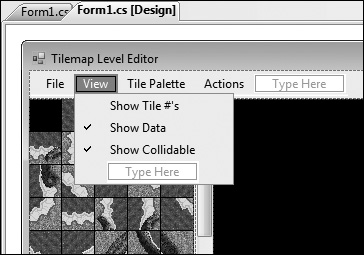
Figure 6.6 shows the default display in the editor window, in which both the Collidable and Data1 field values are shown directly in the editor window. This is purely for the sake of convenience, and you may even want to modify the editor to show more fields than this. Just remember that the data fields can contain text of any length so that could potentially mess up the editor display. In the example shown in Figure 6.6, I have just entered a value of “1” into the Data1 field. Note that the wall tiles all have their Collidable property set, evidenced by the “C” displayed in the editor window—perhaps the most important data to show for each tile, as far as gameplay is concerned.

Turning on the Show Tile #’s option has the effect of displaying the tile ID over every tile in the editor window—see Figure 6.7. This option is disabled by default because it makes for a messy display and it slows down the editor quite a bit. The option is there if you need it—sometimes seeing the tile numbers is helpful when editing a large and complex tilemap.
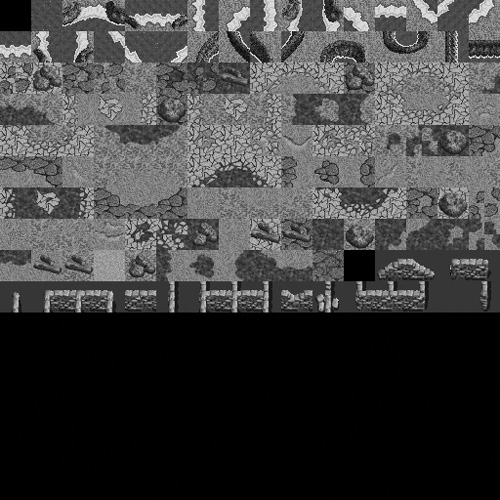
The Tile Palette menu is shown in Figure 6.8. The first option in this menu, Export Palette Texture, will save the tile palette as a 512x512 bitmap file, suitable for use in a game engine that requires texture files of a uniform size. There is no filename prompt; it just saves the palette to the file tilemap.bmp, which is shown in Figure 6.9. This is usually the type of bitmap you would want to use in a game, where the tiles are arranged in the same order that they appear in the editor but with dimensions that are more friendly to game engines and graphics SDKs (some of which, like Direct3D, have a hard time using odd-shaped bitmaps, depending on the video card installed in the PC).

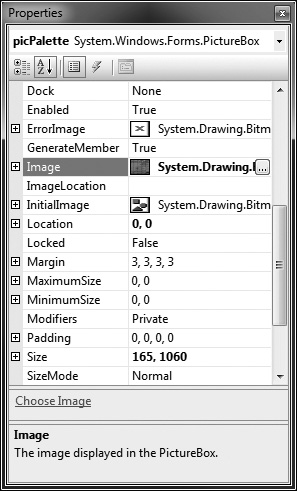
The second option, Export Palette Bitmap, performs a similar service to the first option, but is used more for customizing the level editor than for exporting the palette for use in a game. The result is an image that looks exactly like the palette in the editor, which is what you see in the scrolling panel. If you want to add or change the tiles used in the editor, then you can modify this bitmap and import it back into the PictureBox control used by the editor for the palette (its name is picPalette). To replace the image, open the Properties window for the picPalette control and select a new image using the Image property, as shown in Figure 6.11.

The Actions menu, shown in Figure 6.12, includes four options (currently) to make editing a bit easier. These are just the most useful script-like features I needed while using the editor myself. If you can think of any additional processes that would speed up level editing or make the life of a level designer easier, then I encourage you to go ahead and add them to this menu! See the source code behind the existing Action items for example code on how to manipulate the tilemap.
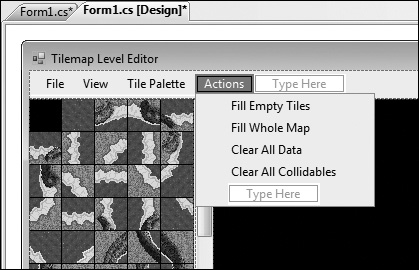
The first Action item, Fill Empty Tiles, will use the currently selected tile (so make sure you select a tile first) to fill all empty spaces in the level. So, any tile that is empty or black will be filled with the selected tile, while all tiles currently in use will be skipped! This is a very useful action. A variation that I would like to add is the ability to replace any tile with another, but the logic is a little bit more complex because we would have to select the tile in the editor to be replaced, then select the new one, before launching the Action item—but it could be done! Below is an example of the code:
for (int index = 0; index < mapSize * mapSize; index++)
{
    if (tilemap[index].tilenum == 0)
        tilemap[index].tilenum = selectedPaletteTile;
}
redrawTilemap();
Let’s see it in action. In Figure 6.13 is a sample tilemap with some tiles of the level deleted. (By the way, you can delete tiles by right-clicking them in the editor window.) Using the Actions menu, select Fill Empty Tiles. A prompt will come up in case you accidentally choose the wrong menu item. Be sure to have the desired tile selected in the palette before continuing because there’s no “Undo” feature. Figure 6.14 shows the result, with all empty tiles filled in using the selected “grass” tile. All empty tiles in the entire tilemap have been similarly replaced, not just those in view.

The next option in the Actions menu is Fill Whole Map. As the title says, this option fills the entire map with the currently selected tile, regardless of what’s already in the tilemap. Since this action replaces the entire tilemap, filling it in with a single tile, use with caution! The most common use for this is when getting started on a new tilemap, filling it in with the most commonly used “ground” tile.
The next two options in the Actions menu, Clear All Data and Clear All Collidables, operate on the data fields of the tiles in the level. As their titles suggest, these options clear the data fields or the collidable field of every tile. What’s missing here are similar actions to clear the portal fields independently from the others. There’s definitely a lot of great things we could do with this menu to improve the level editor from a designer’s point of view!
The GUI for the level editor is a bit complicated. For one thing, it was created using splitter panels (System.Windows.Forms.SplitContainer), regular panels (System.Windows.Forms.Panel) as well as a PictureBox here and there, a menu (System.Windows.Forms.MenuStrip), and numerous scrollbars. Suffice it to say, it would take a lot of explanation to create the GUI from scratch here in this chapter. So, I’m going to recommend you open the project that is included in this chapter’s resource files to see the Form. We’ll go over the source code for the editor so you can see how it all works—the source is like the glue that makes the Form controls work together.
Let’s consider the tile palette, which is arguably the most important part of the editor (refer back to Figure 6.10 to see the tiles). The tile palette is fixed for now with the tiles we need for the game at this point, but since the palette is a PictureBox with an associated Graphics and Bitmap object, we can modify it as needed—adding tiles, removing tiles, and so on. The tiles are fixed at 32x32 pixels—it’s a good size for editing, especially when you’re dealing with huge game levels. There’s no reason why we can’t use a different tile size, since the source code can work with 32x32 or 64x64 or any other reasonable dimension as a variable just as well as a hard-coded pair of numbers. Since the 3D-looking wall tiles (which we might call “2.5D” tiles) are much smaller than the character artwork, we may very well have to use a larger tile size in the game than is used in the editor. (The next chapter covers characters.)
I’ll just presume you have the project open, and we’ll go over the source code while explaining how the editor works. Figure 6.15 shows the editor in the form designer of Visual Studio.

On the left is the tile palette. This is the collection of source tiles used to create a game level, and each tile is 32x32 pixels in size. There is also a one-pixel border separating each tile in the palette. If you create your own palette or add to this one, be sure to maintain that one-pixel border between each tile because the editor (and the game!) counts on that space being there to work correctly. If you want to replace the palette image, just open up the PictureBox control’s properties and choose a new image using its Image property. The height may be shorter or taller, but it’s very important that you maintain the same width as the one currently in the editor! The current one has five tiles across. Just be sure any replacement palette image you want to use has the same five tiles in width and the replacement palette image should work fine!
Like I mentioned before, we aren’t going to look at every line of source code for the level editor, just the most interesting and relevant parts. There’s a ton of code needed to make the Form controls work, and we just don’t need to go over all of that rather mundane code. So, let’s get started. First, these are the .NET Framework namespaces needed:
using System;
using System.Xml;
using System.IO;
using System.Collections.Generic;
using System.ComponentModel;
using System.Data;
using System.Drawing;
using System.Linq;
using System.Text;
using System.Windows.Forms;
using System.Runtime.InteropServices;
The last one, InteropServices, is an odd one! Turns out, we need this to enable mouse wheel support in the editor. Although we can’t scroll left or right, we can scroll up and down in both the tile palette and the editor window by linking the mouse wheel to the vertical scroll bars—and that requires the InteropServices namespace.
Next, we have two structures. First, tilemapStruct contains the tile fields. Then, selectionStruct is a helper structure for working with the tile palette.
public struct tilemapStruct
{
    public int tilenum;
    public string data1;
    public string data2;
    public string data3;
    public string data4;
    public bool collidable;
    public bool portal;
    public int portalx;
    public int portaly;
    public string portalfile;
}

public struct selectionStruct
{
    public int index;
    public int oldIndex;
    public int x, y;
}
Next up, we have the Form1 class definition, global variables, and startup and shutdown events. The IMessageFilter base class makes the mouse wheel work with the scrollbar controls.
public partial class Form1 : Form,IMessageFilter
{
    const int paletteColumns = 5;
    const int mapSize = 128;
    Bitmap drawArea;
    int mousex, mousey;
    Graphics gfx;
    int gridx, gridy;
    Bitmap selectedBitmap;
    Graphics gfxSelected;
    Font fontArial;
    string g_filename = "";
    tilemapStruct[] tilemap;
    int paletteIndex = 0;
    int selectedPaletteTile = 0;
    selectionStruct selectedTile;

    private void Form1_FormClosed(object sender, FormClosedEventArgs e)
    {
        gfx.Dispose();
        drawArea.Dispose();
        gfxSelected.Dispose();
        selectedBitmap.Dispose();
    }

    public Form1()
    {
        InitializeComponent();
        Application.AddMessageFilter(this);

        //create tilemap
        tilemap = new tilemapStruct[mapSize*mapSize];

        //set up level drawing surface
        drawArea = new Bitmap(pictureBox1.Size.Width, pictureBox1.Size.
            Height);
        pictureBox1.Image = drawArea;
        gfx = Graphics.FromImage(drawArea);

        //selected image
        selectedBitmap = new Bitmap(picSelected.Size.Width, picSelected.
            Size.Height);
        picSelected.Image = selectedBitmap;
        gfxSelected = Graphics.FromImage(selectedBitmap);

        //create font
        fontArial = new Font("Arial Narrow", 8);
    }
Now for some truly ugly looking code—tapping into the core Windows messaging system to add mouse wheel support to the vertical scrollbars.
//adds mouse wheel support to scrollable controls
[DllImport("user32.dll")]
private static extern IntPtr WindowFromPoint(Point pt);
[DllImport("user32.dll")]
private static extern IntPtr SendMessage(IntPtr hWnd, int msg,
    IntPtr wp, IntPtr lp);
public bool PreFilterMessage(ref Message m)
{
    if (m.Msg == 0x20a)
    {
        Point pos = new Point(m.LParam.ToInt32() & 0xffff,
            m.LParam.ToInt32() ≫ 16);
        IntPtr hWnd = WindowFromPoint(pos);
        if (hWnd != IntPtr.Zero && hWnd != m.HWnd &&
            Control.FromHandle(hWnd) != null)
        {
            SendMessage(hWnd, m.Msg, m.WParam, m.LParam);
            return true;
        }
    }
    return false;
}
Now, here is a really important function! At its core, this is basically sprite animation code that we’re borrowing to make the tile palette work as a single large image. When you select a tile, the program figures out which tile you clicked on based on the dimensions of the palette image and known factors like the fact that there are five tiles across and that each tile is 32x32 pixels in size. This code is primarily of concern if we ever wanted to change the tile size to anything other than this size.
public void setSelectedTile()
{
    int sx = (selectedPaletteTile % paletteColumns) * 33;
    int sy = (selectedPaletteTile / paletteColumns) * 33;
    Rectangle src = new Rectangle(sx, sy, 32, 32);
    Rectangle dst = new Rectangle(0, 0, 32, 32);
    gfxSelected.DrawImage(picPalette.Image, dst, src,
        GraphicsUnit.Pixel);
    picSelected.Image = selectedBitmap;
}
Next up, we have the core drawing functions used by the editor. A primary function, drawTileNumber(), is used by the others and is therefore highly reusable. This function also handles the special data information (Collidable, Data1, and the Tile # values), so if you wanted to add more information to the editor window, this is where you can make those changes (or additions).
   public void drawTileNumber(int x, int y, int tile)
   {
       //save tilemap data
       tilemap[y * mapSize + x].tilenum = tile;

       //draw tile
       int sx = (tile % paletteColumns) * 33;
       int sy = (tile / paletteColumns) * 33;
       int dx = x * 32;
       int dy = y * 32;
       Rectangle src = new Rectangle(sx, sy, 32, 32);
       Rectangle dst = new Rectangle(dx, dy, 32, 32);
       gfx.DrawImage(picPalette.Image, dst, src, GraphicsUnit.Pixel);

       //print tilenum
       if (menuViewShowTileNum.Checked)
       {
           if (tile > 0)
               gfx.DrawString(tile.ToString(), fontArial, Brushes.White,
                   x * 32, y * 32);
       }

       //print data value
       if (showDataToolStripMenuItem.Checked)
       {
           string data = tilemap[y * mapSize + x].data1;
           gfx.DrawString(data, fontArial, Brushes.White, x * 32,
               y * 32 + 10);
       }

       //print collidable state
       if (showCollidableToolStripMenuItem.Checked)
       {
           bool collidable = tilemap[y * mapSize + x].collidable;
                if (collidable)
           gfx.DrawString("C", fontArial, Brushes.White, x * 32 + 22,
               y * 32);
       }

       //save changes
       pictureBox1.Image = drawArea;
   }

   public void redrawTilemap()
   {
       for (int index = 0; index < mapSize * mapSize; index++)
       {
           int value = tilemap[index].tilenum;
           int x = index % mapSize;
           int y = index / mapSize;
           drawTileNumber(x, y, value);
       }
   }

   public void drawSelectedTile()
   {
       drawTileNumber(gridx, gridy, selectedPaletteTile);
   }

   public void hideSelectionBox()
   {
       //erase old selection box
       int oldx = selectedTile.oldIndex % mapSize;
       int oldy = selectedTile.oldIndex / mapSize;
       drawTileNumber(oldx, oldy, tilemap[selectedTile.oldIndex].tilenum);

   }
The next two functions affect the editor window, drawing the selection box (when in Edit mode) and filling the tile data fields when a tile is selected in the editor.
   public void drawSelectionBox(int gridx, int gridy)
   {
       hideSelectionBox();
       //remember current tile
       selectedTile.oldIndex = selectedTile.index;

       //draw selection box around tile
       int dx = gridx * 32;
       int dy = gridy * 32;
       Pen pen = new Pen(Color.DarkMagenta, 2);
       Rectangle rect = new Rectangle(dx + 1, dy + 1, 30, 30);
       gfx.DrawRectangle(pen, rect);

       //save changes
       pictureBox1.Image = drawArea;
   }

   private void clickDrawArea(MouseEventArgs e)
   {
       switch (e.Button)
       {
           case MouseButtons.Left:
               if (radioDrawMode.Checked)
               {
                   drawSelectedTile();
               }
               else
               {
                   //show selected tile # for editing
                   selectedTile.x = gridx;
                   selectedTile.y = gridy;
                   selectedTile.index = gridy * mapSize + gridx;
                   txtTileNum.Text = tilemap[selectedTile.index].tilenum.
                       ToString();
                   txtData1.Text = tilemap[selectedTile.index].data1;
                   txtData2.Text = tilemap[selectedTile.index].data2;
                   txtData3.Text = tilemap[selectedTile.index].data3;
                   txtData4.Text = tilemap[selectedTile.index].data4;
                   chkCollidable.Checked = tilemap[selectedTile.index].
                       collidable;
                   chkPortal.Checked = tilemap[selectedTile.index].portal;
                   txtPortalX.Text = tilemap[selectedTile.index].portalx.
                       ToString();

                   txtPortalY.Text = tilemap[selectedTile.index].portaly.
                       ToString();
                   txtPortalFile.Text = tilemap[selectedTile.index].
                       portalfile;

                   //draw selection box
                   drawSelectionBox(gridx, gridy);
               }
               break;

           case MouseButtons.Right:
               if (radioDrawMode.Checked)
                   drawTileNumber(gridx, gridy, 0); //erase
               break;
       }
   }
The last section of code (dealing with tile editing) that I’ll share with you finishes off our coverage of the basic editor logic code. The editor window is handled by a PictureBox control called pictureBox1. When you move the mouse over the control, the MouseMove event fires and the pictureBox1_MouseMove() event method handles it. When we move the mouse over the tilemap, we do want the editor to display stuff about each tile as the mouse moves over it. Likewise, clicking on a tile in the editor causes either the currently selected palette tile to be drawn at that location, or if in Edit mode, causes that tile in the editor window to be highlighted so the data fields of the tile can be edited. Note that this code does not have much error handling, so save your levels often!
   private void pictureBox1_MouseClick(object sender, MouseEventArgs e)
   {
       clickDrawArea(e);
   }
   private void pictureBox1_MouseMove(object sender, MouseEventArgs e)
   {
       gridx = e.X / 32;
       gridy = e.Y / 32;
       mousex = e.X;
       mousey = e.Y;
       lblMouseInfo.Text = "CURSOR " + e.X.ToString() + "," +
           e.Y.ToString() + " - GRID " + gridx.ToString() + "," +
              gridy.ToString();

       if (radioDrawMode.Checked)
       {
           int index = gridy * mapSize + gridx;
           txtTileNum.Text = tilemap[index].tilenum.ToString();
           txtData1.Text = tilemap[index].data1;
           txtData2.Text = tilemap[index].data2;
           txtData3.Text = tilemap[index].data3;
           txtData4.Text = tilemap[index].data4;
           chkCollidable.Checked = tilemap[index].collidable;
           chkPortal.Checked = tilemap[index].portal;
           txtPortalX.Text = tilemap[index].portalx.ToString();
           txtPortalY.Text = tilemap[index].portaly.ToString();
           txtPortalFile.Text = tilemap[index].portalfile;
       }

       clickDrawArea(e);
   }

   private void Form1_Load(object sender, EventArgs e){}

   private void palette_MouseMove(object sender, MouseEventArgs e)
   {
       if (e.X < paletteColumns * 33)
       {
           gridx = e.X / 33;
           gridy = e.Y / 33;
           paletteIndex = gridy * paletteColumns + gridx;
           lblTileInfo.Text = "TILE #" + paletteIndex + " : " +
               gridx.ToString() + "," + gridy.ToString();
           lblSelected.Text = "SELECTED: " + selectedPaletteTile.
               ToString();
       }
   }
   private void palette_MouseClick(object sender, MouseEventArgs e)
   {
       if (e.X < paletteColumns * 33)
       {
           gridx = e.X / 33;
              gridy = e.Y / 33;

           switch (e.Button)
           {
               case MouseButtons.Left:
                   selectedPaletteTile = gridy * paletteColumns + gridx;
                   setSelectedTile();
                   break;
           }
       }
   }
Now, what about the next most important issue—loading and saving? After selecting and editing the tilemap, this is definitely the most significant feature of a level editor! Okay, if you have never tried to load or save data using an XML file before, then this will be helpful to you beyond just this level editor project, because working with XML in the .NET environment of Visual C# or Visual Basic is pretty common, and knowing how to read and write XML is a valuable skill. There’s a couple of prerequisites here that I haven’t explained yet, but they are part of the GUI—the OpenFileDialog and SaveFileDialog controls must be added to the form, and they should be called openFileDialog1 and saveFileDialog1. The key to reading an XML file is a class called XmlDocument, with help from XmlNodeList, XmlNode, and XmlElement. These classes all work together to retrieve XML data and make it easy to read.
   //helper function for loadTilemapFile
    private string getElement(string field, ref XmlElement element)
    {
        string value = "";
        try
        {
            value = element.GetElementsByTagName(field)[0].InnerText;
        }
        catch (Exception e)
        {
            Console.WriteLine(e.Message);
        }
        return value;
     }
   private void loadTilemapFile()
   {
       //display the open file dialog
       openFileDialog1.DefaultExt = ".level";
       openFileDialog1.Filter = "Tilemap Files|*.level";
       openFileDialog1.Multiselect = false;
       openFileDialog1.Title = "Load Level File";
       openFileDialog1.InitialDirectory = Environment.CurrentDirectory;
       DialogResult result = openFileDialog1.ShowDialog();
       if (result != DialogResult.OK) return;
       g_filename = openFileDialog1.SafeFileName;
       this.Cursor = Cursors.WaitCursor;

       try
       {
           XmlDocument doc = new XmlDocument();
           doc.Load(g_filename);
           XmlNodeList list = doc.GetElementsByTagName("tiles");
           foreach (XmlNode node in list)
           {
               XmlElement element = (XmlElement)node;

               //read data fields
               int index = Convert.ToInt32(getElement("tile",ref element));
               tilemap[index].tilenum = Convert.ToInt32(getElement("value",
                   ref element));
               tilemap[index].data1 = getElement("data1", ref element);
               tilemap[index].data2 = getElement("data2", ref element);
               tilemap[index].data3 = getElement("data3", ref element);
               tilemap[index].data4 = getElement("data4", ref element);
               tilemap[index].collidable = Convert.ToBoolean(
                   getElement("collidable", ref element));
               tilemap[index].portal = Convert.ToBoolean(
                   getElement("portal", ref element));
               tilemap[index].portalx = Convert.ToInt32(
                   getElement("portalx", ref element));
               tilemap[index].portaly = Convert.ToInt32(
                   getElement("portaly", ref element));
               tilemap[index].portalfile = "";
           }
              redrawTilemap();
       }
       catch (Exception es)
       {
           MessageBox.Show(es.Message);
       }
       this.Cursor = Cursors.Arrow;
   }
Saving the tilemap data into an XML file is a little more involved because we have to create the structure of the XML file while building the save data. It turns out that this is pretty easy to do, and is just a very repetitive process, so it’s time consuming but not very hard. For each XML field, we create a new DataColumn object, set its DataType property to the type of variable we need to save (like string, int, float, etc.), and then add it to a DataSet object. After the structure has been defined, then we can go through all the tiles in the tilemap (all 4,096 of them) and save each one, one at a time. Finally, after all the data has been converted from the tilemap to XML, then it is saved to a file using a DataTable. Okay, so it’s not really all that easy after all, but here’s the code so whatever! I’m ready to start working on the game now!
   private void saveTilemapFile()
   {
       if (g_filename.Length == 0)
       {
           saveTilemapFileAs();
           return;
       }

       this.Cursor = Cursors.WaitCursor;

       try
       {
           System.Data.DataSet ds;
           ds = new DataSet();

           //create xml schema
           System.Data.DataTable table;
           table = new DataTable("tiles");
              //add an autoincrement column
           DataColumn column1 = new DataColumn();
           column1.DataType = System.Type.GetType("System.Int32");
           column1.ColumnName = "tile";
           column1.AutoIncrement = true;
           table.Columns.Add(column1);

           //add index key
           DataColumn[] keys = new DataColumn[1];
           keys[0] = column1;
           table.PrimaryKey = keys;

           //tilemap data columns
           DataColumn column2 = new DataColumn();
           column2.DataType = System.Type.GetType("System.Int32");
           column2.ColumnName = "value";
           table.Columns.Add(column2);

           DataColumn data1 = new DataColumn();
           data1.DataType = System.Type.GetType("System.String");
           data1.ColumnName = "data1";
           table.Columns.Add(data1);

           DataColumn data2 = new DataColumn();
           data2.DataType = System.Type.GetType("System.String");
           data2.ColumnName = "data2";
           table.Columns.Add(data2);

           DataColumn data3 = new DataColumn();
           data3.DataType = System.Type.GetType("System.String");
           data3.ColumnName = "data3";
           table.Columns.Add(data3);

           DataColumn data4 = new DataColumn();
           data4.DataType = System.Type.GetType("System.String");
           data4.ColumnName = "data4";
           table.Columns.Add(data4);

           DataColumn column4 = new DataColumn();
           column4.DataType = System.Type.GetType("System.Boolean");
              column4.ColumnName = "collidable";
           table.Columns.Add(column4);

           DataColumn portal = new DataColumn();
           portal.DataType = System.Type.GetType("System.Boolean");
           portal.ColumnName = "portal";
           table.Columns.Add(portal);

           DataColumn portalx = new DataColumn();
           portalx.DataType = System.Type.GetType("System.Int32");
           portalx.ColumnName = "portalx";
           table.Columns.Add(portalx);

           DataColumn portaly = new DataColumn();
           portaly.DataType = System.Type.GetType("System.Int32");
           portaly.ColumnName = "portaly";
           table.Columns.Add(portaly);

           DataColumn portalfile = new DataColumn();
           portalfile.DataType = System.Type.GetType("System.String");
           portalfile.ColumnName = "portalfile";
           table.Columns.Add(portalfile);

           //copy tilemap array into datatable
           int index = 0;
           for (int n=0; n<mapSize*mapSize; n++)
           {
               DataRow row = table.NewRow();
               row["value"] = tilemap[index].tilenum;
               row["data1"] = tilemap[index].data1;
               row["data2"] = tilemap[index].data2;
               row["data3"] = tilemap[index].data3;
               row["data4"] = tilemap[index].data4;
               row["collidable"] = tilemap[index].collidable;
               row["portal"] = tilemap[index].portal;
               row["portalx"] = tilemap[index].portalx;
               row["portaly"] = tilemap[index].portaly;
               row["portalfile"] = tilemap[index].portalfile;
               table.Rows.Add(row);
               index++;
              }

           //save xml file
           table.WriteXml( g_filename );
           ds.Dispose();
           table.Dispose();
        }
        catch (Exception es)
        {
            MessageBox.Show(es.Message);
        }
        this.Cursor = Cursors.Arrow;
   }
This chapter was awesome, because it showed how to create our own custom game development tool—a level editor! You now have at least a rudimentary understanding of how a level editor should work, so that you can make changes to it as needed while creating and editing game levels. This is one of the cornerstones of the Dungeon Crawler game! What kind of RPG would we have without the ability to create game levels for the player to explore? The tilemap is the most important part of the game because it is the foundation—literally, it is the world on which our characters will walk. You can create a large, vast desert or a lush green world and populate it with vegetation and roads and even buildings. Of course, in a dungeon, there are no such luxuries! I hope you’re preparing yourself to fight vile creatures in the deep places of the Earth because that’s where we’re headed.