This chapter builds on the work developed previously in Chapter 8, “Adding Objects to the Dungeon,” with a new emphasis on working within the collidable structure of a dungeon level containing solid walls. The level editor uses tile properties that we have thus far not put to use—Data 1, 2, 3, and 4. These fields will be used to place specific items in the dungeon via the item editor covered in the previous chapter. As you know, every item has an identifier (ID #) as well as a name. We can add an item to the dungeon at any tile location by using either of those fields. Since every tile has these data properties, there’s no need to specify an X,Y location for an item because it will automatically be positioned over its parent tile! This same technique for adding treasure and pick-up items to the dungeon will be used to position monsters in each level!
One thing you’ll notice in the code starting in this chapter is more error-handling code with tests to make sure stuff is loaded correctly before continuing. Taking control over errors as basic as a missing file improve the player’s experience and gives your game polish. Allowing hard crash errors to pop up gives the player a bad impression of your game. It’s bad enough that an error occurs, but taking control and reporting the error in the game itself shows due diligence on the programmer’s part—and most players are willing to accept that, while they may not accept an unhandled error.
Here is a quick outline of what we’ll cover:
The first thing I want to address is the entrance to the dungeon. In most of the examples so far we have been using just a generic overworld scene with grass and dirt tiles without enforcing collision with solid tiles (i.e., walls), despite collision at the player’s feet already working. So, where does the player begin? Since a dungeon will be made up of many levels, there must be a door or staircase or other type of portal object that allows the player to move from one level to the next. It seems intuitive that the “downward” staircase on level one should correspond with the player’s starting location below on level two, as far as orientation is concerned. But, there is no requirement that every level have the same dimensions! We have the potential for huge levels with the dimensions that the level editor supports.
Some game designers (like yourself?) might really enjoy creating a large level using that much space. As a demonstration game, I will not be working very hard to make creative and cunning level designs—I just need to show you how they work, so you can create creatively ingenious gameplay designs for players to enjoy! So, my example levels will be small and to the point, enough to give you guidance on how things work, without trying to pretend that my example game is production quality, so to speak.
Tip
Remember, you can replace the artwork used for the dungeon level by simply replacing the palette image as long as the tiles are compatible with the level (walls = walls, floors = floors, etc.). The sample art used here is just a sample to show what is possible!
The player spawn point in a dungeon level should represent a ladder or stairway up to the next level, and the goal should be to find the next opening down to go to the next level. This means we need to spawn the player at a specific location in the dungeon level every time—no more random or fixed locations! We’re going to write some code to make this happen and then re-use that code for positioning treasures and monsters in the level as well.
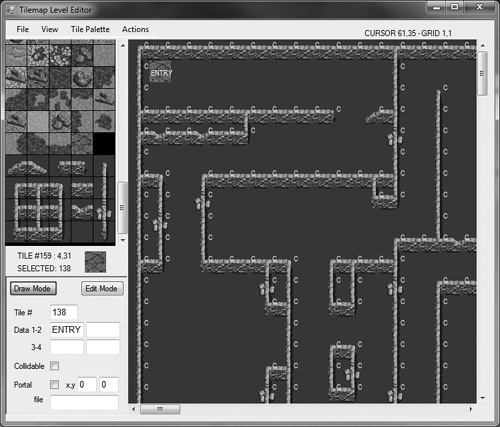
Take a look at Figure 14.1. At the upper-left corner of the level is a highlighted tile. I chose a meaningless tile to place there simply to show the player’s spawn point. In a real game you would want to add new tile artwork representing a ladder or stairway. You can use any of the four data fields to represent the player spawn flag. I’m just going to use Data 1, the first of the four fields. But what goes here? These fields can contain text or numeric values. What if we use text? In that case, you might actually write “ENTRY” here; and for the exit tile, “EXIT.” That does seem more intuitive than numbers or codes, doesn’t it? This is really a matter of preference. Some programmers might prefer numbers, while others prefer codes or text. I suspect designers would prefer text because then the level is self-documenting (and I agree with the benefit of that!). The bottom line is, the game engine needs to know what to look for, so whatever you use as an identifier flag, just be consistent. I’m going to use ENTRY for the player’s spawn point.
Now, speaking of the exit tile, do we really need one? Not really. There is already a portal system built into the game, and it works well. So, to exit a level, you might still show the player a ladder going down but just set that tile to a portal. Now, regarding the portal X,Y fields, those will not be needed, just the filename. Why? Because the player spawn (ENTRY) will kick in as soon as a level is loaded. It is definitely reasonable to load a level and use those X,Y values to start the player at a specific location if your game would use such a feature.
Now let’s write some code to position the player. This means the level must be loaded before the player is positioned. So, we’ll keep the existing player (Hero) creation code in place, but then make sure to set the player’s position after loading the level and retrieving the “ENTRY” tile.
What I mean by player is actually the scroll position, not the location of the hero sprite on the screen. The sprite stays near the center of the screen most of the time, while the level scrolls underneath like a background. It’s the scroll position that must be set, with the player sprite over the top of that specific tile.
I just thought of something. What if there’s no player spawn flag anywhere in the level? What will happen to the player then? There are walls all through the dungeon levels so it will not do to just pick a fixed position or random location. What about just looking for a non-collidable tile and positioning the player there? No, I don’t like accounting for conditions that should be assumed. We decide that our game will use a certain tile data flag to represent the player’s spawn location, and if that is missing then the game needs to quit with an error message, just as if a sprite file is missing. Either way, it’s up to you, but I’m going to opt for the error approach. But, it would be helpful to at least explain in the error message what is missing so a designer who is testing their level can easily fix it.
Tip
Want to really throw the player a curve ball? Make the hero a skeleton or other monster sprite and all the monsters actually hero sprites, and have the monster work his way up from the depths of the dungeon to encounter would-be heroes making their way down! Then pillage the spawn town at the top to win! Better yet, let the player unlock this feature by beating the game and then play in reverse!
After positioning the scroller to the spawn tile, the level will be drawn with that tile at the upper-left corner of the screen, so we need to adjust it a bit. If possible, it would be preferable to move the scroller so that the spawn is somewhat near the center of the screen, assuming the spawn tile isn’t near the edge of the level. One easy way to do that is to just forcibly adjust the scroll position left and up by one-half of the screen (measured in tiles). Perhaps something like 12 tiles over and 9 tiles up? By calling Level.Update() immediately after, the boundary will be enforced and auto-adjusted. This works if the spawn tile is not near the edge of the level, but fails if it is, so that is a start but not a complete solution. We need to figure out exactly where the target tile is on the screen after the scroll position is updated and then move the player sprite there.
Why does it have to be so complicated?
It’s time for a game engine assumption! Yes, we could write a complex algorithm to allow the player to spawn anywhere in the level. This is not a problem at all for treasure and monsters, because they are rendered relative to the scroll window, but it is a problem for the player sprite which is rendered in sync with the scroll window.
Here is the assumption: The spawn point must be in the upper-left corner of the level within one screen worth of tiles.
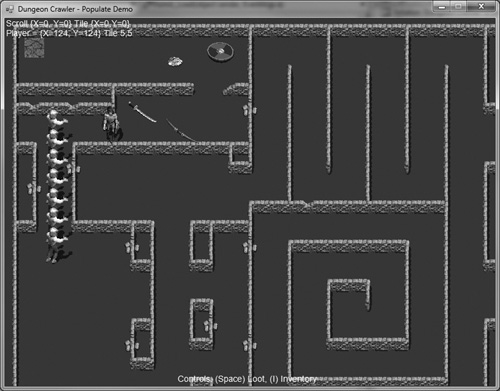
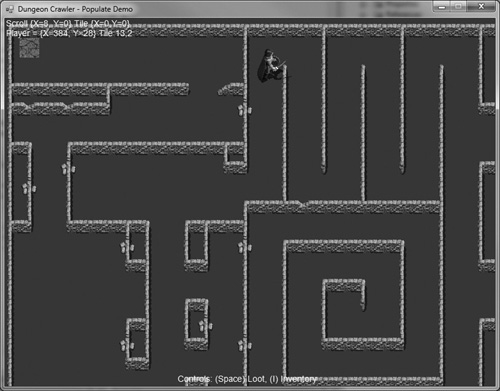
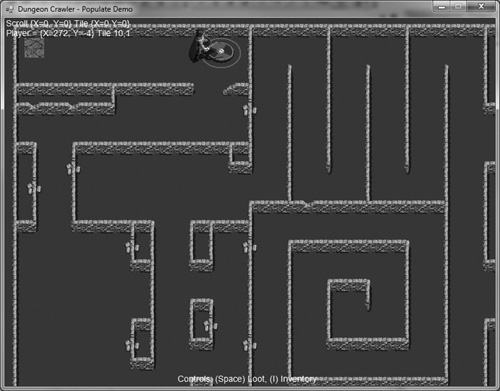
The level will be set to a position of 0,0, and the player sprite will be positioned within that range of tiles without having to deal with any relative positioning. The player sprite is not merely drawn relative to the scroll position, it is at the very core of the scrolling code. So, we can’t easily manipulate it to handle any location on the tilemap without writing a lot of conditional code. Figure 14.2 shows the location of a player spawn tile (note the grid coordinates at the top), while Figure 14.3 shows the game running with the player sprite spawned at that location. Here is some sample source code to give you the basic idea:
Point target = new Point(0, 0);
bool found = false;
for (int y = 0; y < 128; y++)
{
    if (found) break;
    for (int x = 0; x < 128; x++)
    {
        target = new Point(x-1, y-1);
        Level.tilemapStruct tile = level.getTile(x,y);
        if (tile.data1.ToUpper() == "ENTRY")
        {
                found = true;
                game.Hero.Position = new Point(
                    target.X * 32, target.Y * 32-16);
                break;

        }
    }
}
Tip
The player’s spawn position, which is specified by entering “ENTRY” into the Data1 field of a tile in the level editor, is a special case that must be located in the upper-left corner of the level (the first 24× 18 screen of tiles). The player sprite is the only object that has this difficulty. All other objects—gold, treasure, monsters—can be placed anywhere without any issues.
Collision with tiles already works, but we have just been ignoring this property. To enforce collision with walls and other impassable tiles, what’s needed is a pair of variables to keep track of the player’s previous step. When the player runs into a collidable tile, then the sprite is moved back to the previous step—and the sprite will simply stop moving in that direction even if the player holds down the movement key.
The Level class will be modified to make collision a little easier, and at the same time, the old code in doScrolling() will be moved into Level.Update() now that this code is well established and fully tested, to make movement and the scroller somewhat automatic. In our usual doScroller() function, a call to Level.Update() and Level.Draw() will be made, and that will take care of it. (There will be some additional code in Level to make it all work—refer to the project sources for the complete listing.)
private PointF p_oldScrollPos;
private PointF p_oldPlayerPos;
The Update() function now incorporates all of the scrolling logic, and now calls on a new helper function, fillScrollBuffer().
public void Update()
{
   int steps = 4;
   p_oldScrollPos = p_scrollPos;
   p_oldPlayerPos = p_game.Hero.Position;

    //up key movement
    if (p_game.keyState.up)
    {
        if (p_game.Hero.Y > 300 - 48)
        {
            //p_oldPlayerPos = p_game.Hero.Position;
            p_game.Hero.Y -= steps;
        }
        else
        {
           //p_oldScrollPos = p_scrollPos;
           p_scrollPos.Y -= steps;
           if (p_scrollPos.Y <= 0)
                 p_game.Hero.Y -= steps;
        }

        }
        //down key movement
        else if ( p_game.keyState.down)
        {
            if (p_game.Hero.Y < 300 - 48)
            {
                 //p_oldPlayerPos = p_game.Hero.Position;
                 p_game.Hero.Y += steps;
            }
            else
            {
                 //p_oldScrollPos = p_scrollPos;
                 p_scrollPos.Y += steps;
                 if (p_scrollPos.Y >= (127 - 19) * 32)
                     p_game.Hero.Y += steps;
            }
        }

        //left key movement
        if (p_game.keyState.left)
        {
         if (p_game.Hero.X > 400 - 48)
        {
             //p_oldPlayerPos = p_game.Hero.Position;
             p_game.Hero.X -= steps;
        }
        else
        {
            //p_oldScrollPos = p_scrollPos;
            p_scrollPos.X -= steps;
            if (p_scrollPos.X <= 0)
                 p_game.Hero.X -= steps;
        }
    }

    //right key movement
    else if ( p_game.keyState.right)
    {
        if (p_game.Hero.X < 400 - 48)
        {

             //p_oldPlayerPos = p_game.Hero.Position;
             p_game.Hero.X += steps;
        }
        else
        {
            //p_oldScrollPos = p_scrollPos;
            p_scrollPos.X += steps;
            if (p_scrollPos.X >= (127 - 25) * 32)
                p_game.Hero.X += steps;
        }
    }

    //resolve collidable tile
    Point pos = p_game.Hero.GetCurrentTilePos();
    p_currentTile = getTile(pos.X, pos.Y);
    p_collidableFlag = p_currentTile.collidable;
    if (p_collidableFlag)
    {
        p_game.Hero.Position = p_oldPlayerPos;
        p_scrollPos = p_oldScrollPos;
    }

    //resolve portal tile
    p_portalFlag = p_currentTile.portal;
    if (p_currentTile.portal)
    {
       p_portalTarget = new Point(p_currentTile.portalx -
           pos.X / 32, p_currentTile.portaly - pos.Y / 32);
    }

    //fill the scroll buffer only when moving
    if (p_scrollPos != p_oldScrollPos)
    {
        p_oldScrollPos = p_scrollPos;

        //validate X range
        if (p_scrollPos.X < 0) p_scrollPos.X = 0;
        if (p_scrollPos.X > (127 - p_windowSize.Width) * p_tileSize)
            p_scrollPos.X = (127 - p_windowSize.Width) * p_tileSize;

        //validate Y range
        if (p_scrollPos.Y < 0) p_scrollPos.Y = 0;
        if (p_scrollPos.Y > (127 - p_windowSize.Height) * p_tileSize)
            p_scrollPos.Y = (127 - p_windowSize.Height) * p_tileSize;

        //calculate sub-tile size
        p_subtile.X = p_scrollPos.X % p_tileSize;
        p_subtile.Y = p_scrollPos.Y % p_tileSize;

        //fill scroll buffer with tiles
        fillScrollBuffer();
    }
}

private void fillScrollBuffer()
{
    for (int tx = 0; tx < p_windowSize.Width + 1; tx++)
    {
        for (int ty = 0; ty < p_windowSize.Height + 1; ty++)
        {
             int sx = (int)p_scrollPos.X / p_tileSize + tx;
             int sy = (int)p_scrollPos.Y / p_tileSize + ty;
             int tilenum = p_tilemap[sy * 128 + sx].tilenum;
             drawTileNumber(tx, ty, tilenum);
        }
    }
}
With this new code in the Level class, the player will not be able to walk through collidable tiles any longer! At last, the dungeon crawler is starting to work as intended! To begin organizing the project, I have moved the level variable from Form1 to Game, where it has been renamed to World. So, to work with the tile scroller, you would use game.World as a global variable. The new Form1.doScrolling() function is much simplified:
private void doScrolling()
{
    game.World.Update();
    game.World.Draw(0, 0, 800, 600);
}
The same code to position the player will be used to add treasure to the level. But, there is one major difference: while there was just one player starting location, there will be many treasure tiles (which is entirely dependent on the level designer, of course). The character editor has item drop fields that were used in the previous chapter to show how monsters can drop loot when killed. One interesting benefit of this fact is that we could use a character file to drop random loot in the dungeon. Instead of manually adding specific loot items to specific tiles in the dungeon, you could instead simulate a monster dropping loot at that location (as if it has been killed during combat). That would add some randomness to the regular treasure drops in the dungeon because loot items have a percent chance of being dropped—this would add some variability, increasing replay value of a level, and hence, the replay value of the game.
The global treasure list has been moved to the Game class in an attempt to further strengthen it as a true RPG engine. Here is the new Treasure variable:
public List<DrawableItem> Treasure;
Although defined here, we must create the object still in Form1_Load as usual, and in the proper order relative to other objects:
game.Treasure = new List<Game.DrawableItem>();
First, let’s see how to just add an item to the dungeon with a straightforward function called DropTreasureItem. You will pass the item object and X,Y position of the tile where the item will go. Given the two fairly large functions, I believe Treasure might need to be handled in a whole new class. I’m thinking about creating a new Combat class to handle these things. We’ll see that in the next and final chapter.
public void DropTreasureItem(ref Item itm, int x, int y)
{
    Game.DrawableItem drit;
    drit.item = itm;
    drit.sprite = new Sprite(ref game);
    drit.sprite.Position = new Point(x, y);

    if (drit.item.DropImageFilename == "")

    {
        MessageBox.Show("Error: Item '" + drit.item.Name +
            "' image file is invalid.");
        Application.Exit();
    }

    drit.sprite.Image = game.LoadBitmap(drit.item.DropImageFilename);
    drit.sprite.Size = drit.sprite.Image.Size;
    game.Treasure.Add(drit);
}
This function, of course, is dependent on the item database, so we have to load an item file first before trying to drop any items into the dungeon. (I know, this is fundamental, but I’m just being thorough!). The items database has been moved into Game as well, under the variable name Items.
game.Items = new Items();
if (!game.Items.Load("items.item"))
{
    MessageBox.Show("Error loading items");
    Application.Exit();
}
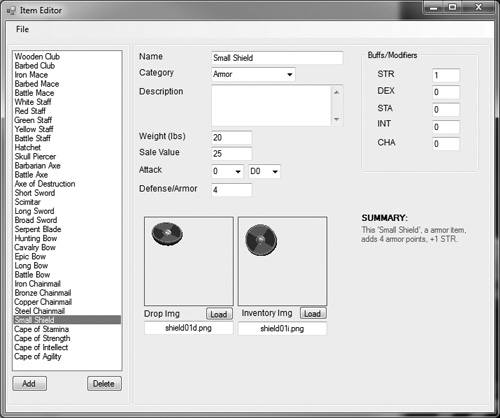
Now, open up items.item in the item editor tool and find an item you want to drop for the player, like this Small Shield shown in Figure 14.4. I know it’s not as great as, say, a bar of gold. Okay, fine, then go ahead and get some artwork of a gold bar and add it to the items database and give a million of them to your players if you want!
This item is called “Small Shield,” so that is how we’ll grab it out of the database to add to the global Treasure list. I’m going to be a bit inconsistent with error handling here by just showing the basic code to do it. You’ll want to add error handling to make sure the item exists before trying to drop it into the dungeon.
Item item = game.Items.getItem("Small Shield");
DropTreasureItem(ref item, 10*32, 1*32);
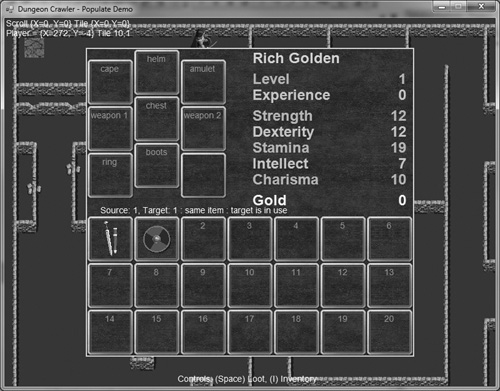
Figure 14.5 shows the shield in the dungeon at exactly the location we expected to find it! (Note the player’s tile position.) Picking up the shield (with the Space key) adds it to the inventory, which can be brought up with the I key. None of this code has changed since it was developed in Chapter 13. (See Figure 14.6.) Isn’t it amazing how synergistic source code can be at a certain point? When these features start to seriously come together and the game engine starts to take shape, we will spend less time on difficult source code and more time on designing the gameplay.
We have this really great function from Chapter 13 available, called DropLoot(), so let’s give it a try without actually adding a monster to the level (we’ll give the player sprite a short break). First, a review of the function is in order:
    public void DropLoot(ref Character srcMonster)
    {
         int count = 0;
         int rad = 64;

         //any gold to drop?
         Item itm = new Item();
         int gold = game.Random(srcMonster.DropGoldMin, srcMonster.DropGoldMax);
         itm.Name = "gold";
         itm.DropImageFilename = "gold.png";
         itm.InvImageFilename = "gold.png";
         itm.Value = gold;
         Point p = new Point(0, 0);
         p.X = (int)srcMonster.X + game.Random(rad) - rad / 2;
         p.Y = (int)srcMonster.Y + game.Random(rad) - rad / 2;
         DropTreasureItem(ref itm, p.X, p.Y);

         //any items to drop?
         if (srcMonster.DropNum1 > 0 && srcMonster.DropItem1 != "")
         {

         count = game.Random(1, srcMonster.DropNum1);
         for (int n = 1; n < count; n++)
         {
            //25% chance for drop
            if (game.Random(100) < 25)
            {
                itm = game.Items.getItem(srcMonster.DropItem1);
                p.X = (int)srcMonster.X + game.Random(rad) - rad / 2;
                p.Y = (int)srcMonster.Y + game.Random(rad) - rad / 2;
                DropTreasureItem(ref itm, p.X, p.Y);
             }
         }
    }
    if (srcMonster.DropNum2 > 0 && srcMonster.DropItem2 != "")
    {
        count = game.Random(1, srcMonster.DropNum2);

        for (int n = 1; n < count; n++)
        {
            //25% chance for drop
            if (game.Random(100) < 25)
            {
                 itm = game.Items.getItem(srcMonster.DropItem2);
                 p.X = (int)srcMonster.X + game.Random(rad) - rad / 2;
                 p.Y = (int)srcMonster.Y + game.Random(rad) - rad / 2;
                 DropTreasureItem(ref itm, p.X, p.Y);
            }
        }
    }
    if (srcMonster.DropNum3 > 0 && srcMonster.DropItem3 != "")
    {
        count = game.Random(1, srcMonster.DropNum3);
        for (int n = 1; n < count; n++)
        {
             //25% chance for drop
             if (game.Random(100) < 25)
             {
                 itm = game.Items.getItem(srcMonster.DropItem3);
                 p.X = (int)srcMonster.X + game.Random(rad) - rad / 2;
                 p.Y = (int)srcMonster.Y + game.Random(rad) - rad / 2;
                 DropTreasureItem(ref itm, p.X, p.Y);
             }
        }
    }
}
Fire up the character editor tool and create a new fake monster to be used just for an item drop. You can create as many custom item drops as you want using this tool. I have created one called “Dummy Drop 1,” shown in Figure 14.7. The animations don’t matter for our purposes here, but they still must be filled in with valid images because the .char file loader requires it.
Character loot = new Character(ref game);
if (!loot.Load("dummydrop1.char"))
{
    MessageBox.Show("Error loading loot file");
    Application.Exit();
}
loot.Position = new Point(8*32,2*32);
DropLoot(ref loot);
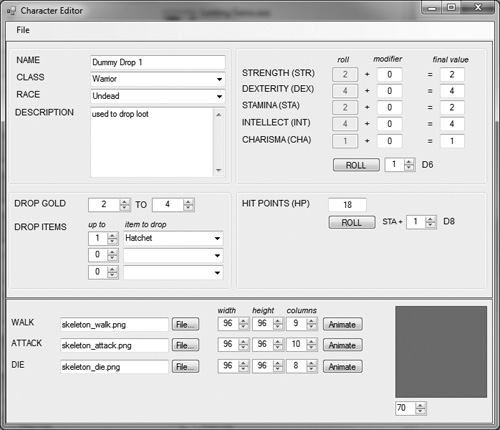
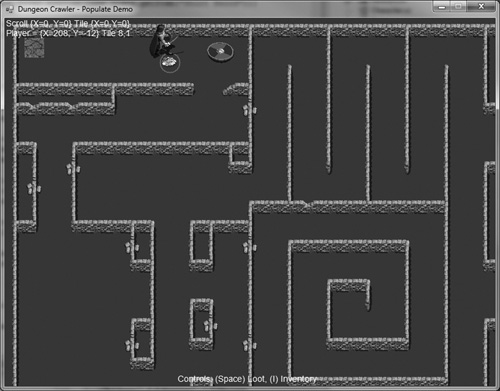
Figure 14.8 shows the game running, with the gold drop in the location as expected (tile 8,2). What did not show up is the “Hatchet” item, but that is to be expected because the items are only dropped by random chance while gold is always dropped.
The last way to add treasure items to the dungeon is from right inside the level editor itself—or, more specifically, using the tile property fields. We have already seen how to use the Data1 field to set the player’s spawn tile. Similar code can be written to look for an item drop code. In this case, there are some decisions that must be made (cooperatively between the designer and programmer, if more than one person is working on the game): How will items be identified in the dungeon levels? Will the item name just be added to Data1, or the item number, or some sort of code?
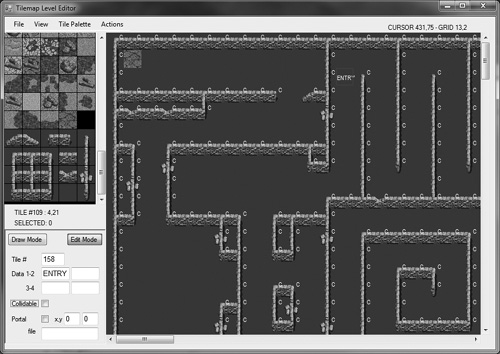
This is really up to you, but I will give you some pointers on just one way to do it. We already know where the item will be located in the level because it will be added right over the top of the tile it belongs to. So, really, all we need is the item name. I’m not even sure if quantity is needed! Do we ever want to add like 50 magic rings or hatchets? No, I don’t think so! You can if you want, it’s no big deal to just use one of the other data fields for quantity. I’m going to use a code word, “ITEM,” to mean that an item should be dropped at that tile location. The Data2 field will contain the item name. See Figure 14.9.
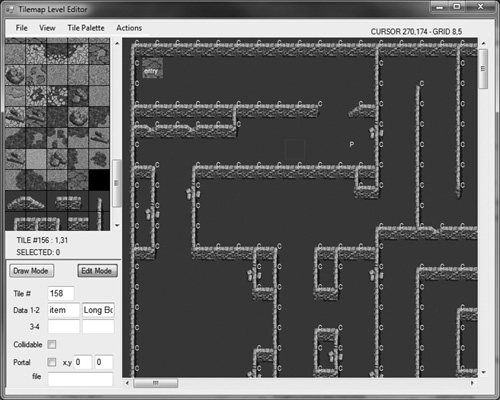
To add items to the dungeon automatically based on tile properties adds a huge element of design power to the game engine! The code to search for the “ITEM” flag and add the associated item to the dungeon will be similar to the code used to position the player. But, instead of breaking when the first item is found, as was done with the player spawn tile, this code needs to keep going and scan the tile records of the entire level. See Figure 14.10.
for (int y = 0; y < 128; y++)
{
    for (int x = 0; x < 128; x++)
    {
        Item it = null;
        Level.tilemapStruct tile = game.World.getTile(x, y);
        if (tile.data1.ToUpper() == "ITEM" && tile.data2 != "")
        {

            it = game.Items.getItem(tile.data2);
            DropTreasureItem(ref it, x*32, y*32);
        }
    }
}
Tip
Some of the item artwork is obviously too large for the dungeon. It’s an easy matter to shrink the drop image to a manageable size that better corresponds with the dungeon, but you may not want to change the inventory image because the inventory uses a fixed icon size. Even so, it will still work with smaller images, so that’s entirely up to you.
Dungeon Crawler now has all the code we need to position the player at a spawn point, and to add items and gold to the dungeon at any desired tile. All of this code will just make it that much easier to add monsters to the level as well. Like the items, we can add a monster manually one at a time, or use a tile data field. The latter is definitely preferred because then a designer can create the levels without having to dig into any code!
Tip
There’s no combat in this chapter’s examples, nor do the monsters move. The point is just to demonstrate how to position things inside the level.
First, we’ll see how to add a single monster manually in code. This example just creates a small array with room for 10 monsters for starters.
monsters = new Character[10];
monsters[0] = new Character(ref game);
monsters[0].Load("zombie.char");
monsters[0].Position = new PointF(1 * 32, 4 * 32);
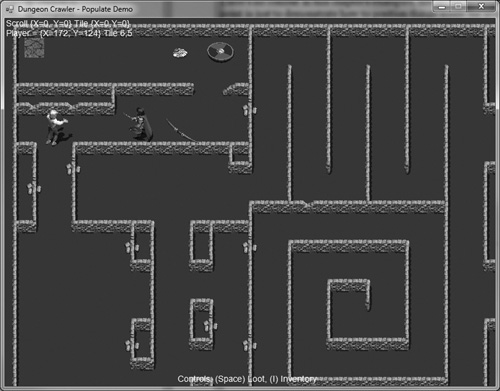
Combat is not a priority right now, so combat code has been stripped out of the doMonsters() function. Not to worry, it will be back in the next chapter. Figure 14.11 shows that a zombie has been added to the dungeon at tile location 2,5.
private void doMonsters()
{
    PointF relativePos;
    PointF heroCenter;
    PointF monsterCenter;
    heroCenter = game.Hero.CenterPos;
    for (int n = 0; n < monsters.Length; n++)
    {
        if (monsters[n] != null)
        {
            //is monster in view?
            if (monsters[n].X > game.World.ScrollPos.X &&
                 monsters[n].X < game.World.ScrollPos.X + 23 * 32 &&
                 monsters[n].Y > game.World.ScrollPos.Y &&
                 monsters[n].Y < game.World.ScrollPos.Y + 17 * 32)
            {
                 //get relative position on screen
                 relativePos = new PointF(

                     Math.Abs(game.World.ScrollPos.X - monsters[n].X),
                     Math.Abs(game.World.ScrollPos.Y - monsters[n].Y));

                 //get center
                 monsterCenter = relativePos;
                 monsterCenter.X += monsters[n].GetSprite.Width / 2;
                 monsterCenter.Y += monsters[n].GetSprite.Height / 2;
                 //draw the monster sprite
                 monsters[n].Draw(relativePos);
            }
        }
    }
}
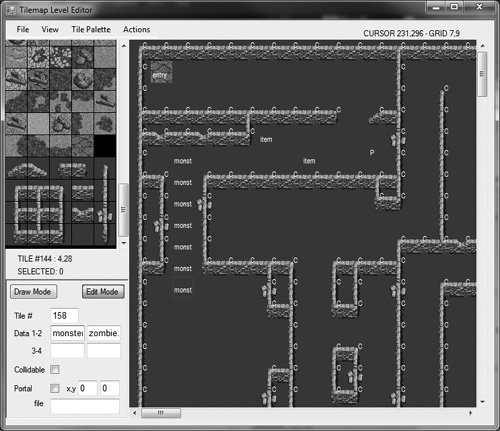
That was a no-brainer. Next, we’ll add monsters using tile data. What shall the data field flag be called for monsters? Oh, I don’t know, how about “MONSTER”? Now, the second piece of data we need to know in order to add a monster is the .char file. For the example, I’m just using zombie.char, but feel free to use whatever file you want. And, of course, for a polished game the monsters will be selectively added to specific rooms and locations (usually to guard treasure!). Figure 14.12 shows the editor with a bunch of monster tile data entered. This is not looking good for our player. Fortunately, the monsters don’t know how to move in this disabled example.
This will be a limited example with support for only 10 monsters, so if you edit the level file and make every tile a monster spawn, it just won’t work. Don’t do that. You could start a zombie apocalypse. Don’t force me to write an apocalypse handler into the code! Figure 14.13 shows our heroic but scared player character facing a horde. He really needs decent gear.
int count = 0;
for (int y = 0; y < 128; y++)
{
    for (int x = 0; x < 128; x++)
    {
        Level.tilemapStruct tile = game.World.getTile(x, y);
        if (tile.data1.ToUpper() == "MONSTER" && tile.data2 != "")
        {
            monsters[count] = new Character(ref game);
            monsters[count].Load(tile.data2);
            monsters[count].Position = new PointF((x-1) * 32, (y-1) * 32);
            count++;

        }
    }
}