We’re going to take our first steps into a new world in this chapter: we will be learning how to load a game level created with the custom level editor developed in the previous chapter. This editor gives us considerable leeway in how the game will play, and we will explore some of the gameplay possibilities related to the game world in this chapter. You will learn the techniques used in tile-based scrolling, gaining an understanding of how a scrolling display is created using a “partial-tile” buffered scrolling algorithm. We’ll be using level data from our custom level editor program to construct the game world. By using a small surface about the same size as the screen, the tiles are drawn to the buffer in order to produce a smooth-scrolling game world. The resulting tile scrolling engine is the foundation for the dungeon crawler game.
Here’s what we’ll cover in this chapter:
Mapping the dungeon
Loading and drawing the map/level file
Introduction to tiled scrolling
Scrolling a tiled game world
Per-tile scrolling
Per-pixel scrolling
In this chapter, we’ll focus on rendering the tilemap for one level and begin to interact with the level by scrolling it in the viewport. This makes it possible to travel through a large level with a much smaller viewport. The goal is to put as much functionality into the rendering and interaction of one level as possible, because that very same functionality (such as preventing the characters from passing through solid objects) extends to any level. Getting one small portion of the game world up and running means that the entire game world can be rendered by the game engine based solely on the level editor files.
This is what we call data-driven programming—where the data describes what should happen, and the source code processes the data according to known rules. So, what we’re doing here is applying professional software engineering methodology to our role-playing game engine. When you want to add a new feature to the game, and that feature is added to the engine based on properties in the level file, then suddenly every level you create has that feature. For example, let’s consider collision tiles, because that is a feature we will be addressing shortly. The level editor lets us specify which tiles are collidable, and which tiles may be passed through. The collidable tiles should block the player from moving through them. Or, put differently: the game should prevent the player from moving through collidable—or let us say solid—tiles on the map. Any tile can be made solid by setting the property in the editor. (By the way, we’ll get into walking through the level and testing for collisions with the walls in the next chapter.)
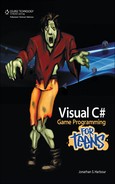
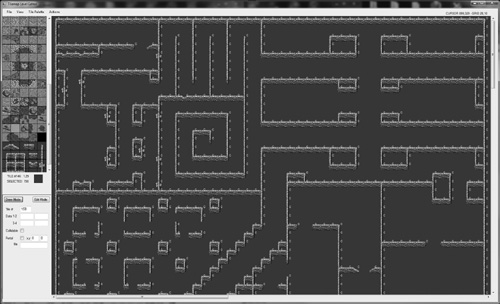
The dungeon we will be creating should have a way to go up to the level above or down to the next level below, with lower levels containing increasingly more difficult monsters. So, we need to create many tilemaps with our own level editor, not just one big game world (as was the case in the sister book on Visual Basic). As you learned in the previous chapter, our tilemaps have a maximum size of 128 tiles across, and 128 tiles down, for a total pixel resolution of 4096x4096. What we need to focus on is the top-level “Town,” which should provide the player’s basic needs such as healing, weapons, armor, etc. Linked directly to the town will be the first level of the dungeon. So, the Town will be level 0, while the first dungeon level will be level 1. Within that first level of the dungeon will be a staircase going down to level 2. Figure 7.1 shows the level editor enlarged so that more of the first level is visible in the editor window.
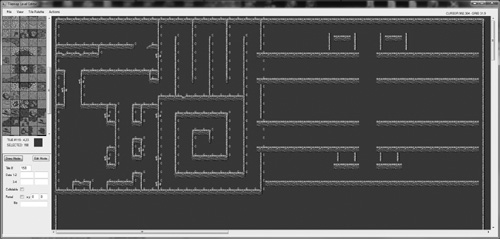
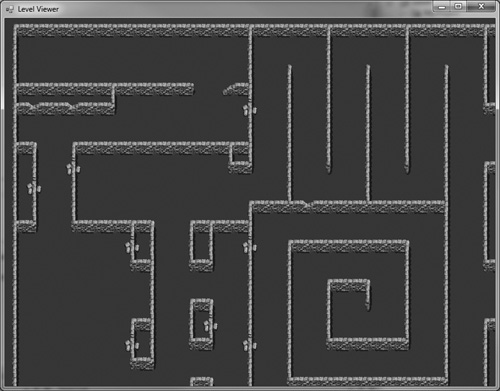
However, we don’t have to actually use that full size for every map. By defining regions with the collidable property, we can limit the player’s movements to a smaller area surrounded by walls. Although the tilemap will remain fixed at 128x128, we can use much smaller areas, as well as combine several tilemaps (via portals) to create larger areas. The gameplay possibilities are endless! If you intend to create your own dungeon crawler game with small levels, then you could have four or more levels on a single tilemap. Note in Figure 7.2 that the tiny sample dungeon only takes up about 25 tiles across—the tilemap can handle up to 128! This gets a bit into the design realm, but I recommend increasing the size of the levels proportionally with the level number. Give the player some early success by letting him complete levels quickly and make the deeper dungeon levels larger and more dangerous! Thus, as the player’s character levels up, he or she will be leveling down further into the depths of the dungeon. Consider also the length of gameplay in your dungeon. If there are only 20 levels, and the player can go through them each in five minutes or less, then the entire game can be beaten in about an hour and a half. Decide how much gameplay you want to give the player, and design levels accordingly.
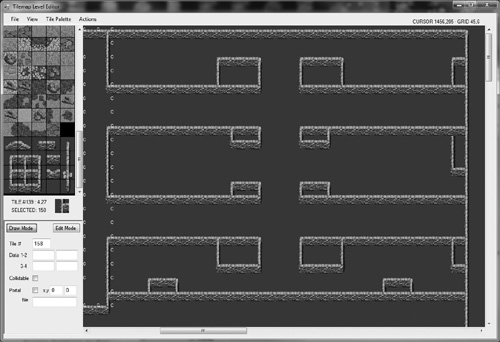
Figure 7.2 shows the first dungeon level with some corner tiles added to the walls to improve the realism of the level. I recommend you throw together your level designs quickly using basically just the vertical and horizontal wall tiles, and after you have the basic layout the way you want it to look, then go in and add details like this.
In addition, be mindful of the player’s level as well. Do you want him to finish the game while his character is only level 3 or 4? That would deny the player the enjoyment of using higher-level abilities! Remember, this is a role-playing game, so the most important factor is giving the player an enjoyable time leveling up his character. If it all ends too quickly, then taking the time to create the character will have seemed a monumental waste of time to your players. Let them level up in proportion to the dungeon’s difficulty. If necessary, recycle levels to increase the total number of levels in the dungeon.
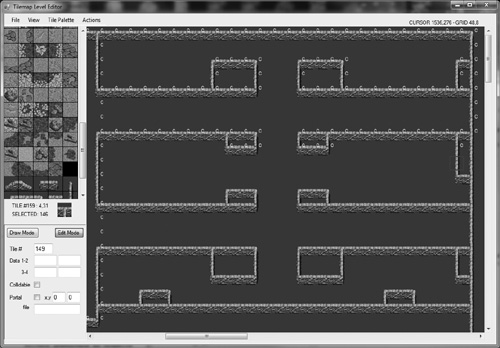
When all of the wall tiles have been placed, then you can go in and set the Collidable property for each tile. First, click the Edit Mode button on the lower-left corner of the Tilemap Level Editor window. This will switch the editor into tile editing mode. Then, check the Collidable checkbox to enable collision for any selected tile, as shown in Figure 7.3. Now, to speed things up, the Space key has been set to toggle the Collidable property, so just click a tile and hit Space to move quickly through the level.
I want to emphasize again that the game world truly has no limit when using level files with portal tiles (which we cover in Chapter 9). When a portal is entered, the game teleports the player to a new location. By using a portal file as well as the coordinates, we can even load up a new level file entirely and position the player at any location in that new file with the same technique. Furthermore, teleporting the player will be almost instantaneous. Which means, you could create a huge level with seamless edges by creating a strip of portal tiles along one edge so that when the player reaches that edge, the player continues to walk in the same direction, having been wrapped around to the beginning. Also, if two level files are designed with seamless edges, the player will never know he has just entered a new level file! This can create the impression of a much larger game world than what there really is (sort of like the Holodeck on Star Trek).
To quickly set the Collidable property for all solid tiles, you can use the Action menu, wherein is an option called Auto Set Collidable. First, select a tile in the palette that is the base “ground” tile, which will be skipped when the action is performed. Then, select the Auto Set Collidable item in the Action menu. This has the effect of setting the Collidable property on every tile except the selected one! A real time saver!
Our custom level editor that was developed in the previous chapter produces XML files containing information about a game level. We can load the XML file using .NET classes in the System.Xml namespace—so loading is not a problem. Rendering the level is where we’ll focus most of our attention. First, let’s just look at loading the data from a level file and render one screen full of tiles with it as a starting point. Until now, we have only seen game levels inside the editor, but now we’ll be able to render the level with C# code. To render a level, we need two things: 1) The tilemap data from the .xml file; and 2) The source tiles stored in a bitmap file. The level file describes the tile number that should be represented at each location in the game level.
Here is the source code for the Level Viewer. This example does not know how to scroll, but it’s a good start. Figure 7.5 shows the result of our first attempt to render a game level.
using System;
using System.Drawing;
using System.Text;
using System.Windows.Forms;
using System.Xml;

namespace Level_Viewer
{
    public partial class Form1 : Form
    {
        public struct tilemapStruct
        {
            public int tilenum;
            public string data1;
            public bool collidable;
        }
        const int COLUMNS = 5;
        private Bitmap bmpTiles;
        private Bitmap bmpSurface;
        private PictureBox pbSurface;
        private Graphics gfxSurface;
        private Font fontArial;
        private tilemapStruct[] tilemap;

        public Form1()
        {
            InitializeComponent();
        }

        private void Form1_Load(object sender, EventArgs e)
        {
            this.Text = "Level Viewer";
            this.Size = new Size(800 + 16, 600 + 38);

            //create tilemap
            tilemap = new tilemapStruct[128 * 128];

            //set up level drawing surface
            bmpSurface = new Bitmap(800, 600);
            pbSurface = new PictureBox();
            pbSurface.Parent = this;
            pbSurface.BackColor = Color.Black;
            pbSurface.Dock = DockStyle.Fill;
            pbSurface.Image = bmpSurface;
            gfxSurface = Graphics.FromImage(bmpSurface);

            //create font
            fontArial = new Font("Arial Narrow", 8);

            //load tiles bitmap
            bmpTiles = new Bitmap("palette.bmp");

            //load the tilemap
            loadTilemapFile("level1.level");

            drawTilemap();
        }

        private void Form1_FormClosed(object sender, FormClosedEventArgs e)
        {
            bmpSurface.Dispose();
            pbSurface.Dispose();
            gfxSurface.Dispose();
        }

        private void loadTilemapFile(string filename)
        {
        try
        {
            XmlDocument doc = new XmlDocument();
            doc.Load(filename);
            XmlNodeList nodelist = doc.GetElementsByTagName("tiles");
            foreach (XmlNode node in nodelist)
            {
                XmlElement element = (XmlElement)node;
                int index = 0;
                int value = 0;
                string data1 = "";
                bool collidable = false;

                //read tile index #
                index = Convert.ToInt32(element.GetElementsByTagName(
                    "tile")[0].InnerText);

                //read tilenum
                value = Convert.ToInt32(element.GetElementsByTagName(
                    "value")[0].InnerText);

                //read data1
                data1 = Convert.ToString(element.GetElementsByTagName(
                    "data1")[0].InnerText);

                //read collidable
                collidable = Convert.ToBoolean(element.GetElementsByTagName(
                    "collidable")[0].InnerText);

                tilemap[index].tilenum = value;
                tilemap[index].data1 = data1;
                tilemap[index].collidable = collidable;
            }
        }
        catch (Exception es)
        {
            MessageBox.Show(es.Message);
        }
        }

        private void drawTilemap()
        {
            for (int x = 0; x < 25; x++)
                for (int y = 0; y < 19; y++)
                    drawTileNumber(x, y, tilemap[y * 128 + x].tilenum);
        }

        public void drawTileNumber(int x, int y, int tile)
        {
            //draw tile
            int sx = (tile % COLUMNS) * 33;
            int sy = (tile / COLUMNS) * 33;
            Rectangle src = new Rectangle(sx, sy, 32, 32);
            int dx = x * 32;
            int dy = y * 32;
            gfxSurface.DrawImage(bmpTiles, dx, dy, src, GraphicsUnit.Pixel);

            //save changes
            pbSurface.Image = bmpSurface;
        }

        private void Form1_KeyUp(object sender, KeyEventArgs e)
        {
            if (e.KeyCode == Keys.Escape)
                Application.Exit();
        }
    }
}
What is scrolling? In today’s gaming world, where 3D is the focus of everyone’s attention, it’s not surprising to find gamers and programmers who have never heard of scrolling. What a shame! The heritage of modern games is a long and fascinating one that is still relevant today, even if it is not understood or appreciated. The console industry puts great effort and value into scrolling, particularly on handheld systems such as the Nintendo DS/DSi/3DS. Scrolling is the process of displaying a small window of a larger virtual game world. There are three basic ways to scroll the display:
Loading a large tiled bitmap image
Creating a large bitmap out of tiles at runtime
Drawing tiles directly on the screen
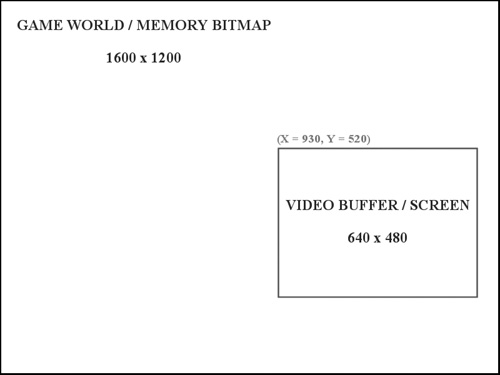
Figure 7.6 illustrates the concept of scrolling, which, in essence, involves the use of a large game world of which only a small portion is visible through the screen at a time.
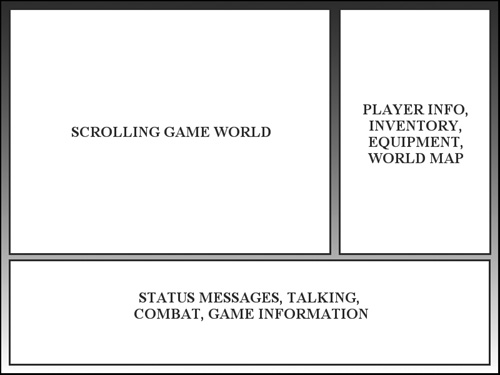
The key to scrolling is having something in the virtual game world to display in the scroll window (or the screen). Also, I should point out that the entire screen need not be used as the scroll window. It is common to use the entire screen in scrolling-shooter games, but role-playing games often use a smaller window on the screen for scrolling, using the rest of the screen for gameplay (combat, inventory, and so on) and player/party information, as shown in Figure 7.7.
You could display one huge bitmap image in the virtual game world representing the current level of the game (or the map), and then copy a portion of that virtual world onto the screen. This is the simplest form of scrolling. Another method uses tiles to create the game world at runtime. Suppose we had a large bitmap file containing a pre-rendered image of the game world. You would then load up that large bitmap and copy a portion of it to the screen, and that portion would represent the current scroll position.
This theory of using a single large bitmap seems reasonable at first glance, but that method of scrolling has a very serious limitation. When you create a game world, the whole point is to interact with that game world. A single, large bitmap used to render the game world prevents you from actually tracking where the player is located on the map, as well as what other objects are on the map. In a tile-based game world, each tile is represented by a number, and that number has meaning. A tile containing a tree is impassable, whereas a tile of grass can be walked on. Of course, you could create a new array or some other method to keep track of the player, various enemies, and objects in the game world, but that requires a lot of extra work. There’s a better way to do it. A high-speed scrolling arcade game automatically scrolls horizontally or vertically, displaying ground-, air-, or space-based terrain below the player’s vehicle (usually represented by an airplane or spaceship). The point of such games is to keep the action moving so fast that the player doesn’t have a chance to rest from one wave of enemies to the next.
Tiling is a process in which there really is no background, just an array of small images that make up the background as it is drawn. In other words, it is a virtual background and takes up very little memory compared to a full bitmapped background. You are already familiar with how tiling works after learning about the level editor, but you are probably wondering: How can I load tiles and make a scrolling game world out of a level file?
Most levels in a scrolling arcade game are quite large, comprised of thousands of tiles in one orientation or the other (usually just scrolling up and down—vertically—or left to right). These types of games are called shooters for the most part, although the horizontally scrolling games are usually platformers (such as the original Mario games). Not only does your average Mario game have large scrolling levels, but those levels have parallax layers that make the background in the distance scroll by more slowly than the layer on which the player’s character is walking.
When working on a new game, I find it helpful to start storing my tiles in a new image one by one as I need them, so that I can construct a new set of tiles for the game while I’m working on the game. This also helps to keep the tile numbers down to a smaller number. If you have a huge tile map with hundreds of tiles in it and you only need a few of them during the early stages of development, then you have to figure out where each tile must be drawn, and you have to work with a texture in memory.
The process of drawing tiles to fill the game world reminds me of laying down stepping stones, and tiling is a perfect analogy for how this works. Basically, tiles of a larger pattern are laid down from left to right, top to bottom, in that order. The first row is added, one tile at a time, all the way across; then the next row down is filled in from left to right, and so on until the entire map is filled. A single large bitmap is just not used—that’s amateur. Another possibility is that you could continue to use a single large bitmap, but create that bitmap at runtime, and fill it with tiles according to the map file and tile images. Although this solution would generate the game world on the fly, the resulting texture representing the game world would require several gigabytes of memory, which is not feasible.
Now that you have a good understanding of what scrolling is and how we can edit tile maps and export them, let’s take a look at the basic theory and code to actually draw a scrolling tile map on the screen. The problem with scrolling a large game world is that too much memory is required to create a texture in memory to contain an entire game world (even if you break the map into sections). You cannot create a single texture to hold the entire game world because most levels are far too large! It would consume so much memory that the program would not even run, and even if it did, that would be a horrible way to write a game. We’re talking about old-school scrolling here, after all, from an era when video game systems had tiny amounts of memory—like 64 KB! Surely we can figure out how they did it back then.
Let’s examine a method of tile rendering that supports giant maps using very little memory. In fact, all the memory required for the tiled scroller developed here is a bitmap for the tiles and an array with all of the tile values, plus a screen-sized texture. (In other words, no more memory than would be needed for a background image.) A map comprised of several million tiles can be rendered by this tile engine and will require only a small memory footprint.
Figure 7.8 shows the game world with the scroll window superimposed, so you can see how the screen represents a portion of the game world. While viewing this figure, imagine there is no image containing this game world map, just a virtual array of tile numbers. Those tiles are drawn just to the screen, based on what is visible in the darkened part of the figure. Do you see the rock border around the map? The border is helpful when you are developing a new tile scroller, because it shows the boundaries, allowing you to determine whether the scrolling view is being displayed at the correct location based on the scroll position. (In other words, it should stop scrolling when it reaches the edge of the “world,” but should not skip any tiles.)
Now let’s assume that you’re using a screen resolution of 800x600, because this is a good resolution to use; it’s relatively small so the screen updates quickly, but it is large enough to display a lot of details on the screen without crowding. We may even want to move up to 1024x768 at some point.
There is a simple calculation that gives you the tile number as well as the partial tile values relatively easily. Are you familiar with modulus? This is a mathematical operation that produces the remainder of a division operation. Let me give you a simple example:
10/5 = 2
This is simple enough to understand, right? What happens when you are using numbers that are not evenly divisible?
10/3 = 3.33333333
This is a problem, because the remainder is not an even number, and we’re talking about pixels here. You can’t deal with parts of a pixel! However, you can work with parts of a tile, because tiles are made up of many pixels. Thinking in terms of complete tiles here, let’s take a look at that division again:
10/3 = 3, with a remainder of 0.33333333
Let me now use numbers more relevant to the problem at hand:
800/64 = 12.5
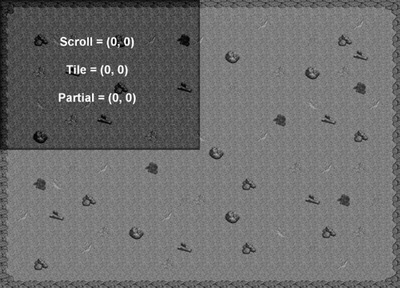
This represents a calculation that returns the number of tiles that fit on a screen with a width of 800 pixels (assuming the tiles are 64 pixels wide). What does 12.5 tiles mean when you are writing a scroller? The .5 represents a part of a tile that must be drawn; hence, I call it partial-tile scrolling. Switching to 32x32 pixel tiles results in an evenly divisible screen, at least horizontally (32x32 results in 25 tiles across, 18.75 tiles down).
Here is where it gets really interesting! After you have drawn your tiles across the screen, and you want to fill in the remaining .5 of a tile, you can calculate the size of the tile like so:
64 × 0.5 = 32
That is, 32 pixels of the partial tile must be drawn to handle the scrolling edge that was not lined up with a tile edge on the map. Rather than keeping track of the remainder at all, there is a simpler way to calculate the portion of the tile that must be drawn, in the measurement of pixels:
800 % 64 = 32
Hint
The modulus operator (“%” in C#) is similar to operators like multiply, divide, add, and subtract, but it simply returns the remainder of a division, which works great for our purposes here.
Try not to think of scrolling in screen terms, because the whole discussion revolves around the tile map in memory (the tile data itself). The tile data is expanded to full tiles when drawn to the screen, but until that happens, these tiles might be thought of as a huge virtual game world from which the scrolling window is drawn.
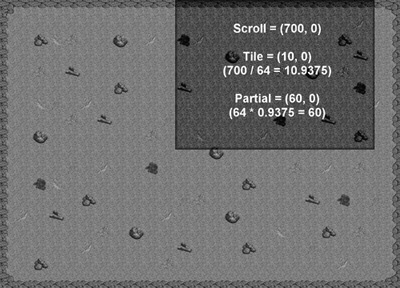
Try another problem so you get the hang of calculating partial tiles before we get into the source code. Suppose the scroll position is at (700,0) on the map, and the tiles are again 64x64. Which would be the starting tile, and what is the value of the partial tile (in pixels)? To calculate first the tile position in the map data array, just drop the decimal part, which represents the remainder:
700 / 64 = 10.9375 (10 whole tiles plus a partial tile)
Next, you do want to keep the remainder, and actually drop the tile position itself, because now you’re interested in pixels.
700 % 64 = 60
To verify that this calculation is correct, you can do the following:
64 × 0.9375 = 60
The modulus operator greatly helps with this calculation by skipping that middle step. It simply provides the remainder value directly, giving the exact number of pixels that must be drawn from the partial tile to fill in the top and left edges of the screen. I have shown the calculation in Figure 7.9, which is based on 64x64-pixel tiles.
Ready for another try at it? This time, calculate the tile numbers and partial-tile values for both the X and Y position of the scroll window at (372,489). Below is the answer, but see if you can figure it out before looking....
First the X value:
372 / 64 = 5.8125 (tile X = 5)
64 × 0.8125 = 52 (pixels)
489 / 64 = 7.640625 (tile Y = 7)
64 × 0.640625 = 41 (pixels)
The same calculations are used for any size of tile, from 16x16 to 32x32 or any other size.
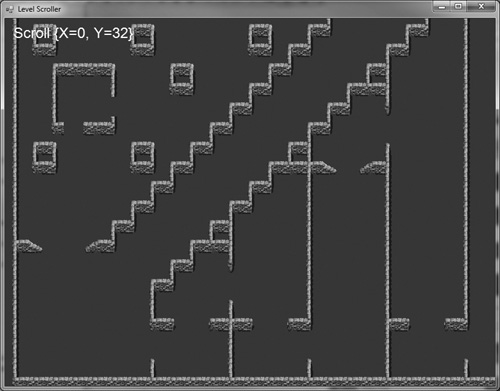
Scrolling the level one tile at a time produces fairly good results, especially if you need extremely high performance in a very fast-paced game. Of course, a role-playing game is not a hectic, fast-paced scroller, but we do still need good performance. For an RPG, we need slower, more precise scrolling that is not possible with a full-tile scroller. What we need is sub-tile scrolling at a per-pixel rate. Let’s learn the full-time method first, since that may come in handy for another game or two, and then we’ll look at the sub-tile method.
For the full tile-based scroller, we’ll be keeping track of the scroll position as it relates to entire tiles with a width and height of 32x32, which is the effective scroll rate (since each tile is 32 pixels across). The Level Scroller demo (shown in Figure 7.10 and listed below) does let you move around and look at the whole level but only one step at a time. There is something appealing about this scroller. I like how precise it is, moving one whole tile at a time, and think this would work great for a turn-based war game or a Civilization type game. We’ll peruse just the important code for the Level Scroller demo that differs from the previous example. The loadTilemapFile() function was already shown in the previous example, so we’ll just skip any functions like this that we have already seen.
To keep track of the scroll position:
private PointF scrollPos = new PointF(0, 0);
Now here is Form1_Load:
   private void Form1_Load(object sender, EventArgs e)
   {
       this.Text = "Level Scroller";
       this.Size = new Size(800 + 16, 600 + 38);

       //create tilemap
       tilemap = new tilemapStruct[128 * 128];

       //set up level drawing surface
       bmpSurface = new Bitmap(800, 600);
       pbSurface = new PictureBox();
       pbSurface.Parent = this;
       pbSurface.BackColor = Color.Black;
       pbSurface.Dock = DockStyle.Fill;
       pbSurface.Image = bmpSurface;
       gfxSurface = Graphics.FromImage(bmpSurface);
       //create font
       fontArial = new Font("Arial", 18);

       //load tiles bitmap
       bmpTiles = new Bitmap("palette.bmp");

       //load the tilemap
       loadTilemapFile("level1.level");

       drawTilemap();
   }
The drawTilemap() function assumes we have an 800x600 display. (800 / 32 = 25 tiles across, and 600 / 32 = 19 tiles down.)
   private void drawTilemap()
   {
       int tilenum, sx, sy;
       for (int x = 0; x < 25; x++)
           for (int y = 0; y < 19; y++)
           {
               sx = (int)scrollPos.X + x;
               sy = (int)scrollPos.Y + y;
               tilenum = tilemap[sy * 128 + sx].tilenum;
               drawTileNumber(x, y, tilenum);
           }

       //print scroll position
       string text = "Scroll " + scrollPos.ToString();
       gfxSurface.DrawString(text, fontArial, Brushes.White, 10, 10);
   }
The drawTileNumber() function uses the modulus operator to draw a tile from the tile palette image (which looks like a vertical strip of five tiles across, shown in the previous chapter). This function does not handle partial-tile scrolling as discussed, but does use the same modulus operator for a similar purpose of drawing a tile out of a source image. The same function can be found in the level editor’s source code.
   public void drawTileNumber(int x, int y, int tile)
   {
       //draw tile
       int sx = (tile % COLUMNS) * 33;
       int sy = (tile / COLUMNS) * 33;
       Rectangle src = new Rectangle(sx, sy, 32, 32);
       int dx = x * 32;
       int dy = y * 32;
       gfxSurface.DrawImage(bmpTiles, dx, dy, src, GraphicsUnit.Pixel);

       //save changes
       pbSurface.Image = bmpSurface;
   }
The Form1_KeyUp() event is really the part of this program that causes things to happen. Based on user input, the tilemap is redrawn at a new scroll position. The drawTilemap() function does the work of filling in the window with tiles at the correct location of the tilemap.
   private void Form1_KeyUp(object sender, KeyEventArgs e)
   {
       switch (e.KeyCode)
       {
           case Keys.Escape:
               Application.Exit();
               break;

           case Keys.Up:
           case Keys.W:
               scrollPos.Y -= 1;
               if (scrollPos.Y < 0) scrollPos.Y = 0;
               drawTilemap();
               break;

           case Keys.Down:
           case Keys.S:
               scrollPos.Y += 1;
               if (scrollPos.Y g 127 - 19) scrollPos.Y = 127 - 19;
               drawTilemap();
               break;

           case Keys.Left:
           case Keys.A:
               scrollPos.X -= 1;
               if (scrollPos.X < 0) scrollPos.X = 0;
               drawTilemap();
               break;

           case Keys.Right:
           case Keys.D:
               scrollPos.X += 1;
               if (scrollPos.X > 127 - 25) scrollPos.X = 127 - 25;
               drawTilemap();
               break;
       }
   }
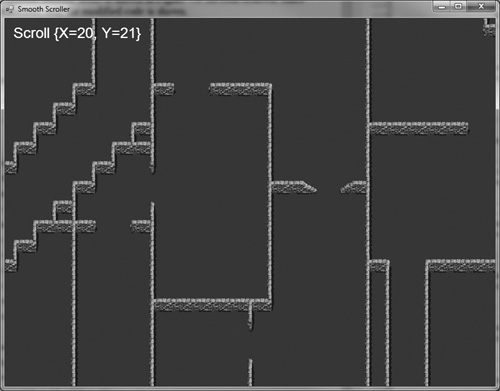
The preceding example showed how to scroll the level one tile per keypress, which would work for a turn-based game but is otherwise too slow. We’ll now take a look at how to scroll while a key is pressed without requiring the user to hit the key repeatedly. The main difference between this and the preceding example is that a flag is used to track the keypress and release states for the keys Up, Down, Left, and Right. As long as a key is being held, the map will continue to scroll in that direction. The Smooth Scroller demo is shown in Figure 7.11. Its code follows. Since only a few changes have been made, only the modified code is shown.
Here are the new pieces of data we need for smooth scrolling:
   public struct keyStates
   {
       public bool up, down, left, right;
   }
   private PointF oldScrollPos = new PointF(-1, -1);
   private keyStates keyState;
   private Timer timer1;
Here is an updated Form1_Load for the new smooth-scrolling program:
   private void Form1_Load(object sender, EventArgs e)
   {
       this.Text = "Smooth Scroller";
       this.Size = new Size(800 + 16, 600 + 38);
       fontArial = new Font("Arial", 18);
       //set up level drawing surface
       bmpSurface = new Bitmap(800, 600);
       pbSurface = new PictureBox();
       pbSurface.Parent = this;
       pbSurface.BackColor = Color.Black;
       pbSurface.Dock = DockStyle.Fill;
       pbSurface.Image = bmpSurface;
       gfxSurface = Graphics.FromImage(bmpSurface);

       //create tilemap
       tilemap = new tilemapStruct[128 * 128];
       bmpTiles = new Bitmap("palette.bmp");
       loadTilemapFile("level1.level");

       //create the timer
       timer1 = new Timer();
       timer1.Interval = 20;
       timer1.Enabled = true;
       timer1.Tick += new EventHandler(timer1_tick);
   }
The key handling methods flag the appropriate property in the keyStates struct variable so the program will know when a key is being held or released.
   private void Form1_KeyDown(object sender, KeyEventArgs e)
   {
       switch (e.KeyCode)
       {
           case Keys.Up:
           case Keys.W:
               keyState.up = true;
               break;
           case Keys.Down:
           case Keys.S:
               keyState.down = true;
               break;
           case Keys.Left:
           case Keys.A:
               keyState.left = true;
               break;
           case Keys.Right:
           case Keys.D:
               keyState.right = true;
               break;
       }
   }

   private void Form1_KeyUp(object sender, KeyEventArgs e)
   {
       switch (e.KeyCode)
       {
           case Keys.Escape:
               Application.Exit();
               break;
           case Keys.Up:
           case Keys.W:
               keyState.up = false;
               break;
           case Keys.Down:
           case Keys.S:
               keyState.down = false;
               break;
           case Keys.Left:
           case Keys.A:
               keyState.left = false;
               break;
           case Keys.Right:
           case Keys.D:
               keyState.right = false;
               break;
       }
   }
The “engine” behind this example is based on a Timer control called timer1, and the timer1_tick() function fires off regularly, which is what makes this a real-time program. Even if no scrolling is taking place, this function still causes the tilemap to redraw at a fast pace.
   private void timer1_tick(object sender, EventArgs e)
   {
       if (keyState.up)
       {
           scrollPos.Y -= 1;
           if (scrollPos.Y < 0) scrollPos.Y = 0;
       }
       if (keyState.down)
       {
           scrollPos.Y += 1;
           if (scrollPos.Y > 127 - 19) scrollPos.Y = 127 - 19;
       }
       if (keyState.left)
       {
           scrollPos.X -= 1;
           if (scrollPos.X < 0) scrollPos.X = 0;
       }
       if (keyState.right)
       {
           scrollPos.X += 1;
           if (scrollPos.X > 127 - 25) scrollPos.X = 127 - 25;
       }

       drawTilemap();
       string text = "Scroll " + scrollPos.ToString();
       gfxSurface.DrawString(text, fontArial, Brushes.White, 10, 10);
   }
Finally, we come to sub-tile scrolling, a term that means scrolling in increments smaller than one whole tile, such as one pixel at a time. In the preceding example, the level was moved one tile at a time—that is, one whole row or column at a time. This is a good and fast way to move around the game world, and is the way I would recommend when you need to warp or jump from one location in the level to another very quickly. But for individual character movement in the game world, we need a slower, more precise form of scrolling, where only a few pixels at a time are shifted in the scroll direction. In order to accomplish this, we need a new feature—a scroll buffer. This buffer will be slightly larger than the screen, with a border around it equal to the size of the tiles. So, if our tiles are 32x32 pixels, then we need a 32-pixel border around the scroll buffer.
The key to implementing a dynamic sub-tile scrolling engine is a third buffer in memory (so called because the screen and back buffer are the first two), upon which the tiles are drawn at the current scroll position. The word dynamic here refers to the way the tile engine draws what is needed at that particular point in the game world, while sub-tile refers to the way it draws full tiles and partial tiles to fill the borders. If you think about it, the tiles are 32x32 pixels in size so without the partial-tile capability, drawing tiles directly to the screen one portion at a time results in very jumpy scrolling, where the screen is only updated whenever complete tiles can be drawn (as was the case in the preceding example).
To make this technique work, we start with a Point variable called scrollPos to keep track of the scroll position. When drawing tiles directly, these variables give a precise position at which the tiles should start drawing in a left-to-right, top-to-bottom orientation. If the scroll position is at (500,500), what does this mean, exactly? It means that the tiles specified in the map should be drawn at the upper-left corner of the screen, from the position of the 500x500 point in the game world. Try to keep this concept in mind when you are working on scrolling, because the screen position is always the same: the scrolling view is rendered onto the screen at the upper left, 0x0. While the scroll position changes all the time, the destination location on the screen never changes. We’re drawing one screen worth of the game world at a time, from any location in that game world. At the same time, we want to render the tiles that make up that portion of the game world dynamically, in order to keep the scroll engine efficient.
After you have filled the scroll buffer with tiles for the current scroll position within the game world, the next thing you must do is actually draw the scroll buffer to the screen. This is where things get a little interesting. The scroll buffer is filled only with complete tiles, but it is from here that the partial tiles are taken into account. This is interesting because the whole tiles were drawn onto the scroll buffer, but the partial tiles are handled when drawing the scroll buffer to the screen. The Point variable called subtile is given the result of the modulus calculation, and these values are then used as the upper-left corner of the scroll buffer that is copied to the screen.
Remember, the scrolling window is just the beginning. The rest of the game still has to be developed, and that includes a lot of animated sprites for the player’s character, non-player characters, plus buildings, animals, and any other objects that appear in the game. The bottom line is that the scroller needs to be as efficient as possible. (Yes, even with today’s fast PCs, the scroller needs to be fast—never use the argument that PCs are fast to excuse poorly written code!)
There is one factor that you must take into consideration while designing the screen layout of your game with a scrolling window. The size of the scrolling window must be evenly divisible by the size of the tiles, or you end up with a floating overlap at the uneven edge. This is an issue that I considered solving in the scrolling code itself. But it turns out that this is unnecessary because you can just change the destination rectangle when drawing the scroll buffer to the screen (something we’ll explore later in this chapter with the “Scrolling View-port” program).
If using a screen resolution of 800x600 with 32x32 tiles, your width is fine, but height doesn’t quite line up evenly. Cut off the bottom of the scroll window at 576 (which is 18 tiles high), leaving the remaining 24 pixels unused at the bottom. This shouldn’t be a problem because you can use that screen real estate for things like an in-game menu system, player status information, or perhaps in-game dialog (not to be confused with the discussion earlier about partial tiles).
We may want to limit the scrolling window to a portion of the screen as it makes more sense than displaying game information over the top of the scrolling window. This holds true unless we are doing something cool like drawing transparent windows over the top of the background. Two more options occur to me: we could just scale the buffer to fill the screen, or we could just draw the extra tile at the bottom and crop it.
Now we come to sub-tile scrolling, the type we need for a slow-paced RPG, in which a character walks around in the game world. This type of game requires a scroller with per-pixel granularity. In other words, scrolling at the pixel level rather than at the full tile level (which was 32 pixels at a time). I’ve called this method “sub-tile scroll buffering” because the game world needs to scroll slowly in any direction one pixel at a time. Some familiar techniques can be used again, but we need to modify the code quite a bit to support this more advanced form of scrolling.
To help you understand this technique better, I’ve created two examples. The first example (shown in Figure 7.12) just demonstrates how the scroll buffer works by letting you move the scroll buffer around on the screen. The final example coming up in the next section demonstrates scrolling a game level with this technique. Again, only the key code is shown here for reference, not the complete code listing (with wasteful repeating of code). This project is called Sub-Tile Buffer demo in the chapter’s resources.
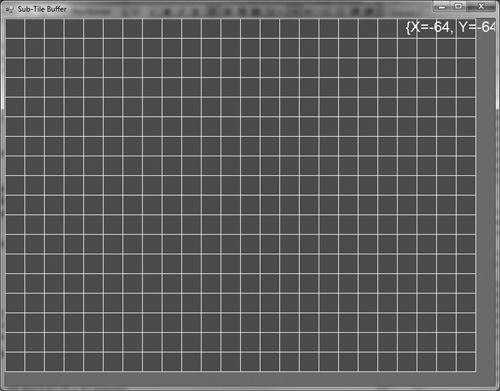
These two new variables are needed for the new example:
  Bitmap bmpScrollBuffer;
  Graphics gfxScrollBuffer;
Here is the main source code for the demo (just the important parts for reference).
    private void Form1_Load(object sender, EventArgs e)
    {
        this.Text = "Sub-Tile Buffer Demo";
        this.Size = new Size(800 + 16, 600 + 38);
        fontArial = new Font("Arial", 18);

        //set up level drawing surface
        bmpSurface = new Bitmap(800, 600);
        pbSurface = new PictureBox();
        pbSurface.Parent = this;
        pbSurface.BackColor = Color.Black;
        pbSurface.Dock = DockStyle.Fill;
        pbSurface.Image = bmpSurface;
        gfxSurface = Graphics.FromImage(bmpSurface);

        //create scroll buffer
        bmpScrollBuffer = new Bitmap(25 * 32 + 64, 19 * 32 + 64);
        gfxScrollBuffer = Graphics.FromImage(bmpScrollBuffer);

        //fill buffer border area
        gfxScrollBuffer.FillRectangle(Brushes.Gray,
            new Rectangle(0, 0, bmpScrollBuffer.Width,
            bmpScrollBuffer.Height));

        //fill buffer screen area
        gfxScrollBuffer.FillRectangle(Brushes.BlueViolet,
            new Rectangle(32, 32, 25 * 32, 19 * 32));

        for (int y = 0; y < 19; y++)
            for (int x = 0; x < 25; x++)
                gfxScrollBuffer.DrawRectangle(Pens.White, 32 + x * 32,
                    32 + y * 32, 32, 32);

        gfxScrollBuffer.DrawString("SCROLL BUFFER BORDER", fontArial,
            Brushes.White, 0, 0);

        //create the timer
        timer1 = new Timer();
        timer1.Interval = 20;
        timer1.Enabled = true;
           timer1.Tick += new EventHandler(timer1_tick);
    }

    private void timer1_tick(object sender, EventArgs e)
    {
        if (keyState.down)
        {
            scrollPos.Y -= 4;
            if (scrollPos.Y < -64) scrollPos.Y = -64;
        }
        if (keyState.up)
        {
            scrollPos.Y += 4;
            if (scrollPos.Y > 0) scrollPos.Y = 0;
        }
        if (keyState.right)
        {
            scrollPos.X -= 4;
            if (scrollPos.X < -64) scrollPos.X = -64;
        }
        if (keyState.left)
        {
            scrollPos.X += 4;
            if (scrollPos.X > 0) scrollPos.X = 0;
        }

        //draw scroll buffer
        gfxSurface.DrawImage(bmpScrollBuffer, scrollPos);

        //print scroll position
        gfxSurface.DrawString(scrollPos.ToString(), fontArial,
Brushes.White, 650, 0);

        //update surface
        pbSurface.Image = bmpSurface;
    }
Now for the final example of the chapter—the sub-tile smooth scrolling. In the preceding example, you could see how the scroll buffer works with a border around the edges of the buffer to take into account the partial tiles. This produces smooth per-pixel scrolling in any direction. Figure 7.13 shows the example program that displays the right and bottom edges of the buffer so you can see how the sub-tile scroller works. (Note: there is a commented-out line of code that will render the scroll buffer smoothly without showing the partial tiles if you wish to see it, but this is more interesting as a learning experience with the tiles left in.)
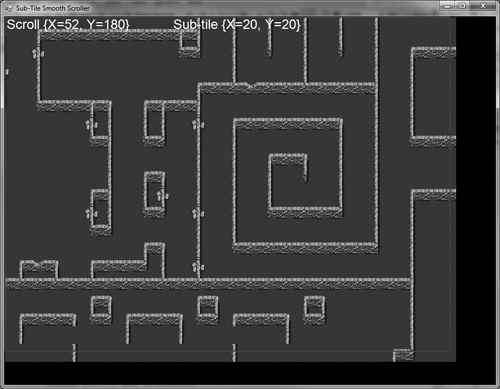
This tile scroller is now finished. We have data specific to each tile for use in gameplay (such as the Collidable property), and a moving game world. However, there are optimizations that can still be made to this scroller—plus, we might want to create a reusable class to consolidate the code a bit. I think it would be nice if we could just call one function to load the tilemap, and another to draw it at any given position in the game level. This source code is found in the project called Sub-Tile Smooth Scroller in the chapter’s resources.
using System;
using System.Drawing;
using System.Text;
using System.Windows.Forms;
using System.Xml;

namespace Level_Scroller
{
    public struct tilemapStruct
    {
        public int tilenum;
        public string data1;
        public bool collidable;
    }

    struct keyStates
    {
        public bool up, down, left, right;
    }

    public partial class Form1 : Form
    {
        const int COLUMNS = 5;
        Bitmap bmpSurface;
        PictureBox pbSurface;
        Graphics gfxSurface;
        Font fontArial;
        keyStates keyState;
        Timer timer1;
        tilemapStruct[] tilemap;
        PointF subtile = new PointF(0, 0);
        Bitmap bmpTiles;
        Bitmap bmpScrollBuffer;
        Graphics gfxScrollBuffer;
        PointF scrollPos = new PointF(0, 0);
        PointF oldScrollPos = new PointF(-1, -1);

        public Form1()
        {
            InitializeComponent();
        }

        private void Form1_Load(object sender, EventArgs e)
        {
            this.Text = "Sub-Tile Smooth Scroller";
            this.Size = new Size(900, 700);
            fontArial = new Font("Arial", 18);

            //set up level drawing surface
            bmpSurface = new Bitmap(1024, 768);
            pbSurface = new PictureBox();
            pbSurface.Parent = this;
            pbSurface.BackColor = Color.Black;
            pbSurface.Dock = DockStyle.Fill;
            pbSurface.Image = bmpSurface;
            gfxSurface = Graphics.FromImage(bmpSurface);

            //create tilemap
            tilemap = new tilemapStruct[128 * 128];
            bmpTiles = new Bitmap("palette.bmp");
            loadTilemapFile("level1.level");

            //create scroll buffer
            bmpScrollBuffer = new Bitmap(25 * 32 + 64, 19 * 32 + 64);
            gfxScrollBuffer = Graphics.FromImage(bmpScrollBuffer);

            //create the timer
            timer1 = new Timer();
            timer1.Interval = 20;
            timer1.Enabled = true;
            timer1.Tick += new EventHandler(timer1_tick);
        }

        private void timer1_tick(object sender, EventArgs e)
        {
            int steps = 4;
            if (keyState.up)
            {
                scrollPos.Y -= steps;
                if (scrollPos.Y < 0) scrollPos.Y = 0;
            }
            if (keyState.down)
            {
                scrollPos.Y += steps;
                if (scrollPos.Y > (127 - 19) * 32) scrollPos.Y =
                    (127 - 19) * 32;
            }
            if (keyState.left)
            {
                scrollPos.X -= steps;
                if (scrollPos.X < 0) scrollPos.X = 0;
            }
            if (keyState.right)
            {
                scrollPos.X += steps;
                if (scrollPos.X > (127 - 25) * 32) scrollPos.X =
                    (127 - 25) * 32;
            }

            //clear the ground
            //note that this is usually not needed when drawing
            //the game level but this example draws the whole buffer
            gfxSurface.Clear(Color.Black);

            //update and draw the tiles
            drawScrollBuffer();

            //print scroll position
            gfxSurface.DrawString("Scroll " + scrollPos.ToString(),
                fontArial, Brushes.White, 0, 0);
            gfxSurface.DrawString("Sub-tile " + subtile.ToString(),
                fontArial, Brushes.White, 300, 0);

            //draw a rect representing the actual scroll area
            gfxSurface.DrawRectangle(Pens.Blue, 0, 0, 801, 601);
            gfxSurface.DrawRectangle(Pens.Blue, 1, 1, 801, 601);

            //update surface
            pbSurface.Image = bmpSurface;
        }

        public void updateScrollBuffer()
        {
            //fill scroll buffer with tiles
            int tilenum, sx, sy;
            for (int x = 0; x<26; x++)
                 for (int y = 0; y < 20; y++)
                 {
                      sx = (int)(scrollPos.X / 32) + x;
                      sy = (int)(scrollPos.Y / 32) + y;
                      tilenum = tilemap[sy * 128 + sx].tilenum;
                      drawTileNumber(x, y, tilenum, COLUMNS);
                 }
        }

        public void drawTileNumber(int x, int y, int tile, int columns)
        {
            int sx = (tile % columns) * 33;
            int sy = (tile / columns) * 33;
            Rectangle src = new Rectangle(sx, sy, 32, 32);
            int dx = x * 32;
            int dy = y * 32;
            gfxScrollBuffer.DrawImage(bmpTiles, dx, dy, src,
                GraphicsUnit.Pixel);
        }

        public void drawScrollBuffer()
        {
            //fill scroll buffer only when moving
            if (scrollPos != oldScrollPos)
            {
                updateScrollBuffer();
                oldScrollPos = scrollPos;
            }

            //calculate sub-tile size
            subtile.X = scrollPos.X % 32;
            subtile.Y = scrollPos.Y % 32;
            //create the source rect
            Rectangle source = new Rectangle((int)subtile.X, (int)subtile.Y,
                bmpScrollBuffer.Width, bmpScrollBuffer.Height);

            //draw the scroll viewport
            gfxSurface.DrawImage(bmpScrollBuffer, 1, 1, source,
                GraphicsUnit.Pixel);
        }

        private void Form1_KeyDown(object sender, KeyEventArgs e)
        {
            switch (e.KeyCode)
            {
                case Keys.Up:
                case Keys.W:
                    keyState.up = true;
                    break;

                case Keys.Down:
                case Keys.S:
                    keyState.down = true;
                    break;

                case Keys.Left:
                case Keys.A:
                    keyState.left = true;
                    break;

                case Keys.Right:
                case Keys.D:
                    keyState.right = true;
                    break;
            }
        }

        private void Form1_KeyUp(object sender, KeyEventArgs e)
        {
            switch (e.KeyCode)
            {
                case Keys.Escape:
                    Application.Exit();
                    break;

                case Keys.Up:
                case Keys.W:
                    keyState.up = false;
                    break;

                case Keys.Down:
                case Keys.S:
                    keyState.down = false;
                    break;

                case Keys.Left:
                case Keys.A:
                    keyState.left = false;
                    break;

                case Keys.Right:
                case Keys.D:
                    keyState.right = false;
                    break;
            }
        }

        private void loadTilemapFile(string filename)
        {
            try
            {
                XmlDocument doc = new XmlDocument();
                doc.Load(filename);
                XmlNodeList nodelist = doc.GetElementsByTagName("tiles");
                foreach (XmlNode node in nodelist)
                {
                    XmlElement element = (XmlElement)node;
                    int index = 0;
                    int value = 0;
                    string data1 = "";
                    bool collidable = false;

                    //read tile index #
                    index = Convert.ToInt32(element.GetElementsByTagName(
                        "tile")[0].InnerText);

                    //read tilenum
                    value = Convert.ToInt32(element.GetElementsByTagName(
                        "value")[0].InnerText);

                    //read data1
                    data1 = Convert.ToString(element.GetElementsByTagName(
                        "data1")[0].InnerText);

                    //read collidable
                    collidable = Convert.ToBoolean(element.
                        GetElementsByTagName("collidable")[0].InnerText);

                    tilemap[index].tilenum = value;
                    tilemap[index].data1 = data1;
                    tilemap[index].collidable = collidable;
                }
            }
            catch (Exception es)
            {
                MessageBox.Show(es.Message);
            }
        }

        private void Form1_FormClosed(object sender, FormClosedEventArgs e)
        {
            bmpSurface.Dispose();
            pbSurface.Dispose();
            gfxSurface.Dispose();
            bmpScrollBuffer.Dispose();
            gfxScrollBuffer.Dispose();
            fontArial.Dispose();
            timer1.Dispose();
        }

    }
}
Wow, that was a ton of great information and some killer source code! This gives us enough information to begin working on the dungeon levels! I don’t know about you, but after this long wait, it feels good to have reached this point. Now that we have a level editor and a working level renderer, we can begin working on gameplay. Although the tilemap is drawing, we aren’t using any of the extended data fields (such as Collidable), which is the topic of the next two chapters! Also, we have that really great Game class back in Chapter 3 that will be more useful than the clunky Timer, so we’ll go to full-time use of the Game class and a while loop in the next chapter. Speaking of which, Chapter 8 is about adding objects to the dungeon and simulating lighting by hiding or showing things based on their distance from the player!