The purpose of this chapter is to build a dialogue system for the game so that the player’s character can talk with non-player characters (NPCs). This is important, because a dialogue system will allow players to sell items and treasures they pick up in the dungeon and buy new gear items to improve their attack and defense strengths. The dialogue system developed in this chapter will be used to communicate with the player in many more ways beyond the single purpose of focus in this chapter. In future chapters, this system will be used for combat and looting as well.
Here’s what we’ll cover in this chapter:
Creating the “Vendor” NPC
Starting a conversation
Dialogue choices
Making eye contact
Positioning the dialogue window
Dialogue GUI
Complete
Dialogueclass
For a dialogue system to work well in the game, the first step is to allow the player to get the attention of an NPC, who will either be walking around or staying in a certain location, usually in a town, in a shop, or on the street. Talking with NPCs usually involves walking up close to them and hitting a “talk” button. In console games, that is usually one of the non-combat buttons (like the X or Y button on an Xbox 360 controller, for instance). Until you are in range of the NPC, you cannot talk with them. So, we’ll need to use the distance function to find out if we’re close enough to an NPC. Interestingly enough, this distance code will be used for combat in the next chapter as well—you know, so that you can only hit an enemy if you’re close enough to it.
Our example in this chapter has just one NPC—the vendor character. Normally, we would see many NPCs in a level file with a town in it, not just one character. But, this demo will be on the simple side so you can study the code and understand how this one NPC works. Adding more characters will then be no problem. We need to treat the NPCs like any other object in the game, and render them appropriately. Do you recall the Tree demo back in Chapter 8, “Adding Objects to the Dungeon”? The same sort of code will be used now to draw the NPC, although we won’t use an array or list this time because there’s only one object. If you want to see a full-blown NPC system with many characters, scenery objects, and monsters, see the finished game in the last chapter!
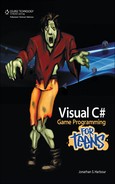
We will use the character editor again to create the vendor character, which is shown in Figure 11.1. You’ll see in the figure that the vendor has no real attributes worthy of note. That is because the vendor cannot fight, and cannot even be attacked. Note also that only one image is used for the vendor’s so-called “animation” sheets, and the columns property is set to 1 for all three. This character doesn’t need to animate or move, which keeps things simple in the art requirement!
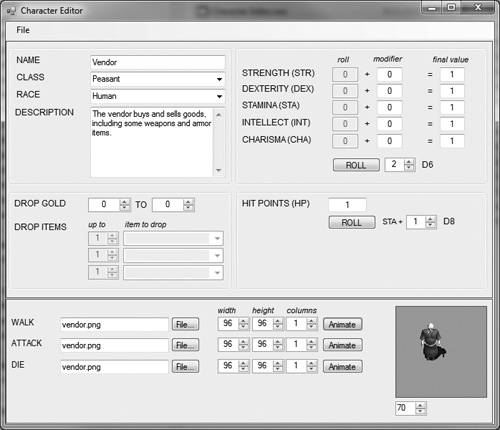
Since both the player and the NPC are based on the Character class, we know that they both have the same properties, including a Position property that returns a PointF (which is like a regular Point structure but containing floats instead of ints). So, how do we use the position of the two characters to find the distance between them? First, we treat the position of each character as the endpoint of a line between them, as shown in Figure 11.2.
Hint
The properties were left out of the Character class in the previous chapter to save space. Some of the properties are mentioned in this chapter, which may be a surprise. Please open the project to see the complete source code.
When using distance to determine whether two sprites are colliding, what we must do is calculate the center point of each sprite, calculate the radius of the sprite (from the center point to the edge), and then check the distance between the two center points. If the distance is less than the two radii combined, then you know the sprites are overlapping. Why? The radius of each sprite, when added together, should be less than the distance between the two sprites.
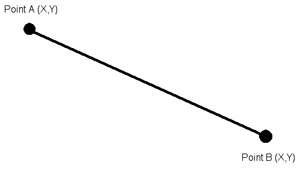
To calculate the distance between any two points, we can use the classic distance formula. Any two points can be converted into a right triangle by treating them as the end points of the two sides of that triangle, as shown in Figure 11.3. Take the delta value of the X and Y of each point, square each delta value, add them together, then take the square root, and you have the distance between the two points. Here is the formula written as pseudo-code:
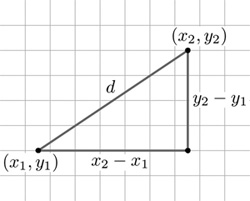
Figure 11.3. A triangle is used to calculate the distance between two points. Image courtesy of Wikipedia.
delta_x = x2 - x1
delta_y = y2 - y1
delta_x_squared = delta_x * delta_x
delta_y_squared = delta_y * delta_y
distance = square root ( delta_x_squared + delta_y_squared)
Here is a function that will meet our needs for calculating distance. This Distance() function would be most reusable if added to the Game class along with some overloaded parameters. We may also need a more specific function suited for the player’s standing position (returning the distance to another Character), so it might be helpful to also add a helper function to the Character class that also calculates distance.
public double Distance(PointF first, PointF second)
{
    float deltaX = second.X - first.X;
    float deltaY = second.Y - first.Y;
    double dist = Math.Sqrt(deltaX * deltaX + deltaY * deltaY);
    return dist;
}
But, we don’t want to just use the player’s raw X,Y position for the comparison. Remember back in Chapter 9, “Going Deeper into the Dungeon with Portals,” we had to compare the player’s foot position to see if he’s walking on a portal or not? The raw position gives the upper-left corner of the player sprite’s collision box. We need to use the same HeroFeet() function that returns an adjusted Point containing the coordinates of the player’s feet, as if the sprite is really walking on the tiled ground.
private Point HeroFeet()
{
    return new Point((int)hero.X + 32, (int)hero.Y + 32 + 16);
}
After deciding whether the player is close enough to an NPC to talk with it, the next step is to trigger a new dialogue mode in the game. We will want the rest of the game to pause while talking so nothing happens that the player would be unable to respond to in the game (like being attacked). This pause mode can be handled with a flag that causes some parts of the game to stop updating, but we will want them to be drawn. While that is happening, we do want to allow dialogue to happen, so this probably calls for a Dialogue class. But what should the class do?
The first example for this chapter, Dialogue demo 1, shows how to calculate the distance between the hero and an NPC, displays the distance, and draws a “talk radius” circle around the NPC so you can see when the character is in range. By pressing the Space key when in range, a “talking” flag is triggered. Figure 11.4 shows the example. (The code to load the vendor and player characters will be shown in the second example later in this chapter.)
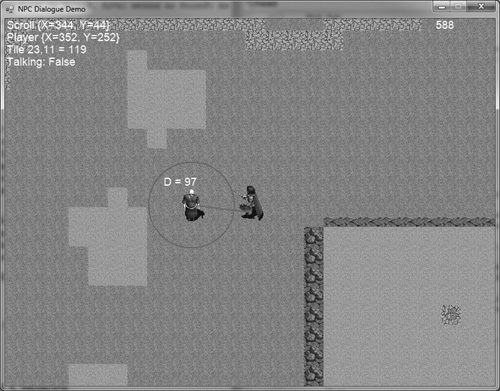
Without getting too deep into the complete source code listing, here is the key code from the first demo (there are three for this chapter). If the player is in range then the circle is drawn in blue to show that the player is in range. A line connecting both characters shows visually what the distance looks like from the precise locations from which is it calculated.
private void doVendor()
{
    float relativeX=0, relativeY=0;
    int talkRadius = 70;
    Pen color;

    //draw the vendor sprite
    if (vendor.X > level.ScrollPos.X &&
        vendor.X < level.ScrollPos.X + 23 * 32 &&
        vendor.Y > level.ScrollPos.Y &&
        vendor.Y < level.ScrollPos.Y + 17 * 32)
    {
        relativeX = Math.Abs(level.ScrollPos.X - vendor.X);
        relativeY = Math.Abs(level.ScrollPos.Y - vendor.Y);
        vendor.GetSprite.Draw((int)relativeX, (int)relativeY);
    }

    //get center of hero sprite
    PointF heroCenter = HeroFeet();
    heroCenter.X += 16;
    heroCenter.Y += 16;
    game.Device.DrawRectangle(Pens.Red, heroCenter.X - 2,
        heroCenter.Y - 2, 4, 4);

    //get center of NPC
    PointF vendorCenter = new Point((int)relativeX, (int)relativeY);
    vendorCenter.X += vendor.GetSprite.Width / 2;
    vendorCenter.Y += vendor.GetSprite.Height / 2;
    game.Device.DrawRectangle(Pens.Red, vendorCenter.X - 2,
        vendorCenter.Y - 2, 4, 4);

    double dist = Distance(heroCenter, vendorCenter);
    //draw line connecting player to vendor
    if (dist < talkRadius)
        color = new Pen(Brushes.Blue, 2.0f);
    else
        color = new Pen(Brushes.Red, 2.0f);
    game.Device.DrawLine(color, heroCenter, vendorCenter);

    //print distance
    game.Print((int)relativeX, (int)relativeY,
        "D = " + dist.ToString("NO"), Brushes.White);

    //draw circle around vendor to show talk radius
    float spriteSize = vendor.GetSprite.Width / 2;
    float centerx = relativeX + spriteSize;
    float centery = relativeY + spriteSize;
    RectangleF circleRect = new RectangleF(centerx - talkRadius,
       centery - talkRadius, talkRadius * 2, talkRadius * 2);
    game.Device.DrawEllipse(color, circleRect);

    //is playing trying to talk to this vendor?
    if (dist < talkRadius)
    {
        if (talkFlag) talking = true;
    }
    else talking = false;
}
If our game had a mystery plot that required the player to interview dozens or perhaps hundreds of NPCs to find out “who dunnit,” then we would absolutely need another game editor to handle all of the complex interactions with these NPCs, with branching dialogue trees and variables so that the NPCs remember past conversations—or at least seem to remember them. We don’t want this level of complexity for our Dungeon Crawler game. Basically, on each major area of the game, we want to have several NPCs that help the player: buying drop items, selling better gear, healing the player, and so on. These are pretty simple interactions. Since the inventory system and item editor won’t be coming along for a couple more chapters, we can’t offer up actual gear for the player to use, nor can we let the player sell drop items to the town vendors (yet). But we can get the framework in place so that these things are possible. In other words, we need a generic dialogue system with options that the player can select.
The graphical user interface (GUI) for a game is a complex subject. GUI programmers are in high demand in the game industry, as are tool programmers! So you are learning a bit of both high-demand skills here!
Continuing to think through the design considerations of our dialogue system, one assumption I’ll make now is that we will not have any complex graphical controls like scrolling lists, drop-down lists, or even anything like a scrollbar. The level of complexity for our GUI will end with buttons, and there will be a limited number of them. However, with the use of a state variable, we can create multiple levels for the dialogue system. Let’s say, first of all, there are two dialogue choices for a vendor:
BUY
SELL
If you choose the “BUY” option, then a variable is set so that a list of items for sale is displayed next. Then we just recycle the same dialogue with a different set of options (a limited list of items for sale).
Dagger
Short Sword
Barbarian Hammer
Leather Armor
Chain Armor
Plate Armor
More...
There are some limitations to this system, but with creative use of state variables you could offer an unlimited number of items by making the last button a More button that brings up a second page, and so on. One design consideration that you might want to consider is abandoning any sort of Back button in the dialogue system. I know it seems reasonable to let the player go back one level or page, but that tends to complicate things. It is easy enough to just end the dialogue and start it up again with the character, and I have seen many games take this approach.
Now that we can determine whether the player is close enough to an NPC to talk with it, the next step is to bring up a dialogue window and let the user interact with the NPC. First, we’ll incorporate the new dialogue helper functions and properties into the classes to make more effective use of them.
We can still use the distance function to find out when the player is close to an NPC, but Distance() is obviously so reusable that it must be moved into the Game class. I’ll go a step further by adding an overload. Feel free to add any other variations of the core Game functions or properties that you would find useful. This new version works with individual coordinate values for the two points passed as parameters. This new Distance function along with the previous version have been added to the Game class starting with the Dialogue demo 2 project.
public double Distance(float x1, float x2, float y1, float y2)
{
    PointF first = new PointF(x1, x2);
    PointF second = new PointF(x2, y2);
    return Distance(first, second);
}
The HeroFeet() function will work again, but it is becoming tiresome. Simple, yes, but it is not very reusable. I want a more generic version of this code actually built into the Character class. We have to make some more assumptions about the tile size used in the game, but at this point we’re set on 32x32 so I won’t be concerned with that now. The HeroFeet() function has become the Character. FootPos property. This property is also now part of the Character class (beginning with the Dialogue demo 2 project).
public PointF FootPos
{
    get { return new Point((int)this.X + 32, (int)this.Y + 32 + 16); }
}
Another helpful property that would greatly help to simplify our code is a CenterPos property for the Character class. The center of a character is its X,Y position plus its width and height, each divided by two.
public PointF CenterPos
{
    get
    {
        PointF pos = this.Position;
        pos.X += this.GetSprite.Width / 2;
        pos.Y += this.GetSprite.Height / 2;
        return pos;
    }
}
Next, we’ll incorporate the distance calculations right inside the Character class while taking into account both the foot position and the center position of the character. Some parameters are objects passed by reference, not because changes are made to them, but to avoid having the object copied to the function every time (a reference is just a pointer to the object in memory).
public double FootDistance(ref Character other)
{
    return p_game.Distance(this.FootPos, other.FootPos);
}

public double FootDistance(PointF pos)
{
    return p_game.Distance(this.FootPos, pos);
}

public double CenterDistance(ref Character other)
{
    return p_game.Distance(CenterPos, other.CenterPos);
}

public double CenterDistance(PointF pos)
{
    return p_game.Distance(this.CenterPos, pos);
}
I’m going to use the CenterPos property this time, rather than FootPos, to simplify the example code a bit and show that both techniques work equally well when you just want to know if the player is close enough to an NPC to talk to it. When the player character is within range of the NPC and the talk radius circle turns blue, then press the Space key to begin talking.
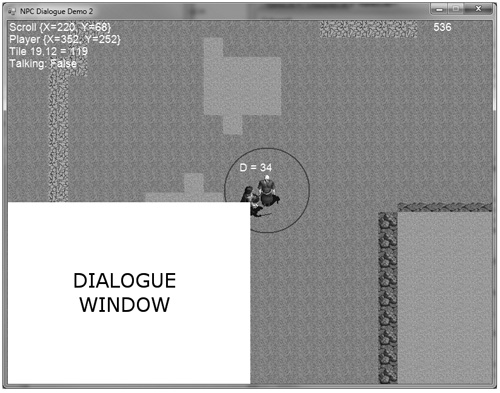
What do we want this dialogue system to look like? It needs to be simple and positioned in such a way that it doesn’t block out a large portion of the screen, but at the same time, it would be helpful to draw the dialogue interface as a window at a certain location every time. What about drawing the window at one of the four corners of the game window, depending on where the player character is located? It would be unfortunate to draw the dialogue window over the top of the player! That affects the user’s suspension of disbelief. The player wants to see his character while talking with an NPC, not interact in some sort of disembodied way. Let’s start by figuring out where the player is located and then drawing a box in an opposing corner—whichever corner is farthest from the player.
The Dialogue class will be reusable and serve many roles beyond just talking with NPCs. This will be our de facto way to communicate with the player, with either just simple messages requiring the click of an OK button to a more complex message with many choices. The Dialogue class will be self-contained, requiring very little from other classes except for Game.Device, which is needed to draw. We’re going to need to use a smaller font than the default font in the Game class. Although we have Game.SetFont() for changing that font, it will be too much of a pain to change the font back and forth after showing the dialogue text, so the dialogue system will use its own font. The dialogue window will be set up using properties and then drawn with a Draw() function, which will pause the game until the player chooses one of the options. Figure 11.5 shows a dialogue window positioned at the lower left with a size of one-quarter the screen (400x300).
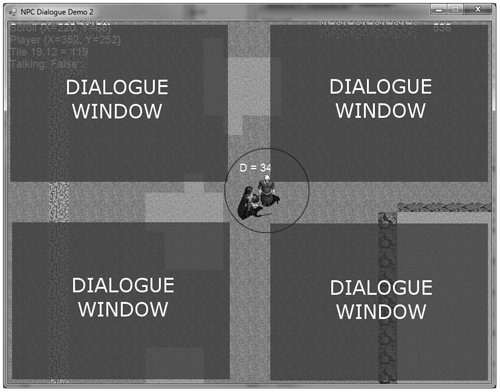
In my opinion, this window size is a bit too large, even if we give it some transparency with an alpha channel. While I would enjoy working on a resizable dialogue window, I’m not willing to get into the complexity of drawing button controls onto a variable-sized window—no, we need to keep this simple and enhance it as needed for each game. Let’s try a slightly smaller window with that alpha channel, shown in Figure 11.6. This screen mock-up shows the slightly smaller dialogue window (360x280) in the four corners. A border and shadow would certainly improve its appearance, but it already looks usable.
Hint
To create your own dialogue window with whatever level of transparency you want, use a graphic editor like GIMP or Paint.Net, create a window with the resolution you want, and then use the Opacity slider or Layer, Mask menu option to change the alpha level of the image. An alpha level of 60% looks pretty good. However, we can also just draw a filled rectangle with whatever alpha level we want at runtime so that’s probably the best solution (although it’s a bit slower).
To automatically move the dialogue to one of the corners based on the player’s position, we’ll use an enumeration:
public enum Positions
{
    UpperLeft,
    LowerLeft,
    UpperRight,
    LowerRight
}
Now, based on the player’s current position, the dialogue window will automatically reposition itself to one of the four corners farthest away from the player.
   switch (p_corner)
   {
       case Positions.UpperLeft:
           p_position = new PointF(10, 10);
           break;
       case Positions.LowerLeft:
           p_position = new PointF(10, 600 - p_size.Y - 10);
           break;
       case Positions.UpperRight:
           p_position = new PointF(800 - p_size.X - 10, 10);
           break;
       case Positions.LowerRight:
           p_position = new PointF(800 - p_size.X - 10,
                   600 - p_size.Y - 10);
           break;
   }
In our main game code, the automatic positioning of the dialogue window is handled. This could easily be moved inside the Dialogue class itself if you prefer.
   if (hero.CenterPos.X < 400)
   {
       if (hero.CenterPos.Y < 300)
           dialogue.setCorner(Dialogue.Positions.LowerRight);
       else
           dialogue.setCorner(Dialogue.Positions.UpperRight);
   } else {
       if (hero.CenterPos.Y < 300)
           dialogue.setCorner(Dialogue.Positions.LowerLeft);
       else
           dialogue.setCorner(Dialogue.Positions.UpperLeft);
   }
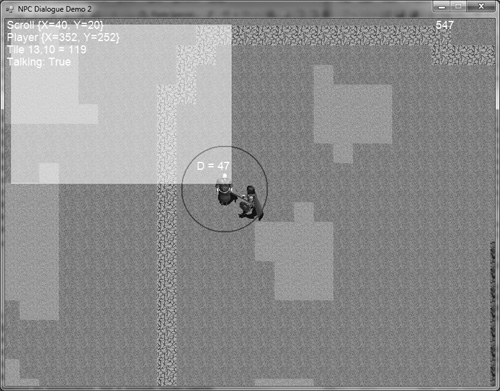
Drawing the window is done with a call to Graphics.FillRectangle(). The trick here is to create a color that contains an alpha channel at the percentage of transparency that we want. Since the color values fall in the range of 0 to 255, one easy way to calculate the alpha level is to just multiply 255 by the desired percentage like so:
   Pen pen = new Pen(Color.FromArgb((int)(255 * 0.6), 255, 255, 255));
   p_game.Device.FillRectangle(pen.Brush, p_position.X,
       p_position.Y, p_size.X, p_size.Y);
The color manipulation code is a bit tricky, because FillRectangle() doesn’t accept just a normal Color parameter, it must be a Brush. Since Pen can convert to a Brush, we can use a Pen with the desired Color components to arrive at a white rectangle with 60% alpha. The result is shown in Figure 11.7. See the example Dialogue demo 2 to see the next step.
Hint
If the dialogue window is too small for your needs, you could make a much taller window and just cause it to stay in place or allow it to automatically move from left to right instead of jumping among the four corners. A window of this type could be used for the player’s inventory system, for instance. For the dialogue system, I was thinking about keeping it smaller and using a small font.
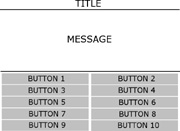
I think that’s all we need to build the dialogue window at this point. All of the items on the window will be positioned relative to the window’s position so that everything gets drawn in the right place even when the window moves. As for the interface, there will be a title, message text, and ten buttons, as shown in the design mock-up in Figure 11.8.
Let’s begin with the title. It should display the name of the character with whom you’re talking. The Title property, p_title, will be displayed in the Draw() function. To center the title on the dialogue window, we use a function called Graphics.MeasureString(), which returns the width and height of text according to the specified string and font. Using this information, we can get the width of the text and center it on the window.
SizeF size = p_game.Device.MeasureString(p_title, p_fontTitle);
int tx = (int)(p_position.X + p_size.Width / 2 - size.Width / 2);
int ty = (int)p_position.Y + 6;
p_game.Device.DrawString(p_title, p_fontTitle, Brushes.Gold, tx, ty);
Next up is the message text. This is the information an NPC wants to communicate to the player, be it for a quest or an introduction or any other purpose. We have quite a bit of room here for a lengthy message given the Arial-12 font. If you want to change the font for the title or the message, that could be done via properties. We again use Graphics.MeasureString(), but this time it is used to position multi-line text within a bounded region specified in the SizeF property layoutArea. Using the supplied dimensions, MeasureString() provides the minimum width and height needed to render the message with the specified font. It’s a very cool function!
SizeF layoutArea = new SizeF(p_size.Width, 80);
int lines = 4;
int length = p_message.Length;
size = p_game.Device.MeasureString(p_message, p_fontMessage, layoutArea,
    null, out length, out lines);
RectangleF layoutRect = new RectangleF(p_position.X + 4, p_position.Y + 34,
    size.Width, size.Height);
p_game.Device.DrawString(p_message, p_fontMessage, Brushes.White,
    layoutRect);
Now we come to the buttons, and the most difficult aspect of the user interface. However, by making some assumptions we can keep the problem under control. First of all, let me state that there is a huge amount of variation in what you could potentially do with the dialogue buttons. With the right options in the form of enumeration values and some creative code, this could be an even more versatile dialogue system than planned. But, I don’t want to go all out with it at this point—keep it functional and simple, with the knowledge that it can handle more at a later time if needed.
A helper structure is needed to manage and draw the buttons. We don’t need to be concerned with the position of each button, because they are simply enumerated and drawn in order, based on the dialogue’s properties. (A future enhancement to the user interface might require a position property for the buttons, though.) In fact, the Dialogue.Button structure doesn’t really resemble a button at all! There is no positional or dimensional information in the structure, just a text property. What gives?!
The structure is in place for future needs (such as the aforementioned features). We don’t need anything more than the text property, but putting it in a structure allows for much easier changes later.
For the first time we are actually going to use the mouse in our game code! That’s quite a statement now that we’re so heavily invested into 11 chapters, but until now we have not needed the mouse. The main form is covered up by the PictureBox that is created by the Game class and attached to the form, so we have to modify the PictureBox control in the Game class to support mouse input, oddly enough.
private Point p_mousePos;
private MouseButtons p_mouseBtn;
A new event handler is needed to support mouse input. This new function is added to the Game class and handles the events for MouseMove and MouseDown, which are both needed to get mouse movement and button clicks. The mouse event handler is created in the Game constructor with these two lines:
p_pb.MouseMove += new MouseEventHandler(p_pb_MouseInput);
p_pb.MouseDown += new MouseEventHandler(p_pb_MouseInput);
Here is the new mouse event handler in the Game class:
void p_pb_MouseInput(object sender, MouseEventArgs e)
{
    p_mousePos.X = e.X;
    p_mousePos.Y = e.Y;
    p_mouseBtn = e.Button;
}
In support of the new mouse handler are these two new properties in the Game class.
public Point MousePos
{
    get { return p_mousePos; }
    set { p_mousePos = value; }
}

public MouseButtons MouseButton
{
    get { return p_mouseBtn; }
    set { p_mouseBtn = value; }
}
Three private variables are needed to handle the buttons on the dialogue window.
private Button[] p_buttons;
private int p_numButtons;
private int p_selection;
The following code will cause the buttons to come to life when the mouse hovers over each button, and causes the Dialogue class to report which button was clicked.
public int NumButtons
{
    get { return p_numButtons; }
    set { p_numButtons = value; }
}

public void setButtonText(int index, string value)
{
    p_buttons[index].Text = value;
}

public string getButtonText(int index)
{
    return p_buttons[index].Text;
}

public Rectangle getButtonRect(int index)
{
    int i = index - 1;
    Rectangle rect = new Rectangle((int)p_position.X,
        (int)p_position.Y, 0, 0);
    rect.Width = p_size.Width / 2 - 4;
    rect.Height = (int)(p_size.Height * 0.4 / 5);
    rect.Y += (int)(p_size.Height * 0.6 - 4);
    switch (index)
    {
        case 1:
        case 3:
        case 5:
        case 7:
        case 9:
            rect.X += 4;
            rect.Y += (int)(Math.Floor((double)i / 2) *
                rect.Height);
            break;
        case 2:
        case 4:
        case 6:
        case 8:
        case 10:
            rect.X += 4 + rect.Width;
            rect.Y += (int)(Math.Floor((double)i / 2) *
                rect.Height);
            break;
    }
    return rect;
}

public int Selection
{
    get { return p_selection; }
    set { p_selection = value; }
}
Now we come to the Draw() function again. Previously, we have already added the code to draw the title and message onto the dialogue window. Now we need to write the code that draws the buttons and detects mouse movement and selection. This code is primarily based around the getButtonRect() function, which returns a Rectangle that represents the position and dimensions of the virtual button. This is then used to both draw the button and to look for mouse activity within its region.
//draw the buttons
for (int n = 1; n < p_numButtons; n++)
{
    Rectangle rect = getButtonRect(n);

    //draw button background
    Color color;
    if (rect.Contains(p_mousePos))
    {
        //clicked on this button?
        if (p_mouseBtn == MouseButtons.Left)
             p_selection = n;
        else
             p_selection = 0;

        color = Color.FromArgb(200, 80, 100, 120);
        p_game.Device.FillRectangle(new Pen(color).Brush, rect);
    }
       //draw button border
       p_game.Device.DrawRectangle(Pens.Gray, rect);

      //print button label
      size = p_game.Device.MeasureString(p_buttons[n].Text,
          p_fontButton);
      tx = (int)(rect.X + rect.Width / 2 - size.Width / 2);
      ty = rect.Y + 2;
      p_game.Device.DrawString(p_buttons[n].Text, p_fontButton,
          Brushes.White, tx, ty);
}
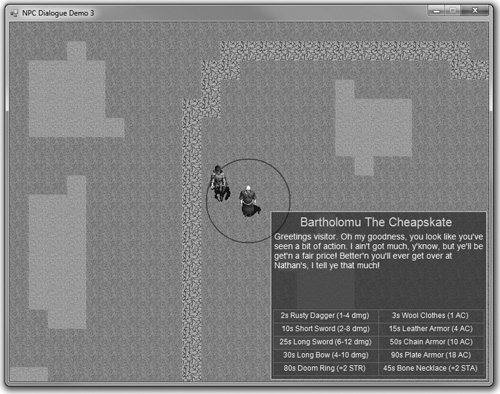
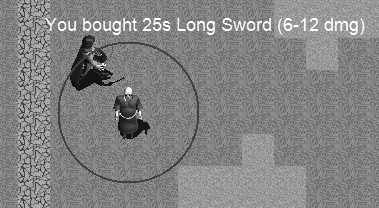
I promised to go over the source code for a complete example before ending this chapter, so we’ll do that now. There are three Dialogue demo projects that go with this chapter that you can open and study one step at a time, from the initial code to calculate distance between the characters to the opening and positioning of the dialogue window to the full user interface. Figure 11.9 shows the final GUI for the dialogue window with all of the buttons filled with sample items for purchase, while Figure 11.10 shows that the game responds to the selection after the dialogue window is closed. To save space, the using statements and the namespace will be omitted since they are now redundant.
public partial class Form1 : Form
{
    public struct keyStates
    {
        public bool up, down, left, right;
    }

    Game game;
    Level level;
    keyStates keyState;
    bool gameover = false;
    Character hero;
    Character vendor;
    bool talkFlag = false;
    bool talking = false;
    int drawLast = 0;
Dialogue dialogue;
string purchase = "";

public Form1()
{
    InitializeComponent();
}

private void Form1_Load(object sender, EventArgs e)
{
    this.Text = "NPC Dialogue Demo 3";

    //create game object
    Form form = (Form)this;
    game = new Game(ref form, 800, 600);

    //create tilemap
    level = new Level(ref game, 25, 19, 32);
    level.loadTilemap("sample.level");
    level.loadPalette("palette.bmp", 5);

    //load hero
    hero = new Character(ref game);
    hero.Load("paladin.char");
    hero.Position = new Point(400 - 48, 300 - 48);

    //load vendor
    vendor = new Character(ref game);
    vendor.Load("vendor.char");
    vendor.Position = new Point(600, 300);

    //create dialogue
    dialogue = new Dialogue(ref game);

    while (!gameover)
    {
        doUpdate();
    }
    Application.Exit();
}
  private void Form1_KeyDown(object sender, KeyEventArgs e)
  {
     switch (e.KeyCode)
     {
         case Keys.Up:
         case Keys.W : keyState.up = true; break;
         case Keys.Down:
         case Keys.S : keyState.down = true; break;
         case Keys.Left:
         case Keys.A : keyState.left = true; break;
         case Keys.Right:
         case Keys.D : keyState.right = true; break;
         case Keys.Space : talkFlag = true; break;
     }
  }

  private void Form1_KeyUp(object sender, KeyEventArgs e)
  {
     switch (e.KeyCode)
     {
         case Keys.Escape : gameover = true; break;
         case Keys.Up:
         case Keys.W : keyState.up = false; break;
         case Keys.Down:
         case Keys.S : keyState.down = false; break;
         case Keys.Left:
         case Keys.A : keyState.left = false; break;
         case Keys.Right:
         case Keys.D : keyState.right = false; break;
         case Keys.Space : talkFlag = false; break;
     }
  }

private void doUpdate()
{
     int frameRate = game.FrameRate();
     int ticks = Environment.TickCount;
     if (ticks > drawLast + 16)
     {
         drawLast = ticks;
         doScrolling();
         doHero();
         doVendor();
         doDialogue();
         if (purchase != "")
         {
             game.Print((int)hero.Position.X, (int)hero.Position.Y,
                 purchase, Brushes.White);
         }

         game.Update();
         Application.DoEvents();
     }
    else Thread.Sleep(1);
}

private void doScrolling()
{
    //move the tilemap scroll position
    int steps = 4;
    PointF pos = level.ScrollPos;

    //up key movement
    if (keyState.up)
    {
        if (hero.Y > 300 - 48) hero.Y -= steps;
        else
        {
             pos.Y -= steps;
             if (pos.Y <= 0) hero.Y -= steps;
        }
    }
    //down key movement
    else if (keyState.down)
    {
        if (hero.Y < 300 - 48) hero.Y += steps;
        else
        {
             pos.Y += steps;
             if (pos.Y >= (127 - 19) * 32) hero.Y += steps;
           }
        }

        //left key movement
        if (keyState.left)
        {
             if (hero.X > 400 - 48) hero.X -= steps;
             else
             {
                pos.X -= steps;
                if (pos.X <= 0) hero.X -= steps;
             }
        }

        //right key movement
        else if (keyState.right)
        {
            if (hero.X < 400 - 48) hero.X += steps;
            else
            {
                pos.X += steps;
                if (pos.X >= (127 - 25) * 32) hero.X += steps;
            }
        }

        //update scroller position
        level.ScrollPos = pos;
        level.Update();

        //draw the tilemap
        level.Draw(0, 0, 800, 600);
   }

   private void doHero()
   {
        //limit player sprite to the screen boundary
        if (hero.X < -32) hero.X = -32;
        else if (hero.X > 800 - 65) hero.X = 800 - 65;

        if (hero.Y < -48) hero.Y = -48;
        else if (hero.Y > 600 - 81) hero.Y = 600 - 81;
        //orient the player in the right direction
        if (keyState.up && keyState.right) hero.Direction = 1;
        else if (keyState.right && keyState.down) hero.Direction = 3;
        else if (keyState.down && keyState.left) hero.Direction = 5;
        else if (keyState.left && keyState.up) hero.Direction = 7;
        else if (keyState.up) hero.Direction = 0;
        else if (keyState.right) hero.Direction = 2;
        else if (keyState.down) hero.Direction = 4;
        else if (keyState.left) hero.Direction = 6;
        else hero.Direction = -1;

        //draw the hero
        hero.Draw();
    }

    private void doVendor()
    {
       float relativeX=0, relativeY=0;
       int talkRadius = 70;
       Pen color;

       //draw the vendor sprite
       if (vendor.X > level.ScrollPos.X &&
           vendor.X < level.ScrollPos.X + 23 * 32 &&
           vendor.Y > level.ScrollPos.Y &&
           vendor.Y < level.ScrollPos.Y + 17 * 32)
       {
           relativeX = Math.Abs(level.ScrollPos.X - vendor.X);
           relativeY = Math.Abs(level.ScrollPos.Y - vendor.Y);
           vendor.GetSprite.Draw((int)relativeX, (int)relativeY);
       }

       //get center of hero sprite
       PointF heroCenter = hero.FootPos;
       heroCenter.X += 16;
       heroCenter.Y += 16;
       game.Device.DrawRectangle(Pens.Red, heroCenter.X - 2,
           heroCenter.Y - 2, 4, 4);
       //get center of NPC
       PointF vendorCenter = new Point((int)relativeX, (int)relativeY);
       vendorCenter.X += vendor.GetSprite.Width / 2;
       vendorCenter.Y += vendor.GetSprite.Height / 2;
       game.Device.DrawRectangle(Pens.Red, vendorCenter.X - 2,
           vendorCenter.Y - 2, 4, 4);

       double dist = game.Distance(heroCenter, vendorCenter);

       //get distance to the NPC and draw a line
       if (dist < talkRadius)
           color = new Pen(Brushes.Blue, 2.0f);
       else
           color = new Pen(Brushes.Red, 2.0f);
       game.Device.DrawLine(color, heroCenter, vendorCenter);

       //print distance
       game.Print((int)relativeX, (int)relativeY,
          "D = " + dist.ToString("NO"), Brushes.White);

       //draw circle around vendor to show talk radius
       float spriteSize = vendor.GetSprite.Width / 2;
       float centerx = relativeX + spriteSize;
       float centery = relativeY + spriteSize;
       RectangleF circleRect = new RectangleF(centerx - talkRadius,
           centery - talkRadius, talkRadius * 2, talkRadius * 2);
       game.Device.DrawEllipse(color, circleRect);

       //is playing trying to talk to this vendor?
       if (dist < talkRadius)
       {
            if (talkFlag) talking = true;
       }
       else talking = false;
   }

    private void doDialogue()
   {
       if (!talking) return;
       //prepare the dialogue
       dialogue.Title = "Bartholomu The Cheapskate";
       dialogue.Message = "Greetings visitor. Oh my goodness, you look " +
           "like you've seen a bit of action. I ain't got much, y'know, " +
           "but ye'll be get'n a fair price! Better'n you'll ever get " +
           "over at Nathan's, I tell ye that much!";
       dialogue.setButtonText(1, "2s Rusty Dagger (1-4 dmg)");
       dialogue.setButtonText(2, "3s Wool Clothes (1 AC)");
       dialogue.setButtonText(3, "10s Short Sword (2-8 dmg)");
       dialogue.setButtonText(4, "15s Leather Armor (4 AC)");
       dialogue.setButtonText(5, "25s Long Sword (6-12 dmg)");
       dialogue.setButtonText(6, "50s Chain Armor (10 AC)");
       dialogue.setButtonText(7, "30s Long Bow (4-10 dmg)");
       dialogue.setButtonText(8, "90s Plate Armor (18 AC)");
       dialogue.setButtonText(9, "80s Doom Ring (+2 STR)");
       dialogue.setButtonText(10, "45s Bone Necklace (+2 STA)");

       //reposition dialogue window
       if (hero.CenterPos.X < 400)
       {
            if (hero.CenterPos.Y < 300)
                dialogue.setCorner(Dialogue.Positions.LowerRight);
            else
                dialogue.setCorner(Dialogue.Positions.UpperRight);
       } else {
            if (hero.CenterPos.Y < 300)
                dialogue.setCorner(Dialogue.Positions.LowerLeft);
            else
                dialogue.setCorner(Dialogue.Positions.UpperLeft);
        }

        //draw dialogue and look for selection
        dialogue.updateMouse(game.MousePos, game.MouseButton);
        dialogue.Draw();
        if (dialogue.Selection > 0)
        {
             talking = false;
             purchase = "You bought " + dialogue.getButtonText(
                 dialogue.Selection);
             dialogue.Selection = 0;
        }
        else purchase = "";
   }
}
This was a heavy-hitting chapter that covered some tough new material, but it was absolutely necessary and we ended up with a powerful new user interface class that can be used for many different parts of the Dungeon Crawler game. Speaking of which, in the very next chapter, it will be time to learn about fighting, gaining experience, and leveling! We have a few minor things to fix by the time we get to the final game in the last chapter, such as character sprites jumping a bit as we near the edge of the level, but it’s nothing that a little extra code won’t fix.