This chapter focuses on the development of an item editor to make creating and managing game items (such as swords, armor pieces, rings, and other gear found in a typical RPG) easier for a designer. We will also build a looting system so that monsters will drop gold and gear items at random when they fall, and a simple inventory screen that allows the player to equip items and move items around in their “bag of loot.” If you have ever tried to create an RPG without an editor like this, I’m sure you ran into the same roadblock that I have when it comes to working with items. Just giving the player a sword tends to be a hard-coded, manual process, with less than favorable results. Even just storing items in a text file and reading them in is better than manually creating arrays of items in code, unless your game is on the extremely simple side with just “hack & slash” gameplay without much depth. Since our goal is to send the player on quests before we finish this book, having items that satisfy the quests is essential! For an example of how the item data is used, we’ll put that on hold until the next chapter and just focus on editing in this one.
Here’s what we’ll cover in this chapter:
Some role-playing games are so focused on inventory micro-management that they lose track of the fun factor and replace real gameplay with an almost never-ending job of sorting and dealing with stuff (also called “loot”). I’ve seen some RPGs allow the player to carry around tons of stuff (I mean literally thousands of pounds of items)! This is, of course, completely ridiculous. But some players like micro-management. I guess there’s room for those types of games, as long as there are players for them. I’ve always been a fan of the simpler approach—giving the player simple weapon, armor, and modifier items. Why should the player spend hours of game time swapping armor items when a single suit of armor would be easier to deal with? (Some games allow you to configure chest, leggings, helmet, bracers, and so on, individually.) There’s certainly some realism in this, but does it make a game more fun?
The item editor is a bit different from the character editor that we developed back in Chapter 10. While characters are stored one per .char file, many items are stored in a .item file. The editor has a File menu, which allows you to start a new item database, load an existing file, or save the current file to a new file. The item editor is shown in Figure 13.1.
The editor was designed to work with groups of items in a file. The example shown here contains some weapons and armor items, but it would be better to organize the items into separate groups (weapons, armor, rings, etc.) so that it’s easier to manage and search for specific items. Another approach is to just store everything in a single item database, which is perfectly okay but it’s just harder to find and edit items when there are so many in a single file.
This editor does make it possible for players to cheat on your game. By giving the filenames a different extension besides .xml, we can at least hide the data from casual wanna-be hackers, but anyone with bare minimum skills will try opening the .item file in a text editor and immediately see that it is an editable text file containing .xml tables. There are ways to get around this problem, but that subject is beyond the scope of this book. Experience has shown me that for players who want to hack a game file, whether it’s a core database or a saved game, no effort short of hard encryption will prevent them from doing so. If someone wants to hack your game that badly, take it as a compliment.
The item editor works with just single-frame bitmaps, with support for two versions for each item: a drop image and an inventory image. The drop image is usually smaller and oriented with the ground tiles, while the inventory image is often oriented straight-on so it looks better in an inventory screen (the player’s equipment). Neither image is suitable for both purposes. If you try to use the inventory image as a drop item, it will look funny on the ground at the wrong angle. However, one alternative is to bring up a “loot window” showing the contents of an item rather than dropping items directly onto the ground. A loot window does eliminate quite a bit of work since we do not need to keep track of two different images in addition to the added code to allow the player to pick up items on the ground.
An advantage to the ground image is that you can place individual items anywhere in the dungeon level for the player to find. But, due to the extra work required, I think most designers would rather have their artists working on new gameplay art rather than extra drop images. This is why in most games you’ll most often find crates and boxes rather than usable items in the dungeon. Since we have both versions of the artwork for every item from Reiner, we can use them with the item editor. Just note that both are not absolutely necessary and it’s acceptable to just use the inventory version, as long as you have a loot window come up in the game whenever the player opens a container. I kind of like the realism added when items drop to the ground when an NPC falls in combat (maybe even add the dramatic effect of having the items scatter around the body randomly). Since it’s fairly common to “loot the corpse” in most computer RPGs, use whichever method you want in your own game since the artwork is available.
What if we were to add multiple image frame support to the item editor, so that batches of item artwork could be stored on a sprite sheet? That’s a distinct possibility. At the very least, we could store both the drop and inventory image together in a two-frame image. The problem is, the artwork is not all uniform in size, with the drop items being somewhat smaller (in Reiner’s). Sure, you could enlarge the images to a fixed size all around, but will that save time in the long run versus just adding both image filenames into the item editor fields?
There is the additional problem of having literally hundreds of asset files in the game’s folder. The limited set of item images used so far already accounts for a large number of files cluttering the game’s main folder. A definite improvement would be to store the images in a sub-folder like .assets under the main folder, and then prefix all of the image filenames stored in the item editor database with .assets. So, a filename field such as “drop plate 1.png” would become “.assets drop plate 1.png.” You can do any such manipulation in the game code while loading these assets.
I wanted to use an auto-increment identifier for each item in the item editor database and then use the ID in quests and in the player’s inventory. But, though an identifier-based database is required for a professional project, it’s not the best choice for an amateur game with multi-purpose tools like what we have for the Dungeon Crawler game. Instead of using an ID, the Item.Name property will be used to look up the data for an item. All that is required to make this work effectively is to ensure that your items each have a unique name. If you want to have three rings called “Magic Ring,” be sure to add a qualifier to the name like “Magic Ring +1” or something to uniquely identify each item. Since the name is the lookup field, the first item matching the name will be used in a lookup.
As with the previous level editor and character editor, the new item editor includes a class (called Item) that makes the data available to our game. The Item class is meant to handle a single item from the editor database (which is stored in an XML file). In our game code, we will need to load the .item file with additional code and then use the Item class for each item that is loaded. In other words, there is no overall “Items” class that loads an entire .item file, saved by the editor, and makes those items available to the game. Perhaps there should be?
public class Item
{
      private string p_name;
      private string p_desc;
      private string p_dropfile;
      private string p_invfile;
      private string p_category;
      private float p_weight;
      private float p_value;
      private int p_attacknumdice;
      private int p_attackdie;
      private int p_defense;
      private int p_buffStr;
      private int p_buffDex;
      private int p_buffSta;
      private int p_buffInt;
      private int p_buffCha;

      public Item()
      {
      p_name = "new item";
            p_desc = "";
            p_dropfile = "";
            p_invfile = "";
            p_category = "";
            p_weight = 0;
            p_value = 0;
            p_attacknumdice = 0;
            p_attackdie = 0;
            p_defense = 0;
            p_buffStr = 0;
            p_buffDex = 0;
            p_buffSta = 0;
            p_buffInt = 0;
            p_buffCha = 0;
      }

      public string Name
      {
            get { return p_name; }
            set { p_name = value; }
      }

      public string Description
      {
            get { return p_desc; }
            set { p_desc = value; }
      }

      public string DropImageFilename
      {
            get { return p_dropfile; }
            set { p_dropfile = value; }
      }

      public string InvImageFilename

      {
            get { return p_invfile; }
            set { p_invfile = value; }
      }

      public string Category
      {
            get { return p_category; }
            set { p_category = value; }
      }

      public float Weight
      {
            get { return p_weight; }
            set { p_weight = value; }
      }

      public float Value
      {
            get { return p_value; }
            set { p_value = value; }
      }

      public int AttackNumDice
      {
            get { return p_attacknumdice; }
            set { p_attacknumdice = value; }
      }

      public int AttackDie
      {
            get { return p_attackdie; }
            set { p_attackdie = value; }
      }

      public int Defense
      {
            get { return p_defense; }
            set { p_defense = value; }
      }

      public int STR
      {
            get { return p_buffStr; }
            set { p_buffStr = value; }
      }

      public int DEX
      {
            get { return p_buffDex; }
            set { p_buffDex = value; }
      }

      public int STA
      {
            get { return p_buffSta; }
            set { p_buffSta = value; }
      }

      public int INT
      {
            get { return p_buffInt; }
            set { p_buffInt = value; }
      }

      public int CHA
      {
            get { return p_buffCha; }
            set { p_buffCha = value; }
      }

      public string Summary
      {
        get {
            string text = "This '" + p_name + "', ";

            string weight = "";
            if (p_weight > 50) weight = "a very heavy ";
            else if (p_weight > 25) weight = "a heavy ";
            else if (p_weight > 15) weight = "a ";
            else if (p_weight > 7) weight = "a light ";

            else if (p_weight > 0) weight = "a very light ";
            text += weight;

            if (p_category == "Weapon") text += "weapon";
            else if (p_category == "Armor") text += "armor item";
            else if (p_category == "Necklace") text += "necklace";
            else if (p_category == "Ring") text += "ring";
            else text += p_category.ToLower() + " item";

            if (p_attacknumdice != 0)
            {
                text += ", attacks at " + p_attacknumdice.ToString()
                    + "D" + p_attackdie.ToString()
                    + " (" + p_attacknumdice.ToString() + " - "
                    + (p_attackdie * p_attacknumdice).ToString()
                    + " damage)";
            }

            if (p_defense != 0)
                text += ", adds " + p_defense.ToString() +
                    " armor points";

            string fmt = "+#;-#";
            if (p_buffStr != 0)
                text += ", " + p_buffStr.ToString(fmt) + " STR";

            if (p_buffDex != 0)
                text += ", " + p_buffDex.ToString(fmt) + " DEX";

            if (p_buffSta != 0)
                text += ", " + p_buffSta.ToString(fmt) + " STA";

            if (p_buffInt != 0)
                text += ", " + p_buffInt.ToString(fmt) + " INT";

            if (p_buffCha != 0)
                text += ", " + p_buffCha.ToString(fmt) + " CHA";

            return text + ".";
    }

    }

    public override string ToString()
    {
        return p_name;
    }
}
Like the character editor from a few chapters back, the item editor was created with Visual Basic. (The only editor written in C# is the level editor.) The item editor is completely self-contained and it can create new item files from scratch as well as edit existing files. One nice feature is auto-save: while editing items, if you click on a different item in the list or close the editor, the current item is automatically saved. This takes out some of the tedium from editing a large number of items—just point, click, and edit, without concern for saving at every step.
Obviously, there is a form filled with controls that are not listed here, because the user interface is too complex to build from scratch (as in a tutorial-style walkthrough). The complete source code for the item editor is available in the project in the chapter resources.
There are two ways to handle looting: by dropping items directly on the ground, or by opening up a loot window from a dead monster or container (such as a treasure chest). Since we’re already heavily invested in code for the inventory manager (coming up later in the chapter), I will forego the loot window and instead just drop items directly on the ground for pickup. We can treat drop items in the game code like monsters as far as range and targeting are concerned—when an item is in range, we can highlight it with a colored circle. Yes, there is a slight conflict when there are many items on top of each other or when a monster is in the way, but we can assume the player will clear out any bad guys from the immediate vicinity before looting. Both attacking and looting will use the Space key so it’s just a matter of whether a loot item or a monster is closer in range.
For the Looting demo, I have removed all living monsters and just dropped items randomly near the player’s start position to speed up the demo a bit. In the finished game coming up two chapters from now, we will use this code to drop random items directly on the ground when a monster dies. The code already does this, but in the interest of speeding up testing of the inventory system, as the monsters are created, they are immediately killed so that the loot can be dropped (which is unfair, I know, but necessary for the sake of this important research!).
Hint
There are quite a few reusable functions in the Form1 code of the Looting demo in this chapter that can be moved inside the Game class once we’re confident that they’re working correctly. It is sometimes better to keep uncertain code close at hand while working on it for quick editing without searching through your project’s classes. Remember, we aren’t going over every line of code, so consider this chapter an overview, not a tutorial.
We need four variables to get started. As you can see, the item database is handled by a single class, Items, which we’ll go over shortly. DrawableItem is a simple structure that extends Item in order to make it drawable. You could easily make the argument that this should be a class that inherits from Item, and I might agree with you—this is just one of those times where a structure seemed easier, and it works just as well in the end.
public struct DrawableItem
{
    public Item item;
    public Sprite sprite;
}

bool lootFlag = false;
List<DrawableItem> treasure;
int lootTarget = 0;
Items items;
The treasure object is created as a linked list of DrawableItem structures. A linked list is an advanced container that we can go through with the ForEach looping statement, and it’s more convenient than an array because we can add as many items to it as we want.
treasure = new List<DrawableItem>();
The items variable is created and initialized in the main program startup code as well.
items = new Items();
if (!items.Load("items.item"))
{
    MessageBox.Show("Error loading file items.item");
    Application.Exit();
}
The Inventory variable is actually found inside Game and is declared with public scope so it’s visible anywhere in the game. We need to access the player’s inventory easily so that is why I put it in the Game class.
public Inventory Inven;
Despite being found in Game, the Inven variable is initialized in our main program, not in the Game constructor. This is also where default items can be added to the player’s inventory, such as the items listed here. Perhaps in the final game, when the player creates a new character, some items will be added based on their class? Another common approach is to make the player earn gear from the start, and give him basically just a dagger and rags to wear. I gave the player these four items for testing purposes, but it demonstrates the power of the Items class, because sure enough, these four items show up in the inventory screen.
game.Inven = new Inventory(ref game, new Point((800 - 532) / 2, 50));
game.Inven.AddItem(items.getItem("Iron Chainmail"));
game.Inven.AddItem(items.getItem("Long Sword"));
game.Inven.AddItem(items.getItem("Small Shield"));
game.Inven.AddItem(items.getItem("Cape of Stamina"));
To add sample piles of loot for testing the inventory system, I just use a real .char file with the loot properties set and then immediately kill the monster that would have been visible in the game world (i.e., the dungeon). There are a pair of functions that make this all possible (and fairly automatic too, thanks to the Items class). The number of loot piles is not that important; I just used 20 and positioned them all within close range of the player’s starting location.
for (int n=1; n<21; n++)
{
    Character monster = new Character(ref game);
    monster.Load("skeleton sword shield.char");
    monster.Position = new Point(game.Random(100,1200),
        game.Random(100,1200));
    monster.AnimationState = Character.AnimationStates.Dead;
    monster.Alive = false;
    //add some loot
    DropLoot(ref monster);
}
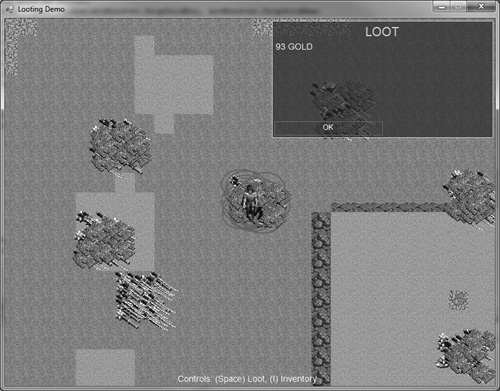
The doTreasure() function in the Looting demo project should look very familiar! It’s essentially the same as the doMonsters() function from the previous chapter! There are a few differences, of course, because we don’t actually fight with treasure, we pick it up. So, instead of a variable called fightRadius, we have lootRadius, and instead of monsterCenter, we have itemCenter. The logic is somewhat complex, though. I didn’t want to make it overly complex, but it just turned out that way, mainly because of the way in which dialogue works. We usually can’t just say, “Show this message to the player” and then forget about it—we have to wait for the player to click a button and then hide the dialogue window. Figure 13.2 shows a bunch of gold on the ground with one highlighted under the player’s feet. An interesting side effect of this code is that you can loot many items without having to close the window (with the OK button), and it will just display the name of the next item looted.
Figure 13.3 is the message displayed (via the Dialogue class) when the player picks up gold. Gold is a special case that must be handled differently than regular items because it is not added to inventory, just to the Player.Gold property.

The second condition in doTreasure() occurs when the player is standing over a real item that can be picked up. When that is the case (rather than gold), a message displays information about the item. Do you recall the Item.Summary property from Chapter 12? We use it to display a quick tidbit of information about the item with any buffs it provides the player and any attack or defense values. This handy property works great here as well, telling the player at a glance what the item can do for him. Figure 13.4 shows the message after picking up an item. Note that this is the item shown in the character editor file as a drop item!
Here is the doTreasure() function. Fortunately, there are a lot of code comments so you should be able to make out what each section of code does. Just remember that this function looks at all of the items in the treasure container (funny variable names, don’t you think?). Another interesting aspect of this code is that it prevents the player from picking up any more items if inventory is full! How cool is that? And we’re still at the prototype stage for this inventory thing.
private void doTreasure()
{
    PointF relativePos = new PointF(0,0);
    const int lootRadius = 40;

    PointF heroCenter = game.Hero.CenterPos;
    PointF itemCenter = new PointF(0,0);
    double dist;

    foreach (DrawableItem it in treasure)
    {
        //is item in view?
        if (it.sprite.X > level.ScrollPos.X - 64
            && it.sprite.X < level.ScrollPos.X + 23 * 32 + 64
            && it.sprite.Y > level.ScrollPos.Y - 64
            && it.sprite.Y < level.ScrollPos.Y + 17 * 32 + 64)
        {
            //get relative position of item on screen
            relativePos.X = it.sprite.X - level.ScrollPos.X;

            relativePos.Y = it.sprite.Y - level.ScrollPos.Y;

            //get center of item
            itemCenter = relativePos;
            itemCenter.X += it.sprite.Width / 2;
            itemCenter.Y += it.sprite.Height / 2;

            //get distance to the item
            dist = game.Hero.CenterDistance(itemCenter);

            //is player trying to pick up this loot?
            if (dist < lootRadius)
            {
                game.Device.DrawEllipse(new Pen(Color.Magenta, 2),
                    itemCenter.X - it.sprite.Width / 2,
                    itemCenter.Y - it.sprite.Height / 2,

                    it.sprite.Width, it.sprite.Height);

            if (lootFlag)
            {
                //collect gold or item
                    if (it.item.Name == "gold" && it.item.Value > 0)
                    {
                         game.Hero.Gold += (int)it.item.Value;
                         treasure.Remove(it);
                         showDialogue("LOOT", it.item.Value.ToString() +
                             " GOLD", "OK");
                    }
                    else
                    {
                         if (game.Inven.AddItem(it.item))
                         {
                             treasure.Remove(it);
                             showDialogue("LOOT", it.item.Summary, "OK");
                         }
                         else
                             showDialogue("OVERLOADED!", "You are overloaded" +
                                 " with too much stuff!", "OK");
                     }

                     //wait for user
                     if (dialogue.Selection == 1)
                     {
                         lootFlag = false;
                         dialogue.Selection = 0;
                     }
                     break;
                  }
             }
             //draw the monster sprite
             it.sprite.Draw((int)relativePos.X, (int)relativePos.Y);
        }
    }
}
The Items class is a helper class to handle the items database. The Items class reads in the entire .item file and is used to drop items when a monster is killed, as well as to show items in the player’s inventory. So, this class is very important—it keeps our main code tidy by providing a very useful helper function called getItem(). When creating an object using this class during program initialization, be sure to use Load() to load the .item file needed by the game. This should be the same .item file you used to specify drop items in the character editor.
public class Items
{
    //keep public for easy access
    public List<Item> items;

   public Items()
   {
       items = new List<Item>();
   }

   private string getElement(string field, ref XmlElement element)
   {
       string value = "";
       try
       {
           value = element.GetElementsByTagName(field)[0].InnerText;
       }
       catch (Exception){}
       return value;
   }

       public bool Load(string filename)
   {
           try
       {
            //open the xml file
            XmlDocument doc = new XmlDocument();
            doc.Load(filename);
            XmlNodeList list = doc.GetElementsByTagName("item");
            foreach (XmlNode node in list)

       {
            //get next item in table
            XmlElement element = (XmlElement)node;
            Item item = new Item();

            //store fields in new Item
            item.Name = getElement("name", ref element);
            item.Description = getElement("description", ref element);
            item.DropImageFilename = getElement("dropimagefilename",
                ref element);
            item.InvImageFilename = getElement("invimagefilename",
                ref element);
            item.Category = getElement("category", ref element);
            item.Weight = Convert.ToSingle(getElement("weight",
                ref element));
            item.Value = Convert.ToSingle(getElement("value",
                ref element));
            item.AttackNumDice = Convert.ToInt32(getElement(
                "attacknumdice", ref element));
            item.AttackDie = Convert.ToInt32(getElement("attackdie",
                ref element));
            item.Defense = Convert.ToInt32(getElement("defense",
                ref element));
            item.STR = Convert.ToInt32(getElement("STR", ref element));
            item.DEX = Convert.ToInt32(getElement("DEX", ref element));
            item.STA = Convert.ToInt32(getElement("STA", ref element));
            item.INT = Convert.ToInt32(getElement("INT", ref element));
            item.CHA = Convert.ToInt32(getElement("CHA", ref element));

            //add new item to list
            items.Add(item);
        }
    }
    catch (Exception) { return false; }
    return true;
}

public Item getItem(string name)
{
    foreach (Item it in items)

    {
        if (it.Name == name) return it;
    }
    return null;
}
}
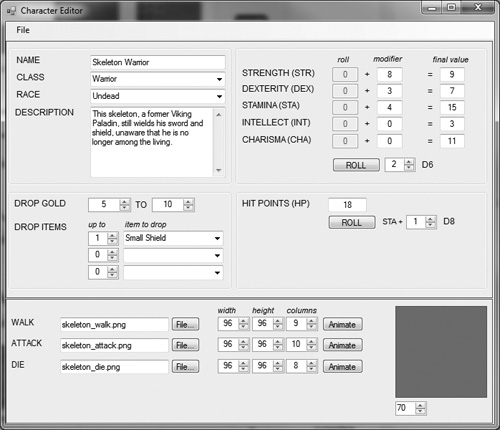
A slightly improved character editor is needed for this chapter. Do you remember the three drop-item fields that have gone unused so far? Now we can finally enable those three drop-down combo list controls and fill them with items from the item database. This is where things start to get very interesting! I’ll show you the results in a bit. Some changes have been made to the Character class to support the three drop-item fields that are now functional. Check Character.cs to see the complete new class. Because of these changes, .char files saved with the old version of the character editor will generate an error. Please use the new character editor to save any characters you have created into the new format. Figure 13.5 shows the new character editor. Well, it’s the same old editor, but with the three item-drop fields now working! Take a look at the item name and quantity: one “Small Shield.”
Take note of this, as I’ll show you this item in the game shortly. Take note also of the gold fields: minimum (5) to maximum (10). This is the random amount of gold that this monster will drop when killed. You can use any amount you want here, but just be sure that dropped gold is consistent with item prices at vendors that will be selling the player gear (and buying their drop items, most likely, as well). If your most awesome epic sword costs 250 gold, and the typical skeleton warrior drops 10–20 gold, then the player will be earning enough to buy the best weapon in the game within just a few minutes! I think many monsters will need to be set to a gold range of 0 to 1, so that only one gold is dropped 25 percent of the time. (In the item-drop code, a random number makes sure that items only drop at this rate—and that might even be too high! This is one of those factors that may need to be adjusted when gameplay testing reveals that monsters are dropping way too much gear, making the player rich very quickly. You want the player to struggle! If the game becomes too easy too fast, your player will become bored with it.)
Here is the new code in the updated Character class (note changes in bold):
public class Character
{
    public enum AnimationStates
    {
        Walking = 0,
        Attacking = 1,
        Dying = 2,
        Dead = 3,
        Standing = 4
    }

    private Game p_game;

    private PointF p_position;
    private int p_direction;
    private AnimationStates p_state;

    //character file properties;
    private string p_name;
    private string p_class;
    private string p_race;
    private string p_desc;
    private int p_str;
    private int p_dex;
    private int p_sta;
    private int p_int;
    private int p_cha;
    private int p_hitpoints;
    private int p_dropGold1;
    private int p_dropGold2;
    private string p_walkFilename;
    private Sprite p_walkSprite;
    private Size p_walkSize;
    private int p_walkColumns;
    private string p_attackFilename;
    private Sprite p_attackSprite;
    private Size p_attackSize;
    private int p_attackColumns;
    private string p_dieFilename;
    private Sprite p_dieSprite;
    private Size p_dieSize;
    private int p_dieColumns;
    private int p_experience;
    private int p_level;
    private bool p_alive;
    private int p_dropnum1;
    private int p_dropnum2;
    private int p_dropnum3;
    private string p_dropitem1;
    private string p_dropitem2;
    private string p_dropitem3;

    public Character(ref Game game)
{
    p_game = game;
    p_position = new PointF(0, 0);
    p_direction = 1;
    p_state = AnimationStates.Standing;

    //initialize loadable properties
    p_name = "";
    p_class = "";
    p_race = "";
    p_desc = "";
    p_str = 0;
    p_dex = 0;
    p_sta = 0;
    p_int = 0;
    p_cha = 0;
    p_hitpoints = 0;
    p_dropGold1 = 0;
    p_dropGold2 = 0;
    p_walkSprite = null;
    p_walkFilename = "";
    p_walkSize = new Size(0, 0);
    p_walkColumns = 0;
    p_attackSprite = null;
    p_attackFilename = "";
    p_attackSize = new Size(0, 0);
    p_attackColumns = 0;
    p_dieSprite = null;
    p_dieFilename = "";
    p_dieSize = new Size(0, 0);
    p_dieColumns = 0;
    p_experience = 0;
    p_level = 1;
    p_dropnum1 = 0;
    p_dropnum2 = 0;
    p_dropnum3 = 0;
    p_dropitem1 = "";
    p_dropitem2 = "";
    p_dropitem3 = "";
}

    ...  //**** note: some code was omitted here ***

    public int DropNum1
    {
        get { return p_dropnum1; }
        set { p_dropnum1 = value; }
    }

    public int DropNum2
    {
        get { return p_dropnum2; }
        set { p_dropnum2 = value; }
    }

    public int DropNum3
    {
        get { return p_dropnum3; }
        set { p_dropnum3 = value; }
    }

    public string DropItem1
    {
        get { return p_dropitem1; }
        set { p_dropitem1 = value; }
    }

    public string DropItem2
    {
        get { return p_dropitem2; }
        set { p_dropitem2 = value; }
    }

    public string DropItem3
    {
        get { return p_dropitem3; }
        set { p_dropitem3 = value; }
    }

    ...  //**** note: some code was omitted here ***

    public void Draw(int x, int y)
    {
        int startFrame, endFrame;
        switch (p_state)
        {
            case AnimationStates.Standing:
                p_walkSprite.Position = p_position;
                if (p_direction > -1)
                {
                    startFrame = p_direction * p_walkColumns;
                    endFrame = startFrame + p_walkColumns - 1;
                    p_walkSprite.CurrentFrame = endFrame;
                }
                    p_walkSprite.Draw(x,y);
                    break;

                case AnimationStates.Walking:
                    p_walkSprite.Position = p_position;
                    if (p_direction > -1)
                    {
                        startFrame = p_direction * p_walkColumns;
                        endFrame = startFrame + p_walkColumns - 1;
                        p_walkSprite.AnimationRate = 30;
                        p_walkSprite.Animate(startFrame, endFrame);
                     }
                     p_walkSprite.Draw(x,y);
                     break;

                 case AnimationStates.Attacking:
                     p_attackSprite.Position = p_position;
                     if (p_direction > -1)
                     {
                         startFrame = p_direction * p_attackColumns;
                         endFrame = startFrame + p_attackColumns - 1;
                         p_attackSprite.AnimationRate = 30;
                         p_attackSprite.Animate(startFrame, endFrame);
                     }
                     p_attackSprite.Draw(x,y);
                     break;

              case AnimationStates.Dying:
                  p_dieSprite.Position = p_position;
                  if (p_direction > -1)
                  {
                      startFrame = p_direction * p_dieColumns;
                      endFrame = startFrame + p_dieColumns - 1;
                      p_dieSprite.AnimationRate = 30;
                      p_dieSprite.Animate(startFrame, endFrame);
                  }
                  p_dieSprite.Draw(x,y);
                  break;

              case AnimationStates.Dead:
                  p_dieSprite.Position = p_position;
                  if (p_direction > -1)
                 {
                      startFrame = p_direction * p_dieColumns;
                      endFrame = startFrame + p_dieColumns-1;
                      p_dieSprite.CurrentFrame = endFrame;
                 }
                 p_dieSprite.Draw(x,y);
                 break;
    }
}

    ...//**** note: some code was omitted here ***

public bool Load(string filename)
    {
    try
    {
         //open the xml file
         XmlDocument doc = new XmlDocument();
         doc.Load(filename);
         XmlNodeList list = doc.GetElementsByTagName("character");
         XmlElement element = (XmlElement)list[0];

         //read data fields
         string data;
         p_name = getElement("name", ref element);

         p_class = getElement("class", ref element);
         p_race = getElement("race", ref element);
         p_desc = getElement("desc", ref element);

         data = getElement("str", ref element);
         p_str = Convert.ToInt32(data);

         data = getElement("dex", ref element);
         p_dex = Convert.ToInt32(data);

         data = getElement("sta", ref element);
         p_sta = Convert.ToInt32(data);

         data = getElement("int", ref element);
         p_int = Convert.ToInt32(data);

         data = getElement("cha", ref element);
         p_cha = Convert.ToInt32(data);

         data = getElement("hitpoints", ref element);
         p_hitpoints = Convert.ToInt32(data);

         data = getElement("anim_walk_filename", ref element);
         p_walkFilename = data;

         data = getElement("anim_walk_width", ref element);
         p_walkSize.Width = Convert.ToInt32(data);

         data = getElement("anim_walk_height", ref element);
         p_walkSize.Height = Convert.ToInt32(data);

         data = getElement("anim_walk_columns", ref element);
         p_walkColumns = Convert.ToInt32(data);

         data = getElement("anim_attack_filename", ref element);
         p_attackFilename = data;

         data = getElement("anim_attack_width", ref element);
         p_attackSize.Width = Convert.ToInt32(data);

            data = getElement("anim_attack_height", ref element);
            p_attackSize.Height = Convert.ToInt32(data);
            data = getElement("anim_attack_columns", ref element);
            p_attackColumns = Convert.ToInt32(data);

            data = getElement("anim_die_filename", ref element);
            p_dieFilename = data;

            data = getElement("anim_die_width", ref element);
            p_dieSize.Width = Convert.ToInt32(data);

            data = getElement("anim_die_height", ref element);
            p_dieSize.Height = Convert.ToInt32(data);

            data = getElement("anim_die_columns", ref element);
            p_dieColumns = Convert.ToInt32(data);

            data = getElement("dropgold1", ref element);
            p_dropGold1 = Convert.ToInt32(data);

            data = getElement("dropgold2", ref element);
            p_dropGold2 = Convert.ToInt32(data);

            data = getElement("drop1_num", ref element);
            p_dropnum1 = Convert.ToInt32(data);

            data = getElement("drop2_num", ref element);
            p_dropnum2 = Convert.ToInt32(data);

            data = getElement("drop3_num", ref element);
            p_dropnum3 = Convert.ToInt32(data);

            p_dropitem1 = getElement("drop1_item", ref element);
            p_dropitem2 = getElement("drop2_item", ref element);
            p_dropitem3 = getElement("drop3_item", ref element);
        }
        catch (Exception ex)
         {
              MessageBox.Show(ex.Message);
              return false;

         }
         //create character sprites
         try
         {
            if (p_walkFilename != "")
            {
                 p_walkSprite = new Sprite(ref p_game);
                 p_walkSprite.Image = LoadBitmap(p_walkFilename);
                 p_walkSprite.Size = p_walkSize;
                 p_walkSprite.Columns = p_walkColumns;
                 p_walkSprite.TotalFrames = p_walkColumns * 8;
         }
     if (p_attackFilename != "")
         {
                 p_attackSprite = new Sprite(ref p_game);
                 p_attackSprite.Image = LoadBitmap(p_attackFilename);
                 p_attackSprite.Size = p_attackSize;
                 p_attackSprite.Columns = p_attackColumns;
                 p_attackSprite.TotalFrames = p_attackColumns * 8;
         }
            if (p_dieFilename != "")
         {
                 p_dieSprite = new Sprite(ref p_game);
                 p_dieSprite.Image = LoadBitmap(p_dieFilename);
                 p_dieSprite.Size = p_dieSize;
                 p_dieSprite.Columns = p_dieColumns;
                 p_dieSprite.TotalFrames = p_dieColumns * 8;
             }
         }
         catch (Exception ex)
         {
              MessageBox.Show(ex.Message);
             return false;
         }
         return true;
}

    ...//**** note: some code was omitted here ***

}
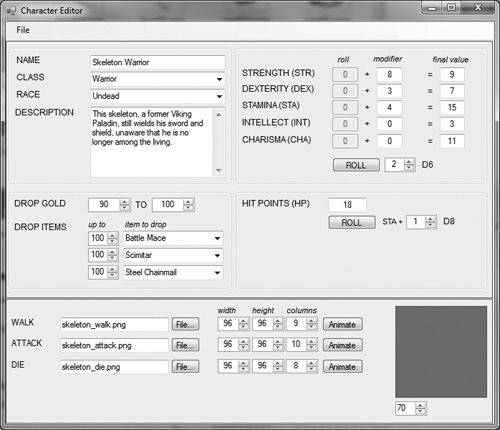
In the main program code are two functions: DropLoot() and DropTreasureItem(), which cause the items to appear in the dungeon level (via the treasure container). The code to draw items is similar to the code for drawing trees found way back in Chapter 8, “Adding Objects to the Dungeon,” and similar to drawing monsters in the previous few chapters. We just need to figure out whether the item is within the scrolling viewport and then draw it at the relative position. This figure shows the drop count “maxxed out” in the character editor to 300 items! Now, remember, there is still only a 25 percent chance that any one of those will drop, but on average we will see about 25 of each item out of that maximum setting of 100. Figure 13.6 shows the data in the character editor. I have to admit, I was a little surprised that the game was able to handle this large number of item drops so easily. It works like a charm even with scores of items piled on top of each other. The inventory fills up before you can even loot it all. Because of this, the code accounts for gold first, so when you go to a pile of loot the gold is picked up first (as shown in Figure 13.7).
The DropLoot() function is listed next. Gold is handled with custom code that requires the gold.png image, so be sure to include that among the many images now required for inventory. A helper function called DropTreasureItem() keeps the code tidy.
public void DropLoot(ref Character srcMonster)
    {
    int count = 0;
    int rad = 64;

    //any gold to drop?
    Item itm = new Item();
    int gold = game.Random(srcMonster.DropGoldMin, srcMonster.DropGoldMax);
    itm.Name = "gold";
    itm.DropImageFilename = "gold.png";
    itm.InvImageFilename = "gold.png";
    itm.Value = gold;
    Point p = new Point(0, 0);
    p.X = (int)srcMonster.X + game.Random(rad) - rad / 2;
    p.Y = (int)srcMonster.Y + game.Random(rad) - rad / 2;
    DropTreasureItem(ref itm, p.X, p.Y);

    //any items to drop?
    if (srcMonster.DropNum1 > 0 && srcMonster.DropItem1 != "")
    {
         count = game.Random(1, srcMonster.DropNum1);
         for (int n = 1; n < count; n++)
         {
              //25% chance for drop
              if (game.Random(100) < 25)
              {
              itm = items.getItem(srcMonster.DropItem1);
              p.X = (int)srcMonster.X + game.Random(rad) - rad / 2;
              p.Y = (int)srcMonster.Y + game.Random(rad) - rad / 2;
              DropTreasureItem(ref itm, p.X, p.Y);
             }
         }
     }
     if (srcMonster.DropNum2 > 0 && srcMonster.DropItem2 != "")
     {
          count = game.Random(1, srcMonster.DropNum2);
          for (int n = 1; n < count; n++)
          {
               //25% chance for drop
               if (game.Random(100) < 25)
               {
                    itm = items.getItem(srcMonster.DropItem2);
                    p.X = (int)srcMonster.X + game.Random(rad) - rad / 2;
                    p.Y = (int)srcMonster.Y + game.Random(rad) - rad / 2;
                    DropTreasureItem(ref itm, p.X, p.Y);

             }
         }
     }
     if (srcMonster.DropNum3 > 0 && srcMonster.DropItem3 != "")
     {
          count = game.Random(1, srcMonster.DropNum3);
          for (int n = 1; n < count; n++)
          {
               //25% chance for drop
               if (game.Random(100) < 25)
               {
                   itm = items.getItem(srcMonster.DropItem3);
                   p.X = (int)srcMonster.X + game.Random(rad) - rad / 2;
                   p.Y = (int)srcMonster.Y + game.Random(rad) - rad / 2;
                   DropTreasureItem(ref itm, p.X, p.Y);
            }
        }
    }
}
The helper function, DropTreasureItem(), verifies that the Item.DropImageFilename property contains a valid filename, then adds a new sprite to the treasure container. The game code looks for sprites to draw and interact with in the dungeon level—not Items—so that is why we need the DrawableItem structure. It’s a relatively trivial amount of code, wherein the Item and Sprite are each initialized here and added to the list container that handles all drop items in the game.
public void DropTreasureItem(ref Item itm, int x, int y)
{
    DrawableItem drit;
    drit.item = itm;
    drit.sprite = new Sprite(ref game);
    drit.sprite.Position = new Point(x, y);
    if (drit.item.DropImageFilename == "")
    {
        MessageBox.Show("Error: Item '" + drit.item.Name +
                "' image file is invalid.");
        Application.Exit();
    }
    drit.sprite.Image = game.LoadBitmap(drit.item.DropImageFilename);
    drit.sprite.Size = drit.sprite.Image.Size;
    treasure.Add(drit);
}
Isn’t it great that the game engine has been developed up to the point where we can begin discussing higher level topics like inventory? It feels as if all the hard work getting to this point was justified. Now what I’m going to do is explain the approach I’ve decided to take with Dungeon Crawler when it comes to managing inventory. There are many different approaches or possible directions we could take with an inventory system. One possibility is to give the player a “backpack” in which all inventory items are stored (this is used in a lot of games). Another approach is to display a list of inventory items by name (popular in online MUDs (multi-user dungeons). We could limit the player to a fixed number of inventory items, or base the limit on weight, in which case every item in the game would need to have a weight property.
Another approach is to follow more of an arcade-style inventory system where the player only possesses what he needs. In other words, the player has a weapon, armor, and modifiers like rings and amulets. The player wields a single weapon, based on the character’s class (i.e., axe, sword, bow, or staff), wears a complete suit of armor (i.e., leather, studded, scale, or chain), and then has the option of wearing rings or amulets. Those modifiers or buffs help to boost the player’s stats (such as strength or intelligence). The Inventory class keeps track of 30 items total—that’s 9 worn items plus 21 items being carried.
Figure 13.8 shows the inventory window after the player has picked up a bunch of sample items from the Looting demo. If you fight the same hostile NPCs, odds are you will end up with several of the same drop items after a while. This Inventory class is awesome! You can move stuff around in the “bag,” equip items, remove items. The same inventory window also shows the player’s basic stats—level, experience, strength, gold, etc. If you want to have a separate screen for that, you are welcome to duplicate the Inventory class and then make the necessary changes. I wanted to keep it simple for this game, to keep the code on the shorter side.
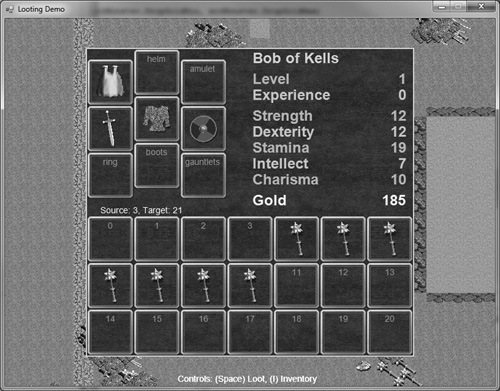
The Inventory class does double duty as a container for the player’s inventory and it produces the rendered output of the inventory screen that the player uses to manage his stuff. This is by far the largest class we’ve seen with quite a few lines of code! The inventory system has to keep track of the mouse position, highlighting buttons when the mouse moves over them, drawing the inventory and equipped items, and the player’s stats. Whew, this class does a lot! The great thing about it is that all of the inventory buttons are positioned in code as rectangles, so if you want to redo the inventory/character screen, you can move the gear buttons around.
public class Inventory
{
   public struct Button
   {

       public Rectangle rect;
       public string text;
       public Bitmap image;
       public string imagefile;
   }

   private int BTN_HEAD;
   private int BTN_CHEST;
   private int BTN_LEGS;
   private int BTN_RTHAND;
   private int BTN_LTHAND;
   private int BTN_RTFINGER;
   private int BTN_LTFINGER;

   private Game p_game;
   private Font p_font;
   private Font p_font2;
   private PointF p_position;
   private Button[] p_buttons;
   private int p_selection;
   private int p_sourceIndex;
   private int p_targetIndex;
   private Point p_mousePos;
   private MouseButtons p_mouseBtn;
   private int p_lastButton;
   private MouseButtons p_oldMouseBtn;
   private bool p_visible;
   private Bitmap p_bg;
   private Item[] p_inventory;

   public Inventory(ref Game game, Point pos)
   {
       p_game = game;
       p_position = pos;
       p_bg = game.LoadBitmap("char_bg3.png");
       p_font = new Font("Arial", 24, FontStyle.Bold, GraphicsUnit.Pixel);
       p_font2 = new Font("Arial", 14, FontStyle.Regular,
           GraphicsUnit.Pixel);
       p_selection = 0;
       p_mouseBtn = MouseButtons.None;

       p_oldMouseBtn = p_mouseBtn;
       p_mousePos = new Point(0, 0);
       p_visible = false;
       p_lastButton = -1;
       CreateInventory();
       CreateButtons();
   }

   public void CreateInventory()
   {
       p_inventory = new Item[30];
       for (int n = 0; n < p_inventory.Length - 1; n++)
       {
           p_inventory[n] = new Item();
           p_inventory[n].Name = "";
       }
   }

   public bool AddItem(Item itm)
   {
       for (int n = 0; n < 20; n++)
       {
           if (p_inventory[n].Name == "")
           {
                CopyInventoryItem(ref itm, ref p_inventory[n]);
                return true;
           }
       }
       return false;
   }

   public void CreateButtons()
   {
          int rx=0, ry=0, rw=0, rh=0, index=0;

          //create inventory buttons
          p_buttons = new Button[30];
          for (int y = 0; y < 3; y++)
          {
               for (int x = 0; x < 7; x++)
          {
               rx = (int)p_position.X + 6 + x * 76;
               ry = (int)p_position.Y + 278 + y * 76;
               rw = 64;
               rh = 64;
               p_buttons[index].rect = new Rectangle(rx, ry, rw, rh);
               p_buttons[index].text = index.ToString();
               index += 1;
          }
      }

      //create left gear buttons
      rx = (int)p_position.X + 6;
      ry = (int)p_position.Y + 22;
      p_buttons[index].rect = new Rectangle(rx, ry, rw, rh);
      p_buttons[index].text = "cape";
      index += 1;

      ry += 76;
      p_buttons[index].rect = new Rectangle(rx, ry, rw, rh);
      p_buttons[index].text = "weapon 1";
      BTN_RTHAND = index;
      index += 1;

      ry += 76;
      p_buttons[index].rect = new Rectangle(rx, ry, rw, rh);
      p_buttons[index].text = "ring";
      index += 1;

      //create center gear buttons
      rx = (int)p_position.X + 82;
      ry = (int)p_position.Y + 6;
      p_buttons[index].rect = new Rectangle(rx, ry, rw, rh);
      p_buttons[index].text = "helm";
      BTN_HEAD = index;
      index += 1;

      ry += 76;
      p_buttons[index].rect = new Rectangle(rx, ry, rw, rh);
      p_buttons[index].text = "chest";

       BTN_CHEST = index;
       index += 1;

       ry += 76;
       p_buttons[index].rect = new Rectangle(rx, ry, rw, rh);
       p_buttons[index].text = "boots";
       BTN_LEGS = index;
       index += 1;

       //create right gear buttons
       rx = (int)p_position.X + 158;
       ry = (int)p_position.Y + 22;
       p_buttons[index].rect = new Rectangle(rx, ry, rw, rh);
       p_buttons[index].text = "amulet";
       index += 1;

       ry += 76;
       p_buttons[index].rect = new Rectangle(rx, ry, rw, rh);
       p_buttons[index].text = "weapon 2";
       BTN_LTHAND = index;
       index += 1;

       ry += 76;
       p_buttons[index].rect = new Rectangle(rx, ry, rw, rh);
       p_buttons[index].text = "gauntlets";
       index += 1;
   }

   public bool Visible
   {
        get { return p_visible; }
        set { p_visible = value; }
   }

    public int Selection
    {
        get { return p_selection; }
        set { p_selection = value; }
    }

    //get/set position in pixels
    public PointF Position
    {
        get { return p_position; }
        set { p_position = value; }
    }

    public int LastButton
    {
        get { return p_lastButton; }
        set { p_lastButton = value; }
    }

    private void Print(int x, int y, string text)
    {
        Print(x, y, text, Brushes.White);
    }

    private void Print(int x, int y, string text, Brush color)
    {
        p_game.Device.DrawString(text, p_font, color, x, y);
    }

    //print text right-justified from top-right x,y
    private void PrintRight(int x, int y, string text, Brush color)
    {
        SizeF rsize = p_game.Device.MeasureString(text, p_font);
        p_game.Device.DrawString(text, p_font, color, x - rsize.Width, y);
    }

    public void updateMouse(Point mousePos, MouseButtons mouseBtn)
    {
        p_mousePos = mousePos;
        p_oldMouseBtn = p_mouseBtn;
        p_mouseBtn = mouseBtn;
    }

    public void Draw()
    {
        if (!p_visible) return;

        int tx, ty;

        //draw background
        p_game.DrawBitmap(ref p_bg, p_position.X, p_position.Y);
        p_game.Device.DrawRectangle(new Pen(Color.Gold, 2), p_position.X - 1,
           p_position.Y - 1, p_bg.Width + 2, p_bg.Height + 2);

        //print player stats
        int x = 400;
        int y = (int)p_position.Y;
        int ht = 26;
        Print(x, y, p_game.Hero.Name, Brushes.Gold);
        y += ht + 8;
        PrintRight(660, y, p_game.Hero.Level.ToString(), Brushes.LightGreen);
        Print(x, y, "Level", Brushes.LightGreen);
        y += ht;
        PrintRight(660, y, p_game.Hero.Experience.ToString(),
                Brushes.LightBlue);
        Print(x, y, "Experience", Brushes.LightBlue);
        y += ht + 8;
        PrintRight(660, y, p_game.Hero.STR.ToString(), Brushes.LightGreen);
        Print(x, y, "Strength", Brushes.LightGreen);
        y += ht;
        PrintRight(660, y, p_game.Hero.DEX.ToString(), Brushes.LightBlue);
        Print(x, y, "Dexterity", Brushes.LightBlue);
        y += ht;
        PrintRight(660, y, p_game.Hero.STA.ToString(), Brushes.LightGreen);
        Print(x, y, "Stamina", Brushes.LightGreen);
        y += ht;
        PrintRight(660, y, p_game.Hero.INT.ToString(), Brushes.LightBlue);
        Print(x, y, "Intellect", Brushes.LightBlue);
        y += ht;
        PrintRight(660, y, p_game.Hero.CHA.ToString(), Brushes.LightGreen);
        Print(x, y, "Charisma", Brushes.LightGreen);
        y += ht + 8;
        PrintRight(660, y, p_game.Hero.Gold.ToString(),
        Brushes.LightGoldenrodYellow);
        Print(x, y, "Gold", Brushes.LightGoldenrodYellow);
        y += ht;

   //draw the buttons
   for (int n = 0; n < p_buttons.Length - 1; n++)
   {
        Rectangle rect = p_buttons[n].rect;

        //draw button border
        p_game.Device.DrawRectangle(Pens.Gray, rect);

        //print button label
        if (p_buttons[n].image == null)
        {
            SizeF rsize = p_game.Device.MeasureString(p_buttons[n].text,
                 p_font2);
            tx = (int)(rect.X + rect.Width / 2 - rsize.Width / 2);
            ty = rect.Y + 2;
             p_game.Device.DrawString(p_buttons[n].text, p_font2,
                 Brushes.DarkGray, tx, ty);
        }
    }

    //check for (button click
    for (int n = 0; n < p_buttons.Length - 1; n++)
    {
       Rectangle rect = p_buttons[n].rect;
       if (rect.Contains(p_mousePos))
       {
           if (p_mouseBtn == MouseButtons.None && p_oldMouseBtn ==
                MouseButtons.Left)
           {
                p_selection = n;
                if (p_sourceIndex == -1)
                     p_sourceIndex = p_selection;
                else if (p_targetIndex == -1)
                    p_targetIndex = p_selection;
                else
                {
                    p_sourceIndex = p_selection;
                    p_targetIndex = -1;
                }
                break;

                }
                p_game.Device.DrawRectangle(new Pen(Color.Red, 2.0f), rect);
           }
       }

       string text = "Source: " + p_sourceIndex.ToString() + ", Target: " +
           p_targetIndex.ToString();
       if (p_sourceIndex == p_targetIndex)
            text += " : same item";

       if (p_selection != -1 && p_sourceIndex != -1 && p_targetIndex != -1)
       {
            if (p_buttons[p_sourceIndex].image == null)
                text += " : source is empty";
            else if (p_buttons[p_targetIndex].image != null)
                text += " : target is in use";
            else
            {
                text += " : good to move!";
                MoveInventoryItem(p_sourceIndex, p_targetIndex);
                p_selection = -1;
            }
        }
        p_game.Device.DrawString(text, p_font2, Brushes.White,
            p_position.X + 20, p_position.Y + 255);

        //draw equipment
        for (int n = 0; n < p_inventory.Length - 1; n++)
        {
             DrawInventoryItem( n );
        }
    }

    private void DrawInventoryItem(int index)
    {
        string filename = p_inventory[index].InvImageFilename;
        if (filename.Length > 0)
        {
            //try to avoid repeatedly loading image
            if (p_buttons[index].image == null || p_buttons[index].imagefile

                != filename)
            {
                p_buttons[index].imagefile = filename;
                p_buttons[index].image = p_game.LoadBitmap(filename);
            }
            GraphicsUnit unit = GraphicsUnit.Pixel;
            RectangleF srcRect = p_buttons[index].image.GetBounds( ref unit );
            RectangleF dstRect = p_buttons[index].rect;
            p_game.Device.DrawImage(p_buttons[index].image, dstRect,
                srcRect, GraphicsUnit.Pixel);
         }
    }

    private void MoveInventoryItem(int source, int dest)
    {
        CopyInventoryItem(ref p_inventory[source], ref p_inventory[dest]);
        p_inventory[source].Name = "";
        p_inventory[source].InvImageFilename = "";
        p_buttons[source].imagefile = "";
        p_buttons[source].image = null;
    }

    public void CopyInventoryItem(int source, int dest)
    {
        CopyInventoryItem(ref p_inventory[source], ref p_inventory[dest]);
    }

    public void CopyInventoryItem(ref Item srcItem, ref Item dstItem)
    {
        dstItem.Name = srcItem.Name;
        dstItem.Description = srcItem.Description;
        dstItem.AttackDie = srcItem.AttackDie;
        dstItem.AttackNumDice = srcItem.AttackNumDice;
        dstItem.Category = srcItem.Category;
        dstItem.Defense = srcItem.Defense;
        dstItem.DropImageFilename = srcItem.DropImageFilename;
        dstItem.InvImageFilename = srcItem.InvImageFilename;
        dstItem.Value = srcItem.Value;
        dstItem.Weight = srcItem.Weight;
        dstItem.STR = srcItem.STR;

        dstItem.DEX = srcItem.DEX;
        dstItem.CHA = srcItem.CHA;
        dstItem.STA = srcItem.STA;
        dstItem.INT = srcItem.INT;
    }

}
The Player class is a bit of a pushover at this point, because we’re getting a bit ahead of ourselves delving into the player’s game state data for just the Looting demo project, but I wanted to at least show you what’s in the class at this early stage since it’s in the project. The only thing here is the Gold property. In the final chapter, this class will be responsible for keeping track of all the player’s information, and for saving and loading the game.
public class Player : Character
{
    private int p_gold;

    public Player(ref Game game) : base(ref game)
    {
        p_gold = 0;
    }

    public int Gold
    {
        get { return p_gold; }
        set { p_gold = value; }
    }

    public override string ToString()
    {
        return base.Name;
    }

    public void LoadGame(string filename) { }
    public void SaveGame(string filename) { }
}
That successfully finishes off the item editor and inventory system! I’m pleased with how these new features turned out. The editor has been developed with a different goal in mind than the other editors, in that many items are stored in a single xml file rather than one item per file. This makes it quite easy to edit many items quickly by simply clicking each item in the list and making changes to it. Since the editor automatically saves changes made to items, this works quite well. Just be sure to save the file when you’re done editing.
When I look at the inventory screen, I think it looks good because there isn’t a whole lot of code there and it works so well. But you know what’s still missing? You can equip items to any gear slot, and they don’t actually do anything for the player yet. Granted, but that’s some easy logic now that inventory is working. The focus in this chapter was just getting the items created with the editor and getting the inventory system to display the right items, allow the player to pick up loot, and let the player move stuff around. The good news is, the code is already in place to make that happen, and we’ll be able to apply inventory item modifiers to the player’s stats.