In this chapter, we draw upon the lessons learned in all of the previous chapters to create our own dungeon role-playing game (RPG). We will pay particular attention to advanced List programming to manage the data for the game. You will gain a lot of good experience by building your own RPG based on the example presented in this chapter. But, unlike most modern RPGs that feature realistic graphics and animation, our RPG will be an homage to games of the past, to the early days of computing when creative storytellers had to use text to describe a fictional world. As you will soon learn, there was an offshoot of the RPG genre way back when that used text characters to represent the walls, floor, items, monsters, treasure, and even the player. These text characters were identified by their “ASCII” character codes—American Standard Code for Information Interchange. Thus, such games came to be known as “ASCII Dungeons.” The sort of game we will be creating uses a random dungeon generator, but you can use the concepts presented to custom design your own game levels.
In this chapter, you will learn how to:
Generate random dungeon rooms
Connect the dungeon rooms with hallways
Add gold, weapons, armor, and health potions
Add roaming monsters that the player can fight
Fight monsters with real to-hit, attack, and defense values
Use your imagination—because this is an ASCII Text RPG!
The Dungeon RPG is shown in Figure 14.1. You will learn to build this game from scratch in this chapter. Along the way, you will learn many tricks and techniques in Python and Pygame with advanced lists and classes. And, it is rather fun to play as well!

Today’s premiere RPGs, like Diablo III and World of Warcraft (with its many expansions), would have been unbelievable to developers and gamers in the early 1980s, at the dawn of personal computers. But technology did not hold imaginative storytellers back; they still wanted to create worlds in the computer for players to have fun exploring, despite the technology. At the time, text-based displays were not considered bad technology, or even crude. That is simply what was available. At the time, game developers (who were really just hobbyists) were enthralled by what was possible with a computer! They didn’t bemoan the lack of graphics, because there was no such thing at the time. Let’s take a look at some classic examples of the genre as we plan to create one of our own design. The individual Roguelike games presented below, as well as Rogue itself, do not necessarily represent the best games of the genre—these are the most popular games in the genre.
It all started with a game called Rogue, according to most fans old enough to have played games in the genre in the old days. All games that fall into the genre are called “Roguelike,” and this has become a recognized term (no space, no dash). According to Wikipedia (http://en.wikipedia.org/wiki/Roguelike), games that fit the description will have these properties:
The design credits for Rogue go to Michael Toy, Glenn Wichman, Ken Arnold, and Jon Lane.
The goal of the game was to explore the dungeon down to the lowest level and retrieve a special item called the Amulet of Yendor, and then make it back up and out of the dungeon again. Even modern games like the Diablo series follow this basic premise, and one might even suggest that Diablo is a Roguelike game with improved graphics. But, instead of claiming treasure, your character must defeat a big bad evil boss guy in the last level. Figure 14.2 shows what the game looked like running on a Unix system.
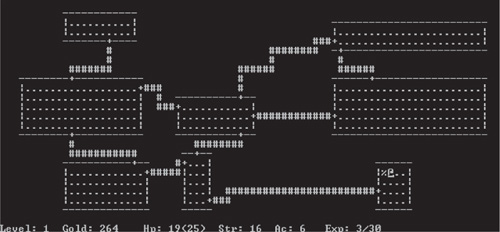
The gameplay of Rogue is repeatable. What this means is, each level is generated and filled with monsters using the same code, so every level is based on the same algorithms. The only difference between levels is the strength of the monsters, which goes up as you descend into deeper levels. Likewise, the player’s hero character gains better strength, abilities, and weapons too, so gameplay remains in balance. Figure 14.3 shows the same game running on an IBM PC.
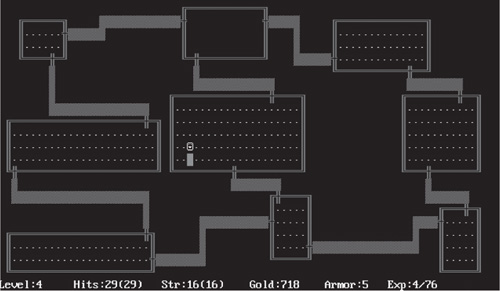
NetHack is an open source, freeware implementation of the gameplay found in the original Rogue game. Releases are maintained and available for download from http://www.nethack.org. NetHack is a fairly accurate version of the traditional gameplay and there are numerous variations of the game available (since it is open source). The official NetHack distribution includes two versions right inside the archive file when you download it. First is the usual text console version of the game with traditional ASCII characters (for purists), and this is shown in Figure 14.4.
A second version, shown in Figure 14.5, is included with NetHack and runs in graphics mode, featuring tiled artwork. No aspect of the gameplay is changed, just the means of displaying the game.

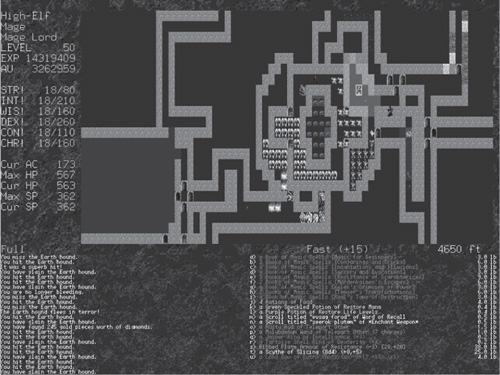
AngBand is another good example of the genre with very familiar gameplay and often more complex levels. This game doesn’t follow the Rogue recipe to the last ingredient; it goes beyond to set itself apart from more traditional games. You can download the game for free from the website http://rephial.org. Figure 14.6 shows AngBand in action.
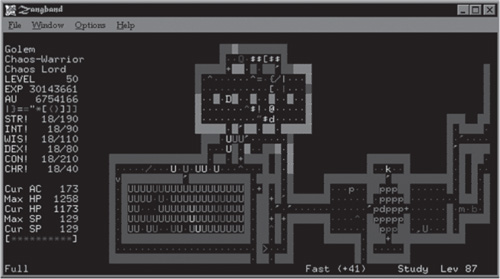
Like many others in the genre, including NetHack, this game features two versions (catering to the two types of fans of this genre), a console-mode version and a graphics-mode version. The graphical version of AngBand is shown in Figure 14.7. The tiled artwork is not a huge departure from the ANSI text version, but it is enough to make the gameplay perhaps a bit more intriguing than mere text.
Going back a few years, we find Sword of Fargoal on Commodore 64, published commercially by EPYX, a popular game publishing company in the 1980s. But this game did not originate on the C=64; it was ported from an earlier Commodore PET game called Dungeon. It was clearly a derivative game, but the level generator used a slightly different algorithm than the one in Rogue. See Figure 14.8.

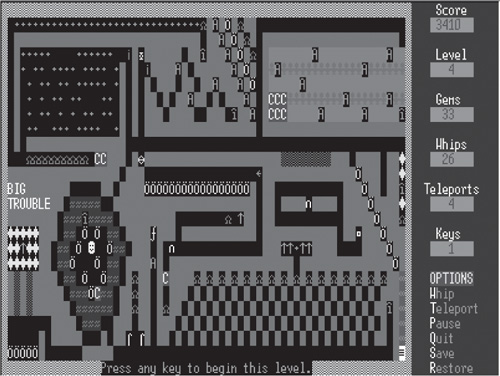
Kingdom of Kroz, shown in Figure 14.9, was another classic of the 1980s. Like the similarly early versions of NetHack, this game employed ANSI characters to display limited animation and colored text. Kroz had quite complex levels because they were custom designed, not randomly generated. Believe it or not, this funny-looking screen offered a huge amount of gameplay to gamers of the time.
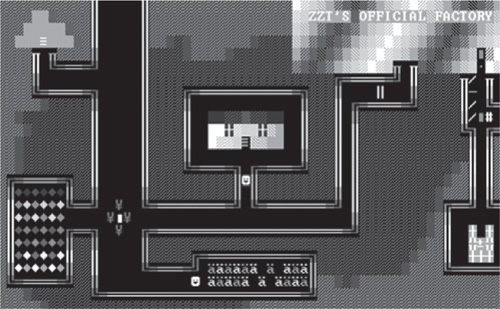
ZZT was another (perhaps the best) ANSI-based Roguelike game. Figure 14.10 shows one screen of a much larger level. ZZT supported a lot of advanced gameplay features like portals and player persistence. It was developed by Tim Sweeney, founder of Epic Games, and this was the company’s first game. You might recognize the name, for today Epic is responsible for the awesome Unreal Engine 3 that powers many commercial games on Windows, Xbox 360, Linux, Mac OS X, and Sony PlayStation 3. It is cutting edge.
The key to making a game of this type is setting up an array (or List in Python) to represent one game level. That array of data is recycled for each level, which is generated randomly. As the player reaches the stairs or portal to the next level down, the game should generate a new random level using the current level number with a common random number seed. This seed makes it possible for the game to re-generate the same levels that the player has already gone through, while travelling back up to exit out of the dungeon (after finding the Amulet of Yendor, if we’re following the classic plot). We are going to cover enough information about the genre to build a level generator, add user input, rudimentary combat with monsters, and collision detection with the walls. But, the rest of the gameplay will be up to you!
When creating a Roguelike game in graphics mode using a library like Pygame, assuming we want the game to look and feel authentic, we have to simulate the text display. This affords us the benefit of making the game look authentic, but giving us the ability to do anything we want with graphics. What is a character set? It’s a numbered list of characters. The standard encoding for characters is called ASCII.
A single character has an “ASCII code,” and there are 256 characters total. You might have noticed that a typical PC keyboard has only about 100 keys. That’s true. The ASCII table includes some special characters used for drawing boxes on the old console displays back in the 1970s and 1980s.
The ASCII codes will be treated like animation frames, and the character set like a sprite sheet. Each character will be handled like one frame of a large animation set. The first 31 characters on the line below were known as non-printing characters because they were not printed on the old console displays. These first 31 characters were used for special codes that would do things on the console display. For instance, ASCII code 10 is the linefeed character, while ASCII code 13 is the newline character. When these codes are “printed out,” they perform an action rather than display a character. Incidentally, the last character on this first line is ASCII code 32, which is Space, the first printable character. The first two characters, which look like little happy faces, were often used for the player character in Roguelike games.
In Python, we can print ASCII characters to the console or in graphics mode with Pygame using the same font printing functions we’ve been using all along. But, you may be wondering, where to you get the ASCII characters that you want to print, if they aren’t all represented on the keyboard? There are three ways to do this.
First, you can find an ASCII table (such as from a website) and copy and paste the characters into your program, as a string. For instance, to print the [PI] character to the console, copy the [PI] character out of an ASCII table and paste it into your print() function call, like so:
print("Pi looks like this: ")
The second way is similar, but doesn’t require copying and pasting the character. Instead, we just embed the character into the string with an Alt key sequence. This is a bit of a hacker trick that most PC users don’t know about anymore today, because command prompts and shells are not commonly used today. What you do is, hold down the Alt key, and type in the ASCII code using the numeric keypad. You need to know the ASCII code, of course, but we’ll solve that little problem here shortly. This doesn’t work with the Python IDLE editor or a Python prompt, so you’ll have to use a text editor like Notepad. Try Alt+100 to see what is displayed.
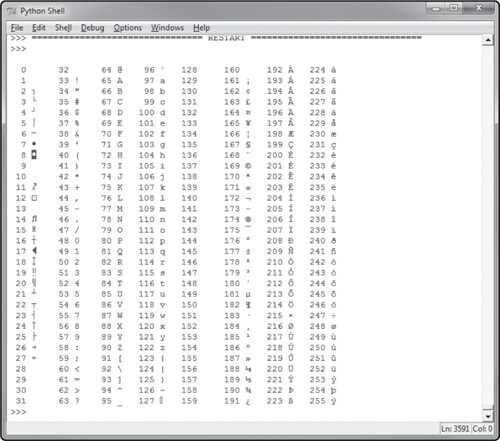
But, both of those are clunky ways to print ASCII characters. The third, and preferred, way is to use code to convert an ASCII code into a character. Python has just a function called chr(). You have to know the ASCII code of the character you want to print, so keep an ASCII table handy. Figure 14.11 is one such table created with the following Python code.
print("ASCII code 100 = " + chr(100))
ASCII code 100 = d
Let’s write a short program to generate an ASCII table that can be used as a reference. Remember, the Python console will not display many of escape sequence, non-printing characters. This program aligns the ASCII table into eight columns
cols = 8
rows = 256//cols
table = list("" for n in range(rows+1))
char = 1

#create strings filled with table data
for col in range(1,cols+1):
    for row in range(1,rows+1):
        table[row] += '{:3.0f}'.format(char) + ' '
        if char not in (9,10,13): #skip movement chars
            table[row] += chr(char)
        table[row] += '	'
        char += 1

#print the ASCII table
for row in table:  print(row)
Note
Want to play a prank on your friends? Create a password using a common word that’s easy to guess, but insert ASCII code 255 into the password. That’s another space character!
This short Python program produces the output shown in Figure 14.11. Many of the characters will not show up in the Python Shell output window. The console was simply not designed to handle escape sequence characters. For our purposes, of using the ASCII chart as a sprite sheet, we don’t need to be concerned with the original purpose of those codes. There’s another more complicated problem with the console’s output—the default encoding is most likely Unicode. So, only the first 128 characters (0 to 127) in the ASCII character set can be printed normally, while the extended codes (up to 255) will be encoded with Unicode characters. Suffice it to say, our little program has issues with character encoding.
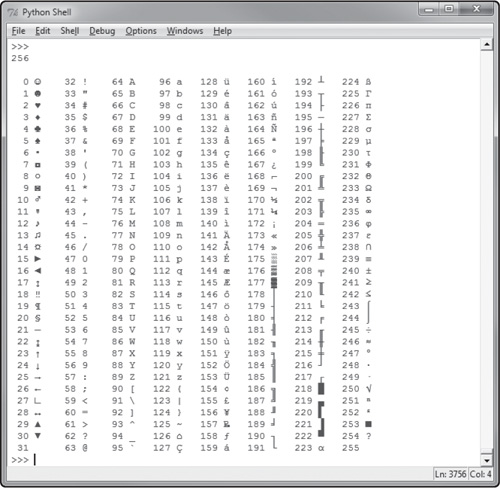
Here’s one way to resolve the problem. Rather than using lookup code (with the chr() function), we can store the ASCII character set as a string and index into it with the ASCII code representing an index. This is kind of a cheat but it produces the nice-looking table we want to use as a reference. The code for formatting the characters into a table is the same, but the call to chr() has been replaced with an index into the chars string with chars[char]. The result is shown in Figure 14.12, and it looks just right! However, you may not be able to type in this code, especially into the IDLE editor, due to the character codes. So, please open up the source code file ASCII Table 2.py from the chapter resources in order to run the program.

cols = 8
rows = 256//cols
table = list("" for n in range(rows+1))
char = 0

for col in range(1,cols+1):
    for row in range(1,rows+1):
        table[row] += '{:3.0f}'.format(char) + ' '
        table[row] += chars[char]
        table[row] += '	'
        char += 1

print(len(chars))
for row in table: print(row)
Now that we understand the ASCII character set, we can use this information to simulate a text console display for our own Roguelike game. Since we’re only simulating a console display, and not duplicating one perfectly, we can cheat a little on the dimensions. The old console displays that Roguelike games were played on could display text characters—80 across and 25 down. We’ll extend it to 80 × 45 for a better ratio, since most modern LCD screens have a widescreen orientation now with a ratio of 4:3 or 16:9 or similar. In these terms, an old CRT (cathode ray tube) monitor had a ratio of 8:2.5. It worked, though, because the characters were taller than they were wide. Figure 14.13 shows an illustration of that space with the actual number of tiles we have available.
Since each character represents one gameplay “tile,” then what we have is a game level that will support 80 × 45 = 3,600 tiles. That is actually quite a lot of space, considering that the game has many such levels (down into the depths).
Now, to fill the game level, we need a pair of objects: a list and a MySprite. First, the list will be created and filled with a default value.
tiles = list()
for y in range(0,45):
    for x in range(0,80):
        tiles.append(8)
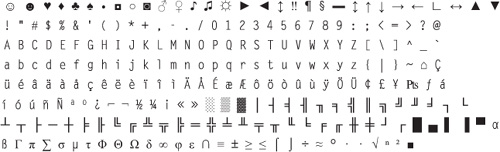
Next, the MySprite object will be created, and a sprite sheet containing all of the ASCII characters will be loaded and treated like frames of animation. The bitmap is shown in Figure 14.14. This file is supplied with the chapter resource files, and is called ascii8x12.png.
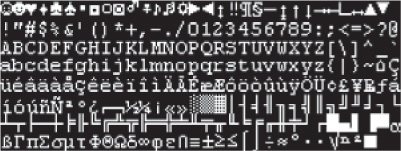
text = MySprite()
text.load("ascii8x12.png", 8, 12, 32)
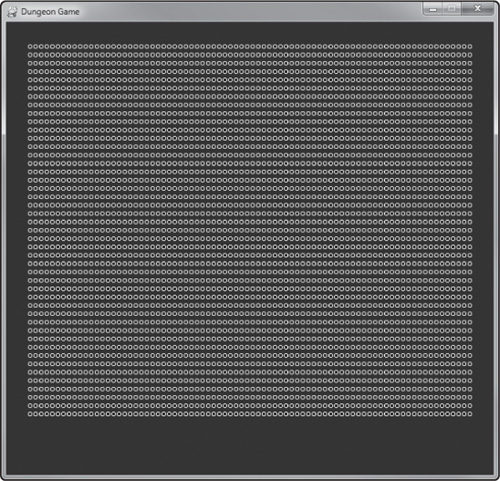
Now we can simply draw the dungeon level by referencing the tiles list, which contains the ASCII code of each tile, and using that as the animation frame index in the sprite. Multiply this process across 80 columns and 45 rows, as the following code does, and we have a level filled with a default ASCII character as shown in Figure 14.15. At this point, the “basic mechanics” of the game is working! This was the hard part. Now, we can focus on generating a random level with rooms and passages.
for y in range(0,45):
    for x in range(0,80):
        index = y * 80 + x
        value = tiles[index]
        text.X = 30 + x * 8
        text.Y = 30 + y * 12
        text.frame = text.last_frame = value
        text.update(0)
        text.draw(surface)
A hallmark feature of Roguelike games is endless replay value because the game levels are randomly generated. Every time you play, the game will be different! To generate a single level, we will fill it with rooms. Now, this is where some creative programming comes in, because there are many ways to do this. In the example presented here, there are eight total rooms in one level—four above, four below. You might take a different approach and generate one large room in the middle with several smaller rooms scattered around it. There are many possibilities! Go ahead and experiment with the Python/Pygame code found here in this chapter and see what interesting new game levels you can come up with!
We have reached a complexity level that requires a class to continue further with the construction of our dungeon. Here is a class called Dungeon that will help organize the data and code. This class will be responsible for generating and drawing random levels. Of particular interest are the two helper methods: getCharAt() and setCharAt(). We will need these to generate a random level. Note that, as was the case in all previous chapters, the MyLibrary.py file must be found in the same folder as the game file so that classes like MySprite are available.
class Dungeon():
    def __init__(self):
        #create the font sprite
        self.text = MySprite()
        self.text.load("ascii8x12.png", 8, 12, 32)

        #create the level list
        self.tiles = list()
        for n in range(0,80*45):
            self.tiles.append(-1)

    def getCharAt(self, x, y):
        index = y * 80 + x
        return self.tiles[index]

    def setCharAt(self, x, y, char):
        index = y * 80 + x
        self.tiles[index] = char

    def draw(self, surface, offx, offy):
        for y in range(0,45):
            for x in range(0,80):
                value = self.getCharAt(x,y)
                if value >= 0:
                    self.text.X = offx + x * 8
                    self.text.Y = offy + y * 12
                    self.text.frame = value
                    self.text.last_frame = value
                    self.text.update(0)
                    self.text.draw(surface)
Now, the prototype will just generate random levels every time the Space key is pressed. This is an important step, to validate whether the level generating algorithm is free of bugs. We don’t want rooms overlapping or hallways missing the mark. To generate the rooms, we will use a rectangle to represent each room, and a list will turn the rooms into an easy-to-manage array. There are three main ASCII codes that will be used to build a dungeon level:
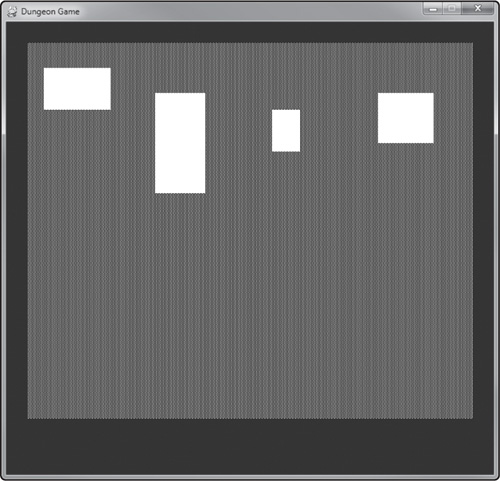
Let’s start off with the top of the level, in which we will put four rooms. Each room will have a slightly random position (within a small variance) and a slightly random size (with a minimum and maximum). After creating the rooms, the Dungeon.generate() method then fills in the tiles array/list with the room data.
def generate(self, emptyChar=175, roomChar=218, hallChar=177):
    #clear existing level
    for index in range(0,80*45):
        self.tiles[index] = emptyChar

    #create random rooms
    self.rooms = list()
    PL = 4
    PH = 8
    SL = 5
    SH = 14
    room = Rect(0 + random.randint(1,PL),
                0 + random.randint(1,PH),
                random.randint(SL,SH),
                random.randint(SL,SH))
    self.rooms.append(room)
    room = Rect(20 + random.randint(1,PL),
                0 + random.randint(1,PH),
                random.randint(SL,SH),
                random.randint(SL,SH))
    self.rooms.append(room)
    room = Rect(40 + random.randint(1,PL),
                0 + random.randint(1,PH),
                random.randint(SL,SH),
                random.randint(SL,SH))
    self.rooms.append(room)
    room = Rect(60 + random.randint(1,PL),
                0 + random.randint(1,PH),
                random.randint(SL,SH),
                random.randint(SL,SH))
    self.rooms.append(room)

    #add rooms to level
    for room in self.rooms:
        for y in range(room.y,room.y+room.height):
            for x in range(room.x,room.x+room.width):
                self.setCharAt(x, y, roomChar)
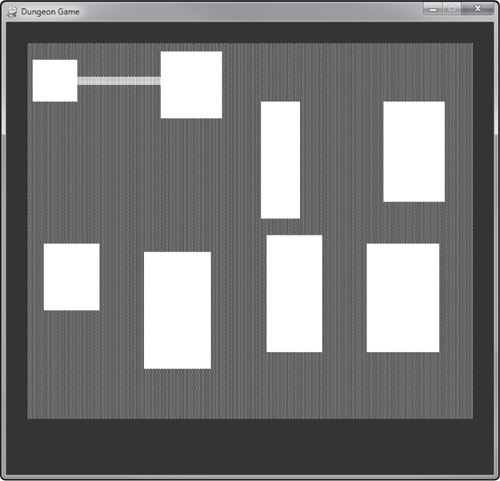
Figure 14.16 shows the result so far. We’re making good progress already, and it seems to be moving along quickly now with the Dungeon class.
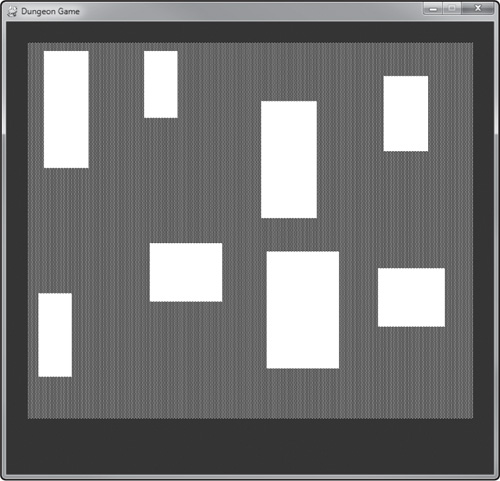
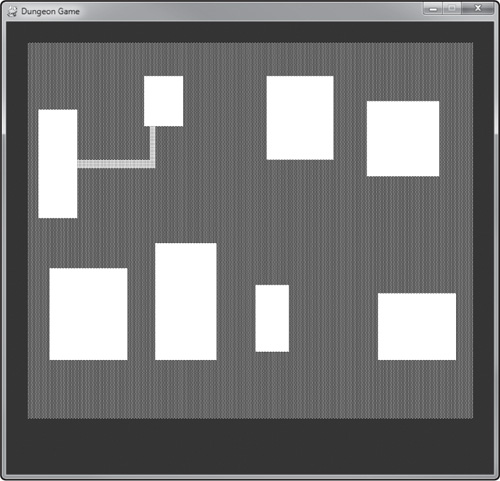
Next, we use similar code with a few minor changes to the Y position of each to generate the four southern rooms, and end up with the level shown in Figure 14.17.
    room = Rect(0 + random.randint(1,PL),
                22 + random.randint(1,PH),
                random.randint(SL,SH),
                random.randint(SL,SH))
    self.rooms.append(room)
    room = Rect(20 + random.randint(1,PL),
                22 + random.randint(1,PH),
                random.randint(SL,SH),
                random.randint(SL,SH))
    self.rooms.append(room)
    room = Rect(40 + random.randint(1,PL),
                22 + random.randint(1,PH),
                random.randint(SL,SH),
                random.randint(SL,SH))
    self.rooms.append(room)
    room = Rect(60 + random.randint(1,PL),
                22 + random.randint(1,PH),
                random.randint(SL,SH),
                random.randint(SL,SH))
    self.rooms.append(room)
This room code is now working great! However, there’s a lot of repeated code here with only minor differences in the code from one room to the next. We can take advantage of this repeatability by writing a reusable method that will work for all eight rooms. So, let’s abolish the room generation code just written and replace it with calls to this new method:
def createRoom(self,x,y,rposx,rposy,rsizel,rsizeh):
    room = Rect(x + random.randint(1,rposx),
                y + random.randint(1,rposy),
                random.randint(rsizel,rsizeh),
                random.randint(rsizel,rsizeh))
    self.rooms.append(room)
Using this new helper method, the code to generate all eight rooms (within generate()) is much more manageable. This will also make it much easier to experiment with different level generation algorithms. This is an example of a proper method, created to eliminate or optimize repeating code. The variables PL, PH, SL, and SH, represent the random position and size of each room. Feel free to experiment with different values!
    PL = 4
    PH = 8
    SL = 5
    SH = 14
    self.rooms = list()
    self.createRoom(0,0,PL,PH,SL,SH)
    self.createRoom(20,0,PL,PH,SL,SH)
    self.createRoom(40,0,PL,PH,SL,SH)
    self.createRoom(60,0,PL,PH,SL,SH)
    self.createRoom(0,22,PL,PH,SL,SH)
    self.createRoom(20,22,PL,PH,SL,SH)
    self.createRoom(40,22,PL,PH,SL,SH)
    self.createRoom(60,22,PL,PH,SL,SH)
The hallways or passages connect the rooms, and are the key to making random levels. To generate the hallways, we will make some assumptions that other Roguelike algorithms might not make. In other words, there are probably more creative path-finding algorithms that link any one room to any other room in the level. But, let’s try to keep it simple and connect two rooms that are near each other.
Note
While running the game, at any time press the Space key to re-generate the level. This is good for testing and debugging the game, but should be removed when the game is finished.
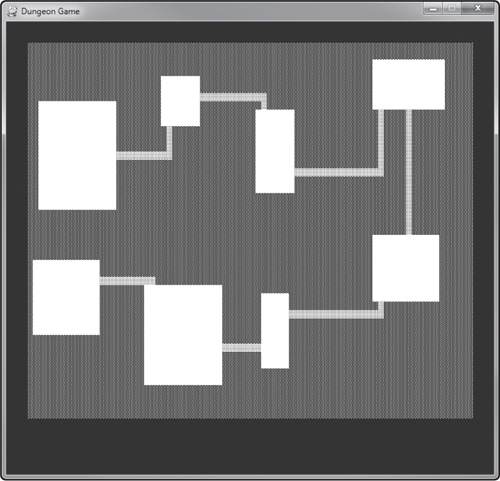
We’ll plan our hallway code with reusability in mind first (and wisely put it into a method from the start). First, we have the source room. Pick a random location along the right edge of the room for the starting point of the hallway. Then, move the hallway toward the right, one tile at a time, until it reaches the position of the destination room. If we have hit the destination room already, then that’s it, the hallway is finished. But, most likely, the hallway will need to go up or down to reach the room. So, if the position of the room is below or above, we route the hall up or down accordingly until we bump into it. Let’s see how it will look first, then show the code. First, in Figure 14.18, we have the condition where the hall ran straight across into the second room without any turns needed.
Next, we can show the condition where a hallway might need to angle up or down to get to the destination room, which is the situation shown in Figure 14.19. At this point, we can repeat the process between the northern four rooms, and then for the southern four rooms. Let’s see the new Dungeon.createHallRight() method first.
Note
Some random dungeons will look fantastic, while some will look horrid. It’s a matter of fine-tuning the algorithm to meet your design expectations. Most likely the best modifications to make will be to the random ranges used to set the position and size of each room. The hallways usually work fine if the rooms are reasonably placed.
def createHallRight(self,src,dst,hallChar):
    pathx = src.x + src.width
    pathy = src.y + random.randint(1,src.height-2)
    self.setCharAt(pathx,pathy,hallChar)
    if pathy > dst.y and pathy < dst.y + dst.height:
        while pathx < dst.x:
            pathx += 1
            self.setCharAt(pathx,pathy,hallChar)
    else:
        while pathx < dst.x+1:
            pathx += 1
            self.setCharAt(pathx,pathy,hallChar)

        if pathy < dst.y+1:
            self.setCharAt(pathx,pathy,hallChar)
            while pathy < dst.y:
                pathy += 1
                self.setCharAt(pathx,pathy,hallChar)
        else:
            self.setCharAt(pathx,pathy,hallChar)
            while pathy > dst.y + dst.height:
                pathy -= 1
                self.setCharAt(pathx,pathy,hallChar)
Because three hallways connect four rooms, we have six total hallways to create. Note how it is a simple connection of one room to another. This could be replaced with a for loop but the code is more “self documenting” this way.
        self.createHallRight(self.rooms[0],self.rooms[1],hallChar)
        self.createHallRight(self.rooms[1],self.rooms[2],hallChar)
        self.createHallRight(self.rooms[2],self.rooms[3],hallChar)
        self.createHallRight(self.rooms[4],self.rooms[5],hallChar)
        self.createHallRight(self.rooms[5],self.rooms[6],hallChar)
        self.createHallRight(self.rooms[6],self.rooms[7],hallChar)
At this point, we have the northern rooms and southern rooms connected to each other, but the north and south “wings,” so to speak, are not accessible to each other. For that, we need vertical hallways as well. We don’t want too many hallways, or it will be too easy to clear the level. Instead, we’ll connect the north and south wings with just one hall, and we’ll do it by choosing a random room so it will be different every time.
def createHallDown(self,src,dst,hallChar):
    pathx = src.x + random.randint(src.width-2)
    pathy = src.y + src.height
    self.setCharAt(pathx,pathy,hallChar)
    if pathx > dst.x and pathx < dst.x + dst.width:
        while pathy < dst.y:
            pathy += 1
            self.setCharAt(pathx,pathy,hallChar)
    else:
        while pathy < dst.y+1:
            pathy += 1
            self.setCharAt(pathx,pathy,hallChar)
        if pathx < dst.x+1:
            self.setCharAt(pathx,pathy,hallChar)
            while pathx < dst.x:
                pathx += 1
                self.setCharAt(pathx,pathy,hallChar)
        else:
            self.setCharAt(pathx,pathy,hallChar)
            while pathx > dst.x + dst.width:
                pathx -= 1
                self.setCharAt(pathx,pathy,hallChar)
The choice of which rooms on the north to connect down south is entirely up to you. Perhaps you will connect a north room on the left with a south room on the right, and create a long, winding corridor between them? For the example, we will stick with a simple downward path that will angle left or right to reach the target room.
        choice = random.randint(0,3)
        print("choice:" + str(choice) + "," + str(choice+4))
        self.createHallDown(self.rooms[choice],self.rooms[choice+4],hallChar)
Note
Try connecting the rooms vertically with one horizontal hallway to invert the overall look of the dungeon! You might even make such changes with random rolls so that sometimes they just happen without code changes. Another type of dungeon that would be compelling might have one large room with small rooms arrayed around it. The important thing is making sure your algorithm creates a reasonable dungeon every time so the player is never given an impossible level.
When experimenting with code such as this, with various algorithms for generating rooms, it often happens that we try to draw a room or hall outside the borders of the screen. It just happens.
IndexError: list assignment index out of range
So, it would be helpful to trap those errors when they occur rather than allowing the game to simply crash. Trapping such an error helps to diagnose the logic bug. First, we can modify Dungeon.setCharAt() so that it checks the ranges before trying to set a tile in the dungeon. We can also modify Dungeon.getCharAt(), although errors will be fewer there. This version will avoid crashing the program due to a range error. The purpose is not to let the user keep playing, but to notify you when a crash is about to happen, in order to fix the bug. I used this very code to solve a bug in the hall generation code and you will need it too when you experiment with new algorithms. When the game is finished, though, you can safely comment out these debugging lines.
def getCharAt(self, x, y):
    if x < 0 or x > 79 or y < 0 or y > 44:
        print("error: x,y = ", x, y)
        return
    index = y * 80 + x
    if index < 0 or index > 80*45:
        print("error: index = ", index)
        return
    return self.tiles[index]

def setCharAt(self, x, y, char):
    if x < 0 or x > 79 or y < 0 or y > 44:
        print("error: x,y = ", x, y)
        return
    index = y * 80 + x
    if index < 0 or index > 80*45:
        print("error: index = ", index)
        return
    self.tiles[index] = char
Note
Do you prefer levels jam-packed with halls and rooms? Our generator leaves a lot of empty space because these are just the major rooms and halls. Using the code available, you can generate smaller off-shoot rooms and halls in any unused area. Some Roguelike games would even add rooms connected with hidden passages!
There are two ways to populate the dungeon: an easy way, and a hard way. The easy way involves just dropping things right into the tile array so that an ASCII character shows up in that location. The player can then interact with it based on that ASCII code. If that code represents treasure, then the player picks it up. If the code is a portal, then the player moves. If it’s a monster, the player fights.
The hard way is to maintain secondary lists of objects (treasure, portals, monsters, etc.), and draw these items over the tiles of the dungeon structure, so to speak. This gives the benefit of a more attractive appearance at the cost of some very challenging code to write and maintain.
One could argue in favor of both techniques, or even suggest other alternatives. For the sake of everyone’s sanity, we’re going to use the easy method in this chapter. Not only is it much less difficult to work with the code, but the game will be more useful to educators who want to use this game as an experiment testbed for “bot” A.I. projects, and sticking with a list of tiles that contains everything in the game makes the code much more accessible.
The entrance portal will be a tile in one of the rooms that sends the player up to the previous level (or out of the dungeon if it’s the first level). We want to position the entrance portal in a room so that the player starts off in that location. It would be best if the exit was not in the same room or else the player can quickly skip the whole level! First, we’ll choose a random room, and then just position the portal in the middle of the room.
    choice = random.randint(0,7)
    self.entrance_x = self.rooms[choice].x + self.rooms[choice].width//2
    self.entrance_y = self.rooms[choice].y + self.rooms[choice].height//2
    self.setCharAt(x,y,29) #entry portal
    print("entrance:",choice,x,y)
We use class variables for the entrance in order to keep track of it more easily for positioning the player. The exit portal will be a tile in a random location in the level that takes the player down to the next level below. The goal of the game in classic Rogue is to reach the last level and claim the Amulet of Yendor, then make your way back up again.
    choice2 = random.randint(0,7)
    while choice2 == choice:
        choice2 = random.randint(0,7)
    x = self.rooms[choice2].x + self.rooms[choice2].width//2
    y = self.rooms[choice2].y + self.rooms[choice2].height//2
    self.setCharAt(x,y,30) #exit portal
    print("exit:",choice2,x,y)
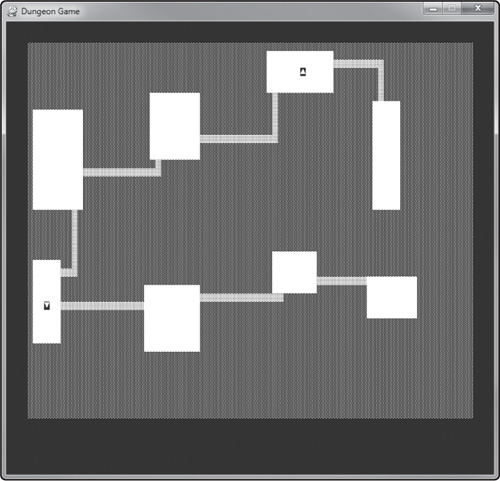
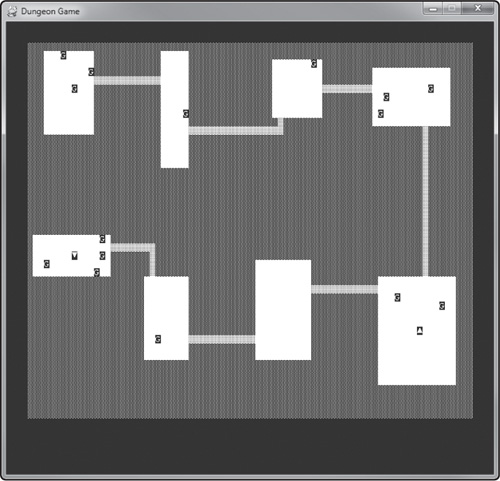
The end result of our new entrance and exit portal code is shown in Figure 14.21. The entrance portal looks like an “up” arrow, while the exit looks like a “down” arrow (ASCII codes 29 and 30, respectively). You may change these to different characters if you wish. Do you see how easy it was to add these tiles using the “easy” level array? Just set any position in the dungeon to any code from 0 to 255, and that change instantly shows up. You could even add new secret passages or cause “cave-ins.”
We’ll follow the old-school Roguelike approach and use “G” to represent gold. To add random gold throughout the level, just pick a random location, check to make sure it isn’t solid rock (the “background” or “empty” character is 175), which is a character with a dot pattern that makes it appear dark gray. You can change that character if you wish, but just be sure to be consistent in your code. It wouldn’t be a bad idea to define constants for these characters.
But, instead of looking specifically at the empty tile code, let’s look for the room code instead, and only drop gold into a room. This eliminates some code we would have to write to pick up gold in the halls, and centers gameplay in the rooms.
Now, let’s add some random gold. First, choose a random number of drops, then scatter them around the level on valid tiles. This is where it becomes handy to have an ASCII table for reference. Figure 14.22 shows the result of the random gold scattered around the level. Isn’t it remarkable how easy it is to add each new feature to the game? That is because we’re building on a solid foundation of code.
    drops = random.randint(5,20)
    for n in range(1,drops):
        tile = 175
        while tile == 175:
            x = random.randint(0,79)
            y = random.randint(0,44)
            tile = self.getCharAt(x,y)
        self.setCharAt(x,y,70) #'G'
In addition to gold, we want to give the player a few random item drops here and there to make the dungeon seem to have been explored before, to give it some character. Usually there will be one or two weapon and armor items here and there in each level, perhaps where a poor adventurer met his fate long ago. In some games, monsters will drop items when you kill them. Using the technique shown above to add gold to the level, you can add any item you wish to the level in a similar way. You could even booby-trap some items, so that the player takes damage after picking up an item! To pick up an item or gold, of course, just add it to the player’s gold count or inventory, and remove it from the level by setting that tile to a room or hall code.
So, let’s just add one “W” and one “A” to the level, representing one weapon and one armor item, and two “H” items representing health potions (for healing). You can use this code to add any other items you wish. There are even some ASCII codes that look sort of like these items (if you use your imagination!).We don’t need to keep track of the strengths of these items, or their value, because those random numbers can just be generated when the player picks them up! See the section titled “Advanced Gameplay” for more details on picking up items.
The code to drop an item is the same for gold, so we have some code again that needs to be put into a reusable method. Let’s take the “gold code” and write a new method called Dungeon.putCharInRandomRoom(). This code can be reused endlessly to add anything you want in the dungeon, including monsters. In the lower levels, you might want to limit the health potions, or make them only restore a small amount of health, to increase the difficulty of the game. After all, the player gets essentially free gear upgrades by just finding those items, so don’t make it too easy!
    self.putCharInRandomRoom(roomChar,86) #'W'
    self.putCharInRandomRoom(roomChar,64) #'A'
    self.putCharInRandomRoom(roomChar,71) #'H'
    self.putCharInRandomRoom(roomChar,71) #'H'
Here is the new method:
def putCharInRandomRoom(self,targetChar,itemChar):
tile = 0
while tile != targetChar:
x = random.randint(0,79)
y = random.randint(0,44)
tile = self.getCharAt(x,y)
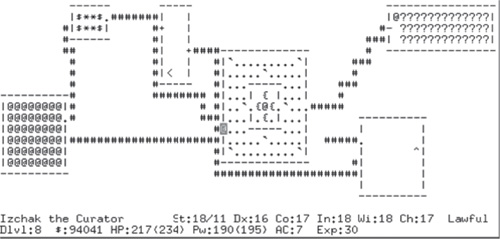
self.setCharAt(x,y,itemChar)
![Can you spot the [W]eapon, [A]rmor, and [H]ealth potion items?](http://imgdetail.ebookreading.net/software_development/6/9781435459809/9781435459809__more-python-programming__9781435459809__graphics__f0277-01.jpg)
Ah, monsters! We need a good, strong antagonist to make a story interesting. Monsters can be represented with any ASCII code, so peruse the table and find some really gnarly looking characters for your monsters! Then add them using the same code we wrote for the gold. Monsters should look scary. Choose the scariest-looking ASCII codes you can for the monsters. For instance, any of these characters might be a classic one-eyed “beholder”: ![]() . A “basilisk” might be represented with: ß or B. In the classic Roguelike gameplay, you want the monsters to get stronger and scarier as the player reaches deeper levels, and start with basic scary animals near the top, like giant rats, rabid wolves, etc.
. A “basilisk” might be represented with: ß or B. In the classic Roguelike gameplay, you want the monsters to get stronger and scarier as the player reaches deeper levels, and start with basic scary animals near the top, like giant rats, rabid wolves, etc.
Due to the additional work required, we might want to manage the monsters in the main program rather than inside the Dungeon class. But just to get things started, here’s some code that will add several “M” characters to the dungeon. Remember, the character is just a placeholder, without any data behind it. When the player encounters the monster, all of its info will be generated on the fly.
    num = random.randint(5,10)
    for n in range(0,num):
        self.putCharInRandomRoom(roomChar,20)
That’s a lot of code we’ve gone over in a short time. The complete source code for this game can be found in the Chapter 14 resource files (found at www.courseptr.com/downloads). We’ll go over the final code for the game later in this chapter. Right now, let’s just see a complete listing of the Dungeon class now that it’s finished. The file is called Dungeon.py.
import sys, time, random, math, pygame
from pygame.locals import *
from MyLibrary import *

class Dungeon():
    def __init__(self,offsetx,offsety):
        #create the font sprite
        self.text = MySprite()
        self.text.load("ascii8x12.png", 8, 12, 32)
        #create the level list
        self.tiles = list()
        for n in range(0,80*45):
            self.tiles.append(-1)
        self.offsetx = offsetx
        self.offsety = offsety
        self.generate()

    def generate(self, emptyChar=175, roomChar=218, hallChar=177):
        self.emptyChar = emptyChar
        self.roomChar = roomChar
        self.hallChar = hallChar

        #clear existing level
        for index in range(0,80*45):
            self.tiles[index] = emptyChar

        #create random rooms
        PL = 4
        PH = 8
        SL = 5
        SH = 14
        self.rooms = list()
        self.createRoom(0,0,PL,PH,SL,SH)
        self.createRoom(20,0,PL,PH,SL,SH)
        self.createRoom(40,0,PL,PH,SL,SH)
        self.createRoom(60,0,PL,PH,SL,SH)
        self.createRoom(0,22,PL,PH,SL,SH)
        self.createRoom(20,22,PL,PH,SL,SH)
        self.createRoom(40,22,PL,PH,SL,SH)
        self.createRoom(60,22,PL,PH,SL,SH)

        #connect the rooms with halls
        self.createHallRight(self.rooms[0],self.rooms[1],hallChar)
        self.createHallRight(self.rooms[1],self.rooms[2],hallChar)
        self.createHallRight(self.rooms[2],self.rooms[3],hallChar)
        self.createHallRight(self.rooms[4],self.rooms[5],hallChar)
        self.createHallRight(self.rooms[5],self.rooms[6],hallChar)
        self.createHallRight(self.rooms[6],self.rooms[7],hallChar)

        #choose a random northern room to connect with the south
        choice = random.randint(0,3)
        print("choice:" + str(choice) + "," + str(choice+4))
        self.createHallDown(self.rooms[choice],self.rooms[choice+4],hallChar)

        #add rooms to level
        for room in self.rooms:
            for y in range(room.y,room.y+room.height):
                for x in range(room.x,room.x+room.width):
                    self.setCharAt(x, y, roomChar)

        #add entrance portal
        choice = random.randint(0,7)
        self.entrance_x = self.rooms[choice].x + self.rooms[choice].width//2
        self.entrance_y = self.rooms[choice].y + self.rooms[choice].height//2
        self.setCharAt(self.entrance_x,self.entrance_y,29) #entry portal
        print("entrance:",choice,self.entrance_x,self.entrance_y)

        #add entrance and exit portals
        choice2 = random.randint(0,7)
        while choice2 == choice:
            choice2 = random.randint(0,7)
        x = self.rooms[choice2].x + self.rooms[choice2].width//2
        y = self.rooms[choice2].y + self.rooms[choice2].height//2
        self.setCharAt(x,y,30) #exit portal
        print("exit:",choice2,x,y)

        #add random gold
        drops = random.randint(5,20)
        for n in range(1,drops):
            self.putCharInRandomRoom(roomChar,70) #'G'

        #add weapon, armor, and health potiions
        self.putCharInRandomRoom(roomChar,86) #'W'
        self.putCharInRandomRoom(roomChar,64) #'A'
        self.putCharInRandomRoom(roomChar,71) #'H'
        self.putCharInRandomRoom(roomChar,71) #'H'

       #add some monsters
        num = random.randint(5,10)
        for n in range(0,num):
            self.putCharInRandomRoom(roomChar,20)

    def putCharInRandomRoom(self,targetChar,itemChar):
        tile = 0
        while tile != targetChar:
            x = random.randint(0,79)
            y = random.randint(0,44)
            tile = self.getCharAt(x,y)
        self.setCharAt(x,y,itemChar)

    def createRoom(self,x,y,rposx,rposy,rsizel,rsizeh):
        room = Rect(x + random.randint(1,rposx),
                    y + random.randint(1,rposy),
                    random.randint(rsizel,rsizeh),
                    random.randint(rsizel,rsizeh))
        self.rooms.append(room)

    def createHallRight(self,src,dst,hallChar):
        pathx = src.x + src.width
        pathy = src.y + random.randint(1,src.height-2)
        self.setCharAt(pathx,pathy,hallChar)
        if pathy > dst.y and pathy < dst.y + dst.height:
            while pathx < dst.x:
                pathx += 1
                self.setCharAt(pathx,pathy,hallChar)
        else:
            while pathx < dst.x+1:
                pathx += 1
                self.setCharAt(pathx,pathy,hallChar)
            if pathy < dst.y+1:
                self.setCharAt(pathx,pathy,hallChar)
                while pathy < dst.y:
                    pathy += 1
                    self.setCharAt(pathx,pathy,hallChar)
            else:
                self.setCharAt(pathx,pathy,hallChar)
                while pathy > dst.y + dst.height:
                    pathy -= 1
                    self.setCharAt(pathx,pathy,hallChar)

    def createHallDown(self,src,dst,hallChar):
        pathx = src.x + random.randint(1,src.width-2)
        pathy = src.y + src.height
        self.setCharAt(pathx,pathy,hallChar)
        if pathx > dst.x and pathx < dst.x + dst.width:
            while pathy < dst.y:
                pathy += 1
                self.setCharAt(pathx,pathy,hallChar)
        else:
            while pathy < dst.y+1:
                pathy += 1
                self.setCharAt(pathx,pathy,hallChar)
            if pathx < dst.x+1:
                self.setCharAt(pathx,pathy,hallChar)
                while pathx < dst.x:
                    pathx += 1
                    self.setCharAt(pathx,pathy,hallChar)
            else:
                self.setCharAt(pathx,pathy,hallChar)
                while pathx > dst.x + dst.width:
                    pathx -= 1
                    self.setCharAt(pathx,pathy,hallChar)

    def getCharAt(self, x, y):
        if x < 0 or x > 79 or y < 0 or y > 44:
            print("error: x,y = ", x, y)
            return
        index = y * 80 + x
        if index < 0 or index > 80*45:
            print("error: index = ", index)
            return
        return self.tiles[index]

    def setCharAt(self, x, y, char):
        if x < 0 or x > 79 or y < 0 or y > 44:
            print("error: x,y = ", x, y)
            return
        index = y * 80 + x
        if index < 0 or index > 80*45:
            print("error: index = ", index)
            return
        self.tiles[index] = char

    def draw(self, surface):
        for y in range(0,45):
            for x in range(0,80):
                char = self.getCharAt(x,y)
                if char >= 0 and char <= 255:
                    self.draw_char(surface, x, y, char)
                else:
                    pass #empty tile

    def draw_char(self, surface, tilex, tiley, char):
        self.text.X = self.offsetx + tilex * 8
        self.text.Y = self.offsety + tiley * 12
        self.text.frame = char
        self.text.last_frame = char
        self.text.update(0)
        self.text.draw(surface)
We now have a playable random dungeon level generator, and have populated the dungeon with things. The player’s character (PC) is a special character that will not be merely added to the dungeon; it will be maintained with separate variables. After all, we have to keep track of the player’s stats. This is best done with a custom Player class. When the game begins, usually the player can participate in “rolling” the character’s stats. We will just fill them in randomly for the chapter example, but you may want to add a feature to your own game where you can customize the player or re-roll the stats before moving on.
Our player variable will be global, not part of the Dungeon class. So, let’s assume the player object is created before the dungeon object (in the main program code), and go from there. When the level is generated, we can just position the player using the Dungeon.entrance_x and Dungeon.entrance_y variables. We’ll skimp on some of the code at this point because the complete source code for the main file is shown later.
    dungeon.generate()
    player.x = dungeon.entrance_x+1
    player.y = dungeon.entrance_y+1
The Player class has all of the variables and methods needed to manage the player’s stats and position. We will draw the player’s ASCII character separately from the rest of the dungeon, over the top of the dungeon tiles. Here, now, is a highly developed Player class with a helper function called Die used to generate random numbers like from a die roll. The class will be added to a new Python source code file called Player.py. Just to be thorough, note the required import statements. Note that the Monster class has been appended to the bottom of this listing, as it inherits directly from Player.
import sys, time, random, math, pygame
from pygame.locals import *
from MyLibrary import *
from Dungeon import *

def Die(faces):
    roll = random.randint(1,faces)
    return roll

class Player():
    def __init__(self,dungeon,level,name):
        self.dungeon = dungeon
        self.alive = True
        self.x = 0
        self.y = 0
        self.name = name
        self.gold = 0
        self.experience = 0
        self.level = level
        self.weapon = level
        self.weapon_name = "Club"
        self.armor = level
        self.armor_name = "Rags"
        self.roll()

    def roll(self):
        self.str = 6 + Die(6) + Die(6)
        self.dex = 6 + Die(6) + Die(6)
        self.con = 6 + Die(6) + Die(6)
        self.int = 6 + Die(6) + Die(6)
        self.cha = 6 + Die(6) + Die(6)
        self.max_health = 10 + Die(self.con)
        self.health = self.max_health

    def levelUp(self):
        self.str += Die(6)
        self.dex += Die(6)
        self.con += Die(6)
        self.int += Die(6)
        self.cha += Die(6)
        self.max_health += Die(6)
        self.health = self.max_health

    def draw(self,surface,char):
        self.dungeon.draw_char(surface,self.x,self.y,char)

    def move(self,movex,movey):
        char = self.dungeon.getCharAt(self.x + movex, self.y + movey)
        if char not in (self.dungeon.roomChar,self.dungeon.hallChar):
            return False
        else:
            self.x += movex
            self.y += movey
            return True

    def moveUp(self): return self.move(0,-1)
    def moveDown(self): return self.move(0,1)
    def moveLeft(self): return self.move(-1,0)
    def moveRight(self): return self.move(1,0)

    def addHealth(self,amount):
        self.health += amount
        if self.health < 0:
            self.health = 0
        elif self.health > self.max_health:
            self.health = self.max_health

    def addExperience(self,xp):
        cap = math.pow(10,self.level)
        self.experience += xp
        if self.experience > cap:
            self.levelUp()

    def getAttack(self):
        attack = self.str + Die(20)
        return attack

    def getDefense(self):
        defense = self.dex + self.armor
        return defense

    def getDamage(self,defense):
        damage = Die(8) + self.str + self.weapon - defense
        return damage

class Monster(Player):
    def __init__(self,dungeon,level,name):
        Player.__init__(self,dungeon,level,name)
        self.gold = random.randint(1,4) * level
        self.str = 1 + Die(6) + Die(6)
        self.dex = 1 + Die(6) + Die(6)
Now we have enough built up to move and draw the player’s character (which brings a whole new meaning to the word!). In the event handler of the main program, we’ll respond to key press events in order to move the player’s character. What happens is, we try to move the player in one of the four directions. If that way is blocked by any code other than a room or hall code, then that is an object and we should respond to it before moving over it. Note that some of the code for the event handler has been skipped so we can focus on the important stuff.
    if event.key == K_ESCAPE: sys.exit()

    elif event.key == K_SPACE:
        dungeon.generate(TILE_EMPTY,TILE_ROOM,TILE_HALL)
        player.x = dungeon.entrance_x+1
        player.y = dungeon.entrance_y+1

    elif event.key==K_UP or event.key==K_w:
        if player.moveUp() == False:
            playerCollision(0,-1)

    elif event.key==K_DOWN or event.key==K_s:
        if player.moveDown() == False:
            playerCollision(0,1)

    elif event.key==K_RIGHT or event.key==K_d:
        if player.moveRight() == False:
            playerCollision(1,0)

    elif event.key==K_LEFT or event.key==K_a:
        if player.moveLeft() == False:
            playerCollision(-1,0)
When the up, down, left, or right keys are pressed, we “simulate” movement in that direction by calling Player.MoveUp(), Player.MoveDown(), and so on. These methods return True if the movement is legal, or False if there’s an obstacle in the way. If that happens, we need to respond to the “collision” with the obstacle. That is handled by a helper function in our main program, called playerCollision(). This is some early code that just tries to identify the obstacle and print a message to the console. But, this is all we need to complete the game. Now, if the player tries to move into a wall, the game won’t let them!
def playerCollision(stepx,stepy):
    global TILE_EMPTY,TILE_ROOM,TILE_HALL,dungeon,player,level
    char = dungeon.getCharAt(player.x + stepx, player.y + stepy)
    if char == 29: #portal up
        print("portal up")
    elif char == 30: #portal down
        print("portal down")
    elif char == TILE_EMPTY: #wall
        print("You ran into the wall--ouch!")
In this section, we cover the advanced gameplay options that bring the game to life, covering fighting, visibility, item pickups, A.I. movement, and others. By this point, we have a fully interactive game but incomplete gameplay with the finished Dungeon, Player and Monster classes. To remedy the gameplay issue, we’ll include a complete listing of the code, one section at a time. Let’s begin with the initialization. In order for this program to run, be sure to include the Dungeon.py and Player.py files in the same folder, along with the ASCII font file, ascii8x12.png.
import sys, time, random, math, pygame
from pygame.locals import *
from MyLibrary import *
from Dungeon import *
from Player import *

def game_init():
    global screen, backbuffer, font1, font2, timer
    pygame.init()
    screen = pygame.display.set_mode((700,650))
    backbuffer = pygame.Surface((700,650))
    pygame.display.set_caption("Dungeon Game")
    font1 = pygame.font.SysFont("Courier New", size=18, bold=True)
    font2 = pygame.font.SysFont("Courier New", size=14, bold=True)
    timer = pygame.time.Clock()

def Die(faces):
    roll = random.randint(1,faces)
    return roll
To enable item pickups, the player must have an inventory, which presumes he or she has a backpack of some sort. We can make that assumption if we want, but an inventory system requires quite a bit of design and forethought. We can’t just add items to a list. How do we display them? There’s no feature in the game to display an inventory system. Perhaps a secondary screen that hides the dungeon and shows the inventory? That’s a feasible idea, but not one we’re going to explore in this chapter. I will encourage you to pursue this idea if you wish, but we’ll stick with the simple approach with weapons and armor.
The simple approach is this: The player has an attack and defense value for fighting monsters. When you pick up a weapon or armor in the dungeon, if that item is better than what you currently have, then it is auto-equipped. If not, it is turned into gold. A more complex Roguelike game would make you return to a shop and sell the items, but that is another rather complex feature that would take a very long time to explain, and so it is beyond the scope of this chapter. We need a whole book to explore these ideas! In fact, whole books have been written on them.
Previously, we added several items to the game (“W”, “A”, “G”, and “H”), so let’s deal with those first, and then you can use similar code for any other types of items you wish to add to the game. To do this, we return to the playerCollision() function again, in the main program code. Here’s an example of picking up gold.
def playerCollision(stepx,stepy):
    global TILE_EMPTY,TILE_ROOM,TILE_HALL,dungeon,player,level
    yellow = (220,220,0)
    green = (0,220,0)

    #get object at location
    char = dungeon.getCharAt(player.x + stepx, player.y + stepy)

    if char == 29: #portal up
        message("portal up")

    elif char == 30: #portal down
        message("portal down")

    elif char == TILE_EMPTY: #wall
        message("You ran into the wall--ouch!")

    elif char == 70: #gold
        gold = random.randint(1,level)
        player.gold += gold
        dungeon.setCharAt(player.x+stepx, player.y+stepy, TILE_ROOM)
        message("You found " + str(gold) + " gold!", yellow)
To handle weapons, we need to look for the ASCII code used for a weapon drop. In the Dungeon class, this was the “W” character, ASCII code 86. We’ll write some code to give the player a random new weapon when they pick up a “W”.
    elif char == 86: #weapon
        weapon = random.randint(1,level+2)
        if level <= 5: #low levels get crappy stuff
            temp = random.randint(0,2)
        else:
            temp = random.randint(3,6)
        if temp == 0: name = "Dagger"
        elif temp == 1: name = "Short Sword"
        elif temp == 2: name = "Wooden Club"
        elif temp == 3: name = "Long Sword"
        elif temp == 4: name = "War Hammer"
        elif temp == 5: name = "Battle Axe"
        elif temp == 6: name = "Halberd"
        if weapon >= player.weapon:
            player.weapon = weapon
            player.weapon_name = name
            message("You found a " + name + " +" + str(weapon) + "!",yellow)
        else:
            player.gold += 1
            message("You discarded a worthless " + name + ".")
        dungeon.setCharAt(player.x+stepx, player.y+stepy, TILE_ROOM)
We’ll use similar code for armor pickups. The code for an armor item is “A,” 64.
    elif char == 64: #armor
        armor = random.randint(1,level+2)
        if level <= 5: #low levels get crappy stuff
            temp = random.randint(0,2)
        else:
            temp = random.randint(3,7)
        if temp == 0: name = "Cloth"
        elif temp == 1: name = "Patchwork"
        elif temp == 2: name = "Leather"
        elif temp == 3: name = "Chain"
        elif temp == 4: name = "Scale"
        elif temp == 5: name = "Plate"
        elif temp == 6: name = "Mithril"
        elif temp == 7: name = "Adamantium"
        if armor >= player.armor:
            player.armor = armor
            player.armor_name = name
            message("You found a " + name + " +" + str(armor) + "!",yellow)
        else:
            player.gold += 1
            message("You discarded a worthless " + name + ".")
        dungeon.setCharAt(player.x+stepx, player.y+stepy, TILE_ROOM)
Lastly, we have health potions to pick up, character “H,” 71.
    elif char == 71: #health
        heal = 0
        for n in range(0,level):
            heal += Die(6)
        player.addHealth(heal)
        dungeon.setCharAt(player.x+stepx, player.y+stepy, TILE_ROOM)
        message("You drank a healing potion worth " + str(heal) +
            " points!", green)
It’s been a while since we’ve seen a build of the game, so let’s see what it looks like at this point. The message() function is a helper that displays action messages below the dungeon. Just for the variety, the room character has been replaced with a blank space, which is black. Now the rooms are black and the outer dungeon is solid-looking. You may use either theme or use another one entirely if you wish. This just shows the variety of options.

Combat in most RPGs follows very specific rules that we will try to emulate. The basic premise for combat in modern RPGs may differ from the way it was done in Rogue, but we’ll do our best to make combat fun. There are three factors involved in combat:
Defender’s defense value
Attacker’s attack value
Attacker’s damage value
You might have noticed that we already have methods in the Player class for doing these things, so we’re all ready to go as far as the code is concerned. Let’s dig into the calculations to understand how combat works.
To calculate the defense value used for a to-hit roll, which determines whether the attack succeeds, we use the following formula:
Defense = DEXTERITY + Armor Value
Let’s face it, we’re going to fake it here regarding monster armor, and just throw a random number out for use as armor, based on the current dungeon level. So, given the current dungeon level, we’ll multiply that by a random number. Let’s say the current level is 5. Therefore, whatever number we roll for the monster’s dexterity will be multiplied by 5.
The formula for the attack value is as follows:
Attack = STRENGTH + D20
The “D20” means rolling a 20-sided die. There’s a wide variance in the attack value with such a many-sided die. This reflects the effect of combat, where some swings totally miss and some hit the enemy. Based on this attack value, we compare it to the monster’s defense value. If attack is greater than defense, then the “to-hit” roll succeeds. Damage is calculated next.
If the to-hit roll succeeds, then the defender takes damage. That amount will be based on the following calculation:
Damage = D8 + STRENGTH + Weapon Damage - Defense
As you can see, the Defense value is used twice: first, to calculate to-hit, and secondly, to calculate damage. That’s good! It means the stats of the defender are very important to the gameplay.
The game will only recognize one fight at a time. When the player attacks a monster, there’s no turning back, no way to flee. A global monster object will remember the current monster being fought.
monster = Monster(dungeon,level,"Grue")
Unfortunately, to build a really comprehensive combat system like this requires that we keep track of each monster individually in a list, which is just too overwhelming for this single chapter project. So, we’re going to cheat a bit. All of the logic for rolling to-hit chance, damage, and so on, could be written given the methods are already written in Player, but one hit will kill every monster. Where we’ll make it difficult is in the amount of damage that the player takes as a result. Some high-level monsters could potentially kill the player with a single blow too, if the player’s armor class is not up to the pounding. The only time an attack will continue for more than one round is if the player misses completely!
We can use the playerCollision() function again to attack a monster.
    elif char == 20: #monster
        attack_monster(player.x+stepx, player.y+stepy, 20)
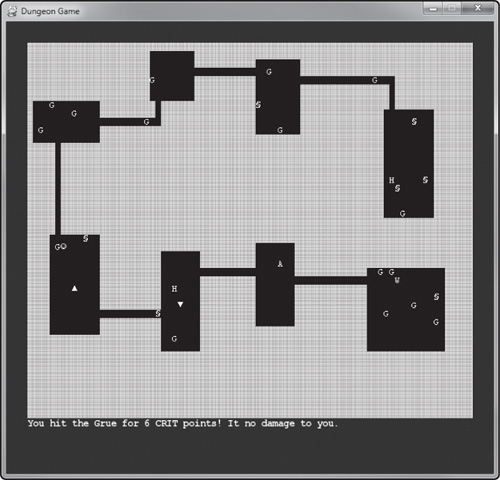
Let’s write that important function now. Working with the to-hit, attack, damage, defense values is a lot of fun! The combat calculations are often the most enjoyable part of building an RPG. If you want to make improvements or change the logic, you are welcome to make this game your own. Figure 14.25 shows the result of a battle with a Grue! Note that gold was dropped where the Grue died. Can you spot the player? It’s in the room on the lower left corner.
def attack_monster(x,y,char):
    global dungeon, TILE_ROOM
    monster = Monster(dungeon,level,"Grue")

    #player's attack
    defense = monster.getDefense()
    attack = player.getAttack()
    damage = player.getDamage(defense)
    battle_text = "You hit the " + monster.name + " for "
    if attack == 20 + player.str: #critical hit?
        damage *= 2
        battle_text += str(damage) + " CRIT points!"
        dungeon.setCharAt(x, y, 70) #drop gold
    elif attack > defense: #to-hit?
        if damage > 0:
            battle_text += str(damage) + " points."
            dungeon.setCharAt(x, y, 70) #drop gold
        else:
            battle_text += "no damage!"
            damage = 0
    else:
        battle_text = "You missed the " + monster.name + "!"
        damage = 0

    #monster’s attack
    defense = player.getDefense()
    attack = monster.getAttack()
    damage = monster.getDamage(defense)
    if attack > defense: #to-hit?
        if damage > 0:
            #if damage is overwhelming, halve it
            if damage > player.max_health: damage /= 2
            battle_text += " It hit you for " + str(damage) + " points."
            player.addHealth(-damage)
        else:
        battle_text += " It no damage to you."
    else:
        battle_text += " It missed you."

    #display battle results
    message(battle_text)

    #did the player survive?
    if player.health <= 0: player.alive = False
When moving monsters, we have a lot of options, and it depends on what you want the monsters to do in the game. We really don’t want them to just immediately start chasing the player. But what if the player stumbles upon a monster? If the player is close enough, the monster definitely should move toward the player! Just remember, this is a turn-based game, so things only happen when the player moves. We can borrow some of the visibility code to see when the player is close enough to a monster to trigger the A.I. code for movement. It’s important to make sure the monster doesn’t go through any walls or gold or items. If a monster moves over gold or other items in our “easy” dungeon tile algorithm, those items are erased by the monster’s code.
Let’s begin by inserting some logic into the user input section of code so that monsters will move when the player moves. This code is found in the main loop in the event handler.
    elif event.key==K_UP or event.key==K_w:
        if player.moveUp() == False:
            playerCollision(0,-1)
        else:
            move_monsters()

    elif event.key==K_DOWN or event.key==K_s:
        if player.moveDown() == False:
            playerCollision(0,1)
        else:
            move_monsters()

    elif event.key==K_RIGHT or event.key==K_d:
        if player.moveRight() == False:
            playerCollision(1,0)
        else:
            move_monsters()

    elif event.key==K_LEFT or event.key==K_a:
        if player.moveLeft() == False:
            playerCollision(-1,0)
        else:
            move_monsters()
Although the Monster class inherits from Player, and thus it has the move methods available, we can’t use them! Monsters in the tilemap are just placeholders until the player stumbles into them. No, we have to move things in the dungeon with new code. With these two helper functions, move_monsters() and move_monster(), every time the player makes a move, the monsters all move too! Better yet, they move inside their current room and do not walk over anything or bump into any of the walls.
def move_monsters():
    #find monsters
    for y in range(0,44):
        for x in range(0,79):
            tile = dungeon.getCharAt(x,y)
            if tile == 20: #monster?
                move_monster(x,y,20)

def move_monster(x,y,char):
    global TILE_ROOM
    movex = 0
    movey = 0
    dir = random.randint(1,4)
    if dir == 1: movey = -1
    elif dir == 2: movey = 1
    elif dir == 3: movex = -1
    elif dir == 4: movex = 1
    c = dungeon.getCharAt(x + movex, y + movey)
    if c == TILE_ROOM:
        dungeon.setCharAt(x, y, TILE_ROOM) #delete old position
        dungeon.setCharAt(x+movex, y+movey, char) #move to new position
Let’s just admit it: the game isn’t really all that scary if you can see the whole level immediately from a bird’s-eye view! What we need to implement is a scheme to hide everything that is beyond the player’s visible range. Some Roguelike games tend to reveal the level and keep it visible as the player explores, as a sort of built-in mapping system. Some reveal the dungeon as you go, but darken areas that are no longer visible due to lighting. These are really great features that add to the depth of the gameplay. What can we do very simply to create a similar effect without getting bogged down in complex code? To hide everything not in view of the player requires a ray-casting system. It’s not hard to write code to do that, but the code does require more explanation than we can get into in this single chapter.
Note
Learn how a line-of-sight ray-casting algorithm can be added to the game in my book Visual C# Game Programming for Teens, published in 2011 by Course PTR. That entire book is devoted to RPG techniques.
To reveal the level and keep it visible requires an extra flag attached to every tile that determines whether it has been “seen” or not. That would require modifications to the dungeon code, which I am not prepared to do at this point. We will take a simple but effective approach: simulating a torch light around the player. This adds an interesting new dimension to the gameplay. What if the player runs out of lamp oil or candles? We could reduce the player’s visibility to a tiny circle, but enlarge it if the player has a light source. Wouldn’t that be spooky, wandering around when you can only see a few feet in front of you? Only a fool would take the chance of running into a Grue in the dark!
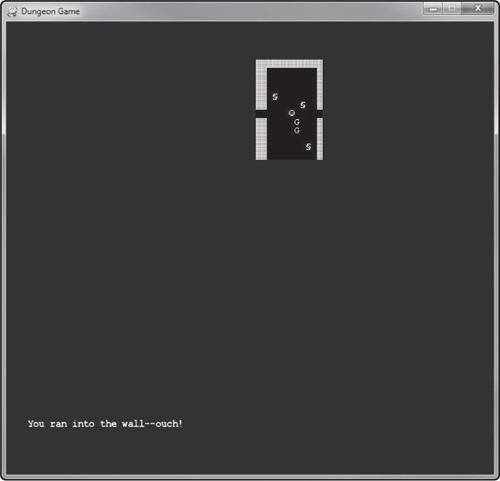
This is surprisingly easier than one might expect it to be. All we have to do is go back to the Dungeon.draw() method, duplicate it, and skip any tiles that are a certain range from the player. Or, rather, pass the method new parameters, position and radius, and have it draw only the tiles within that range. Since this is a dramatic change to the game, we’ll make it an option that doesn’t have to be on all the time. We’ll call this new method Dungeon.draw_radius(). This surprisingly small amount of code produces the dramatic result shown in Figure 14.26.
def draw_radius(self, surface, rx, ry, radius):
    left = rx - radius
    if left < 0: left = 0
    top = ry - radius
    if top < 0: top = 0
    right = rx + radius
    if right > 79: right = 79
    bottom = ry + radius
    if bottom > 44: bottom = 44

    for y in range(top,bottom):
        for x in range(left,right):
            char = self.getCharAt(x,y)
            if char >= 0 and char <= 255:
                self.draw_char(surface, x, y, char)
The player may enter an entrance portal to go up a level, or an exit portal to go down a level. These “portals” might simply be stairs or steps between the levels, not really magical teleporters, but the game code treats them as such. Upon touching an entrance portal, the current level will be reduced by one, and the level re-generated. A real Roguelike game—that is, one intended for release with polish and detail—will keep track of the levels so the player doesn’t get to cheat by just going in and out of a portal to re-fill the level with gold and items again. When a room has been cleared, it should remain cleared of items, but perhaps monsters could re-spawn after a while. We already detect when the player touches the entry or exit portals, so it’s just a matter of updating the level variable and re-rolling the dungeon.
Now it’s time to wrap up this game. We need to add a few basic things, like displaying the current level, the player’s stats and gold, and other informative details. We will go over the basic code here, and you can use it to display any additional information you want in the game.
The following function handles most of the information presented on the screen regarding the player’s stats, current dungeon level, and so on.
def print_stats():
    print_text(font2, 0, 615, "STR")
    print_text(font2, 40, 615, "DEX")
    print_text(font2, 80, 615, "CON")
    print_text(font2, 120, 615, "INT")
    print_text(font2, 160, 615, "CHA")
    print_text(font2, 200, 615, "DEF")
    print_text(font2, 240, 615, "ATT")
    fmt = "{:3.0f}"
    print_text(font2, 0, 630, fmt.format(player.str))
    print_text(font2, 40, 630, fmt.format(player.dex))
    print_text(font2, 80, 630, fmt.format(player.con))
    print_text(font2, 120, 630, fmt.format(player.int))
    print_text(font2, 160, 630, fmt.format(player.cha))
    print_text(font2, 200, 630, fmt.format(player.getDefense()))

    #get average damage
    global att,attlow,atthigh
    att[0] = att[1]
    att[1] = att[2]
    att[2] = att[3]
    att[3] = att[4]
    att[4] = (player.getAttack() + att[0] + att[1] + att[2] + att[3]) // 5
    if att[4] < attlow: attlow = att[4]
    elif att[4] > atthigh: atthigh = att[4]
    print_text(font2, 240, 630, str(attlow) + "-" + str(atthigh))

    print_text(font2, 300, 615, "LVL")
    print_text(font2, 300, 630, fmt.format(player.level))
    print_text(font2, 360, 615, "EXP")
    print_text(font2, 360, 630, str(player.experience))

    print_text(font2, 440, 615, "WPN")
    print_text(font2, 440, 630, str(player.weapon) + ":" + player.weapon_name)
    print_text(font2, 560, 615, "ARM")
    print_text(font2, 560, 630, str(player.armor) + ":" + player.armor_name)

    print_text(font2, 580, 570, "GOLD " + str(player.gold))
    print_text(font2, 580, 585, "HLTH " + str(player.health) + "/" +
        str(player.max_health))
The game needed a consistent way to display information about events happening in the game, like combat rolls and so forth. The message() function handles this, while the actual message is printed later.
def message(text,color=(255,255,255)):
    global message_text, message_color
    message_text = text
    message_color = color
Finally, we arrive at the main program logic in Game.py. Thus far, we have had two major helper classes in Player.py and Dungeon.py, which significantly cleaned up the code in Game.py, which we have been going over for the last few pages. Now, we can present just the core logic of the game. It is surprisingly simple considering how much is going on. You have already seen the event handler code, but it is shown here again so the code is not interrupted.
#define ASCII codes used for dungeon
TILE_EMPTY = 177
TILE_ROOM = 31
TILE_HALL = 31

#main program begins
game_init()
game_over = False
last_time = 0
dungeon = Dungeon(30, 30)
dungeon.generate(TILE_EMPTY,TILE_ROOM,TILE_HALL)
player = Player(dungeon, 1, "Player")
player.x = dungeon.entrance_x+1
player.y = dungeon.entrance_y+1
level = 1
message_text = "Welcome, brave adventurer!"
message_color = 0,200,50
draw_radius = False

#used to estimate attack damage
att = list(0 for n in range(0,5))
attlow=90
atthigh=0

#main loop
while True:
    timer.tick(30)
    ticks = pygame.time.get_ticks()

    #event section
    for event in pygame.event.get():
        if event.type == QUIT: sys.exit()
        elif event.type == KEYDOWN:
            if event.key == K_ESCAPE: sys.exit()
            elif event.key == K_TAB:
                #toggle map mode
                draw_radius = not draw_radius
            elif event.key == K_SPACE:
                dungeon.generate(TILE_EMPTY,TILE_ROOM,TILE_HALL)
                player.x = dungeon.entrance_x+1
                player.y = dungeon.entrance_y+1
            elif event.key==K_UP or event.key==K_w:
                if player.moveUp() == False:
                    playerCollision(0,-1)
                else:
                    move_monsters()
            elif event.key==K_DOWN or event.key==K_s:
                if player.moveDown() == False:
                    playerCollision(0,1)
                else:
                    move_monsters()
            elif event.key==K_RIGHT or event.key==K_d:
                if player.moveRight() == False:
                    playerCollision(1,0)
                else:
                    move_monsters()
            elif event.key==K_LEFT or event.key==K_a:
                if player.moveLeft() == False:
                    playerCollision(-1,0)
                else:
                    move_monsters()

    #clear the background
    backbuffer.fill((20,20,20))

    #draw the dungeon
    if draw_radius:
        dungeon.draw_radius(backbuffer, player.x, player.y, 6)
    else:
        dungeon.draw(backbuffer)

    #draw the player’s little dude
    player.draw(backbuffer,0)

    #draw the back buffer
    screen.blit(backbuffer, (0,0))

    print_text(font1, 0, 0, "Dungeon Level " + str(level))
    print_text(font1, 600, 0, player.name)
    #special message text
    print_text(font2, 30, 570, message_text, message_color)
    print_stats()
    pygame.display.update()
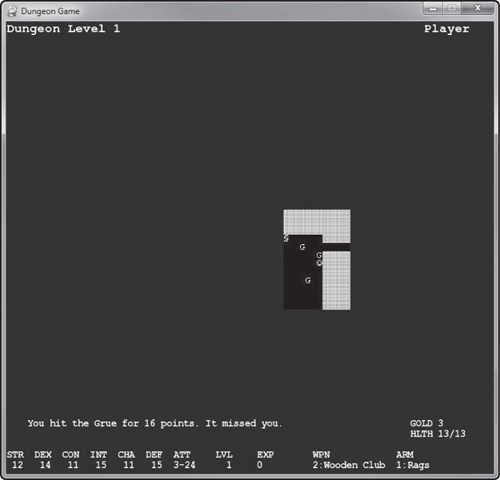
With the lamp mode toggled on (toggle it with the Tab key) and all of the information displayed on the screen, our game is now finished! See Figure 14.27 for the final result.
This chapter was a singularly monumental effort to build an old-school RPG in a single go. I think we’ve succeeded in getting the most important aspects of the gameplay in, given the limited space. There’s more that could be done with the game, of course, but that might be said of anything and everything when we’re talking about game programming. I trust you will do something fun with it above and beyond the chapter example.