
Chapter 12. NXT Remote Control

In this chapter, you’ll create an app that turns your Android phone into a remote control for a LEGO MINDSTORMS NXT robot. The app will have buttons for driving the robot forward and backward, turning left and right, and stopping. You’ll program it so the robot automatically stops if it detects an obstacle. The app will use the Bluetooth capabilities of the phone to communicate with the robot.
LEGO MINDSTORMS robots are fun to play with, but they are also educational. After-school programs use robots to teach elementary- and middle-school children problem-solving skills and introduce them to engineering and computer programming. NXT robots are also used by kids aged 9–14 in FIRST Lego League robotics competitions.
The NXT programmable robotics kit includes a main unit called the NXT Intelligent Brick. It can control three motors and four input sensors. You can assemble a robot from LEGO building elements, gears, wheels, motors, and sensors. The kit comes with its own software to program the robot, but now you can use App Inventor to create Android applications to control an NXT using Bluetooth connectivity.
The application in this chapter is designed to work with a robot that has wheels and an ultrasonic sensor, such as the Shooterbot robot pictured here. The Shooterbot is often the first robot that people build with the LEGO MINDSTORMS NXT 2.0 set. It has left wheels connected to output port C, right wheels connected to output port B, a color sensor connected to input port 3, and an ultrasonic sensor connected to input port 4.
What You’ll Learn
This chapter uses the following components and concepts:
The
BluetoothClientcomponent for connecting to the NXT.The
ListPickercomponent to provide a user interface for connecting to the NXT.The
NxtDrivecomponent for driving the robot’s wheels.The
NxtUltrasonicSensorcomponent for using the robot’s ultrasonic sensor to detect obstacles.The
Notifiercomponent for displaying error messages.
Getting Started
You’ll need Android version 2.0 or higher to use the application in this chapter. Also, for security reasons, Bluetooth devices must be paired before they can connect to each other. Before you get started building the app, you’ll need to pair your Android with your NXT by following these steps:
On the NXT, click the right arrow until it says Bluetooth and then press the orange square.
Click the right arrow until it says Visibility and then press the orange square.
If the Visibility value is already Visible, continue to step 4. If not, click the left or right arrow to set the value to Visible.
On the Android, go to Settings→Wireless & Networks.
Make sure the Bluetooth checkbox is checked.
Click “Bluetooth settings” and “Scan for devices.”
Under “Bluetooth devices,” look for a device named “NXT.”
Note
If you’ve ever changed your robot’s name, look for a device name that matches your robot’s name instead of “NXT.”
If you see “Paired but not connected” under your robot’s name, you’re finished! Otherwise, continue to step 9.
If you see “Pair with this device” under your robot’s name, click it.
On the NXT, it should ask for a passkey. Press the orange square to accept 1234.
On the Android, it should ask for the PIN. Enter 1234 and press OK.
You should now see “Paired but not connected.” You’re finished!
Connect to the App Inventor website and start a new project. Name it “NXTRemoteControl” and set the screen’s title to “NXT Remote Control”. Open the Blocks Editor and connect to the phone.
Designing the Components
For this app, we’ll need to create and define behaviors for both non-visible and visible components.
Non-Visible Components
Before creating the user interface components, you’ll create some non-visible components, listed in Table 12-1 and illustrated in Figure 12-1, to control the NXT.
Component type | Palette group | What you’ll name it | Purpose |
| Other stuff |
| Connect to the NXT. |
| LEGO MINDSTORMS |
| Drive the robot’s wheels. |
| LEGO MINDSTORMS |
| Detect obstacles. |
| Other stuff |
| Display error messages. |
Set the properties of the components in the following way:
Set the
BluetoothClientproperty ofNxtDrive1andNxtUltrasonicSensor1to BluetoothClient1.Check
BelowRangeEventEnabledonNxtUltrasonicSensor1.Set the
DriveMotorsproperty ofNxtDrive1:If your robot has the left wheel’s motor connected to output port C and the right wheel’s motor connected to output port B, then the default setting of “CB” doesn’t need to be changed.
If your robot is configured differently, set the
DriveMotorsproperty to a two-letter text value where the first letter is the output port connected to the left wheel’s motor and the second letter is the output port connected to the right wheel’s motor.
Set the
SensorPortproperty ofNxtUltrasonicSensor1.If your robot’s ultrasonic sensor is connected to input port 4, then the default setting of “4” doesn’t need to be changed.
If your robot is configured differently, set the
SensorPortproperty to the input port connected to the ultrasonic sensor.
Visible Components
Now let’s create the user interface components shown in Figure 12-2.

To make the Bluetooth connection, you’ll need the unique
Bluetooth address of the NXT. Unfortunately, Bluetooth addresses
consist of eight 2-digit hexadecimal numbers (a way of representing
binary values) separated by colons, making them very cumbersome to
type. You won’t want to type in the address on your phone every time
you run the app. So, to avoid that, you’ll use a ListPicker that displays a list of the
robots that have been paired with your phone and lets you choose
one.
You’ll use buttons for driving forward and backward, turning
left and right, stopping, and disconnecting. You can use a VerticalArrangement to lay out everything
except for the ListPicker, and a
HorizontalArrangement to contain
the buttons for turning left, stopping, and turning right.
You can build the interface shown in Figure 12-2 by dragging out the components listed in Table 12-2.
Component type | Palette group | What you’ll name it | Purpose |
| Basic |
| Choose the robot to connect to. |
| Screen Arrangement |
| A visual container. |
| Basic |
| Drive forward. |
| Screen Arrangement |
| A visual container. |
| Basic |
| Turn left. |
| Basic |
| Stop. |
| Basic |
| Turn right. |
| Basic |
| Drive backward. |
| Basic |
| Disconnect from the NXT. |
To arrange the visual layout as shown in Figure 12-2, place LeftButton, StopButton, and RightButton inside HorizontalArrangement1, and place ForwardButton, HorizontalArrangement1, BackwardButton, and DisconnectButton inside VerticalArrangement1.
Set the properties of the components in the following way:
Uncheck
ScrollableonScreen1.Set the
WidthofConnectListPickerandDisconnectButtonto “Fill parent.”Set the
WidthandHeightofVerticalArrangement1,ForwardButton,HorizontalArrangement1,LeftButton,StopButton,RightButton, andBackwardButtonto “Fill parent.”Set the
TextofConnectListPickerto “Connect...”.Set the
TextofForwardButtonto “^”.Set the
TextofLeftButtonto “<”.Set the
TextofStopButtonto “-”.Set the
TextofRightButtonto “>”.Set the
TextofBackwardButtonto “v”.Set the
TextofDisconnectButtonto “Disconnect”.Set the
FontSizeofConnectListPickerandDisconnectButtonto 30.Set the
FontSizeofForwardButton,LeftButton,StopButton,RightButton, andBackwardButtonto 40.
In this application, it makes sense to hide most of the user
interface until the Bluetooth is connected to the NXT. To accomplish
this, uncheck the Visible
property of VerticalArrangement1.
Don’t worry—in a moment, we’ll make the application reveal the user
interface after it connects to the NXT.
Adding Behaviors to the Components
In this section, you’ll program the behavior of the app, including:
Letting the user connect the app to a robot by choosing it from a list.
Letting the user disconnect the app from a robot.
Letting the user drive the robot using the control buttons.
Forcing the robot to stop when it senses an obstacle.
Connecting to the NXT
The first behavior you’ll add is connecting to the NXT. When
you click ConnectListPicker, it
will show a list of the paired robots. When you choose a robot, the
app will make a Bluetooth connection to that robot.
Displaying the List of Robots
To display the list of robots, you’ll use ConnectListPicker. A ListPicker looks like a button, but when
it’s clicked, it displays a list of items and lets you choose
one.
You’ll use the BluetoothClient1.AddressesAndNames
block to provide a list of the addresses and names of Bluetooth
devices that have been paired with the Android. Because BluetoothClient1 is used with NXT
components, it automatically limits the devices included in the
AddressesAndNames property to
those that are robots, so you won’t see other kinds of Bluetooth
devices (like headsets) in the list. Table 12-3 lists the blocks
you’ll need for this step.
Block type | Drawer | Purpose |
ConnectListPicker | Triggered when
| |
set ConnectListPicker.Elements to | ConnectListPicker | Set the choices that will appear. |
BluetoothClient1.AddressesAndNames | BluetoothClient1 | The addresses and names of robots that have been paired with the Android. |
How the blocks work
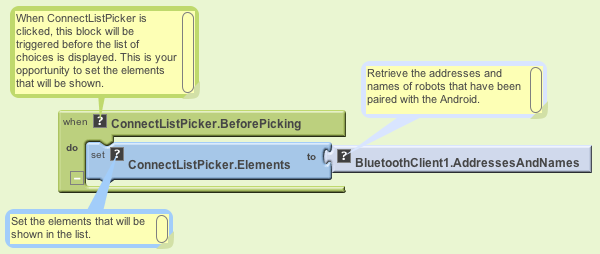
When ConnectListPicker is
clicked, the ConnectListPicker.BeforePicking
event is triggered before the list of choices is displayed, as
shown in Figure 12-3. To
specify the items that will be listed, set the ConnectListPicker.Elements
property to the BluetoothClient1.AddressesAndNames
block. ConnectListPicker will
list the robots that have been paired with the Android.
Test your app.
On your phone, click “Connect...” and see what happens. You should see a list of all the robots your phone has been paired with.
If you just see a black screen, your phone hasn’t been
paired with any robots. If you see addresses and names of other
Bluetooth devices, such as a Bluetooth headset, the BluetoothClient property of NxtDrive1 and NxtUltrasonicSensor1 has not been set
properly.
Making the Bluetooth Connection
After you choose a robot from the list, the app will connect
to that robot via Bluetooth. If the connection is successful, the
user interface will change. ConnectListPicker will be hidden, and the
rest of the user interface components will appear. If the robot is
not turned on, the connection will fail and an error message will
pop up.
You’ll use the BluetoothClient1.Connect block to make the connection. The ConnectListPicker.Selection property provides the address and name of the chosen robot.
You’ll use an ifelse block to test whether the connection was successful or not. The ifelse block has three different areas where blocks are connected: “test,” “then-do,” and “else-do.” The “test” area will contain the BluetoothClient1.Connect block. The “then-do” area will contain the blocks to be executed if the connection is successful. The “else-do” area will contain the blocks to be executed if the connection fails.
If the connection is successful, you will use the Visible property to hide ConnectListPicker and show VerticalArrangement1, which contains the
rest of the user interface components. If the connection fails, you
will use the Notifier1.ShowAlert block to
display an error message. Table 12-4 lists the
blocks you’ll need for this behavior.
Block type | Drawer | Purpose |
ConnectListPicker | Triggered when a
robot is chosen from | |
ifelse | Control | Test whether the Bluetooth connection is successful. |
BluetoothClient1.Connect | BluetoothClient1 | Connect to the robot. |
ConnectListPicker.Selection | ConnectListPicker | The address and name of the chosen robot. |
set ConnectListPicker.Visible to | ConnectListPicker | Hide |
false | Logic | Plug into set ConnectListPicker.Visible to. |
set VerticalArrangement1.Visible to | VerticalArrangement1 | Show the rest of the user interface. |
true | Logic | Plug into set VerticalArrangement1.Visible to. |
Notifier1.ShowAlert | Notifier1 | Show an error message. |
text (“Unable to make a Bluetooth connection.”) | Text | The error message. |
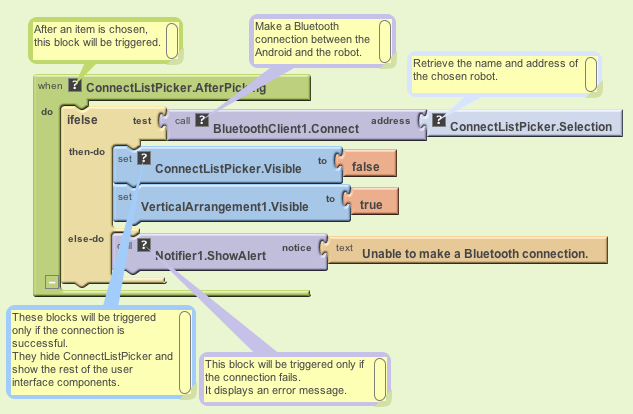
How the blocks work
After a robot is picked, the ConnectListPicker.AfterPicking
event is triggered, as shown in Figure 12-4. The BluetoothClient1.Connect block
makes the Bluetooth connection to the selected robot. If the
connection is successful, the “then-do” blocks are executed: the
ConnectListPicker.Visible
property is set to false to hide ConnectListPicker, and the VerticalArrangement1.Visible
property is set to true to show VerticalArrangement1. If the connection
fails, the “else-do” blocks are executed: the Notifier1.ShowAlert block
displays an error message.
Disconnecting from the NXT
You’re probably excited about connecting your Android to your NXT, but before you do that, let’s do one more thing: add the behavior for disconnecting. That way, you’ll be able to test both connecting and disconnecting.
When DisconnectButton is
clicked, the app will close the Bluetooth connection and the user
interface will change. ConnectListPicker will reappear, and the
rest of the user interface components will be hidden.
Use the blocks listed in Table 12-5 to build the
BluetoothClient1.Disconnect block
that closes the Bluetooth connection. You will use the Visible property to show ConnectListPicker and hide VerticalArrangement1, which contains the
rest of the user interface components.
Block type | Drawer | Purpose |
DisconnectButton.Click | DisconnectButton | Triggered when
|
BluetoothClient1.Disconnect | BluetoothClient1 | Disconnect from the robot. |
set ConnectListPicker.Visible to | ConnectListPicker | Show |
true | Logic | Plug into set ConnectListPicker.Visible to. |
set VerticalArrangement1.Visible to | VerticalArrangement1 | Hide the rest of the user interface. |
false | Logic | Plug into set VerticalArrangement1.Visible to. |
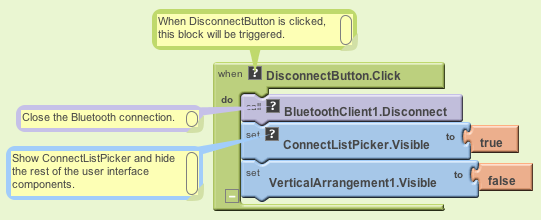
How the blocks work
When DisconnectButton is
clicked, the DisconnectButton.Clicked event
is triggered, as shown in Figure 12-5. The BluetoothClient1.Disconnect
block closes the Bluetooth connection. The ConnectListPicker.Visible
property is set to true to show ConnectListPicker, and the VerticalArrangement1.Visible
property is set to false to hide VerticalArrangement1.
Test your app.
Make sure your robot is turned on and then, on your phone, click “Connect...” and choose the robot you want to connect to. It will take a moment to make the Bluetooth connection. Once the robot connects, you should see the buttons for controlling the robot, as well as the Disconnect button.
Click the Disconnect button. The buttons for controlling the robot should disappear, and the Connect button should reappear.
Driving the NXT
Let’s get to the really fun part: adding behavior for driving forward and backward, turning left and right, and stopping. Don’t forget about stopping—if you do, you’ll have an out-of-control robot on your hands!
The NxtDrive component
provides five blocks for driving the robot’s motors:
MoveForwardIndefinitely drives both motors forward.
MoveBackwardIndefinitely drives both motors backward.
TurnCounterClockwiseIndefinitely turns the robot to the left by driving the right motor forward and the left motor backward.
TurnClockwiseIndefinitely turns the robot to the right by driving the left motor forward and the right motor backward.
Stop stops both motors.
The Move... and Turn...
blocks each have a parameter called Power. You’ll use a number
block, along with all the other items listed in Table 12-6, to specify the amount
of power the robot should use to turn the motors. The value can
range from 0 to 100. However, if you specify too little power, the
motors will make a whining sound but not turn. In this application,
you’ll use 90 (percent).
Block type | Drawer | Purpose |
ForwardButton.Click | ForwardButton | Triggered when
|
NxtDrive1.MoveForwardIndefinitely | NxtDrive1 | Drive the robot forward. |
number (90) | Math | The amount of power. |
BackwardButton.Click | BackwardButton | Triggered when
|
NxtDrive1.MoveBackwardIndefinitely | NxtDrive1 | Drive the robot backward. |
number (90) | Math | The amount of power. |
LeftButton.Click | LeftButton | Triggered when
|
NxtDrive1.TurnCounterClockwiseIndefinitely | NxtDrive1 | Turn the robot counterclockwise. |
number (90) | Math | The amount of power. |
RightButton.Click | RightButton | Triggered when
|
NxtDrive1.TurnClockwiseIndefinitely | NxtDrive1 | Turn the robot clockwise. |
number (90) | Math | The amount of power. |
StopButton.Click | StopButton | Triggered when
|
NxtDrive1.Stop | NxtDrive1 | Stop the robot. |
How the blocks work
When ForwardButton is
clicked, the ForwardButton.Clicked event is
triggered. The NxtDrive1.MoveForwardIndefinitely
block shown in Figure 12-6 is used to
move the robot forward at 90% power. The remaining events function
similarly for the other buttons, each powering the robot backward,
left, and right.

When StopButton is
clicked, the StopButton.Clicked event is
triggered. The NxtDrive1.Stop block is used to
stop the robot.
Test your app.
Follow the instructions in the previous Test your app. section to connect to the NXT. Make sure the robot is not on a table where it could fall, and then test its behavior as follows:
Click the forward button. The robot should move forward.
Click the backward button. The robot should move backward.
Click the left button. The robot should turn counterclockwise.
Click the right button. The robot should turn clockwise.
Click the stop button. The robot should stop.
If your robot doesn’t move, but you can hear a whining sound, you may need to increase the power. You can use 100 for maximum power.
Using the Ultrasonic Sensor to Detect Obstacles
Using the ultrasonic sensor, the robot will stop if it encounters an obstacle, like the culprit shown in Figure 12-7, within 30 centimeters.

The NxtUltrasonicSensor
component can be used to detect obstacles. It has two properties
named BottomOfRange and TopOfRange that define the detection range
in centimeters. By default, the BottomOfRange property is set to 30
centimeters and TopOfRange is set
to 90 centimeters.
The NxtUltrasonicSensor
component also has three events called BelowRange, WithinRange, and AboveRange. The BelowRange event will be triggered when an
obstacle is detected at a distance below BottomOfRange. The WithinRange event will be triggered when
an obstacle is detected at a distance between BottomOfRange and TopOfRange. The AboveRange event will be triggered when an
obstacle is detected at a distance above TopOfRange.
You’ll use the NxtUltrasonicSensor1.BelowRange
event block, shown in Table 12-7, to detect an
obstacle within 30 centimeters. If you want to detect an obstacle
within a different distance, you can adjust the BottomOfRange property. You’ll use the
NxtDrive1.Stop block to stop the
robot.
Block type | Drawer | Purpose |
NxtUltrasonicSensor1.BelowRange | NxtUltrasonicSensor1 | Triggered when the ultrasonic sensor detects an obstacle at a distance below 30 centimeters. |
NxtDrive1.Stop | NxtDrive1 | Stop the robot. |
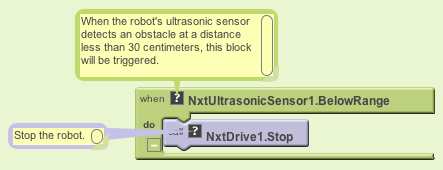
How the blocks work
When the robot’s ultrasonic sensor detects an obstacle at a distance below 30 centimeters, the NxtUltrasonicSensor1.BelowRange event is triggered, as shown in Figure 12-8. The NxtDrive1.Stop block stops the robot.
Test your app.
Follow the instructions in the previous Test your app. section to connect to the NXT. Using the navigation buttons, drive your robot toward an obstacle, such as a cat. The robot should stop when it gets within 30 centimeters of the cat.
If the robot doesn’t stop, the cat may have moved away from the robot before it got within 30 centimeters. You may need to test your app with an inanimate obstacle.
Variations
After you get this application working—and you’ve spent enough time actually playing with your NXT robot—you might want to try:
Varying the amount of power when driving the robot.
You can do this by changing the numeric value that you plug into the MoveForwardIndefinitely, MoveBackwardIndefinitely, TurnCounterclockwiseIndefinitely, and TurnClockwiseIndefinitely blocks.
Using the
NxtColorSensorto shine a red light when an obstacle is detected.You can use an
NxtColorSensorcomponent and itsGenerateColorproperty.You’ll need to set the
DetectColorproperty to false (or uncheck it in the Component Designer) because the color sensor cannot detect and generate color at the same time.
Using an
OrientationSensorto control the robot.Using LEGO building elements to physically attach your phone to the robot. Create applications that make the robot autonomous.
Summary
Here are some of the concepts we’ve covered in this tutorial:
The
ListPickercomponent allows you to choose from a list of paired robots.The
BluetoothClientcomponent makes the connection to the robot.The
Notifiercomponent displays an error message.The
Visibleproperty is used to hide or show user interface components.The
NxtDrivecomponent can drive, turn, and stop the robot.The
NxtUltrasonicSensorcomponent is used to detect obstacles.