Chapter 5. Sharing Photos and Videos
HOW EASY IS IT TO SHARE PHOTOS WITH friends and family through Google+? Depending on what you shoot your photos with and where you keep them, the answers range from “easy” to “very easy.” Seriously—Google+ makes it super simple to share photos with people, whether or not they use Google+. You get unlimited space to post photos and videos, handy tools to make them look better, and a very slick page for showing them off. If you have an Android phone or use Google’s Picasa Web Albums, the photo and video features of Google+ will feel like second nature. If you’re an iPhone owner or Flickr fan instead—or even if you’ve never posted photos before—this chapter will still have you uploading photos in no time.
Just as with posts, you have a lot of control over who gets to see the photos and videos you post on Google+. So you can share snapshots and movies with friends to remind them of all the fun you had at the cabin last weekend—while making sure your boss and mother don’t see the details of said cabin adventure. This chapter explains how to share your photos with others, view and download the shots other people have shared with you, show off your videos, and organize your photos into albums that are easy for people to see and download.
Viewing Photos
WHEN SOMEONE IN YOUR circles posts a picture and shares it with you, it appears in your stream. But what if you just want to focus on snapshots without all those other, non-photo posts distracting you? As with circles, Google+ includes a page dedicated exclusively to photos. It’s your command center for everything photo related. To hop to your Photos page, click the Photos button near the top of any Google+ page

When you arrive at the Photos page, you’ll see photos that people in your circles have uploaded. Each photo has a little label on the bottom that indicates who uploaded it (“by Joe Smith”), and if people have commented on a particular photo, it has a small speech-bubble icon in its upper-right corner that indicates the number of comments.
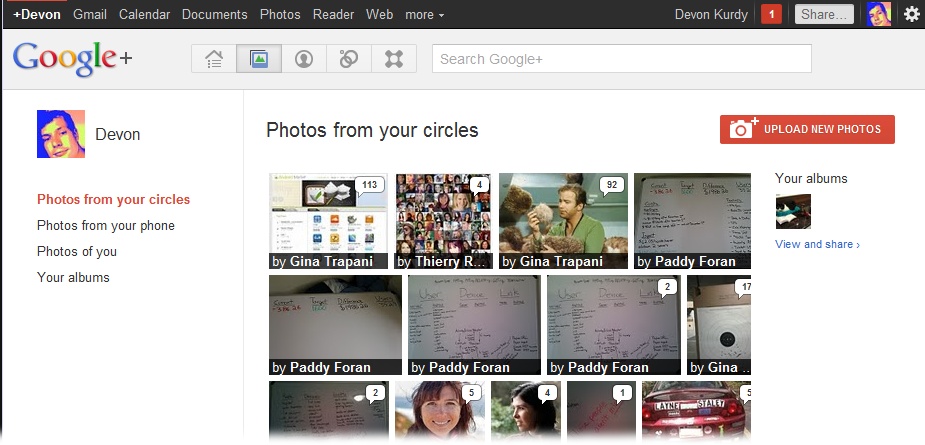
You can change which photos you see in the middle of the page by clicking one of the categories on the left side of the screen, below your profile picture:
Photos from your circles. When you first go to your Photos page, Google+ automatically selects this category (you can tell it’s selected here because its name is displayed in red text). When it’s selected, your Photos page displays images labeled with the name of the person who shared that photo, and, if anyone has commented on it, a speech-bubble icon.
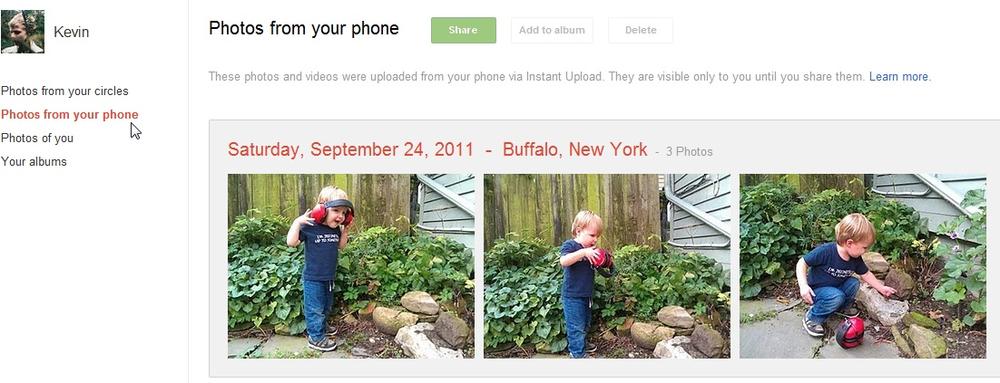
Photos from your phone. Click the name of this category to see photos you’ve uploaded from your phone using the Instant Upload feature described on Uploading photos automatically from an Android phone or tablet. (As of this writing, Instant Upload is only available on Android phones.)
Photos of you. Here you’ll see photos that you’ve been tagged in, either by yourself, by people in your circles, or by people outside your circles whose tags you’ve approved. (As Tagging Photos explains, tagging is a way to indicate who’s in a photo.) If you’ve been tagged in a photo with another person, those photos also show up in a subcategory labeled “Photos of you with…”
Photos from your posts. These are the photos you’ve specifically shared with certain people or circles by attaching them to posts or choosing them from among your uploaded albums.
Your albums. This category includes all your photos, even ones you haven’t shared with anyone yet. (In Google+, an album is a batch of photos you upload in one batch.) You’ll also see automatically compiled albums here, like “Photos from posts,” “Photos from Messenger” (see Starting a Messenger Session (Apps Only)), and “Profile photos.”
Note
If you’ve used Google’s Picasa Web Albums service before Google+ to upload and organize photos, you’ll see those albums listed on your Google+ Photos page as well.
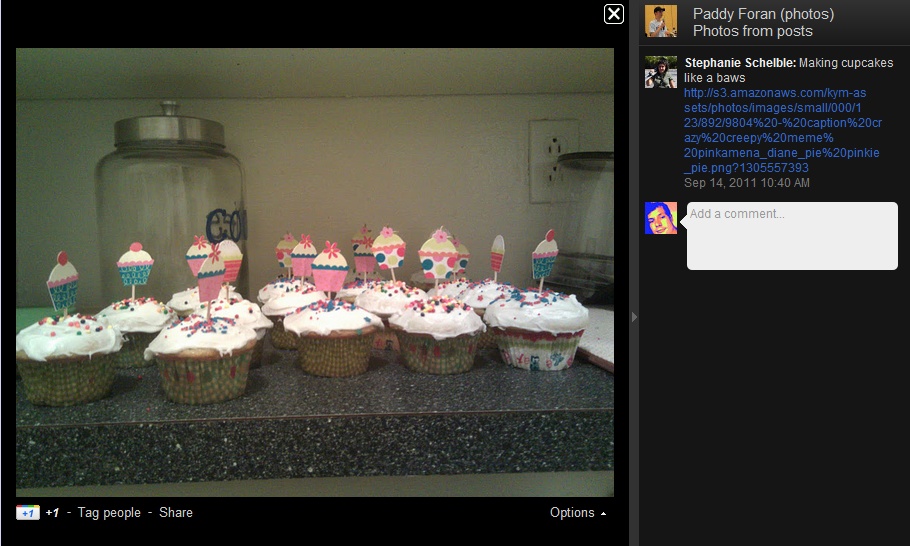
If you see a photo you’re interested in, click it. If it’s one of your photos, you’ll be taken to a page showing that photo and the other images in the album it came from. Click the photo again and your screen changes drastically: A larger version of the photo appears on a mostly black (or all-black, depending on your browser) background. This distraction-free view is similar to one photographers often use to examine and display their work; Google calls this lightbox view.
Near the upper-right corner of the lightbox view screen is an X you can click to get back to the Photos page. The two translucent arrows on either side of the image let you move through the photos. On the right side of the page is a panel where you see, from top to bottom, the person who posted the photo, any comments that have been made about that photo, and a box where you can add your own comment, if you’d like.
Underneath the photo itself are four buttons (or links, depending on your browser): +1 (which indicates how many others have +1’d this photo, if any), Share, “Tag people,” and Options. If you’re viewing one of your own photos, you’ll also see a fifth button or link: Edit Photo; Changing visibility for individual photos explains how to use the items in that menu. And at the bottom is a strip of all the photos from this category—in this case, photos shared with you from people in your circles—that you can use as a guide when you’re navigating through the images using the translucent arrows.
Note
Google+ switches to lightbox view when you click a picture anywhere on the site: in your stream, on a profile page, and so on. To return to wherever you were before you hopped to lightbox view, click the X near the upper right of the lightbox page.
Here’s the lowdown on each part of this screen:
The photo itself. Clicking it advances you to the next slide, just like clicking the right-facing arrow next to it. Right-clicking it (or tapping with two fingers on a MacBook trackpad) displays a shortcut menu of all the options your web browser gives you for images. Among them will likely be choices similar to “Save image as,” which lets you save the image to your computer, and “Open image in new tab” (or “View image”), which opens the image in another browser tab so you can then drag it onto your computer for easier saving.
The “John Doe (photos)/Photos from posts” box. In the upper rightmost corner of the lightbox view screen, you’ll see a small profile picture of the person who shared this photo. Clicking on their picture or their name brings you to their profile page. Clicking the “(photos)” link brings you to that person’s albums page, which, like your own “Your albums” page, shows all their photos that you’re allowed to see. Clicking “Photos from posts” brings you to that section of their photos page, where you see all the photos they’ve specifically shared, usually with a comment.
The comments list. Commenting on a photo here is the same as commenting on someone’s post (Commenting). When you add a comment here, it shows up in people’s streams just like any other comment.
The Share button. This works just like the Share link in your stream (Sharing Others’ Posts). Click it to see a pop-up box where you can add a comment and choose which circles or people you want to share it with. Keep reading for a fuller description, just ahead.
The “Tag people” button. This button lets you add tags to photos as explained on Tagging Photos.
The Options button. This button displays a few options that differ depending on whether you’re viewing one of your contact’s photo (and on what restrictions the photo’s owner has placed on it, if any) or one of your own photos. If it’s someone else’s photo, you’ll see a “Photo details” option, which displays nitty-gritty info about the shot (aperture, focal length, exposure, and so on). The “Download photo” option does just what it says (you won’t see this option if the person who posted the photo specifically turned off photo downloading in their Google+ setting, as explained on Adjusting Overall Photo Settings). Choose “Report abuse” if the photo is inappropriate, malicious, or otherwise bad for the Google+ community. If you’re viewing one of your photos, the Actions menu also includes options for rotating, editing, and deleting the image.
The filmstrip at the bottom of the page. This strip of images (which may not show up if you’re viewing one of your own photos that isn’t in an album) shows you which photos are included in the particular group you’re viewing. For example, the group might include more photos from the person who took the photo you clicked to get to lightbox view. Or if you’d clicked one of the other categories on the Photos page (Viewing Photos), the other photos in the filmstrip might be from other people in your circles, from your phone, pictures that you’re in, or photos from your albums. Clicking the arrows to the left or right of the picture you’re looking at moves back or forward through the pictures in the timeline of photos you’re viewing. You can also click any of the little thumbnails at the bottom of the page to bring them up for viewing.
Tip
Want to flip through pictures more quickly? You can use the arrow keys on your keyboard to move left and right through a series of pictures in lightbox view. You can also use the J and K keys: J to move forward, K to move backward. (The N and P keys work, too.) Getting familiar with using these keys isn’t a bad idea—they move you forward and backward in lots of places in Google+, and in Gmail, Google Calendar, and many other Google services.
Sharing Photos
SHARING PHOTOS IN GOOGLE+ is remarkably easy. The process is slightly different depending on whether you want to share a single photo or a whole album, but either way, it takes just a few seconds.
Head to the Photos page and find the photo or album you want to share. You can share anything you can see on the Photos page, from any section listed on the left: images from your circles, from your phone, ones you’ve been tagged in (“Photos of you”), and so on.
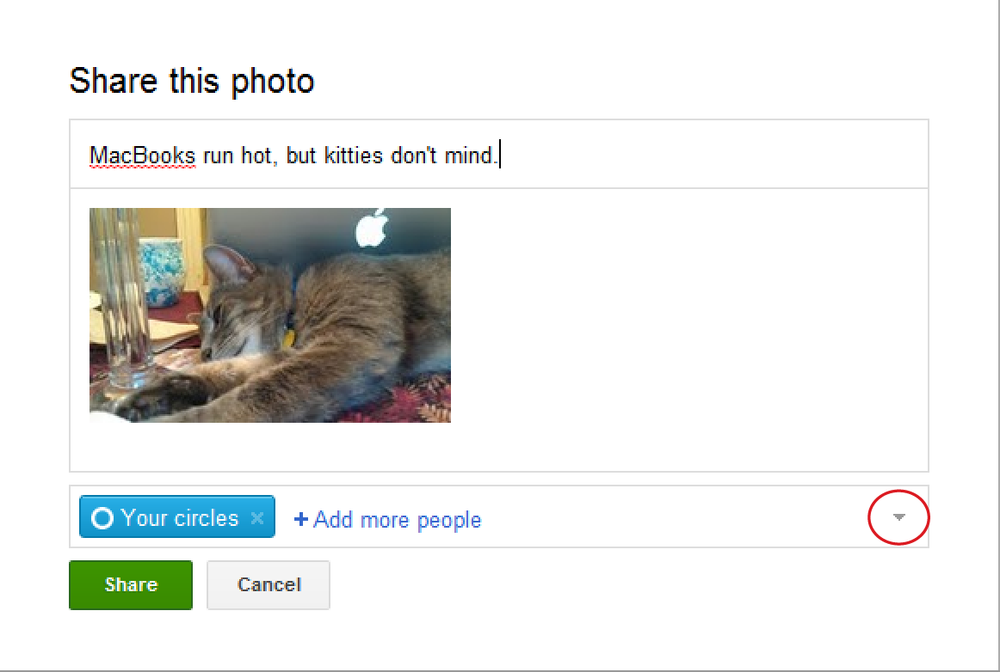
If you just want to share one photo, that’s pretty easy. Navigate to the photo you want to share, and then click it so that it comes up in lightbox view. You should see a Share button (or link) just below the photo. (If you don’t, it’s because the image is in the “Photos from your circles” collection, and the person who posted this photo “locked” it or specifically disabled further sharing [Editing and Deleting Photos].) Click this button and you’ll get a pop-up box where you can add a comment and choose which people and/or circles can see the image. If you click the tiny arrow circled in the figure, you can disable comments on this post and lock the post to prevent people from sharing it with others. When everything looks good, click Share.
Note
If you have an Android Phone and you use Instant Upload (Uploading photos automatically from an Android phone or tablet), “Photos from your phone,” works a bit differently. Clicking a photo in this category just selects it, so you can keep clicking other images to select them, too. To display a photo in this category in lightbox view so you can share it, you have to double-click it.
If you want to share an entire album of photos, head to the “Your albums” category, click the album you want to share, and then click the “Share album” button near the top of the page.

So what if you have several different photos you’ve uploaded to Google+ and want to share, but they’re not in an arranged album? Actually, Google+ isn’t all that helpful in this case. There’s no way to rearrange your albums in Google+ and move photos from one album to another. However, if the photos you want to share are on your computer, you can create a new album by uploading those photos to Google+ in a single batch, either by clicking the Upload New Photos button on the Photos page (Uploading via Your Browser), or by creating a new post, clicking the camera icon, and then choosing “Create an album” (Uploading as post attachments). So if you’re desperate to get images that are stored only on Google+ into a single album, you could download the images to your computer, and then upload them back onto Google+ so they’re all in the same album; it’s tedious, but it works. And, remember, you don’t need to worry about double-uploading photos, since Google+ gives you unlimited storage space for photos.
Including Photos and Videos in Your Profile
People who’ve added you to their circles will see your photos in their streams and in the “Photos from your circles” category of their own Photos pages. But you can also share photos and videos on your Profile page so that anyone who seeks you out or clicks your name can see them (assuming you set the images’ or clips’ visibility to Public, of course).
As you learned in the box on Editing Your Profile, your profile has a few different tabs, including two labeled Photos and Videos (respectively). Google+ automatically displays these tabs, so you don’t actually need to do anything to display them in your profile—they’re already there. But if you turned these tabs off while editing your profile, it’s super easy to turn them back on. Just head to your Profile page, click the Edit Profile button, and then click the Photos tab and turn on the “Show this tab on your profile” checkbox. Do the same for the Videos tab. (The items underneath these checkboxes—concerning automatic tag approval and geolocation info—are the same as the ones in your Google+ settings, and we’ll cover them in just a bit [Adjusting Overall Photo Settings].)
Getting Photos onto Google+
THERE ARE THREE MAIN ways to add your photos to Google+. You can upload them, either in batches or individually, to Google+ using a web browser. Or, you can upload them from a web-connected cellphone that’s running the Google+ mobile app. Finally, if you use Google’s photo-sharing service, Picasa Web Albums, you can easily move photos from Picasa over to Google+. The following sections explain all these options.
Tip
Flip to Adjusting Overall Photo Settings to read about settings that affect all the photos you upload to Google+.
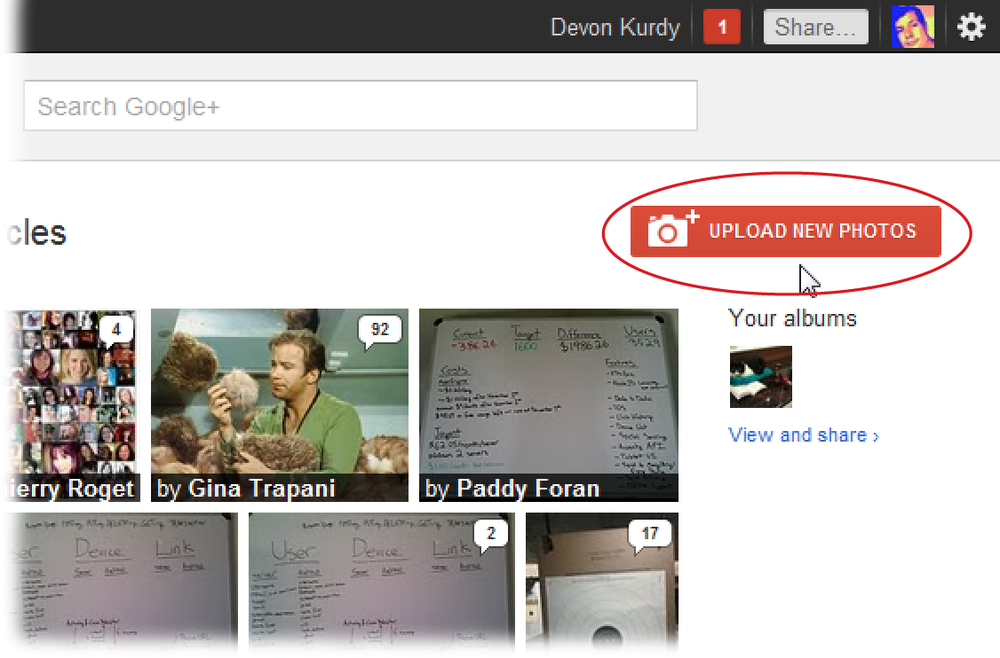
Uploading via Your Browser
It’s hard to miss the big, red Upload New Photos button in the upper-right corner of your Photos page.
When you click it, you see an “Upload and share photos” box that should look familiar if you uploaded a profile picture when you signed up for Google+. What’s in the box varies slightly depending on which web browser you use. At the center of the box is a “Select photos from your computer” button. You may also see a message telling you to “Drag photos here” and a dotted line indicating where to drop images you’ve dragged over from elsewhere on your computer—your Pictures folder, your desktop, or even an attachment in an email program.
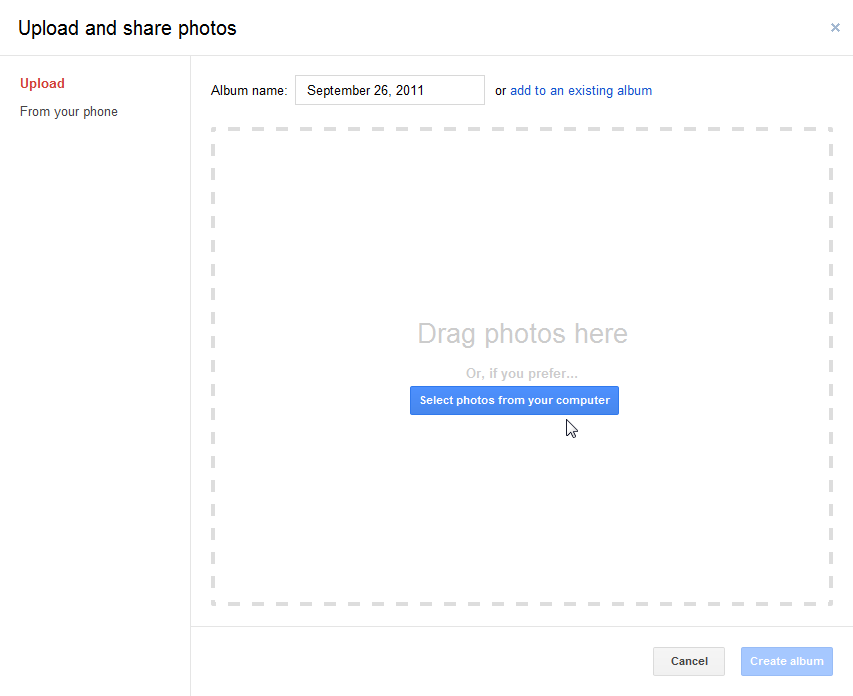
Click “Select photos from your computer” to open a dialog box where you can choose files to upload. (Select multiple photos using the Control [or ⌘ on a Mac] and Shift keys.) Once you’ve selected the photos you want, click Open (or Choose, depending on your browser) in the dialog box.
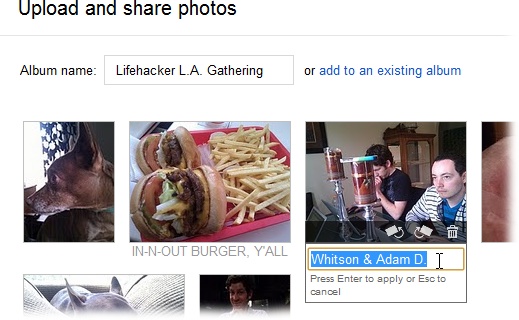
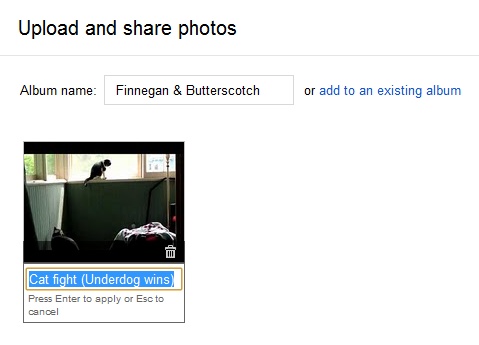
Back in the “Upload and share photos” box, Google+ displays a thumbnail preview of each image you dragged over or selected. Move your cursor over or just below a thumbnail and you’ll see a few handy icons tools that let you rotate the photo clockwise or counterclockwise or remove the photo from this batch (click the trashcan), and a link you can click to add a caption to the photo—though you’ll have time, and much more space, to edit and comment on your photos later, too.
If you decide, after seeing the pics you plan to upload, that you want to add a few more, click the “Upload more” link in the lower-left corner of the upload box to re-open the file-picker dialog box. Or, if you saw the “Drag photos here” message mentioned earlier, just drag more photos onto the “Upload and share photos” box.
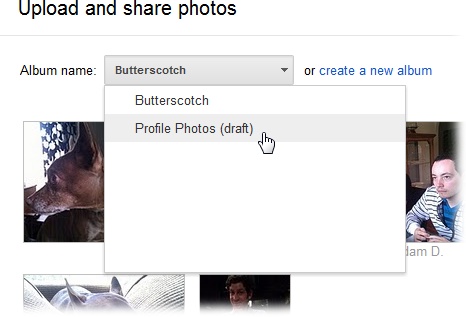
Once you’ve selected the photos you want to upload, you can either put them in a new album or add them to an existing one. (In Google+, an album is a batch of photos you upload at the same time, although you can add more photos to albums after that, too.) If you’re new to Google+ and have never used Picasa Web Albums, you won’t have any existing albums to choose from, so use the “Album name” box to give this group of photos a descriptive name, like “Vermont Vacation 2011” or “Fried Turkey Leg Inside a Hamburger Experiment.” If you’re uploading a bunch of unrelated photos, you could create an album called “Random pictures,” or just leave today’s date, which Google+ automatically puts in the “Album name” box. To add these photos to an album you created previously, click “add to an existing album” and use the drop-down menu that appears to select the one you want. (You can also do this later, though.)
When everything looks good, click the button in the lower-right corner of the box (if you’re creating a new album, it’s labeled “Create album”; if you’re putting these photos in an existing album, it’s labeled “Add photos”).
The next thing you see is the “Share album” box. Near the top is an “Add a comment” field where you can explain or comment on these pics (“Thanks, Adam, for putting me up in L.A. for a week! Sorry about the avocado stuck to the ceiling fan!”). Just like in a post, you can mention people by adding + or @ in front of their names (see Mentioning People in Posts). Near the bottom of the box are sharing controls that let you choose who can see this album. The process is the same as when you’re writing a post, as explained on Choosing Who Sees Your Posts. When you click Share, a notice about your album appears in the streams of everyone you shared it with.
However, you don’t have to share your photos the moment you post them. If you just wanted to upload these photos to Google+ for safekeeping or you decide you’d rather share them later, simply hit Cancel in the “Share album” box. Your photos still get uploaded to Google+ so they’re available to you there, but no one is notified that you posted them.
Uploading as post attachments
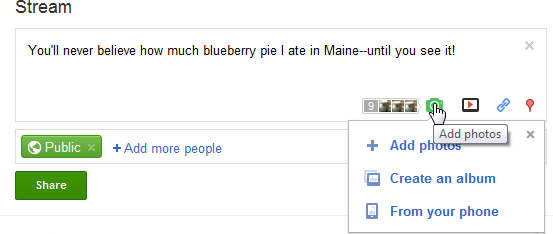
You don’t have to upload batches of photos to Google+ before you share them. You can simply upload individual photos, or even albums, on the fly as you write a post. Simply start a new post (Writing a Google+ Post) and then click the camera icon to see options for uploading photos or albums:
Add photos lets you select a few photos for showing off.
Create album lets you quickly make and name a new album and upload photos for it by dragging-and-dropping or choosing image files.
From your phone (Android only) brings up a pop-up box that shows the most recent photos from your Android phone, if you have Instant Upload turned on (see Uploading photos automatically from an Android phone or tablet).
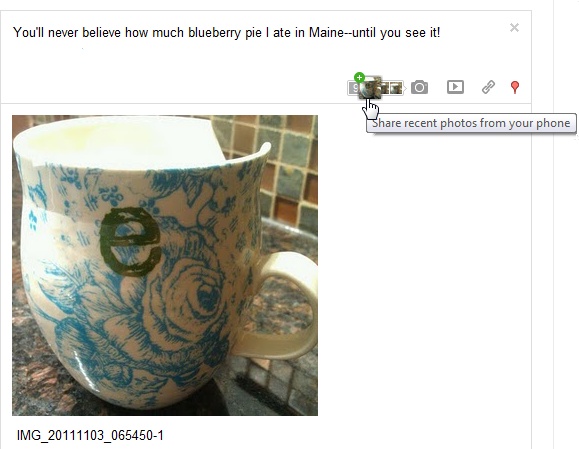
If you have an Android phone with the Google+ app installed and the Instant Upload feature turned on, you’ll see tiny thumbnails of your most recently uploaded photo right there next to the camera icon, as shown here. Click a thumbnail to select it, and then click more images to select them as well. Once you’ve selected all the photos you want to attach, click the “Add photos to post” button in the lower-right corner of the pop-up box. You can’t get a larger look at these photos from this screen, unfortunately, but you can head to your Photos page, select photos in the “From your phone” gallery, and then click Share if you’d like to make sure you’re posting the right images.
Uploading from Your Phone
The best camera, the saying goes, is the one you have with you. These days, people carry cellphones with surprisingly decent (and in some cases really good) cameras everywhere they go, occasionally snapping pictures of sunsets, cute dogs, delicious meals, and the people they care about. If you have an Android phone, posting photos to Google+ is incredibly simple (even automatic), yet secure. If you have an iPhone, Windows Phone 7, BlackBerry, or any other cell-phone that can go online, you can get your snapshots into Google+ with only a modicum more fuss.
Note
To learn how to install the Google+ app on your phone, flip to Getting Google+ onto Your Phone. This section focuses exclusively on how to use the app to upload photos, but Chapter 8 explains more about using Google+ on a web-connected phone.
Uploading from an Android phone
If you have an Android cellphone and you’ve installed the official Google+ app on it, you’re always just one snap and two clicks away from shooting and sharing a photo—and sometimes just one click.
After you’ve installed the Google+ app, agreed to the app’s terms of service, and confirmed the Google account you’re using with Google+ (see Chapter 8 for details on all these steps), your phone considers Google+ a source for items you want to share, including photos. Go into your phone’s Gallery app (sometimes called Photos) and open a photo or select a whole bunch of them.

Tap the Share button at the bottom of the screen. (If you don’t see a Share option, you might have to tap the More button first, press the Menu button on the phone itself, or tap and hold the photo to bring up the Share option.) The list of sharing options that appears should include Google+.
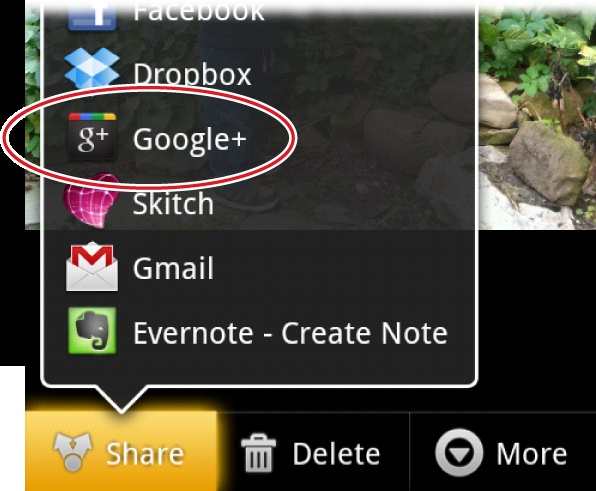
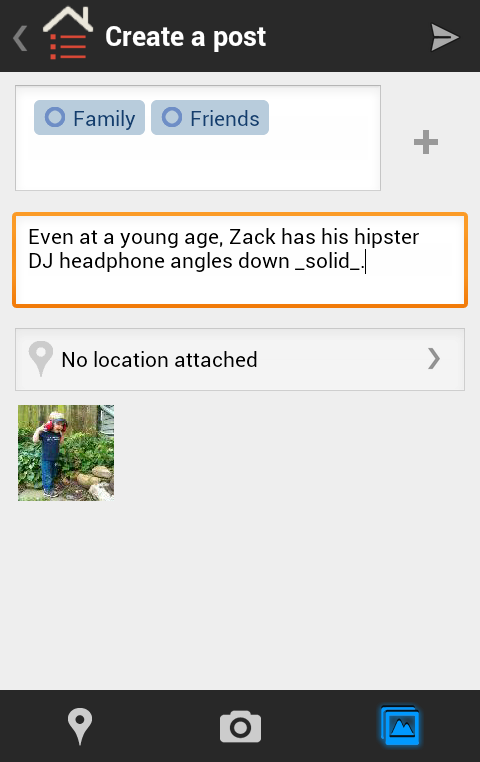
Tap the Google+ menu item to display the screen shown here. Just like when you share anything else on the Google+ web-site, you get to choose who to share it with, include a location, and add a comment to the photo before you send it out. The layout of this screen is different than the Google+ website, but all the options are there. The circles you’re sharing with are shown at the top, in blue, and you can add or modify them by tapping the arrow to their right. Your comment goes in the box below that, and the Post button in the upper right sends the photo to the right peoples’ streams.
Tip
Other Android apps that deal in images or photos can Share images with Google+ in this same fashion: Tap the app’s Share button, choose Google+, and the photo shows up primed for posting. There’s more on sharing photos (and text and links and more) on Sending Things to Google+ from Other Apps (Android Only).
Uploading photos automatically from an Android phone or tablet
The single best feature of the Google+ Android app is its ability to automatically upload photos from your phone to a private Google+ album. Why is that the best feature? Typically, getting all your photos off any cellphone and onto the Web involves hunting down a special USB cable, connecting the phone to your computer, launching a program to sync your photos to your computer, then uploading them through a web browser to a photo-sharing service. And all that is to just get your photos ready to share.
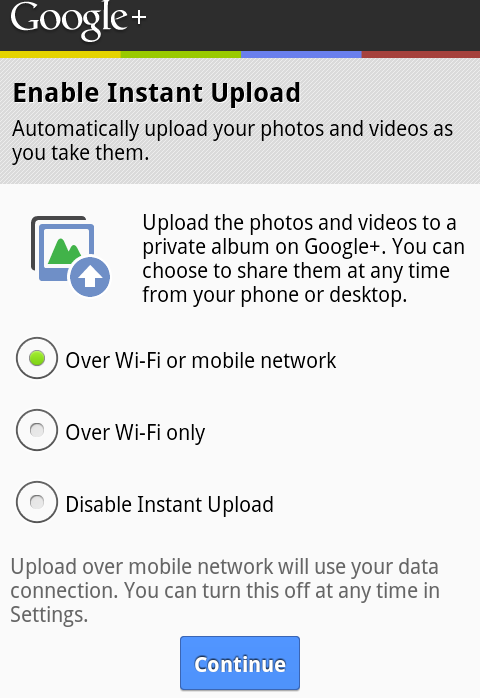
The Instant Upload feature on Android phones and tablets makes the upload process much simpler. Once you turn this feature on, it watches your device for new photos and videos. When it finds any, the Google+ app automatically uploads them to a special spot in your Google+ account (and in Picasa Web Albums, as explained in a bit). You might have already seen the “Photos from your phone” category on the left side of your Photos page, and that’s exactly where your Instant Upload photos end up. Nobody can see them except you—at least until you choose to share them.
How do you turn on Instant Upload? The most recent version of the Google+ Android app asks you about Instant Upload when you first install the app. If you tell the app to turn this feature on, you then have to decide when you want to upload photos: whenever your phone has a data connection (either WiFi [a.k.a. wireless] or mobile network [often referred to as 3G or 4G]), or only when you’re connected to a WiFi router (usually at home or work). “Over Wi-Fi only” is the safest bet because it can save you from incurring fees for going over your monthly allowance of mobile-network data and prevent battery drain caused by uploading lots of images over a mobile network, which can take forever.
If you disabled Instant Upload when setting up the Google+ app or you want to tweak your WiFi/mobile network preference, you can do that in the app’s settings. Head to the app’s home page by tapping the gray Google+ logo in the upper-left corner the screen, and then press your phone or tablet’s Menu button. (On a phone, this is usually the button just below the screen itself; on an Android tablet, this is the onscreen button in the lower-left corner that looks like a small 3-by-2 grid.) Next, in the row of black buttons that appears at the bottom of your screen, tap Settings. Scroll with your finger toward the bottom of the list of options till you see the Instant Upload section. You can simply check the Instant Upload box to turn it on, but you’ll want to tap “Instant Upload settings” to control how your phone sends images over to Google+. More on these settings in Chapter 8.
Uploading from an iPhone
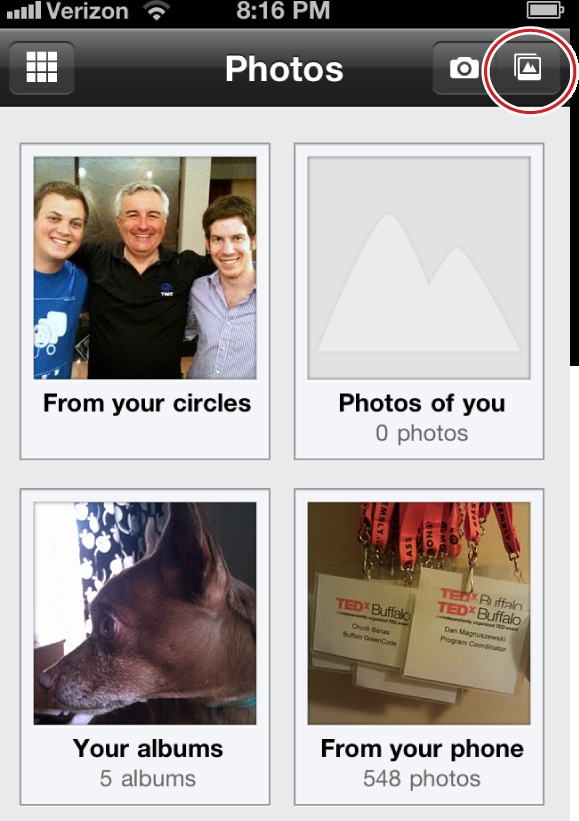
Uploading photos to Google+ from an iPhone is nearly the same as on an Android phone. Assuming you have the Google+ app installed (iPhone/iPod Touch) and you’re signed into your account, open the app and head to the Photos section (Viewing Photos). At the top-right corner of the Photos screen, you’ll see two icons: a camera and a small stack of what look like Polaroid pictures. Tap the Polaroid icon.
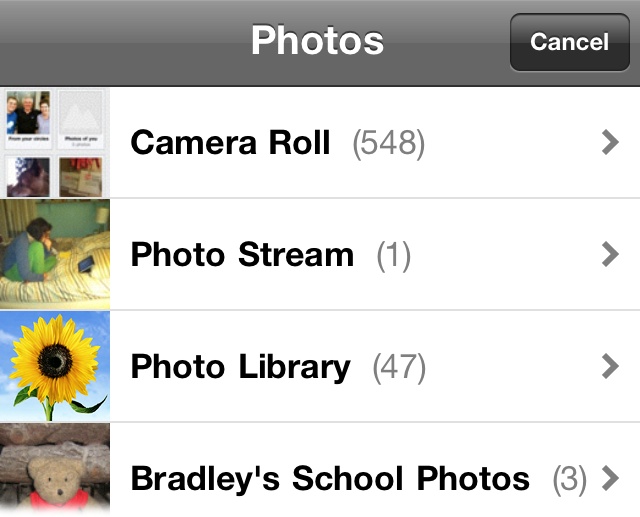
When you do, you’ll see a selection screen that you might recognize from other iPhone apps. You can choose from albums you’ve synced to your phone through iTunes, or select Camera Roll to pick photos taken with your iPhone’s camera.
Once you’ve tapped on a few photos to select them, and then tapped the “Share” button, you’ll be given all the options you’re used to seeing in Google+ on your computer: a “Share your thoughts” field for adding a comment, a section for choosing the circles and people to share with, and location information you can choose to share (to delete this location info, tap the small X to its left).
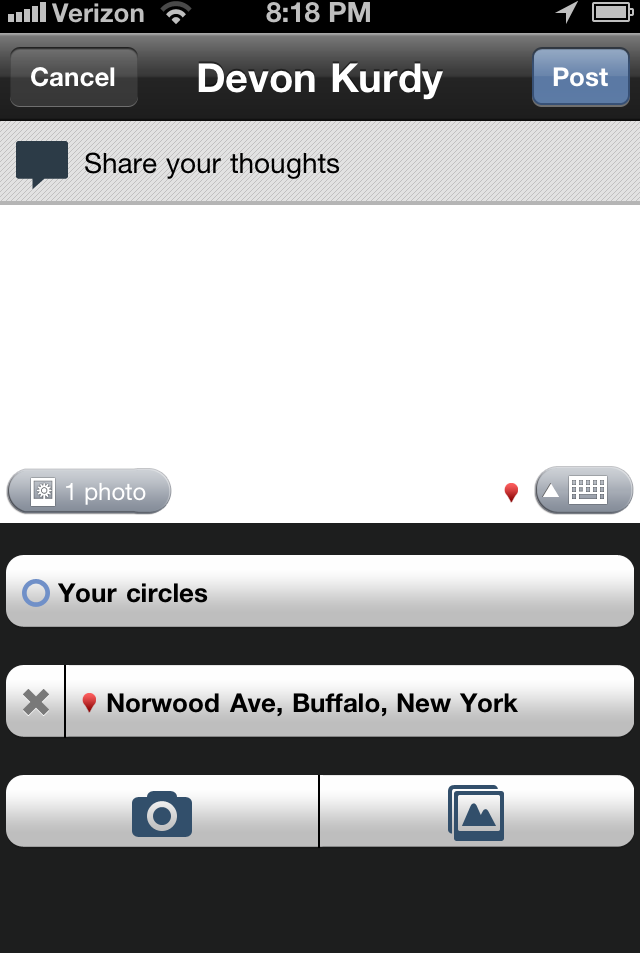
At the bottom of the screen are those familiar camera and stack-of-photos buttons. Tap the camera button if you decide to shoot a new photo with your phone, or tap the stack-of-photos icon to pick out a different photo from your gallery. You can also share both a live shot and others from your collection by tapping one icon and then the other before tapping “Post.”
Sending photos straight to Google+
It’s more convenient to shoot photos with your phone’s standard camera app and capture everything you need, and then upload them to Google+ later on using the methods described in the preceding sections. But if you want to share a photo with your friends on Google+ right away, you can.
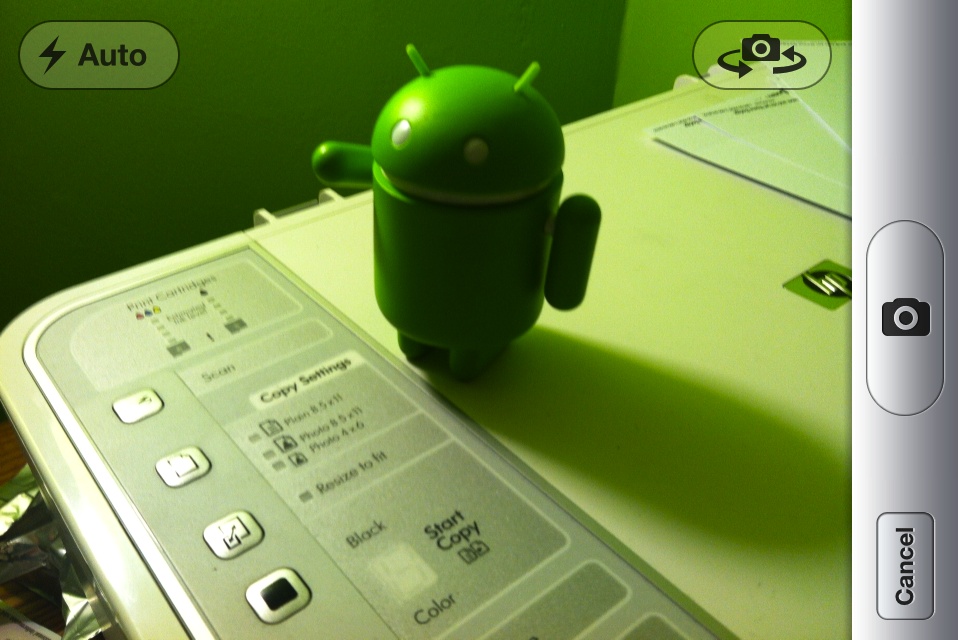
Head to the Photos section of either the Android or iPhone Google+ app and, in the top-right corner of the screen, tap the camera icon. On an Android phone, tapping the camera button brings up a prompt for “Camera photo” or “Choose photo.” On an iPhone, the button is separated into a camera for taking live shots, and a mountain icon for choosing a photo from your Camera Roll. Tap “Camera photo” (Android) or the camera icon (iPhone) and you’ll see your phone’s familiar camera program.
Once you snap the photo by tapping the shutter button on an Android phone or the camera icon on an iPhone, you can review the shot and tap OK (or Use, on an iPhone) if it’s good enough to post to Google+. (Tap Retake to snap another shot, or Cancel on an Android if you decide not to share a photo after all; iPhone folks have to click Retake and then Cancel to back out.) After you tap OK (or Use), you see a screen similar to the one shown on Sending photos straight to Google+ where you can add a comment and choose which circles or people to share with, just as if you’d picked out a photo from your collection.
Pulling Images from Picasa Web Albums
Whether or not you used Google’s Picasa Web Albums service before signing up for Google+, by uploading photos to Google+ and sharing them, you’re using it now. That’s because the services are merged—the photos you upload and share through Google+ are available in Picasa Web Albums, and any photos you might have uploaded previously to Picasa are easily accessible from Google+. You can skip this section if you’ve never used Picasa Web Albums before signing into Google+, but if you have a stash of photos already in Picasa, this section explains how to share them with your circles.
As noted back on Signing In and Joining Up, when you sign up for Google+, Google lets you know that your existing Picasa account will undergo some changes. They’re mostly good changes, especially the unlimited storage space you’ll receive. Pictures can be uploaded up to 2048 pixels square, and videos, even 1080p HD videos, can run up to 15 minutes in length. And Google+ remembers the visibility settings you originally gave the images on Picasa, so none of your private albums will suddenly go public on you.
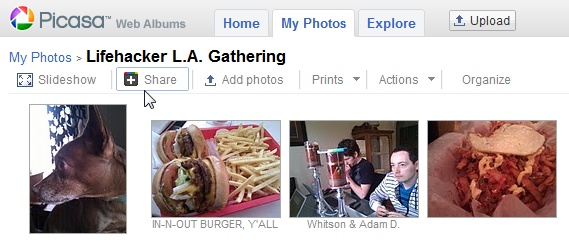
Other than more storage space, the main thing that has changed about Picasa are your sharing options. The Picasa site looks the same (aside from a few notices about your new Google+ account), and the photos are laid out the same way. (To get to Picasa Web Albums, go to www.picasaweb.google.com.) But click any album and you’ll start seeing where Google+ comes in. The fact that the Share button now includes the Google+ icon is one hint.
Now when you want to share an album from Picasa, Google assumes you’ll share it through Google+. You’ll see the familiar Google+ “Share this album” box, where you can add your comment at the top and choose exactly who to share with.
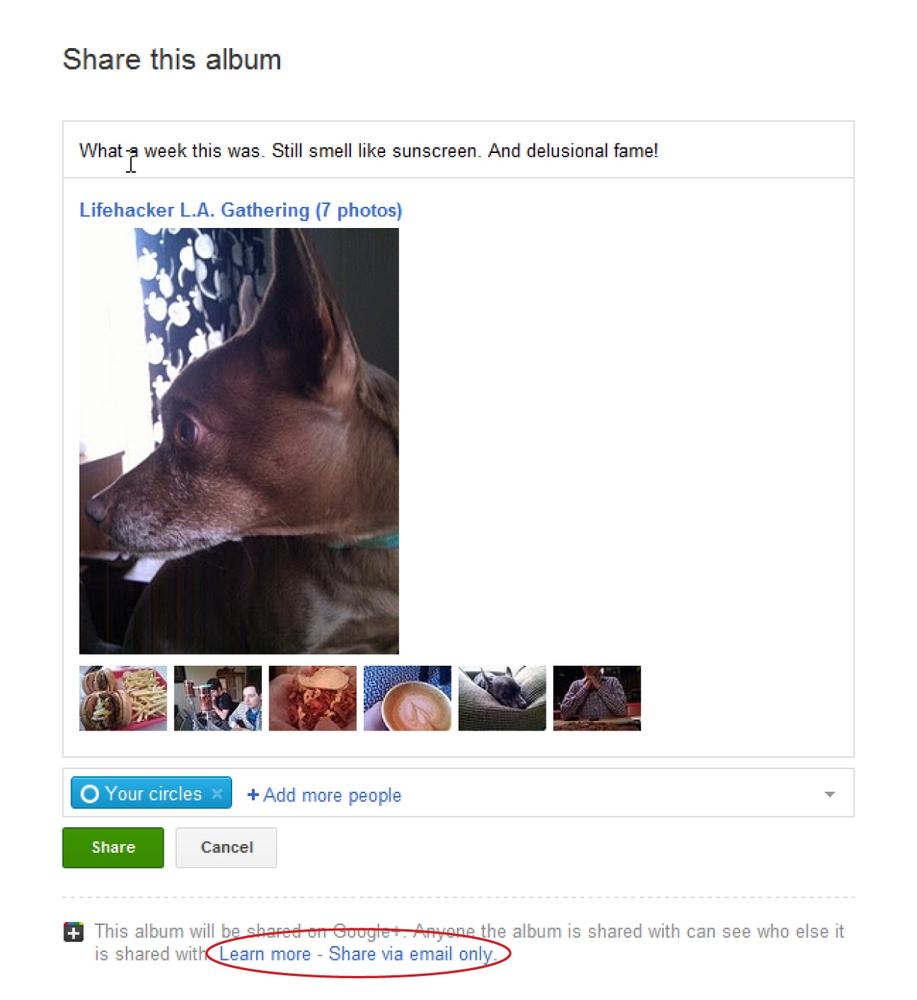
What if you don’t want to share an album through Google+, but want to send it out by email invitation instead, the way you used to do with Picasa? You can still do that, but Google doesn’t advertise that fact. You’ll have to hunt for the small “Share via email only” link at the bottom of the box. Click it to bring up a familiar page for sharing photos by entering email addresses. If you’re viewing the contents of an album, you can also click the “Link to this album” link on the right side of the page, and then copy the resulting web address and paste it into an email, IM, or wherever you like.
Individual photos on Picasa Web Albums are still shared through Picasa—either sharing via email or by linking to a photo in an album you’ve shared or made public. It’s a fairly good bet, though, that Google will integrate Picasa into Google+ even more in the future, and that all photos will be available for sharing in Google+, individually or as albums.
Finally, Picasa has its own privacy settings for albums, which you’ll want to modify if you set up your account as a place where only you have access to these photos. Head back to your Picasa home page by clicking the “My Photos” tab in the top left of the page (just beneath the black Google toolbar) and then click the “Edit visibility” link on the left side of the page to make changes.
Tip
If you’ve installed the Google+ app on your Android phone and turned on its Instant Upload feature (Uploading photos automatically from an Android phone or tablet), you’ll see an Instant Upload folder in Picasa Web Albums. This folder contains the same photos as the “Photos from your phone” section of the Google+ Photos page (Viewing Photos). Combined with the “Share via email only” link shown on the previous page, it makes the Google+ app a very easy way to share photos from your phone, even with people who aren’t on Google+.
Tagging Photos
ONCE YOU’VE POSTED SOME photos on Google+, you can tag them to indicate who’s in each snapshot. You can even tag other people’s photos (if they set the photos’ permissions to allow tagging).
What happens when you tag someone in a photo? Just like when you mention someone in a post by adding a + or @ in front of their name (see Mentioning People in Posts), they’ll see a post, with a link to your photo, in either the stream associated with the circle they put you in or, if you’re not in one of their circles, their Incoming stream (Other posting tips). They’ll also receive a notification that you’ve tagged them in a photo, and when they click the notification’s link to look at your photo, they’ll have the option remove the tag as explained in the box on Removing Your Name From Tagged Photos.
Note
When you tag someone in a photo, that person gets access to the whole album that photo belongs to. So before you tag someone in a snapshot, think about whether the other photos in that album are appropriate for them to see.
To get started tagging, click any photo in Google+, whether it’s in your Photos collection or a photo you see in a stream or on a Profile page, to hop to the light-box view with the dark background (you may need to click the photo a second time to get to this view). Under the photo, you’ll likely see an “Add tag” button (or link); if you don’t, that means the person who posted the photo has disabled tagging, as explained on Tagging Photos.
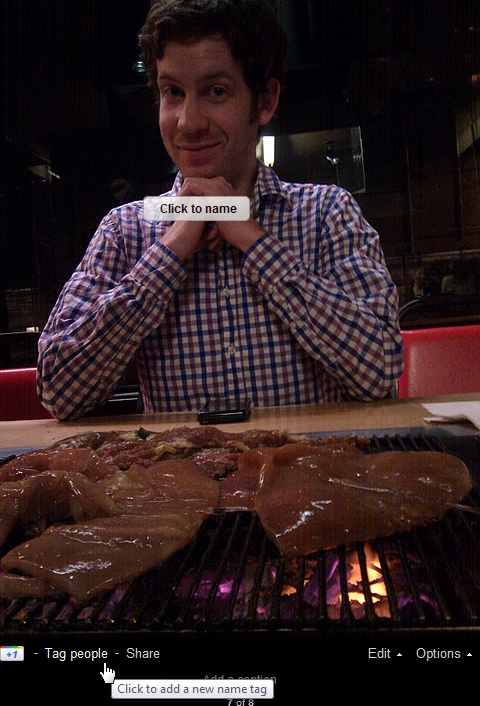
As long as the photo you’re looking at has people in it, if you put your cursor over the “Add tag” button (without clicking it), “Click to name” buttons should appear just under each face in the photo. Simply mouse up to the photo and click one of these buttons to add a tag. When you do, a box appears so you can enter the person’s name.
Start typing the name of the person in the photo and, just like in a post or a search box, a list of likely candidates appears. If you see the person you’re trying to tag, click their name in the list, or tap your keyboard’s down arrow to scroll through the list. If you don’t find a match, that person probably isn’t in your circles, and maybe isn’t on Google+ at all. No matter—people don’t have to be on Google+ for you to tag them in photos. Just finish typing their name and then hit Enter (Return on a Mac) or Tab; that way you at least have a record of the person’s name.
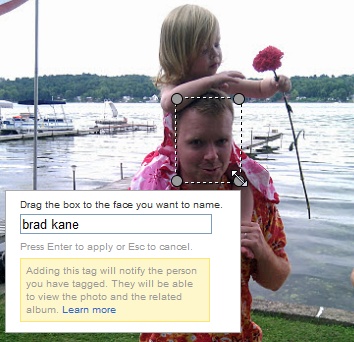
If you don’t see a “Click to name” button appear under someone’s face when you mouse over the “Add tag” button, that means Google didn’t spot that particular face, but you can still tag that person. Just click the “Add tag” button, and a little dotted-line box appears in the photo. It’s easy to move and resize this box so that it’s over someone’s face in the photo. Click and drag within the box to move it, and click and drag the gray circles on its corners to resize it. You just want the box over most of the face, but it doesn’t have to be perfect. Then type the person’s name in the text box.
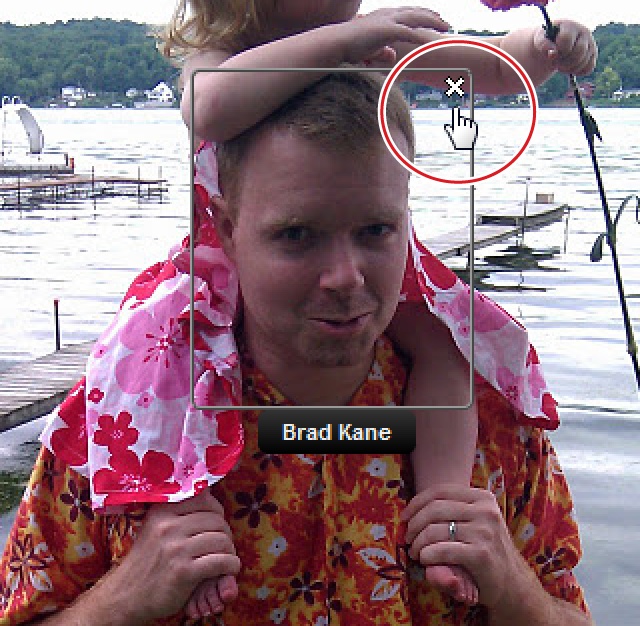
If you messed up a tag, or change your mind about tagging somebody, simply move your cursor over their face and look for an X to appear in the upper-right corner of the tag box. Click the X to remove the tag.
Now that you’ve seen how tagging works, take a peek at your main Photos page again. The “Photos of you” category should make more sense now—it’s where photos that you’ve been tagged in go.
Editing and Deleting Photos
AFTER YOU UPLOAD PHOTOS, you can do a lot with them besides just tag them. In addition to adjusting who gets to see them, you can rotate, delete, and even edit them. And Google+ gives you more than just your standard crop and resizing tools, too—you can nudge slightly off photos closer to perfection, give them an old-timey sepia look, make them black and white, or even make them look like they were shot with a cheap, vintage camera.
Note
You can only edit photos you uploaded, not ones uploaded by anyone else—even if the person tagged you in the photo.
Changing Album Visibility
To change who can see your images, head to the “Your albums” section of the Photos page (Viewing Photos). Click an album to see the photos in it, and to share it or change its visibility settings.
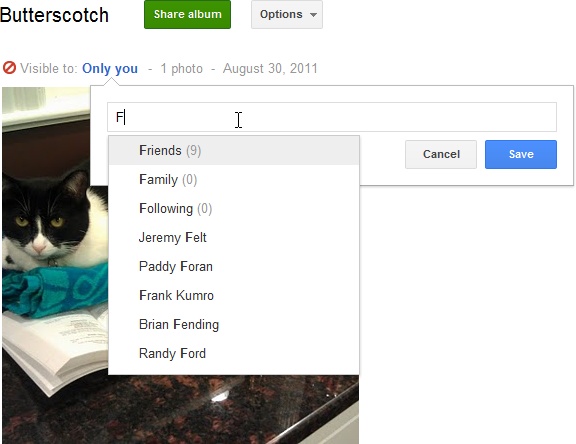
Near the top of the page that appears, click the “Share album” button to display a box you’ve likely seen before. It includes a field where you can comment on the photos you’re sharing, and lets you choose which people and circles to share them with.
Click the Options button instead to see a menu that contains just one option (as of this writing, at least): “Delete album.” Choosing this option deletes the album and deletes any posts about that album.
Underneath those buttons, just above the photos, are the words “Visible to:,” followed by a link that reads something like “Only you,” “Limited,” or “Public.” The text of the link tells you who can see your photos when they browse over to your albums, either from your Profile page, or by clicking the “(photos)” link that appears in the upper-right corner of lightbox view when you’re looking at someone else’s photos. To change who can see this album, click the link (“Only you” or whatever), and you’ll have a chance to (you guessed it) add (or remove) circles or people. Changing this setting doesn’t actually create a post about this album; it just changes who can see this album if they arrive at your Photos page and look for it.
After adjusting the people and circles you’d like to share with, check out the little lock icon below the +Add field. As you learned in Chapter 3 (Sharing Others’ Posts), people viewing your photos can share them with their own circles, just like they can share posts you write. Click the “Lock this album?” link to get more info about locking albums. Basically, locking an album lets you share its photos specific circles and people, but prevents them from easily sharing those photos with other people. To lock the album, click the box to the left of the lock icon. If you later want to unlock it, simply click that box again. If you want to change a photo back to being visible to “Only you,” simply remove all the people and circles from the +Add box, and then turn on the “Lock this album?” box for good measure.
Note
If you want to do some serious album editing and organizing, it’s a lot easier to do that on the Picasa site rather than on Google+. Head to http://picasaweb.google.com and click the album you want to edit. Near the top of the screen that appears, click the Organize link. On the next screen, select the photo(s) you want to reorganize (hold down Control [⌘ on a Mac] to select multiple photos). You can then drag them to change their order in the album, or click the Copy, Move, or Delete buttons on the right side of the screen to do one of those things. (If you click Move, you’ll see a dialog box that lets you put the image[s] in either a brand-new album or one of your existing ones.) All the changes you make on the Picasa site should instantly be reflected in your Google+ albums.

Note
Just like posts, albums you’ve locked can’t be shared by your friends by clicking the Share link at the bottom of your post, but that doesn’t prevent your friends from taking a screenshot of your photo, or downloading it through some other geeky trickery. So consider locking more of a request for privacy rather than an iron-clad guarantee of it.
Changing visibility for multiple albums
Above all the photos in the “Your albums” section is a “Change how your albums are shared” link. Click it to display a window with privacy settings for each and every one of your albums. Use the drop-down menu in the middle of each album’s row to choose the visibility option you want. Your options are the same ones you learned about back on Choosing Who Sees Your Posts.
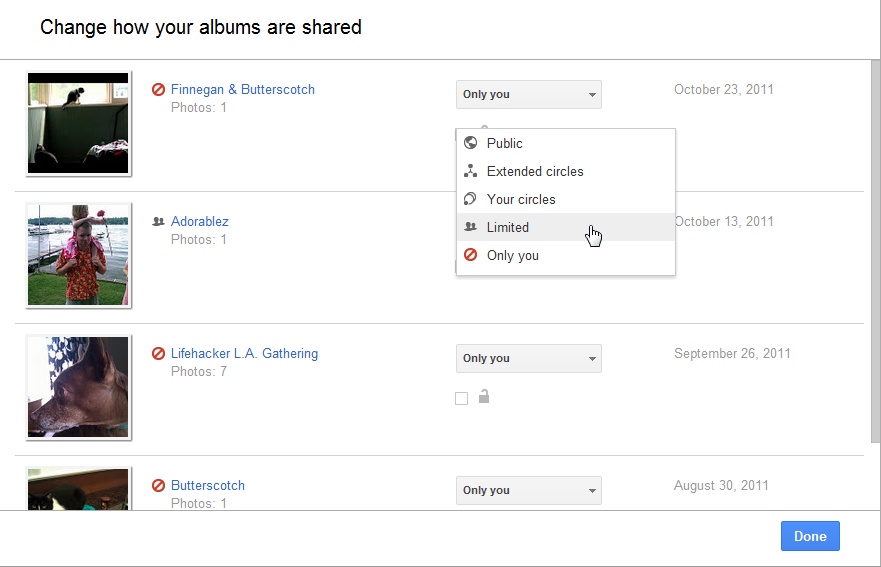
You can change these same settings before you share a batch of photos as an album (Including Photos and Videos in Your Profile) or when you click an album and then click its “Visible to” setting (Editing and Deleting Photos). But this window is the most convenient way to make changes to a whole bunch of albums or just double-check what people can see when they wander over to your profile and browse through your photos. Once you’ve got all your albums set the way you want, click Done to close the window.
Changing visibility for individual photos
There is no setting in Google+ to change the visibility of an individual photo. The simplest work-around is to put a photo into its own album, and make that album visible to whomever you’d like, as shown above. Otherwise, Google+ seems to expect that if you have a photo you want to make visible, you’ll click the Share button when looking at it in the lightbox view, and send it out to certain people, or whole circles.
Fixing Photos and Getting Creative
Got a photo that could look better, or maybe just looks wrong on Google+? Click it to open it in lightbox view, and then click the Edit Photo button (or link) below the photo to see a menu with a few editing options.
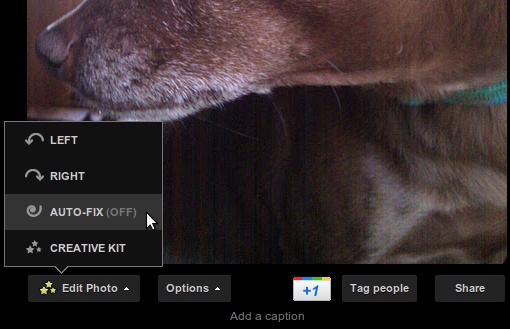
The Left and Right commands pitch your shot 90 degrees counterclockwise or clockwise, respectively. Auto-Fix is just what it sounds like: a tool tries to improve the contrast, lighting, color saturation, and other aspects of your photo. Most often, this tool makes a subtle shift in your photo, which can take a decent photo and make it just a bit better, crisper, or more natural looking. Sometimes, though, Google+ goes a bit overboard, especially with dark, indoor photos taken with a smaller point-and-shoot camera or smartphone. To give Auto-Fix a shot, simply choose it in this menu. If you don’t like what it does, simply choose it again to undo the changes.
Choose the Creative Kit menu item and you’ll see a new, white box appear—and you’ll likely wait a bit, while Google loads its photo-editing tools.
Note
If you don’t have Adobe Flash installed in your browser, or you’re using a browser that doesn’t support Flash (like on an iPad), the Creative Kit won’t load, and you’ll see a message directing you to download Flash to continue. Until you can get to a browser with Flash, you’ll have to rely on Auto-Fix to spiff up your photos.

The Creative Kit window is so chock-full of features and looks so much like a separate editing program that it can be kind of intimidating at first. But it only includes a few kinds of tools, with lots of variations on each one. Besides, anything you do to your photo you can easily undo by clicking the Undo button in the window’s upper right.
To see the different tools Creative Kit offers, click one of the categories in the window’s upper-left corner:
Basic Edits. Along with the Auto-Fix tool you just learned about, you’ll find tools here that let you crop, rotate, and resize your image, as well as sliders that adjust exposure, colors, and sharpness.
Effects. Google+ applies these effects to your whole image, giving it a sepia tone, the look of an old camera like the Orton or Holga, a Polaroid-like frame, and so on. Clicking an effect on the left automatically applies it to your photo; move the sliders around, see how it looks, then click either Apply or Cancel to add the effect or remove it.
Specialty/Seasonal category. The exact name of—and offerings in—this category depends on what major holiday is coming up or just passed. For example, as this book was being written, the Creative Kit window included a Halloween category that let you add vampire eyes, blood splatters, and spider webs, among other things.
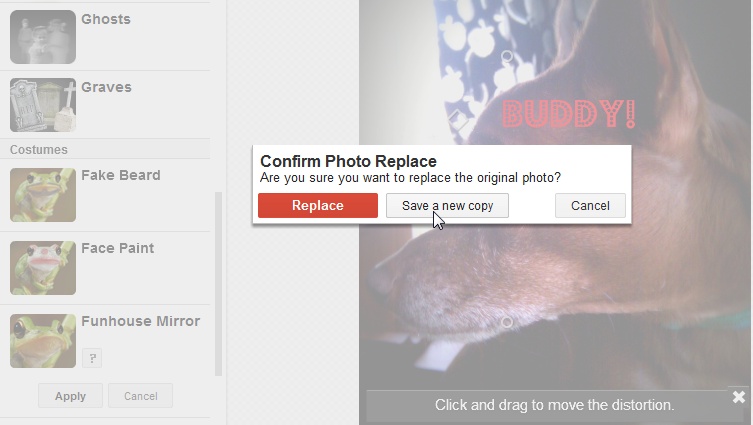
Text. Select this category and then type some words you’d like to lay over the image in the “Type here…” box at the top left of the window. Next, choose a font from the (fairly substantial) list shown in the figure on Fixing Photos and Getting Creative, and then click the Add button to place the text on the photo. You then can move the text around and resize it by dragging the little circles on the frame around the word, or click the text itself on the image and drag to move the text. When you click your text, a box pops up with all kinds of settings that let you change the text’s color, transparency, size, and even blend mode. Play around and see what works best.
You can undo any effects you apply while messing about in Creative Kit. Even when you click Save in the upper-right corner of the Creative Kit window, you’ll get another chance to change your mind: You’ll see buttons that let you either replace your original version of the photo with your newly edited version, or save the new version as a copy—highly recommended because, after all, you have unlimited photo-storage space. Choose either Save option and, after seeing some spinning gears and a “Working…” message for a bit, you’ll arrive back at lightbox view with your creative new image displayed.
Tip
Want even more photo-fixing options? Happily, you don’t need to invest in expensive photo-editing software. Google offers two great free options. One is Picnik, which you learned about on Signing In and Joining Up; simply head to www.picnik.com and upload your photo. The other option is Picasa (www.google.com/picasa), a desktop photo-organizing and editing program. Picasa gives you tools for deleting red eye, adjusting lighting, and adding filters, and it has an I’m Feeling Lucky button, which is a lot like Auto-Fix. Most importantly, it lets you easily upload photos to Picasa Web Albums, which (as you learned on Pulling Images from Picasa Web Albums) makes it a snap to get those images into Google+.
Deleting and Downloading Photos, and Viewing Details
If you’re looking at one of your own photos in lightbox view, the Options menu gives you a few basic controls that are similar to the ones you see when you click Options while viewing other people’s Google+ photos (Viewing Photos). The “Photo details” and “Download photo” options do the same things as for other people’s photos, but there’s also a “Delete photo” option and a “Report/Delete comments” option. “Delete photo” removes the photo not only from your collection, but also from any of your posts that it appears in. In fact, if the photo you delete was the only image attached to a post, that whole post gets deleted, too—text and all. So deleting a photo is a pretty drastic move. If you realize you’ve accidentally shared a photo more widely than you wanted, a better option than deleting it is to restrict who it’s shared with, as explained on Changing Album Visibility.
Note
Remember, even if you delete a photo or restrict how it’s shared, that doesn’t guarantee that it didn’t fall into the wrong hands before you did so. Someone could have taken a screenshot of it or downloaded it while it was up. So think carefully before you upload sensitive photos in the first place.
“Report/Delete comments” makes flags and Xs appear on the comments in the box on the right side of lightbox view (if there are any comments). As with a post, you can click the X to remove a comment, or click the flag to report a comment that’s really annoying, hurtful, or placed by someone you think has not-so-awesome motives for being on Google+. Reporting a comment brings it to Google’s attention, and they can then give the person who posted it a warning—and possibly kick him off the site.
Adjusting Overall Photo Settings
AS YOU’VE LEARNED, MOST of the settings you need to control who can see, comment on, and tag people in photos appear when you click on a photo or album. But you can save yourself some time by tweaking a few options on the Google+ settings page that affect all your photos.
To get to the Google+ settings page, head to the upper-right corner of any Google+ page, click the gear icon, and then choose “Google+ settings.” (The one place you won’t see this icon is in lightbox view, so if you’re viewing a photo there, simply click the X to see the gear icon.) On the page that appears, scroll down to the Photos section.
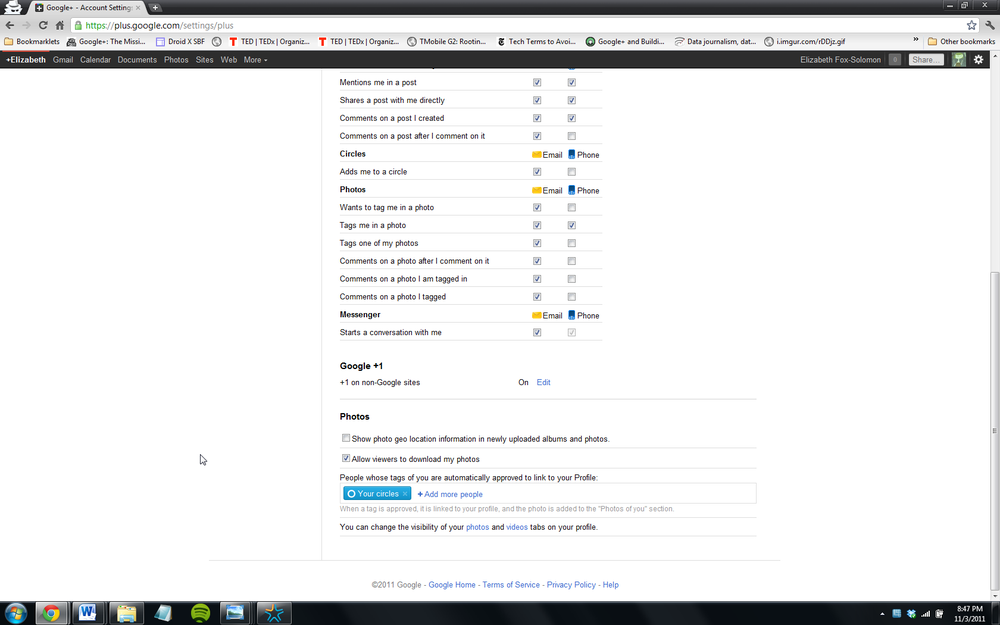
This section contains three settings that affect every photo you post, as well as two links that remind you of how to change which photos and videos people visiting your profile can see. Here’s what each option does:
Show photo geo location information in newly updated albums and photos. Most cellphones automatically record your GPS coordinates when you snap a picture. If you turn this setting on and then upload images from your phone, people looking at those photos can click the Options button and choose “Photo details” to see where photo was taken (displayed on a Google Map). If you keep this setting off, you have to manually add location info to a photo (or batch of photos) when you upload them (you can’t add location information after that).
Allow viewers to download my photos. It’s fine to leave this setting turned on if you don’t mind people grabbing copies of your shots. But if you’re concerned about your images floating around the Web, or your photos are of a professional or sensitive nature, you’ll want to turn this off. Keep in mind, though, that if someone can see your image, there’s always a way for them to get a copy of it (by taking a screenshot, for example).
People whose tags of you are automatically approved to link to your Profile. This is where you decide who has the right to tag you in a picture and have that tag automatically approved so that the image shows up in the Photos section of your profile. If you generally like and know everybody you’ve added to your circles, then leaving this set to “Your circles” is probably fine. But if you’ve created some circles of people you don’t completely trust, change this to just specific circles instead: Family, Friends, and so on.
The photos and videos links let you hop directly to the Photos or Videos section of your profile, respectively. Click the photos link to head to the appropriate section, and Google+ automatically puts you in editing mode (as indicated by a red bar across the top of the page) so you can change things like whether any photos show up on your profile, and which photos show up prominently on your Profile page. Click the videos link to tell Google+ whether you want the Videos section included in your profile. When you have things set the way you want, click “Done editing” at the top of the page. (Editing Your Profile has more about editing your profile.)
Sharing Videos
NOW THAT YOU KNOW all about uploading and sharing photos on Google+, working with videos is a piece of cake. You share videos the same way you share photos—you can even share a video on its own or as part of an album.
Uploading Videos
You upload videos to your Google+ account the same way you do photos: upload them directly to the Photos page by clicking the “Upload new photos” button (there isn’t a separate button for videos), or as an attachment to a post (Adding Photos, Videos, Links, and Locations). You can also upload a video from your web-connected phone (Uploading from Your Phone), or by pulling a video over from Picasa Web Albums (Pulling Images from Picasa Web Albums). Anywhere you see a link or button for uploading photos, you can also upload one or more videos simply by choosing a video file instead of an image file.
Google+ can handle the same video formats that work on YouTube: AVI, MOV, MP4, and WMV files, as well as 3GP files from Android and other smartphone cameras and FLV files from Adobe Flash projects. Generally, any video that you can upload to Picasa Web Albums, YouTube, or any another Google service will run just fine in Google+.
Tip
If you have an Android phone, the Google+ app’s Instant Upload feature works for videos, too. Flip to Uploading photos automatically from an Android phone or tablet for details on setting it up.
Viewing and Editing Videos
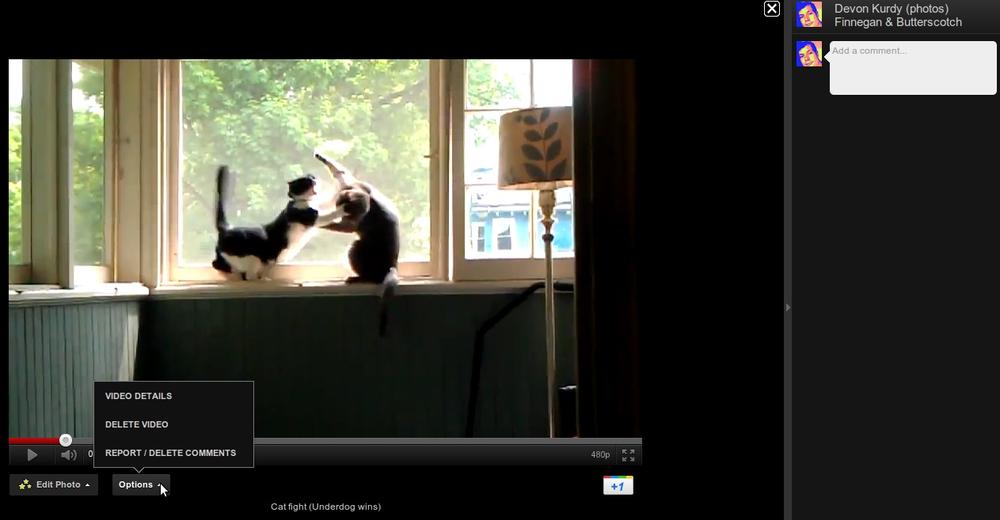
Videos are kept in the same place as photos: on your Photos page, under the “Your albums” and “Photos from your posts” categories, as appropriate. They can even be part of an album along with photos. To differentiate videos from photos, Google+ puts a large sideways triangle icon (like a Play button) on videos. When people view one of your videos by clicking on it in a post or on your Profile page, it appears on a black background just like lightbox view for photos. The screen includes playback controls (they’re basically a simplified version of the ones you see on YouTube controls), an Actions button, and comment panel.
You can’t edit videos in as many ways as you can edit photos. But if you click the Edit button below one of your movies in lightbox view, you can rotate the clip right or left (in case you accidentally held the camera sideways while filming). Click the Options button to see details about it (statistics that are mainly of interest only to A/V geeks), or delete it. The box below explains a few other ways you can edit videos.
As noted above, Google+ doesn’t give you many options when it comes to editing videos. You can rotate them if they’re sideways, but that’s about it. Fortunately, you can easily make more elaborate changes by heading over to another site owned by Google: YouTube. Yup, YouTube offers decent, if basic, video-editing tools that are free to use.
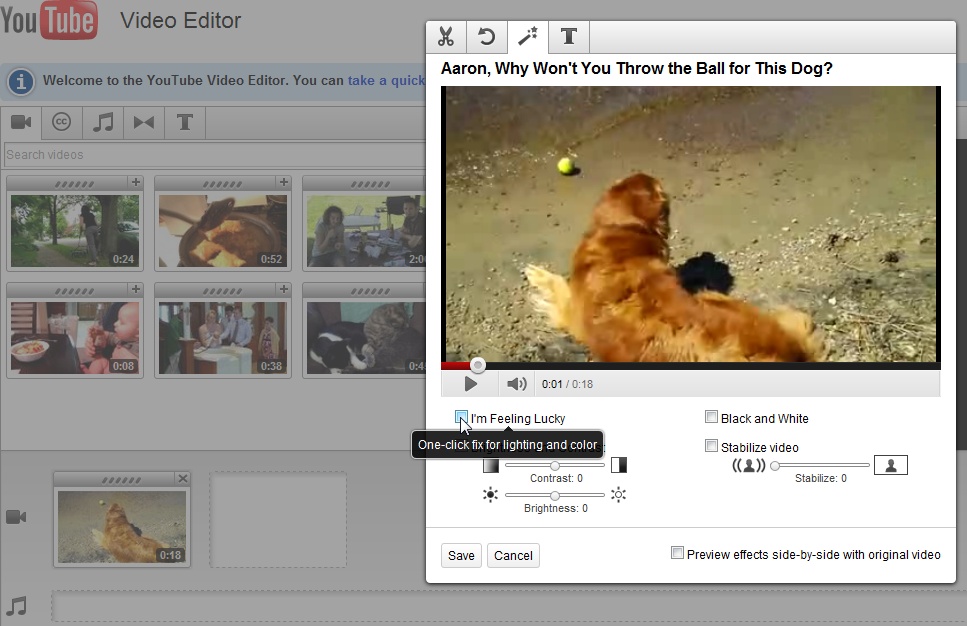
Head over to YouTube.com and sign in with the same Google Account you use for Google+. At the top of any YouTube page, click the Upload link. If you’ve never uploaded to YouTube before, you may be prompted to create a username, and a channel name for your videos. On the next page, click “Select files from your computer” button or “Record from webcam” if you feel like doing a little impromptu video performance. After you select a video or record one with your webcam, give it a title, a description, and set its visibility (public or unlisted—either works for Google+). When it’s all done uploading, head to www.youtube.com/editor. Select the video you want to edit from the thumbnails at the top of the page, and then drag that video down into the empty box below. When you mouse over the video in the lower section, you’ll see icons for trimming, rotating, adding effects (which includes fixing lighting and contrast issues), and adding text.
Once you’ve edited your video, you can attach it to a Google+ post. Simply start a new post as detailed on Writing a Google+ Post, click the video icon, choose the YouTube option, and then choose the “Your YouTube videos” heading on the left. If you’re signed into Google+ with the same account as your YouTube channel, your edited video should show up there. If not, open a new browser window or tap and pull up your video on YouTube, and then copy its web address; head back to Google+ and paste the address into the “Enter a URL” box.
If you’d like to save a copy of your edited video, you can head to YouTube, click the box in the upper-right corner that has your username and two arrows (like this: >>) pointing downward, and then choose My Videos in the box that appears near the top of the page. On the My Uploaded Videos page, find the video you want to download, then look for a set of buttons underneath it: “Edit info,” “Edit video,” “Insight,” and a downward-pointing arrow. Click the arrow, choose Download MP4, and grab yourself a drink—it will probably take a while. To upload the video to Google+, click the Upload New Photos button on the Photos page, and it’ll end up in the “Your albums” section so you can share it any time.