
Chapter 6. Hanging Out
WRITING POSTS, uploading pictures, and checking out all the things your friends have written and uploaded to Google+ is a great way to let people know what you’re up to and keep tabs on what they’re doing. But what if you want to connect with people in real time and on a more personal level? That’s where Google+ hangouts come in. They’re a super simple way for you to chat with people using a microphone and (if you have one) a webcam, a video camera designed specifically to send video to your computer. (Most newer laptops come with webcams built in.)
In Chapter 3, you learned how your main Google+ stream is kind of like the lobby of a college dorm, and the streams for your individual circles are similar to hallways within that dorm, where everyone’s written notes and posted photos on their doors. To continue that analogy, Google+ hangouts are like hanging out in a dorm room with the door open so people can pop in and out. (Or, as Vic Gundotra, Google’s Senior Vice President of Engineering put it, hangouts are like sitting on your front porch and letting people know you’re there: “Hey, I’m hanging out on my porch. I’m available, [and] if you’re available too, you can join [me].”) It’s a place where you can turn on your microphone and, if you like, your webcam and, well, hang out with your friends. You can see your friends’ faces and have meaningful conversations. And best of all, nobody has to install a special program, trade usernames, or “ring” a whole bunch of participants on separate “calls.”
You can use hangouts to do whatever you want with up to 10 people: hold business meetings, discuss a document or spreadsheet, or wish somebody a happy birthday in a way that’s as close to in-person as possible. The only thing you need to do before using hangouts is to set up some Google+ circles. And at a minimum, you need a microphone that’s either built into your computer or plugged into it (although hangouts are more fun if you have a camera, too). This chapter explains the rest.
Note
Google+ works with most modern web browsers, but you need a pretty fast Internet connection for hangouts to work well. If you’re just going to hang out with one other person, Google recommends at least at 900 kilobytes per second (KBps) for both uploads and downloads, though you can squeak by with a bare minimum of 230 KBps uploads and 380–500 KBps downloads. For a hangout with more than two people, Google suggests a download speed of at least 2 megabytes per second (mbps) and an upload speed of 900 KBps. Most modern cable and broadband Internet connections should meet at least the two-person requirements, but if you have a really slow connection, you might have to pass on group hangouts until you can upgrade—or you’ll end up with frustratingly low-resolution (and possibly choppy) video and stuttering audio.
Not sure of your upload and download speeds? The best way to check is to head to www.speedtest.net, and then click the Begin Test button.
Starting a Hangout
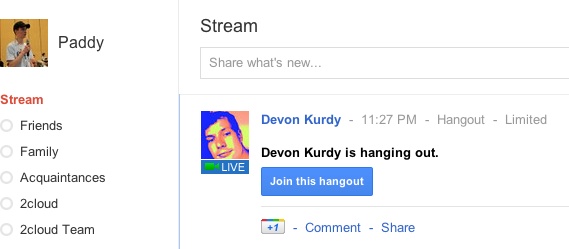
IF YOU’VE PEEKED AT the right side of any of your stream pages, you’ve seen a yellow icon and a button inviting you to “Start a hangout.”
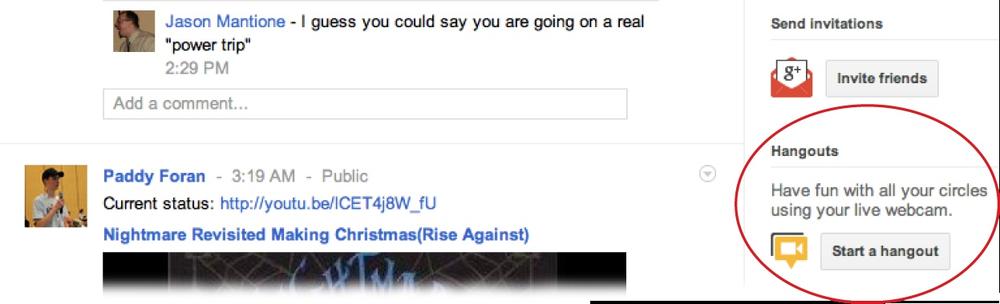
Creating a hangout is a lot like writing a post in terms of how you create and share it. You can click the “Start a hangout” button on any stream page, but the simplest thing to do is head to the stream page for the circle that includes the people you want to hang out with and then click the button. That way, the people in that circle will see your hangout in their streams. But if it’s more convenient, you can click the “Start a hangout” button anywhere it appears and then adjust the hangout’s sharing settings later (Inviting People to Hang Out).
Tip
After you click the “Start a hangout” button, you may be prompted to install a plug-in for Google’s voice- and video-chat services. (A plug-in is a small piece of software that lets your web browser to do a little something extra, like play Flash or Quicktime videos; you probably already have several installed.) You can also download the plug-in from www.google.com/chat/video. It’s free and works on most modern computers (ones with Windows XP Service Pack 3 or later, Mac OS X 10.5 [a.k.a. Leopard] or later, and most versions of Linux). When you click the Install Plugin button, handy installation instructions appear to help you out. The whole process should take only a few seconds.
Checking Your Setup
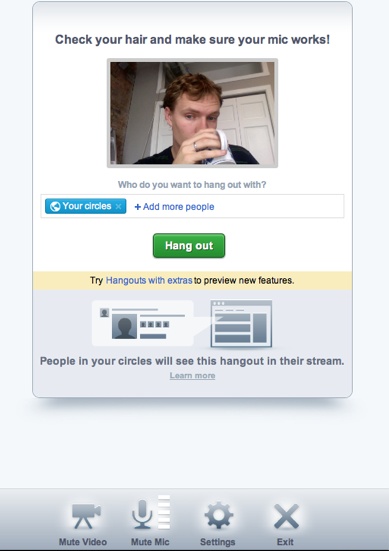
After you click “Start a hangout” and your web browser checks to make sure you have the required plug-in installed, a new browser window pops up. The window includes a little motherly advice: check how you look and make sure people can hear you.
Tip
In addition to checking your hair and clothes, take a sec to consider whether what’s behind you will be too distracting. For example, if you’re sitting in a busy café, the other people in your hangout might get annoyed by all the strangers in the background of your video feed, or any screens in sight behind you.
If you’re using a laptop with a built-in webcam, Google+ should be able to automatically connect to it and show you what you’ll look like to other people in the hangout. If your webcam is separate from your computer, you can plug it in while this setup screen is up; if video from the camera doesn’t show up on your screen, try closing the setup screen and then clicking “Start a hangout” again. If that doesn’t work, keep reading this section to learn how to troubleshoot it.
The setup screen is small, but it shows what kind of lighting you’re got, how your face will be framed when it shows up in the hangout—and whether you need to give your hair a quick finger brushing. Your image will show up much larger when you’re actually in the hangout, so try to look your best (or at least presentable).
Tip
If you don’t have a webcam or are just feeling camera shy, you can still use hangouts. You don’t need a video connection to hang out—you can just stick to using a microphone. You can also do the opposite—hang out using a camera but no microphone, or a muted microphone—and still hear the audio, but you’d need to type in any comments you wanted to make.
Next, test your microphone. If your computer has one built in, you can use that, or you can connect one to your computer with a USB cable or microphone jack. To make sure it’s working, simply say something in a normal voice, like you’d talk to your friends, and watch the volume bars next to the microphone icon at the bottom of the setup screen. If you see at least half of them turn green when you’re talking, you’re good to go. If only one bar turns green or all the bars do, you’re too far away from or too close to your mic.

What if you don’t see any green bars at all when you talk, or you don’t see yourself in the small window in the middle? Click the Settings button at the bottom of the screen. You’ll see a screen where you can test every aspect of your setup: camera, microphone, and speakers. Even if your camera and mic are working fine, it’s worth clicking the “play the test sound” link to make sure you’ll be able to hear the other people in the hangout, and that your speakers and mic—especially a built-in laptop mic—don’t create a nasty feedback loop.
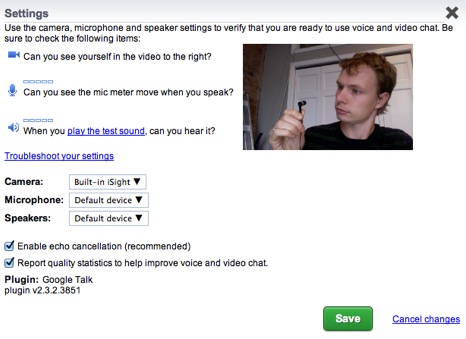
If you’re using any equipment that didn’t come with your computer—a USB headset or webcam, for example—make sure the proper devices are selected in the Camera, Microphone, and Speakers drop-down menus. Below those menus are two checkboxes you’ll probably never turn off. The first one helps prevent echoes, which is nice for everyone listening. The second box gives your computer permission to send reports about your hangout back to Google. It doesn’t send anything personal, just notes about how fast your connection is, the frame rate of your video connection, and other geeky numbers that the network engineers at Google would love to have. If you tweaked some settings on this screen to get everything working, click the green Save button. If you don’t want to save your changes (or you didn’t make any), click the “Cancel changes” link or the X in the upper-right corner of this screen to get back to the setup screen.
Inviting People to Hang Out
Depending on which stream you were viewing when you clicked the “Start a hangout” button, the box on the setup screen below your image will either contain a rectangle representing “Your circles” or a particular circle. If the rectangle represents the group of people you want to hang out with, you’re all set—click the green “Hang out” button and flip to the next section.
Note
You can invite as many people as you want to hang out—like everyone in all your circles—but only 10 people can actually participate in a hangout at once.
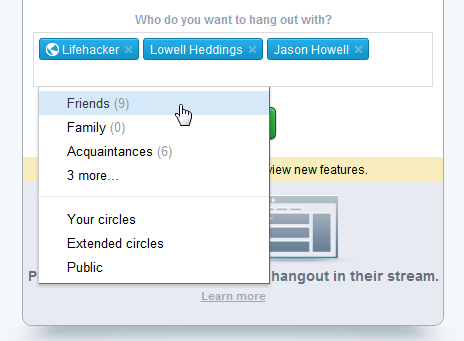
If you want to hang out with a different circle or with specific people, the process is just like choosing who else gets to see a post or photo (Choosing Who Sees Your Posts). Start typing the name of a circle or a person in your circles (or even someone who isn’t in your circles), and then click or use your arrow keys to choose an item in the list of suggestions that appears.
Tip
If the name of a circle or person you don’t want to invite appears in the +Add box, simply click the faint X on the right side of the rectangle that represents that circle or person.
Inviting someone to hang out means they’ll see a notice in their stream that you’ve started a hangout, and they can click the “Join this hangout” button to join you. (They’ll see the “Check your hair” screen before joining, too).
If you’ve invited fewer than 25 people to a hangout (including circles and indi-viduals), then the invitees will also receive a notification that they’ve been invited to hang out (unless they’ve changed their settings not to receive them, as explained in Chapter 4). And any Google+ members who happen to be signed into Google Chat when you send out the invite will also see a window with a link to your hangout.
Tip
Google Chat, which you can sign into on the left side of your Google+ home page, isn’t new or unique to Google+. It’s an instant-messaging service that anyone with a Google account can use, and it’s included in other Google offerings like Gmail and on Android phones. You can learn more about setting up, signing into, and using Google Chat at www.bit.ly/gchathelp.
The people you invite don’t have to click Yes or No—they can just ignore your invitation if they don’t have time to join you. The whole point of hangouts is that they’re semi-spontaneous “Let’s chat” invitations, not obligations. Keep that in mind when you’re inviting people to hang out—folks with day jobs, for example, might get annoyed if you send repeated hangout pitches during work hours. If someone you’ve invited to hang out tries to start their own hangout while yours is in session, they’ll receive a notice that your hangout is already happening so they can consider stopping by yours, instead.
Note
Just like posts and photos, you can make a hangout public, meaning anyone who finds the invitation in your stream or on your profile page can join in, and they can share the hangout even further when friends of those friends see that they’re in a hangout. That can be fun, and perhaps even helpful when you’re looking to meet up with a group of strangers, but you’ll definitely want to keep reading and learn what to do if things go sour.
Google states on one of its Google+ help pages that “No one owns a hangout,” meaning that anybody in the hangout can invite anybody else they’d like to join the hangout. So you may start a hangout with just a few select people, but one of those people could click the Invite button and send an invitation out to all their circles, or even set it as Public, and that invitation will show up in people’s streams. The invitation post may include your profile picture (except to people you have blocked) to show that you’re one of the participants. So hangouts aren’t a way to have a secret meeting—just like you wouldn’t hold a secret meeting on your front porch.
Hanging Out
CAMERA, MICROPHONE, AND SPEAKERS working? Check. Invitations sent? Check. Now that you’ve done all the prep work, go ahead and click the “Hang out” button on the hangout setup page. When you do, you’ll see the following graphic.
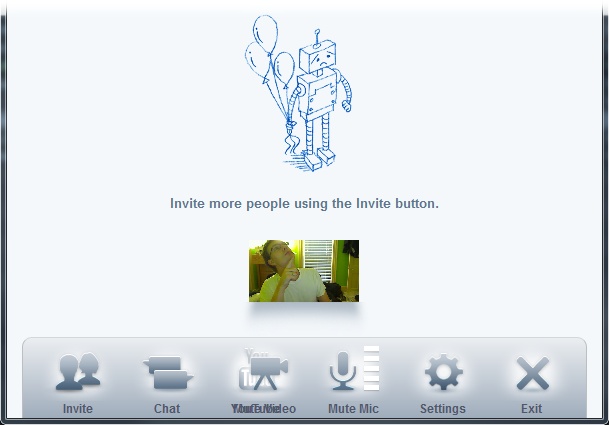
Aww. That robot looks so sad with all those balloons and no one to share them with. But no worries—your invitees probably just haven’t seen the link to your hangout yet. Remember the dorm room/front porch analogy—folks just need some time to wander by and join in. And hangouts aren’t like Skype calls (voice or video calls you make via the Internet), where your chat request “rings” each person individually. Give it some time, and people will start showing up, most likely.
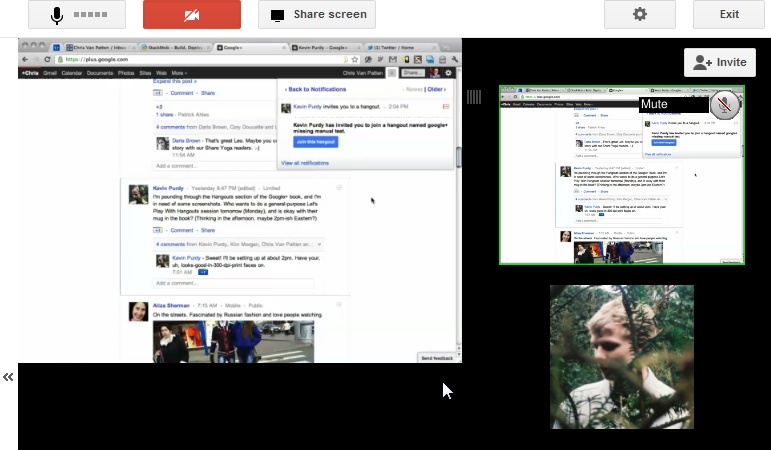
As people start showing up, small versions of their video feeds show up at the bottom of the hangout window, just above the control buttons. (If somebody is going audio-only for this hangout, then you see their Google+ profile picture instead of a video feed.) Google+ tries to figure out who’s currently talking and puts that person’s video (or picture) in the upper part of the window and makes the image much larger than the tiny ones below. Google+ doesn’t do a perfect job of this, but it’s pretty good job at switching between speakers. You have to try a hangout or two to get the feel for it, but it’s really pretty natural after you settle in.
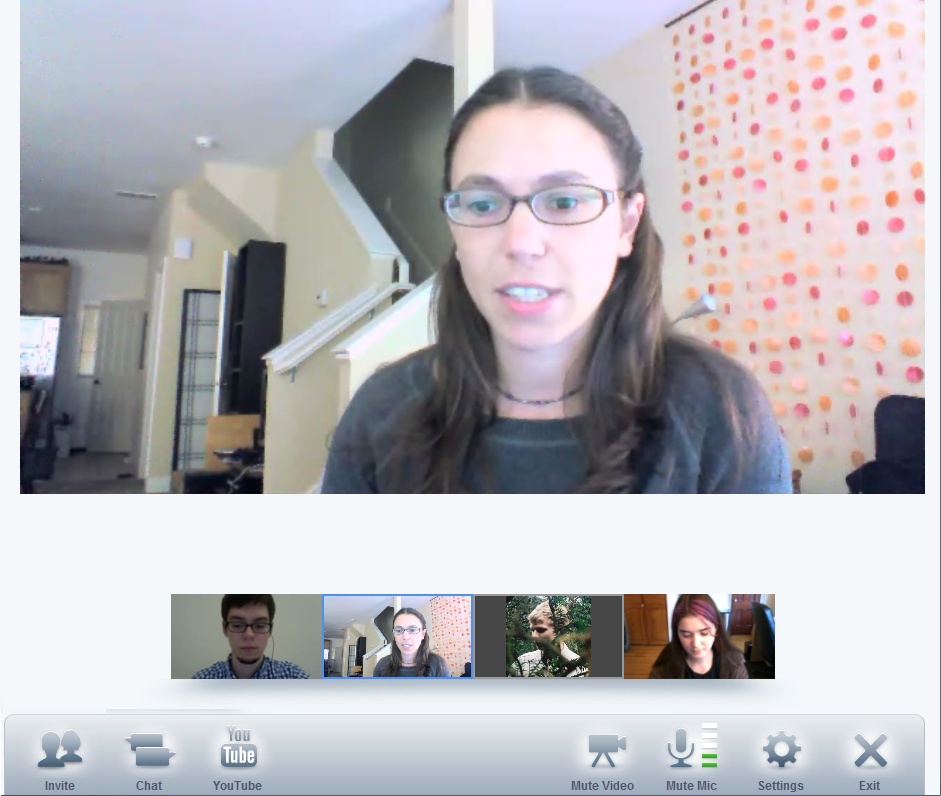
Down in the lower-right corner of the window are some handy controls. The Mute Video button temporarily turns off your webcam so the other people in the hangout can hear you but not see you (useful, for example, if your toddler niece wanders into the room to show you her new diaper-removing trick). When your video is muted, folks will see your profile picture instead of your video feed. The Mute Mic button turns off your microphone (in case you need to sneeze or answer the phone, say). Click either button a second time to undo its effect, or click the Unmute button that appears at the top of the hangout window. The Settings button takes you to the settings screen you saw on Inviting People to Hang Out.
Tip
When you’re in a hangout, it’s a really good idea to mute your mic if you need to type something, especially if you’re using the built-in microphone on a laptop. The clacking of keys can annoy other participants and make Google+ think you’re the one speaking so that it switches the focus of the main video feed from the actual speaker to you, even though you’re just looking dead-eyed at a monitor while you type.
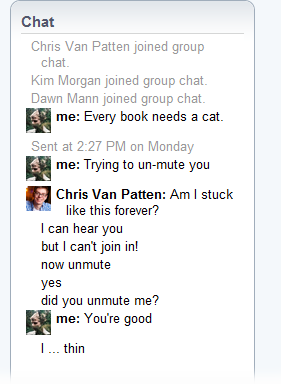
The buttons in the lower-left corner of the window are more interesting. Click Invite to bring up the standard circle- or people-picking box so you can type in names of people or circles to invite them to hang out. The Chat button opens up a panel on the left side of the hangout window, where you can type things instead of saying them out loud. This is helpful for pasting in links to websites (or YouTube videos, as explained next), for those hanging out with video but not audio (such as folks joining from work), and when someone wants to contribute a quick thought without interrupting the speaker (especially useful in formal hangouts, like team meetings). Click the Chat button again to collapse the panel.
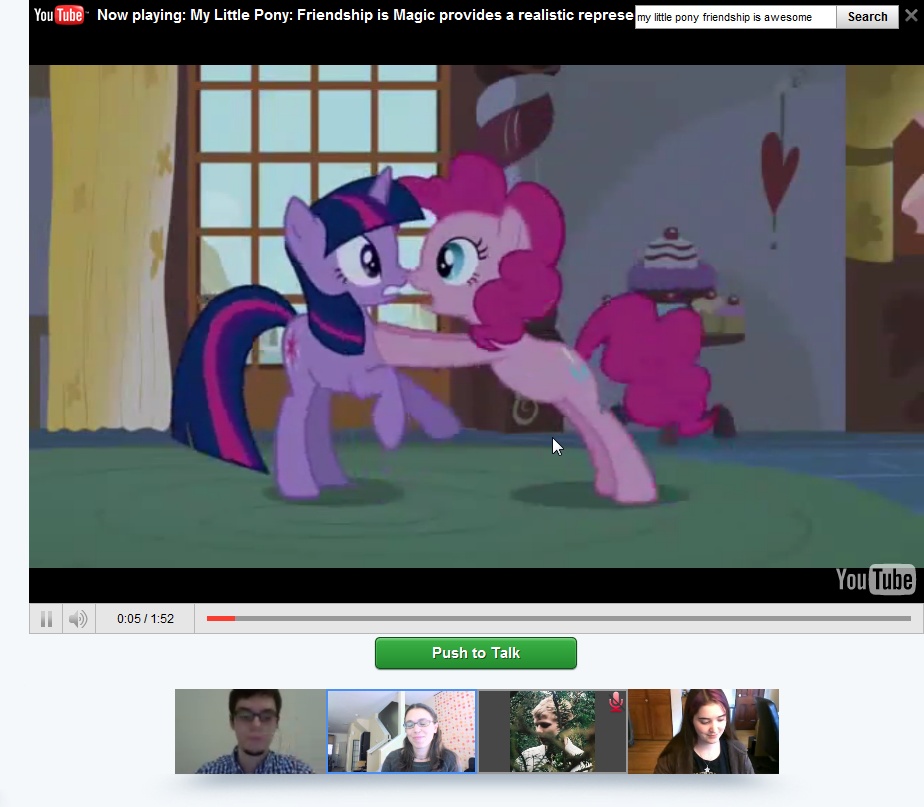
The YouTube button is mostly just for fun, but it can be a practical tool if there’s a video you want to share with the group. When you click the button, the center of the hangout window changes to let you search for YouTube videos. Type a search term in the text field, hit Enter (Return on a Mac), and then click the video you want everyone to see.
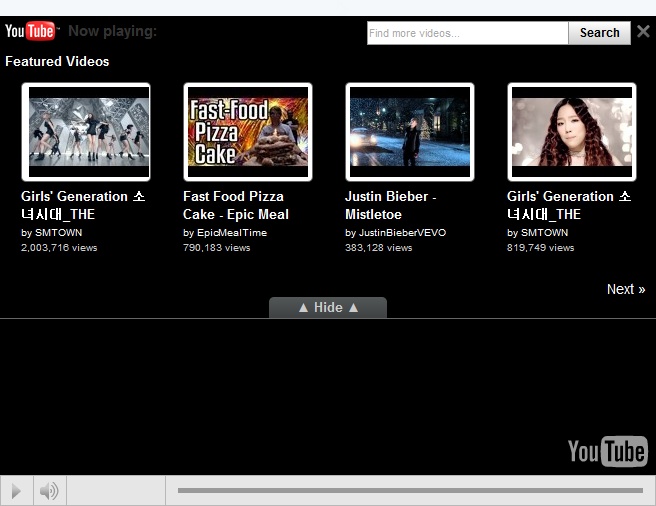
After a brief pause while the video loads, everyone will see the video play in the center of the hangout window, so you can laugh, interject, and scratch your chins in real time. You’ll also notice that Google+ automatically mutes every-one’s mics while the video is playing, then unmutes it when the video ends. That makes some sense, since you’re likely soliciting opinions (or just chuckles) from your audience. But if you want to interject something during the video, click and hold the “Push to Talk” button that appears under the video, speak your piece, and then let go of the button.
You already know that the Mute Mic button lets you mute your own audio feed. But what if somebody else’s audio is causing problems? For example, somebody might step away from their keyboard and not know that their IM program is making a really annoying notification sound. Muting is definitely the way to go for simple annoyances and mic problems. Anyone in a hangout has the power to mute other participants—folks can even mute the hangout’s organizer, if they want.
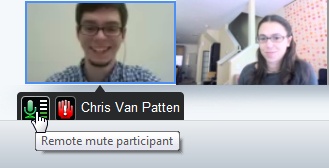
To mute someone, point your cursor at the person’s video feed in the row of attendees near the bottom of the window, and you’ll see two icons: a green microphone and a red hand. Click the green mic and you’ll see a little bar at the top of the hangout window that says “Mute audio for meeting participant [name]?” Click the “Mute now” button to do just that, or Cancel if you change your mind. The person’s audio will go quiet so nobody can hear him, and he’ll see a quick pop-up notification that he’s been muted. It’s up to him to unmute himself by clicking the Unmute Mic button in his hangout window. Obviously, muting is more of a temporary fix than a way to solve audio problems. If someone starts muting people just to be annoying, you might want to block them.
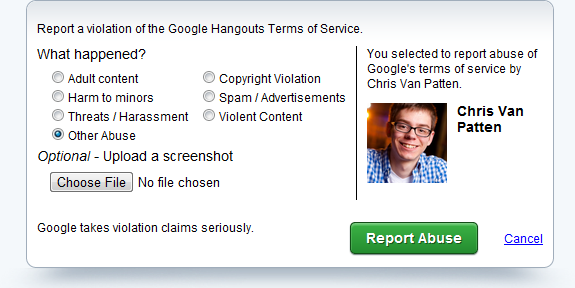
The red hand icon is for reporting abuse, which is for more serious problems with a hangout participant. Unlike reporting abuse for posts and photos, though, clicking this icon gives you very specific options for reporting what the person did wrong: they shared adult or violent content, or material that could harm minors; they threatened or harassed someone; they’re trying to sell something or they’re spamming people; or they’re violating copyright laws. If someone is intentionally being a pushy, disrespectful jerk, click the red hand icon below her video feed, turn on the radio button for the type of violation she committed, and then click Report Abuse. (If you want to document the violation, you can take a screenshot of the problem before clicking the red hand icon, and then you can upload that image before clicking Report Abuse.) Google+ moderators will then investigate and might end up booting the troublemaker from the site.
Note
What constitutes a copyright violation? Google doesn’t want you to use hangouts to share clips from professionally produced TV shows or movies—no matter how easy it is to find clips from the Star Wars online. It’s a fine line that Google+ and other social-networking sites are walking, but the point is Google doesn’t want you to use the video bandwidth they’re giving you and your friends to host film screenings, for example.
When you’re done hanging out, click the Exit button in the lower right corner of the hangout window (the X icon), and then close the browser window itself.
One thing worth noting about hangouts is that people you’ve blocked (see Blocking, Muting, and Reporting Posts) can’t join your hangouts, even if they see that you’re hosting one—which they might, if a mutual contact joins your hangout. In that way, hangouts are just like most everything else on Google+: you control who can access your stuff.
Hangouts with Extras
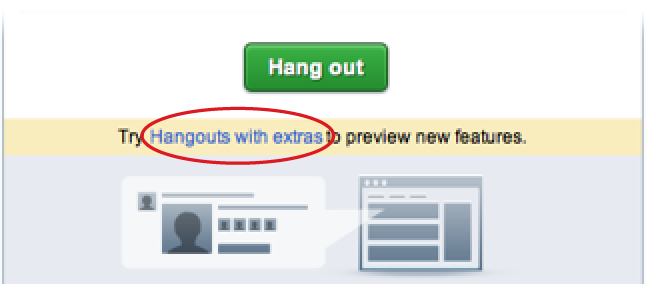
You might have noticed that, on the “Check your hair” screen you see before you start a hangout, there’s a “Hangouts with extras” link in the midst of the other buttons and options:
“Hangout with extras” is a good name for what Google+ is offering: the same kind of video chatroom you get in a regular hangout, but with a few interesting doodads to try out. As of this writing, hangouts with extras are just an alternate, still-in-testing version of hangouts, but based on how Google typically rolls out new features, the extras will probably become part of regular hangouts in the near future.
You might choose a hangout with extras if you’re organizing a more work-oriented, presentation-type meeting. One of the extras is that you can give such hangouts a name, both so you can make the topic clear (as opposed to the more freewheeling nature of standard hangouts) and so that any documents you create during the hangout can be saved and indexed (more on that in a sec).
To start a hangout with extras, click the standard “Start a hangout” button on the right side of any stream’s page. Next, in the window that appears, click the “Hangouts with extras” link shown above, and then click “Try Hangouts with extras.” You’ll then see a slightly modified “Check your hair” screen where you can name the hangout and choose who to invite. (If you don’t name your hangout, Google+ names it after the date and time you started the hangout.) Once you’re all set, click “Start hangout.”
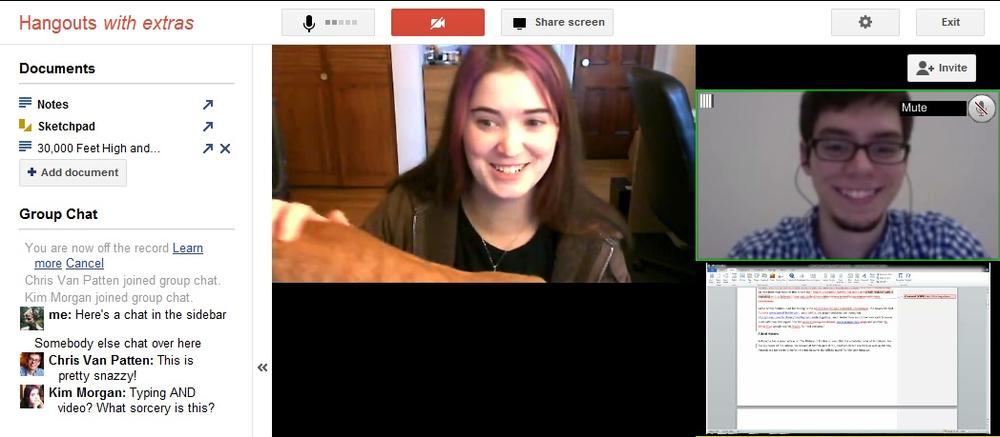
As you can see in the figure on Notes, Sketchpad, and Google Docs Collaboration, the layout of a hangout with extras is a little bit more squared-off and business-like than a standard hangout, but it shouldn’t take you long to get the lay of the land.
Tip
If you’re not sure what one of the buttons at the top of a hangout with extras does, point your cursor at the button to see a little tooltip pop up with the button’s name.
Here’s a brief overview of the bonus features you can use when you choose to go “with extras.”
Notes, Sketchpad, and Google Docs Collaboration
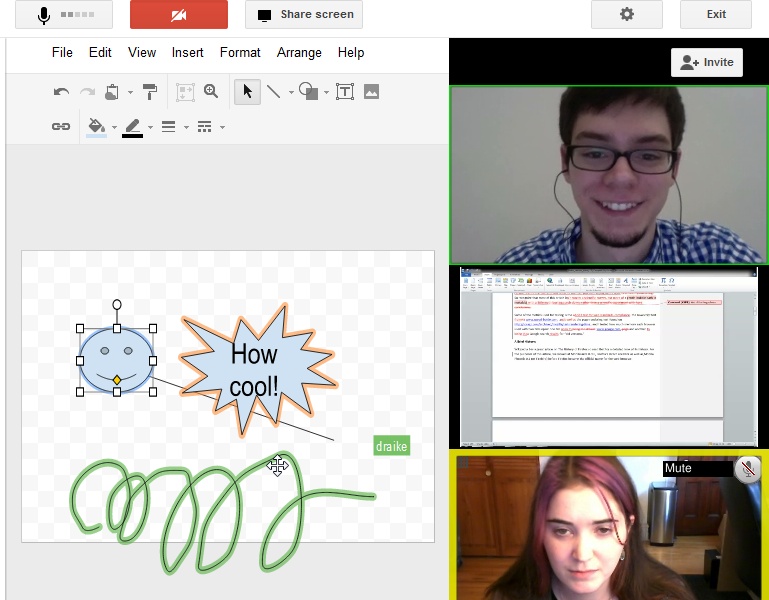
In the panel on the left side of the hangout window, the Documents section offers three handy tools. Click Notes to display a blank document for, well, note taking. If it’d be easier to explain something by drawing a diagram, click Sketchpad to bring up some simple drawing tools. And if you want to give people in the hangout access to one of your Google Docs documents, click “+Add document.” (Google Docs is a site that lets you create word-processing documents, spreadsheets, and more right in your web browser. All you need to use it is a Google account. Check it out at www.google.com/docs.)
When you click any of these tools, the document appears in the center of the hangout window, replacing the video of whoever is speaking. Clicking Notes or Sketchpad brings up a blank document or blank drawing pad that everyone in the hangout can see, and which everybody has permission to edit. Whatever people or type or draw is instantly saved to your Google Docs account.
Note
When you’re all done typing or drawing, you can head to Google Docs by pointing your web browser to www.google.com/docs or clicking the Documents link in the black toolbar at the top of any Google+ page. You’ll see the new document or drawing in your list of files. Its name starts with “Sketchpad” or “Notes” followed by “talk.google.com/,” and then the name of the hangout in which it was created (if you didn’t name the hangout, Google inserts the date and time of the hangout instead).
If you’ve already created a document in Google Docs that you want to share and work on with your hangout partners, click “+Add document.” In the list that appears, turn on the checkbox next to a file’s name (you can turn on more than one if you want to share multiple documents), and then click the Select button.
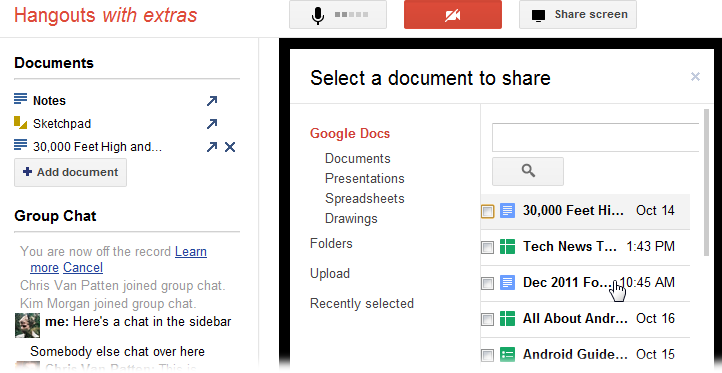
You may see a message asking if you’re sure you want to let the people in this hangout collaborate on this document—worth thinking about, because they’ll have access to the document outside the hangout as well when they log into their own Google Docs accounts, unless you specifically revoke their access by clicking the “Document sharing settings” button in the hangout window, or by heading over to www.docs.google.com after the hangout and editing the document’s sharing settings. Once you’ve shared a document, you can switch to a different document by clicking “+Add document” again. Your previous document is added to the Documents list, and you can pull it up again by simply clicking it in the list.
Screen sharing
You’ve seen how to display documents and sketches in the hangouts with extras window. For anything else you can pull up on your computer, there’s screen sharing. To try it out, click the “Share screen” button near the top of the hangouts with extras window.

A window pops up that lets you choose exactly which window you want to share. One of the options is Desktop, which includes everything you can see on your screen. Choose either Desktop or a specific window you want to show people, and then click the “Share selected window” button. The window you picked appears in place of your video feed.
If you pick Desktop, things can get a bit tricky, since the folks in the hangout might end up seeing a duplicate of the hangout window, and you have to be conscious of everything you’re showing these folks and keep in mind that they can only see a smaller, less clear version of your screen. So it’s usually better to share a single window, and use windows and apps with big fonts and large buttons. You can play a video on your shared screen, but it might look really choppy and blurry to the other people in the hangout.
Hangouts on Mobile Devices
IF YOUR ANDROID PHONE or tablet has a front-facing camera (that is, it can take photos of you when you’re looking at its screen), and you’re running a relatively modern version of the Android operating system, you can take part in Hangouts right through your device—no keyboard or monitor required.
Note
Google+ Hangouts are due to be available for iPhone and iPad soon, but they weren’t as this book went to press. They’ll also be available on more Android devices, ones with Android 2.3 and later installed.
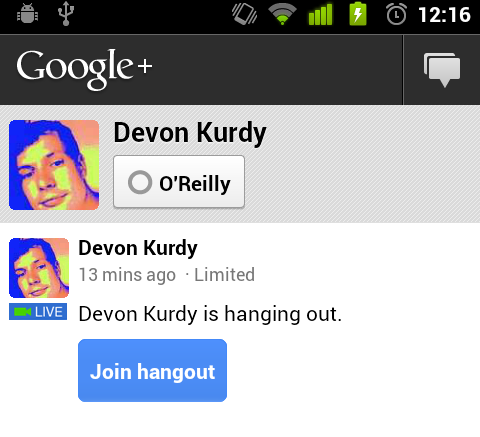
To get started, launch the Google+ mobile app (see Chapter 8.) Then simply click the “Join hangout” button in a stream you’re checking out, or (if you receive a notification about a hangout) tap the notification. You see the same “Check your hair” screen you get on a computer. Tap the “Hang out” button to join the fun.
Tip
Like hangouts on a computer, mobile Android hangouts require a decent Internet connection: 900 KBps upload and download speeds for two-person hangouts, and 1800 KBps download and 900 KBps upload speeds for multi-person pangouts. You can usually get that with your phone or tablet’s WiFi feature turned on and connected to a decent high-speed connection. But if you’re on cellular network that’s not cutting edge (like some carriers’ 3G networks), you might have a rather choppy experience, or not be able to connect at all.
The hangout’s main video feed (the one showing the person who’s talking) pretty much takes over your device’s entire screen. You can check how you look by glancing at the small box in the lower-right corner. The buttons at the bottom let you read and or send chat messages, mute your mic or video, switch to your device’s back-side camera, and exit the hangout.
Tips for Better Hangouts
IF YOU’RE GOING TO spare the time—and the computer power—to set up a hangout with a group of friends and acquaintances (and, if you’re feeling brave, complete strangers via public hangouts), you may as well do it right. That means having the best possible connection, decent lighting, and the right spirit and etiquette to converse and lead the group along. Some hangouts are meant to be casual and loosely structured, but every hangout can benefit from a little know-how.
Here are a few tips to help you get the most out of your group video chat, drawn from your humble author’s experience on live-via-Skype talk shows.
Dig out an Ethernet cable. A wireless connection is okay for most video-chat situations. But to avoid choppiness and get the absolute smoothest video, grab a network cable and connect your laptop or desktop computer directly to one of the outgoing ports on your home router. Video connections suffer a bit from the back-and-forth bounce of a WiFi signal, but a cable connection should give you good video quality as long as you have a fast Internet connection (see the Note on Note for the minimum requirements).
Grab a USB headset. You’ll get the best possible sound if you use a head-set that plugs into a USB port on your computer. The next best thing is to use standard earbud or in-ear headphones (this can help prevent echoes and feedback). If you don’t have either of those, go ahead and talk straight at your laptop, but at least determine where your computer’s microphone is so you know where to aim. (Finding the mic can be tricky—try Googling your computer’s model number or flip through its manual)
Speak in full sentences, and wait an extra second before talking. If you’ve ever been on a conference call on a glitchy day or made a really long-distance international phone call, you’ve experience the frustration of talking over the end of someone’s sentences, and then apologizing, and then apologizing again for talking over their apology, and so on. That can occasionally happen in hangouts, especially if more than two people have joined. To help avoid that problem, try to speak in full, thought-out sentences with clear conclusions, and occasionally remind others to try the same.
Get lots of light behind your camera. Webcams don’t do so hot in low lighting, and your face can end up indistinct if the light is behind your head. Try to set things up so there’s an ample light source behind the camera, leaving your face illuminated but not washed out.
The best way to get better at hangouts is to give them a try. Talk to some friends, meet some friends-of-friends, and get used to the idea that you can use Google+’s video-chat service in a way that doesn’t feel like an job interview. Line up the camera and get to know the people in your circles.