
Appendix A. iPad Settings
You’ll learn to:
Configure the way your iPad looks and sounds
Customize the way your apps work
Manage your WiFi and cellular connections
Add a passcode lock to your tablet
Set restrictions for kids
DESPITE ITS SLIM GOOD looks, any iPad big or small is, at its core, a computer. And like most computers, you can customize its settings to suit your needs. Want to make the screen less bright, flip on Location Services so the Maps app can find you, turn on Bluetooth capability, tell Siri who you are, sign up for a month of Verizon 4G LTE service, or add a new email account?
You can do it all that right in the iPad’s Settings area. In fact, unless you go in there and poke around for a bit, you may have no idea how much of the iPad you can actually fiddle with—and that’s what this appendix is for.
In addition to letting you tweak the way your iPad works, the Settings area has resetting options in case your iPad suddenly develops an attitude (and Appendix B has more on troubleshooting). So if you want to find the controls to adjust your iPad’s date and time, change your iCloud syncing preferences, turn off Siri, or power down the cellular chip in your Wi-Fi + Cellular ’Pad when the flight attendant comes around, turn the page to start your Settings walkthrough.
Tour the iPad’s Settings
TAP THE SETTINGS ICON on your iPad’s Home screen to see a list of all the slab’s features you can change, under headings like Safari and Brightness & Wallpaper.
Tap an item in the list to display its options on the right side of the screen. Then tap the relevant button, link, or label to get to the setting you want to change. To return to the main Settings area, tap the Settings arrow button in the top-left corner (circled).
Airplane Mode
Anybody who’s flown commercially in the past 10 years knows the drill: Just before the plane takes off, the cabin crew asks you to turn off all electronic devices to avoid interfering with the plane’s instruments.
Once the captain says you can use your gadgets again, turn your
iPad back on and choose Settings→Airplane Mode→On. Why? Airplane Mode—signified by a tiny
plane icon (![]() ) at the top of the iPad’s screen—conforms to
federal regulations that prohibit wireless devices whose signals may
interfere with the plane’s electronics. So switching Airplane Mode to
On turns off your iPad’s link to the Internet and
its GPS functions. But you can still use the device to read downloaded
iBooks, listen to music, type up Notes, and do other non-Net
activities.
) at the top of the iPad’s screen—conforms to
federal regulations that prohibit wireless devices whose signals may
interfere with the plane’s electronics. So switching Airplane Mode to
On turns off your iPad’s link to the Internet and
its GPS functions. But you can still use the device to read downloaded
iBooks, listen to music, type up Notes, and do other non-Net
activities.
“But wait,” you say, “many flights now have WiFi available on-board. What about that??” If the plane offers WiFi from Gogo (which has its own iPad app, by the way) or a similar service, go back to Settings→Wi-Fi and select On so you can override Airplane Mode’s WiFi blackout and join the plane’s wireless network; your iPad’s cellular network (the one that sends signals along cellphone towers) remains off via Airplane Mode. When the aircraft lands and you’re free to move about the cabin and off the plane, don’t forget to choose Settings→Airplane Mode→Off.
Note
The settings for Wi-Fi, Wi-Fi + Cellular, and Wi-Fi + 3G iPads can differ slightly from model to model and carrier to carrier. If you see a setting in this appendix that you don’t see on your iPad, odds are your iPad model or carrier doesn’t offer the feature. For example, you see the Personal Hotspot setting only on Wi-Fi + Cellular iPads, and even then only if you activate this optional feature from wireless carriers. An iPad system software update could also change things around a bit.
WiFi
Tap Wi-Fi on the Settings screen to turn the iPad’s wireless chip on or
off. With Wi-Fi set to On, the iPad sniffs around for your usual set
of airwaves. If it can’t find them, it lists any hotspots it
does find and asks if you want to join one. Tap a
network name to join it or tap ![]() to see the network’s settings. Click “Forget this Network” to permanently
remove it from the list of available nets. To turn off the message
bugging you to join a new network, choose Settings→Wi-Fi→Ask to Join
Networks→Off. If you’re outside a WiFi zone altogether, turn Wi-Fi to
Off so your iPad no longer hunts for a signal, saving battery
life.
to see the network’s settings. Click “Forget this Network” to permanently
remove it from the list of available nets. To turn off the message
bugging you to join a new network, choose Settings→Wi-Fi→Ask to Join
Networks→Off. If you’re outside a WiFi zone altogether, turn Wi-Fi to
Off so your iPad no longer hunts for a signal, saving battery
life.
Bluetooth
In iOS 6, the switch for turning the iPad’s Bluetooth radio on or off sits right out there in plain sight on the Settings panel. If you’re running iOS 5 on an older iPad and can’t update to iOS 6, you have to go the long way to get to your Bluetooth settings: tap Settings→General→Bluetooth→On/Off. On either system, this is the place to turn Bluetooth off or on for use with Bluetooth gadgets.
Cellular Data (Wi-Fi + 4G/3G iPads Only)
With a Wi-Fi + Cellular or Wi-Fi + 3G iPad, you can get on the Internet using a wireless network (WiFi), just as WiFi-only iPad owners can. But you can also tap into the Web via AT&T, Sprint, or Verizon’s cellular data network.
New owners of AT&T 4G/3G iPads can choose from three data plans. The cheapest gives you 250 MB of data for $15 a month; there’s also 3 GB for $30 a month or 5 GB for $50 month. (If you’re an original 3G iPad owner, you can hang on to your original unlimited-data-for-$30-a-month plan.) Sprint’s monthly plans include $15 for 300MB; $35 for 3 GB; $50 for 6GB; and $80 for 12GB. Verizon has four monthly data plans: 1 GB for $20, 2GB for $30, 5GB for $50, or 10GB for $80.
You can find other 4G/3G options at Settings→Cellular. Tap the 4G LTE network to Off to save battery life. Tap View Account to see how much data you’ve used, upgrade your plan, add an international plan, or edit your payment info. If you’re on a foreign trip, you can turn off Data Roaming so your iPad doesn’t grab data over pricey international networks. Owners of 4G/3G iPads can add a PIN code to lock down the tablet’s micro-SIM card so others can’t use the tablet; just tap SIM PIN and pick a number. And make sure Settings→Carrier→Automatic is set to On so your iPad can find a cellular network.
In iOS 6, flip the Wi-Fi Plus Cellular switch to On and the iPad’s cellular chip automatically takes over data-slinging in the presence of a weak WiFi signal. You can opt to use cellular data for specific chores like syncing the Safari Reading List.
Do Not Disturb (iOS 6 only)
Need some peace? Go to Settings→Do Not Disturb→On to turn off all iPad alerts. You can schedule quiet time automatically in the Notifications settings.
Notifications
Certain programs, mainly social networking apps and games, can push notifications to your iPad, even when you’re not actively using the program or game. This means that a little alert bubble pops up on your screen when, say, you have new mail or it’s your move in a Game Center game. Depending on the app, you may be able to configure your alerts several ways, including displaying them in a tidy list on your Notification Center screen (Use Notifications); the options vary by app.
Notifications from certain apps—like Messages, Game Center, Reminders, and FaceTime—can even appear on your iPad’s Lock Screen, where you can jump right to them by sliding the app’s icon to the right to simultaneously unlock the screen and launch the app. Some apps may also get your attention with a badge alert—a number in a little red circle on an app’s icon, like the number of new magazine issues awaiting you in the Newsstand app.
To switch things up, tap Settings→Notifications. Here, you can choose to sort app alerts manually (by the app’s importance to you) or by the time the alert comes in (the most recent alerts top the list). On the Notification Center screen, tap the name of each app listed. On that app’s page of settings, choose how you want to be notified (by sound, alert, or badge), the on-screen position of the alerts (top or middle), and whether you want them displayed in the Notification Center or on the Lock Screen. Push notifications help keep you up to date, but all that notifying can run down your battery because the iPad has to constantly sniff the air for notices.
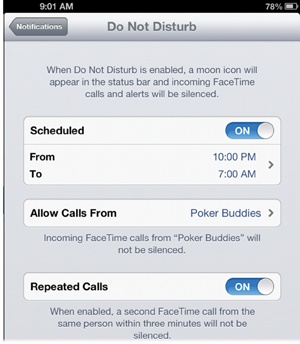
iOS 6 offers a Do Not Disturb mode for the iPad. Tap Settings→Notifications→Do Not Disturb to set your preferences. To schedule quiet time from alerts and alarms, select a time period, like from 11 p.m. to 7 a.m. so you can get some sleep. You can also screen your FaceTime calls and allow repeated calls to get through (Hang Out the “Do Not Disturb” Sign).
General
When you tap Settings→General, you see a whole screen full of menus that change the way the iPad behaves. These include:
About. Tap here to see your iPad’s vitals: its name (which you can change by tapping the line and picking something new), drive capacity, amount of storage available, system software version, model number, WiFi and Bluetooth network addresses, and serial number. You can also see how many songs, videos, photos, and apps live on your iPad. And, as a special bonus for the extremely bored or insomnia-afflicted, you can read Apple’s legal and regulatory information.
Software Update. Tap here to see if there’s an update available (or currently downloading) for your iPad’s operating system. If an update awaits, tap Download & Install (or just Install if your iPad already downloaded it).
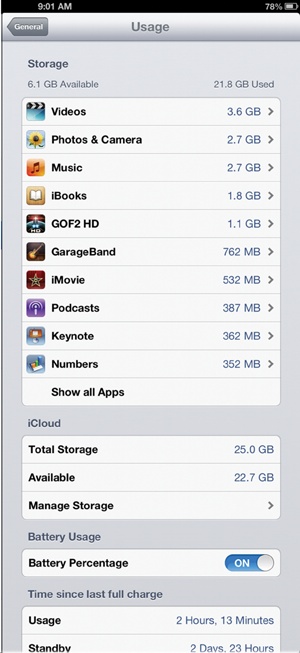
Usage. Check here to see how much of the iPad’s battery you’ve drained—or how much of your monthly cellular data plan you’ve gobbled up so far. You can see the amount of space various types of content, like songs or videos, consume; tap an app and you can delete it on the next screen. You can also see the status of your free 5 GB of iCloud storage, and your battery and cellular data usage.
Siri (iOS 6/2012 iPad only). Activate your iPad’s virtual assistant at Settings→Siri→On. Choose a spoken language and when you want audio feedback (Always or Handsfree Only). You can also fill in your basic personal info so Siri knows who she’s dealing with.
VPN. If your office lets you hook into its virtual private network (VPN) for a more safe and secure link to the Internet, tap VPN (in iOS 5, this setting is called Network). Here, you can turn on the iPad’s VPN function and configure your connection based on information you get from the corporate IT folks.
iTunes Wi-Fi Sync. Tap here if you want to wirelessly sync your iPad’s content with iTunes over your WiFi network.
Spotlight Search. Choose what types of files show up—contacts, apps, music, mail, and so on—when you use your iPad’s uber-search engine, Spotlight (Search the iPad). Use the grip strip (
 ) to reorder the categories so the most
important files show up first in search results.
) to reorder the categories so the most
important files show up first in search results.Auto-Lock. Tap this setting to adjust how long your iPad screen stays on before it turns itself off (and displays the Lock Screen when you wake it up). You can choose 2, 5, 10, or 15 minutes—or Never.
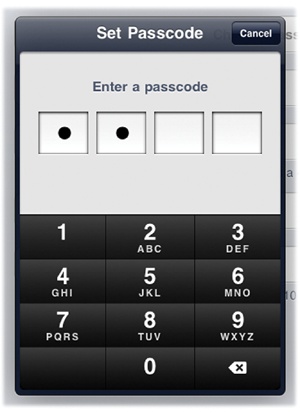
Passcode Lock. If you have sensitive information on your iPad (or just want to keep the kids out), tap Passcode Lock. On the next screen, tap Turn Passcode On. Think up a four-digit number and verify it. From now on, to get by the iPad’s Lock Screen/Picture Frame, you must type in this code. If you have really sensitive data on your iPad, tap Settings→General→Passcode Lock→Erase Data to completely wipe all the information off the iPad’s drive if someone incorrectly enters the passcode more than 10 times. Just make sure you have that top-secret info in a full set of backup files securely tucked away on another computer, since it won’t be on the iPad anymore.
iPad Cover Lock/Unlock. If you have one of Apple’s Smart Covers (Protect Your iPad), you can flip this switch to On and have the tablet automatically lock up and go to sleep when you close the cover and unlock when you open it.
Restrictions. Speaking of the kids, tap Settings→General→Restrictions→Enable Restrictions to set up usage rules for the iPad (this feature requires that you set up a Passcode Lock, too). Once you do, you can block the kiddies from using iTunes, Safari, and FaceTime. (The iPad removes the screen icons for these apps until you type in the passcode.) You can also prevent new apps from being installed and restrict apps from using Location Services. And you can turn off multiplayer gaming and restrict the type of content kids can play on the iPad—like, no music with explicit lyrics.
Use Side Switch. Assign your preferred function to the iPad’s side switch here—either make it a mute button or use it to quickly lock the tablet’s screen orientation so the display doesn’t spin all over when you move.
Multitasking Gestures. Tap here to turn on (or off) the four- or five-fingered swipes that replace several Home button functions (Use Multitasking Gestures on the iPad).
Date & Time. Tap here to switch between a 12-hour (AM/PM) clock and a military-style 24-hour clock. Frequent travelers can also pick a time zone and manually set the iPad’s date and time.
Keyboard. Within the keyboard settings area, you can turn on (or off) the auto-correction and auto-capitalization features that fix your typing, activate the spell-checker, and turn on the Enable Caps Lock feature. You also go here to turn on the so-called “.” shortcut that sticks a period at the end of a sentence, adds a space, and then capitalizes the next letter when you double-tap the keyboard’s space bar. Speaking of keyboards, you can turn on the split keyboard for easier typing, or tap International Keyboards to add an alternate keyboard in another language, like French or German, or to add the Emoji emoticon keyboard (Use an International or Emoji Keyboard). If you want to have the iPad translate your speech to text, you can turn on the dictation feature here, too. (If you don’t like Apple sending your speech and other personal information to remote servers for transcription, set Dictation to Off.) You can also create text shortcuts here—type “iow” in a note, for example, and the iPad expands it to “In other words” (see Protecting the iPad’s Screen).
International. World travelers can easily set the language the iPad uses for its menus and commands by tapping Settings→General→International→Language. To turn on international keyboards, tap Settings→General→International (see “Keyboard” above) to format dates, times, and phone numbers based on the standards of a particular country.
Accessibility. The iPad has a number of features that make it easier for those with visual impairments to use. Choose Settings→General→Accessibility to turn on the VoiceOver feature that announces menu names and titles out loud. (VoiceOver requires a bit of setup and offers many special gestures you can use to operate the iPad; for more information, tap Home→Safari, go to http://tinyurl.com/appleipadguide, and then tap the Accessibility chapter [24] for in-depth instruction on this extensive feature.)
The iPad’s accessibility settings also include Zoom for major magnification by double-tapping with three fingers (although, according to Apple, you can’t use it along with VoiceOver). For easier reading, change the text size or tap the high-contrast White on Black option to reverse the screen colors. You can also switch the iPad’s audio output from stereo to mono to let those with hearing impairments hear the entire sound signal at once instead of splitting it into two channels. You can turn on the Assistive Touch feature if you have physical issues and need to use a special stylus or other tool on the touch screen. If you want the iPad’s auto-correction function to shout out the typos it’s fixing while you’re busy looking at the keyboard, choose Settings→General→Accessibility→Speak Auto-Text→On. And you can set the Home button to toggle on or off VoiceOver or the white-on-black screen with a triple-click.
Reset. Tap here to get to all the buttons for blanking out the iPad’s memory. You can reset all its settings or just the network options, reset the dictionary that corrects your typing, revert to the Home screen’s original layout, and resume getting those little warnings about using your location settings after you give programs like Maps permission to do so. If you want to erase everything off the iPad, choose Settings→General→Reset→“Erase All Content and Settings.” But remember, you’re nuking everything—info, music, videos, photos, and iBooks.
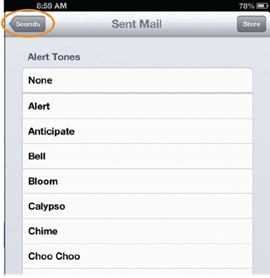
Sounds
Tap Sounds to adjust the iPad’s audio level with a volume slider. You can also turn off (or on) alert sounds for new mail, sent mail, text messages, tweets, calendar events, reminders, lock sounds, and the tap-tap-tappy keyboard click. In iOS 5, you find the iPad’s audio settings at Settings→General→Sounds.
Brightness & Wallpaper
You really get no surprises here. Tapping Settings→Brightness & Wallpaper lets you a) use a virtual slider to make the screen dimmer or brighter so it’s easier on your eyes, and b) select a new image to appear as the background (wallpaper) for both your iPad’s Lock Screen (the one you see when you wake the iPad from sleep but before you swipe the Unlock slider) and its Home screen (where all your apps live).
Tap the Wallpaper label to select new background images from Apple’s stock shots or from a set of photos you added to your tablet (see Chapter 16 to learn how to add pics). Tap a thumbnail to preview a photo, and then tap the button of your choice: Set Lock Screen, Set Home Screen, Set Both, or Cancel.
Picture Frame
The iPad’s built-in Picture Frame feature (Turn the iPad into a Picture Frame) lets you show off your photo collection when you’re not using the tablet for other things. Tap Settings→Picture Frame to tell the iPad how to play a slideshow. You can choose the type of transition between images (the standard Dissolve or the fancier, animated Origami), whether you want Picture Frame to zoom in on people’s faces, and if you want the iPad to shuffle (randomly display) your photos. Finally, you can pick which photos you want to appear (Hint: It might be a good idea to leave those Las Vegas bachelorette party photos out if you know your mother’s coming over for tea). To set up a regular photo-album slideshow, see Play Slideshows on Your iPad.
Privacy (iOS 6) / Location Services (iOS 5)
In iOS 6, tap Settings→Privacy→Location Services→On (or in iOS 5, tap Settings→Location Services→On) if you want the iPad to pinpoint your position on a map or supply information about where you are to certain location-aware applications, like restaurant finders. Tap it to Off if you don’t want to be found, or if you want to save some battery power—Location Services communicates with GPS satellites, cell towers, and WiFi hotspots all the time. You can see which apps use your location here—and turn off access to your coordinates as you see fit. Tap the System Services button to see (and adjust) iPad apps, like the clock’s time zone, that use Location Services. The iOS 6 Privacy screen also shows what apps can see your photos, contacts, and other personal info.
iCloud
A trip to Settings→iCloud brings you to all the controls for Apple’s free online storage locker. You can set up (and delete) an iCloud account here, and also set your Mail, Contacts, Calendars, Reminders, Bookmarks, and Notes apps to back up their data and sync it to your other iOS devices.
You can turn on (or off) Photo Stream syncing across devices (Stream Photos with iCloud), opt to back up documents and data from supported apps like iWork, and turn on the Find My iPad tablet-tracking beacon (Find a Lost iPad). Tap Storage & Backup to buy more space on Apple’s servers and manage your backup preferences for the iPad’s internal settings, app data, and Camera Roll album.
Mail, Contacts, Calendars
Settings for the Mail app hog much of the screen when you tap Settings→Mail, Contacts, Calendars. Still, you’re probably going to adjust your mail settings more often than your contacts or calendar settings.
For example, you come here to add new email accounts (or delete old ones), tell your iPad how often to fetch new messages, and change the look of the mail program in general. You can choose the number of messages you want to see in the iPad’s Inbox (50 to 1,000 recent messages at a time) and have the inbox preview more or less of a message (one to five lines, or none at all).
You can change Mail’s font size to squint less (go to Settings→General→Accessibility in iOS 6), choose a default mail account if you have several, turn quote level indents on or off, and change your Signature file—the standard text that gets attached to messages sent. You can also make the iPad ask you to confirm that you want to delete a message, show (or hide) images in email, and show the To/Cc label to see if a message was addressed directly to you. Want to send a secret copy of a message to yourself? Tap Always Bcc Myself to On.
The Mail settings area has a couple more options: you can turn on (or off) server-based images in messages and organize your mail in threads (Tour the Mail Program).
In the Contacts area, specify which way you want the iPad to sort and display people’s names—last name first and first name last, or the first name and then last name. In the Calendars area, turn on your New Invitation Alert to have your iPad pipe up when someone sends you a meeting invitation and to select a time zone for your calendar (useful if you live in New York but telecommute to the main office in San Francisco). Finally, you can pick a default calendar for your appointments if you have multiple calendars synced to the iPad. In iOS 5, Syncing preferences for the Reminders app (for reminders from other services, like Yahoo) round out the bottom of the list. Reminders in iOS 6 have their own settings area, described on the next page.
Notes
Hate the font the Notes app uses? Choose between Noteworthy, Helvetica, and Marker Felt. You can also choose an email account to sync with Notes—if you don’t use iCloud, you can sync copies of your Notes to a Yahoo or Gmail account instead.
Reminders (iOS 6 only)
If you’re serious about your To Do List, visit Settings→Reminders to choose how far back you want to sync reminders to your calendars or the Mac’s Reminders app in OS X 10.8. You can also choose which online calendar you want to sync with here. (The settings in iOS 5 are in Mail, Contacts, Calenders.)
Messages
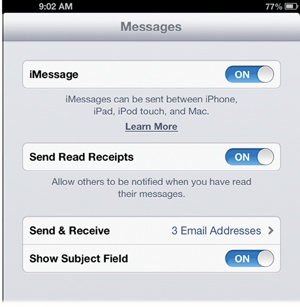
Tap the Messages settings to turn on your ability to send and receive free text messages with other iOS 5 and iOS 6 users. If you do use Apple’s iMessage service, you can configure the app to display subject lines in text conversations and send Read Receipts so you can see if someone opened your message. The settings here also let you receive all the messages sent to your various Apple gadgets by adding the email addresses you use for messages on those gadgets.
FaceTime
Flip the On switch here to enable your iPad to make and take FaceTime video calls. You can also set up your preferred email address for use with FaceTime and select the Caller ID name that appears on the other person’s screen when you ring in with a video call.
Maps (iOS 6 only)
Tap Settings→Maps to adjust the audio volume for the new turn-by-turn audio directions in the iOS 6 Maps app. Your choices are No Voice or low, normal, or loud volume (the latter is helpful when driving through roadwork areas).
On the maps themselves, you can display distances in either miles or kilometers. Nervous monolingual English speakers can flip a button to always see map labels in English and you can adjust the text size for those labels to small, normal, or large.
Safari
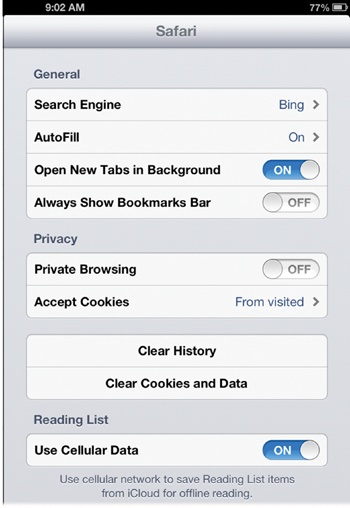
The Settings area for the iPad’s Safari browser has many helpful buttons. Here, you can choose a preferred search engine and opt to have the Autofill feature automatically fill in information in web forms. You can also open browser tabs in the background and browse the Web without leaving a trail by flipping Private Browsing to On.
Want to see your Bookmarks toolbar at all times in the Safari window? Tap Settings→Safari→Always Show Bookmarks Bar→On to make it so. (And if you simply must have all your saved web pages in sync on your iPad, under Reading List, tap Cellular Data to On.)
In the Security area, you can help protect yourself as you surf by turning on the fraud warning (which spots phishing sites out to rip off your personal information), enabling or disabling the JavaScript-powered interactive features some websites use (if you’re worried about security), blocking pop-up ads, and rejecting cookies from sites you don’t personally visit.
Tap Advanced→Website Data to see the content Safari stores locally on your iPad (like files from Apple’s online iPad help guide). If Safari is acting sluggish or you want to erase your tracks, tap the buttons to clear the browser’s history, cookies, and cache files. Are you a web developer who wants to know why your web page is acting wiggy on iPad Safari? Tap Settings→Safari→Advanced→Web Inspector→On to get some help deciphering those errors.
iTunes & App Stores (iOS 6) / Store (iOS 5)
Want all the music, apps, and books you buy on one computer or iOS device to get pushed out and land on all the other computers and iOS gadgets authorized to use the same Store account? Turn on automatic downloads for any or all of those file types. If you prefer that the iPad stick to a WiFi connection for your automatic downloads instead of chomping through your monthly AT&T or Verizon data allowance, make sure the button next to Use Cellular Data is set to Off.
If you need to see your address and billing information for the iTunes Store or App Store, tap the Store icon in the Settings list, and then tap View Account. You can also sign out of your account by tapping Sign Out.
Music
In the iPad’s Music settings, you can turn on iTunes Match (if you ponied up the $25 a year for it) to keep a copy of your music library online. You can also turn on the Sound Check feature, which smooths out the variable song volumes in a playlist into one fairly consistent sound level.
Tap EQ to pick an equalizer preset to make your music sound better. If you worry about hearing loss or damage from headphones full of loud music, tap Volume Limit to On and set a maximum audio level. There’s also an On/Off button to group your songs by artist so they’re better organized on-screen. If you want to stream and copy iTunes music and video between multiple computers, iOS devices, and Apple TV boxes (second-generation or later), you can sign into the Home Sharing feature (Authorize Computers for iTunes and Home Sharing) here, too.
Videos
You can sign into Home Sharing in the iPad’s Video settings as well. Here, you can opt to have the iPad bookmark where you stopped a movie or TV show so you can pick up where you left off when you come back to it. Just tap Settings→Video→Start Playing→Where Left Off; you can also choose From Beginning if you want to always start the whole thing over again. If you have videos with closed-captioned text embedded in the files, you can flip Closed Captioning on or off.
Photos & Camera (iOS 6) / Photos (iOS 5)
If you didn’t turn on the Photo Stream option on the iCloud settings screen (Set Up iCloud on Your iPad), you can do so here. The iPad keeps a few settings for photo slideshows at Settings→Photos, too. You can choose the amount of time each picture stays on-screen, automatically repeat the slideshow over and over again, and decide if you want to shuffle the pictures into a different order from the way they appear in your photo album.
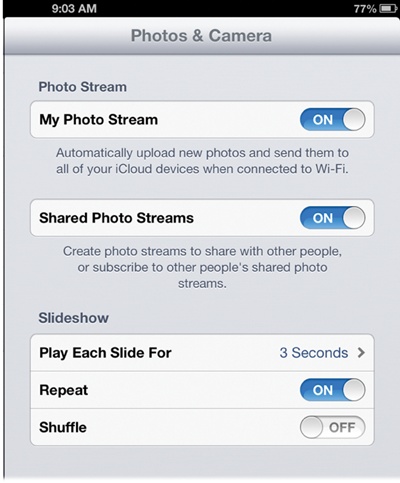
In iOS 6, you can turn on Shared Photo Streams. As explained on Share Your Photo Stream, iCloud lets you share your personal Photo Stream with other people (if you have a new baby, your parents will demand a constant stream). You can also subscribe to other people’s photo streams here.
iBooks
If you downloaded and installed Apple’s iBooks app on your iPad, you get an icon for it on the Setting screen. Tap Settings→iBooks to adjust the hyphenation and justification of book text, or to dictate what happens when you tap the left margin of the virtual page—you can go back a page or advance to the next one. You can also turn on cross-device syncing for bookmarks or book collections. And if you have iBooks textbooks or other interactive titles with data-hogging audio and video files streaming from online servers, you can turn off the multimedia streaming to save some megabytes on your data bill.
Newsstand
Control which digital periodicals automatically download to your iPad here, which can be helpful for timing the arrival of those 600 MB magazines.
iTunes U
If you’re a student at iTunes U and have the U app installed, tap Settings→iTunes U to turn on syncing for your courses and notes.
Tap Settings→Twitter to log into an existing account or to install the official Twitter app for the iPad. (You get nagged to install the full app, but you can skip it, or save it for later, and start tweeting links to web pages, YouTube videos, map locations, and any other app that supports Twitter; see Use Twitter.) You can create a new Twitter account here or add additional accounts if you tweet from multiple identities. Tap each Twitter name listed to get to settings for that account, like whether people can find you in the Twitter directory by your email address or if you want your location information included in your tweets.
Facebook (iOS 6 only)
The social network has mind-melded with iOS 6. Tap Settings→Facebook to install the official Facebook app for iPad, enter your account settings, and set up your Facebook alerts and notifications. If you choose, you can also allow Facebook to wade around in your calendars and sync up your Facebook address book with your iPad Contacts list. People with suspicions about Facebook’s intentions with personal information may want to limit the app’s access.