
Appendix B. iPad Troubleshooting and Care
You’ll learn to:
Restart a stuck iPad
Back up and restore your iPad
Update your iPad’s software
Locate a lost or stolen iPad
Find an iPad repair shop
LIKE MOST ELECTRONIC GADGETS, the iPad always works perfectly fine—until it doesn’t. Many iPad woes are common and pretty easy to fix—the battery ran all the way down, for example, and needs to charge up before iTunes recognizes your iPad. You can solve less obvious glitches by adjusting something in the Settings area, as explained in Appendix A.
But the iPad and its Mini-Me are computers themselves, and they can exhibit bigger problems that require more than flipping a setting—and may even need the help of a technical expert. Figuring out what your tablet is trying to tell you when it’s sick is the first step in getting it back to good health. This chapter explains what to do if your iPad starts acting weird—and where to go if you can’t fix it yourself or need more info.
In 2012, Apple introduced a revamped version of its AppleCare extended warranty for its prized tablet. Now dubbed AppleCare+ for iPad, this new $99 insurance policy covers a variety of potential iPad mishaps, and you’ll find out about that here, too.
Troubleshooting Basics
IF YOUR IPAD IS freezing up, crashing, or acting erratically, here are some common tricks to try:
Restart the iPad. Just as with a computer that’s behaving badly, sometimes restarting your iPad clears up a cranky or stalled system. To restart your tablet, hold down the Sleep/Wake (On/Off) button on the top of the slab until the red “Slide to Power Off” bar appears. Swipe your finger to shut things down. Then press the Sleep/Wake button again until the Apple logo appears on-screen and the iPad starts up again.
Force-quit a frozen app. Apps are programs, too, and sometimes software gets stuck (just ask anyone who’s used a computer for more than a month). To make a cranky app shut down without having to restart your whole iPad, press and hold the Sleep/Wake button until you see the red “power-off” slider—but don’t slide this time. Instead, press and hold the Home button until the app quits and you find yourself back on the Home screen.
Reset an app’s settings. Sometimes an app’s custom settings get scrambled, so tap Home→Settings and scroll down to see if the program has its own entry in the Apps category. If it does and there’s a Reset button, tap it to go back to the factory settings. Troubleshoot Apps has more on troubleshooting apps.
Reset the iPad. A reset is a bit more abrupt than a restart, but it can free up a completely frozen tablet. The next page tells you how to execute one (a reset, not a frozen tablet).
Reset the iPad’s settings. If you’re having problems even after you fiddle with an app’s settings, you can reset the iPad’s settings (not the iPad itself; that’s covered on the next page). Choose Settings→General→Reset. The Reset screen lets you wipe your custom configurations (like your network info) and take the iPad back to its factory settings.
Check the battery level. If it’s in the red, plug in the iPad to recharge it. iTunes won’t download files (like bug fixes) if your iPad is low on power.

Note
For in-depth articles on specific issues or problems with the iPad, Apple offers a detailed set of troubleshooting documents at www.apple.com/support/ipad.
Reset Your iPad
RESTARTING YOUR IPAD (TURNING it completely off and then back on again) can solve many problems, but what do you do if your iPad doesn’t respond to this gentle touch? You can physically reset it without losing your files.
Resetting is the troubleshooting step Apple recommends if restarting doesn’t work; it reboots the tablet if it’s too flummoxed to respond to a normal restart.
To give your iPad the old reset move, follow the steps below:
Plug the iPad into its wall charger if you suspect its battery is running low.
Simultaneously press and hold down the Sleep/Wake button on top and the Home button on the front. Let go when you see the Apple logo. You can hold it up or lay it flat on the table to reset it, as long as you hit the buttons properly.
If the technology gods are smiling on you, your iPad will go through its little start-up sequence, and then return you to the Home screen.

Download iTunes and iTunes Updates, and Reinstall iTunes
IF ITUNES IS ACTING up, you may need to download and install a fresh version of the program. The latest version is always waiting for you at www.apple.com/itunes/download. Your iTunes program itself may alert you to a new version—or you can make sure it does so in the future:
If you use iTunes for Windows and installed the Apple Software Update utility when you added iTunes, you’ll see an alert box telling you that Apple has updated iTunes and offering to install the new version. If you skipped installing the utility, choose Edit→Preferences→General and turn on “Check for updates automatically.” If you prefer to check manually, choose Help→Check for Updates. Either way, you’re prompted to snag an update if there is one.
On the Mac, the built-in Software Update program alerts you, via a pop-up dialog box, about iTunes updates. If you turned Software Update off (in System Preferences), you can run it manually by choosing Software Update from the Apple menu (
 ).
).

Note
If iTunes just flat-out refuses to recognize your iPad when you connect it to your computer, you may have to uninstall and then reinstall a software component called the Apple Mobile Device Service (AMDS). On Windows systems, just restarting the AMDS may help. Apple tells you how to restart the program (as well as reinstall it) on Windows PCs at http://support.apple.com/kb/TS1567. Mac OS X users running Mac OS X 10.6.8 or earlier can find instructions at http://support.apple.com/kb/ht1747.
Reinstalling iTunes itself is trickier—it’s deeply entwined with Mac OS X, so check for iTunes updates to see if one is available to solve the problem. Apple has its own guide to reinstalling iTunes for Windows users at http://support.apple.com/kb/ht1923.
As with any update, once you download the file, double-click the Installer icon and follow along as the program takes you through several screens of upgrade excitement. If the version of iTunes you’re installing is newer than the one you’ve got, you get an Upgrade button when you run the Installer—and upgrading usually takes less time than fully uninstalling and then reinstalling the software.
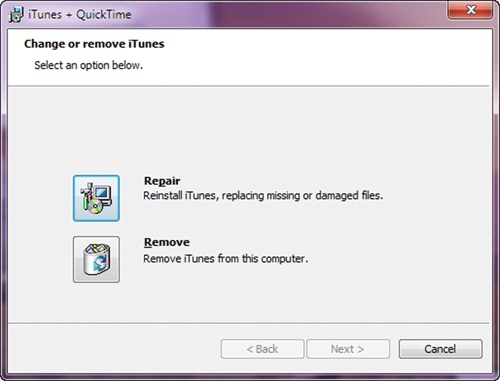
If you’re installing the same version of iTunes, the Installer may politely ask if you want to Repair or even Remove your existing iTunes program. Choosing Repair can often fix damaged files that iTunes needs to run properly. It can also be a quicker fix than fully removing the program and reinstalling it. (See the Note on the opposite page for another uninstall method.)
Reinstalling iTunes doesn’t erase all your music, movies, books, or other items out of your iTunes library. It just gives you a fresh—and hopefully better-working—version of iTunes.
If you open the reinstalled iTunes to an empty library, don’t panic. Quit iTunes and go find the iTunes folder, usually in My Documents→My Music→iTunes or Music→iTunes. Drag the iTunes library file from the iTunes folder onto the computer’s desktop. Then go back to the iTunes folder, open the Previous iTunes Libraries folder, and find the iTunes library file stamped with the date you updated the program. Drag this file out into the main iTunes folder and rename it to just “iTunes Library” without the date in the file name. Now start up iTunes again and see if everything is all better. If not, take a trip to www.apple.com/support/itunes for further help.
Update Your iPad’s Software
UPDATING THE IPAD’S INTERNAL software—which Apple occasionally does to fix bugs or add features—is much easier than it used to be. Before iOS 5, every time you needed to install an iPad software update, you had to download a 600 MB to 700 MB file to your computer via iTunes, then connect the iPad by USB and install the updated operating system.
But with iOS 5 and later, you can install incremental (also known as delta) updates that are much smaller (say around 150 MB) because they include only new code, not the entire program. And best of all, you can install these updates wirelessly, as long as your iPad is plugged into a power outlet and connected to a WiFi network.

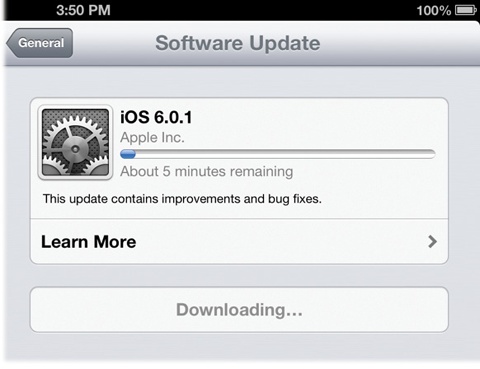
To update wirelessly, tap Settings→General→Software Update. The resulting screen shows if there’s an update’s available; tap to download and install it—all without digging up a cable.
But if you prefer to update your iPad through iTunes, here’s how:
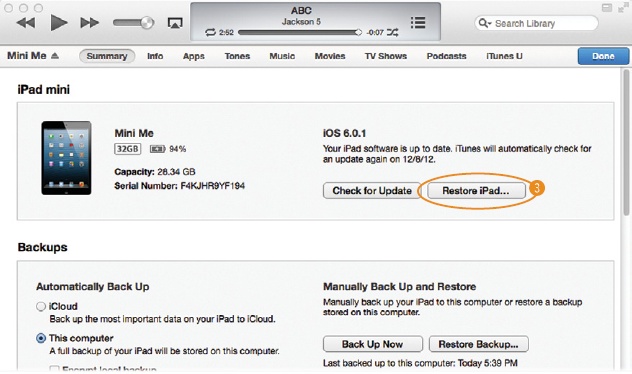
Connect your iPad to the computer and click its icon in the iTunes window.
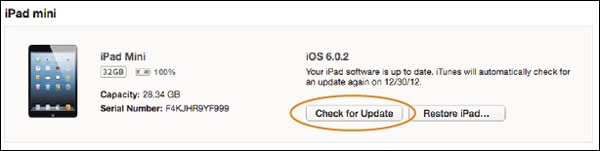
On the Summary tab on the next screen, click “Check for Update” in the Version area (circled below). If your iPad is up to date, iTunes tells you so.
If iTunes finds new iPad software, it prompts you to download it. Click the Downloading icon (
 ) in the iTunes window to monitor your
download progress. (Sometimes iTunes will have already downloaded
the new iPad software. In that case, just click the Update button in
iTunes’ main window.)
) in the iTunes window to monitor your
download progress. (Sometimes iTunes will have already downloaded
the new iPad software. In that case, just click the Update button in
iTunes’ main window.)Follow the instructions on-screen.
You mainly just have to sit there while iTunes handles everything. The iPad usually hangs out quietly, displaying a progress bar and an Apple logo on its screen while it gets a system refresh. Once all that goes away, your iPad screen returns to normal and iTunes displays a message telling you the update is complete.
Use iPad Backup Files
AS LONG AS YOUR iPad is running iOS 5 or later, you can back up your iPad to two places: iTunes and iCloud. Here’s how you back up your iPad’s system settings, app data, Camera Roll album, and more with each method. (Stuff you put on your iPad by way of iTunes—like music, photos, contacts, and all that—should resync after you restore your settings from either backup option here.)
Wireless Backup and Restore with iCloud
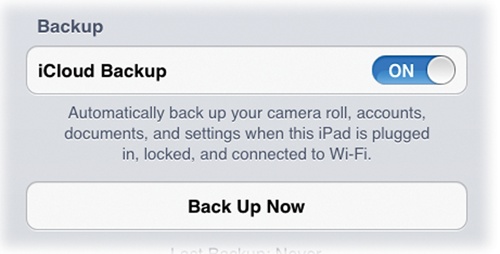
For this method, you need an iCloud account. If you didn’t turn on iCloud Backup during the iPad’s original setup process (Activate and Set Up Your iPad Over WiFi), choose Settings→iCloud→Storage & Backup→iCloud Backup→On. The iPad now backs itself up to iCloud daily as long as it’s plugged in, has a WiFi connection, and its screen is locked. (Tap the Back Up Now button on the iCloud Backup screen to manually back up.)
If the iPad goes wiggy and you ever need to restore the iPad from an iCloud backup, tap Settings→iCloud→Storage & Backup→Restore. Choose the backup file you need and let iCloud fix you up. If you find yourself starting over on the iPad setup screens, either because it totally crashed or you decided to wipe the whole thing and start over with Settings→General→Reset→“Erase All Contents and Settings,” just choose to restore the iPad from an iCloud backup when you get to that screen in the setup process. Boom, done.
USB Backup and Restore with iTunes
When you sync the iPad with your computer or install updates, iTunes creates backup files of your iPad’s settings (so sync every once in a while, okay?). You can choose to back up your files to iCloud (described above) or to iTunes—either automatically each day or manually when you want. If you choose iTunes, you also get the option to encrypt your backup files for extra data security.

To restore a tanked iPad from its iTunes backup file, connect the tablet to your computer (the one you usually sync it with) via its USB cable and click its icon in the iTunes window. On the iTunes Summary screen, scroll to the Manually Backup and Restore area and click Restore Backup. In the box that appears, choose the backup file you want to use (if you sync more than one iPad to this computer, iTunes sorts the backups by date and device name). Click the Restore button and let iTunes do its thing. When iTunes is done, your iPad should look pretty much like it did the last time you backed it up.
Start Over: Restore Your iPad’s Software
JUST LIKE THE OPERATING system that runs your computer, your iPad has its own system software to control everything it does. Restoring the iPad software isn’t the same thing as updating it. Restoring is a much more drastic procedure, like reformatting the hard drive on your computer. For one thing, restoring the software erases everything on your iPad (unless you’re restoring your tablet from a previous backup; see the Note below.)
So restore with caution, and do so only after you try all the other troubleshooting measures in this section. If you decide to take the plunge, first make sure you have the most recent version of iTunes and then proceed as follows:
Start iTunes, and connect your iPad to your computer with its cable. (You can’t wirelessly restore your tablet, so go find that USB cable.)
When your iPad appears in the iTunes window, click its icon to see a screen full of Summary information, as shown below.
In the Summary area, click the Restore iPad button.
Because restoring erases everything on your iPad, you get a warning message. If you’re sure you want to continue, click Restore again. (If you use a Mac, you may need to enter an administrator password.) A progress bar appears on your iPad’s screen to show the update in action.
iTunes backs up your iPad’s settings and content each time you connect it, but will pipe up if it senses you have purchases you’ve not copied over yet.
Leave the iPad connected to your computer to complete the restoration. You may also see an Apple logo appear on-screen.


After iTunes restores your iPad, its setup assistant window appears, asking you if you’d like to restore the tablet’s contents from a previous backup, or set it up as a new iPad. If you’ve been backing up regularly (yes, you have, haven’t you?), select the option to restore the tablet from the most recent backup file and let iTunes copy everything back to the tablet. If you choose the “Set Up as New iPad” option, you get to start fresh, loading up your iPad with whatever strikes your fancy.
Tip
If the iPad crashes during an update and is frozen and unresponsive, try going into Recovery Mode. First, reset your iPad (Reset Your iPad), and then hold down the Home button while you connect it to your computer with the USB cable. Let go of the Home button when you see “Connect to iTunes” on the iPad’s screen. Now try to restore it.
Apple has more details on this particular problem at http://support.apple.com/kb/ht4097.
Protect Your iPad
THE IPAD WAS MEANT to be held—held up for others to see, held on your lap, held under your arm as you walk down the hall, and so on. But with holding sometimes comes dropping (and with that, cursing), so protecting your iPad with a case or cover might help cushion its fall. Cases and covers also protect the surface of the tablet (especially that glossy screen) when it’s riding around in a purse or backpack.
In addition to protecting the iPad, a case, from a hot-pink zippered number to a stately leather portfolio, shows off a bit of your own personality. Here are a few of the many places to find the latest in geek chic for your iPad:
Apple Store. The company that makes the iPad also makes sure you have plenty of other stuff to buy to go with it, including cases, covers, docks, keyboards, and headphones. One iPad protector that Apple is particularly proud of is the Smart Cover for the iPad 2 (and later); a pee-wee version for the iPad Mini is also available. The Smart Cover (shown below) magnetically clamps to the tablet’s edge, can serve as an easel for upright viewing, and even turns the iPad on or off when you open or close the flap. If there’s no brick-and-mortar Apple Store in town, visit it online at store.apple.com.
Belkin. After years of making computer and mobile accessories, Belkin has added about a dozen iPad cases to its product line. Models include a professional leather portfolio for the boardroom and several easy-to-grip textured silicone sleeves for iPads that see a lot of action on campus. Prices range from $30 to $60. (www.belkin.com)
Griffin Technology. A long-time maker of iPhone and iPod accessories, Griffin has jumped right in with iPad gear as well. Several iPad case styles are available (prices range from $30 to $50), as is the $25 Screen Care Kit for iPad, which includes a low-glare stick-on screen protector and a cleaning cloth. (www.griffintechnology.com)


Find a Lost iPad
IT CAN BE YOUR worst iPad-related nightmare: Your beloved tablet goes missing. Lost and stolen gadgets are a problem, but Apple offers a LoJack-type setting built into iOS 5 and later that may help get your tablet back—by revealing its location on a map. This potentially soothing feature is called Find My iPad.
To use Find My iPad, you need an iCloud account. Activate and Set Up Your iPad Over WiFi explains how to set one up when you first activate the iPad, but in case you didn’t do it then:
On the iPad’s Home screen, tap Settings→iCloud. Under the Account area, tap Add Account. Type in your Apple user name and password (Set Up an Apple ID). Apple creates your iCloud account and sends a message to the email address linked to your Apple ID so you can verify your request.
After you verify your account, go back to Settings→iCloud. On the iCloud settings screen, zip down the list of iCloud syncing options and, next to Find My iPad, tap the button to On. In the permission box that appears, tap Allow.
Tap Home→Settings→General→Location Services→On. This lets the app pinpoint your iPad’s whereabouts on a map.
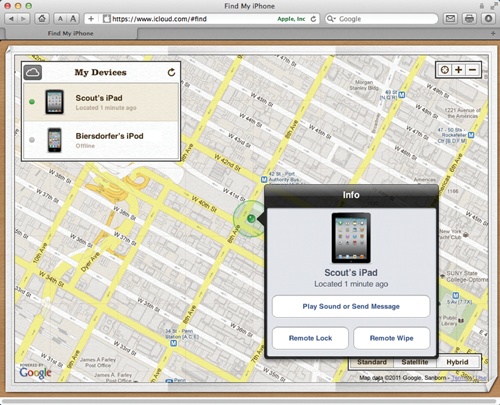
To find your iPad, log into iCloud (www.icloud.com) and click Find My iPhone on the main page (yes, click Find My iPhone even though you’re looking for an iPad). You land on a map that pinpoints the iPad’s location. Click it, and a box pops up with the option to send a message (like a request for its return and your phone number) that will appear on the iPad’s screen as it sounds an alarm. If you have sensitive information on the tablet, you can lock it remotely—or wipe its contents entirely. But hopefully, it won’t come to that, and your lost iPad will come home safely.
Tip
There’s an App Store version of the “Find My” app called, simply and oddly, Find My iPhone, and it pinpoints the location of any iOS device, iPads and iPod Touches included. If you lose your iPad, you can download Find My iPhone onto an iPhone (natch) or an iPod Touch to locate your tablet without having to use a computer.
Find an iPad Repair Shop
UNDER ITS THIN, GLOSSY exterior, the iPad is still a computer, and computers have been known to have technical difficulties. If your iPad begins to exhibit problems—screen fritzing, battery failure, or other unexplained hardware woes, you have some options:
If you live near an Apple Store (there are 300 of them worldwide; find them at www.apple.com/retail), call it up and make an appointment at the Genius Bar to have your iPad looked at by an Apple pro. If the iPad is still under warranty, the fix is usually free.
If there’s no Apple Store around, look for a nearby Apple-approved repair shop by searching www.apple.com/buy/locator/service.
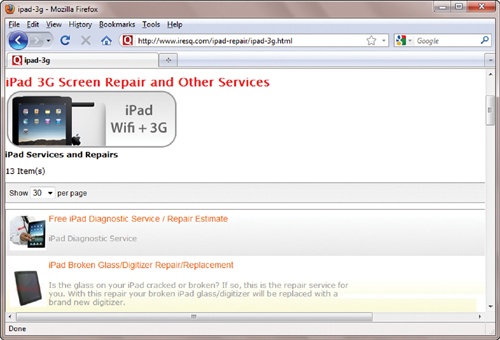
If there’s no reliable repair shop physically nearby, you can try one of the various mail-order repair companies that specialize in Apple products. A quick web search brings up a list of possibilities, but be sure to read the reviews and do some background research on the company to make sure it does good, legitimate work. Sites like iResQ (www.iresq.com) and Milliamp (www.ipadrepair.com) are two of the better-known online shops. While you may have to wait longer for the fix, the out-of-warranty repair bill often tends to be cheaper.
Note
If your old out-of-warranty iPad needs basic help, like a battery replacement, you might be able to fix it yourself for much less than what a repair shop would charge. Check out iFixit (www.ifixit.com), a cheerful site dedicated to DIY gadget repair, for illustrated instructions on a variety of iPad issues.
AppleCare—What It Is and Whether You Need It
YOU PROBABLY HAVE AN insurance policy on your house and car, so why not get one for your iPad? That’s the logic behind the AppleCare+ Protection Plan for your iPad. The price for this peace of mind? Why, that’d be $99.
When you buy a brand-new iPad, you automatically get free telephone support to fix one problem within your first 90 days of iPad ownership, plus a year-long warranty on the hardware. If your iPad starts acting weird or stops working altogether during this time, Apple will fix it for free or send you a replacement. If you buy the AppleCare Protection Plan (available in many places where you buy iPads or at www.apple.com/support/products/ipad.html), you get:

Two full years of free telephone support from the date of your purchase.
Two full years of hardware protection from the date of your purchase. In addition to technical issues, you’re also covered for up to two incidents of accidental damage (but each comes with a $49 service fee.)
If you need a repair or replacement, your iPad is covered, and so are your tablet’s battery and cables. Paying an extra $99 to get the extended warranty may not appeal to everyone, but if you want a little peace of mind with your new iPad, it’s a small price to pay. You just need to sign up for AppleCare+ within 30 days of purchasing your iPad. Apple has a Frequently Asked Questions page on the topic at www.apple.com/support/products/faqs.html.
Note
Thinking about passing off your old iPad to a relative after you bought a new one or selling your tablet so you can put the money toward the latest and greatest model? Before you send that old model on its way, you may want to make sure the software is fully updated so your recipient has the latest version. You should also wipe all your content off the old iPad, for personal safety’s sake more than anything. While restoring the software (Start Over: Restore Your iPad’s Software) removes your data from view, it may still be lurking deep down, so tap Home→Settings→General→Reset→“Erase All Content and Settings” on the iPad to be sure.