
Chapter 7. Organize Your Life With the iPad’s Apps
You’ll learn to:
Sync contacts, calendars, and notes to your iPad
Keep time with the iPad’s new clock app
Set reminders for tasks and appointments
Give nosy apps the boot
Get turn-by-turn directions
Post to Facebook from apps
APPS, ALSO KNOWN AS “programs that run on your iPad” (and iPhone and iPod Touch), make Apple’s tablet a versatile device beyond its role as, say, a Web window or portable email reader. As mentioned in Chapter 2, the iPad comes standard with several built-in apps, including the previously discussed Safari and Mail apps.
Later in this book, you’ll learn about the iPad’s entertainment apps, including the Music (Chapter 14), Videos (Chapter 15), and Photos (Chapter 16) apps. But this chapter focuses on the apps that let you navigate your daily life and the world around you. Yes, this part of the book is all about personal organization.
For starters, you’ll find apps for calendars (for appointments), contacts (your address book), and notes (for jotting down bits of text). Then you have a four-function Clock app, Reminders (a to-do list), and Notifications (an app that pipes up when your other apps have something to tell you). And finally, there’s Maps, which helps you find yourself and chart your course to other places.
And these are just a few of the programs that come with your iPad. Once you get to know these babies, you’ll be ready to tackle the gajillion other goodies in the App Store. But that’s for another chapter (8, to be exact).
Sync Your Personal Info to the iPad
OVER THE YEARS, COMPUTERS and portable devices have replaced paper-based address books and Day-Timer planners. If you’ve been keeping your contacts and calendars in desktop programs like Microsoft Outlook or Apple’s iCal, getting that information onto your iPad is just a sync away. All you need to do is connect your iPad to iTunes by way of Wi-Fi Sync or USB cable—or use Apple’s iCloud service—to wing your personal information over to your tablet.
Syncing With iTunes
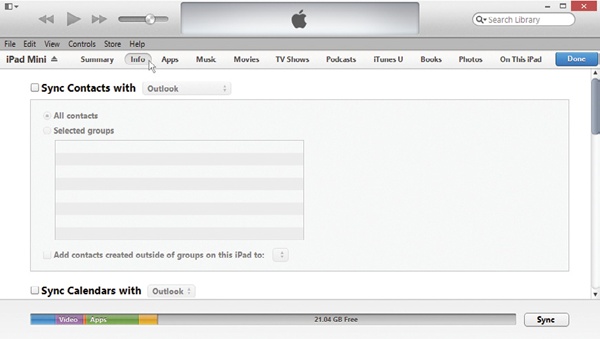
To copy your personal information over to a connected iPad using iTunes, click the iPad icon in the main iTunes window. On the iPad settings screen that appears next (shown below), click the Info tab and then use the pop-up menu to choose the programs you keep your info in. Scroll down the Info screen to see all the personal data you can sync up:
Calendars. Add your appointments to the iPad by turning on the checkbox for your Outlook or iCal calendar. Set Up Your Calendars has details.
Contacts. Move your computer’s address book over to the iPad in a flash. Use Twitter explains which date-book programs you can use and how to make the move.
Notes. Those jottings you keep in Microsoft Outlook or the Mac’s Mail program can bounce to the iPad’s Notes app as well. Take Notes explains how.
The next few pages describe the syncing process for each program—Calendars, Contacts, and Notes—in detail.
Syncing With iCloud
IF YOU SIGNED UP for an iCloud account (Set Up iCloud on Your iPad) when you set up your new iPad (Activate and Set Up Your iPad Over WiFi), you may already be sharing your personal information between your iPad, your Windows PC or Mac, and any other iCloud-friendly gadgets you have. But what if you skipped that opportunity and now want to sign up for the Cloud? Or what if you decide that, after a few iCloudy weeks, you’d rather not sync certain calendars or your iPad’s Notes?
All you need to do is adjust your iPad’s settings:
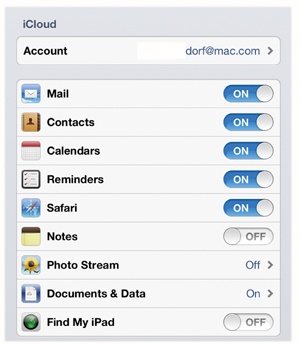
Tap Home→Settings→iCloud.
In the panel of settings shown below, tap the button to On or Off next to each app or chunk of info you want to sync (or not) to your ’Pad.
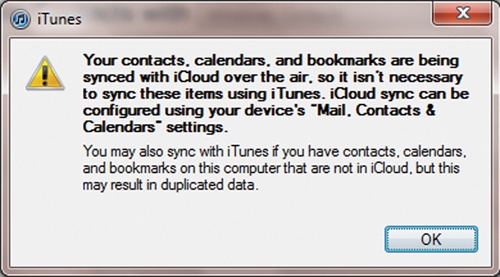
Just remember that if you sync your info through iCloud (Set Up iCloud on Your iPad), you don’t want to sync it through iTunes, too. If you try to, you’ll see the warning box below, pointing out that you’re about to duplicate a lot of data.
Set Up Your Calendars
AS MENTIONED ON THE previous page, iCloud gives you two ways to get your calendar appointments from your computer to your iPad (and vice versa). You’ll find the wireless way, through iCloud, discussed on Set Up iCloud on Your iPad. But if you don’t use iCloud or don’t want your personal information flying around the air, you can sync up through iTunes. Be sure to pick only one syncing source, though (iTunes or iCloud), or you’ll get multiple copies of everything.
Just as iTunes syncs bookmarks and mail settings from your computer to your slab, so it can snag and sync a copy of your daily or monthly schedule—if you happen to use Outlook on your Windows PC or iCal on your Mac. You can also use Entourage 2004 or later by choosing, in Entourage, Preferences→Sync Services and checking the option to have Entourage share its info with iCal. (Outlook 2011 for the Mac works the same way: Preferences→Sync Services.) To get your life in sync between computer and iPad, fire up iTunes, and then:
Connect your iPad to your computer via Wi-Fi Sync or USB cable (Sync Your iPad with iTunes), and then click the iPad’s icon in the row at the top of the iTunes window.
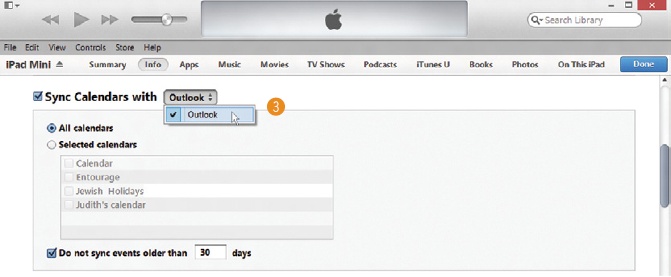
On the iPad settings screen (shown below), click the Info tab. Scroll down past Contacts to Calendars.
Turn on the checkbox next to “Sync Calendars with Outlook” (Windows) or “Sync Calendars” (Mac). If you have multiple calendars—like for work, home, and school—select the ones you want to copy.
In the lower-right corner of the iTunes window, click Apply.
If your iPad doesn’t automatically start updating its date book, choose File→Devices→Sync iPad in iTunes. If you haven’t changed any settings for the Calendars app (like turning off iCal sync), you won’t see the Apply button; rather, you’ll see just the Sync button. Click that to update your appointments instead of going up to Menuville.

On the iPad, tap the Calendar icon on the Home screen to see your schedule unfold. If you have multiple calendars, tap the Calendars button to select one and see only its events—or consolidate appointments into one uber-calendar by clicking Show All Calendars. Use the search box to find specific events.
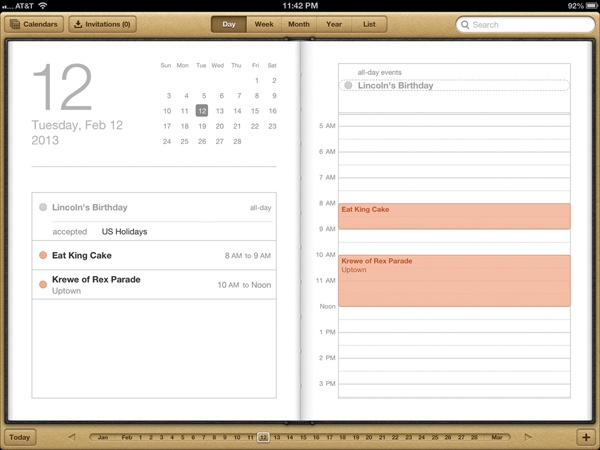
At the top of the screen, tap List, Day, Week, Month, or Year to see your schedule for the short or long term, color-coded by calendar type (home, work, maintenance schedule, and so on).
Tap Today to see what’s in your immediate future. List view displays events one after the other.
Depending on the view you choose, the iPad displays the relevant months, weeks, or days in a navigation bar below the calendar. Tap the arrows on either side of the bar to go forward or backward in time.
If you’re not so much into syncing but want to create a calendar right there on your iPad, you can do that, too. Tap the Calendars button in the top-left corner. Tap the Edit button on the next screen, tap Add Calendar, and then name your new creation. (People using iCal can also turn on a Birthdays calendar culled from birthdays you include with contact info in the Mac OS X Address Book.) To delete a calendar, tap Calendars→Edit→[Name of Calendar]. Then, at the bottom of the screen, tap the red Delete Calendar button.
Use the iPad Calendar
THE IPAD CALENDAR ISN’T a static event repository. You can add or delete events on your iPad and sync the changes back to your computer (or to your iCloud or Exchange accounts). The iPad’s Calendar app also lets you subscribe to online calendars to stay apprised of events in Web-based Google and Yahoo calendars—or even the events on your favorite sports team’s calendars.
Add a Calendar Event
To punch in a new appointment or event, tap ![]() in the lower-right corner of the calendar
screen. In the box that pops up, fill in the event info, like its
name, location, and starting and ending times.
in the lower-right corner of the calendar
screen. In the box that pops up, fill in the event info, like its
name, location, and starting and ending times.
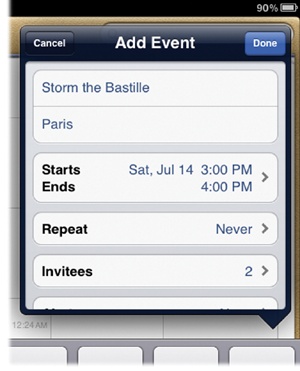
There’s an All-Day option for those outdoor rock festivals and softball tournaments. And if you need a standing appointment, like a weekly banjo lesson or staff meeting, you can repeat an event every day, every week, every other week, every month, or every year (like for your wedding anniversary or spouse’s birthday).
Tap Alert to be reminded of an appointment, from 5 minutes to two days ahead of time. There’s also a little Notes field in the Add Event box in case you need to remember some additional information about the appointment, like “Bring Q3 report” or “Pack allergy meds.”
Edit or Delete an Event
Schedules change, especially if you work in the high-powered corporate world or have teenage children—or both. To change the time of an event, find the event on the calendar, tap it, and then tap Edit. If you need to cancel an appointment, flick down to the bottom of the edit box and tap the red Delete Event button.
Set Up an iPad Alert
To make the iPad pipe up with a text and audio alert for a looming event, tap Settings→General→Sounds and flip Calendar Alerts to On. At the predetermined nag time, a reminder box flashes on-screen, accompanied by an R2-D2-like booping noise. If your iPad is turned off, the message appears when you turn it back on, but the audio alert doesn’t play.
To make alerts appear as notifications and on the pull-down Notifications Center screen (Use Notifications), tap Settings→Notifications→Calendar→On.
Subscribe to an Online Calendar
If you have a shared calendar or one you subscribe to online, you can add it to the iPad, too. If it’s a specific calendar on the Web, choose Settings→Mail, Contacts, Calendars→Add Account→Other. Select Add CalDAV Account (when you want to add a date book like a Google calendar; see http://bit.ly/iYvA5 for instructions) or Add Subscribed Calendar. Enter the online calendar’s URL and any other information you need to subscribe to it, like a user name and password.
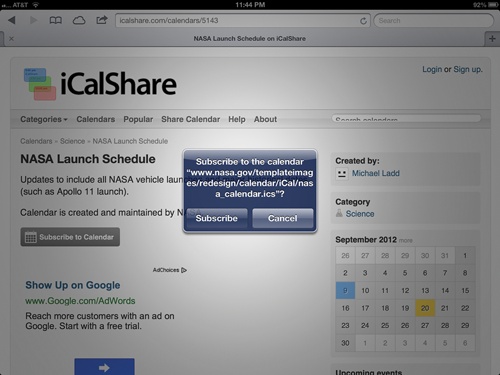
Want to instantly add customized online calendars for all sorts of topics, including religious holidays, schedules of your favorite sports teams, movie release dates, and more—right on your iPad? Crank up the Safari browser and visit iCalShare.com (http://icalshare.com). When you find a calendar you want, tap the “Subscribe to Calendar” button, and then confirm your decision in the box that pops up (above right). The iPad adds your new calendar to your subscription list, and you see its events on your schedule. Tap the Calendars button and select it to show (or hide) those dates.
Calendars you subscribe to over the Internet are read-only, so you can’t add your own events to them. To end a calendar subscription, tap Settings→Mail, Contacts, Calendars. In the Accounts list, tap the name of the calendar, and then tap Delete Account.
Tip
If you have an iPad calendar set up to sync with an Exchange account, you can respond to Outlook or Entourage meeting invitations. When you get a new invite, it
lands on the scheduled date and time in your calendar with a dotted
line around the event. You respond to it by tapping the event or by
tapping ![]() at the top of the Calendar screen to review
your invites. Select the one you wish to reply to. Tap Invitation
From to get all the details, like who called the meeting and who
else got invited. When you get an invitation, you can tap Accept,
Maybe, or Decline to send off your RSVP. And if you get your meeting
invitations by email instead, tap the Invite icon attached to the
message to open up the invite and respond to the sender. If you
accept, the iPad adds the event to your calendar.
at the top of the Calendar screen to review
your invites. Select the one you wish to reply to. Tap Invitation
From to get all the details, like who called the meeting and who
else got invited. When you get an invitation, you can tap Accept,
Maybe, or Decline to send off your RSVP. And if you get your meeting
invitations by email instead, tap the Invite icon attached to the
message to open up the invite and respond to the sender. If you
accept, the iPad adds the event to your calendar.
If you get a lot of meeting invitations and want to know as soon as they arrive, tap Settings→Mail, Contacts, Calendars. In the Calendars area, tap New Invitation Alert to On.
Maintain Contacts
PUTTING A COPY OF your contacts file (your electronic address book) on your iPad is easy. You can sync contacts over the air with iCloud (detailed on Set Up iCloud on Your iPad) or, as explained below, through iTunes here on the ground—but just pick one sync method. For iTunes, Windows users need to have their contacts stored in Outlook Express, Outlook 2003 or later, Windows Contacts, or the Windows Address Book (used by Outlook Express and some other email programs).
Mac folks need to use at least Mac OS X 10.6.8 and the Mac OS X Address Book/Contacts program, which Apple’s email software uses to stash addresses. You can also use Outlook 2011 or Entourage 2004 and later, but you first have to link before you sync. To do so, choose Preferences, click Sync Services, and then turn on the checkboxes for sharing contacts with Address Book. Outlook or Entourage shares the contact info, and Address Book syncs it up with your iPad.
To turn your iPad into a big glass address book, follow these steps:
Connect your iPad to your computer by Wi-Fi Sync or USB cable and click its icon when it shows up at the top of the iTunes window. (If you use Outlook or Outlook Express, launch that now, too.)
In the main part of the iPad settings screen, click the Info tab.
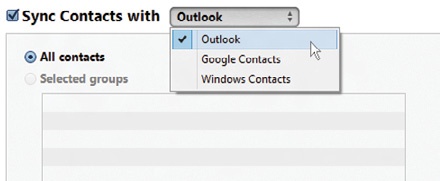
Windows owners, turn on the checkbox next to “Sync Contacts with” and then use the drop-down menu to choose the program whose contacts you want to copy. Mac owners, turn on the “Sync Address Book contacts” checkbox. If you want to sync contact groups, select them from the “Selected groups” box. You can also choose to import any profile photos you have in your contacts files.
Click the Apply button in the lower-right corner of the iTunes window.
iTunes adds the contact information in your address book to your iPad. If you add new contacts to your desktop computer with your iPad plugged in, choose File→Devices→Sync iPad or click iTunes’ Sync button to manually move the new data to your tablet. Got iCloud? You get a backup copy of your contacts online!
Tip
You can add contacts right on the iPad as well—tap the
![]() button at the bottom of the Contacts screen and
type in the person’s info. If you’re on a synced Exchange server, tap
Settings→Mail, Contacts, Calendars, tap your account name, and then
tap the Contacts button to On to pull new addresses into the iPad over
the air.
button at the bottom of the Contacts screen and
type in the person’s info. If you’re on a synced Exchange server, tap
Settings→Mail, Contacts, Calendars, tap your account name, and then
tap the Contacts button to On to pull new addresses into the iPad over
the air.
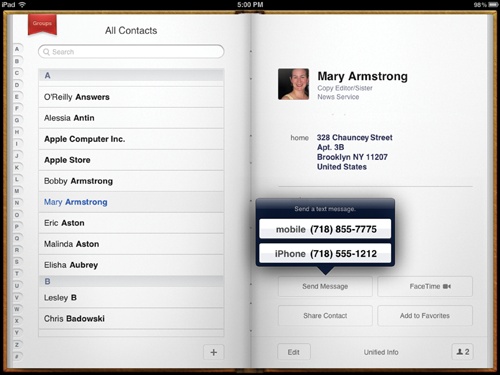
To look up a pal on your iPad, tap the Home screen’s Contacts icon. Use the search box or, in the Contacts list, flick to the person’s name on the left side of the screen (take a shortcut by tapping the letter tab on the outer edge). Tap a name to see the person’s details. Here are some of the things you can do now:
Change the information. Need to update an address or change a phone number? Tap the Edit button at the bottom of the screen.
Add a photo. Profile pictures in your desktop contacts program should be here on the iPad. You can add a picture of a contact from your iPad’s Camera Roll, too. Open the contact file, tap Edit, and then tap Add Photo. Find the pic you want, and then pinch and zoom to crop it to the right size.
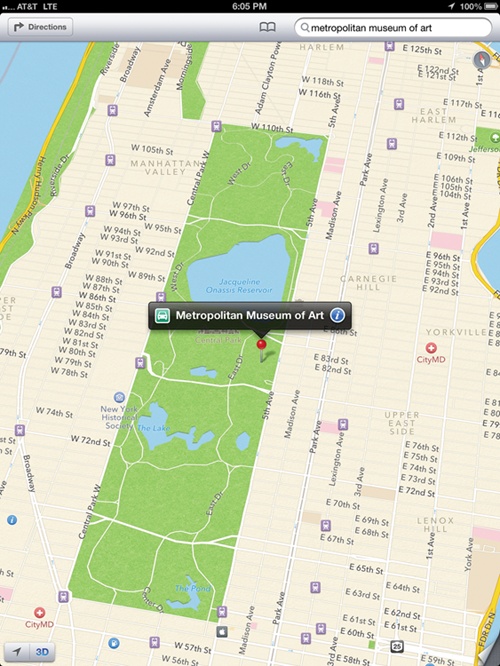
Map an address. Tap an address to open the Maps app and see the location highlighted in a flash of instant iPad cartography.
Send messages. Tap a person’s email address to open up a pre-addressed mail message. Tap the Message button to send a Message (Send Messages).
Pass along contact info. Tap the Share Contact button on the contact’s page to attach the information as a .vcf file (the format most computer address books use) to a new message.
Start a FaceTime video call. Tap the FaceTime tab, and then tap the phone number or email address your pal uses for FaceTime (Make Video Calls with FaceTime).
To delete a contact, whack it from your computer’s address book and the person disappears from your iPad the next time you sync up. To delete a contact directly on the iPad, tap open the file, tap Edit, and then tap Delete Contact.
Take Notes
NEED A PIECE OF virtual scratch paper to jot down a few thoughts? Have to type up a memo to email to colleagues, but don’t own the Pages app described in Chapter 11? Want to copy a recipe off a web page and save it for future reference? The iPad’s Notes program is here to serve. To get started, return to your Home screen and tap Notes. The program opens, and here’s where Apple’s designers got really creative.
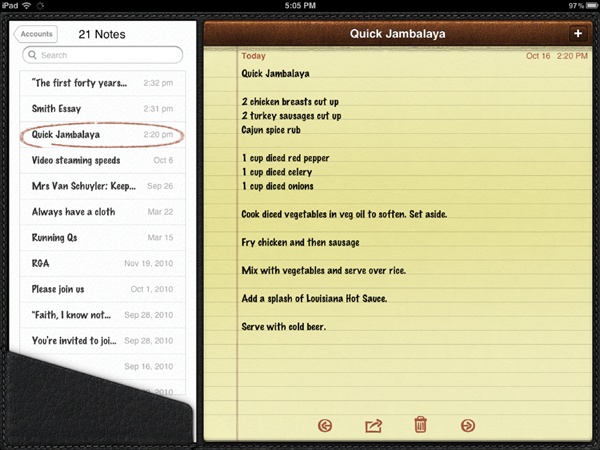
When you hold your iPad in portrait mode, it looks like one of those yellow lined pads of paper you used to scribble lecture notes in school. But hold the iPad in landscape mode, as shown above, and the yellow pad shares the screen with a virtual slip of index paper listing your notes, all tucked inside a faux leather folio, the kind made to sit on top of your desk and look fancy. You can even see stitches in the digital leather.
Tip
Although it’s hard to change your own handwriting in a real pen-and-paper world, the iPad’s Notes program gives you a choice of three fonts to hold your thoughts. To see your options or to change the current font, go to the Home screen and tap Settings→Notes. Here, you can choose from Noteworthy, Helvetica, and a font called Marker Felt, which was the jaunty original (and, at that time, only) typeface Notes used.
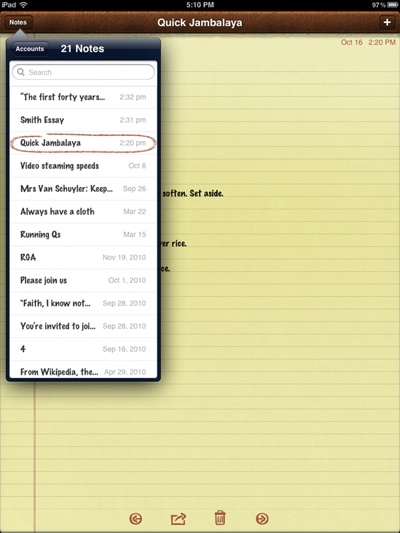
When you hold the iPad in portrait mode, you call up the Notes index by tapping Notes in the upper-right corner. Tap any entry in the list to open and read that particular note—or to add more text to it. All of the Cut | Copy | Paste | Suggest | Define functions described back in Chapter 3 (Cut, Copy, Paste, and Replace Text) work in Notes, so you can paste in gobs of text you copy from web pages and elsewhere. (You can’t, however, paste picture files—you just get a string of text with the image’s file name and location.) Here are some other Notable tricks:
New notes. To start a new note, tap
 in the upper-right corner, and then tap the
blank sheet of “paper” to summon the iPad’s keyboard for a little
good, old-fashioned text entry.
in the upper-right corner, and then tap the
blank sheet of “paper” to summon the iPad’s keyboard for a little
good, old-fashioned text entry.Sync notes. With iCloud (Set Up iCloud on Your iPad), you can sync iPad Notes to the Notes app on a Mac running OS X 10.8. On older versions of Mac OS X, you can sync Notes with a Mac Mail or Windows Outlook account. Just connect the iPad to your computer (either by Wi-Fi Sync or USB cable, as Sync Your iPad with iTunes describes), click the iPad icon in the iTunes window, and then click the Info tab at the top of the screen. Scroll down to the Other area and turn on the checkbox next to Sync Notes. Click Apply, and then tap Sync to make it so.
Search notes. If you’re looking for a certain word or words, type them into the search box to call up a list of all the notes where the words appear. To flip forward or backward through your collected notes, tap the arrow keys at the bottom of the screen. You can even print or email the contents of a note by tapping the hand-drawn
 icon down below and choosing either Print or
Email. (See Print with Your iPad for info on
printing from the iPad.)
icon down below and choosing either Print or
Email. (See Print with Your iPad for info on
printing from the iPad.)
Track Time With the iPad’s Clock
APPLE’S CLOCK APP FOR the iPad, new in iOS 6, does much more than confirm your lateness—it actually gives you four timey-wimey apps in one: World Clock, Alarm, Stopwatch, and Timer. Here’s how to use each.
World Clock
The iPad’s World Clock lets you display a mini-clock on the screen for 12 time zones. You also get the current temperature in each of your chosen locations. To set up a clock:
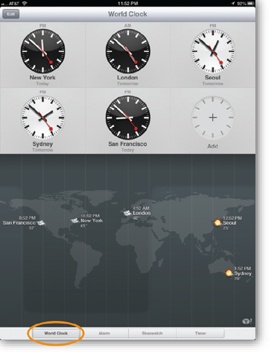
Tap Home→Clock and then tap the World Clock tab at the bottom of the screen.
A few starter clocks are already in place. Tap the ghosted clock in the bottom row. (If all six clocks are full, swipe the row to the left to get to the cloaked clock on the next screen.)
Pick a city from the alphabetical list. You can also jump to a certain town by typing its name in the search box.
Your newly added clock appears. As you add clocks for different cities, the iPad marks those locations by name, time, and temperature on the map below.
To delete a clock from the list, tap the Edit button in the
top-left corner, tap ![]() next to the city you want to lose, and then tap
Delete to confirm. In this same Edit box, you can rearrange the order
of the clocks on your screen by dragging them up and down the list
with your finger on the grip strip (
next to the city you want to lose, and then tap
Delete to confirm. In this same Edit box, you can rearrange the order
of the clocks on your screen by dragging them up and down the list
with your finger on the grip strip (![]() ). Tap the Edit button again to close the
box.
). Tap the Edit button again to close the
box.
Alarm
This fully programmable alarm clock lets you set wake-up calls, complete with your choice of alarm noise to rouse you from your slumber. To set the alarm:
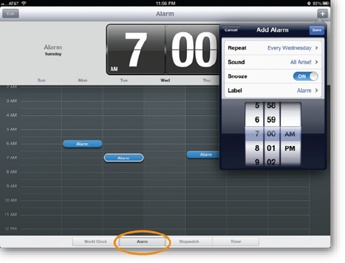
Tap Home→Clock and then tap the Alarm tab at the bottom of the screen.
Tap
in the upper-right corner of the screen. In
the Add Alarm box, tap Repeat and pick the day of the week you
want the alarm to go off.Tap the Back button and then tap Sound and select a song or ringtone (short music loop) to use as your audio cue to get up. Then tap the Back button.
Next, tap the Snooze button to On if you want the option to sleep an extra 10 minutes before the alarm sounds again. You can also give this particular alarm its own name (“Work,” “Day Care Car Pool,” and so on) by tapping Label on the line below and choosing a name.
At the bottom of the Add Alarm box, spin the numbered wheels to select when you want the alarm to go off. Then tap Save.
To turn your alarms on or off, tap the On/Off button on the main screen.
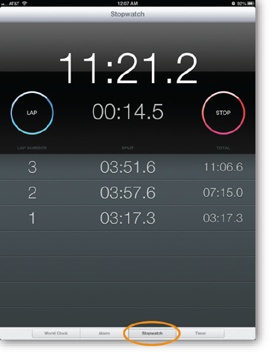
Stopwatch
While maybe not quite the pocket model you want to take on your morning jog, the iPad’s Stopwatch function does let you track time for others and includes a lap counter. To use it:
Timer
The Clock’s Timer function is handy for cooks and other clock-watchers. To set it:
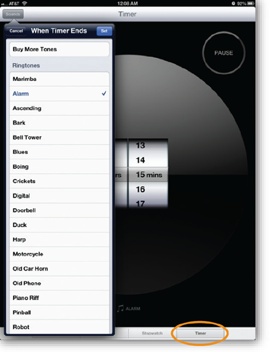
Tap Home→Clock, and then tap the Timer tab at the bottom of the screen.
Spin the wheels in the middle of the screen to dial up the amount of time for your task.
Tap the Sounds button in the top-left corner to pick the alert noise that plays when time’s up.
Tap Start. Tap Pause to temporarily stop the Timer, and Resume to pick it up again.
Use Reminders
THE IPAD’S REMINDERS APP is an iCloud-savvy to-do list that’s also wonderfully easy to use. You can write down your chores in a straightforward list or assign them to a future date—and then have the iPad pop up an alert to remind you of your Reminder.
To schedule a note to yourself:
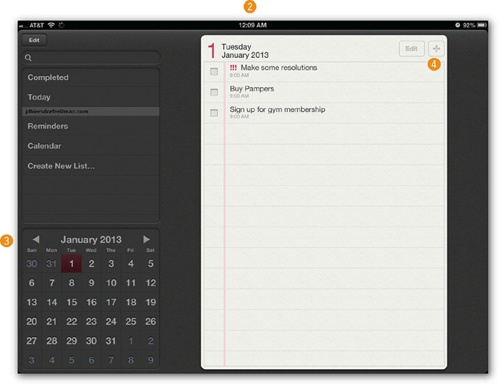
Tap the Reminders icon on the iPad’s home screen.
The main Reminders screen appears, as shown below.
In the calendar down in the corner, find and select the date you want.
Now, in the center of the screen, tap the
button in the upper-right corner, and then
type in what you need to accomplish, like “Buy Pampers.”
As you complete your chores, tap the empty square next to the task
to check it off. Tap the Completed line on the left side of the screen
to see a list of completed tasks and get that proud feeling of
accomplishment. (You can delete a reminder by tapping the Edit button
and tapping ![]() next to the chore you want to remove, completed
or not.)
next to the chore you want to remove, completed
or not.)
You can see your chores for the day ahead by tapping the Today line. The top-left side of the Reminders screen also holds a search box for digging up once and future reminders you want to track down.
Reminders don’t have to be a cryptic three-word thought. You can annotate your task-at-hand with all kinds of additional information. Just tap a reminder in the list to summon the Details box, as shown below. Here, you can:
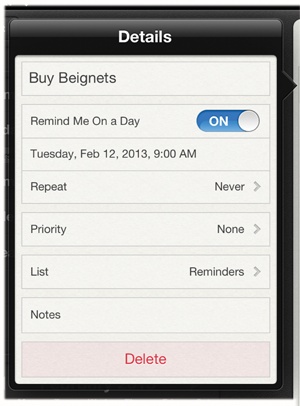
Tell your iPad to nag you about your chore at a specific time on that day. Tap the date line to change it.
Tap the Show More line to see the Details box, which lets you repeat an alert and set a priority for the reminder. You can even jot down a note. (An area for notes can come in handy, say, for your “Hardware store” task, because you can write stuff like “get a box of 2d nails, wood glue, and six 48-inch 2x4s” to round out your reminder.)
The last item in the Details box is a Delete button, for those times when you decide you don’t want to be reminded.
Location-based reminders, which let the iPad use its Location Services feature (Sounds) to pester you when you’re in a certain geographic place, were promised in iOS 6, but the feature was missing for many when the system first arrived. Still, Apple plans to include it eventually, so check back for a “Remind Me at a Location” setting and enter the address you want to use.
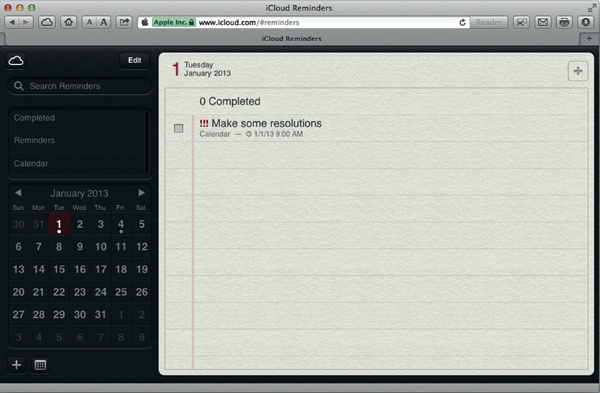
Reminders on your iPad can sync with iCloud, where you can check them out at www.icloud.com (shown below) and on your other iOS devices looped into that same iCloud account. To rearrange the order or delete tasks, tap Reminders under iCloud, and then tap the Edit button at the top of the list.
The iPad’s Reminders also sync up with the Reminders app on Mac OS X 10.8, in iCal on Mac OS X 10.7, and with Microsoft Outlook. Apple has more information on how Reminders work with each program at http://tinyurl.com/appreminders.
Use Notifications
THE IPAD’S NATIVE APPS can keep track of your life, from bugging you about meetings to reminding you to buy milk on the way home. Once you visit Settings→Notifications and turn on alerts for the apps you want to hear from, you’ll get little on-screen notifications no matter what you’re doing on the iPad.
But with all the various apps on board, wouldn’t it be great to have one place where you can get a quick snapshot of your day—like, say, any pressing calendar appointments, email, or text messages awaiting you?
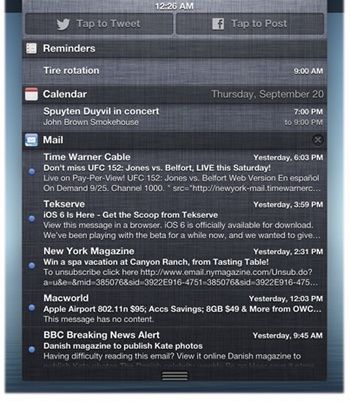
Thankfully, there is such a Dashboard of Your Life. It’s called the Notifications screen. To get to it from anywhere or any app on your iPad, place your finger at the very top edge of the screen and drag downward, as though you’re pulling down a miniature window shade. The Notifications screen (right) appears. You can get a quick hit of data and jump to any listed app or message by tapping it.
You’ll also see notifications on the iPad’s Lock Screen. To go right to them, put your finger on the app’s icon and slide it to the right. This simultaneously unlocks the iPad and opens the app that’s badgering you.
To dismiss the Notifications screen, put your finger at the bottom of the iPad screen and flick it upwards. Consider yourself notified.
Customizing Notifications
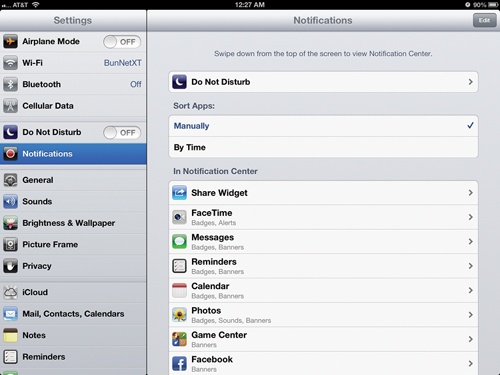
By default, the Notifications screen shows basic infobits, like pending appointments, calendar events, and the arrival of new email messages. But you can customize your notifications by resorting your apps and setting their notification options.
To do all this, tap Settings→Notifications. You can sort the
apps manually or by time (the newest notifications appear highest up).
To manually sort the apps, tap the Edit button in the top-right corner
and use the grip strip (![]() ) to drag them into a new order. Tap an app’s
name to turn its notifications on or off—or to further customize its
notifications by choosing the alert style (banner or box) and whether
it makes a sound or appears on your iPad’s Lock Screen.
) to drag them into a new order. Tap an app’s
name to turn its notifications on or off—or to further customize its
notifications by choosing the alert style (banner or box) and whether
it makes a sound or appears on your iPad’s Lock Screen.
Hang Out the “Do Not Disturb” Sign
EVER BEEN JARRED OUT of sleep by a FaceTime call from someone in another time zone or heard a loud alert from your sports-score app during a budget meeting? With iOS 6’s Do Not Disturb feature, you can temporarily suspend incoming calls and alerts from everyone—or just the people you don’t want to hear from.
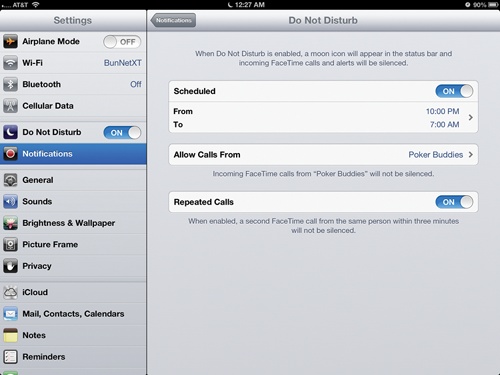
To get started, go to your Home screen and tap Settings→Notifications→Do Not Disturb. You land on a screen where you can:
Schedule the iPad to automatically hang out the “Do Not Disturb” sign. Specify when you want some peace and quiet, say 10 p.m. to 8 a.m.
Allow FaceTime calls from everyone, no one, or just your favorite people. To make your selection, tap the Allow Calls From line and choose your option on the next screen. You can also choose entire groups of contacts from your iPad’s Address Book (Maintain Contacts)
Allow a second FaceTime call from the same person within three minutes to ring anyway. Why? Apple figures that if someone’s calling you that frantically, there must be an emergency.
After you set up your preferences, go to the left side of the Settings screen and tap the Do Not Disturb button to On. You can tell the Do Not Disturb feature is turned on by the small crescent moon icon next to the time in the iPad’s status bar.
Set App Privacy Settings
SOME PEOPLE MAY NOT care what information app developers and social networking sites collect about them or what personal data these groups can grab off the iPad. If you’re one of them, feel free to skip this section. However, if you want to know if that fun photo program you got from the App Store is grabbing a copy of your Contacts list for itself or what apps track you through Location Services, read on.
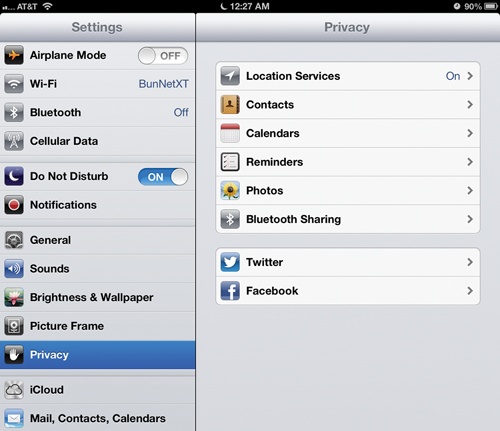
New to iOS 6, the Privacy settings page is a centralized list of all the apps that request access to certain parts of your iPad. These include both built-in and third-party apps that want access to the contents of your Photos app, your contacts and calendars, your location settings—even your Facebook and Twitter accounts.
Most of the time, these requests are perfectly fine and necessary for an app to function. After all, how is the Maps app supposed to give you directions unless it can pull in your GPS coordinates? Still, some apps may be a little sneakier about the data they peek at (often for advertising reasons).
To see who’s looking at what on your iPad (and turn off access to stuff you don’t want to share), tap Home→Settings→Privacy.
Privacy and Location Services
The GPS function, known as Location Services, pins your presence on a map by way of the iPad’s cellular chip and WiFi signal. While useful for Maps (and Yelp check-ins at restaurants), you may not always want to be located. To turn off the tracker, tap Home→Settings→Privacy→Location Services→Off.
The Location Services screen also shows you a list of apps requesting your whereabouts. Tap the On or Off button next to each one’s name to approve or deny the request.
You can also see what iOS 6 functions use your location data. On the Locations Services screen, tap System Services to see a list with an On/Off switch next to each service. Denying your location information to a system service may impede the iPad from things like finding your correct time zone based on your location, but you do have the power to say No if you want to.
Find Your Way with Maps
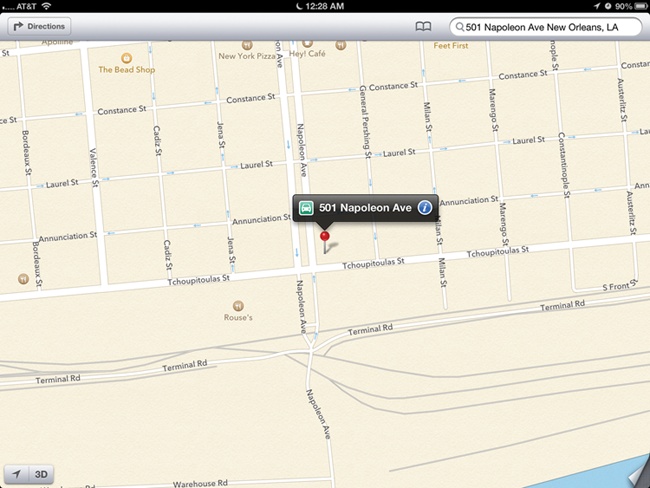
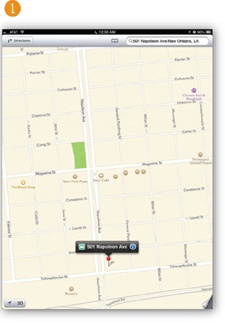
THE IPAD’S MAPS APP lets you forget all about those folded paper road maps that always end up stained and crumpled in the back seat of the car. Tap open the Maps app on the Home screen, type any address into the search box at the top of the screen, and you instantly see that location marked with a virtual red pin. All your usual iPad finger moves work on the maps, so you can zoom, scroll, pinch, and flick your way around the world.
Like Safari, though, Maps needs an Internet connection to pull its data down from the Web, so it’s not the best source of emergency directions when you’re lost in a bad part of town with only a WiFi iPad. If you ponied up the big bucks for a Wi-Fi + Cellular model, you don’t have to worry about lack of an Internet connection (but you may still have to worry about getting mugged).
To plot your course, tap the Maps icon on the Home screen. Here are some of the things you can do with Maps and a network connection:
Find an address. Tap the Search button. In the Address box at the top of the screen, type in an address—or tap
 to call up an address you previously marked,
see your recent locations, or map an address from your contacts
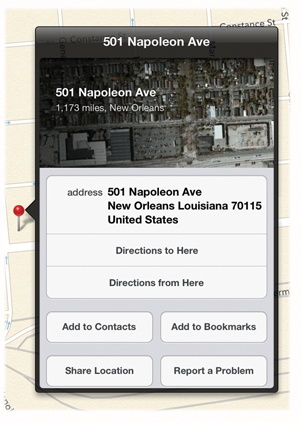
list. When the red pushpin drops onto the map, tap
to call up an address you previously marked,
see your recent locations, or map an address from your contacts
list. When the red pushpin drops onto the map, tap
 in the bar above it to get an info box for
that address, like the one shown on the next page. (Tap
in the bar above it to get an info box for
that address, like the one shown on the next page. (Tap
 to get turn-by-turn driving directions,
explained on Turn-by-Turn Directions.)
to get turn-by-turn driving directions,
explained on Turn-by-Turn Directions.)Mark the spot. Press and hold any spot on the map to drop a pin there. If you miss slightly, press and drag the pin to the right address. Tap
 to see the full address, get directions (to
or from there), or to remove the pin. You can also add the location
to your contacts list or bookmarks, or tap Share Location to send
the address by email, Twitter, or Message—very handy when you set up
a group dinner at a new restaurant. You can plant a pin the long way
by tapping the bottom-right corner of the screen (where it looks
like the map is peeling away), tapping the Drop Pin button, and then
dragging the pin around the map to the right location. And
Maps marks your current location when you tap the
to see the full address, get directions (to
or from there), or to remove the pin. You can also add the location
to your contacts list or bookmarks, or tap Share Location to send
the address by email, Twitter, or Message—very handy when you set up
a group dinner at a new restaurant. You can plant a pin the long way
by tapping the bottom-right corner of the screen (where it looks
like the map is peeling away), tapping the Drop Pin button, and then
dragging the pin around the map to the right location. And
Maps marks your current location when you tap the
 icon in the lower-left corner.
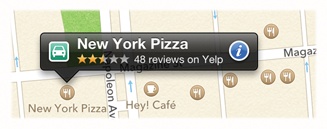
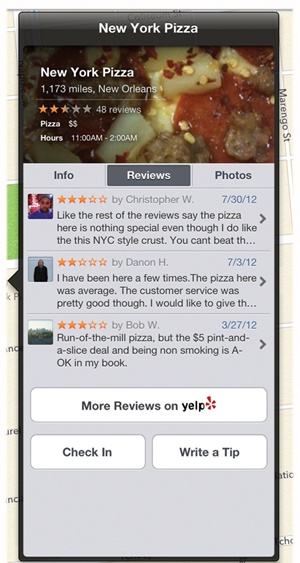
Get Advice From Yelp Users. Ever been in an unfamiliar area and wanted to find a decent restaurant, bar, hotel, or other place of business—but didn’t know where to begin? In iOS 6, you can get advice from millions of people, thanks to the built-in Yelp reviews service. To see what the Yelpverse thinks about a particular establishment, tap one of the small round icons on the map—like the knife and fork, (used for restaurants), the bed (hotels), or the shopping bag (stores). When you do, the name of the business pops up (middle right), along with a star rating and the number of reviews posted on the Yelp site. Tap the
icon. In the box that unfolds, tap the Info
tab to get general details about the business, like the full address
and directions. Tap the Reviews tab to read what people say, check
in with Yelp, or pen a tip yourself. Tap the Photos tab to see
pictures taken at the location so you can get an idea of what the
place looks like on the inside.
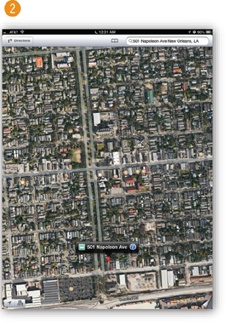
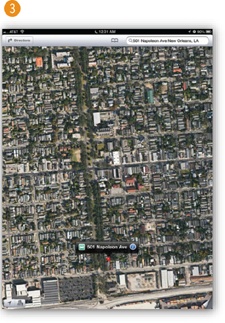
See Maps in Different Views
THE MAPS APP DOESN’T skimp on the scenery. Tap the bottom-right corner—where it looks like a paper corner curling up—to see the available map styles. To switch back and forth, just tap the name of the style. Here are your choices:
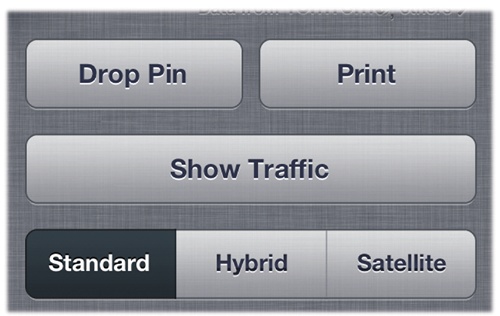
Standard. Tap here to see traditional, easy-to-read cartography, complete with labels for street names and public places.
Hybrid. This view combines the labels for street names and other points of interest with a satellite image, but you may need to zoom in to see better.
Satellite. Choose this option for a high-quality photo from a camera high in the sky.
Tap Show Traffic to see current road congestion and maybe take that antacid before you leave the house. Tap the Print button to take an AirPrint (Print with Your iPad) hard copy with you on your travels—especially helpful should your iPad’s battery conk out before you reach your destination.
In iOS 6, you can see certain cities, including Boston and San Francisco, in 3D. Tap the 3D button in the lower-left corner to see if a 3D view is available. The images on the opposite page show off the 3D look, as does Use Twitter. On a 3D map, you can drag your fingers around the iPad screen to see different angles.
Note
Ever wonder what those green, yellow, and red lines actually mean on a map of traffic conditions? The color-coding is all about the need for speed—or the lack of it. Green means traffic is moving at a rate of 50 mph or more, and yellow means slower going, at 25 to 49 mph. Red means traffic is creeping along at less than 25 mph, so you may find some very crabby cabbies out there.
Locate Your Position Using GPS
EVER LOOK AT A map and wonder exactly where you are in relation to the place you’re trying to get to? Unless that map has one of those You Are Here arrows, you usually have to guess—but not if you have an iPad.

Just make sure you have an Internet connection and your Location
Services turned on (Sounds). Then tap the Current
Location icon (![]() ) at the bottom of the Maps screen. The iPad drops a blue dot on the map to mark
your position to within a few hundred yards. While the WiFi iPad doesn’t
have a GPS chip inside it like the cellular ’Pad does, it does have
software that calculates your position based on a big database of WiFi
hot spots and cell towers.
) at the bottom of the Maps screen. The iPad drops a blue dot on the map to mark
your position to within a few hundred yards. While the WiFi iPad doesn’t
have a GPS chip inside it like the cellular ’Pad does, it does have
software that calculates your position based on a big database of WiFi
hot spots and cell towers.
You can even combine the iPad’s ability to detect your current
location with its ability to give you directions. Tap the Directions
button at the top of the screen—unless you’re offline, the iPad usually
starts with your current location in the first box. In the second box,
type in a destination or tap ![]() to get to your contact addresses. Once you give
Maps your starting and ending points, tap the bar at the top of the
Directions box for driving, mass transit, and walking directions (see
the next page for more on getting directions).
to get to your contact addresses. Once you give
Maps your starting and ending points, tap the bar at the top of the
Directions box for driving, mass transit, and walking directions (see
the next page for more on getting directions).
To use your current position and navigate your way Boy
Scout-style, the iPad includes a digital compass. To use it, tap the
Current Location icon once to get your position, and then tap it again
to activate the digital compass, which appears on the screen as a
compass icon in the top-right corner. To rotate the compass-point North,
hold your iPad parallel to the ground. To get back to regular map view,
tap the Compass icon (![]() ) in the bottom toolbar.
) in the bottom toolbar.
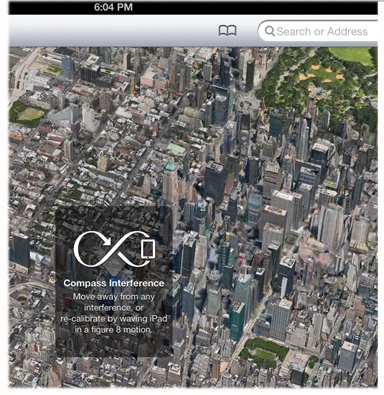
If a message with a large ![]() symbol appears on-screen, as shown here, you need
to calibrate the compass—which is normal the first time you use it.
Firmly grip the iPad and wave it in a horizontal “air Figure 8” pattern
to fine-tune its sense of direction and get you on your way.
symbol appears on-screen, as shown here, you need
to calibrate the compass—which is normal the first time you use it.
Firmly grip the iPad and wave it in a horizontal “air Figure 8” pattern
to fine-tune its sense of direction and get you on your way.
Get Directions on the Map
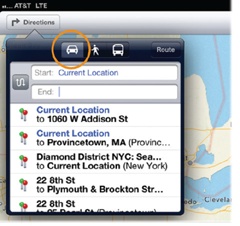
NEED TO FIND YOUR way from Point A to Point B, or at least from
Albany to Boston? To map your route, tap the Directions button at the
top of the screen. A two-field box appears. If you want to start from
someplace other than your current location, tap ![]() in the Start box and type in a new point of
origin. In the End box, type in your destination or tap
in the Start box and type in a new point of
origin. In the End box, type in your destination or tap
![]() and choose from your list of bookmarked sites,
recently visited, or contacts.
and choose from your list of bookmarked sites,
recently visited, or contacts.
Once the iPad gets the starting and ending points, it calculates
how to get there by car or on foot. Tap the car (![]() or walking-person icon (
or walking-person icon (![]() ) to get step-by-step directions. If you’re in the
middle of nowhere, driving directions may be all you see here. When you
have everything set, tap the blue Route button in the box. To reverse
the starting and ending points so you can get back home, tap the
) to get step-by-step directions. If you’re in the
middle of nowhere, driving directions may be all you see here. When you
have everything set, tap the blue Route button in the box. To reverse
the starting and ending points so you can get back home, tap the
![]() icon. In iOS 5, instructions for using mass
transit were also available by tapping the bus icon (
icon. In iOS 5, instructions for using mass
transit were also available by tapping the bus icon (![]() ), but iOS 6 sends you to the App Store for a
transit app when you tap the bus.
), but iOS 6 sends you to the App Store for a
transit app when you tap the bus.
The iPad delivers your directions on the screen, with your route marked in blue. If alternate routes are available, you’ll see them marked as Route 1, Route 2, and so on; tap the one you want to use. When you select a route, tap the Start button to get going. You can see your journey in one of three ways:
To see all the turns on a route, tap
 in the gray bar in the bottom-left corner of
the screen and flick down the Directions list (shown below). Tap any
step to jump to that part of the journey so you can get a close-up
of the area. Tap the square icon to close the box.
in the gray bar in the bottom-left corner of
the screen and flick down the Directions list (shown below). Tap any
step to jump to that part of the journey so you can get a close-up
of the area. Tap the square icon to close the box.Each step of the trip appears as a green interstate-like sign along the top of the iPad’s screen. Flick your finger along the row of signs to move through the steps in either direction.
Tap the Overview button in the top-right corner to see the starting and ending points of the trip displayed on the map.
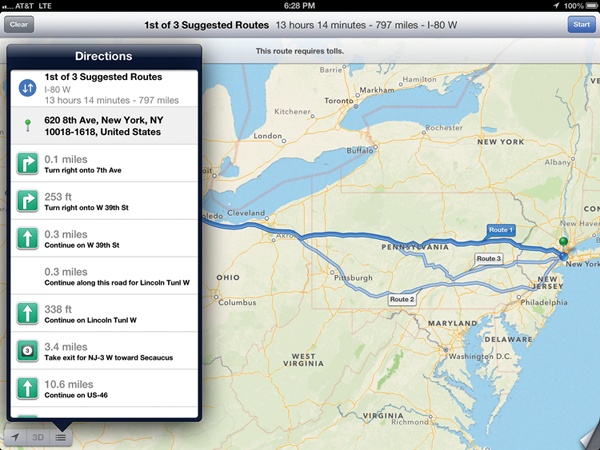
For driving and walking directions, you get an approximate travel time for the trip and a note about any tolls along the way. If you have an Internet connection as you go, the route can also update current traffic conditions.
Turn-by-Turn Directions
You know how a regular GPS unit (the kind embedded in the car’s dashboard or suction-cupped to the inside of the windshield) can pinpoint your current location and then give you turn-by-turn directions out loud as you drive toward your destination? The Wi-Fi + Cellular iPad can do the same thing—as can a WiFi iPad riding shotgun with a mobile hotspot (Use the iPad as a Personal Hotspot).
To get the iPad telling you where to go, make sure you turn on the tablet’s Location Services (Sounds), and then tap the Directions button. Then:
In the Start box, tap to select Current Location.
In the End box, type in the destination address.
Tap the Route button, choose one of the paths presented, and then tap Start. (Remember, you can jump right into turn-by-turn directions from any point on the map by tapping
in the place name, as noted on See Maps in Different Views.)
After you start a route, a pleasing (yet robotic) voice begins to announce your directions and turns out loud. (The audio technology here is from Tom Tom, a company that makes its own GPS units and navigation software as well.)
As you drive along, the iPad’s GPS senses your location and advances to the next step. The turn-by-turn audio guide continues, even if you jump to another app on the iPad—and the text directions appear as banner alerts from the iPad’s Home screen or in full on the Lock Screen itself; tap an alert to return to the Maps app. Keep going until you arrive at your destination. If you want to stop the highway narration before you get there, tap the End button.
Tip
Want to adjust the volume of the iPad’s GPS navigation voice, or turn it off entirely? Tap Home→Settings→Maps to get to the controls for the robot voice. In the Maps settings, you can also switch the distance units from miles to kilometers and adjust the text size of the labels on points of interest.
Use Facebook on the iPad
FACEBOOK, THE SOCIAL NETWORKING site that ate Harvard in 2004 and then went on to sign up another 955 million users around the world, has been available on the iPad for years. Anybody with an iPad can get to the site from the Safari browser or with Facebook’s own custom app from the App Store.
In iOS 6, Facebook is more tightly integrated into the iPad’s
apps. For example, if you’re in the Photos app and want to post a
picture to Facebook, you just tap the Action menu (![]() ) and select Facebook—instead of having to open
Facebook, tap the Add Photo button, navigate to the picture in your
Photos app, and then upload it. Quickly posting
links to Facebook from Safari works the same way.
) and select Facebook—instead of having to open
Facebook, tap the Add Photo button, navigate to the picture in your
Photos app, and then upload it. Quickly posting
links to Facebook from Safari works the same way.
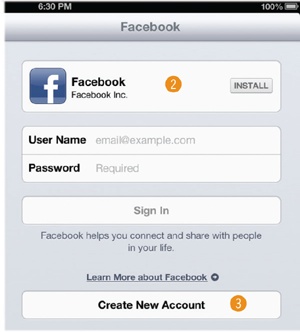
To take advantage of the tighter integration that comes with iOS 6, you need to install the Facebook app on your ’Pad and configure your Facebook account. Fortunately, you can do it all in the same place:
Tap Home→Settings→Facebook.
If you don’t have the Facebook app installed already, tap the Install button, This takes you to the App Store, where you can download the free app. (You do need an Apple ID for this; see Set Up an Apple ID if you haven’t signed up yet.)
If you’re one of the few people in the civilized world without a Facebook account to begin with, tap Create New Account and follow along.
Once you install the Facebook app, go back to Home→Settings→Facebook and enter your Facebook user name and password. A privacy notice appears, explaining all the bits of your personal information on the iPad that Facebook has access to, like your Photos and Contacts apps. If you have privacy issues, turn off access to certain apps, like Contacts and Calendars. If you don’t, you can even sync your Contacts with Facebook.

Once you get Facebook installed and configured on your iPad, you
can share links, photos, videos, and other Facebook-friendly content by
just tapping the Action menu (![]() ) and selecting the Facebook icon
(circled).
) and selecting the Facebook icon
(circled).

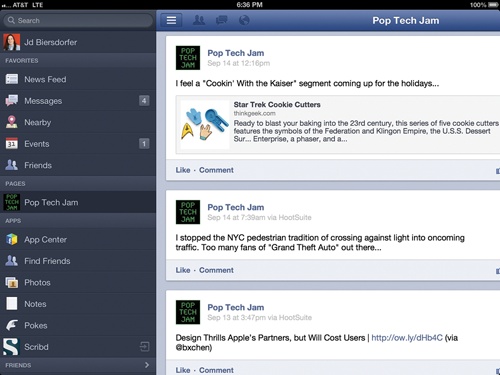
Like the Mail app in Chapter 5, the Facebook
app for iPad works in both vertical and horizontal orientation. The
vertical view is great for zipping through a long string of Friend
updates. Holding the iPad horizontally displays your chat buddies on the
right, or (as shown here) a left-side menu for navigating Facebook; you
can toggle the menu on and off by tapping the ![]() icon. Just swipe your finger left or right to
slide between chat and menu.
icon. Just swipe your finger left or right to
slide between chat and menu.
Tip
Want to keep up with your Facebook friends even if you don’t have the app open? Configure your iPad’s Notification settings (Use Notifications) to add Facebook alerts to the mix. In iOS 6, you can also tap Home→Settings→Facebook→Settings to turn on audio or vibration alerts for new chat and message notifications.