
Chapter 17. Back Up and Sync Your Gadgets with iCloud
You’ll learn to:
Set up iCloud on your iPad and desktop computers
Back up music, photos, apps, email, and more to the Cloud
Tap into iWork documents
Sync your photos to all your devices
Automatically share photos with family and friends
ODDS ARE YOU HAVE more than one computer in your life. An iPad for sure, and maybe a desktop or laptop computer, an iPhone, an iPod Touch, or some combination of these devices. All of them can snap photos, store contact information, keep track of appointments, and transport downloaded music, apps, and books. Wouldn’t it be great if they could share the same files and information so all your devices were always in sync and up-to-date?
They can. When you set up all your iOS and desktop/laptop devices to work with iCloud, it backs up and syncs your music, email, apps, photos, books, contacts, calendar appointments, notes, reminders, and iWork documents across Windows PCs, Macs, iPads, iPhones, and iPod Touches. Best of all, the service is free and comes with 5 gigabytes of online storage—and that’s over and above the space your iTunes Store purchases or your cache of photos take up.
Because iCloud comes as part of iOS 5 and later, you may have signed up for it when you activated your iPad. If not, you’ll learn how to do that now. Either way, this chapter tells you how to use iCloud’s features to keep your life in sync.
Set Up iCloud on Your iPad
BACK BEFORE ICLOUD FLOATED into view, if your iPad got broken or lost and you hadn’t backed up its files to your desktop computer, you were out of luck.
iCloud remedies that. It backs up all your stuff, including documents, bookmarks, personal info, and more, to that great big server in the sky. Providing, that is, your iPad has iCloud turned on and set up to copy your data. To do that, you need at least iOS 5 installed on your iPad (and on any other iOS devices you want to keep in sync). If you didn’t create an iCloud account when you first set up your iPad (Activate and Set Up Your iPad Over WiFi), here’s what to do:
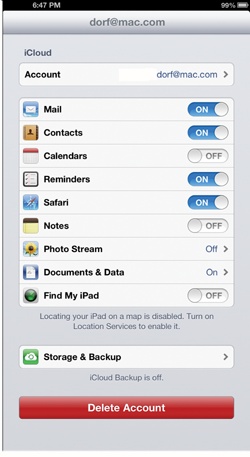
Go to the Home screen and tap Settings→iCloud.
Create an iCloud account. Tap the Account button and type in your Apple user name, password (Set Up an Apple ID), and other requested info. New users get an iCloud email address and account, and former MobileMe users get an iCloud address that matches their old me.com addy.
Now it’s time to tell iCloud what you want it to back up and sync. The first batch of apps in the list are personal information and organizer programs: Mail, Contacts, Calendars, Reminders, Safari Bookmarks, and Notes. Tap the button to On for each one you want iCloud to sync for you. You also get online versions of the Mail, Notes, Reminders, Contacts, and Calendars apps, whose files you can tap into, read, and edit using any web browser.
Now it’s time to get your photo stream flowing. To have iCloud automatically transfer photos you take with your iPad to your computer, Apple TV, and other iOS devices (like your iPhone or iPod Touch), tap Photo Stream in the iCloud settings to On. (You also need iCloud set up on your desktop or laptop computer; see Set Up iCloud on Your Computer.) There’s more on Photo Stream on Stream Photos with iCloud.
Note
If you prefer to keep the business of syncing and backing up your personal info, media files, and iPad settings on the ground, you can do all the tasks described on these pages through iTunes; see Sync Your iPad with iTunes.
If you do a lot of word processing, number-crunching, or other info-intensive work on your iPad, odds are you want to back up all your files so your hard work doesn’t go to waste if the dog knocks your tablet to the floor. On the iCloud settings screen, tap Documents & Data, and then tap On.
Another benefit of iCloud is its Find My iPad feature. You can use it to track down a missing tablet, whether it’s just lost in the house somewhere, back at the office, or hijacked by an evildoer. Tap the On button here to be able to hunt down (and even remotely shut down) your iPad. (Find a Lost iPad has instructions on setting up Find My iPad and spotting the slab’s whereabouts on a map.)
Although your iTunes Store purchases and your Photo Stream pictures don’t count against iCloud’s free 5 gigabytes of storage, you may need more room if you have a lot of documents and other files to back up. If you suspect things are getting tight, tap the Storage & Backup button on the iCloud settings screen to see how much space your data currently takes up. If you don’t want to delete anything, tap the Buy More Storage button. On the next screen, you can tap to sign up for an additional 10 GB ($20 a year), 20 GB ($40 a year), or 50 GB ($100 a year) of storage. All of this is on top of your free 5 GB. The extra gigs get billed to your iTunes Store account.
Finally, if you want to back up your iPad’s system settings, app settings, and Camera Roll photos, go to Settings→iCloud→Storage & Backup, pop down to iCloud Backup, and tap it to On. iCloud now copies your iPad’s housekeeping settings and pics over your WiFi connection each day. Or, you can trigger a backup session right away by tapping Back Up Now. (Remember, all your other data—iTunes purchases, personal info, and documents—are taken care of by other parts of the iCloud service.)
Later, if you need to restore all your backed-up data to a freshly restored (Start Over: Restore Your iPad’s Software) or brand-new iPad, choose Restore From iCloud Backup as you tap through the setup process.
iCloud does its deep-in-the-background backup thing when you have your iPad connected to a WiFi network, plugged in to a power source, and locked. It’s automatic, and has the added advantage of giving you a second copy of your iPad files (in addition to the one you get with the desktop version of iTunes), which can come in handy if your computer ever gets hosed.
If you ever need to adjust your backup settings, add more online storage, or even delete your account, just return to Settings→iCloud.
Note
Wondering how to retrieve backups of your iTunes Store purchases? Head back to Use iTunes in the Cloud. And if you want to make sure you back up all your music—and not just the songs you bought from iTunes—read up on Apple’s $25-a-year iTunes Match service on Use iTunes Match.
Set Up iCloud on Your Computer
WHEN YOU LOOP YOUR desktop and/or laptop computer into the sync, iCloud sends copies of the content in your account—like photos, bookmarks, documents, and contact info—to your computer. It also sends copies of pictures from your Photo Stream to your computer—where they won’t get deleted after 30 days, as iCloud-based photos do. And changes you make on your computer—like adding an appointment to your calendar—go up to the cloud for syncing with other devices, too.
iCloud also keeps copies of your Mail, Notes, Reminders, Contacts, and Calendars apps online so you can tap into them through your desktop browser. It distributes any changes you make to these apps’ files across your devices. And you can keep your browser’s bookmarks in sync (including the Safari Reading List) across your gadgets, too.
If you haven’t signed up for an iCloud account, stop off at www.icloud.com and click Sign Up. If you already have an Apple ID, just enter that user name and password to log in.
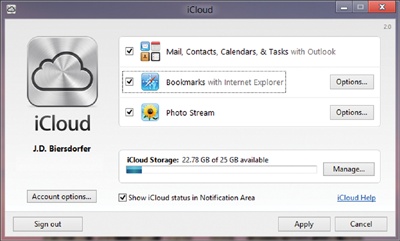
Windows users must download an iCloud control panel from the site first. Once you install the software, go to Start→Control Panel→Network and Internet→iCloud and log in.
In the window that pops up, turn on the checkboxes for the stuff you want to sync from your computer, including mail, contacts, calendars, and browser bookmarks. Windows users need Microsoft Outlook 2007 or later to sync their mail, contacts, and calendars. You can also turn on Photo Stream here, but Stream Photos with iCloud has much more on that.
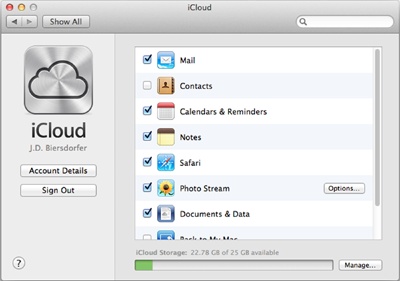
Mac OS X 10.7 (Lion) users (and later) just need to visit
![]() →System Preferences→iCloud to get to the options
for syncing mail, contacts, calendars, and Safari bookmarks.
→System Preferences→iCloud to get to the options
for syncing mail, contacts, calendars, and Safari bookmarks.
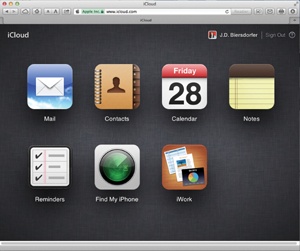
Once you have iCloud configured on both your iPad (described on the previous two pages) and your computer, you’re syncing. Log in to www.icloud.com and click the Mail, Contacts, or Calendars icons to see your info on the Web.
Using iWork with iCloud on the Web
Chapter 11 SHOWED YOU how to use Apple’s iWork suite of apps—Pages, Numbers, and Keynote—to get some business done on your iPad. If you don’t use iWork and don’t intend to, skip this page and go splash around in the Photo Stream on the next page. If you do use any of the iWork apps, you’ll be happy to know that there’s a corner of the cloud devoted to backing up your files.
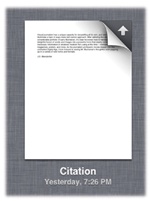
In fact, if you told iCloud to back up Documents & Data (Set Up iCloud on Your iPad), you’ll find the absolute latest Pages, Numbers, and Keynote files in your online storage locker—where you can download them to your computer for further editing (you can’t edit them on the Web, at least not yet). Even if your iPad has no Internet connection when you edit a file, the little arrow in the top-right corner of the document means iCloud will grab a copy of it when you get back online.
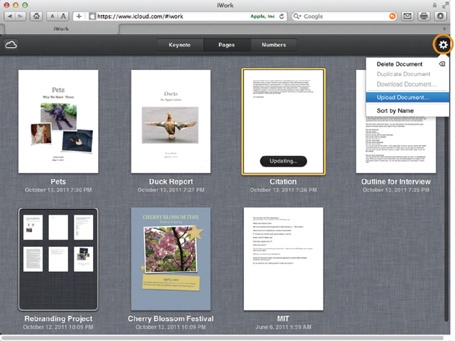
To see your iWork files in your web browser, log into your account at www.icloud.com and click on the iWork icon (right). At the top of the iWork screen, you see three tabs: Keynote, Pages, and Numbers.
Click the tab for the program you want, and then click the file you want to download to your computer. Depending on the iWork app you’re working with, you have your choice of several file formats: the ones Microsoft Office uses for documents, spreadsheets, and presentations (.doc, .xls, or .ppt), the near-universal PDF format, or Apple’s native iWork ‘09 file formats.
You can delete and sort files on the Web from the
![]() menu, circled below. The menu also gives you the
option to upload Microsoft Office or iWork ‘09 files from your computer.
Want a faster way? Just drag the files from your hard drive to the iWork
apps page in your browser. When you do that, the files automatically pop
up in the iWork apps on your iPad or other iOS device. Life is
good.
menu, circled below. The menu also gives you the
option to upload Microsoft Office or iWork ‘09 files from your computer.
Want a faster way? Just drag the files from your hard drive to the iWork
apps page in your browser. When you do that, the files automatically pop
up in the iWork apps on your iPad or other iOS device. Life is
good.
Stream Photos with iCloud
JUST THINK ABOUT ALL the possible ways to take digital photos, especially if you have an iPad, iPhone, and iPod Touch. You might have a digital camera, too. Luckily, iCloud’s Photo Stream feature ensures that you always have a copy of all your pictures on all your iOS devices and on your computer. Now you don’t have to be embarrassed when you pull out your iPad to show the girls in the book club a picture of your new niece, only to remember that you actually took the photo with your iPod Touch, which is sitting at home. (For close friends, you can also share Photo Streams, as Share Your Photo Stream explains.)
With Photo Stream in action, iCloud stores the last 1,000 pictures you took for 30 days, which should give you plenty of time to sync your pics across all your devices and, most importantly, to your desktop computer, which serves as the archive for your images—while iCloud holds only your last thousand shots, all your pictures are permanently stored on your Windows PC or Mac, which probably has a bit more storage than your iPad.
To use Photo Stream, you have to activate it on your iPad, your other iOS devices, and your desktop computer. If you didn’t turn on Photo Stream when you set up your iPad (Activate and Set Up Your iPad Over WiFi), go to the iPad’s Home screen and tap Settings→iCloud→Photo Stream→On. Repeat this step on all the iOS 5 (and later) devices that you want to paddle along in the Stream. (You can also turn Photo Stream on by tapping Settings→Photos→Photo Stream→On.)
Once your iOS devices are ready, you need to bring your computer into the mix so it can serve as the master archive for all your photography.
Photo Stream for Windows Users
If you use a Windows PC, you first need to install the iCloud software for Windows (Set Up iCloud on Your Computer). Once you do, choose Start→Control Panel→Network and Internet→iCloud. When the dialog box opens, type in your iCloud user name and password. Then turn on the checkbox next to Photo Stream and click Options.
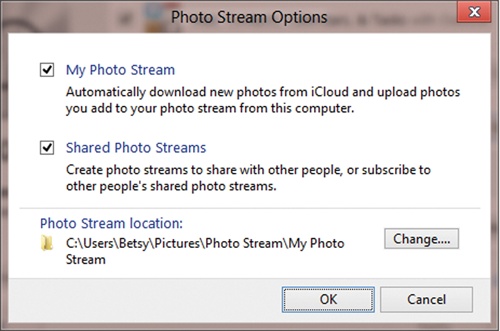
In the Options box (shown here), you turn on your Photo Stream (and Shared Photo Streams, explained on Share Your Photo Stream). By default, iCloud sets up a Photo Stream folder in your Windows Pictures library, with subfolders called My Photo Stream (for the downloads), one called Uploads, and one called Shared.
If you want to change the Photo Stream folder location, click the Change button next to “Photo Stream location” to pick a different one. Click OK when you’re done and ready to start streaming photos.
Photo Stream for Mac OS X Users
Apple makes things a bit easier for its own operating system and computers. You just need to use the most recent version (and update) of its iPhoto ‘11 or Aperture programs for organizing and editing pictures. To turn on Photo Stream in either Mac program, click the Photo Stream icon in the left panel, and then click the Turn On Photo Stream button that appears in the window.
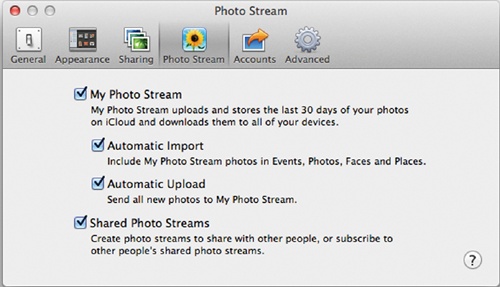
To see iPhoto’s Photo Stream preferences (and adjust them if needed), choose iPhoto→Preferences→Photo Stream. In the box, turn on the checkbox next to My Photo Stream. You can also turn on checkboxes next to Automatic Import (which lets iPhoto include Photo Stream images in its Events, Photos, Faces, and Places albums), Automatic Upload (which pushes photos you import from your camera to your computer up to iCloud, in turn sending smaller versions of your camera’s pics out to your devices), and Shared Photo Streams (Share Your Photo Stream).
Photo Stream on the Apple TV
If you’ve fully stocked your house with Apple hardware, you probably have an Apple TV connected to your television set so you can take advantage of AirPlay (Stream and Mirror Files with AirPlay). Like AirPlay, Photo Stream only works on second- and third-generation Apple TVs (the ones that look like a thick black drink coaster). And if you’ve had the box for a while, you may need to update its software. From the main screen, use the Apple TV remote and surf to Settings→General→Update Software, then download and install any updates listed.
To see your streamed photos on your TV set, change the video source to your Apple TV (Play iPad Videos on Your TV). On the main menu screen, use the remote control to slide along Internet→Photo Stream, log in if asked, and enjoy the show.
Share Your Photo Stream
THE ICLOUD PHOTO STREAM is a great way to keep your pictures up to date across your iOS devices, but wouldn’t it be great if it could also keep the people in your life up to date with your pictures? If you have iOS 6, it can—thanks to the new Shared Photo Streams feature.
When you share your Photo Stream with another iOS user, your pictures automatically pop up in their Photos app, saving you the trouble of emailing big files to a bunch of people—or having to fumble around uploading images to a photo-sharing site and then sending links to the album page. If your pals have iOS 6 on their devices (or Photo Stream-enabled Windows PCs or Macs, as explained on Stream Photos with iCloud) and accept the invitation to share your Photo Stream, they can follow along with your photographic adventures as soon as you snap pics and mark them for sharing on your iPad.
Of course, not everyone has Apple software. “So,” you ask, “How do I share with those tech-deprived friends running around with Android phones and tablets?” Not a problem. You just mark the shared photo for display in a public gallery on your iCloud page and send them the link so they can go see the photos using any web browser.
Setting Up a Shared Photo Stream
To get rolling with your stream-sharing, you need to set up the iPad to share, and then set up an album or two with pictures you’d like to virtually pass around among your friends. Here’s how:
Go to Home→Settings→Photos & Camera→Shared Photo Stream→On. (You don’t need to have the iPad’s Photo Stream turned on in Settings.)
Go to Home→Photos and tap the Photo Stream tab.
Tap the
 button. In the box that pops up, add the
email addresses of the people you want to share with; tapping the
button. In the box that pops up, add the
email addresses of the people you want to share with; tapping the
 icon pulls up your Contacts list so you can
add people by tapping their names in the list. In this same box,
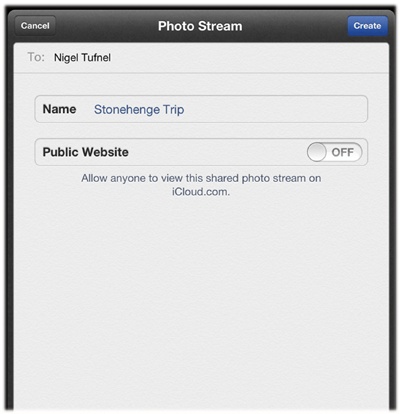
you can also name the new shared Photo Stream (“Tahoe Vacation,”
or whatever) and flip the switch next to Public Website to post
copies to your iCloud page. Then tap Create.
icon pulls up your Contacts list so you can
add people by tapping their names in the list. In this same box,
you can also name the new shared Photo Stream (“Tahoe Vacation,”
or whatever) and flip the switch next to Public Website to post
copies to your iCloud page. Then tap Create.A new album appears on your Photos screen. Tap it, and then tap the Add Photos to put some pictures in there for sharing.
Your designated contacts get an email message from you with the option to add your shared stream. After they accept your invite to look at your pictures on their own iOS 6 devices or computers, they can tap their screens and add comments or “Like” your shared images. Shared streams even show up on second-and third-generation Apple TVs.
You can set up a shared stream with just one photo from your
iPad, too. When you have an image you want to share anew (or add to an
existing stream), tap ![]() and then tap the Photo Stream icon. In the box
that pops up, tap New Photo Stream to start a fresh stream, or tap the
name of the album you want to use.
and then tap the Photo Stream icon. In the box
that pops up, tap New Photo Stream to start a fresh stream, or tap the
name of the album you want to use.
Viewing Shared Streams

To see the photo streams friends have shared with you, tap Home→Photos→Photo Stream. You’ll see the shared albums listed by album name and by the name of the person who shared them with you. When new pics arrive in a shared stream, the Photos app displays a red number badge and, if you have Notifications set up for Photos (Use Notifications), you get an alert, too.
Deleting Photos and Shared Streams
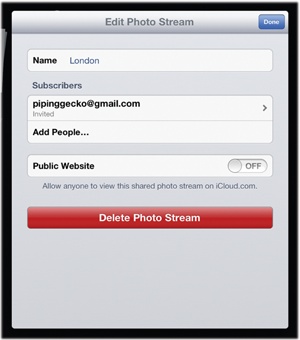
Want to add users to a stream, unsubscribe someone, or stop
sharing? Go to Home→Photos→Photo Stream and tap Edit in the top-right
corner. Tap the center of the album (not the
![]() ) you want to change. In the box that appears,
tap Add People to invite more subscribers by email. To take someone
out of the stream, tap his or her address, and then tap Remove
Subscriber on the next screen. You can also turn the stream’s Public
Website option on or off here. Tap Delete Photo Stream to remove all
the pics at once. You can remove individual images from an open shared
album by tapping Edit, selecting the pictures you want to whack out of
the stream, and then tapping the red Delete button in the left corner.
Tap Delete Selected Photos to confirm your intentions. Deleting here
takes the pictures out of the Photo Stream
only—not off of your iPad.
) you want to change. In the box that appears,
tap Add People to invite more subscribers by email. To take someone
out of the stream, tap his or her address, and then tap Remove
Subscriber on the next screen. You can also turn the stream’s Public
Website option on or off here. Tap Delete Photo Stream to remove all
the pics at once. You can remove individual images from an open shared
album by tapping Edit, selecting the pictures you want to whack out of
the stream, and then tapping the red Delete button in the left corner.
Tap Delete Selected Photos to confirm your intentions. Deleting here
takes the pictures out of the Photo Stream
only—not off of your iPad.