
Chapter 30. Glade
There once was a time when “Windows” meant Microsoft. Nowadays, if you don’t precede the word with “Microsoft” or “X,” you may unwittingly reveal yourself as out-of-the-know. There are very few Linux distributions that don’t try to start an X session during the installation process, and the battle over desktop environments (Gnome versus KDE) and GUI toolkits (GTK+ versus Qt) puts the Cola Wars to shame.
The Unix desktop wars are clearly not limited to the various Linux distributions; the Gnome Project, for example, has gained the support of several large corporations. And it isn’t too far-fetched to imagine stable ports of XFree86 and other Unix-y essentials coming to the Microsoft and Apple worlds (think Cygwin and Apple’s OS X), opening up the possibility of even more widespread exposure for these desktop environments and the tools and applications that live in them.
How does this affect Perl developers? Perl has never lacked muscle in the world of back-end tool development and is often described as the duct-tape of the Internet. On the server side, Perl is considered by many to be the language of choice for web development (look at the hundreds of Apache:: modules), database tools (DBI), text processing, application prototyping, haiku generation, and more. But GUI development?
What does it mean when the ground Perl sits on most firmly (the Unix world) begins its move to the desktop? In a peek at an increasingly popular area, this article presents one of the options available for developers wishing to develop GUIs with Perl on Unix.
GTK+/Gnome
One of the major players in the Unix desktop game is the Gnome Project, which is now steered by the Gnome Foundation. A Gnome desktop consists of applications built using GTK+ (Graphical ToolKit). The Gnome framework also provides other important features, such as CORBA services, internationalization, and session management. GTK+ provides the widgets—buttons, windows, menus, detachable toolbars, and so on—which, when assembled properly, create the user experience.
There are also several Gnome widgets, many composed of multiple GTK+ widgets, which provide a common cross-application interface for basic tasks; there’s a Gnome Number Entry widget for entering numbers, a Gnome File Entry to let users select files, and a Gnome About Dialog that provides a standard format for About dialog boxes.
These widgets save time for developers, providing built-in functionality for basic tasks in addition to creating a common and convenient user experience across applications. For example, the Gnome Number Entry widget allows the user to enter a number manually or to bring up a calculator for complex calculations, without a single line of code by the programmer. Also, the Gnome File Entry dialog box lets users browse filesystems to choose a file. These types of widgets make life easier for developers, and shorten the learning curve as users move from one Gnome application to another.
Perl and GTK+/Gnome
There are several tools that bring Perl to the world of GUI development on the Gnome desktop. The most important are the Perl bindings to the GTK+ library. The Perl GTK+ bindings, known collectively as Gtk-Perl, are currently maintained by Paolo Molaro and available on CPAN or at the Gtk-Perl homepage (http://www.gtkperl.org/).
Gtk-Perl allows you to create widgets and respond to user input in a fashion similar to Perl/Tk and Perl-Qt. Using Gtk-Perl alone, however, forces you to manage the creation and arrangement of widgets in your code. Not only is this time-consuming and prone to error, it can also be an obstacle in creating medium- to large-sized applications, because the functionality of your application gets mixed up with the definition of the user interface, one of the first no-no’s in good GUI design.
Glade
Luckily, we have Glade. Glade is a free user interface builder for GTK+ and Gnome, available at http://glade.gnome.org/. Glade doesn’t force a language upon you; as of this writing, Glade applications can be designed with C, C++, Ada95, Python, or Perl.
Glade simply defines the arrangement of the graphical widgets making up your application and stores this definition as XML. Then special code in your language of choice reads this definition, and using the GTK+/Gnome bindings in that language, puts together the interface when your application launches. Your code, and the main GTK+ user event handler, do the rest. In the case of Perl, the “special code” gluing Glade and Perl together is creatively named Glade-Perl and was developed by Dermot Musgrove. It is available on CPAN or at http://www.glade.perl.connectfree.co.uk/. To summarize:
- Gnome
A graphical user environment
- GTK
GUI library used by Gnome
- Glade
A graphical interface designer for GTK applications
- Perl
A language that can implement a Glade-designed interface
Installation
Setting up the Glade-Perl development environment is fairly simple. First, you must have a Gnome desktop running. Most Linux distributions include an option to install Gnome. If you don’t want to go through a fresh Linux installation, you can go to the Gnome Project web site (http://www.gnome.org) and find installation information there. Ximian (http://www.ximian.com) also provides an easy Gnome installation.
The latest stable version of Glade-Perl (0.57) requires
gnome-libs 1.2.4 and GTK+ 1.2.7. You can discover your version of
gnome-libs by typing gnome-config
--version at a shell prompt, and you can find out
which version of GTK+ you have by typing gtk-config
--version at a shell prompt. Second, you must download and
install the most recent version of Glade from http://glade.gnome.org/. Finally, you should install
the most recent versions of Glade-Perl and XML::Parser from CPAN. You
should get the latest version of Gtk-Perl from the Gtk-Perl homepage
(http://www.gtkperl.org).
Designing an Interface
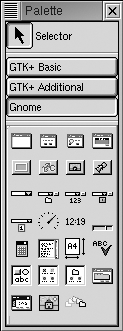
Putting together a user interface in Glade is easy. Start Glade, and look at the Palette window, shown in Figure 30-1. This window displays the various widgets you can use. The widgets are grouped into various categories (more categories and widgets can be added to the palette; for example, if you install gnome-db, the Gnome database connectivity package, you can include gnome-db widgets in your application).
Gnome applications typically start with a Gnome application window. You can find this widget under
the Gnome tab in the Palette window. When you create this widget,
Glade gives it the name app1. We’ll use this name
later.
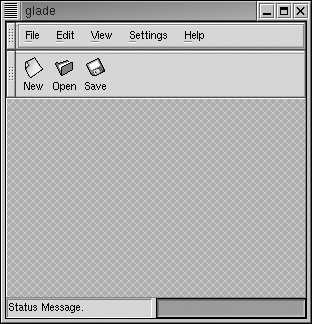
The Gnome application window contains a standard menu bar, toolbar, and status line; it’s an effort to give Gnome applications a standard look and feel (Figure 30-2).
Adding Code
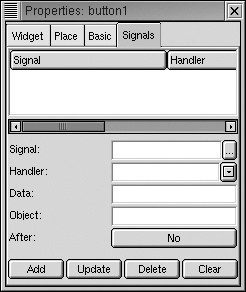
A standard look and feel doesn’t do much good if the buttons don’t do anything. To illustrate, we will attach some code to the New button. First, click on the New button in the Gnome application window you created. Then go to Glade’s Properties window and select the Signals tab, shown in Figure 30-3. Signals connect your code to user interface events (button clicks, list selections, mouse movements, and so on).
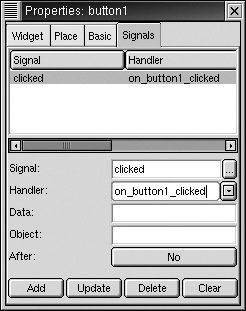
Every widget has a set of signals which it emits if and when the
user interacts with it. Clicking on the ellipsis (…) next to the
Signal input box provides a list of the signals our New button can
emit (Figure 30-4). Select
clicked, press OK, and, returning to the Properties
window, click the Add button (Figure 30-5).

We want a Perl subroutine to be called when our button is
clicked. This subroutine is called a signal
handler, and Glade automatically gave ours a name:
on_button1_clicked. But where do we put this
subroutine? As always in Perl, There’s More Than One Way To Do It. See
Writing the Signal Handler Code below for our
approach.
Saving and Building the Project
Now we will save and build our new project. First, click the
Save button in the main Glade window. The first time you save a
project, you are given a Project Options window where you can set the
name of your project (it should say Project1) as
well as the language you wish to have it built in (Figure 30-6). Select Perl as your language
and click OK.
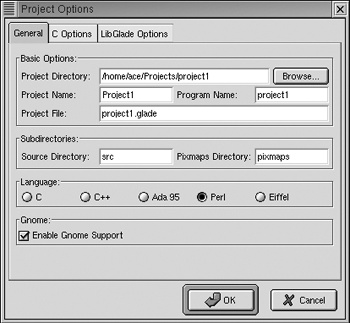
Now click the Build button in the main Glade window. The source code for your application will be written to the directory specified in the Source Directory input on the Project Options window.
Writing the Signal Handler Code
There are several methods by which you can add signal handlers to your application. Remember that signal handlers are the Perl subroutines that respond to GUI events, such as mouse clicks or cursor movements. In our example application, we have specified that we wish to invoke a subroutine when a user clicks on the New button.
Glade writes several files to the source code directory. The names of the files are based on the project name specified in the Project Options window (Figure 30-6). Project1UI.pm is a module used by the other modules to build the user interface; you generally won’t have to modify this code. Project1SIGS.pm contains stub routines for the application’s signal handlers.
Most of the time you’ll copy the stubs to another file and fill
them in with your signal handler code. As a convenience, Glade-Perl
creates such a file the first time you build your project. This file
is Project1.pm. Open it and locate the signal
handler stub that Glade created for the New button; remember that it
is called on_button1_clicked. Modify that
subroutine so that it looks like this:
sub on_button1_clicked {
my ($class, $data, $object, $instance, $event) = @_;
my $me = __PACKAGE__ . "->on_button1_clicked";
# Get reference to a hash of all the widgets on our form
my $form = $__PACKAGE__::all_forms->{$instance};
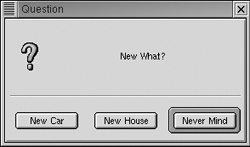
# We will display a message box to the user.
my $button_pressed = Gnome::MessageBox->new(
"New What?", # the message
"question", # the message type
"New Car", # the button labels...
"New House",
"Never Mind"
)->run();
} # End of sub on_button1_clickedNow we just need to run our application. In the project
directory (see the Project Directory option in the Project Options
window, shown in Figure 30-6),
create a file called app.pl:
#!/usr/bin/perl
# app.pl

use lib qw(./src);
use Project1;

app_run app1;
Project1.pm is the module to which we just
added our signal handler. We have to use lib, the
recommended method of altering @INC, to tell Perl
where to find this module. As explained previously, Glade writes this
file to the Source Directory specified in the Project Options window
(Figure 30-6). Since we are running
app.pl in the parent directory of the Source
Directory, we provide use lib
with a relative directory reference
(qw(./src)).
app1 is a package defined in
Project1.pm. You will recall that our Gnome
application window was given the name app1. The
app1 package is thus a Perl class representing the
Gnome application window we created.
app_run is a class method defined for the
app1 class, created by Glade-Perl. Running this
class method initializes our Gnome application, creating a new
instance of the app1 class, showing it to the user
and entering the main GTK+/Gnome event loop.
The GTK+ event loop handles user interactions, handing off processing to our signal handler subroutines if the user does anything to trigger one of those signals.
Execute the app.pl script from a shell
prompt:
perl app.pl
Clicking the New button, we see the fruits of our
signal-handling labors in Figure 30-7. What is
remarkable is that we have written only four lines of code: one to
fill in the stub of our signal handler and three to start up the
application. Filling in a signal handler to make File › Exit quit the
application is left as an exercise to the reader (hint: use the method
Gtk->main_quit).
Inheritance as a GUI Development Tool
Now we will see how class inheritance can make our life as a GUI
developer easier. Using Glade’s Palette window, create a Gnome Dialog
Box and fill it in with widgets as demonstrated in Figure 30-8. Name the dialog box
dialog_details and name the combo boxes
combo_model and combo_color,
respectively (hint: the Table widget greatly simplifies
layout).
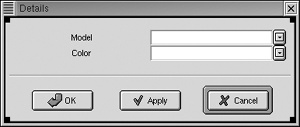
The problem is simple. If a user wants a new car, we’d like to ask the user for details on which new car they want. If the user wants a new house, on the other hand, we want to provide them with choices appropriate for a new house. But designing two different dialog boxes which differ only in their combo box options seems like overkill; in addition, what if we want the choices to come from a database or some other external data source? A better approach would be to separate the design of the interface from the specific options themselves.
To do this, we’ll create two classes that inherit from the
dialog_details class. Each will override the object
constructor, filling in the combo boxes with options appropriate for
its class. For simplicity, we’ll put the class definitions in
app.pl:
#!/usr/bin/perl
# app.pl
use lib qw(./src);
use Project1;
# Class definition for the "New Car Details" window
package Car_Details;
use vars qw(@ISA);
@ISA = qw(dialog_details);
my @models = qw(Audi Ford Honda Toyota);
my @colors = qw(Blue Green Red Watermelon);
sub new {
my $class = shift;
my $self = bless $class->SUPER::new(), $class;
$self->TOPLEVEL->title('New Car Details'),
$self->FORM->{'combo_model'}->set_popdown_strings(@models);
$self->FORM->{'combo_color'}->set_popdown_strings(@colors);
return $self;
}
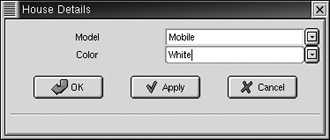
# Class definition for the "New House Details" window
package House_Details;
use vars qw(@ISA);
@ISA = qw(dialog_details);
my @models = qw(Mobile Ranch Suburban Victorian);
my @colors = qw(Brick Brown Red White);
sub new {
my $class = shift;
my $self = bless $class->SUPER::new(), $class;
$self->TOPLEVEL->title('New House Details'),
$self->FORM->{'combo_model'}->set_popdown_strings(@models);
$self->FORM->{'combo_color'}->set_popdown_strings(@colors);
return $self;
}
package main;
app_run app1;We have created two new classes: Car_Details
and House_Details. Each of these inherits from
dialog_details, the class Glade-Perl created for us
corresponding to the Details window (Figure 30-8). They override the
new method (the constructor) inherited from
dialog_details. The new first
calls the inherited new, thus obtaining a valid object reference for
the Details window being created. It then sets the appropriate window
title and combo box options.
Now we must modify our New button signal handler to load up the
appropriate Details window in response to the user input. Remember
that this signal handler is in Project1.pm.
Modify on_button1_clicked as follows:
sub on_button1_clicked {
    my ($class, $data, $object, $instance, $event) = @_;
    my $me = __PACKAGE__ . "->on_button1_clicked";
    # Get ref to hash of all widgets on our form
    my $form = $__PACKAGE__::all_forms->{$instance};

    # We will display a message box to the user.
    my $button_pressed = Gnome::MessageBox->new(
       "New What?",    # the message
       "question",     # the message type
       "New Car",      # the button labels...
       "New House",
       "Never Mind"
    )->run();

    # $button_pressed is the 0-based index of the button pressed.
    # 0 = "New Car", 1 = "New House", 2 = "Never Mind", and so on.

    # Stop if user pressed "Never Mind".
    return if $button_pressed = = 2;

    # Create details window based on user response.
    my $details = undef;
    $details = Car_Details->new() if $button_pressed = = 0;
    $details = House_Details->new() if $button_pressed = = 1;

    # Display the details window, hiding it when the user is done choosing.
    $details->TOPLEVEL->run_and_close();
      Gnome::MessageBox->new(
                              "You are using free software! " .
                              "You obviously can't afford that model!",
                              "info", "Ok" )->run();

} # End of sub on_button1_clicked
By virtue of being an instance of one of our two inherited
classes, the window referenced by $details has
combo box options appropriate to the user response (Figure 30-9). Since
$details inherits from
dialog_details, the TOPLEVEL
method is available. This method returns the top-level widget
corresponding to that class, in this case a Gnome::Dialog, widget
which in turn implements the run_and_close
method.
Further Exploration
With just a few clicks of the mouse and a little organization we have laid out an extensible framework for a new application. We even used Perl’s OO features to provide the framework for clean GUI development. Perl is already known as a rapid development language; combining it with a tool like Glade enables lightning-fast GUI application development.
As is often mentioned on the perl5-porters mailing list, most every problem domain Perl is brought into quickly becomes a Simple Matter of Programming (SMOP). GUI development is no different, and Glade fulfills the exciting potential of bringing Perl and SMOP to the desktop.
More Information
For an introduction to using Gnome and Perl together, read Simon Cozens’ excellent article at http://www.perl.com/pub/a/2000/10/gnome.html.
An invaluable resource in working with Gtk-Perl is the tutorial written by Stephen Wilhelm, available at http://personal.riverusers.com/%7Eswilhelm/gtkperl-tutorial/.
For information on object-oriented Perl, read the definitive book of the same name by Damian Conway.