
Chapter 34. Getting Started with Perl/Tk
Perl/Tk is a marvelous object-oriented Perl extension that provides a comprehensive collection of widgets for spiffy graphical applications. Tk was developed by John K. Ousterhout and adapted and extended for Perl by Nick Ing-Simmons.
Perl/Tk runs on all variants of Unix, Linux, and Windows. The original version ran on X windows, which uses a client/server model. Clients (such as the one you’ll see in this article) communicate with a server that manages the computer’s display, keyboard, and mouse. For every display there is a window manager that provides a consistent “look and feel,” at least at a high level, for all clients sharing the machine’s display. There are many different window managers, but they all provide similar facilities, such as iconifying, moving, and resizing windows, and framing them in decorative borders. You’ll see window manager commands in later columns.
This article contains a gentle introduction to the fundamentals of Perl/Tk, after which it develops a real application step-by-step. (All of the programs in this book are available at http://www.oreilly.com/catalog/tpj2.)
Perl/Tk is available on CPAN, and a FAQ dedicated to it is available at http://phaseit.net/claird/comp.lang.perl.tk/ptkFAQ.html, the repository of Almost Everything Ever Written About Perl/Tk, thoughtfully maintained by Cameron Laird.
Perl/Tk Programming
Perl/Tk programs are written using the object-oriented syntax
$object->method, where
$object refers to a Tk widget (such as a Button or
Menu, or even an image), and method names an action
to be performed. We’ll learn more about objects and such in the next
column, but now, without further ado, here is your prototypical
“Hello, world” program written in Perl/Tk, swiped from the
distribution:
#!/usr/bin/perl -w
# A simple Tk script that creates a button that prints "Hello, world".
# Clicking on the button terminates the program.
#
# The first statement imports the Tk objects into the application, the
# second statement creates the main window, the third statement creates the
# button and defines the code to be executed when the button is pressed,
# the fourth line asks the packer to shrink-wrap the application's main
# window around the button, and the fifth line starts the event loop.

use Tk;

$MW = MainWindow->new;

$hello = $MW->Button(  -text => 'Hello, world',
                    -command => sub {print STDOUT "Hello, world
"; exit;});
$hello->pack;
MainLoop;
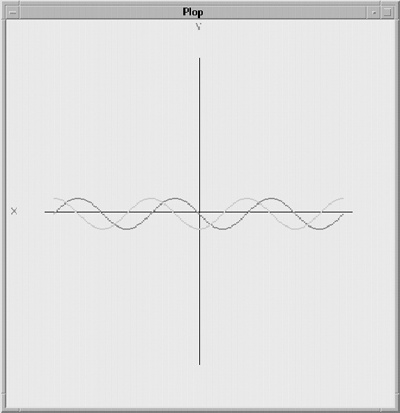
When the program is executed, the window shown in Figure 34-1 appears.
The main window, $MW, is the program’s first
top-level window—the primary “container” for
most, if not all, descendant widgets, which form a hierarchy (each widget always has
a parent and might have children as well).
This particular top-level widget has a single child object belonging to the Button class. All widgets are objects derived from some base class, inheriting its characteristics. You might have several instances of button objects that look quite different, but share the distinguishing characteristics of the Button class: they display a text label or bitmap, and “do something” when pressed. When the button in the example is pressed, the anonymous subroutine is executed, which prints “Hello, world” and exits. The subroutine is called because it is bound to the button click. Almost all widget classes have default button and keypress bindings established by Perl/Tk, and you can add, delete, or modify bindings on a class or per-widget basis as you see fit.
The statement $hello = $MW->Button( … );
is a widget creation command: an object of class
Button is constructed and configured with the specified options, which
becomes a descendant of widget $MW, the main
window. The variable $hello is initialized with an
object reference to the newly created button
widget. In Perl, an object reference is just an ordinary reference
that points to something that has been “blessed” (using the Perl
bless function) into a certain class. The
“something” is typically a hash or a list, and the act of blessing an
object ties it to that particular class. Perl/Tk widget objects are
hashes, as you can see from this debugging session:
%perl -de 0Loading DB routines from $RCSfile: ch34,v $$Revision: 1.11 $$Date: 92/08/07 18:24:07 $ Emacs support available. Enter h for help. main::(-e:1): 0 D1 use TkD2 $ref = { }D3 $MW = MainWindow->newD4 $oref = $MW->ButtonD5 print $refHASH(0x200f78c8) D6 print $orefTk::Button=HASH(0x2021c780)
The variable $ref is a plain reference to an
anonymous hash, whereas $oref is an object
reference to a hash of class Tk::Button. But from now on, I’ll refer
to variables like $hello and
$oref simply as objects or widgets. (If you’re not
familiar with the Perl debugger, the idiom perl -de
0 starts an interactive instance of Perl where you can
debug, or simply enter Perl commands—a great environment for testing
out code.)
The statement $hello->pack; is a
method invocation: the Tk geometry manager known
as the packer is invoked to assign a size and
position to the $hello object, and then to “map”
it. A widget must be mapped (or realized) before it becomes visible on
the display. By default widgets are always packed inside their parent,
and if you don’t specify otherwise, the packer aligns them in a
column, from top to bottom.
Perl/Tk programs are event driven,
meaning that you don’t write a main loop, but rather delegate that job
to Tk. Instead, you write small code sections, referred to as
callbacks, a fancy name for a subroutine, to
process those events and which Tk invokes as
required. There are many Tk events that need to be processed in a
timely fashion: timers, file input and output, and motion and button
events generated by your mouse. You activate the Tk event loop with a
MainLoop statement, which should be the last line
called by your program.
Most Perl/Tk applications share these common features:
A
use Tkstatement at the beginning of the program that imports the base Tk definitions.A primary
MainWindowas the root of the widget hierarchy.A series of widget creation commands.
Optional binding and callback creation and registration commands. (More about those soon.)
A series of geometry commands to pack widgets in a pleasing and user friendly manner.
A
MainLoopcommand to begin program execution. (Actually, there are times when you must control event processing yourself; we’ll see an example of this in a later column.)
Tk provides 15 standard widgets, listed below; Perl/Tk provides additional derived widgets, as well as composite widgets, such as ColorEditor, Dial, FileSelect, LabEntry, and Table. Composite widgets, also called megawidgets, are complex objects built from these standard widgets.
- Button
These widgets execute a callback when invoked. They’re derived from the Label widget.
- Canvas
These widgets provide a drawing surface for text and graphics.
- Checkbutton
These widgets select one or more items from a list. They’re derived from the Label widget.
- Entry
These widgets allow users to enter and edit a single text string.
- Frame
These widgets are primarily used as containers to group other widgets; for instance, during packing. Frames might be arranged inside an application’s main window, with other widgets inside them. Frames are also used as spacers and to add colored borders.
- Label
These widgets display a text or image label. Button, Checkbutton, and Radiobutton widgets are derived from the Label widget.
- Listbox
These widgets display a list of strings and allow the user to select one, a range, or a scattered set of the strings.
- Menu
These widgets are special widgets that work in conjunction with MenuButtons. Invoking a Menubutton displays its associated menu. There are various kinds of menu items, like buttons, checkbuttons, radiobuttons, separators, and cascades.
- Menubutton
These widgets display a label (just like Buttons) but when selected display a Menu.
- Message
These widgets are similar to Labels, but they display multiline strings instead of just single lines.
- Radiobutton
These widgets select an item from a list. They’re derived from the Label widget.
- Scale
These widgets consist of a slider which allow users to specify a value by moving the slider.
- Scrollbar
These widgets control the view of other widgets, such as Canvas, Entry, Listbox, and Text. Users can scroll the widget by dragging the slider.
- Text
These widgets display lines of editable text. Characters in a text widget can be colored, given specific fonts, spacing, margins, and more.
- Toplevel
These widgets are essentially secondary MainWindows. They resemble Frames in that they act as container widgets, except they aren’t “internal” widgets.
A Sample Perl/Tk Program: plop
The Perl/Tk application that I develop here is called “Plot
Program,” or plop for short, featuring Button,
Canvas, Dialog, Frame, Label, LabEntry, Menu, Menubutton, Scrollbar, and Text widgets. It plots a list of mathematical functions
of the form y = f($x), where $x
iterates from the graph’s X-minimum to X-maximum. Each function is
evaluated in turn for a particular value of $x; the
y value is then computed and a point is painted on
the canvas. Plop emphasizes the canvas widget
because I’ve noticed that new Tk users, after watching around two
thousand lines of canvas documentation roll by, tend to place
“exploring the canvas widget” at the end of their to-do
list!
A canvas widget can be thought of as an artist’s canvas for freehand drawing of graphics and text organized as a classical Cartesian coordinate system. A key difference is that the canvas origin, position (0,0), is defined to be the top left corner of the canvas window, so canvas X coordinates increase when moving right (as you’d expect) and Y coordinates increase when moving down (as you wouldn’t). Also, canvas coordinates can’t have negative values. For these reasons, we’ll use and equation to transform between canvas and Cartesian coordinates.
Here’s the first version of plop:
#!/usr/bin/perl -w
use strict;
use Tk;

my ($o, $s) = (250, 20);
my ($pi, $x, $y) = (3.1415926, 0);
my $mw = MainWindow->new;
my $c = $mw->Canvas(-width => 500, -height => 500);

$c->pack;
$c->createLine(50, 250, 450, 250);
$c->createText(10, 250, -fill => 'blue', -text => 'X'),
$c->createLine(250, 50, 250, 450);
$c->createText(250, 10, -fill => 'blue', -text => 'Y'),

for ($x = -(3*$pi); $x <= +(3*$pi); $x += 0.1) {
    $y = sin($x);
    $c->createText($x*$s+$o, $y*$s+$o, -fill => 'red', -text => '.'),
    $y = cos($x);
    $c->createText($x*$s+$o, $y*$s+$o, -fill => 'green', -text => '.'),
}

MainLoop;
Granted, this is really ugly code, lacking in style, but it’s a proof of concept. As you’ll see, I’ll whip this code into proper shape pronto! Before I explain it, you can see what it looks like in Figure 34-2.
Some global variables are initialized, the main window
($mw) and a canvas widget ($c)
are created, and the canvas is realized. The next four statements
create two canvas line items (for the graph axes) and two text items
(for the axis labels). Other canvas item types are arcs, bitmaps,
groups, images, ovals, polygons, rectangles, and windows.
These statements draw and annotate the X axis:
$c->createLine(50, 250, 450, 250);
$c->createText(10, 250, -fill => 'blue', -text => 'X'),
Here, I’m creating one line item and one text item. Since the canvas is 500x500 pixels, I deliberately arranged for canvas coordinate position (250,250) to coincide with the Cartesian origin (0,0). I also wanted to have 50-pixel wide top/bottom and left/right margins. Given these constraints, the X axis line starts at (50,250) and extends horizontally to (450,250), with a blue letter “X” painted in the left margin at (10,250). Similarly, the Y axis is stroked vertically from top to bottom and labeled with a blue “Y”. Now all that remains is to graph some functions.
The for statement varies from -3π to +3π
radians, and even old biology-types like myself know that sine and
cosine return values in the range [-1,1]. Such tiny values aren’t
especially useful unless you’re looking for a graph one pixel high, so
a transform is required:
$y = sin($x);
$c->createText($x*$s+$o, $y*$s+$o, -fill => 'red', -text => '.'),
We want to scale our $y values, which is what
the expression $y*$s+$o does: the Y value is
enlarged 20 times and translated to the canvas origin. Then a red dot
is deposited on the canvas. (There’s actually a bug is the transform
equation. Can you spot it? Hint: try graphing the
exp function.)
Improving plop
So much for the ugly plop prototype; with a
lot of work I can turn this code into a first-rate Perl/Tk
application. For starters, I want to eliminate every single hardcoded
value and use variables instead. Then I’ll add these features:
A menu across the top. Like all respectable applications, it’ll have File and Help menubuttons.
A title for the graph.
Adjustable minimum and maximum X and Y values.
An editable list of functions.
The option to read in functions from a file. Heck, let’s just do it:
eval {require “plop.pl”;}. Just store your private functions in the fileplop.pland they’ll be available for plotting. For instance,plop.plmight contain these lines if you wanted to graph the hyperbolic arctangent:sub atanh { return undef if ($_[0] < -1 or $_[0] > 1); return .5 * log( (1 + $_[0]) / (1-$_[0]) ); } 1;
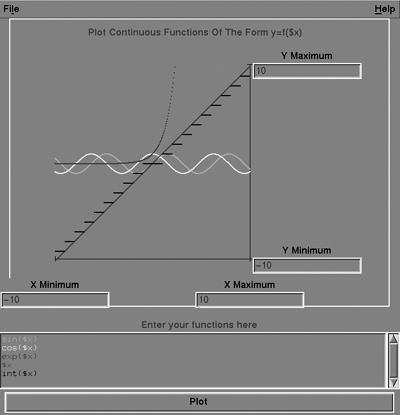
Figure 34-3 illustrates a
sample run of the new plop.
The main window is divided into three major regions: a top frame with menubuttons (containing the File and Help menus), the canvas in the middle (including the title and boundary values), and a bottom area containing a series of other widgets (including a scrollable text widget with the list of functions).
The Perl code has been modularized and looks something like this:
my $MW = MainWindow->new;
initialize_dialogs;
initialize_menus;
initialize_canvas;
initialize_functions;
Subroutine initialize_dialogs creates
dialog widgets that aren’t part of the main window
proper—they pop up at certain times, wait for the user to respond, and
then go away. Typically they persist for the lifetime of the
application: thus, they are created once during program initialization
and are then hidden until it’s time to “Show” them;
Show is a dialog method that deiconifies the
widget, waits for the user to select a dialog button, and then returns
the label of the selected button to the program. Here is how
plop’s “About” dialog widget is created:
$DIALOG_ABOUT = $MW->Dialog(
                        -title => 'About',
                      -text    => "plot_program $VERSION

" . ' 1995/12/04',
                       -bitmap => 'info',
                      -buttons => ['Dismiss'] );
Like all widget creation commands,
$MW->Dialog returns a reference to an object.
The buttons attribute is a list of strings that
specify the button labels. In this case, there’s only one button,
“Dismiss,” which hides the dialog after you’ve read the really
informative “About” message!
To create the plop menus, initialize_menus reuses some
old code that generates menubuttons from a data structure, mainly
because I’m lazy and menus always take time to get just right. My next
column goes into details on menus, cascades, and so on, but for now
examine this code:
$MBF = $MW->Frame(-relief => 'raised', -borderwidth => 1);
$MBF->pack(-fill => 'x'),

make_menubutton($MBF, 'File', 0, 'left', [['Quit', &exit, 0]]);
make_menubutton($MBF, 'Help', 0, 'right',
                [ ['About', [$DIALOG_ABOUT => 'Show'], 0],
                  ['', undef, 0],
                  ['Usage', [$DIALOG_USAGE => 'Show'], 0] ] );
The first statement creates the container frame to hold the
menubuttons, with a relief of “raised” and a
borderwidth of one. The relief attribute specifies
the widget’s 3D look, but you need a non-zero borderwidth to see it.
Notice that the frame is packed with its fill attribute set to “x”,
which makes the packer geometry manager expand the frame in the X
direction to fill all available space. Otherwise, the File and Help
menubuttons would be mapped side-by-side and centered in the frame.
Creating the menubuttons and their corresponding menu items entails
calls to make_menubutton with these five
parameters:
The parent widget.
The menubutton label.
The shortcut character index. All our menubuttons have a shortcut character index of 0. For example, the 0th (first) character of “File” is ‘
f’, which means that users can type Alt-f to activate the File menu.The side of the menu frame to pack the menubutton.
A list of lists describing the menu items. Each inner list has three components: a label, a callback that is executed when the menu item is invoked, and a shortcut underline character. Null labels are treated as separators—do-nothing menu items that appear as lines.
Callbacks come in various flavors, and we’ll see more of
them in later columns. But in plop’s case there are
just two: an explicit reference to a subroutine (also called a code
reference), and a reference to an array. An example of the first form
is the Quit menu item, which calls exit. The Help
menu items use the second form, where the first array element is an
object (widget reference) and the second is the name of the method to
invoke. Thus, when the user selects “About,” the
about dialog widget appears. Note that widgets used
in callbacks must exist before they are referred to—that’s precisely
why we had to create the dialog widgets first.
The initialize_canvas subroutine generates
the middle area of plop’s main window but is
slightly different than the first version, because it has a title,
embedded widgets with editable X and Y values, and axes moved to the
borders of the area to reduce visual clutter.
$CANV = $MW->Canvas( -width => $MAX_PXL + $MARGIN * 2,
                    -height => $MAX_PXL,
                    -relief => 'sunken'),
$CANV->pack;
$CANV->CanvasBind('<Button-1>' => &display_coordinates);
The above code creates the canvas but uses global “constants”
rather than hardcoded values: $MAX_PXL is obviously
the size of the canvas, in pixels. Here’s our first
callback, which binds the subroutine
display_coordinates to mouse button 1.
$CANV->createText(325, 25,
    -text => 'Plot Continuous Functions Of The Form y=f($x)',
    -fill => 'blue'),
Nothing new there, eh? But something new follows—the
window canvas item type, demonstrated in the second
and fourth statements below:
# Create the X axis and label it. Then label the minimum
# and maximum X values, and draw tick marks to
# indicate where they fall. The axis limits are LabEntry
# widgets embedded in Canvas windows.

$CANV->createLine($MIN_PXL + $MARGIN, $MAX_PXL - $MARGIN,
                      $MAX_PXL - $MARGIN, $MAX_PXL - $MARGIN);

$CANV->createWindow($MIN_PXL + $MARGIN, $MAX_PXL - $label_offset,
               -window => $MW->LabEntry( -textvariable => $X_MIN,
                                                -label => 'X Minimum'));

$CANV->createLine($MIN_PXL + $MARGIN, $MAX_PXL - $MARGIN - $tick_length,
                      $MIN_PXL + $MARGIN, $MAX_PXL - $MARGIN + $tick_length);


$CANV->createWindow($MAX_PXL - $MARGIN, $MAX_PXL - $label_offset,
               -window => $MW->LabEntry( -textvariable => $X_MAX,
                                                -label => 'X Maximum'));

$CANV->createLine($MAX_PXL - $MARGIN, $MAX_PXL - $MARGIN - $tick_length,
                      $MAX_PXL - $MARGIN, $MAX_PXL - $MARGIN + $tick_length);
The first canvas line item is simply the horizontal X axis, and
the two remaining lines are the tick marks at each end. The two window
items are containers where other objects can be stuffed, in this case
two composite LabEntry widgets, which, as you might guess, combine the
features of label and entry widgets. Their
textvariable attributes are references to scalars
$X_MIN and $X_MAX; when the
program changes the variable’s value, it’s reflected on the display,
and when the user edits a LabEntry, the associated textvariable is
updated. The Y axis is handled in a similar manner.
Subroutine initialize_functions creates
plop’s remaining widgets, which are, in
top-to-bottom packing order, a spacer frame, a label providing
rudimentary instructions, a text widget with an attached scrollbar,
and finally another container frame to hold a button or so.
$MW->Frame(-height => 20)->pack;
$MW->Label(      -text => 'Enter your functions here',
           -foreground => 'blue')->pack;

# Create a Frame with a scrollable Text widget that
# displays the function list, and a Button to
# initiate plot activities.

my $functions_frame = $MW->Frame;
$functions_frame->pack;
$TEXT = $functions_frame->Text(-height => 6);
$TEXT->pack;
$functions_frame->AddScrollbars($TEXT);
$functions_frame->configure(-scrollbars => 'e'),
update_functions;

my $buttons_frame = $MW->Frame;
$buttons_frame->pack(-padx => 10, -pady => 5,
                     -expand => 1, -fill => 'x'),
my @pack_attributes=qw(-side left -fill x -expand 1);
$buttons_frame->Button(   -text => 'Plot',
                       -command => &plot_functions)->pack(@pack_attributes);
The above code creates a 20 pixel high frame (so much for the
ban on hardcoded constants!) to occupy space, and some instructional
text in blue. (Anywhere you can give a dimension as an integer pixel
value, you can also append the characters i, c, m
or p, to indicate inches, centimeters, millimeters,
or points.)
Next we create the text widget, $TEXT, with a
scrollbar anchored “east,” and finally a large “Plot” button. Notice
the convenient method AddScrollbars for attaching
scrollbars to the text widget. The text widget contains the function
list, which is particularly appropriate since each line can be tagged
and assigned a different color. The function values are then plotted
in that color.
The graphical interface in now complete, and when the user
invokes the “Plot” button, the callback
plot_functions is executed. Before plotting the
function list, plop tidies up the text window and
ensures that each function is assigned its proper color, providing for
up to nine simultaneous functions before the colors cycle. Here’s the
code:
$TEXT->delete('0.0', 'end'),
my $i = 0;
foreach (@FUNCTIONS) {
    $TEXT->insert('end', "$_
", [$i]);
    $TEXT->tagConfigure($i, -foreground => $COLORS[$i % $NUM_COLORS],
                                  -font => 'fixed'),
    $i++;
}
$TEXT->yview('end'),
First, everything is deleted, from line zero, character zero, to
the end of the text widget. Then, each function from the
@FUNCTIONS array is inserted and assigned a tag,
which just happens to be its order in the text widget. A tag is simply
an identifying string used for reference in other widget commands. In
this case, the tagged text items are configured with their unique
foreground color and assigned a fixed space font.
Now that the text widget is in sync with the function list, let’s plot some functions:
$CANV->delete('plot'),
$canv_x = $MIN_PXL + $MARGIN;    # X minimum
$DX = $X_MAX - $X_MIN;           # update delta X
$DY = $Y_MAX - $Y_MIN;           # update delta Y

ALL_X_VALUES:
for ($x = $X_MIN; $x <= $X_MAX; $x += ($X_MAX-$X_MIN) / $ALEN) {
  ALL_FUNCTIONS:
    foreach (0 .. $#FUNCTIONS) {
        $y = eval $FUNCTIONS[$_];
         $canv_y = (($Y_MAX - $y) / $DY) * $ALEN + $MARGIN;
         if ($canv_y > $MIN_PXL + $MARGIN and $canv_y < $MAX_PXL + $MARGIN) {
             $CANV->createText($canv_x, $canv_y,
                           -fill => $COLORS[$_ % $NUM_COLORS],
                           -tags => ['plot'], -text => '.', );
         }
     } # end of ALL_FUNCTIONS
     $canv_x++;                  # next X pixel
} # end of ALL_X_VALUES
After all this we’re back to where we started, except that the
code has been made more general and the transform equation has been
fixed. $X_MIN and $X_MAX are
dynamically assigned because they’re part of the LabEntry widgets, and
the X increment is calculated dynamically based on those values and
the axis length. Y points painted on the canvas are automatically
assigned their proper colors. And each point is tagged with the string
“plot,” so all current graphs can be easily deleted the next time the
“Plot” button is pushed; that’s what the
$CANV->delete(‘plot’) is for.
But there’s one stone left unturned: the button binding established during canvas creation. Since we already know how to convert a Cartesian coordinate to a canvas coordinate, I thought it would be interesting to do the opposite: click anywhere on the canvas to display the Cartesian coordinates. The following code demonstrates how to handle an X event structure, in this case a button press:
sub display_coordinates {
    my ($canvas) = @_;
    my $e = $canvas->XEvent;
    my ($canv_x, $canv_y) = ($e->x, $e->y);
    my ($x, $y);
    $x = $X_MIN + $DX * (($canv_x - $MARGIN) / $ALEN);
    $y = $Y_MAX - $DY * (($canv_y - $MARGIN) / $ALEN);
    print "
Canvas x = $canv_x, Canvas y = $canv_y.
";
    print "Plot x = $x, Plot y = $y.
";
}
When a binding callback is executed, the subroutine is
implicitly passed a reference to its widget—here, the canvas. Using
XEvent, the variable $e is now
assigned a reference to the event structure. Two of
$e’s methods, x and
y, return the relative position of the mouse when
button 1 was pressed. Once the coordinates are known, it’s a simple
matter of using the existing transform equation, solving for X and Y,
and printing the results.
In the next article, we’ll look more into objects, build a composite widget, and examine menus in greater detail.