Chapter 11. Sound
IN THIS CHAPTER
ActionScript Sound Architecture
Internal and External Sounds
Playing, Stopping, and Pausing Sounds
Buffering Sounds
Changing Sound Volume and Pan
Reading ID3 Metadata from MP3 Sounds
Visualizing Sound Data
Visualizing Microphone Input
Recording, Playing, and Saving Microphone Input
What’s Next?
As the ActionScript language has evolved, it’s interesting to see how far its sound capabilities have come. Although many audio and ActionScript experts alike will say that many issues still must be overcome before the Flash Platform truly conquers sound, few will deny that the current audio features far surpass anything available in ActionScript before.
As of Flash Player 9 you can control multiple discrete channels of audio, gain direct access to the bytes of data that make up the actual sound file, process that data in several ways, and visualize its content. Flash Player 10 adds the ability to extract data from audio files, generate sound from scratch, save audio files, record microphone input without a server, and more.
If you want to be inspired before beginning your journey into ActionScript sound control, visit http://www.audiotool.com and play with the incredibly impressive Audiotool. This amazing project replicates a feature-rich electronic music studio and allows you to pick from many sound synthesizers, process them through a host of effects, sequence them in a near infinite number of ways, and even save and share your compositions with others.
Make no mistake: Audiotool is a very advanced project created by programming experts that have long led the way in ActionScript sound manipulation. In fact, much of what ActionScript can do today in this area is possible partially because of the efforts of this team—forever pushing the limits of the language—and the Flash Player engineers who were inspired to add greater sound features to Flash Player as a result.
Will you be able to create anything of Audiotool’s complexity and quality after only working through this chapter? Realistically, no; such a project takes great skill, effort, and time to achieve. You will, however, have a good foundation of techniques on which you can build and evolve creative sound toys of your own.
To get you started, we’ll look at the following introductory topics in this chapter:
ActionScript Sound Architecture. Depending on what you want to do, you’re likely to work with a handful of sound-related classes in ActionScript 3.0. This section provides a quick overview of the most commonly used classes.
Internal and External Sounds. We’ll show you how to work with internal sounds found in your library, as well as load external MP3 sounds on the fly.
Playing, Stopping, and Pausing Sounds. In addition to playing and stopping sounds, you’ll learn how to pause and resume playback, as well as stop sound playback in all active channels at once.
Buffering Streaming Sounds. To optimize playback across slower connections, you can buffer, or preload, sounds. This ensures that sounds play longer without interruption while data continues to download.
Changing Sound Volume and Pan. The
SoundTransformclass gathers volume and panning features, allowing you to increase or decrease volume, as well as move sounds between the left and right speakers.Reading ID3 Metadata from MP3 Sounds. When creating MP3 files, it’s possible to embed metadata, including artist name, track title, and so on, into the file. The
ID3Infoclass allows you to parse this information, if available, for use in your application.Visualizing Sound Data. Using ActionScript 3.0, you can dynamically poll the amplitude and frequency spectrum data of a sound during playback. You can use the information gathered to display visualizations of the sound, such as waveforms, peak meters, and artistic interpretations while the sound plays.
Working with Microphone Data. You can also access the microphone to check the activity level periodically to visualize the amplitude of a live sound source. Depending on the version of the Flash Player you want to target, and your ActionScript compiler, you can also access the raw microphone data.
Recording, Playing, and Saving Microphone Input. To end this chapter, we’ll use features introduced in Flash Player versions 10 and 10.1 to record microphone input, generate sound dynamically (rather than playing an MP3, for example), and save the result as a WAV file.
ActionScript Sound Architecture
The ActionScript 3.0 sound architecture, found in the flash.media package, is composed of several classes that contribute to a finer degree of control over sound data and sound manipulation than previously available. You’ll be using several of these classes, so before moving on to specific examples, let’s take a quick look at each.
SoundThe
Soundclass is the first required to work with sound. It’s used to load and play sounds, and manage basic sound properties.SoundChannelThis class is used to create a separate channel for each discrete sound file. In this context, we’re not referring to the left or right channel of a stereo sound. Audio playing in an ActionScript sound channel can be either mono or stereo. Instead, an instance of this class is analogous to a channel in a recording studio mixing desk. By placing each sound in its own channel, you can work with multiple audio files but control each separately.
SoundMixerAs the name implies, the
SoundMixerclass creates a central mixer object through which all sound channels are mixed. Changes to the mixer will affect all playing sounds. For example, you can use this class to stop all sounds that are playing.SoundLoaderContextIn conjunction with the
load()method of theSoundclass, you can use theSoundLoaderContextclass to specify how many seconds of a sound file to buffer.SoundTransformThis class is used to control the volume and panning between left and right stereo channels of a source. With it, you can also affect a single sound channel, the
SoundMixerobject (to globally affect all playing sounds), the microphone, and even the sound of a video.ID3InfoThe
ID3Infoclass is used to retrieve metadata written into ID3 tags found in an MP3 file. ID3 tags store information about the MP3, including artist name, song name, track number, and genre.MicrophoneUsing the
Microphoneclass, you can control the gain, sampling rate, and other properties of the user’s microphone, if present. You can check the activity level of the microphone (and create simple visualizations of microphone amplitude values) in all versions of ActionScript. In Flash Player 10 and later, you can also access raw microphone data to visualize, process, and even save recorded input.
Although we’ll demonstrate many capabilities of these classes, experimenting with sound is one of the most rewarding ways to learn more about what ActionScript has to offer. Be sure to carry on your learning after working through this chapter!
Internal and External Sounds
Typically, ActionScript control of sound in your projects will include loading sounds from external sources. Keeping your sounds external to your primary SWF has many benefits. As two simple examples, external audio can keep the file size of your SWF from becoming too large, and it’s easy to change the sound files without having to recompile your SWF.
Most of the examples we’ll cover in this chapter use external sound files, but it’s still possible to use internal sounds without having to rely on the timeline. To prepare for the remaining examples, we’ll show you how to store a reference to both an internal and an external sound. Thereafter, you can adapt any exercise to use internal or external audio sources.
Working with Sounds in Your Library
Creating an instance of a sound from your Flash Professional library is consistent with creating an instance of a display object, as described in Chapter 4 and used throughout the book. After importing a sound, you’ll find it in the Library panel of your FLA file. Select the sound in the Library panel and open the Symbol Properties dialog. Click the Export for ActionScript check box and give the sound a class name. Flash Professional will automatically create a class name for you, but look at it carefully, as you may want to edit the provided text.
For example, consider a sound in your library called claire elmo.mp3. When exporting this symbol for ActionScript, Flash Professional will remove the space for you (all class names must be one word) giving you claireelmo.mp3. However, you must still remove the period, which is also not allowed in a class name, and omit the file extension. Finally, it’s a good idea to capitalize the first character of class names and use camel case (uppercase letter for each new word) if you want to follow best practices. This gives you ClaireElmo, as shown in Figure 11-1. Appropriately, the Base class automatically assigned is the Sound class, so your class inherits all the accessible properties, methods, and events of the Sound class upon instantiation.

Once you’ve provided a linkage class name, you can create an instance of the sound the same way you instantiate a movie clip:
varsnd:Sound=newClaireElmo();
Thereafter, you can manage the instance of this sound by referring to the variable snd. This creation of a Sound class instance and the use of one method to load a sound file are the only basic differences between using internal and external sounds. All play, pause, stop, and transform operations are identical, regardless of the sound source.
Note
Another difference between working with internal and external sounds is that you can buffer a loaded sound to improve playback experience. Buffering a sound means that your playback won’t begin until a specified amount of sound data has loaded. This allows the background loading of the rest of the sound to stay ahead of your playback and is discussed in the Buffering Sounds section later in this chapter.
If you prefer to use internal sounds, the using_internal_sound.fla source file demonstrates the playing and stopping of a short imported sound using the basic syntax explained in the Playing, Stopping, and Pausing Sounds section later in this chapter. However, we recommend using external sounds for most uses.
Loading External Sounds
Using internal sounds, creating an instance of the Sound class and populating it with audio occur in one step. To load a sound from an external MP3, we need to use the load() method of the Sound class, so we must first explicitly create an instance of the class. This is shown in line 1 of the following code, found in the loading_external_sound.fla source file.
1varsnd:Sound=new Sound(); 2 3 var req:URLRequest=new URLRequest("song.mp3"); 4 snd.load(req);
As discussed in prior chapters, you also need to create an instance of the URLRequest class (line 3) any time you load something. Although it has additional purposes for advanced URL processing, the URLRequest class is also used to standardize the loading process. This allows you to load many asset types in a consistent manner. Finally, we load the sound in line 4.
Once you’ve completed this process, you’re again ready to start manipulating the snd instance. When working with external sounds, however, there are additional factors that warrant a little extra attention. The steps we’ll describe aren’t required, but they’re recommended. You’ll find that they improve not only your own development efforts (such as when listening for errors when loading a sound), but also the user experience (such as providing feedback during loading).
It’s not uncommon when loading external assets to encounter a missing file problem. The path to the file may be old or incorrect, or the loaded asset or your SWF may have been moved. In this case, a runtime error like this may occur:
Error #2044: Unhandled IOErrorEvent:.
text=Error #2032: Stream Error.
So, it’s a good idea to plan for this possibility and listen for an IO_ERROR (input/output error). If you do encounter an error, you can present it to the viewer as part of the user experience (through an alert or warning icon, for example), or just try to correct it during the authoring process by tracing to the Output panel. The following listener function traces a message, as well as the descriptive text sent with the event.
5//listen for error6 snd.addEventListener(IOErrorEvent.IO_ERROR, onIOError, 7false, 0,true); 8functiononIOError(evt:IOErrorEvent):void{ 9trace("Error occurred when loading sound:", evt.text); 10 }
The next enhancement to include when working with external sounds is to provide feedback to the user during the loading process. Again we add a listener to the sound instance, this time listening for a PROGRESS event, which is dispatched whenever loading progress occurs. When this happens, you can update the user by, for example, increasing the width of a sprite to create a progress bar.
Lines 12 through 24 of the following code create the progress bar. Line 12 passes a color to the drawBar() function (lines 17 through 24), which creates a sprite, draws a rectangle that is 1 pixel wide and 10 pixels tall, and returns the sprite. Lines 13 and 14 position the progress bar and line 15 adds it to the display list.
Lines 26 through 30 contain the listener function. The event captured by the listener function carries with it information, including the total number of bytes in the target object (in this scenario the sound being loaded), as well as the number of bytes loaded at the moment the event was fired. By dividing the latter by the former, you end up with a fraction. For example, if 500 bytes of a total 1,000 bytes have loaded, the progress is 500/1,000 or 0.5, indicating that the object is 50-percent loaded. By multiplying with a desired width of the progress bar, the bar will increase to the final desired size when the file is 100-percent loaded.
Note
In this example, the progress bar will reach 100 pixels wide when the process finishes or will stay at its original 1-pixel width if the function fails. Keeping these start and finish sizes in mind when testing locally is useful because loading even very large files from a local hard drive happens very quickly, and it’s quite common not to see the progress bar move at all with small sound files.
11//track loading progress12varloadBar:Sprite= drawBar(0x000099); 13 loadBar.x= 20; 14 loadBar.y= 15; 15addChild(loadBar); 16 17functiondrawBar(col:uint):Sprite{ 18varbar:Sprite=new Sprite(); 19varg:Graphics= bar.graphics; 20 g.beginFill(col, 1); 21 g.drawRect(0, 0, 1, 10); 22 g.endFill(); 23returnbar; 24 } 25 26 snd.addEventListener(ProgressEvent.PROGRESS, onLoadingProgress, 27false, 0,true); 28functiononLoadingProgress(evt:ProgressEvent):void{ 29 loadBar.width= 100 * (evt.bytesLoaded/ evt.bytesTotal); 30 }
The last option we’ll introduce here is for responding to the completion of the sound loading process. The structure is similar to the prior two event listener examples, this time using the Event.COMPLETE event to trigger the listener function.
31//react to successful load32varsndLength:Number= 0; 33 snd.addEventListener(Event.COMPLETE, onCompleteLoad, 34false, 0,true); 35functiononCompleteLoad(evt:Event):void{ 36 sndLength = snd.length; 37trace("Sound length:", sndLength); 38 }
After creating the variable in line 32, this example stores the length of the sound in milliseconds in sndLength, and traces that value as a quick indication that the process is complete. This code is the starting point for an audio player exercise that runs throughout the chapter. Soon, we’ll use the sound’s length to update a progress bar during playback of the sound. First, however, let’s look closely at the playback syntax.
Playing, Stopping, and Pausing Sounds
The simple syntax of the Sound class’s play() method can be a bit deceiving because it’s only part of the picture. To play a sound, all you need to do is call the method from the Sound class instance. However, all this does is start playback and, without additional infrastructure, you can’t do much else. Instead, you should play the sound into an instance of the SoundChannel class, which allows you to stop, pan, or adjust the volume of the channel. This is different from prior versions of ActionScript, in which all sound control rested with the Sound object.
To emphasize this idea, let’s think again about a recording studio. To move a sound from the left speaker to the right speaker in a mix, a sound engineer would twist a knob at the mixing desk, not ask a musician to run from one side of the studio to another. Similarly, although musicians often handle volume subtleties, fading a sound up or down is typically accomplished by adjusting a sound channel’s volume slider. In other words, the playback of the sound is typically separated from the manipulation of that sound in the mixing process. The same is true in ActionScript 3.0.
We’ll begin with simple examples and then we’ll add these features to our ongoing audio player.
Playing a Sound
To place a sound into a channel, all you need to do is create the channel and then set it equal to the result of the sound’s play() method.
varchannel:SoundChannel; =new SoundChannel(); channel = snd.play();
This associates the sound with the specified channel, the same way you would plug a guitar into a channel in our metaphorical recording studio’s mixing desk. Once the sound is in the channel, you’ll be able to adjust its volume, set its pan, and stop its playback—all of which we’ll discuss in a moment.
But how soon can you play the sound? If you’re using imported audio files, you can typically play the sound right away. However, when working with external files, you must consider the loading process. If you invoke the load() method to start loading an external sound file and then immediately attempt to play the sound, your attempt will likely fail because the sound will probably still be loading. However, we saw in the previous section that a COMPLETE event is dispatched when a Sound instance’s MP3 is finished loading. So, an event listener listening for that event can play the sound without any problem.
The following snippet shows syntax for playing a sound immediately after it’s loaded. This snippet assumes a Sound instance of snd, and a SoundChannel instance of channel.
snd.addEventListener(Event.COMPLETE, onLoadComplete,false, 0,true);functiononLoadComplete(evt:Event):void{ channel = snd.play(); }
This approach is used to play a sound as soon after loading as possible. This is useful for things like background audio that begins playing right away. Perhaps the most common way to play a sound, however, is by clicking a button or through similar user interaction. We’ll set up just such a button when we return to our ongoing sound player project.
Stopping a Sound
Stopping a single sound in a channel requires only the stop() method. Unlike playing the sound, however, this method is invoked from the channel, not from the sound itself. Again assuming you’ve previously created a new instance of the SoundChannel, named channel, the syntax looks like this:
channel.stop();It’s also possible to stop all sounds using the SoundMixer class. As in the real world, multichannel playback funnels through a master sound mixer. Just as you can kill that master channel in a studio, you can stop all sounds using the SoundMixer class and it’s stopAll() method.
Note
You can control the volume and pan of the master mix by using the SoundMixer class, which we’ll demonstrate later on. We’ll also use the SoundMixer to visualize a sound during playback later in the chapter.
Unlike the previous methods discussed, stopAll() is static. This means an instance of the SoundMixer class does not need to be created using the new keyword. Instead, the method is called directly from the class. Therefore, to stop playing the sounds in all channels, you need only write:
SoundMixer.stopAll();
Pausing Sounds and Resuming Playback
Pausing a sound is a bit different. Currently, there is no dedicated pause method in ActionScript 3.0. Instead, you must rely on an optional parameter of the play() method that allows you to play the sound starting from a particular number of seconds offset from the beginning of the sound.
To use this feature to pause playback, you must first store the current position of a sound as it’s playing. Having retrieved this value from the channel’s aptly named position property, you can then stop playback in that channel. Later, you can resume playback by playing the sound from the stored position. Assuming the ongoing use of the snd and channel instance names, here are the first and second steps of the process:
varpausePosition:Number= channel.position; channel.stop();
Then, at some later point, you can resume playback from where you left off:
channel = snd.play(pausePosition);Applying the Syntax
Now let’s put these concepts into practice and pick up from the source file we started in the Loading External Sounds section. The following code, added to the previous example, forms the player_basic.fla source file.
If you want to look ahead, here’s a quick description of all the code related to playing a sound, spanning lines 40 through 75, so we know what we’re trying to accomplish. Lines 44 through 54 contain an event listener that will be triggered when a user clicks on the play button we’ll soon create. Lines 56 through 65 include the code required to show a progress bar during playback. Finally, lines 67 through 75 contain the function triggered when the playback is complete.
Now let’s focus on the function that plays the sound and its accompanying variables. Line 40 creates a Boolean variable that we’ll use to check whether the sound is already playing. Because we’ll be using a button to play our sound, it will now be possible to play the sound multiple times. However, this also means that rapid repeated clicks of the button will play the sound over and over itself, layering the sound. This is fine for simulating a musical instrument or an echo, for which multiple simultaneous occurrences of the sound are acceptable, but it’s less desirable for playing spoken dialog or other sounds that typically would not be layered over themselves.
Line 41 creates a variable that will store the most recent playback position of the song in its channel, when the pause button is pressed. Remember that we’re adding extra functionality to the play process to support pausing playback, so we’ll need to pass this value to the play() method. Because we’re using one play() method to play from a stop and from a pause, it’s very important to initialize the value of this variable to zero so that the sound starts playing at the beginning when first played. Similarly, when we code the stop behavior later on, we’ll need to reset this variable to zero after stopping the sound, to avoid restarting from any previous pause position when replaying.
Lines 44 through 54 make up the onPlaySound() function, which will be called by a play button that we’ll add later on. Line 45 checks to see whether the sound is not already playing. If that test passes, the isPlaying variable is set to true to prevent the sound from playing more than once simultaneously. Lines 47 and 48 add a listener to the main timeline (the scope of the script) that will fire upon every enter frame event. We’ll use this listener to update the playback progress bar in just a moment. Lines 49 through 51 add a listener to the channel to trigger when the sound playback is complete. We’ll use that to reset things so the sound can be played again. Finally, line 52 plays the sound. The first time it plays, it will play from the beginning because of the initial 0 value of the soundPosition variable in line 41.
39 //play 40varisPlaying:Boolean=false; 41varsoundPosition:Number= 0; 42varchannel:SoundChannel=new SoundChannel(); 43 44functiononPlaySound(evt:MouseEvent):void{ 45if(!isPlaying) { 46 isPlaying =true; 47addEventListener(Event.ENTER_FRAME, onPlayProgress, 48false, 0,true); 49 channel.addEventListener(Event.SOUND_COMPLETE, 50 onPlayComplete, 51false, 0,true); 52 channel = snd.play(soundPosition); 53 } 54 }
Next, we’ll setup the playback progress bar. Lines 56 through 59 create the bar, position it and add it to the display list. The drawBar() function is the same function found earlier in the file, spanning lines 17 through 24 and discussed in the Loading External Sounds section earlier in this chapter. It simply creates a sprite and draws a 1 × 10-pixel rectangle.
The function in lines 61 through 65 updates the width of the progress bar. It’s called every enter frame event because of the listener created in lines 47 and 48. Dividing the playback position of the sound in the channel by the total length of the sound gives us a percentage. For example, if the position is 5000 and the length of the sound clip is 10,000 milliseconds (10 seconds), the playback is 50-percent complete. That percentage is then multiplied by the desired width of the bar, 100 pixels, and the width of the bar is set to this value.
Later on in the chapter, we’ll drop two function calls into lines 63 and 64 to control the volume and pan of the sound, and we’ll update peak meter graphics on the stage that show the amplitude of the sound during playback.
55//play progress bar56varplayBar:Sprite= drawBar(0x0000FF); 57 playBar.x= 20; 58 playBar.y= 15; 59addChild(playBar); 60 61functiononPlayProgress(evt:Event):void{ 62 playBar.width= 100 * (channel.position/ sndLength); 63//future home of volume and pan adjustment64//future home of amplitude meter adjustment;65 }
The onPlayComplete() listener function (added in line 48) is triggered after the sound has finished playing. Lines 68 and 69 remove both listeners added when playback began. Once the sound is finished playing, there is no longer a need to update its playback progress or listen for a SOUND_COMPLETE event. Removing the listeners is not only efficient, but also allows us to set the playback progress bar width to 0. If not removed, the enter frame event would continue to set the bar’s width to 100. (The position of the sound is at the end of the file when playback is complete.)
The remainder of the function stops the sound, resets the soundPosition variable to 0, the width of the play progress bar to 0, and the isPlaying variable to false. All of this allows us to play the sound anew.
66//playback complete listener function67functiononPlayComplete(evt:Event):void{ 68removeEventListener(Event.ENTER_FRAME, onPlayProgress); 69 channel.removeEventListener(Event.SOUND_COMPLETE, 70 onPlayComplete); 71 channel.stop(); 72 soundPosition = 0; 73 playBar.width= 0; 74 isPlaying =false; 75 }
Now that we have the play functionality complete, we need a button to trigger it. We’ll be creating three buttons by the time we’re done, so rather than repeating the button creation code three times, let’s set up a function to do the work for us. This takes less code but, more importantly, it means that if a future edit is required, you have to edit the code in only one place, not three.
We’re going to draw our buttons dynamically, using the RoundRectButton class we created in Chapter 8, so line 77 imports the class. Remember that this material is presented in chunks for clarity. Import statements are typically consolidated at the top of your script and you should feel free to reorganize your code any way you see fit.
Note
One idea behind using the RoundRectButton class to draw buttons dynamically is to give you continued practice using packages and classes. However, you’ll also find when we’re done that this entire file will contain no imported assets. As such, the entire audio player is less than 5 KB! This is a best-case scenario because we kept the interface simple—both so you didn’t need to rely on library assets and so a more complex interface didn’t intrude on the sound tutorial. The idea, however, is good. You could use the Graphics class to draw additional interface artwork, for example, and still keep the file size low.
The createButton() function in lines 79 through 87 instantiates a button, positions it on the stage, adds a mouse click event listener, and adds the button to the display list. This later lets us create buttons with only one line of code, as seen with the first button in line 89. With three or more buttons, this approach can really be economical.
The function takes three arguments: the y coordinate to place the button on the stage, the label for the button, and the function that will be triggered when the user clicks on the button. Although this book has shown how to pass numbers and strings into functions, this is the first time we’ve used a function as an argument. This is a handy process that’s not only expedient, but also emphasizes the fact that functions are objects too, just like numbers and strings.
As mentioned, line 89 creates the first button, passing a y-position of 40, a label of “Play” and the onPlaySound() function, created earlier, as the function to execute when the button is clicked.
76//playback complete listener function77importcom.learningactionscript3.ui.RoundRectButton; 78 79functioncreateButton(yLoc:Number, labl:String, 80 func:Function):void{ 81varbtn:RoundRectButton = 82newRoundRectButton(100,20,10,2,0x000099,labl,0xFFFFFF); 83 btn.x= 20; 84 btn.y= yLoc; 85 btn.addEventListener(MouseEvent.CLICK, func,false, 0,true); 86addChild(btn); 87 } 88 89 createButton(40,"Play", onPlaySound);
The remainder of the script is dedicated to the pause and stop buttons. Lines 91 through 98 create the pause button, setting its y location to 65 and adding the onPauseSound() function as its mouse click listener. In line 93, the function checks to see whether the sound is playing and, if so, stores the current playback position in the soundPosition variable. It then stops the sound and sets the isPlaying variable to false so the sound can play again later.
Lines 99 through 102 follow the same process but are even simpler. The stop button is created in line 99, which places the button below the previously created play and pause buttons, and adds the onStopSound() method as the button’s mouse click listener. The functionality required by manually stopping the sound is the same as the functionality required when the sound stops on its own in the onPlayComplete() function (lines 67 through 75). Therefore, all that’s required here is to call that function.
However, because onPlayComplete() is a listener function, it expects an event argument. Calling the function without supplying the expected event argument will cause an argument count mismatch error. We can get around this by sending null to the function to stand in for the event. The null value will satisfy the type checking at the listener function because null is the default value for all events. As long as your listener function doesn’t rely on specific information from the event, such as mouse coordinates or keyboard key code values, this technique makes it possible to use listener functions not only when an event occurs, but also manually.
Note
For more information about listener functions and the argument count mismatch error, see the Using Event Listeners section of Chapter 3.
90//playback complete listener function91 createButton(65,"Pause", onPauseSound); 92functiononPauseSound(evt:MouseEvent):void{ 93if(isPlaying) { 94 soundPosition = channel.position; 95 channel.stop(); 96 isPlaying =false; 97 } 98 } 99 createButton(90,"Stop", onStopSound); 100functiononStopSound(evt:MouseEvent):void{ 101 onPlayComplete(null); 102 }
At this point, you should be able play, pause, and stop your sound, and both the load and play progress bar should reach 100 pixels in width upon their respective completions.
Buffering Sounds
Waiting to play a sound until it’s fully loaded will prevent errors or stutters that might otherwise occur during the loading process. This method, however, does suffer from the drawback of having to wait. An alternative approach is to preload only a portion of the sound prior to playback, and then play the sound while it continues to download progressively to Flash Player in the background. The principle behind this approach is to preload a buffer that can stay ahead of playback during the time required to download the remainder of the sound. You’ll still need to wait, but not as much.
How much of the sound should you buffer? That depends on how you plan to distribute your project. Theoretically, if you have no load time, you need no buffer time because the sound loads instantly. This is usually true of local files, when you are not loading the sound from the Internet. For remote files, connection speeds can dictate how much sound needs to be preloaded. If you know you’ll only encounter broadband connection speeds, you can buffer less of the sound. If you’re worried about slower connections, you may want to buffer more of the sound to prevent the playback from catching up with the loading process and stalling playback.
To specify the buffer time, you must use the SoundLoaderContext class at the time of sound loading. The number of milliseconds of sound to buffer is passed to the constructor when instantiating the class; otherwise, a default value of 1000 is used. After instantiating the class, you then pass the resulting instance into the sound load() method, as a second parameter following the URLRequest object.
The following example adapts the start of our audio player by inserting line 2, and modifying line 4. It buffers 5 seconds of the loaded sound before the play() method will execute. This modification can be found in the player_buffering.fla source file.
1varsnd:Sound=new Sound(); 2varcontext:SoundLoaderContext=new SoundLoaderContext(5000); 3 var req:URLRequest=new URLRequest("song.mp3"); 4 snd.load(req, context);
Note
Remember that buffering will have little effect when testing locally because the loading process will complete very quickly. You may wish to upload your test files to a server, and perhaps even use a very large sound file, to test your efforts.
Changing Sound Volume and Pan
During playback, it’s possible to manipulate the volume and pan of individual channels, as well as the global mixer containing all sounds. Doing so requires the SoundTransform class.
The process involves starting with a SoundTransform instance (either by creating a new instance or by storing a reference to the existing transform object of the channel or mixer), setting the volume and/or pan setting of that instance, and then applying the transformation to the channel. For example, this snippet will set the volume of a SoundChannel instance called channel to 50 percent.
vartrans:SoundTransform=new SoundTransform(); trans.volume= 0.5; channel.soundTransform= trans;
This syntax will set the volume of a channel to half of what it currently is:
vartrans:SoundTransform= channel.soundTransform; trans.volume*= 0.5; channel.soundTransform= trans;
Notice that the first example sets the volume of a new SoundTransform instance to 0.5, while the second example multiplies the volume of an existing SoundTransform instance by 0.5. The first example will set the volume to 50 percent, regardless of its prior setting, but the second example will cut the current volume in half. For example, if the second volume was originally 50 percent, it would then be 25 percent.
Most ActionScript 3.0 settings that require percentage values use a unit range of 0 to 1. For example, volume is expressed as a range of 0 (muted) to 1 (full volume) with any interim value expressed as a percentage of full volume.
To determine a value that describes a pan setting between left and right stereo channels, both a percentage left and a percentage right are required. Therefore, the units are expressed as a range of −1 (full left) through 0 (centered) to 1 (full right). Negative interim values reflect some degree of pan left, and positive interim values reflect some degree of pan right. The following script sets the channel instance to a pan setting of full left:
vartrans:SoundTransform=new SoundTransform(); trans.pan= −1; channel.soundTransform= trans;
To transform all playing sounds at once, substitute the specified channel with the master SoundMixer class. For example, the following script mutes all sounds:
vartrans:SoundTransform=new SoundTransform(); trans.volume= 0;SoundMixer.soundTransform= trans;
Now let’s apply what we’ve learned to our ongoing player example. The following code can be found in the player_transform.fla source file, and demonstrates both volume and pan by using mouse coordinates. Figure 11-2 shows how the mouse will affect the sound transformation. Moving the mouse left and right pans the sound left and right. Moving the mouse up and down fades the volume up and down.
Line 104 creates a SoundTransform instance and lines 105 through 109 contain the onPlayProgress() function that will set and apply the transformations. This function will be called from the enter frame event listener function created earlier, which we’ll adapt in a moment.
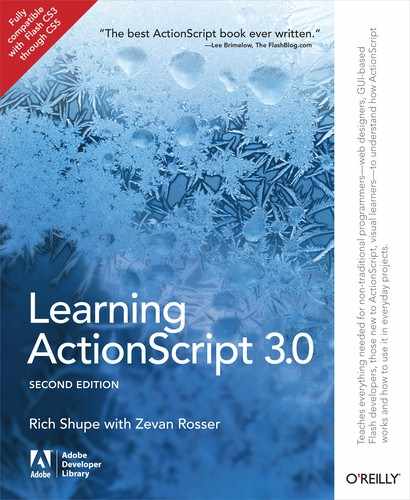
To set these changes with the mouse in a natural and intuitive way, we need to think about ActionScript mouse coordinates and apply a little math. Line 106 sets the volume based on the y-coordinate of the mouse. By dividing the current vertical mouse coordinate (mouseY) by the stage height, we get a percentage change. For example, if the mouse were in the middle of the stage, the value would be 50 percent (0.5). This suits us just fine because the volume setting should be between 0 and 1.
103//transformations104vartrans:SoundTransform=new SoundTransform(); 105functionupdateMouseTransform():void{ 106 trans.volume= 1 -mouseY/stage.stageHeight; 107 trans.pan=mouseX/ (stage.stageWidth/ 2) - 1 108 channel.soundTransform= trans; 109 }
However, y-coordinates in ActionScript increase by moving down, and we typically think of the values of a volume slider increasing as they go up. Therefore, we must subtract our percentage from 1 to get the correct value. For example, let’s say the mouseY is 100, and the stage is 400 pixels tall. Dividing 100 by 400 gives us 25 percent, but the mouse is near the top of the stage, which we think of as a higher volume when imagining a volume slider. By subtracting 0.25 from 1, we end up with 0.75, or 75 percent, which is what we want. Next, let’s look at calculating pan.
Line 107 affects the pan. This calculation is similar to the volume calculation, but we need a value between −1 for full left and 1 for full right, and a value in the center of the stage should equate to 0. To find the middle of the stage, we need to divide the stage width by 2, and if we continually divide the horizontal location of the mouse (mouseX) by that value, we get a range of 0 to 2. For example, using the default stage width of 550, the center would be 275. Far left is 0/275 (0), center is 275/275 (1) and far right is 550/275 (2). Because, we need a range of −1 to 1, we subtract 1 from the entire formula.
After calculating the volume and pan values based on the mouse position, and altering the corresponding properties of the trans transform object you created (lines 106 and 107), all that remains is updating the soundTransform property of the desired channel (line 108).
Note
Again, if you want to transform every sound playing at a given moment, simply substituting SoundMixer for the specific channel in line 108 will accomplish the task.
Now all we have to do is amend the onPlayProgress() function earlier in the script, to update the transform. The function spans lines 60 through 64 and we need to replace the earlier sound transformation placeholder comment with a call to the updateMouseTransform() function (shown in bold in the following example). Now when you test your movie, you should be able to vary the volume and pan of the playing sound by moving the mouse around the stage.
60functiononPlayProgress(evt:Event):void{ 61 playBar.width= 100 * (channel.position/ sndLength); 62 updateMouseTransform(); 63//future home of amplitude meter adjustment;64 }
Reading ID3 Metadata from MP3 Sounds
When encoding MP3 files (compressing and saving the audio in the MP3 format), most sound applications can inject metadata into the file, storing this data in tags established by the ID3 specification. The amount of metadata included is decided during the encoding process, usually by whomever is doing the encoding. The software itself, however, can add some information, such as the name and/or version of the encoding software.
Note
Many audio applications can add ID3 tags to sounds, both during and after the encoding process. Apple’s free iTunes can tag and encode, and Pa-software’s shareware ID3 Editor can inject tags into existing MP3s. Both are available for the Macintosh and Windows platforms.
Accessing this information is accomplished via the ID3Info class. The simplest way to query a sound’s main ID3 tags is by using the named properties of the ID3Info instance found in every Sound object. This is found in every sound’s id3 property. For example, you can query the artist and song names of an MP3 file this way (again assuming a Sound instance called snd):
snd.id3.artist;
snd.id3.songName;
There are seven tags supported in this direct fashion, as seen in Table 11-1.
ID3 2.0 tag | ActionScript property |
COMM |
|
TALB |
|
TCON |
|
TIT2 |
|
TPE1 |
|
TRCK |
|
TYER |
|
The remainder of the supported tags can be accessed through the same id3 property of the Sound class, but using the tag’s four-character name. Table 11-2 shows supported tags that do not also have accompanying property names of their own. Accessing the beats-per-minute data, for example, would require the following syntax:
snd.id3.TBPM;
If you prefer a consistent approach, it’s also possible to access all ID3 tag information using the four-character tag names, including the seven tags that have their own dedicated property names. However, for quick access to the most commonly used properties, you will likely find the descriptive names to be more useful.
Description | |
TBPM | Beats per minute |
TCOM | Composer |
TFLT | File type |
TIT1 | Content group description |
TIT3 | Subtitle/description refinement |
TKEY | Initial key |
TLAN | Languages |
TLEN | Length |
TMED | Media type |
TOAL | Original album/movie/show title |
TOFN | Original filename |
TOLY | Original lyricists/text writers |
TOPE | Original artists/performers |
TORY | Original release year |
TOWN | File owner/licensee |
TPE2 | Band/orchestra/accompaniment |
TPE3 | Conductor/performer refinement |
TPE4 | Interpreted, remixed, or otherwise modified by |
TPOS | Disc/position in set |
TPUB | Publisher |
TRDA | Recording dates |
TRSN | Internet radio station name |
TRSO | Internet radio station owner |
TSIZ | Size |
TSRC | ISRC (international standard recording code) |
TSSE | Software/hardware and settings used for encoding |
WXXX | URL link frame |
Finally, it’s possible to output all ID3 tags using a type of for loop. The following code, found in the player_id3.fla source file, continues our player example by first creating a text field to display the data (lines 111 through 118). Lines 120 through 127 then add a listener to the sound instance to listen for the Event.ID3 event. Line 122 pulls the ID3 information from the event argument.
The for...in loop in lines 123 through 126 is a little different than the for loop discussed in Chapter 2. Instead of looping through a finite number of times, it loops through all the properties of an object. It uses the property name as a key, and pulls the property value from the object using that string. Lines 124 and 125 add each tag to the end of the field by concatenating a string and ending it with a new line character to jump down to the next line.
110//id3111varid3Field:TextField=new TextField(); 112 id3Field.x= 140; 113 id3Field.y= 15; 114 id3Field.width= 340; 115 id3Field.height= 95; 116 id3Field.border=true; 117 id3Field.background=true; 118addChild(id3Field); 119 120 snd.addEventListener(Event.ID3, onID3Info,false, 0,true); 121functiononID3Info(evt:Event):void{ 122varid3Properites:ID3Info= evt.target.id3; 123for(varpropertyName:String inid3Properites) { 124 id3Field.appendText("ID3 Tag "+ propertyName +" = "+ 125 id3Properites[propertyName] +" "); 126 } 127 }
When ID3 information is detected and the listener function is triggered, an ID3Info object is created to store the incoming data. The for...in loop in lines 123 through 126 walks through all the properties stored and, in this case, adds them to a text field on stage. The data could also be displayed in a custom MP3 player interface, placed into a database to rank most often played songs, and so on.
Note
In all cases, if a tag has not been encoded into the MP3, querying the tag directly will return undefined as a value.
Visualizing Sound Data
Mastering any language depends heavily on motivating yourself to practice it. This is especially true with programming languages, because code is difficult to work into day-to-day conversation. Finding as little as 15 minutes a day to experiment with ActionScript 3.0 will hasten your progress considerably, however, and visualizing sound data will make that practice time fly by.
ActionScript 3.0 gives you access to raw sound data during playback, allowing you to synchronize visuals to amplitude or frequency spectrum information. Using the former, you might easily create peak meters, or animated speaker illustrations, that bounce or throb to the beat. With spectrum data, on the other hand, you can draw a waveform of the sound or depict the low-, mid-, and high-range frequency bands of a sound much like an equalizer display.
Amplitude
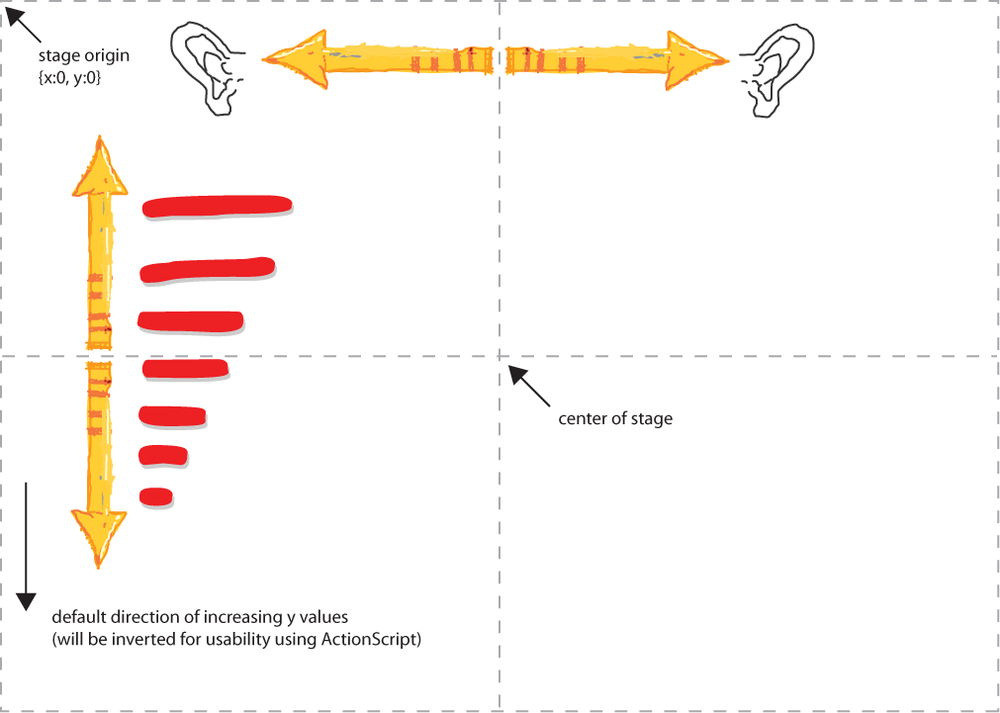
The terms amplitude and volume are often used interchangeably, but understanding just a bit about these concepts can help clarify our task. Volume is probably a familiar idea. It’s a measure of the loudness or intensity of a sound, and is somewhat subjective. Amplitude, on the other hand, is a physics property that more directly applies to a sound wave. It measures the distance of the peak of a sound wave from its baseline.
Because a waveform can contain positive and negative values, amplitude can also be positive or negative, as a waveform’s peaks can be above and below its baseline. Peak amplitude is a specific measurement of amplitude, measuring from one peak of a sound wave to the next. Because it’s measuring between peaks, and not from a baseline, its value is always positive. In other words, peak amplitude is the absolute value, or nonnegative value, of amplitude, and is the kind of amplitude information ActionScript 3.0 will deliver in this example. Figure 11-3 shows both amplitudes in a hypothetical sound wave.
Note
A simple way to distinguish amplitude and volume is to remember that amplitude will likely change over time even while a sound plays at a fixed volume. Think about a basic bass drum rhythm playing at full volume. As the beats progress, the peak amplitude will vary between 0 (no sound) and 1 (full amplitude). The peak amplitude of a bass drum kick might shoot up to 1 and then decay quickly back to 0, over and over again, but the volume remains constant. If you visualized this change in amplitude during playback, you’d end up with what are often called peak meters—meters that repeatedly display the maximum current amplitude. If you visualized full volume, you’d see a very boring straight line at 1.
Getting the amplitude of a sound channel requires only that you read its leftPeak and/or rightPeak properties depending on which stereo channel you want to visualize. These properties will be equal when mono sounds are playing. Assuming a SoundChannel instance called channel, the syntax is:
channel.leftPeak;
channel.rightPeak;
Note
Remember that sound channels are akin to recording tracks, allowing multiple sound sources to be manipulated discretely, and that stereo channels deliver only left and right separation of a specific sound. A sound channel can contain mono or stereo sounds. Mono sounds will contain the same information in both channels.
These properties will return a value between 0 and 1 to represent the current amplitude. Conveniently, this is also the range of values used by such properties as alpha, scaleX, and scaleY. Therefore, to create a basic amplitude meter, you need only manipulate the height of a movie clip. Imagine two movie clips that look like vertical bars 100 pixels high, with instance names leftMeter and rightMeter. Because the leftPeak or rightPeak values are always a fraction of 1, multiplying the full size of the meters by these values will cause the meter to vary between a height of 0 (at minimum volume) and 100 (at full volume). A leftPeak value of 0.5 will set the left meter to half-height, or 50 pixels. The following snippet shows this process in code. We’ll also use this same technique in our sound player project in just a moment.
leftMeter.height= 100 * channel.leftPeak; rightMeter.height= 100 * channel.rightPeak;
If you wanted something slightly less conventional, you might manipulate the scale of a graphic, rather than the height of a bar, with the amplitude values. For example, you could create a picture of a speaker that increased in size based on the amplitude values. Unlike a peak meter, however, you don’t want the speaker icons to disappear at 0 volume—a possible byproduct of setting the scale of the graphic to a dynamic value between 0 and 1, inclusive. Therefore, you can add the amplitude value to the graphic’s original scale of 1 (100 percent, or full size). The speakers, therefore, will remain unchanged during silence and potentially grow to twice their size at 100 percent amplitude—that is, a scale of 1 + 1, or 2. This approach is shown in the following code snippet, and a complete implementation of the code is found in the speakers_peak.fla source file.
leftSpeaker.scaleX= leftSpeaker.scaleY= 1 + channel.leftPeak; rightSpeaker.scaleX= rightSpeaker.scaleY= 1 + channel.rightPeak;
Adding peak meters to the sound player
Let’s add a pair of peak meters to the sound player project we’ve been developing. The following code is found in player_peak.fla.
Lines 129 through 139 create two sprites using the drawBar() method discussed earlier—with one important difference. The bars are rotated −90 degrees so that they will expand upward, instead of to the right. Lines 141 through 144 update the scaleX of each peak meter. Note that we’re updating scaleX, even though it will look like the height of the meters is changing due to the rotation in lines 130 and 136. Figure 11-4 illustrates this idea.
128//peak meters129varlPeak:Sprite= drawBar(0x009900); 130 lPeak.rotation= −90; 131 lPeak.x= 500; 132 lPeak.y= 110; 133addChild(lPeak); 134 135varrPeak:Sprite= drawBar(0x009900); 136 rPeak.rotation= −90; 137 rPeak.x= 520; 138 rPeak.y= 110; 139addChild(rPeak); 140 141functionupdatePeakMeters():void{ 142 lPeak.scaleX= channel.leftPeak* 100; 143 rPeak.scaleX= channel.rightPeak* 100; 144 }
As with the updateMouseTransform() function call in the Changing Sound Volume and Pan section, we must now update our peak meters in the onPlayProgress() function found earlier in the script. We’ll again replace a function placeholder comment, this time the amplitude meter adjustment comment found in line 63 with a call to the updatePeakMeters() function.
60functiononPlayProgress(evt:Event):void{ 61 playBar.width= 100 * (channel.position/ sndLength); 62 updateMouseTransform(); 63 updatePeakMeters(); 64 }
Now when you test your file, you should see two peak meters in the upper-right corner of the stage, moving in sync with the music and visualizing the peak amplitude of the sound during playback. You may also notice that this visual feedback reflects the sound transformations made with your mouse.
If, for example, you move the mouse to the upper-left corner of the stage, you will see larger peaks in the left meter. If you move your mouse across the top of the stage, you will see the peaks move from the left meter to the right meter to correspond with the panning of the sound. Finally, if you then move your mouse down the right side of the stage, you will see the peaks steadily diminish in size as the amplitudes of the sound diminish.
Just for fun, we’re going to show you a slightly more expressive peak meter, based on a meter that you might see on a home stereo. In case you’ve never seen a peak meter before, it’s usually a series of 6 to 10 consecutive lights, stacked vertically or placed end to end, which glow in sequence depending on the amplitude of the sound. Typically, low amplitudes reveal cool colors (green or blue) for acceptable amplitudes. Additional lights reveal warm colors (yellow or amber) as amplitudes increase to possible distortion levels. Finally, hot colors (red) are revealed when the amplitude exceeds acceptable levels. A representation of this type of meter is shown in the top illustration of Figure 11-5.
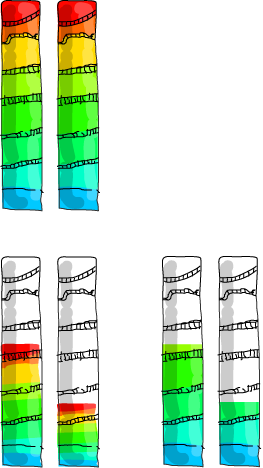
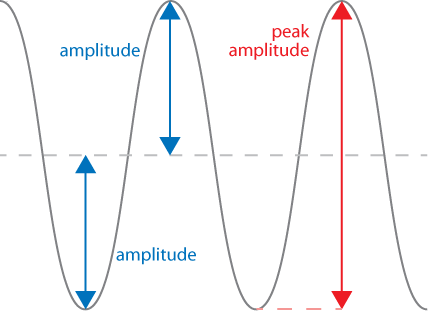
Because of the color changes, we can’t simply adjust the width, height, scaleX, or scaleY properties of the meter. If we did that, we would invalidate the purpose of the color bands because all the colors would be visible all the time, even at low amplitudes. This can be seen in the bottom left illustration of Figure 11-5. We need, instead, to show only those colors representative of the amplitude, be they cool or hot, as seen in the bottom-right illustration of Figure 11-5.
You can reveal only specific colors by creating a mask for the color bars, and scaling only the mask. The entire peak meter is a movie clip, within which are two discrete elements: the color bands and another movie clip used as a mask. (In our file, a third element serves as an outline but is not affected by ActionScript.) Because a mask dictates which part of the content is seen (rather than hiding that content), altering the size of the mask will reveal the desired portion of the color bars, as seen in Figure 11-6.

The following code is included in multicolor_peak_meters.fla, which contains two instances of a movie clip that serves as our meter. The instances are called lPeak and rPeak, and the symbol contains the outline, mask, and color bars seen in Figure 11-6. The mask has an instance name of barMask.
The first five lines cover the basic sound loading and playing tasks discussed earlier in the chapter. The code inside the listener function sets the vertical scale of the mask inside each meter to match the peak amplitudes of the left and right channels.
varsnd:Sound=new Sound(); snd.load(new URLRequest("song.mp3"));varchannel:SoundChannel=new SoundChannel(); channel = snd.play();addEventListener(Event.ENTER_FRAME, onLoop,false, 0,true);functiononLoop(evt:Event):void{ lPeak.barMask.scaleY= channel.leftPeak; rPeak.barMask.scaleY= channel.rightPeak; }
Unlike the speaker example discussed earlier, we do want the colors in the peak meter to disappear during silent passages, so we can set the scaleY property directly to the values generated by the leftPeak and rightPeak properties.
Though this example uses assets found in the library of an FLA, the learningactionscript3 package contains the PeakMeter class for creating multicolor peak meters entirely from code. The PeakMeter_Example.as document class, and the corresponding PeakMeter_Example.fla file for Flash Professional users, demonstrate how to use the class.
Sound Spectrum Data
So far, we’ve been able to synchronize visuals with sound data by using the values returned by the leftPeak and rightPeak properties of the SoundChannel instance. With this information, we’ve already created peak meters to visualize the amplitude of a sound during playback—but there’s a lot more you can do. We discussed scaling a speaker, and you can just as easily change the alpha, x, y, or rotation properties of a display object. The peak_visualizations directory in the accompanying source code includes examples of each of these tasks.
Even with a lot of creativity behind your efforts, however, you still only have two simultaneous values to work with when using peak amplitudes. Fortunately, ActionScript 3.0 provides another way to visualize sound by giving you access to spectrum data during playback. Audio spectrum data typically contains a mixture of frequency and amplitude information and can give you a visual snapshot of a sound at any moment. You can use this information to draw a sound wave or you can preprocess the information to look at amplitudes in the low, mid, and high frequency ranges—much like the visual feedback a home-stereo equalizer can give you.
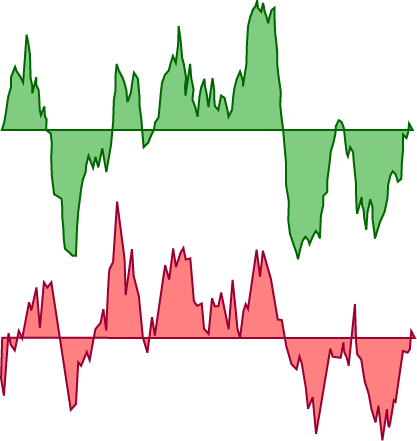
We’ll support both kinds of data, and we’ll do so in a class so that it’s easy to add waveform visualization to your own projects. Figure 11-7 shows an example of what our class can draw. It depicts the left stereo channel waveform in green and the right stereo channel waveform in red.
Storing and retrieving sound spectrum data
Before we discuss the new class, let’s talk a little bit about how much data we’ll be using and how we’ll handle the load. Each time we retrieve the sound spectrum data, we’re going to do so using the computeSpectrum() method of the SoundMixer class. This method retrieves data from the sound in real time and places that data into a special kind of array called the ByteArray, which we’ll explain in a moment. Every time the method is called, we’ll be using 512 data values from the sound—256 for the left channel and 256 for the right channel—to draw our waveform.
We’re going to use an enter frame event listener to call the method so, assuming the default Flash Professional frame rate of 24 frames per second, that means we’ll be using 12,288 values per second. What’s more, the computeSpectrum() method returns bytes, which are very small units of data. We need to work with decimal values like 0.5, which are also called floating-point numbers or floats. It takes 4 bytes to make a single float, and we need 12,288 floats per second. Therefore, our file will need to process 49,152 bytes per second!
You don’t need to worry about any of this math, because you’ll soon see that it’s all handled for you. But it does help to understand the magnitude of what we’re going to be doing. Working your way through nearly 50,000 values per second isn’t trivial, so this is a potential performance issue.
Storing the data and retrieving it quickly are challlenges handled by the ByteArray class. A byte array is an optimized array that can be used to store any kind of bytes. For example, we used the ByteArray as part of the process that saved an image in Chapter 9. It can also be used to read external file data, like the ZaaIL library mentioned in the same chapter, that reads unsupported image formats. In this case, we’re going to use a ByteArray instance to store sound data.
The ByteArray class has special methods that make retrieving data fast and efficient. These methods will process a series of bytes and turn them into the data format you need, so you don’t have to. For instance, we need float values, rather than bytes. The readFloat() method will read four sequential bytes, translate them into a float, and return the data we need. What’s more, the method will automatically increment through the bytes so that you don’t have to update a loop counter when parsing the contents of the array.
For example, think of an array called myByteArray that contains 12 bytes. If this data were stored in a normal array, you’d likely work through it using a for loop, and you’d have to increment the loop counter after each query. Using a byte array, however, the first time you execute myArray.readFloat(), it will read the first four bytes, return a float, and remain poised at byte 5 to continue parsing the array. With the next call of myArray.readFloat(), bytes 5 though 8 will be returned as a float—again with no manual incrementing of the array—and you’re now at byte 9 ready to continue.
The computeSpectrum() method will populate our ByteArray for us, and the readFloat() method will automatically translate the bytes into the data format we need, so we’re ready to go. However, a second, optional parameter of the computeSpectrum() method will allow us to choose between two ways to analyze our sound.
Drawing a waveform or frequency spectrum
By default, the computeSpectrum() method will fill a byte array with values that will translate to floats between −1 and 1. These values will plot a waveform as it ascends above or descends below its baseline, as shown in Figure 11-7.
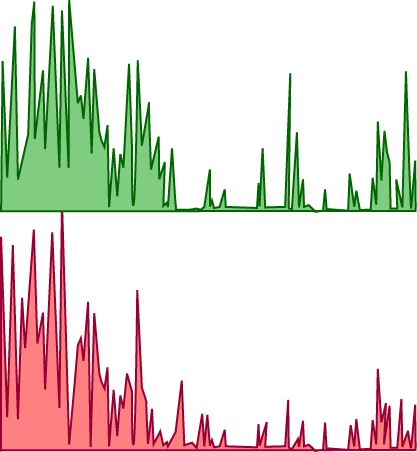
However, a second, optional parameter called FFTMode will return the amplitude of individual frequencies, with values between 0 and 1. An FFT plot distributes positive amplitudes of different frequencies across the baseline, much like the visual feedback a home-stereo equalizer can give you. Low frequencies of each channel appear on the left, and high frequencies appear on the right, as seen in Figure 11-8.
Note
FFT refers to “Fast Fourier Transform,” a method for efficiently computing the component frequencies that make up a signal like a sound or light wave.
As previously described, our example exercise will draw a waveform. However, after you’ve successfully tested your code, experiment with setting the second parameter of the computeSpectrum() method to true to plot FFT frequency amplitudes.
The Waveform class
The first dozen or so lines of the Waveform class will be familiar to you if you’ve been reading this book linearly. Line 1 declares the class’s package path as this class is part of the learningactionscript3 code library developed throughout this book. Lines 3 through 7 import all the other classes required by this class. Line 9 declares the class and extends Sprite so it can inherit all accessible properties, methods, and events from the Sprite class. As discussed extensively in Chapter 6, this is important for things like being able to access properties like graphics, use event listeners, and add instances of this class to the display list.
1packagecom.learningactionscript3.sound { 2 3import flash.display.Graphics; 4import flash.display.Sprite; 5import flash.events.Event; 6import flash.media.SoundMixer; 7import flash.utils.ByteArray; 8 9public classWaveformextends Sprite{ 10 11private var_bytes:ByteArray=new ByteArray(); 12private var_fft:Boolean; 13private var_g:Graphics; 14 15public functionWaveform(fft:Boolean=false) { 16 _fft = fft; 18 _g =this.graphics; 19this.addEventListener(Event.ENTER_FRAME, onVisualize, 20false, 0,true); 21 } 22 23private functiononVisualize(evt:Event):void{ 24SoundMixer.computeSpectrum(_bytes, _fft); 25 _g.clear(); 26 plotWaveform(0x009900, 50); 27 plotWaveform(0xFF0000, 100); 28 } 29 30private functionplotWaveform(col:uint, 31 chanBaseline:Number):void{ 32 _g.lineStyle(1, col); 33 _g.beginFill(col, 0.5); 34 _g.moveTo(0, chanBaseline); 35for(vari:Number= 0; i < 256; i++) { 36 _g.lineTo(i, (chanBaseline - 37 _bytes.readFloat() * 50)); 38 } 39 _g.lineTo(i, chanBaseline); 40 _g.endFill(); 41 } 42 } 43 }
Lines 11 through 13 create three class properties. The _bytes property stores an instance of the ByteArray class to hold the sound data. The Boolean _fft determines whether the class draws a waveform or frequency peaks. Finally, _g stores a reference to the graphics property, as described in Chapter 8, so we can draw the waveform with vectors.
The class constructor in lines 15 through 21 does only three simple things. Line 16 sets the Boolean class property _fft to the value passed into the FFTMode parameter during instantiation. Note that the parameter has a default value of false. Therefore, if true is passed into the parameter, computeSpectrum() will use its FFT mode, and only positive values will be calculated. If nothing is passed into the parameter, computeSpectrum() will return values between −1 and 1, drawing a waveform.
Line 17 stores a reference to the graphics property of the class so we can draw the sound’s waveform at runtime. Remember that this class extends Sprite, so it already has its own graphics property. Furthermore, because you’ll be adding an instance of this Waveform class to the display list anyway, there’s no benefit to creating another sprite within that instance just to serve as a canvas for your drawing.
Finally, lines 19 and 20 add an event listener to the class that calls the onVisualize() method every time it hears an enter frame event. This method draws one waveform for each stereo channel.
The first task of the onVisualize() method is to extract the waveform data from the sound using the computeSpectrum() method (line 24). The data is stored in the _bytes property and _fft determines if wave or frequency spectrum data is returned. Line 25 then clears all prior drawing to the graphics property to show only the current waveform and prevent an ongoing layering of vectors. Finally, lines 26 and 27 call the plotWaveform() method to draw a waveform for the left and right stereo channels, respectively. These calls pass the color and y coordinate of the baseline of each waveform to the method.
The first two lines of the method create a hairline stroke (line 32) and 50-percent transparent fill (line 33) of the requested color. Line 34 moves the virtual drawing pen to an x coordinate of 0, and a y coordinate that matches the requested baseline. The loop that follows in lines 35 through 41 will draw the waveform from this point.
Earlier we mentioned that the ByteArray is populated with 512 data values each time the computeSpectrum() method is called. Note, however, that the for loop starting in line 35 iterates only 256 times. This is because the class is designed to draw the waveform for the left and right stereo channels consecutively. That is, the method call in line 26 draws a waveform using the first 256 values, which correspond to the left channel. Line 27 calls the method to draw a waveform using the next 256 values, representing the right channel. Therefore, each time onVisualize() is executed all 512 values are retrieved. Because the ByteArray instance automatically increments itself when a value is retrieved, it returns to its first position ready for the next request of 256 values.
Note
Using two loops of 256 values, rather than 1 loop of 512 values, makes it easier for us to draw the left and right channels separately. For example, because the loop counter (i) ranges from 0 to 255, we can use it as an x coordinate for each point of our waves. If we used a single loop from 0 to 511, the x coordinate of the right channel waveform would begin at 256, after the left channel waveform ended, and the two waveforms would appear next to each other, rather than stacked vertically.
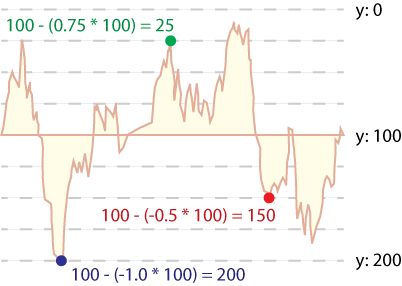
Lines 36 and 37 call the lineTo() method of the Graphics class. The repeated call of the method by the loop draws a line that connects all 256 samples of each waveform. The x coordinates increment from 0 to 255, and the y coordinates are based on the values stored in the byte array. Each float, or decimal value, returned from the byte array is multiplied by the maximum waveform height of 40 pixels.. Therefore, at full amplitude (1 or −1), the waveform height at that point is 40 or −40, at minimum amplitude (0), the height of the waveform is 0, and with an interim amplitude the waveform height will fall somewhere in between.
The resulting waveform height is then subtracted from the desired baseline. A positive sample amplitude is subtracted from the baseline position, causing a peak to rise above the baseline. Negative sample amplitudes are effectively added to the baseline position (subtracting a negative value is equivalent to adding that value) causing a peak to appear below the baseline. (Increasing y values in the Flash Coordinate system move down the y axis.) Figure 11-9 shows a few sample values and their resulting position in the waveform.
Finally, lines 39 and 40 return the drawing point of the waveform to its baseline, and then close the fill, respectively.
The best part of this visualization is that it operates independently of any sound playback code. As we discussed previously, the SoundMixer class is equivalent to the main channel on a recording studio mixing desk. As such, our Waveform class will automatically visualize any sound running through that master mixer—in other words, any sound in any SoundChannel instance. We’ll show this in action by demonstrating how easy it is to add the visualization to a project that already plays sound.
Adding the Waveform Visualization to Our Sound Player
The following code completes our ongoing sound player project, and appears in the player_complete.fla source file. Because the visualizer plots waveforms for all sounds, and because the player is already capable of playing sound, all we need to do is add an instance of Waveform to the player’s display list.
Line 146 imports the class we just created, line 148 creates the instance we need, lines 149 and 150 position the visualization sprite, and line 151 adds it to the display list. For cosmetic purposes, line 152 doubles the scale of the visualization so it spans 512 pixels to fill the stage, rather than its default 256-pixel width.
145//waveform visualization146importcom.learningactionscript3.sound.Waveform; 147 148varvis:Waveform =newWaveform(); 149 vis.x= 20; 150 vis.y= 100; 151 vis.scaleX= vis.scaleY= 2; 152addChild(vis);
This is just one example visualization, with a simple display. The kind of art you can create is limited only by what you can manipulate with numbers in real time and, of course, your imagination.
Visualizing Microphone Input
Prior to Flash Player 10, accessing input from the microphone was very limited. Only an overall activity level, somewhat akin to the amplitude of the input, was available. As of Flash Player 10, extensive manipulation of mic input is now possible. You can draw a waveform of the input, capture the input, alter it, and even save it to a WAV file with the help of additional classes.
For maximum compatibility, we’ll start our discussion about microphone input by visualizing the mic’s activityLevel property. This is compatible all the way back to the introduction of ActionScript 3 (which also means versions CS3 through CS5 of Flash Professional support this technique). We’ll then follow with additional features that require Flash Player 10.
Activity Level
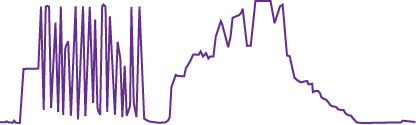
The following code is found in the microphone_activity_level.fla source file. After granting Flash Player permission to use the microphone, this file will continually react to microphone input, drawing a line across the screen that corresponds to microphone activity level. The relationship between activity and time makes the file look a bit like an EKG read out. The line perpetually draws to the right and the line draws up and down with mic activity.
Figure 11-10 shows a sample of the file output. The first segment of the plot was created with staccato whistling. The sharp rise and fall of activity is characteristic of this type of sound. The second segment was created by a human voice steadily increasing the amplitude of a single tone to crescendo and then diminishing again to silence. The fact that the rise and fall of the tone are not represented by straight lines is attributed to the natural wavering of the average human voice when attempting this exercise.
The first six lines of this script are important as they initialize the microphone for use. Line 1 stores a reference to the current microphone using the static method, getMicrophone() of the Microphone class. This will activate the microphone, but it won’t yet provide any data to ActionScript. In order to work with the microphone input, you’ll need to feed that data back to ActionScript, as seen in line 2.
When doing so, it’s best to use echo suppression, shown in line 3, to minimize feedback from your speakers during recording. As an added measure against feedback, we’ll set the volume of the microphone to 0 later on, as we don’t need to hear the input in this example. Line 4 sets the gain of the microphone—the amount by which the microphone data is multiplied before transmitting. It’s a little like the volume of the microphone’s throughput. 0 transmits nothing, 50 is the default value, and 100 amplifies the input to its maximum degree.
Line 5 sets the sample rate of the microphone—the number of samples taken from the source audio during the encoding process. The higher the sample rate, more samples are taken, and the better the sound quality is. Possible values include 5, 8, 11, 22, and 44, which correspond to 5.512 and 8.000 kHz, (both poor quality), 11.025 kHz (good for basic voice input), 22.050 kHz (mid quality), and 44.100 kHz (maximum quality, and the rates at which audio CDs are sampled).
Line 6 sets the silence level—a kind of activity threshold. In order for the microphone to sense any activity, a noise level above the first value (5 in this case) must be sustained for a specified number of milliseconds (1,000, or 1 second, in this case). This helps reduce the amount of background noise captured by the microphone.
1varmic:Microphone=Microphone.getMicrophone(); 2 mic.setLoopBack(true); 3 mic.setUseEchoSuppression(true); 4 mic.gain= 80; 5 mic.rate= 11; 6 mic.setSilenceLevel(5, 1000);
Despite echo suppression, if your microphone is close to your speakers (particularly when using a laptop with a built-in microphone), feedback can still occur. Therefore, if you don’t need to hear the input, you may wish to set the volume of the mic throughput to zero, as seen in lines 8 through 10. This is not the same as muting, or deactivating, the microphone; it merely sets the volume of the data recorded to an inaudible level.
7//transformation8vartrans:SoundTransform= mic.soundTransform; 9 trans.volume= 0; 10 mic.soundTransform= trans;
The next two dozen lines are optional and provide feedback about the mic to the Output panel. If you’re not getting any results from your code, it’s helpful to know what your microphone settings are. You may find that the mic is muted, or has a 0 gain, or a high silence threshold.
You may also be able to check on the microphone’s responsiveness by checking its silenceTimeout property. This is the number of milliseconds between the time the microphone stops sensing input, and the time an inactivity event is sent. (The event ActivityEvent.ACTIVITY is dispatched both when the microphone starts and stops sensing activity.)
The listener created in lines 12 through 20 responds to the event, StatusEvent.STATUS, which is triggered by any microphone status updates, such as when the mic is muted or unmuted. Each time the listener function is triggered, it checks to see whether the user has granted access to the mic, which would be reflected by a Microphone.Unmuted status code (line 15). If so, the showMicInfo() function is called. If the received code is Microphone.Muted (line 17), a trace says that access was denied.
11//mic status12 mic.addEventListener(StatusEvent.STATUS, onMicStatus 13false, 0,true); 14functiononMicStatus(evt:StatusEvent):void{ 15if(evt.code=="Microphone.Unmuted") { 16showMicInfo();17 }else if(evt.code=="Microphone.Muted") { 18trace("Microphone access denied."); 19 } 20 } 21 22functionshowMicInfo():void{ 23varsndInputs:Array=Microphone.names; 24trace("Available sound input devices:"); 25for(vari:int= 0; i < sndInputs.length; i++) { 26trace("--", sndInputs[i]); 27 } 28trace("Selected sound input device name:", mic.name); 29 30trace("Muted:", mic.muted); 31trace("Echo suppression:", mic.useEchoSuppression); 32trace("Gain:", mic.gain); 33trace("Rate:", mic.rate,"kHz"); 34trace("Silence level:", mic.silenceLevel); 35trace("Silence timeout:", mic.silenceTimeout); 36 }
Another reason that you may not get the results you expect from microphone input is if the wrong input has been selected, when multiple inputs are available. Lines 23 through 28 of the showMicInfo() function retrieve an array of all available microphones, loop through the list and trace them, and finish with the name of the currently selected microphone. This allows you to verify that the desired mic is active.
Next, we begin to get into the visualization section of the file. This example will plot a graph of microphone activity levels over time. To do this, we need to use the Graphics class and draw lines from point to point, as discussed earlier when covering the Waveform class. Lines 38 through 46 create a sprite into which we can draw, clear the canvas, set a line style, and move the virtual drawing pen to the far left of the stage at the y coordinate 300.
Notice that lines 43 through 45, the methods responsible for initializing the canvas, are placed into a function and then called right away in line 47. This may seem like an unnecessary step but the initCanvas() function will be called again and again to reinitialize the canvas.
37//creating a canvas to draw into38varcanvas:Sprite=new Sprite(); 39varg:Graphics= canvas.graphics; 40addChild(canvas); 41 42functioninitCanvas():void{ 43 g.clear(); 44 g.lineStyle(0, 0x6600CC); 45 g.moveTo(0, 300); 46 } 47 initCanvas();
As our last task, we draw the graph. We want this exercise to plot continually, even if there is no activity, much like an EKG will run until it is stopped. So, we’ll use a Timer event firing every 50 milliseconds to visualize the mic activity (lines 49 through 52). Line 54 initializes a variable that will be used for the x coordinate of each point in the line.
Note
See the Timer Events section of Chapter 3 for more information.
The graph is drawn from point to point in line 56, using the same technique discussed in the Waveform class. The x coordinate is advanced across the screen, and the y coordinate is determined by subtracting the mic activity level from a baseline. A maximum line height is not required here, however, because the values output from the activityLevel property are between 0 and 100.
Finally, a conditional in lines 57 through 62 determines the x coordinate of each point to which a line is drawn in the graph. Line 57 checks to see if the x coordinate has exceeded the right side of the stage. If so, the xPos property is reset to 0, the graph is cleared, and the graphing process begins anew from the left side of the stage. If not, the graph continues to advance across the stage 2 pixels at a time.
48//drawing the activity graph49varmyTimer:Timer=new Timer(50); 50 myTimer.addEventListener(TimerEvent.TIMER, onTimer, 51false, 0,true); 52 myTimer.start(); 53 54varxPos:int= 0; 55functiononTimer(ev:TimerEvent):void{ 56 g.lineTo(xPos, 300 - mic.activityLevel); 57if(xPos >stage.stageRight) { 58 xPos = 0; 59 initCanvas(); 60 }else{ 61 xPos += 2; 62 } 63 }
SampleDataEvent
Flash Player 10 significantly improves ActionScript’s sound processing capabilities through the use of the SampleDataEvent.SAMPLE_DATA event. This event is dispatched in two ways. The first is when a sound object requests sound data. We’ll look at this circumstance at the end of the chapter when we play back recorded input.
The second way this event is used is when the microphone receives input. Every time audio samples become available to the microphone, the event is dispatched and you can process the incoming data. The following example, found in the microphone_sample_data_event.fla source file, visualizes microphone input by drawing a waveform at runtime.
Lines 1 through 5 create a sprite canvas into which we’ll draw our visualization. Line 3 positions it horizontally, 20 pixels from the left of the stage, and line 4 centers the visualization vertically. Line 5 scales the canvas to 25 percent of its original size. We’ll tell you why in a moment when we discuss the size of the waveform we’re drawing.
Line 8 creates an instance of the microphone, and line 9 sets its sample rate to 44.100 kHz. Lines 10 and 11 create a microphone event listener that responds to the SAMPLE_DATA event. Each time sample data is received by the microphone, the onMicData() function (lines 13 through 22) is called. This function uses the same techniques described when visualizing spectrum data and microphone activity level, with a few notable exceptions that we’ll explain after the code.
1varcanvas:Sprite=new Sprite(); 2varg:Graphics= canvas.graphics; 3 canvas.x= 20; 4 canvas.y=stage.stageHeight/ 2; 5 canvas.scaleX= canvas.scaleY= 0.25; 6addChild(canvas); 7 8varmic:Microphone=Microphone.getMicrophone(); 9 mic.rate= 44; 10 mic.addEventListener(SampleDataEvent.SAMPLE_DATA, onMicData, 11false, 0,true); 12 13functiononMicData(evt:SampleDataEvent):void{ 14varxPos:Number= 0; 15 g.clear(); 15 g.lineStyle(1, 0x0000FF); 17 18while(evt.data.bytesAvailable) { 19 g.lineTo(xPos, evt.data.readFloat() * 200); 20 xPos++; 21 } 22 }
First, we’re not calculating sound bytes using the computeSpectrum() method. Instead, bytes are being provided by the event, and we’re referencing the byte array in which they’re stored through the event’s data property.
Second, we’ve simplified access to the byte array by looping through all available bytes. This is possible because the byte array readFloat() method automatically increments through the data, as discussed in the Sound Spectrum Data section of this chapter. So, as long as the event has bytes that have not yet been read, the loop will continue. When all bytes have been checked, the loop concludes and the next event is processed.
Finally, although the actual drawing of the waveform (line 19) is consistent with prior examples, it does influence the scale setting we used in line 5. There’s nothing different about the use of the lineTo() method in this example. We’re still incrementing the x coordinate of each point every time through a loop, and we’re still determining the y coordinate of each point by multiplying an amplitude float from the byte array by a maximum possible wave height.
However, the number of samples used by the microphone dictates how many points are drawn. When recording or generating audio, you can typically work with between 2048 and 8192 samples (bytes) per SAMPLE_DATA event. The higher the number of samples, the better your sound. The number of samples used is determined by the rate property of the microphone. Table 11-3 shows the correlation between the digital sample rate and the number of samples used.
Note
When recording microphone input, you can actually work with 1024 samples per SAMPLE_DATA event, by using a microphone rate of 8 or 5. However, we recommend against it. We suggest using a rate of 44, resulting in 8192 samples per event, but a rate of 11, for 2048 samples per event, should be a minimum.
Notably, the fewer samples you use, the higher the likelihood of introducing audio artifacts like clicks and pops into your sound. In fact, when generating sounds from code, you can’t even use fewer than 2048 samples.
SAMPLE_DATA eventMic rate | Sample Rate | Samples Used |
44 | 44.100 kHz | 8192 |
22 | 22.050 kHz | 4096 |
11 | 11.025 kHz | 2048 |
8 | 8.000 kHz | 1024 |
5 | 5.512 kHz | 1024 |
We set the mic rate property to 44 in line 9, which means 8192 samples are used every time onMicData() is called. Because we need floats, not bytes, the readFloat() method advances through the available bytes four at a time. This means that we end up with 2048 points each time the waveform is plotted. So, to fit the waveform within the default stage width of 550 pixels, we scale the canvas sprite down to 25 percent.
Note
See “Storing and retrieving sound spectrum data” earlier in the chapter for more information about the ByteArray class and readFloat() method.
When testing your file, after you grant access to the microphone, the SWF will draw a single waveform in the center of the screen when microphone input is received, as shown in Figure 11-11.
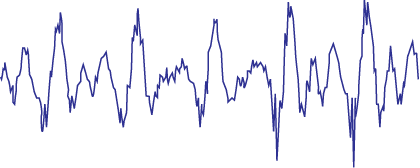
Recording, Playing, and Saving Microphone Input

The following exercise covers new features introduced with Flash Players 10 and 10.1 and requires Flash Player 10.1 or later to function. In this example, you’ll capture mic input and play it back without a sound file to work from. You’ll also use the ByteArray to save the data as a WAV file.
The source code consists of two classes: RecordMicrophone, which is part of the learningactionscript3 package (in the sound directory), and RecordMicrophone_Example, which is a document class that accompanies the RecordMicrophone_Example.fla. The document class simply sets up a user interface with five buttons that are used to control the RecordMicrophone class. The RecordMicrophone class contains the core functionality of the exercise and is where we’ll start.
Flash Professional users can try the exercise by testing the FLA, but you’ll need version CS5 to compile. If you’re using another ActionScript editor, we’ve written the RecordMicrophone_Example class to extend MovieClip so it can easily be used as an application class.
RecordMicrophone Class
Relying heavily on event-driven sample processing, RecordMicrophone is a utility class that provides the minimum required to effectively record, play, and save microphone input. During recording, it adds an event listener to the microphone to listen for the SAMPLE_DATA event, and will capture any input that is fed to the mic.
During playback, it again creates an event listener to listen for the SAMPLE_DATA event but, this time, the listener is added to the Sound object. In this case, the listener plays any sample data that is sent to the sound object, generating the sound dynamically at runtime.
Because both processes are event-driven, adding and removing these listeners essentially switches on and off the two functions. Stopping recording or playback, for example, removes the corresponding listener, and listeners are recreated each time the record or play button is used. Now let’s look at the code.
Note
As you look over the RecordMicrophone class in the coming pages, note which methods are public and which are private. Their designation will affect which methods we can call from our second class, which builds the example interface.
Lines 1 through 10 establish the package path of the class, and import all required additional classes. Note that we’re using another class from Adobe’s as3corelib package, and the FileReference class, discussed in the Image Encoding and Saving section of Chapter 9. The WAVWriter class encodes bytes of sound data as a WAV file and, as of Flash Player 10 and later, the FileReference class saves a file to your hard drive.
Lines 12 through 17 declare the class and class properties. The _mic property holds an instance of the microphone. The _sndBytes property contains a byte array of all microphone input, _snd is a Sound instance that we can use to play back what we record, and _channel references the sound channel into which the Sound object is played.
Note
The RecordMicrophone class doesn’t extend anything because no inheritance is required. We don’t need to add instances of this class to the display list, for example, or inherit the accessible properties, methods or events of a parent class.
Lines 19 through 28 include the class constructor and setupMicrophone() method. The latter is a basic microphone initialization method that creates an instance of the microphone and sets three simple mic properties discussed previously in the chapter.
1packagecom.learningactionscript3.sound { 2 3import flash.events.Event; 4import flash.events.SampleDataEvent; 5import flash.media.Microphone; 6import flash.media.Sound; 7import flash.media.SoundChannel; 8import flash.net.FileReference; 9import flash.utils.ByteArray; 10importcom.adobe.audio.format.WAVWriter; 11 12public classRecordMicrophone { 13 14private var_mic:Microphone; 15private var_sndBytes:ByteArray; 16private var_snd:Sound=new Sound(); 17private var_channel:SoundChannel=new SoundChannel(); 18 19public functionRecordMicrophone() { 20 setupMicrophone(); 21 } 22 23public functionsetupMicrophone():void{ 24 _mic =Microphone.getMicrophone(); 25 _mic.rate= 44; 26 _mic.setSilenceLevel(0); 27 _mic.setUseEchoSuppression(true); 28 }
Recording microphone input at runtime
Note
Note that the RecordMicrophone constructor does nothing but call the method setupMicrophone(). Why, then, isn’t the content of the latter method just placed inside the constructor?
Remember that a constructor executes immediately upon instantiation but is not typically called again. By moving the setup routine to its own method, you can setup your microphone any time you like. What’s more, by making the method public, you can setup the mic from another part of your project, such as a button or frame script, if desired. The constructor calls this method, too, to enable recording the moment the RecordMicrophone class is instantiated.
Lines 30 through 45 contain the code needed to start and stop recording. When the public startRecording() method is called from a button we’ll create later, a new byte array is created to hold the new recording. Lines 33 and 34 add a SAMPLE_DATA event listener to the mic to prepare it for capturing input. First, however, line 32 checks to see if the listener doesn’t already exist. This is a very useful technique to prevent the accidental creation of redundant listeners and makes it easier to remove listeners and manage memory and performance issues.
The getMicData() method in lines 38 through 40 is the aforementioned listener method and does nothing more than write incoming bytes to the byte array. It’s private because it’s only accessed by the listener, not from outside the class. The last method in this block, stopRecording() in lines 42 through 45, removes the SAMPLE_DATA listener, to stop the recording process. This, too, is public so a stop recording button in a user interface can call the method.
Note
Although helpful when adding listeners, checking to see if a listener is present before removing it is not required. The removeEventListener() method is designed to have no effect if the listener doesn’t already exist.
29//start and stop recording30public functionstartRecording():void{ 31 _sndBytes =new ByteArray(); 32if(!_mic.hasEventListener(SampleDataEvent.SAMPLE_DATA)){ 33 _mic.addEventListener(SampleDataEvent.SAMPLE_DATA, 34 getMicData,false, 0,true); 35 } 36 } 37 38private functiongetMicData(evt:SampleDataEvent):void{ 39 _sndBytes.writeBytes(evt.data); 40 } 41 42public functionstopRecording():void{ 43 _mic.removeEventListener(SampleDataEvent.SAMPLE_DATA, 44 getMicData); 45 }
The next three methods control recording playback. The playSound() method in lines 47 through 58 starts the process. After checking to see if a SAMPLE_DATA listener doesn’t already exist in line 48, the listener is added in lines 49 through 51. This is the mechanism used to enable playback of a dynamically generated sound. When we used this event with the microphone, the listener listened for incoming data to record. When we use the event to generate a new sound, the sound object listens for data to play.
The byte array is then reset in line 52 to enable playback. Remember that the byte array automatically increments itself as its used. So, when you finish populating or playing a byte array, its position will be at the end of the file. If not reset, the byte array will have nothing to play.
The sound is then played into a channel in line 53, and a COMPLETE event listener is added to the channel in lines 54 through 56.
Writing sound data dynamically at runtime
The playbackData() method is an example of generating sound at runtime. Instead of playing an internal audio file, or a loaded MP3, bytes from the captured microphone input are fed to the Sound object in real time.
When generating sound dynamically, you must feed the Sound object between 2048 and 8192 samples at a time. The greater the number of samples, the less likely you are to hear pops, clicks, or other audio artifacts.
Note
When using higher numbers of samples, the chance of latency—the delay between interacting with a sound and hearing the result—also increases. Unfortunately, latency is the hardest thing to conquer when processing sound in Flash Player, and the problem is related to your computer operating system performance. We recommend starting with 8192 samples when generating audio and scaling back when required. See http://help.adobe.com/en_US/as3/dev/WSE523B839-C626-4983-B9C0-07CF1A087ED7.html for more information.
Because you can’t be sure of the amount of microphone input you’ll receive, you need to process as many samples as are required to play back the sound. As a safeguard against running out of data prematurely and generating an error, we need to be sure we have enough data to accomplish our immediate goal. In this case, we need to write floats from the mic to a Sound object, so we’ll be using the writeFloat() method to turn 4 bytes into a float.
So before proceeding, line 62 first checks to be sure there are at least 4 bytes in the mic data to create a float. If so, line 63 creates the sample. Because the mic input is mono, and the sound object contains stereo channels, the sample must be written twice—once for each channel. This will create a mono sound with the same data in both left and right channels. As the mic data is written to the sound object, we hear the sound play. Next we need to understand two circumstances under which playback is halted.
Stopping playback
The onPlayComplete() method in lines 70 through 75 remove the listeners from the sound and sound channel objects, readying them for reuse. This function is triggered when the sound has played fully and stops on its own. We need similar behavior when the user stops playback.
This is accomplished with the stopPlaying() function in lines 77 through 80. In addition to stopping the channel playback manually, it also calls the onPlayComplete() method to remove the active listeners. Rather than repeating this code, the event listener method is called, passing the default event value of null to avoid an argument count mismatch error. (See the Pausing Sounds and Resuming Playback section for more information.)
46//play recording47public functionplaySound():void{ 48if(!_snd.hasEventListener(SampleDataEvent.SAMPLE_DATA)){ 49 _snd.addEventListener(SampleDataEvent.SAMPLE_DATA, 50 playbackData, 51false, 0,true); 52 _sndBytes.position= 0; 53 _channel = _snd.play(); 54 _channel.addEventListener(Event.SOUND_COMPLETE, 55 onPlayComplete, 56false, 0,true); 57 } 58 } 59 60private functionplaybackData(evt:SampleDataEvent):void{ 61for(vari:int= 0; i < 8192; i++) { 62if(_sndBytes.bytesAvailable>= 4) { 63varsample:Number= _sndBytes.readFloat(); 64 evt.data.writeFloat(sample); 65 evt.data.writeFloat(sample); 66 } 67 } 68 } 69 70private functiononPlayComplete(evt:Event):void{ 71 _snd.removeEventListener(SampleDataEvent.SAMPLE_DATA, 72 playbackData); 73 _channel.removeEventListener(Event.SOUND_COMPLETE, 74 onPlayComplete); 75 } 76 77public functionstopPlaying():void{ 78 _channel.stop(); 79 onPlayComplete(null); 80 }
Finally, lines 82 through 96 contain the saveFile() method, which we’ll use for encoding and saving the recording as a WAV file. Line 83 first checks to be sure the byte array contains content to save. If it does, line 84 again resets the byte array’s position to the beginning of the sound data, and line 86 creates a byte array to contain the newly encoded data. Line 88 creates an instance of Adobe’s WAVWriter class to initialize a new WAV file, and line 89 sets its encoding channel count to 1 (mono) instead of the default 2 (stereo).
Note
WAVWriter uses a default bit depth of 16-bit, and a default sample rate of 44.100 kHz. If you use a different sample rate in your microphone settings, you must assign the samplingRate property of the WAVWriter class to match.
For example, if your mic rate property were 22, you would set the WAVWriter instance samplingRate property to 22050. (It’s measured in Hz, not kHz.) If you save a stereo sound you can use the default numOfChannels value of 2, but remember that the ActionScript Microphone class records in mono.
Line 90 encodes the data from the recording byte array _sndBytes and stores it in the new byte array, outputStream. It also specifies the incoming sample rate and number of channels for the encoding process. You must match the incoming sample rate and number of channels with the corresponding values used for the WAVWriter instance to avoid resampling or errors during the encoding process.
The last part of the function is to instantiate the FileReference class and use its save() method to save the newly WAV-encoded byte array data with a default file name of recording.wav. The user’s operating system will prompt for a save location during the save. This is the same process we used to save a PNG in the Image Encoding and Saving section of Chapter 9, and requires Flash Player 10.
81//save recording to WAV82public functionsaveFile():void{ 83if(_sndBytes.length> 0) { 84 _sndBytes.position= 0; 85 86varoutputStream:ByteArray=new ByteArray(); 87 88varwavWriter:WAVWriter =newWAVWriter(); 89 wavWriter.numOfChannels = 1; 90 wavWriter.processSamples(outputStream, _sndBytes, 91 44100, 1); 92 93varfileRef:FileReference=new FileReference(); 94 fileRef.save(outputStream,"recording.wav"); 95 } 96 } 97 } 98 }
RecordMicrophone_Example Class
This class sets up a simple five-button interface to put the RecordMicrophone class to work. It extends MovieClip so it can be used as a document class or application class so that an FLA is not mandatory to try the exercise.
Lines 1 through 9 are standard fare, with the only additional notable mention being that we’re using the RoundRectButton class to create our buttons. Lines 11 and 12 declare class properties to store an instance of the RecordMicrophone class and microphone, respectively.
Line 15 creates the RecordMicrophone instance, and lines 17 through 34 create five buttons to record, stop recording, play, stop playing, and save the recording, respectively. Using a method to create multiple buttons is the same approach used in the “Playing, Pausing, and Resuming Sounds” section of this chapter.
The remainder of the class consists of event listener methods triggered by the buttons. They do nothing but call the equivalent public methods of the RecordMicrophone class.
1package{ 2 3import flash.display.MovieClip; 4import flash.media.Microphone; 5import flash.events.MouseEvent; 6importcom.learningactionscript3.ui.RoundRectButton; 7importcom.learningactionscript3.sound.RecordMicrophone; 8 9public classRecordMicrophone_Exampleextends MovieClip{ 10 11private var_sm:RecordMicrophone; 12private var_mic:Microphone; 13 14public functionRecordMicrophone_Example() { 15 _sm =newRecordMicrophone(); 16 17 createButton(25,"Record", startRecording); 18 createButton(50,"Stop Recording", stopRecording); 19 createButton(75,"Play", playRecording); 20 createButton(100,"Stop Playing", stopPlaying); 21 createButton(125,"Save Recording", saveRecording); 22 } 23 24private functioncreateButton(yLoc:Number, labl:String, 25 func:Function):void{ 26varbtn:RoundRectButton = 27newRoundRectButton(120, 20, 10, 2, 0x000099, 28 labl, 0xFFFFFF); 29 btn.x= 20; 30 btn.y= yLoc; 31 btn.addEventListener(MouseEvent.CLICK, func, 32false, 0,true); 33addChild(btn); 34 } 35 36private functionstartRecording(evt:MouseEvent):void{ 37 _sm.startRecording(); 38 } 39 40private functionstopRecording(evt:MouseEvent):void{ 41 _sm.stopRecording(); 42 } 43 44private functionplayRecording(evt:MouseEvent):void{ 45 _sm.playSound(); 46 } 47 48private functionstopPlaying(evt:MouseEvent):void{ 49 _sm.stopPlaying(); 50 } 51 52private functionsaveRecording(evt:MouseEvent):void{ 53 _sm.saveFile(); 54 } 55 } 56 }
What’s Next?
This chapter covered quite a bit of ground regarding ActionScript control of sound, but there is much left to explore and many fun experiments left to try. The companion website for this book can serve as a starting point for this ongoing study. The website includes a more elaborate object-oriented example akin to a desktop sound mixer, in which you can mix three sound files. The site also includes examples of how to generate sound from scratch and how to extract sound from MP3 files and use the extracted sample.
Next, we make the logical jump to another media type: video. We’ll not only demonstrate how to deliver Flash video in a number of ways—including both with components and ActionScript-only solutions—but we’ll also briefly discuss how to encode videos into a Flash-compatible format.
In the next chapter, we’ll discuss:
Using components for video playback requiring little to no ActionScript
Writing your own simple ActionScript-only video player to reduce file size
Displaying video in a browser in true full-screen resolution
Adding captions to video playback