
Chapter 2. Introduction to Linux
In June 2014, 97% of the world’s fastest computers were powered by Linux. Linux is the operating system of choice for most of the servers powering the Internet and over a billion Android devices worldwide. And, of course, Linux is on your Intel Edison.
This chapter is meant to be a whirlwind tour of Linux and the specific Linux distribution running on Edison. By the end of the chapter, you’ll be able to easily navigate your Edison filesystem, install packages, transfer files over the internet, and just feel comfortable in the driver’s seat of the Linux command line.
What Is Linux?
Linux is a free and open source operating system (OS). It runs on top of the Linux kernel, which was first released by Linus Torvalds on October 5, 1991. It is fitting that Linux is the operating system running on Intel Edison, since the original intent of Linux was to serve as a free operating system for Intel x86-based personal computers.
Truly, Linux is one of the shining stars of the open source software movement. With over 10,000 contributing developers and over 17 million lines of source code, the estimated cost for the entire Linux code base is over $300 million USD. With so many different contributors and use cases, it’s not surprising that many different flavors of Linux have emerged. You may already be familiar with some of them: Ubuntu, Arch, Fedora, and Gentoo. These different Linux distributions exist to suit different needs. Whether it’s increased security, a faster/lighter operating system, or better usability, there’s a flavor of Linux for every occasion.
The version of Linux running on Intel Edison is Yocto Linux. Yocto Linux is designed specifically for embedded devices, which are devices buried within the hardware of a system and often used to control the system in real time. Yocto is highly customizable; while all builds will contain the same core, you can build almost an infinite number of versions around the core to suit your hardware and software needs. For example, the Intel Edison version of Yocto is already built to enable Arduino-compatible hardware interfaces. And Intel is enabling new features and improving their build all the time, which is why we had to flash a new build in Chapter 1.
Because it’s built for embedded devices, Yocto Linux does not have a traditional point-and-click user interface. In fact, there’s no graphical user interface (GUI) at all, meaning we’ll have to do 100% of our operations and programming on the command line if we’re not using the Arduino IDE. Thus, to leverage Edison’s full power, it becomes imperative that we know how to navigate the Linux command line properly. Let’s start by explaining how the Linux filesystem works.
The Edison Filesystem
On your host computer, all files are stored in folders. In Linux, we call each of these folders a directory. And just like most of the folders on your host computer, directories on Linux often have a specific purpose and location.
Figure 2-1 shows a diagram with analagous directory structures between the Linux and Windows operating systems. Just as you can think of C:/ as the highest directory in Windows, you can think of / as the highest directory in Linux. And just like Windows, the path, or full, absolute location, of a directory in Linux builds on the layer before it.
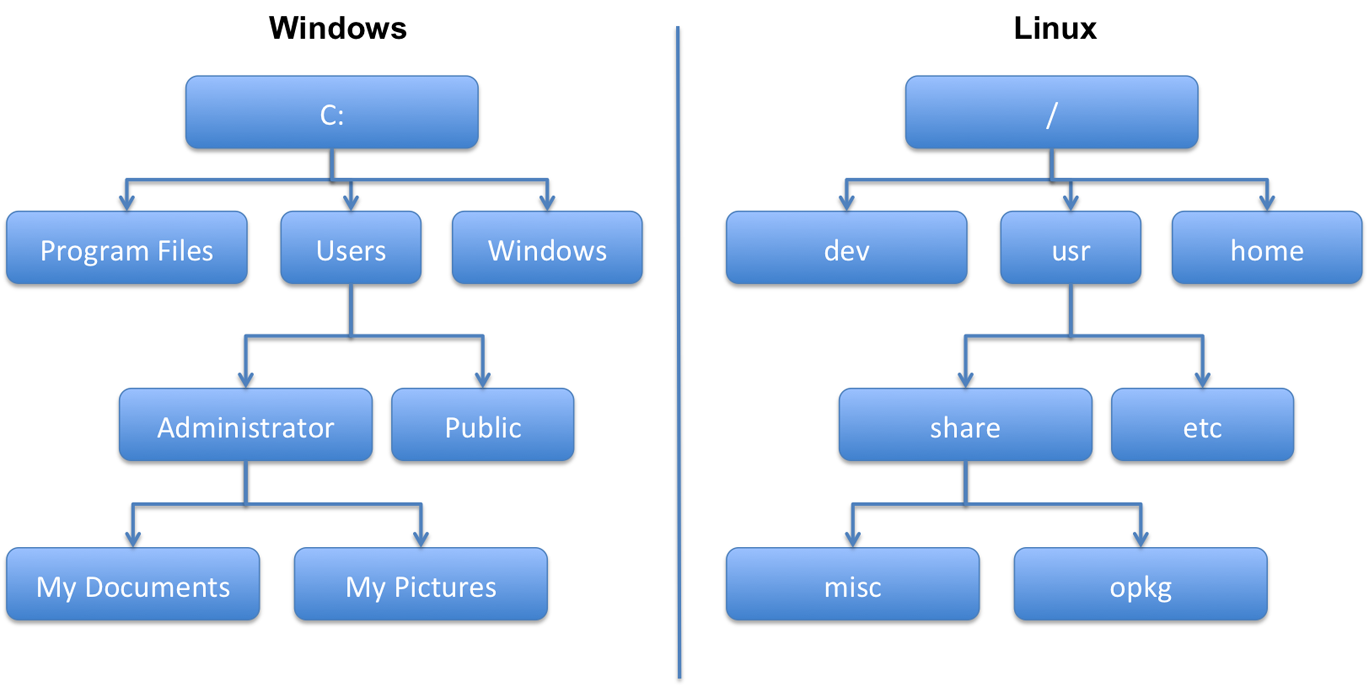
Figure 2-1. A comparison of structure between the Windows and Linux file systems. Only a few directories and subdirectories are shown on each side for comparison.
Some important paths on the Edison filesystem are shown in Table 2-1. Most of the paths match a standard Linux filesystem, though some, such as /sketch, are unique to Edison.
| Directory path | Function |
|---|---|
/bin |
Contains binary executables comprising the basic system programs and utilities |
/boot |
Contains the files that the system needs to boot, including the Linux kernel, and system map. |
/dev |
Directory for physical and virtual devices on the system |
/etc |
Contains the Linux configurations files |
/etc/init.d |
Contains Linux startup scripts |
/home/root |
Home directory for the root user |
/lib |
Library files that can be accessed by the entire system |
/lost+found |
A place for Linux to store files that would normally be lost if there were damage to the filesystem, corruption, or loss. |
/media |
Preferred directory for attached storage devices, such as USB flash drives and SD cards |
/mnt |
Directory for mounting hard-drive partitions and physical devices, though /media is often preferred for connected storage devices |
/opt |
Directory reserved for optional software and add-on packages that are not part of the default installation |
/proc |
Contains information and statistics about running processes and other runtime parameters |
/sbin |
Holds the binary executables comprising the basic system administrative programs and utilities |
/sketch |
Directory for holding compiled Arduino sketches |
/sys |
Contains information and statistics about Linux devices |
/tmp |
Contains temporary system files |
/usr/bin |
Contains additional system binaries |
/var |
Serves as a “catch-all” for data generated while the system is running |
/var/log |
Holds the Linux log files |
Upon login to Edison, the command line is already greeting you with a set of information: your username (root), the device name (edison), and the path of your current working directory (~). Commands are typed to the right of the # symbol and executed by pressing Enter. An example of this command-line prompt is shown below:
root@edison~#
You may notice that ~ does not appear to be a match for any path we’ve mentioned so far. The symbol ~ represents your home directory, which the system has set to /home/root by default. When you ssh or screen into Edison, you’ll always start out there.
Note
In future chapters, for brevity, the command line will be indicated simply by # or $ at the start of a command.
Intel Edison uses the Bourne shell, one of the many Linux shells out there. The Bourne shell supports tab-completion, meaning you only have to type the first few letters of a command or path and the shell will try to complete it for you when you press the Tab key. If multiple matches exist, the shell won’t be able to complete but will show you the possible options if you hit Tab twice. Additionally, the shell keeps track of your command history, and you can access it by pressing the up arrow. This is extremely useful if you’re repeatedly issuing the same set of a few commands.
If you’re wirelessly connected to Edison, you can also exploit my two favorite command-line shortcuts: Ctrl+A and Ctrl+E. Ctrl+A will take you to the beginning of the current command-line prompt, right after the $. Ctrl+E will take you to the very end. These shortcuts are very useful if you’re fixing a long command from your history that originally had typos. Instead of navigating the command with the left and right arrow keys, you can skip around with the Ctrl shortcuts. Note that this will not work if you’re connected to Edison serially using the screen program. Ctrl+A is a screen command, and your host computer will register the keystrokes as such. Regardless of how you’re connected to Edison, the all-powerful Ctrl+C will kill the command that is running in the terminal.
Basic Linux Commands
Let’s now learn some commands to navigate the Edison filesystem. To change directories, use the cd (for “change directory”) command. The following command will take you to the highest directory, /, on the filesystem:
root@edison~# cd /
To switch back to your home directory, you can use any of the following three commands:
root@edison/# cd /home/root
root@edison/# cd ~
root@edison/# cd
You can also change directories relative to your current location. Linux uses . to represent the current directory and .. to represent the folder one directory up in the filesystem. Issuing the following command will take you from the /home/root directory to the /home directory:
root@edison~# cd ..
root@edison:/home#
If you’re ever wondering where on the filesystem you are, or if you want the full, absolute path to your current location, use the pwd (for “present working directory”) command:
root@edison:~# pwd
/home/root
One of the most important commands in Linux is the ls (for “list directory contents”) command, which lists the directory contents. To see the contents of the current directory, simply issue the command by itself:
root@edison~# ls
This command probably returned nothing, since we’ve not yet loaded any files or folders into our home directory. Let’s look at a folder that will return some results. To list the contents of another directory, specify that path as shown in the following example:
root@edison:~# ls /etc/
bash_completion.d     issue.net             rc4.d
binfmt.d              ld.so.cache           rc5.d
and more...
The ls command can also be issued with flags. Flags set the configuration for any specific command and are issued after the name of the command itself. In Chapter 1, we used the flag --setup to tell the configure_edison command which options to configure. Most Linux commands support multiple flags, and the flag --help is often reserved to display the command help text. The ls flag -a tells Linux to show all files and folders in a directory, including hidden ones. Hidden files and directories begin with: .
root@edison:~# ls -a
.                .ash_history     .python-history
..               .node_app_slot
You can also set the flag ls to view the output in a list format. This provides additional information about permissions, file sizes, and dates.
root@edison:~# ls -al
drwxr-xr-x    4 root  root   4096 Mar 22 17:29 .
drwxr-xr-x    4 root  root   4096 Jan 21 17:14 ..
-rw-------    1 root  root    578 Mar 22 17:41 .ash_history
drwxr-xr-x    2 root  root   4096 Jan 21 17:14 .node_app_slot
-rw-------    1 root  root     13 Jan 21 17:23 .python-history
You can also add the h flag to increase “human readability,” which shows the filesizes in a more appropriate format.
Flags
Some command-line utilities allow you to combine flags (like -lah) others don’t. It takes a little playing with these commands to get used to this. Many flags also have a short-form version, a single - followed by single character, and long-form version, a -- followed by a word or words. For example, most commands have a help text that can be displayed with either the -h or the --help flag.
The command touch will create an empty file with the specified name:
root@edison:~# ls
root@edison:~# touch notes.txt
root@edison:~# ls
notes.txt
You can use the command mkdir to create a new, empty directory:
root@edison:~# mkdir newdirectory
root@edison:~# ls
newdirectory  notes.txt
You can copy files from one directory to the other with the copy command, cp. Specify the original file as the first command argument and then the copied file as the second. If you don’t specify a filename in the second argument, the original file will be copied with the same name. If you specify a new filename, the file will be renamed when it is copied.
Tab Complete It!
When issuing the next few commands, remember to utilize your tab completion!
root@edison:~# ls newdirectory/
root@edison:~# cp notes.txt newdirectory/
root@edison:~# ls newdirectory/
notes.txt
root@edison:~# cp notes.txt newdirectory/newfilename.txt
root@edison:~# ls newdirectory/
newfilename.txt  notes.txt
To move a file from one directory to another, use the move command mv:
root@edison:~# mv notes.txt newdirectory/newfilename2.txt
root@edison:~# ls
newdirectory
root@edison:~# ls newdirectory/
newfilename.txt   newfilename2.txt  notes.txt
Notice that notes.txt is no longer present in the home directory. The mv command is like dragging and dropping a file into a folder on Mac or Windows, whereas cp is like copying the file and pasting it.
You can also use mv to rename a file in place:
root@edison:~# touch file1.txt
root@edison:~# ls
file1.txt     newdirectory
root@edison:~# mv file1.txt file2.txt
root@edison:~# ls
file2.txt     newdirectory
The Recursive Flag
One very important and almost universal flag is -r, which stands for recursive. Linux treats folders differently than it treats files and for this reason will not copy, move, or delete folders straight-away:
root@edison:~# cp newdirectory /home/
cp: omitting directory 'newdirectory'
The -r flag tells Linux to run the command not only for all files in the directory, but also for all folders, folders within folders, and files within folders recursively on until forever.
To delete a file, use the rm (for remove) command:
root@edison:~# ls
file2.txt     newdirectory
root@edison:~# rm file2.txt
root@edison:~# ls
newdirectory
Deleting Files
While Edison does have limited storage, making it necessary to delete files, use rm with caution and rm -r with extreme caution! Unlike your host computer, which moves deleted files to the trash can, the rm command is immediate and irreparable! Once those files are removed, they’re gone forever.
I personally recommend creating a trash-can-like system for deletion on your Edison. Create a directory reserved for trash, and move the files that you’re thinking of deleting into that directory instead of deleting them. Should your Edison run low on space, you can then delete the files in your trash can.
The command clear will clear the command prompt and give you a clean window. This is especially useful if you’re focused on the output of a single command.
The command date will display your Edison’s current date and time:
root@edison:~# date
Sun Mar 22 17:44:11 UTC 2015
The command df will give you a quick overview of your available disk space. If you start running out of space on your Edison, this command can help you decide how to reallocate. Use the flag -h, which stands for “human-readable,” for an output that is easier to parse:
root@edison:~# df -h
Filesystem                Size      Used Available Use% Mounted on
/dev/root                 1.4G    380.2M    961.1M  28% /
devtmpfs                479.9M         0    479.9M   0% /dev
There are two more basic commands worth mentioning. The first is find. Without a GUI search tool, it can often be difficult to find the file you’re looking for. By itself, the find command will list the path to all files in the current working directory and in all subdirectories. Specifying a starting path and a search criteria can be extremely powerful. For example, the following command searches the entire filesystem (recursively from /) for a file named libz.so:
root@edison:~# find / -name libz.so
/usr/lib/libz.so
Additionally, you can search for text within files by using the grep command. The following example searches for the phrase “wpa” within the WiFi configuration file wpa_supplicant.conf:
root@edison:~# grep "wpa" /etc/wpa_supplicant/wpa_supplicant.conf
ctrl_interface=/var/run/wpa_supplicant
For more flexible search criteria, you can use regular expressions. Regular expressions are an extremely powerful template matching system for words, numbers, and symbols. It is possible, using regular expressions, to limit searches and outputs by specifying the structure of the item you’re looking for. While it is certainly beyond the scope of this book to explain the entire regular expression syntax (for more info, see the resources in “Going Further”), there’s one specific key that’s definitely worth mentioning, the wildcard *. At the Linux command line, * is your best friend. It allows you to match any number characters, and * by itself matches everything. The best way to illustrate how to use the * key is using examples:
Show all the files within the newdirectory folder:
root@edison:~# ls newdirectory/*
newdirectory/newfilename.txt   newdirectory/notes.txt
newdirectory/newfilename2.txt
List only those files starting with the letters notes:
root@edison:~# ls newdirectory/notes*
newdirectory/notes.txt
Find all files in the /var/run/ folder with the phrase “wpa” in the name:
root@edison:~# find /var/run/ -name *wpa*
/var/run/wpa_supplicant
Search all files in the /etc/wpa_supplicant/ folder for the phrase “each”:
root@edison:~# grep "each" /etc/wpa_supplicant/*
/etc/wpa_supplicant/udhcpd-p2p.conf:# remaining for each lease in the udhcpd leases file. This is
Accounts, Permissions, and Ownership
Every file on Edison has an owner and a specific set of permissions associated with it. Using ls -l will list permissions and other information, as shown in Figure 2-2.

Figure 2-2. Output of running ls -l
Permissions are broken into three user based groups: owner, group, and all users. The owner is generally the person who has created the file or folder, unless someone else has taken control of it. Files and folders that came as part of the Linux operating system are owned by the root user by default. The group is the group of users that have been assigned to this file or directory. All-User permissions apply to every user of the filesystem.
As the root user, you can change and set ownership of a file by using the chown command:
root@edison:~/newdirectory# chown username filename
Each file or directory has three types of permissions: read, write, and execute. The read permission describes the user’s ability to read the contents of the file. The write permission refers to a user’s ability to modify or save a file or directory. The execute permission describes the user’s ability to execute a file or view the contents of a directory.
Individual file and folder permissions are described by a dash followed by a set of nine letters: -rwxrwxrwx. The first three letters describe the owner’s permissions to read, write, and execute the file or folder. The next three describe the group’s read, write, and execute permissions; and the last three describe the same permissions for all users. Any letter that is replaced by a - is a permission that the corresponding user or group does not have. For example, in Figure 2-2, the root user is the owner of all three files and has the permission to both read and write, but not execute. The group and all other users have permission only to read these three files.
You can change these permissions using the chmod command. Specify the user or group with u for owner, g for group, and a or o for all users. Use the + sign to add permissions and the - sign to revoke them. Use r, w, and x to specify which permissions are being changed.
The following example gives write permission for the file notes.txt to all users:
root@edison:~/newdirectory# chmod a+w notes.txt
This example gives write and execute permissions for all files with the extension .txt to the groups that own them:
root@edison:~/newdirectory# chmod g+wx *.txt
And this example removes write and execute permissions for the owning group and read, write, and execute permissions for all users for any file starting with the word new:
root@edison:~/newdirectory# chmod g-wx,o-rwx new*
Currently, you’re logged in as the root user, which is the superuser for your Intel Edison. Since default ownership of the Linux files goes to root, you have the supreme power to modify, move, delete, and own pretty much any file on the system. This also means that you can easily destroy necessary files and folders from the Edison system, rendering it useless. There are ways to recover from these mistakes, but it’s best not to take chances. For this reason, it’s often better to create a non-superuser account and use it for your prototyping and development.
To create a new user, use the command useradd followed by the new username:
root@edison:~# useradd username
You can change the password for this user with the passwd command followed by the username. Then, follow the prompts to set or change the password:
root@edison:~# passwd username
If you use passwd without specifying a username, Linux will prompt you for a new password for the logged-in account: in this case, root.
To log out of the account, press Ctrl+D. Go ahead and log in to the account you just created. You’ll see a new command prompt, and you’ll be started in your new home directory, /home/username. Note that /home/root/ and subsequent files and folders will still exist on the system; it’s just not the default home for your new user:
edison:~$ pwd
/home/username
edison:~$ cd ../root/newdirectory/
edison:/home/root/newdirectory$ ls
newfilename.txt   newfilename2.txt  notes.txt
To show the safegaurds built into the Linux system, we can try and delete a necessary file, such as our Internet configuration:
edison:~$ rm /etc/wpa_supplicant/wpa_supplicant.conf
rm: remove '/etc/wpa_supplicant/wpa_supplicant.conf'? y
rm: can't remove '/etc/wpa_supplicant/wpa_supplicant.conf': Permission denied
Because we’re not root, the system tells us that we don’t have permission to perform such an action.
Scripting and More Advanced Linux Commands
Until now, we’ve been working with empty files created using the touch command. Let’s fill them in with some content. The echo command simply repeats back any specified input and the -e flag tells the command to interpret line breaks and other similar characters:
root@edison:~# echo "1,2,3,4
5,6,7,8"
1,2,3,4
5,6,7,8
root@edison:~# echo -e "1,2,3,4
5,6,7,8"
1,2,3,4
5,6,7,8
To redirect the command-line output to a file, use the > or >> symbols. If the specified file does not exist, it will be created. If the file already exists, using >> will append to the end of it, whereas > will replace the contents entirely:
root@edison:~# echo "1,2,3,4" > file1
root@edison:~# echo "5,6,7,8" >> file1
root@edison:~# ls -l > file2
To read the contents of this newly created file, use the more command:
root@edison:~# more file1
1,2,3,4
5,6,7,8
For longer files, you can press the Enter key to move one line down, the space bar to page down, and the q key to quit. Aside from more, you can also use less, which is similar but allows both forward and backward navigation through a file. Pressing j or Enter will move one line forward, pressing k will move one line backward, pressing the space bar will page down, and pressing b will page up. As with more, press q to quit.
Occasionally, you’ll want to see only the first or last few lines of a file. This can be accomplished using the head and tail commands. By default, each of these commands will show you 10 lines, but this can be changed with the -n flag. For example, the following two commands show only the first and last lines of file1:
root@edison:~# head -n 1 file1
1,2,3,4
root@edison:~# tail -n 1 file1
5,6,7,8
The cat command also displays file contents but allows for multiple files to be specified:
root@edison:~# cat file1 file2
1,2,3,4
5,6,7,8
-rw-r--r--    1 root     root            16 Aug 26 16:43 file1
-rw-r--r--    1 root     root             0 Aug 26 16:44 file2
drwxr-xr-x    2 root     root          4096 Aug 26 16:39 newdirectory
You can also use cat to concatenate files together:
root@edison:~# cat file1 file2 > file3
root@edison:~# more file3
1,2,3,4
5,6,7,8
-rw-r--r--    1 root     root            16 Aug 26 16:43 file1
-rw-r--r--    1 root     root             0 Aug 26 16:44 file2
drwxr-xr-x    2 root     root          4096 Aug 26 16:39 newdirectory
Obviously, stringing these longer commands together gives you a lot of flexibility and power at the command line. Linux has another very elegant and simple way of chaining command-line commands together, known as piping. Piping takes the output of one command and supplies it as the input to another, using the | symbol as the pipe operator.
Let’s use this with the ps command, which lists all running programs, their identification numbers (PIDs), and their stats. To find programs containing the word “launcher”, pipe the output of ps into the grep command:
root@edison:~# ps | grep launcher
188 root      2404 S    {launcher.sh} /bin/sh /opt/edison/launcher.sh
338 root      2412 S    grep launcher
The PID is the first number specified. To kill any running program on your system, use kill .PID
One fairly common debugging strategy you’ll see on the Edison forums is to check out the end of the kernel message buffer by piping the dmesg command to tail:
root@edison:~# dmesg | tail
[  184.797665] CFGP2P-ERROR) wl_cfgp2p_add_p2p_disc_if : P2P
               interface registered
[  184.817868] WLC_E_IF: NO_IF set, event Ignored
[  232.514182] CFG80211-ERROR) wl_cfg80211_connect :
               Connectting with40:8b:07:67:f9:35 channel (11)
               ssid "Dante's Inferno", len (15)
[  232.514182]
[  232.600295] wl_bss_connect_done succeeded with
               40:8b:07:67:f9:35
[  232.612966] wl_bss_connect_done succeeded with
               40:8b:07:67:f9:35
[  235.092365] ip (530) used greatest stack depth: 4932 bytes left
[  236.866492] systemd-fstab-generator[574]: Checking was
               requested for "rootfs", but it is not a device.
[  237.356150] systemd-fstab-generator[583]: Checking was
               requested for "rootfs", but it is not a device.
[  237.819098] systemd-fstab-generator[592]: Checking was
               requested for "rootfs", but it is not a device.
This is especially useful for checking if the last few actions you took actually worked. For example, if you just plugged in a USB device and it registered, you would see it in the last few lines of dmesg. Here, you can see that I just successfully connected to my home WiFi network, “Dante’s Inferno.”
Finally, you can write a series of command-line commands to a file with a .sh extension (required by the Bourne shell) and then execute all of them sequentially by running that file. This is extremely useful if you’re performing a task that requires you to issue several commands repetitively:
root@edison:~# echo "ls -la" >> file3.sh
root@edison:~# echo "echo All Done" >> file3.sh
You can execute the script with the sh command:
root@edison:~# sh file3.sh
drwxr-xr-x    4 root     root   4096 Aug 26 16:59 .
drwxr-xr-x    4 root     root   4096 Jun 19 05:33 ..
drwxr-xr-x    2 root     root   4096 Jun 19 05:36 .node_app_slot
-rw-------    1 root     root     13 Jun 19 05:37 .python-history
-rw-r--r--    1 root     root     16 Aug 26 16:43 file1
-rw-r--r--    1 root     root    196 Aug 26 16:44 file2
-rw-r--r--    1 root     root    212 Aug 26 16:51 file3
-rw-r--r--    1 root     root     21 Aug 26 16:59 file3.sh
drwxr-xr-x    2 root     root   4096 Aug 26 16:39 newdirectory
All Done
You can also change the permissions on the script to make it executable and run it directly:
root@edison:~# chmod +x file3.sh
root@edison:~# ./file3.sh
The Internet
If you configured your WiFi in “Configuring Edison and Getting Online”, then you should already be connected to the Internet. To check, you can use ping to send a packet of information to a site and acknowledge a response:
root@edison:~# ping google.com
You can transfer a URL or data to/from a server using curl. Curl is a very powerful tool that allows you to interact with the Internet from the command line—a necessary evil on Edison since there’s no web browser. Issuing the following command will display the contents of the Google home page on the command line:
root@edison:~# curl http://www.google.com
Lynx
It’s not strictly true that there are no web browsers available on a command-line-only system. Lynx is a powerful and popular web browser for command-line interfaces. It does not come preinstalled on Edison, but if you want a command-line web browser, I recommend trying it.
Finally, a great way to pull files from the Internet is using the wget command:
root@edison:~# wget http://ftp.gnu.org/gnu/wget/wget-1.5.3.tar.gz
wget can also be used to pull files recursively or from a list of sites.
Compressed Files
Many Linux software packages are distributed in a compressed format, often as tar.gz files. To view the files within, uncompress the package using the tar command and the xvf flag:
root@edison:~# tar xvf wget-1.5.3.tar.gz
To create a tar.gz file for upload or distribution, use the cvf flag, specify the name of the output file and then the files to be compressed:
root@edison:~# tar cvf data.tar.gz file3.sh get-pip.py wget-1.5.3
You can also download files to your host computer and transfer them to Edison using scp or sftp. While you can do this from the command line, there are a number of great file transfer programs out there with nice graphical displays. My personal recommendation is CyberDuck for Mac and Windows and FileZilla for Linux (though FileZilla actually works for all three platforms).
To initiate the connection in CyberDuck, click the Open Connection icon in the top-left corner. A new window will pop up asking for the connection parameters. Change the drop-down at the top from FTP (File Transfer Protocol to SFTP (SSH File Transfer Protocol). Then, in the server field, specify either Edison’s IP address or devicename.local as well as the username and password for login in their respective fields. If you forgot your IP address, run the configure_edison command with the flag --showWiFiIP. This setup is shown in Figure 2-3. The setup process is very similar for FileZilla.

Figure 2-3. Configuration for wireless file transfer using Putty; be sure to replace edison.local with your devicename.local or the device IP address
Click the Connect button to make the connection. When the connection is established, the program starts you in the home directory by default. You can move up directories using the drop-down and double-click on folders to move through them. To transfer files in either direction, just drag and drop them between CyberDuck and your host computer.
Edison will only work with SFTP and not standard FTP, and SFTP will only work if you set a password for your Edison when you configured it. Otherwise, the connection will be blocked by the device.
Installing Packages in Yocto
Yocto ships with the opkg command-line tool for installing packages, which makes installing new packages quick and simple for a few reasons. First, opkg automatically installs all package dependencies, or software on which your new package relies. Second, the package installation is incredibly fast, as the files have already been precompiled and built for your Intel Edison. Wherever possible, it’s better to use the opkg utility for installing packages than downloading them from the Internet and installing them manually on Edison.
Before we can use opkg though, we have to edit the configuration files to tell it where to pull packages from. The opkg package stores its list of repositories in the /etc/opkg/base-feeds.conf file. The following commands will append some useful Edison repositories to this file:
root@edison:~# echo -e "src/gz all http://repo.opkg.net/edison/repo/all
src/gz edison http://repo.opkg.net/edison/repo/edison
src/gz core2-32 http://repo.opkg.net/edison/repo/core2-32" >> /etc/opkg/base-feeds.conf
root@edison:~# echo "src mraa-upm http://iotdk.intel.com/repos/1.1/intelgalactic" > /etc/opkg/mraa-upm.conf
Then, opkg will properly source these files when you tell it to update:
root@edison:~# opkg update
Going forward, any changes you make to these files will require an update to take effect.
Warning
After sourcing these files, do not perform an opkg upgrade, as this command will try to download all the available packages for install, quickly filling all available storage on your Edison.
Let’s install a few packages that we’ll need later: git, a web-based code-sharing and version control system, and mraa, Intel’s I/O controller for Edison:
root@edison:~# opkg install git libmraa0
It’s as easy as that!
To remove a package, use the remove command. The following is just an example removal; it is probably best to leave git on your system or reinstall it after the removal:
root@edison:~# opkg remove git
Removing package git from root...
If a package you’re trying to remove is required by others on your system, opkg will issue a warning message and give you options for continuing. opkg absolutely will not let you remove packages that will crash other software without warning you first.
OPKG Packages
If you’d like to see all packages available to you, you can view the links we added to the configuration files. The most common software packages can be found here.
The package names look like git_1.9.0-r0_core2-32.ipk, but when you issue the opkg install command, only use the part of the package name up to the first _. So, for this package, it’s simply opkg install git.
Text Editors
Up until now, you’ve been using echo and other command-line utilities to add text to files. Another option is to edit files directly using a text editor.
Without a graphical display, text editing can be a bit tough. The preinstalled text editor on Edison is vi. It’s a powerful text-editor, but it definitely has a steep learning curve. Another GUI-less text editing option is nano, which is much easier for the new user. If you’d like to give it a try, install it now:
root@edison:~# opkg install nano
Whichever text editor you choose, use it now to turn off the logging functionality on Edison. While logging can be useful for debugging, the loggers on Edison run constantly and eat up a lot of usable storage space. To open any text file in your editor, issue the command:
root@edison:~# editor_name filename
The configuration file for logging is located at /etc/systemd/journald.conf. Open the file, and change the line near the top from Storage=persistent to Storage=none.
Going Further
We’ve done so much, and we’ve still barely scratched the surface. If you’re interested in diving deeper into any of these topics, you can use the following resources.
- “Introduction to Linux”
-
A great introductory guide to pretty much all aspects of Linux.
- The Yocto Project
-
The maintainers of Yocto Linux; this site has links and discussions on pretty much everything Yocto-related.
- “The Command-Line Cheat Sheet”
-
A pretty comprehensive list of all the commands you might need on the Linux shell. Also touches on building software and monitoring processes.
- Bourne Shell Programming
-
In-depth scripting, including variables and functions, on the Bourne Shell.
- Regular-Expressions.info
-
A list of tutorials for different regular expressions topics.
- “An Extremely Quick and Simple Introduction to the Vi Text Editor”
-
An incredibly good overview introduction to the text editor vi.
- :nano Command Manual