
Chapter 5. Teach Edison to See
Vision is the art of seeing what is invisible to others. —Jonathan Swift
Introduction
One area where Intel Edison’s compute power really shines is the area of computer vision: the gathering, processing, analyzing, and understanding of images and video data. Computer vision is a complex, widely studied, and ever-growing field in the scientific world today. The algorithms that comprise a computer vision system are often very computationally heavy tasks, making Intel Edison’s dual-core x86 processor more aptly suited than other embedded systems. In fact, because Intel’s x86 architecture is the top choice for high-performance computing (over 99% by market share), many available computer-vision algorithms have been optimized for this architecture and will perform better on an x86 than they will on other systems.
In this chapter, you’ll be exploring some applications of computer vision on your Intel Edison using a live video stream as well as images pulled from the Internet. Along the way, you’ll interface Edison with a webcam and learn to pull streaming video from that input.
Breakout Boards
While Chapter 3 and Chapter 4 were somewhat heavily dependent on using the Arduino Breakout Board, this chapter, along with Chapter 6, can be done almost in their entirety on either the SparkFun Base Block or the Mini Breakout Board. Since neither has a full-size USB port, you’ll need a USB On-The-Go (OTG) cable that is microUSB male-to-full-sized-USB-female.
The SparkFun Base Block can be powered from either microUSB port, so you can power (and still connect to) it from the console port while using the other port for the OTG cable and device. However, the Intel Mini Breakout Board uses the same microUSB cable for power and OTG devices, so you’ll need to use either the J21 power headers or solder on a barrel jack connector to supply power while using USB devices.
Materials List
Only two parts are required for this chapter:
-
A UVC-compatible webcam
My personal preference is for the Creative Live! Cam Sync HD 720P Webcam, because it’s small and quite cheap on Amazon. However, Intel Edison has driver support for any UVC compatible camera. A complete list can be found at Ideas on Board.
-
A power supply
If you’re on the Arduino Breakout Board, USB power will deactivate when you select to use the full-size USB port for the camera. To power the board, you’ll need to supply power to the barrel jack onboard instead. Any DC power supply in the range 7V to 15V will do; a good, fairly cheap example is Adafruit’s 9V supply. Note that if you’re on the SparkFun Base Block, you won’t need to worry about a power supply because both microUSBs serve as power ports.
OpenCV
For much of the programming in this chapter, you’ll be using OpenCV and its Python bindings. OpenCV stands for open source computer vision; it’s open source because it’s totally free and community developed. You can install openCV and its Python bindings with opkg:
# opkg install python-opencv
Extracting Colored Objects
The first example you’ll do to get acquainted with OpenCV in Python is to detect the location of a colored object within an image. For this, use the interactive Python shell so that you can follow along with each command.
Open the interactive Python shell and then import the OpenCV library, numerical Python, and the urllib library for retrieving files from the Internet:
>>>  import cv2
>>>  import numpy as np
>>>  import urllib
Use the urllib library to retrieve an image of a blue frog from Wikipedia and save it in your current folder as BlueFrog.jpg. You’ll notice that this is a high-quality photo; it will probably take a few seconds to download:
>>> urllib.urlretrieve('https://upload.wikimedia.org/wikipedia/commons/6/6f/Dendrobates_azureus_%28Dendrobates_tinctorius%29_Edit.jpg','BlueFrog.jpg')
This particular blue frog is the Dendrobates azureus, a poison dart frog from Brazil that gets its distinctive blue color from the poisonous alkaloids in its skin. You’ll use this blue color to extract the skin of the frog from the rest of the image. First, use OpenCV to read the image from the file:
>>> frame = cv2.imread('BlueFrog.jpg')
Most images, such as JPEGs, are loaded as a 2D array of blue, green, and red (BGR) values in the range 0 to 255 that map the picture you see. To extract the blue frog, you need to tell openCV what range of colors you’re specifically seeking. Define an array of the lowest BGR values that you would consider “blue” and an upper array of the highest values of “blue.” Then, use the OpenCV inRange function to find all values within this range:
>>> lowerblue = np.array([50, 0, 0],dtype = "uint8")
>>> upperblue = np.array([255, 80,  80],dtype = "uint8")
>>> mask = cv2.inRange(frame, lowerblue, upperblue)
In this specific example, the value of blue must exceed 50, but the values of green and red cannot exceed 80. The inRange function then labels all the pixel locations within the image that meet this criteria. You can create an image showing only these pixels by applying the mask to your original blue frog with bitwise_and:
>>> res = cv2.bitwise_and(frame,frame, mask= mask)
Finally, to see your processed blue frog, you’ll need to save the image. To save a single image of the original and processed photos next to each other, use numpy’s hstack (horizontal stack) function while writing out the file:
>>> cv2.imwrite('BlueFrog_processed.jpg',np.hstack((frame,res)))
Viewing Images
The only thing left is to view the processed image you’ve created. There are a few ways to do this.
Using the SPI Screen
Change directories into the ILI9341 folder that we downloaded with git in Chapter 4. Within this folder is a script called photo.py. Open it in a text editor:
""" Showing a picture """importImageimportILI9341disp=ILI9341.ILI9341()disp.begin()# Load the imageimage=Image.open('/home/root/BlueFrog_processed.jpg')# Resize the image and rotate it so it's 240x320 pixels.image=image.rotate(90).resize((240,320))# Draw the image on the display hardware.disp.display(image)
This file is the most basic file for displaying a photo on the screen. The script takes the following sequence of actions.

It imports the necessary libraries: Python’s imaging library and the SPI screen driver library.

It creates the screen object and initializes it.

It imports the image from the filesystem. Don’t forget to change the path to this image if it differs from the default set here.

It uses the image library to rotate and resize the image to fit on the screen.

It displays the resized and rotated image to the screen.
Run this script, and you’ll see the blue frog, before and after processing, appear on the screen.
This method is really simple and instantaneous, but it also has its drawbacks. Because the screen resolution is only 240 x 320 pixels, you’ll either always be viewing your images using this maximum resolution or only seeing a small fraction of your images at a time. To see full-resolution images, anything over 240 x 320, you’ll have to transfer the files to your host computer.
Using File Transfer
You can transfer the files back to your host computer using either of the two following methods:
- Wireless transfer
-
You can
scporsftpthe file back over to your host computer using the process described in “The Internet”. - MicroSD card
-
Plug a MicroSD card into the slot on Intel Edison, and move or copy the image over to the card:
# mv BlueFrog_processed.jpg /media/sdcard/
Then, before removing the device, unmount/eject it safely with the umount command:
# umount /media/sdcard/
Plug this card into your host computer to view the file.
The result is shown in Figure 5-1 for reference.

Figure 5-1. The blue frog example image before (left) and after (right) processing
Face Detection
Color detection is cool, but what about something more complicated? The next example detects human faces within an image. This is a tough processing problem for a number of reasons: faces differ in size, shape, color, and appearance and can appear at a variety of distances and angles within an image.
I’ve written a script for facial recognition that can be downloaded from GitHub:
# wget https://raw.githubusercontent.com/SCUMakerlab/Intel-Edison-Code/master/FacialRecognition.py
After pulling the script, open it with your favorite text editor. The contents of the script are shown here:
# Import necessary librariesimportcv2importurllib# Grab the imageurllib.urlretrieve('http://stephaniemoyerman.com/wp-content/uploads/2015/06/DSC_0713_linkedin.jpg','steph.jpg')# And grab the config file for facial recognitionurllib.urlretrieve("https://raw.githubusercontent.com/Itseez/opencv/master/data/haarcascades/haarcascade_frontalface_alt.xml","haarcascade_frontalface_alt.xml")# Use OpenCV to load the imageimg=cv2.imread("steph.jpg")# And convert to grayscale for processinggray=cv2.cvtColor(img,cv2.COLOR_BGR2GRAY)# Create the classifier and run the algorithmfaceCascade=cv2.CascadeClassifier("haarcascade_frontalface_alt.xml")faces=faceCascade.detectMultiScale(gray,scaleFactor=1.1,minNeighbors=5,minSize=(30,30),flags=cv2.cv.CV_HAAR_SCALE_IMAGE)# For each face found in the image, draw a box around itfor(x,y,w,h)infaces:cv2.rectangle(img,(x,y),(x+w,y+h),(255,0,0),2)# Write the image back out to a filecv2.imwrite("steph_facefound.png",img)
This script does a number of things:
Imports the necessary libraries opencv and urllib.
Utilizes urllib to download an image of me from my blog site and the opencv configuration file for face detection to the current directory. If you’re curious about how complicated a face detection algorithm truly is, open the haarcascade_frontalface_alt.xml file and gaze upon its contents. The configuration for face detection is over a thousand lines long!
Uses openCV to read in my image and then converts it to grayscale. This turns the image into a single valued array instead of keeping all three values of blue, green, and red. These sort of transforms are very common for image processing, and openCV has code for more than a hundred of them.
Creates the
faceCascadeobject using the parameters from the haarcascade_frontalface_alt.xml file. This object is used to find the location of my face using thedetectMultiScalefunction. The parametersscaleFactor,minNeighbors, andminSizetell the algorithm the scaling between faces, the minimum distance between faces, and the minimum size of any single face respectively. Note that this algorithm is made to find as many faces as appear in an image; it’s not limited to just one!The
forloop draws a rectangular box around each face that was found in the image using the coordinates kicked out by the algorithm. These boxes are drawn on the original image and not on the grayscale version, though either is possible.
The result is written out to steph_facefound.png in the current directory.
Run the Python script, and you’ll notice that when it completes, three new files appear in your current directory: steph.jpg, haarcascade_frontalface_alt.xml, and steph_facefound.png. Use your favorite method to view to steph_facefound.png image. You should see me with a blue rectangle around my face as shown in Figure 5-2.

Figure 5-2. Result of the OpenCV facial recognition example
Using this example, you should now be able to perform face detection on any image you can pull from the Internet or load onto your Intel Edison. But, what if you want to do this with a live camera?
Webcam
The first step in live detection is to connect a live video feed into your Intel Edison. If you’re on the Arduino breakout board, make sure to supply power via the barrel jack on the board, then flip the switch on the front of the board toward the full-size USB port and plug in your webcam.
Issue the lsusb command, which displays information about the USB buses on your system and the devices connected to them. You should see your camera appear in the list:
# lsusb
Bus 001 Device 002: ID 041e:4095 Creative Technology, Ltd
Bus 001 Device 001: ID 1d6b:0002 Linux Foundation 2.0 root hub
Bus 002 Device 001: ID 1d6b:0003 Linux Foundation 3.0 root hub
To check that the uvcvideo driver has successfully interfaced with your camera, use the dmesg (display or driver message) command, which prints the message buffer of the kernel. The dmesg command will output the entire buffer, which is a lot, so pipe the output to grep, searching specifically for the phrase uvc:
# dmesg | grep "uvc"
[   54.260633] uvcvideo: Found UVC 1.00 device Live! Cam Sync HD VF0770 (041e:4095)
[   54.274395] usbcore: registered new interface driver uvcvideo
Snapping Photos
Now that you’re connected, you can use Python to grab control of your camera and snap a still image. Open the Python interactive shell and import OpenCV, which has excellent video-camera-binding functionality:
>>> import cv2
Connect to the video camera using the VideoCapture command. This command takes only one input, and it’s the index of the video camera of interest. Since you presumably have only one camera connected, the index will be 0:
>>> cap = cv2.VideoCapture(0)
Multiple USB Devices
Although Edison only has one USB port, it can handle multiple connected devices through a powered USB hub. It’s important that the hub have its own power supply, as Edison alone probably won’t be able to supply enough current to power multiple USB devices.
You can grab a frame from the camera with the read function. You’ll notice that the power LED on the camera comes on after issuing the read command. Be sure to hold up your camera and pose before doing this, because this is the selfie you’re gonna get!
>>> ret, frame = cap.read()
To view the captured frame, you’ll have to save it out to a file. Just as you did in previous examples, you’ll do this using the function imwrite:
>>> cv2.imwrite('mypicture.png',frame)
Note that you can issue the cap.read() command as many times as you like before writing out the image. OpenCV will snap a frame every time you issue the command, and imwrite will write out the very last assignment of frame. Before closing the interactive Python shell, be sure to release your hold on the camera:
>>>  cap.release()
>>>  exit()
Check out your selfie by transferring the file over to your host computer or using your display screen.
Digital Camera
You may have noticed that we just positioned ourselves, took a photo on cue, and then displayed it out to an affixed screen. If you were to connect one of Edison’s inputs to a button, you could program Python to do the same thing on a button press. Sound familiar? You’ve just created a digital camera!
Recording Video
You’ve just snapped a still photo, but you might be wondering how you can also record video from your camera. To do so, download my VideoCapture.py from GitHub:
# wget https://raw.githubusercontent.com/smoyerman/EdisonOpenCVVideo/master/VideoCapture.py
Open the file in a text editor. You should see the following:
# Import Librariesimportnumpyasnpimportcv2# Define variablesframerate=20.0# frames per secondvideolength=3# length of video in seconds# Grab Cameracap=cv2.VideoCapture(0)# Define the codec and create VideoWriter objectfourcc=cv2.cv.CV_FOURCC(*'XVID')out=cv2.VideoWriter('myvideo.avi',fourcc,framerate,(640,480))# Video partforiinrange(int(videolength*framerate)):if(cap.isOpened()):ret,frame=cap.read()ifret==True:frame=cv2.flip(frame,0)out.write(frame)else:continue# Release the camera and video filecap.release()out.release()
This script performs the following sequence of events.
Imports the necessary libraries: OpenCV and numpy.
Defines the video recording variables: framerate and videolength.
Binds to the camera.
Creates an object for writing the video. The
VideoWriterfunction takes four arguments: the output filename, the codec for video encryption (defined earlier in the code), the framerate, and the video width and height in pixels.Loops through the total number of frames required for the video.
At each iterations of the loop, it checks that the camera is open and available.

If the camera is available, it reads a frame.

Checks that the frame was read properly. If it was, flip the frame and write it out to the video file. If it was not, simply skip this single iteration through the loop and
continuewith the next iteration.
Release both the camera and the video recording.
Point your camera at something interesting and run the script. The camera light should turn on shortly after the script initiates and off again about three seconds later when the script completes. Congratulations! You just shot your first video! Move the file to your host computer to check it out.
Streaming Video
This example uses OpenCV and Python’s Flask library to create a video-streaming web server. First, install Flask using pip, since it’s not available in the opkg repos:
# pip install flask
Next, I’ve written a short script that serves video content over the web. Download it from GitHub:
# wget https://raw.githubusercontent.com/SCUMakerlab/Intel-Edison-Code/master/LiveStream.py
Open the script in a text editor to check out its contents:
fromflaskimportFlask,Responseimportcv2classCamera(object):def__init__(self):self.cap=cv2.VideoCapture(0)defget_frame(self):ret,frame=self.cap.read()cv2.imwrite('blah.jpg',frame)returnopen('blah.jpg','rb').read()app=Flask(__name__)defgen(camera):whileTrue:frame=camera.get_frame()yield(b'--frame'b'Content-Type: image/jpeg'+frame+b'')@app.route('/')defvideo_feed():returnResponse(gen(Camera()),mimetype='multipart/x-mixed-replace; boundary=frame')if__name__=='__main__':app.run(host='0.0.0.0',debug=True)
Amazingly, using the power of Python and its libraries, serving streaming video over the web reduces to only about 20 lines of code. Let’s look at what it does.
Imports the necessary libraries.
Defines a
Cameraobject that has two functions. Theclasscall is used for defining an object in Python, whereas thedefcall is used for defining a function.Defines the function
init, which happens the first time we call thecameraclass. It binds to the camera.Defines the function
get_frame, which snaps a frame from the camera, saves it usingimwrite, and then reads the saved file in a web-ready format.Initializes the webapp using Flask.
Defines the
genfunction, which pulls the images from the camera and inserts them into content for a web page.Defines the URL path for this web page.
Defines the function
video_feed, which returns the web content.Initiates the app on your server in the main function and tells it to run at
0.0.0.0, which is replaced at runtime with the IP address of your Intel Edison.
Close this file and run it. Since we specified debug = True in the run function, you’ll see debugger messages in the Edison console. The output should match the following:
# python LiveStream.py
 * Running on http://0.0.0.0:5000/ (Press CTRL+C to quit)
 * Restarting with stat
On your host computer, head over to http://XXX.XXX.X.XX:5000 or http://devicename.local:5000 in your browser, where XXX.XXX.X.XX is your device IP address and devicename is whatever you named your Edison. You should see your video streaming live at this address. Mine is shown in Figure 5-3, along with me saying hi to you!

Figure 5-3. A screenshot of live video from my web server
You may notice that the video streams pretty well but that there’s a little lag between the action and the video being displayed in your browser. This is due to the time it takes to save and reload the image in the script and the natural lag of the Internet information transfer.
Processed Streaming Video
As a final exercise, you’ll create a web server that streams not only live video but also a processed version of that video. Both streams will be shown simultaneously for comparison. This is a great template for testing your own live-video processing scripts on Edison.
The processing that you’ll be doing is known as edge detection. It sweeps across multiple directions and uses the rate of change of the colors in the image to determine when an edge has been hit. Writing such an algorithm from scratch requires a working knowledge of both calculus and matrix manipulations, but using OpenCV makes it a breeze.
First, you’ll need to download a modified version of our last script from GitHub:
# wget https://raw.githubusercontent.com/smoyerman/EdisonWebVideoProcessed/master/LiveStreamProcessed.py
Open the script in a text editor, and you’ll notice that very little has changed; I’ve added lines 9, 10, and 15 and modified line 17. Above each change, I’ve also written in a comment for clarity. The following code snippet shows the top 18 lines of code from the file, where all the changes occur:
fromflaskimportFlask,Responseimportcv2importnumpyasnpclassCamera(object):def__init__(self):self.cap=cv2.VideoCapture(0)# Reset camera capture size for faster processingself.cap.set(3,480)self.cap.set(4,360)defget_frame(self):ret,frame=self.cap.read()# Apply laplacian edge detection to imagelaplacian=cv2.Laplacian(frame,cv2.CV_64F)# Write out original and edge detected images at oncecv2.imwrite('blah.jpg',np.hstack((frame,laplacian)))returnopen('blah.jpg','rb').read()
Downsizes the image being pulled from the camera. This is just to keep the processing time to a minimum.
Performs the entirety of our actual image processing. This one line applies the Laplacian filter for edge detection to our image.
Using the same trick from the blue frog example, the code writes the before-and-after images out to the same file by stacking them next to each other. Then the web server loads both at once and displays them on the page.
Run the script and head over to the same browser location on your host computer as we did in the last example. You’ll see a smaller image being served up by your camera on the left and the processed image served on the right. An example of my output is given in Figure 5-4.
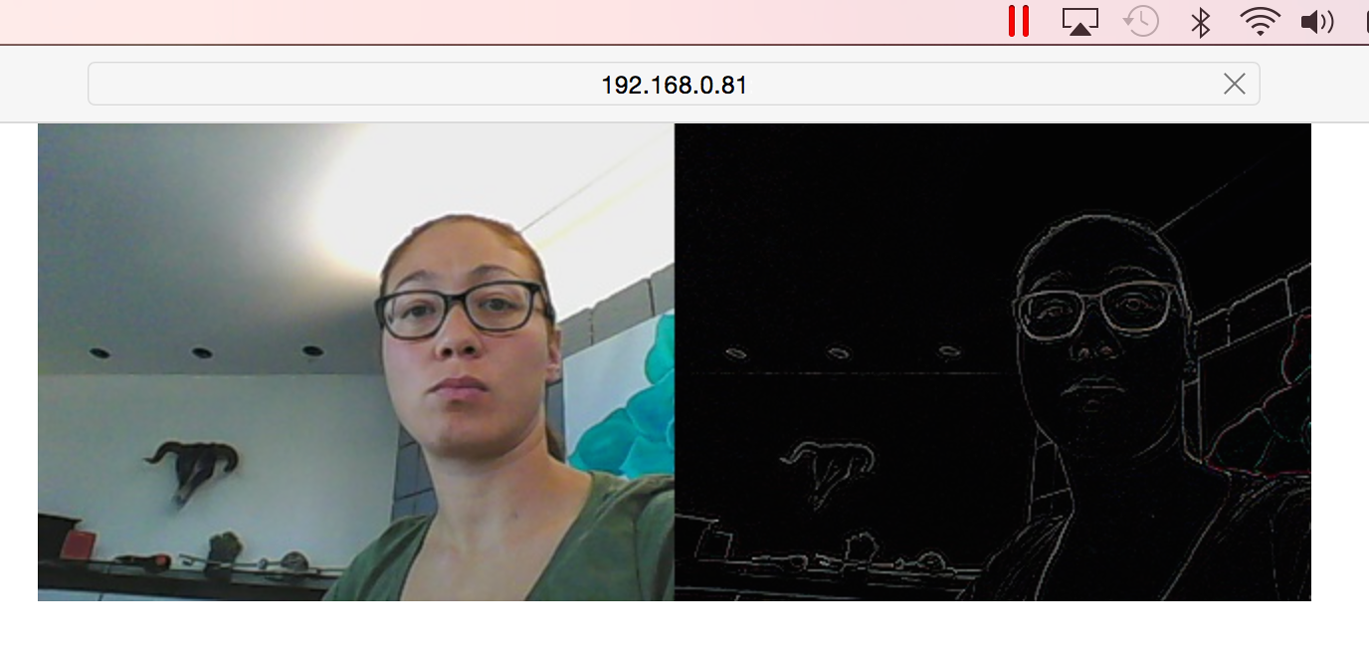
Figure 5-4. A snapshot of my live web server displaying both the output of my webcam and the same image processed for edge detection
Going Further
As you might be able to tell, image and video processing is a topic that is quite near and dear to my heart. If you’d like to explore these topics in more depth, there are a wealth of resources to get you started:
- Python tutorials for OpenCV
-
This is a great place to start. There are many short, functional examples of image and video processing as well as good descriptions of the algorithms being employed. Be warned, however, that these tutorials run an older version of OpenCV than is currently available. Some of the examples will need small changes to work. Thank goodness for Google and Stack Overflow!
- Programming Computer Vision with Python
-
A hands-on introduction to computer vision with Python. A lot of working examples and minimal deep-dives into the mathematical theory.
- Learning OpenCV
-
This text is great if you’re looking to get way from just Python and explore the full OpenCV computing facilities. This is a very hands-on text.