
Chapter 4. Programming in Python
The first programming language that I ever learned was Java. This was followed by C and then shortly after by Fortran. In college, a professor saw these on my resume and told me to just list Python. “It’s so easy by comparison,” he claimed, ”that you can just learn it in a day if anyone asks.” I think he might have been right. My college has since changed their introductory computer science course to Programming in Python.
Introduction
Python is the language of choice for many developers and even more so for many hackers and makers. It’s widely regarded as a great first programming language for many reasons:
- Interpreted language
-
Python is an interpreted language, meaning you can execute scripts directly through an interpreter instead of first compiling them into machine code. This adds the benefit of not having to explicitly declare variable types as we did in the Arduino IDE. The interpreter figures out for you which variables are ints, floats, etc.
- The interactive shell
-
The Python interpreter can execute full Python scripts directly or as individual commands at an interactive shell. The shell presents a powerful way to develop scripts line by line without the hassle of writing a whole program around it.
- The user community
-
The developer community around Python is enormous and incredibly active. From microcontrollers to web development to big data, there are libraries and communities that exist to help you get started and move you along.
In the last chapter, we used the Arduino IDE to control our circuits. In this chapter, we’ll use the Python programming language to perform those same exercises and even add a few more.
The only additional equipment that you’ll need is a smartphone or tablet—either iOS or Android—that is BLE enabled. It’s best if you can get your hands on an Android, as one of the exercises in this chapter (“Bluetooth-Controlled LED”) works for Android only.
“Hello, World” in Python
The best way to learn to program is to dive right in. Connect to the terminal on your Edison by using screen or Putty or ssh’ing in wirelessly (“Connecting”). Edison’s Yocto Linux distribution comes prepackaged with Python, so open the interactive shell simply by typing python at the command prompt. As the shell opens, you’ll be greeted with information about the Python version running on your Edison and a triple chevron (>>>), indicating that the interpreter is ready for your commands:
# python
Python 2.7.3 (default, Mar 31 2015, 14:39:49)
[GCC 4.8.2] on linux2
Type "help", "copyright", "credits" or "license" for more information.
>>>
Python Distributions
Intel Edison comes preconfigured with Python 2.7.3. There are other, newer version of Python, Python 3.X, that are close to the same but differ from the 2.7.3 distribution in just a few ways. If ever you come across a Python tutorial online that isn’t working for you, check the Python version number that it’s written for. This is particularly applicable if you’re doing anything that involves byte strings and/or byte arrays.
At the prompt, issue the following command and then press Enter:
>>> print "Hello, World!"
Hello, World!
The interpreter executes your command and spits back the response in the same window. “Hello, World,” the quintessential first programming task, is so simple when compared to other languages, that it actually inspired an xkcd cartoon.
You can also use Python for simple and not-so-simple computations:
>>>  3+5
8
>>>  import math
>>>  math.sqrt(20374)
142.73752134600068
The import statement is like the include statement we used in the Arduino IDE. It tells the interpreter to include the code from certain libraries or modules, making them available for use. You can also declare variables and perform operations on them:
>>>  a = 2
>>>  a*math.atan(12)
2.9753101898129106
The interactive Python shell also supports tab completion on functions, libraries, and variables. If you type math. and then press the Tab key twice, you’ll see all the functions available in the math module. Python also has a very useful built-in help statement:
>>>  help("sum")
Help on built-in function sum in module __builtin__:

sum(...)
    sum(sequence[, start]) -> value

    Returns the sum of a sequence of numbers (NOT strings)
    plus the value of parameter 'start' (which defaults to
    0).  When the sequence is empty, returns start.
If the help text is long, you can exit out of it by pressing the Enter key to scroll to the bottom or by pressing the q key.
Often you’ll probably want to execute standalone Python scripts or programs, which can be done by creating a text file with the .py extension and then calling it from the command line. To do so, first exit out of the interactive shell by hitting Ctrl+D or using the command exit().
Open a blank text file with the name HelloWorld.py using the text editor of your choice. Insert the following text, save the file, and close:
“Hello,world!”a=10a+=5a
Run the file and you’ll see that it outputs the print statements to the shell:
# python HelloWorld.py
Hello, world!
15
Note
For the remainder of this chapter, I’ll be switching between the interactive shell and standalone scripting. You’re also free to do the same, pasting shell scripts into text files and vice versa. If you’d like to run the standalone programs, simply save them with a .py extension and run as we did above.
Functions and Loops
As we saw in Chapter 3, functions are an incredibly useful coding tool. Functions in Python have a slightly different structure than in C++:
>>> def multiply(a,b):
...     return a*b
...
>>> a = multiply(10,6)
>>> a
60
Notice that you didn’t have to declare types for inputs or returns, but you did have to indent the return statement within the multiply function. If you left this out, you’d receive an error message:
>>> def m(a,b):
... a*b
  File "<stdin>", line 2
    a*b
    ^
IndentationError: expected an indented block
This is one of the biggest hurdles for beginners in coding with Python. Its coding structure is determined almost entirely by colons and whitespace. Any line introducing a block of code, such as a function declaration or if statement, should be finished with a colon. Everything within that block of code, starting with the next line, should be indented. When the indentation stops, the interpreter knows that the code block is over. It’s identical in purpose to surrounding our functions with the curly braces in the Arduino IDE.
Two constructs in Python will be important when you start translating your Arduino code into this new language: the for loop and the while loop. The for loop steps through its associated code block at each increment in the for statement;
foriinrange(10):a=2*ia
The range function creates an array of 10 integers starting from 0:
>>> range(10)
[0, 1, 2, 3, 4, 5, 6, 7, 8, 9]
The code then steps through these values, multiplies each value by two, and then prints the result to the shell. You should see the even integers from 0 to 18 as the output of your for loop.
By contrast, the while loop executes its associated code so long as its condition is true. The following while loop performs the exact same action as the preceeding for loop:
i=0while(i<10):a=2*iai+=1
Changing this code to that in the following example will create a loop that runs indefinitely, since the condition will always be true. This is just like the loop() function in Arduino:
i=0while(True):a=2*iai+=1
Use Ctrl+C to kill this code so that it doesn’t run forever.
Installing Libraries
There are an incredible number of libraries that add functionality to the standard Python distribution. They encompass everything from machine learning to image and audio processing and even web streaming. In fact, the Instagram website was built with Python’s Django library at its core.
If the standard Python distribution does not include a library you’d like to use, you can often install it using the package manager pip. To install pip, first use wget to grab the pip installation file get-pip.py:
# wget https://bootstrap.pypa.io/get-pip.py
Then, run the code you downloaded to install pip:
# python get-pip.py
A very useful library to have installed on Intel Edison is pyserial. Pyserial reads and writes serial data like the serial library we used in the Arduino IDE. You can install this library by calling pip at the command line:
# pip install pyserial
Similarly, should you wish to uninstall this package, just run the uninstall command:
# pip uninstall pyserial
Installing Python Packages
Although using pip and opkg to install Python packages are probably equally easy, it will often be much faster to use the opkg method. This is especially true of large libraries or modules. Packages for opkg have been prebuilt for Intel Edison, whereas pip needs to do the build at install time. It’s best to use pip only in instances where the prebuilt packages do not exist in the opkg repository. Pyserial is one such package.
We’ll explore many Python libraries later in the book; just know for now that if there’s a specific functionality you’re seeking, there’s probably a Python library you can install that provides it. And in 99% of cases, installing it will be just as easy as it was for pyserial.
Blink in Python
Let’s move our original Blink example into Python, blinking the onboard LED connected to pin 13. To make sure that your former Arduino sketches do not conflict with your new Python code, remove the stored Arduino sketches before beginning to program in Python:
# rm /sketch/*
Create the script blink.py, open it in a text editor, and add the following:
importmraaimporttimeledPin=13sleepTime=0.2# blink timingx=mraa.Gpio(ledPin)x.dir(mraa.DIR_OUT)whileTrue:x.write(1)time.sleep(sleepTime)x.write(0)time.sleep(sleepTime)
This code performs the following actions:

The first two lines import the necessary libraries. The
mraalibrary that we installed at the end of Chapter 2 gives Python the ability to interface with the Arduino board hardware. Time gives us access so the system clock.
The next four lines declare variables for the LED pin and blink time and then initialize the GPIO pin as an output.

The
whileloop writes the I/O pin, alternating to 1 (high) and 0 (low), sleeping for 0.2 seconds in between.
Save this program and run it, and you’ll see that the onboard LED connected to pin 13 will blink until you kill the program with Ctrl+C.
Most code in this chapter makes pretty heavy use of Intel’s mraa library. Libmraa is a library written in C/C++ with bindings to other languages such as JavaScript and Python. The goal is to allow easy interfaces with the I/Os on Galileo, Edison, and other platforms where port names and numberings automatically match the board that you are on.
MRAA Numbering
The mraa library has some really odd GPIO pin numbering schemes for the SparkFun Blocks and mini breakout board. If you’re attempting to use one of these boards, the pin-mapping, along with the mraa documentation, can be found on GitHub.
Scripting at Bootup
One of the most common questions is how to make Python scripts start at boot-up as the Arduino sketches do. The easiest way is to create a script that calls your Python code on startup.
First, change into the /etc/init.d directory. If this is your first time adding a start up script to Edison, then you’ll have to create the directory first:
# mkdir /etc/init.d
# cd /etc/init.d
Using your text editor, create a shell script called automatic.sh and paste in the following contents:
#!/bin/sh
python /home/root/blink.py >> /dev/null 2>&1 &
The latter part of the command suppresses the output and runs the Python script in the background. Save the file and close it.
Change the permissions on the automatic.sh script to make it executable:
# chmod +x automatic.sh
Next, add the script as a system service with the default settings, meaning it will be executed last at bootup:
# update-rc.d automatic.sh defaults
If you now reboot the board, the script will run, and the blinking will automatically start. If you wish to remove this script from the startup process, change directories into /etc/init.d/ and issue the command:
# update-rc.d -f automatic.sh remove
Button-Controlled Blink
Digital inputs are handled by mraa as simply as digital outputs. To integrate a button into the blink circuit, recreate the circuit shown in Figure 3-7. The accompanying sketch that toggles the LED translates into Python as follows:
importmraaimporttimeledPin=12# LED pin number for mraa libraryledState=0# current state of led: offbuttonPin=2# button pin number for mraa librarybuttonState=0# current state of button: not pressedled=mraa.Gpio(ledPin)led.dir(mraa.DIR_OUT)button=mraa.Gpio(buttonPin)button.dir(mraa.DIR_IN)whileTrue:ifbuttonState==0andbutton.read()==1:ledState=1–button.read()led.write(ledState)buttonState=button.read()time.sleep(0.1)
This code should be fairly transparent based on the Arduino sketch you wrote before. In fact, most simple Arduino sketches will translate easily over to Python and should be extremely “readable.”
Bluetooth-Controlled LED
A far more interesting exercise is to use a Bluetooth connection from your smartphone to toggle an LED. For this example, you’ll use just the Arduino Breakout Board, toggling the onboard LED connected to pin 13. Unfortunately, exchanging serial data directly with Intel Edison will only work using an Android device, but the process of Bluetooth pairing will work with either iOS or Android. Whether you’re on Android or iOS, pair your device now. Later, you’ll do a BLE example that works with both systems, and you’ll need to be paired.
Bluetooth Pairing
The first step is to enable Bluetooth on Edison with the rfkill command. You can check that Bluetooth is enabled by using the command rfkill list:
# rfkill unblock bluetooth
# rfkill list
0: phy0: wlan
        Soft blocked: no
        Hard blocked: no
1: brcmfmac-wifi: wlan
        Soft blocked: no
        Hard blocked: no
2: bcm43xx Bluetooth: bluetooth
        Soft blocked: no
        Hard blocked: no
3: hci0: bluetooth
        Soft blocked: no
        Hard blocked: no
Note
Edison boots in a Bluetooth-disabled mode in order to save power. Every time you power cycle Edison, you’ll need to issue the rfkill command to instantiate the Bluetooth again. If you’re sure you want the Bluetooth automatically active with every boot, a good option is to add the command to a startup script.
Next, we have to pair our Bluetooth devices to each other. This step need only be done a single time for each device; the pairing will remain forever so long as you don’t delete the paired Bluetooth devices from your phone or Intel Edison.
To pair, you’ll use the command-line Bluetooth controller program, bluetoothctl. Open it by typing the name at the Edison command line:
# bluetoothctl
[NEW] Controller 98:4F:EE:02:F2:D2 edison [default]
[bluetooth]#
When bluetoothctl starts, the MAC address and name of your Edison’s bluetooth will appear after the word “Controller.” Issuing the command help will show you all the Bluetooth configuration options available in bluetoothctl:
[bluetooth]# help
Available commands:
  list                       List available controllers
  show [ctrl]                Controller information
and more...
On your smartphone, enable Bluetooth discovery of your device by going to Settings → Bluetooth, confirming that Bluetooth is set to On, and setting the device to discoverable. Once the phone is discoverable, start Bluetooth scanning on your Intel Edison to find the phone’s MAC address. This may take a few seconds of searching:
[bluetooth]# scan on
Discovery started
[CHG] Controller 98:4F:EE:02:F2:D2 Discovering: yes
[NEW] Device A8:66:7F:AB:AE:01 Stephanie Moyerman’s Nexus 5
Once you have the MAC address of your phone, disable scanning and pair with your phone, making sure your phone is unlocked and active:
[bluetooth]# scan off
[CHG] Device A8:66:7F:AB:AE:01 RSSI is nil
[CHG] Controller 98:4F:EE:02:F2:D2 Discovering: no
Discovery stopped
[bluetooth]# pair A8:66:7F:AB:AE:01
Attempting to pair with A8:66:7F:AB:AE:01
After issuing the command, a pairing message will pop up on your phone. Select Pair so that the two devices can connect. Upon connection, the status will be indicated in bluetoothctl.
So that future connections can forgo this process, set your Intel Edison to discoverable and set the permissions to trust your smartphone indefinitiely:
[bluetooth]# discoverable on
[bluetooth]# trust A8:66:7F:AB:AE:01
Exit from bluetoothctl:
[bluetooth]# quit
[DEL] Controller 98:4F:EE:02:F2:D2 edison [default]
Exchanging Information
To handle the connection and information transfer between your phone and Edison, download the SPP-loopback.py made available from Intel’s developers. SPP stands for serial port profile, which emulates a serial cable for wireless communication such as Bluetooth. We’ll get to the loopback portion later:
# wget http://downloadmirror.intel.com/24909/eng/SPP-loopback.py
Run this code in the background:
# python SPP-loopback.py &
This program runs indefinitely, performing a few different functions. First, it waits for a Bluetooth connection from the phone. When the connection happens, it opens a socket for data transmit and receive. The code then transmits any data received from the phone back again with the prefix "looping back:". Finally, when the phone disconnects, the code closes the socket and starts all over again, waiting for a new connection. As long as this code is running, you can connect and disconnect from your phone at will.
To test it out, you’ll need an app that can transmit and receive data over Bluetooth. If you’re on Android, download the BlueTerm+ application from the Google Play Store. After downloading, open the application and tap on the three dots in the lower-right corner to bring up the menu. Select Connect Device and choose your Intel Edison from the list of possible options. The application will connect, and the status in the upper-right corner will change. This is shown in Figure 4-1. Once connected, anything you type will be transmitted to your Edison and then sent back to you, one character at a time. Get it? It loops back.
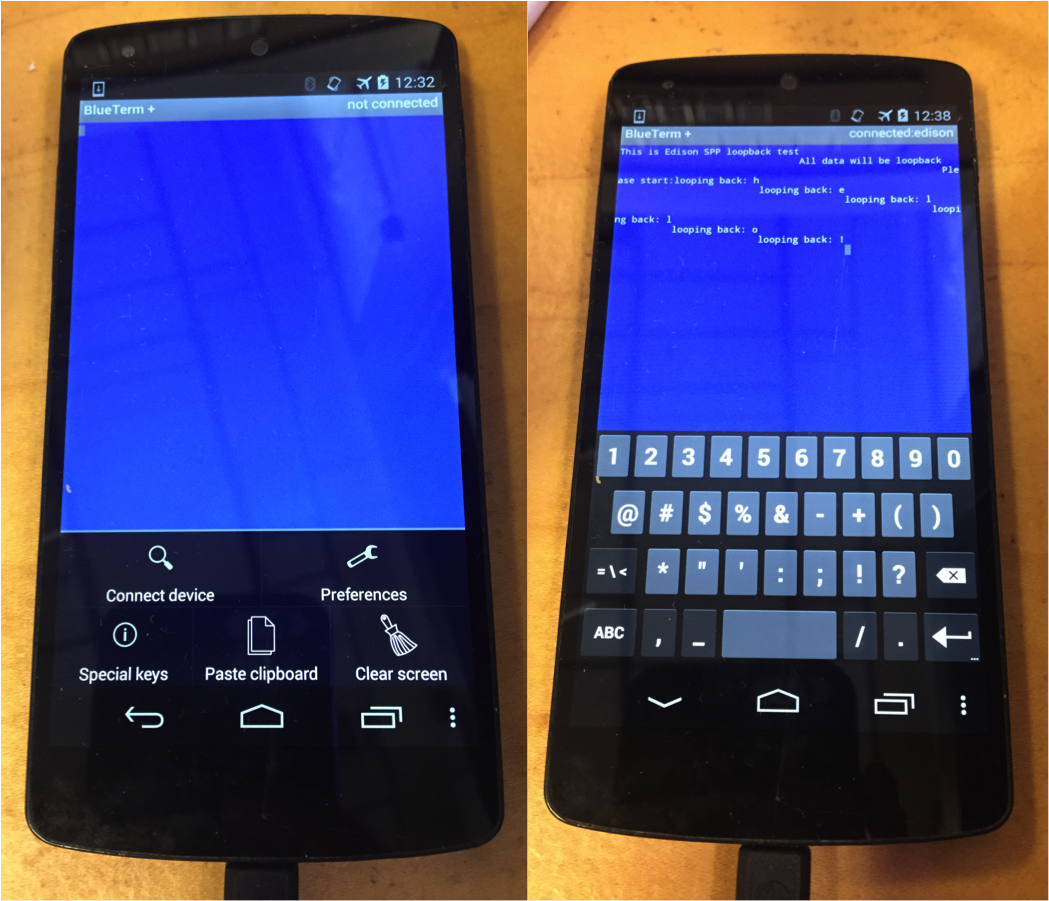
Figure 4-1. Example of using the Blueterm+ application before (left) and after (right) connecting to Intel Edison
Open this file using your favorite text editor. Note that it’s lines 45-47 where Intel Edison receives the characters from the Bluetooth transmission and loops them back out to the smartphone:
whileTrue:data=server_sock.recv(1024)("received:%s"%data)server_sock.send("looping back:%s"%data)
Instead of looping sent items back, you’re going to use the information to toggle the LED. I’ve modified the SPP-loopback.py for this purpose and put it on GitHub. Download it to your Intel Edison:
# wget https://raw.githubusercontent.com/smoyerman/Edison-Bluetooth-LED/master/SPP-blink.py --no-check-certificate
Open this file in a text editor to observe the changes. Lines 18-22 import the mraa library and declare the LED pin as an output, just as you have in prior examples:
# Initiate LED stuffimportmraaledPin=13# LED pin number for mraa libraryled=mraa.Gpio(ledPin)led.dir(mraa.DIR_OUT)
Lines 51-59 replace the loopback functionality with LED controls:
data=server_sock.recv(1024)ifdata=='1':led.write(1)stringy="LED is on"elifdata=='0':led.write(0)stringy="LED is off"else:stringy="Unrecognized Command. Please send either 0 or 1 to toggle the LED."server_sock.send(stringy)
The data is first read from the socket as before.
If the incoming data from the phone is a 1 (read by Python as the string
1), Edison will turn the LED on, and the variablestringywill be updated accordingly.If the incoming data from the phone is a 0, Edison will turn the LED off, and the variable
stringywill be updated accordingly.
If any other data is received, the variable
stringywill be set to an error message.
The variable
stringyis sent back to the phone as a status update.
Try it! Run the program as you did with the loopback file:
# python SPP-blink.py &
Then connect using the BlueTerm+ app and send the LED commands. You should see the onboard LED toggle on and off as you send 1s and 0s. You can build upon this very simple example by adding more commands to the SPP-blink.py script and programming them to take on different actions.
Killing Programs
If the old SPP-loopback.py is still running, and it will be if you haven’t restarted your Edison, then you’ll need to kill it before initiating the new one. To do so, you can use the top command, which provides a dynamic, real-time view of what’s running on your system, and pipe the output to grep to find only what you’re looking for. For example, to find where the SPP-loopback.py program is running, enter the following command:
# top | grep "SPP-loopback.py"
   378   225 root     S    16776   2%   0% python SPP-loopback.py
Then kill the output with Ctrl+C. The first number in the returned line is the process ID of the SPP-loopback.py function. You can kill this function with the kill command:
# kill 378
If the program you’re wanting to kill is a Python program, like SPP_loopback.py, then you can also kill it with the following:
# killall python
Be warned, however. If you have other Python programs running, this command will definitely kill those, too.
The Potentiometer
You can transfer the analog I/O code over to Python just as easily as you transferred the digital I/O code. First, assemble your Intel Edison and breadboard as shown in Figure 3-11. Next, create a Python script, analog.py, with the following contents:
importmraaasmledPinAnalog=9potPinAnalog=5;# Analog in potentiometer pin A5pot=m.Aio(potPinAnalog)led=m.Pwm(ledPinAnalog)led.enable(True)while(True):potReading=pot.readFloat()led.write(potReading)
First, as always, you import the necessary mraa library.
Just as in the Arduino example, you declare your pin numbers.
Next, you initialize each pin with its respective function: analog input or PWM.
Loop indefinitely, reading the potentiometer value at each iteration and assigning it to the LED. The only real difference between this code and the Arduino code is the lack of a
mapfunction. While Arduino expects an integer in the range 0 to 255 for PWM input, mraa expects a float in the range 0 to 1. By using thereadFloat()function, you automatically get a 0 to 1 scaled decimal back from our potentiometer. For reference, theread()function will return the unscaled 0 to 1,023 integer value for analog in.
I2C Accelerometer
To recreate the accelerometer examples in Python, wire the MMA8451 to the Intel Edison breakout as shown in Figure 3-12. Just as you did in the Arduino example, the first step in reading data from the accelerometer is to perform a check that the device is connected and addressable. Create a Python script with the following code to perform that check:
importmraaasm# Init I2Cx=m.I2c(1)# Some addressesMMA_i2caddr=0x1DMMA8451_REG_WHOAMI=0x0DMMA_DEVID=0x1A# Check that we're connected to the MMA8451 chiptry:x.address(MMA_i2caddr)mma_id=x.readReg(MMA8451_REG_WHOAMI)ifnotmma_id==MMA_DEVID:"Wrong device found! Dev ID ="+str(mma_id)else:"MMA8451 Detected!"except:"MMA Device Not Connected!"
Create an I2C object using the mraa library.
Declare variables for the addresses and registers of the accelerometer.
Addresses the device at its known address.
Ask the device for its ID.
If the returned ID does not match the known ID of the MMA8451, then the script prints an error message indicating what was detected.

If the returned ID matches the known ID of the MMA8451, the script prints the “MMA8451 Detected!” message.
Run the script, and you should receive the “MMA8541 Detected!” statement. If not, check your wiring.
Try Except
There is a new construction in your accelerometer code that has not yet been used in this chapter: try and except. The try command attempts to perform all the actions within its respective code block. If any of them throws an error, then the code exits the try block and moves to the except block. For this specific example, the code will throw an error if the MMA8541 is not addressable or cannot be read from. In that case, the code will print the error message, “MMA Device Not Connected!”
Installing the Dependencies
Now that you know you’re connected to the accelerometer, it’s time to read some data. To run this example, you’ll need Numerical Python, or NumPy. NumPy is really the base fundamental package for all scientific computing in Python. Install it with:
# opkg install python-numpy
Numerical Python is a great example of why you should do installs using opkg over pip at any available opportunity. Installing Numpy via pip will take several hours. Installing Numpy via opkg takes only several seconds.
Using the MMA Library
For this example, I’ve written a library and placed it on Github. Pull this library to your current directory, cd into the folder it creates, and ls to see the directory contents:
# git clone https://github.com/smoyerman/EdisonMMA8451.git
# cd EdisonMMA8451
# ls
MMA8451.py  README.md   example.py
Git Cloning
You may wonder why I used git clone this time whereas I’ve always used wget before. If there’s more than one file in a directory, using git will grab all of the files in one fell swoop. By contrast, I generally use wget to pull one raw file at a time, avoiding readme and license files that I don’t really need. It’s a matter of preference really, but know that if there are multiple files in a directory or you’re planning to update/resync these files later, git is probably the way to go.
The example.py file is the one you’ll be using, and the MMA8451.py file is the library itself. Open example.py in a text editor, and you’ll see that it’s fairly similar to what you did in “I2C Accelerometer” in your Arduino sketch. The contents are as follows:
importMMA8451asmma8451importtime# Potential range valuesMMA8451_RANGE_8_G=0b10# +/- 8gMMA8451_RANGE_4_G=0b01# +/- 4gMMA8451_RANGE_2_G=0b00# +/- 2g (default value)# Make accelerometer objectaccel=mma8451.MMA8451()# Check for MMA 8451ismma=accel.check8451()ifismma==True:"MMA 8451 Found!"else:"No MMA Found. What is this?!"# Set up mma, default range is 2Gsaccel.setup()# Can declare a different range withaccel.setup(MMA8451_RANGE_8_G)# Loop, read, and print out valuesforiinrange(10):ax,ay,az=accel.readData()"("+str(round(ax,1))+","+str(round(ay,1))+","+str(round(az,1))+")"orientation=accel.readOrientation()orientationtime.sleep(0.1)
Import the mma library (it’s within the mma library that NumPy is called).
Sets variables for the different accelerometer ranges, and create the accelerometer object,
accel.These six lines should seem vaguely familiar from the previous example. You’re using the function
check8451to check that the identification register matches your expectations and then printing out a status message based on the function response.After checking the device, perform a setup function, which can take an optional input of accelerometer range. The code sets up once with the default of 2 Gs and then reconfigures to use 8 Gs instead.
Read data values and device orientation from the accelerometer 10 times, printing the output of each to the screen.
When you run the code, you should see something like the following output:
# python example.py
MMA 8451 Found!
Range = 2Gs
Range = 8Gs
(4.4, 0.1, -4.2)
Portrait Up Front
(-0.0, 0.2, 1.0)
Portrait Up Front
(-0.0, 0.2, 1.0)
and more...
Just like before, if your MMA is lying flat on a table or other surface when you run this code, you’ll see a value close to 1.0 for az, the third number in the parenthesis.
Accelerometers are frequently used for wearable devices such as step counters. The general idea is to log a portion of the data as it streams in and then to look for either a pattern or a certain event threshold (e.g., the force from the striking of a step). Intel Edison and the MMA8451 supply all the hardware you need to get started, and Python, with its easy access to libraries and data structures, provides the ideal environment to develop such an algorithm. Give it a shot! See if you can detect something a bit more obvious at first, such as tapping the MMA with your finger.
Troubleshooting
In playing with this previous example, I found that it was not uncommon for my MMA to stop working or not start up properly if I connected it when Intel Edison was already on and booted up. If this happens to you, shut down Edison, disconnect power from the board, and then reboot with the MMA already connected.
SPI Screen
Driving displays over Python has significant advantages over C or C++. Python has amazing image manipulation and image-drawing libraries that make configuring shapes and scenes a cinch.
As with the accelerometer example, I’ve written a library in Python for our display screen. Use git to grab it now:
# git clone https://github.com/smoyerman/EdisonILI9341.git
# cd EdisonILI9341
# ls
ILI9341.py         README.md          example_shapes.py  photo.py
Open the file example_shapes.py to see how drawing to the screen works:
""" Drawing something """importILI9341disp=ILI9341.ILI9341()disp.begin()disp.clear((255,0,0))drawing=disp.draw()# Draw some shapes.# Draw a blue ellipse with a green outline.drawing.ellipse((10,10,110,80),outline=(0,255,0),fill=(0,0,255))# Draw a purple rectangle with yellow outline.drawing.rectangle((10,90,110,160),outline=(255,255,0),fill=(255,0,255))# Draw a white X.drawing.line((10,170,110,230),fill=(255,255,255))drawing.line((10,230,110,170),fill=(255,255,255))# Draw a cyan triangle with a black outline.drawing.polygon([(10,275),(110,240),(110,310)],outline=(0,0,0),fill=(0,255,255))disp.display()
Import the ILI9341 library and create an ILI object called
disp.Call the
beginfunction, which sends the screen over 50 configuration commands and initializes the device.The function
clearsets the screen buffer to the specified (R,G,B) values but does not yet send the buffer to the display. In the case of this script, the function is setting the background color to pure red. If no input is specified toclear, the function buffers a black background by default.The script gets interesting when you call the
drawfunction, which returns a PythonImageDrawobject.ImageDrawobjects are essentially a canvas on which you can paint usingImageDrawfunctions.The script then draws an ellipse, rectangle, two lines, and a polygon simply by specifying coordinates and colors of each shape.
Finally, calling
displayrenders the actual image to the screen.
A full list of ImageDraw functions and a couple of quick examples can be found on the documentation page. You can even load images, such as JPEGs and PNGs, and draw on top of them. You’ll do an example of this in Chapter 5.
Run the example_shapes.py file and, after a second or two of configuration and initilization, the screen will render the shapes given in the script. This library and script are meant as a starting point for building larger interactive systems. Python has libraries and distributions that handle building interactive games and images, so get making!
BLE Beacon
The final example in this chapter is turning your Intel Edison into a Bluetooth Low Energy (BLE) beacon, a transmitter that will broadcast signals that can be heard by compatible or smart devices. No additional hardware is necessary for this exercise, just an Intel Edison compute module and any breakout board. Because beacons are typically used for location sensing and tracking, this particular example works great when you put Intel Edison on a smaller breakout board. Imagine your Edison on the SparkFun base and battery blocks as a keychain and serving as a locater for your keys!
Edison Side
I’ve written a script to turn Edison into an ibeacon that is specific to Edison’s Yocto distribution. It is based largely off of Donald Burr’s awesome linux-ibeacon library. Download this code from GitHub.
# wget https://raw.githubusercontent.com/smoyerman/edison-ibeacon/master/ibeacon
You might notice that the .py extension is missing from this script. This is because the script is meant to be run as an executable. To run a Python script as an executable, you must specify the path to the Python interpreter installed on your platform as the first line of the script itself. In this case, the first line is as follows, since this is where Python resides on Edison:
#!/usr/bin/python
Note that this is the same thing you did for your shell script in “Scripting at Bootup”, except the extension there was /bin/sh.
Next, set the permissions to run this file in executable mode using the chmod command:
# chmod +x ibeacon
Run the executable:
# ./ibeacon
Advertising on hci0 with:
       uuid: 0xE20A39F473F54BC4A12F17D1AD07A961
major/minor: 0/0 (0x0000/0x0000)
      power: 200 (0xC8)
LE set advertise enable on hci0 returned status 12
The script shows you the universally unique identifier (uuid) of your freshly created BLE beacon, as well as the major and minor identifiers and transmission power. In order to understand these parameters and use them optimally, it’s best to explain what each one of them does:
- UUID
-
A 16-byte string used to label a large group of related beacons. For example, if I were a farmer and wanted to track each of my animals with an Edison beacon, I would assign them all the same uuid.
- Major
-
A 2-byte string used to distinguish smaller subset of the same uuid. On my farm, while all animals get the same uuid, pigs get one major identifier, and cows receive another.
- Minor
-
Another 2-byte string identifying individual beacons within the uuid and major sets. Though all pigs on my farm would have the same uuid and major, each would receive its very own minor. How cute!
- Power
-
The transmission (tx) power is used to determine the distance from the beacon. The specified tx power should be set to the strength of the signal exactly 1 meter from the device. This value must be calibrated and specified in advance so that a beacon can be used for a rough distance estimate.
You might now see why beacons are so cool and effective. Not only can I group and uniquely identify every single animal on my farm, I can also tell how far each one is from me (if I’m in range of the tx signal, of course). Additionally, BLE beacons work well indoors, unlike GPS and other satellite trackers.
Unblocking Bluetooth
If you run the beacon script and receive the following error, it’s because your bluetooth is not enabled:
# ./ibeacon
Error: no such device: hci0 (try `hciconfig list')
Make sure to enable it before running the script:
# rfkill unblock bluetooth
You can set the default parameters in the ibeacon program at runtime. For a full list of the possible inputs, use the help flag:
# ./ibeacon --help
Smartphone Side
So, let’s use Edison as a true BLE beacon! Download the Locate Beacon (or any comparable) app from either the App Store on iOS or the Google Play Store on Android. I like Locate Beacon because it’s totally free and cross platform.
Open the app, and click the Locate iBeacons button. You’ll need to tell Locate Beacon the specifics of your iBeacon in order for it to appear in the list. To do so, tap on the option that reads “Tap here to configure visible iBeacon UUIDs” and then on the plus sign in the upper-right corner of the next screen. The configuation screen will pop up for you to name your beacon (the name of your Edison works nicely here) and label it with the uuid, major, and minor identifiers. Note that the uuid you enter has to match the format of their example uuid exactly (include the “-” marks). Save your device and then go back one screen to the visible iBeacons. Your Edison should now appear in the list and show you a running distance to the device. Try moving around your room to see the distance change.
If you find that the distance is a bit off from what you’d expect (mine was pretty good with the default program settings), you can correct this on either the phone side or the Edison side. On the phone side, tap the device in the device list and then click the Calibrate button. The app will walk you through calibrating your distance. Alternatively, on the Edison side, you can run the program with different power settings until the phone readings line up with your real-life measurements. Setting the power lower will increase the distance read by the phone and vice versa.
Going Further
In this chapter, we’ve seen a lot of examples of the flexibility and power of Python programming. From general programming to algorithms to peripheral devices, Python’s libraries and wide user community/support make it a really great environment for development and rapid prototyping. The following resources will help you to go further with Python and follow up on examples you’ve seen in this chapter:
- Code Academy’s introductory Python course
-
I think the number of enrolled students more than speaks for itself: 2.5 million.
- Python’s own getting-started guide
-
Links to many resources and code examples for everyone from the newbie to the experienced Python programmer.
- Intel Edison Products Bluetooth User Guide
-
At 73 pages, this guide is not for the faint of heart! However, it is jam-packed with heaps of good information about Bluetooth hardware and software and Edison-specific knowledge.