
At this stage we have Identity Management database ready with the required repository schemas in place. The next step in the provisioning process is to create a Provisioning response file or Provisioning Profile. In order to do this, we must install the provisioning framework on the Identity Management Application node. The Identity Management provisioning framework is part of the Identity Management lifecycle tools, which include the Provisioning wizard as well as other command-line tools. Note that if your selected topology has multiple application nodes for Identity Management then you must install the provisioning framework on all the application nodes. Once we have the framework installed, we will use the Provisioning wizard on the primordial host to create the response file. This file will be used in the next chapter to provision the actual Identity Management environment.
Installing the IDM Provisioning Framework
Fusion Applications 11g, Releases 7, 8, and 9 include Oracle Identity and Access Management version 11.1.1.7, while earlier versions use version 11.1.1.6. If you are installing Oracle Fusion Applications 11g, Release 6 or earlier, you need to install the Identity Management components manually, as discussed in Chapter 3.
From Oracle Fusion Applications 11g, Release 7 onward, Oracle bundles the Provisioning wizard for Identity Management along with the installer media. This saves us time and the complexity of the manual installation, configuration, and integration. This greatly decreases the chances of errors during manual configuration. Before we can provision Identity Management we must first install the Identity Management provisioning framework or wizard, which is included as part of the Identity Management lifecycle tools. In this section, we will have a look at how to install the IDM lifecycle tools.
If your application host is different than the database host (two- or three-tier topology) then you need to install JDK on the host from the ZIP file provided in the media.
[fusion@idmhost ∼]$ mkdir /app/oracle
[fusion@idmhost ∼]$ cd /app/oracle/
[fusion@idmhost oracle]$ unzip /stage/installers/jdk/jdk6.zip
This will create a folder named /app/oracle/jdk6 and this will be our JAVA_HOME for all further installation steps. Now let’s install the Provisioning wizard using the Identity Management lifecycle management tools installer (ldmlcm).
[fusion@idmhost admin]$ cd /stage/installers/idmlcm/idmlcm/Disk1/
[fusion@idmhost Disk1]$ ./runInstaller -jreLoc /app/oracle/jdk6
If this is the first Oracle product being installed on this machine, then you may see the inventory location screen shown in Figure 5-1.

Figure 5-1. Specify new inventory directory location
In this screen you specify a location for the inventory directory. If in the next screen you confirm this inventory as the central inventory on the host, this becomes the central inventory in the system configuration files and other Oracle products will be installed here by default.
You also need to specify the operating system group for this directory. This will enable all other Oracle software installation users who are part of same group to read the central inventory directory. In this case, we will specify the dba group, which is already installed. You could also select oinstall but then you must make sure that all future Oracle product installations on this node have the same default group for the user. If you know that this is not the first Oracle product being installed on this host and you already have an inventory, make sure that the /etc/oraInst.loc file has read permission to the fusion installation user.
Once you click OK, the installer will prompt for the executing inventory registration scripts, as shown in Figure 5-2.

Figure 5-2. Central inventory registration scripts prompt
This screen prompts you to run the <Inventory_location>/createCentralInvetory.sh script as the root user. If you have root access then open a new terminal window and run the script as the root user. This script will assign the directory location as the central inventory for the host in the /etc/oraInst.loc file, which is used by all Oracle Software installations.
[root@idmhost ∼]# /home/fusion/oraInventory/createCentralInventory.sh
Setting the inventory to /home/fusion/oraInventory
Setting the group name to dba
Creating the Oracle inventory pointer file (/etc/oraInst.loc)
Changing permissions of /home/fusion/oraInventory to 770.
Changing groupname of /home/fusion/oraInventory to dba.
The execution of the script is complete
If you do not have root privileges or you do not want to register IDMLCM in the central inventory then you select the Continue Installation with Local Inventory checkbox. In this case, the installer will create an inventory but will not assign it as the central inventory in the /etc/oraInst.loc file.
Click OK once you have executed the script or selected the checkbox to proceed with IDM lifecycle tools installation. The Welcome screen provides information about the purpose of this installer. No action is necessary on this screen. Click Next to proceed to the Prerequisite Checks screen, as shown in Figure 5-3.

Figure 5-3. Prerequisite Checks status screen
This step checks the following required operating system prerequisites for Oracle Identity Management lifecycle tools installation.
Operating System Certification: Some very old or very recent versions of operating systems are not supported, so make sure that you have the supported operating system and it is not the lowest version supported for future support sustainability and to avoid OS upgrades in the near future. You can check the list of compatible OSs for a current version using Oracle Certification Matrix in the Oracle support portal.
Operating System Packages: Although we have already installed the recommended packages/RPMs for the operating system, this wizard will confirm it.
Kernel Parameters: It will check all required kernel parameters for required minimum values. Note that kernel parameters values will be checked for the current session only, so make sure that you have also added the values in the relevant system files permanently.
Recommended glibc Version: Although the mandatory packages would have already taken care of this, it specifically checks for the glibc version as well.
Physical Memory: It will check the total amount of the installed memory on the host.
Once the prerequisites check is successful, click Next to continue to the installation location screen, as shown in Figure 5-4.

Figure 5-4. Installation Location selection screen
The Installation Location screen prompts for the following details:
Oracle Middleware Home: It is important not to get confused by the Oracle Fusion Middleware Home directory under which we will install all the IDM components. This is a parent directory only for the IDM lifecycle tools and will not be used after the provisioning is complete. This should be on a shared location if you are installing IDM components on multiple nodes. In this case, we will use /app/provisioning/tools. Make sure that there is a writable /app directory available. If there isn’t one, use the following command to create it:
[root@idmhost ∼]# mkdir /app
[root@idmhost ∼]# chown fusion:dba /app
Oracle Home Directory: The home directory of the IDM lifecycle tools. It recommended that you name it idmlcm. The tools and related utilities will be installed under this directory.
Click Next to proceed to the Installation Summary screen, as shown in Figure 5-5.

Figure 5-5. Installation Summary screen
The installation summary summarizes the directory locations selected, verifies the amount of disk space available, and confirms the component being installed. Click Save to save the entered information in a file. This will help if you want to start the installation at a later stage or restart it after any errors. It can also help in doing multiple identical installations. Review the Summary screen and click Install to start the installation process, as shown in Figure 5-6.

Figure 5-6. IDM lifecycle tools Installation Progress screen
The installation screen shows the progress of the overall installation and the installation log file’s location and name. It also shows the status message of the current activity being performed. Any errors or warnings will be displayed here. The overall installation time is shown at the bottom of the screen. In case of any errors, refer to the log file created at <Inventory_location>/logs/install<timestamp>.log.
Once the installation is complete, click Next to proceed to the installation summary, as shown in Figure 5-7.

Figure 5-7. Installation summary screen
Review the installation summary and save the same for project documentation purposes.
Understanding the Directory Structure
Now we have the Identity Management lifecycle tools installed, which can be used to provision an Identity Management instance for Fusion Applications. Let’s first look at the directory structure. Note that the IDM provisioning framework is evolving, so you may find some directories empty but they will be used in future versions of the framework. Certain functionalities are disabled in the framework that are included in the media of Oracle Fusion Applications 11g, Releases 7, 8, and 9. Figure 5-8 shows some of the important directories of interest in the IDM lifecycle management tools home.

Figure 5-8. Important directories of the IDM provisioning framework (IDM lifecycle tools)
Let’s explore the important directories and files shown in Figure 5-8 one by one.
common: This directory contains important libraries and utilities like apache ANT.
cfgtoollogs: This directory contains the logs for the IDM lifecycle tools installation. The log files in this directories are available in <oraInventory>/logs as well. Note that this directory does not contain the logs for the IDM provisioning phases, but contains the installation logs for the lifecycle tools only.
release.txt: This file contains the version details for the IDM lifecycle tools for the purpose of troubleshooting and informing Oracle support while reporting any issues with the installer.
provisioning: This directory contains the IDM provisioning framework. It has following important subdirectories.
util: This directory contains various common utilities like zip, unzip, freememory, and so on, which are used by the tools during provisioning
provisioning-build: This directory is identical to the one included in Fusion Applications provisioning framework .It mainly contains XML build files that are not currently required by IDM Provisioning wizard but are only FA provisioning.
idm-provisioning-build: This directory contains all the XML build files that are required for the IDM provisioning orchestration process. You may find all provisioning targets and actions performed during the actual provisioning process.
provisioning-plan and template: Similar to the provisioning-build directory, these directories are identical to one used by Fusion Applications provisioning framework and are placeholders in this release of IDM provisioning framework.
lib: This directory contains all important Java class files used by the IDM Provisioning wizard in the jar format.
bin: This directory contains the scripts to run the Provisioning wizard. We will initiate the provisioning process from this directory only. It contains a graphical wizard as well as command-line scripts required to provision an IDM instance.
Creating an IDM Provisioning Response File
The Identity Management Provisioning response file is also called the Provisioning Profile. This term is used interchangeably. The Identity Management Provisioning wizard allows us to enter all the parameters required for the selected installation topology using a question-answer wizard and save them in a response file in advance. We can use this response file at the time of actual installation. This saves us a lot of time in case there was any issue during or after starting the installation, we need not provide the same values again but can simply supply this file to the wizard to automatically populate the required parameters for the installation.
Since we use port 7777 for IDM web server, make sure nothing is running on this port.
[fusion@idmhost ∼]$ netstat -an | grep 7777
Note
Until Fusion Applications 11.1.7, Apache ANT utility was missing from the repository so if you are installing Identity Management from the 11.1.7 media, the solution is to either install the Fusion Applications provisioning framework on this node as well, which includes ANT, or manually download ANT (version 1.7.1 or higher) from http://ant.apache.org/ for your platform.
From Fusion Applications 11.1.8 onward, Apache ANT is included in the IDM lifecycle tools common utilities directory.
Launch the IDM Provisioning wizard to create a new response file.
[fusion@idmhost ∼]$ export JAVA_HOME=/app/oracle/jdk6
[fusion@idmhost ∼]$ cd /app/provisioning/tools/idmlcm/provisioning/bin/
[fusion@idmhost bin]$ ./idmProvisioningWizard.sh
The Welcome screen, as shown in Figure 5-9, is an informal screen that cautions the user to ensure that the prerequisites are already performed before proceeding.

Figure 5-9. Identity Management Provisioning wizard welcome screen
When you create a provisioning response file, you need to ensure that an exclusive Oracle database has been created for hosting Identity Management components and also the required repository has been created using Oracle Identity Management RCU. Make sure to bring up the database and listener on the database host (idmdbhost in this case) since the wizard verifies the connection details later. Once this is ensured, click Next to proceed.
This screen provides four different options of activities that can be performed by the IDM Provisioning wizard, as shown in Figure 5-10.
Install an Identity Management Database: Note that as of Oracle Fusion Applications 11g, Releases 8 and 9, the bundled IDM lifecycle tools that ship with the media do not support this option. In all future releases this option may be available. If it is not supported, then you will see this option grayed out or disabled.
Create a New Identity Management Environment Provisioning Response File: This option creates a new Identity Management provisioning response file. You also can create as many response files as you want using this option for different topologies for learning purposes. Selecting this option, the wizard will later ask a set of questions. Based on the responses, it will create a consolidated response file and will use them for the provisioning process.
Update an Existing Provisioning Response File: This option should be used if you find that there was any mistake in providing the details while creating the response file earlier or if there is any change in some parameters. Instead of creating a new response file all over again, you can use this option to modify the changed values and resave.
Provision an Identity Management Environment: We will use this option later to install and configure an Oracle Identity Management environment using an already created provisioning response file. It will also provide an option to review certain sections before proceeding with the installation process. We will look at this section later.

Figure 5-10. Wizard option selection screen
Caution
Although the IDM Provisioning wizard enables you to update the existing response file, it is not yet fully supported in the build supplied with Fusion Applications 11g, Release 8. So it is recommended not to use this option in this release.
Select Create a New Identity Management Environment Provisioning Response File and click Next to proceed. Now you will see a common Oracle installer screen that prompts for an email address, where you want to be notified in case there are any important security issues and updates. Provide the details as requested or else just leave this empty and click Next to proceed to the Products List screen, as shown in Figure 5-11.

Figure 5-11. Identity Management Products List screen
This screen allows you to select which Identity Management Products you want to provision. Since this wizard can be used for non-Fusion applications environment as well, it provides an option to check or uncheck the individual products. But for the Identity Management infrastructure to be used with Oracle Fusion applications, you need to select all the products as shown in Figure 5-11. By default, all products are selected. Leave the selection unchanged.
Note
From Oracle Fusion Applications 11g, Release 9 onward the bundled IDM provisioning framework has the products selection screen grayed out so that you do not deselect any product by mistake.
The lower panel of this screen provides a summary information of the Oracle Identity Management topology. It displays the number of WebLogic servers that will be configured, including Administration Servers Application Managed Servers. Click on the Details button to launch a pop-up screen with the list of WebLogic servers that will be created during provisioning, as shown in Figure 5-12.
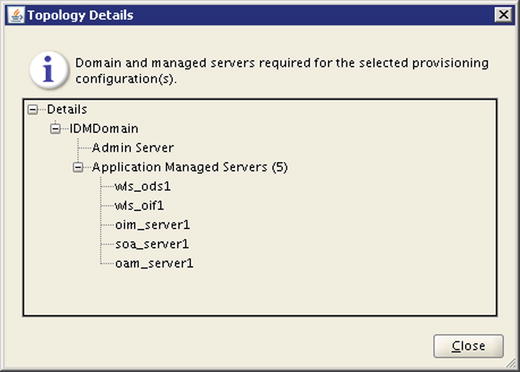
Figure 5-12. Topology details pop-up screen
At this moment there is no option to change the names of the managed servers unlike we used to do in manual installation in earlier releases. Once you have reviewed the information, click Close to return to the previous screen and click Next to proceed to the Response File Details screen, as shown in Figure 5-13.

Figure 5-13. Response File Description screen
This screen will prompt for the following provisioning response file details.
Response File Name: The default name is provisioning.rsp. You can change it to any name so that you can recognize the response file by name itself if you have created multiple response files for different topologies.
Response File Version: You can manually maintain the version numbers of the response file if you have made any changes since last time.
Created By: Automatically populated by the wizard. Defaults to the operating system user who started the wizard. This value cannot be changed. In this case its value is fusion.
Created Date: Automatically populated by the wizard. This is the time when the response file was first created and this does not change even if you modify the response file later. This field cannot be changed as well.
Response File Description: You can specify any arbitrary description for your response file. You can read the response file and summary files using any text editors later.
Enter the response filename provisioning.rsp and click Next to proceed to the Installation Location details screen, as shown in Figure 5-14.

Figure 5-14. Install Location Configuration screen
The Provisioning wizard now prompts for the following location parameters. Make sure to have these directories on a shared disk if you are using multiple nodes topology for IDM.
Software Repository Location: Provide the location where you have created the installer repository. The wizard checks for the availability of installers directory within this location provided. In this case it is /stage so provide that here.
Software Installation Location: This is the location where the middleware homes for the WebLogic server, HTTP server, and directory servers will be installed. Make sure that the base directory is on a writable location. We already have an /app directory owned by the fusion user. Enter the value as /app/oracle or any desirable path under 45 characters length.
Shared Configuration Location: This value will be populated automatically once you have provided the value of the software installation location. Make sure that this folder is on a shared disk if you are using multi-node architecture since this directory contains the instance and domain configuration files, startup scripts, logs, and so on.
Enable Local Configuration: This should be selected only if you are using an Enterprise topology to isolate the configuration files for each tier. This is also required if you are going to use high-availability architecture and want to keep configuration settings for each node separate to allow tuning the nodes separately. Once you check this checkbox then the next field becomes active where you can select a location for local configuration directory. This directory has to be on a local disk that’s not shared with other nodes. For example, /app/local/oracle.
Once the details are entered, click Next to proceed to the topology selection, as shown in Figure 5-15.

Figure 5-15. Node Topology selection screen
In the Node Topology selection, we have two top-level options to choose from.
Single Host: When you select this option, all IDM components will be installed on the same host. In this case, it is idmhost.paramlabs.com.
EDG Topology: Use this option for three-tier Enterprise topology. Since initial releases of Oracle Identity Management 11g, Oracle uses the term EDG for Enterprise Deployment Guide, but now it is called Enterprise Topology only. It allows us to change the hostname for Directory Server, Web Server, and Application Server (Identity and Access Management) with three different hostnames.
If you have selected EDG topology, the checkbox selection for Configure second application instances will be enabled. This option allows you to enable high availability for all products of Oracle Identity Management. If you select this checkbox then it will prompt you to select a secondary host for the Directory server, Web server, and IAM server. This will allow you to use up to six hosts for the selected topology. Note that the wizard will not allow you to keep any value blank. You can use the same hostname again but do not leave it blank. The last checkbox is for Install Web Tier in DMZ. Select this option only if you have selected EDG topology and you have DMZ set up in your environment.
Note that once you select EDG topology and/or second instances and specify any values in the hostnames, if you want to change back to the Single Host selection, you must make sure to remove each values from Second instance hostnames first before unchecking it and change each hostname value in EDG topology fields to same hostname before switching to Single Host. Due to some bug, if the field values contain different hostnames the installer may fail.
Caution
Be very careful while making selections in this screen, as changing the topology will alter some values in further screens as well, for example port values, hostnames, and so on. Even if you change the values back to originals, the other screen’s value does not change back to the original unless you start the response file creation from scratch. This can cause the actual provisioning process to fail at install or configure phases.
Table 5-1 shows the different topology combinations available in this screen and the impact of the selected topology on other components selection. Note that this table excludes DMZ node.
Table 5-1. Toplogy Options Available in the IDM Provisioning Wizard
Select Option | High Availability | Load Balancer Required? | Number of Hosts | Identity Store | Policy Store |
|---|---|---|---|---|---|
Single Host | No | No | 1 | OID | OID |
EDG Topology | No | Yes | up to 3 | OVD | OID |
EDG Topology + Configure Second instances | Yes | Yes | up to 6 | OVD | OID |
In this example, we will select idmhost.paramlabs.com for the single hostname and click Next to proceed to the Virtual Hosts Configuration screen, as shown in Figure 5-16.

Figure 5-16. Virtual Hosts Configuration settings screen
The options in the Virtual Hosts Configuration screen will be grayed out if you have selected Single Host option in the previous screen since there is no other node for the Virtual IP to fail over or migrate. This option is available for the EDG topology even if you have not selected second instances. This is an optional selection so you might not want to select a virtual hostname in the EDG topology as well. You have the option to select the virtual hostname for each server in the topology, including second instances. Each virtual hostname should be different. You also need to register these hostnames in DNS so that the other hosts and load balancer can reach these servers.
Note
Note that virtual hostname should not be mistaken with the network load balancer name. The load balancer will forward requests received at a single IP or name to multiple servers, while the virtual hostname is used here only to give a different alias than the actual hostname. That way, if you want to failover or migrate to another host, you need not reconfigure the application.
Figure 5-17 shows an example of this screen with the Configure Virtual Hosts option selected.

Figure 5-17. Virtual Hosts Configuration settings screen
This example is for the EDG topology without a second server for the components. So we have only three selections available. If EDG and a second instance are selected, you may see more rows here.
Caution
If you selected the EDG topology earlier and selected the load balancer details in this screen and then changed back to single host, this screen will become grayed out with old values that are no longer valid. But due to an issue with the IDM Provisioning wizard, it will still validate the grayed out values and throw an error in the install or configure phase. Figure 5-18 shows an example of this.

Figure 5-18. Incorrect virtual hostname selection screen for the Single Host topology
Once you have made suitable selection and entered the virtual hostnames, click Next to continue to the Common Passwords screen, as shown in Figure 5-19.

Figure 5-19. IDM Common Passwords screen
You will be prompted to enter a common IDM password and the same password will be set for all users in the IDM suite products as well as the keystores. The password policy is similar to what you’ve seen earlier but the difference here is that it requires at least one uppercase letter in addition to policy of eight characters maximum, with alphabetical and numerical requirements.
Enter a common IDM password in both fields and click Next to proceed to OID configuration, as shown in Figure 5-20.

Figure 5-20. Oracle Internet Directory Configuration screen
In OID Configuration page prompts for the following values:
Identity Store Realm DN: Enter the Identity Store Realm Distinguished name (DN). The format is generally similar to dc=domain,dc=com. In this case, we will use dc=paramlabs,dc=com.
Policy Store Realm DN: This value is automatically populated the same as the Identity Store Realm DN value. You cannot manually modify this value in the wizard. As you can see, it has populated the same value (dc=paramlabs,dc=com) here.
This screen has a new option in the latest Provisioning framework build, which is bundled with Oracle Fusion Applications 11g, Release 9 onward. This option is to select Authentication Directory Type or Identity Store Type. Earlier versions bundled with FA 11.1.7 and 11.1.8 didn’t have this option so identity store used to default to OID only. In previous releases, we could manually change the value for Identity Store type directly in the response file. The following three parameters are used for selecting an identity store in the response file if you do not see this option on the screen.
#idstore -oid info
IDSTORE_TYPE : OID
IDSTORE_HOST : idmhost.paramlabs.com
IDSTORE_PORT : 3060
If you see the option to select the identity store type, then choose it based on the following conditions.
Oracle Internet Directory (OID): Use this for a single IDM host topology
Oracle Virtual Directory (OVD): Use this option for the EDG Topology with or without a second instances host
Click Next to proceed to the ODSM port configuration, as shown in Figure 5-21.

Figure 5-21. Oracle Directory Service Manager Configuration screen
In the ODSM configuration page, the hostname will be automatically populated based on the values entered in the Topology Configuration page. If you have selected the EDG topology with second instances then you will see entries for the second host as well. The default port for ODSM is 7005. You may change it if your security policy does not allow default ports to be used or if you have any port conflicts on the host. Click Next to proceed to OHS Configuration, as shown in Figure 5-22.

Figure 5-22. Oracle HTTP Server Configuration screen
In the Oracle HTTP Server (OHS) Configuration page, the default values are already populated and you can only change the OHS and SSL port values. The default values for the port and SSL port are 7777 and 4443, respectively. You can change these values if your organization has a policy of setting non-default port values. The OHS host is populated based on the Web server selected earlier. In this example, it is idmhost.paramlabs.com. The current version of the IDM Provisioning wizard does not allow changing the instance name (default ohs1 or ohs n) and protocol values (default http) from this screen.
Optionally, it will also prompt for a second OHS hostname, second OHS port, second OHS SSL port, and second OHS instance name if you have selected second instances in the topology selection page. Provide similar values as first host here. In this case, we do not see these fields since we have selected a single host. Review the ports and click Next to proceed to the OIM Configuration, as shown in Figure 5-23.

Figure 5-23. Oracle Identity Manager Configuration screen
On the OIM configuration page, you are required to provide or confirm the following details.
OIM Host: This value is automatically filled based on the value selected on the Topology configuration page. In this case, it is idmhost.paramlabs.com.
Port: The default port for OIM is 14000. We will leave it unchanged.
Secondary OIM Host and Port (optional): If a second instance is selected, the wizard will show two more fields. Enter the same port value as the first host.
Configure Email Server: If you want to configure outgoing emails then select this checkbox. If you do not select the next checkbox of custom email server, then it will use the default email server configured at the Linux/Solaris operating system level. If you are using Windows and if you want to configure the email server, you must select the custom server settings as well.
Custom Email Server: This option is used to manually set outgoing the email server settings if no default email server is set at host or if you want to use different email server.
Outgoing Server Name: Provide a name or IP of an outgoing email server.
Outgoing Server Port: The default SSL port is 465 and non-SSL port is 25. Enter a value according to the outgoing server security.
Outgoing Server Security: Enter None (insecure), TLS, or SSL.
Username and Password: If your outgoing email server requires authentication then enter the username and password here.
Enter and verify all of this information and click Next to proceed to OAM Configuration, as shown in Figure 5-24.

Figure 5-24. Oracle Access Manager Configuration screen
The OAM configuration page requires the following information:
OAM Host: The hostname is automatically filled based on the topology configuration and is not editable.
OAM Port: The default OAM port is 14100. Change it only if required.
OAM Transfer Mode: There are two options, Simple and Open. For Linux platform, we must select it as Simple.
Cookie Domain: Enter a value for setting the cookie domain. In our case, we entered .paramlabs.com. Make sure to put a dot (.) before the domain name.
Note
Until 11.1.6 we were allowed to use Open Transfer mode. But from 11.1.7 onward, we must use Open for AIX OS only and for all other OS, we must specify Simple.
Enter the required values and click Next to proceed to the SOA configuration, as Figure 5-25.

Figure 5-25. The SOA Configuration screen
The SOA Configuration page has only one editable property, which is the SOA port. The default value is 8001 and we will leave it as is. The other property on the page is the SOA host, which is automatically populated by the wizard based on the topology selection. Second node information will be requested as additional two fields if the second instance is selected in an EDG topology. Click Next to proceed to the OID Identity Store database information screen, as shown in Figure 5-26.

Figure 5-26. OID Identity Store DB Connection parameters screen
IDM Provisioning allows us to have a different database of directory services and another database for IDM components. This screen prompts for the following database connection details of the OID Identity Store database.
Schema User Name: The username cannot be changed and it remains ODS only. This username does not have the schema prefix that was selected during RCU. This field is not editable.
Service Name: This is a Database Service Name in the case of the RAC database and SID in the case of Single Node database. We will enter idmdb here.
Schema Password: Enter the password for the ODS schema.
Single DB/RAC DB: Select the appropriate option to select single or RAC database. Provide connection details such as hostname and listen port for single or RAC nodes. We will select single node DB with idmdbhost.paramlabs.com as the hostname and custom listener port 1531, which we selected during IDM database creation.
Enter the database details and click Next to proceed to the OID Policy Store Database Configuration screen, as shown in Figure 5-27.

Figure 5-27. OID Policy Store DB Connection details screen
Since the OID policy store resides on the same database as the Identity Store, we will see that the screen is grayed out and the values are uneditable. All the information will remain same as provided in the OID Identity Store DB Configuration page.
Tip
At any point in time during the response file creation, click Back to go back to any previous screen and review or update the values. Once you modify a value in the previous screens and return to where you left, you need not reenter the details again. The values are saved during the session until you cancel or finish the response file creation.
Review the information and click Next to proceed to the OIM Database Configuration screen, as shown in Figure 5-28.
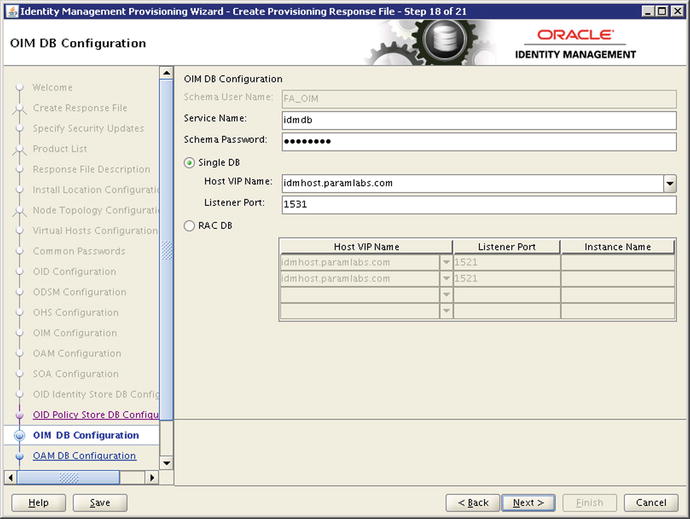
Figure 5-28. Oracle Identity Manager database connection details screen
This screen prompts for the database connection details of database containing OIM specific schemas. As mentioned earlier, IDM Provisioning allows us to one database for Directory Services and another database for IDM components. You can either enter the same database details (which is the case in our installation) or if you have provisioned IDM schemas in different database then enter that database details here. Note that the Schema username cannot be changed and it remains FA_OIM as created while running RCU. Once the connection details are entered or verified, click Next to proceed to the OAM Database configuration screen, as shown in Figure 5-29.

Figure 5-29. Oracle Access Manager database connection details screen
This screen shows the connection details for the database containing Oracle Access Manager schema (FA_OAM), which is invariably the same as OIM DB. Hence the fields on this screen remain disabled. Review the information and click Next to proceed to the Load Balancer Configuration, as shown in Figure 5-30.
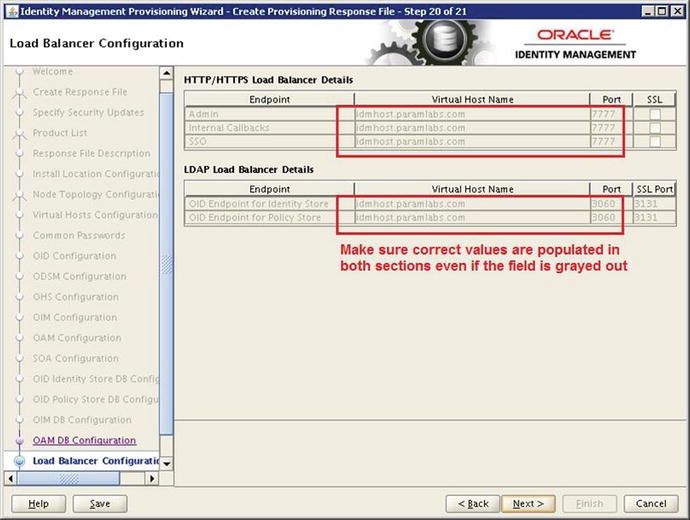
Figure 5-30. Load Balancer Configuration detail screen
If you have selected a single host for the IDM components in the topology selection page, then the Load Balancer Configuration screen will be completely grayed out, as shown in Figure 5-30. If you have selected EDG topology with or without a second instance then you should use Network Load Balancer (NLB) or virtual hostname. The role of load balancer in a single Web server would be just to forward the requests or act as an alias. In the case of multiple hosts the load balancer will accept the requests on the same or a different port and forward them to internal servers on the OHS port configured earlier.
You have to provide a virtual hostname and an NLB port for following three endpoints. You also need to specify whether you want to use SSL for the virtual host or not. This screen is slightly different in recent releases of IDM lifecycle tools (Fusion Applications 11.1.9 onward). As cautioned earlier in Figure 5-18, be careful to make sure that there is no incorrect virtual hostname grayed out for a single host topology.
Admin: This will be the virtual hostname for administration activities.
Internal Callbacks: This will be the virtual hostname for Identity Management internal callbacks across components.
SSO: This will be the single sign-on page virtual host. Generally you should select SSL (HTTPS) for this page since this will be the URL that users see when they launch the Fusion Applications Login screens.
On the same screen, we also can select Load Balancer for LDAP or Directory Server components as follows. Depending on the topology selected, these fields may be editable or non-editable.
OID Endpoint for Identity Store: Provide the value for Identity Store virtual host and port. You need to provide non-SSL and SSL ports. By default, OID is configured on the 3060 (non-SSL) and 3131 (SSL) ports unless you have modified them manually.
OID Endpoint for Policy Store: This value will always be the same as the identity store.
Provide required details or verify the details automatically populated on screen click Next to proceed to Summary screen as shown in Figure 5-31.

Figure 5-31. Respone File Creation summary screen
Review the installation summary carefully since it shows consolidated information to be stored in the response file. If you find something is not correct, you can go back to the desired page and change the values.
This page prompts for the following three details. The values are automatically populated so it is optional to change them.
Provisioning Response File Name: Same as what you mentioned in the response file description earlier. Change it if required.
Provisioning Summary: Name of the provisioning summary file with the same name as the response file and with a .summary extension. Although the installer doesn’t use this file, it contains the summary information in the file for later review and documentation purposes.
Directory: The location where the Identity Management Provisioning response file and summary will be created. You can change it to another location if required. The default location is <IDMLCM_HOME>/provisioning/bin or the same location from where the provisioning scripts were invoked.
Review the summary and click Finish to complete the response file creation and then close the window. Once this is done, you will see these two files created under the previously mentioned directory. Make sure to check the timestamp to confirm these are the files created by the wizard if you already have existing response files in this location.
Modify the IDM Provisioning Response File for Fusion Applications
Since the IDM provisioning is generic, we must change the following values in order to meet the requirements for the Fusion Applications provisioning. Change the following values manually in the provisioning.rsp file (or the name you specified).
#IDStore UserNames Configuration
IDSTORE_OAMADMINUSER=oamadmin
IDSTORE_OAMSOFTWAREUSER=oamLDAP
IDSTORE_OIMADMINUSER=oimLDAP
Go to the provisioning response file directory and back up the existing response file for precaution.
[fusion@idmhost ∼]$ cd /app/provisioning/tools/idmlcm/provisioning/bin/
[fusion@idmhost bin]$ cp -p provisioning.rsp provisioning.rsp.bak
Edit the response file and change the values of IDSTORE_OAMADMINUSER, IDSTORE_OAMSOFTWAREUSER and IDSTORE_OIMADMINUSER as mentioned.
[fusion@idmhost bin]$ vi provisioning.rsp
Let’s make sure that the correct lines were changed and compare them with the original file.
[fusion@idmhost bin]$ diff provisioning.rsp provisioning.rsp.bak
355,357c355,357
< IDSTORE_OAMADMINUSER=oamadmin
< IDSTORE_OAMSOFTWAREUSER=oamLDAP
< IDSTORE_OIMADMINUSER=oimLDAP
—
> IDSTORE_OAMADMINUSER=oamAdminUser
> IDSTORE_OAMSOFTWAREUSER=oamSoftwareUser
> IDSTORE_OIMADMINUSER=oimAdminUser
Copy Credentials Wallet File to DMZ Hosts (Optional)
If you are using DMZ hosts in your topology, you must copy certain files to the DMZ nodes since they are not on the shared location. In this case, you will see another directory named <provisioning_filename>_data under the same location where the IDM Provisioning response files have been created. You will see a file named cwallet.sso, which contains the credentials information for encryption and decryption purposes. Copy the response file as well as this folder to the same location on DMZ hosts or any hosts that do not have shared disks visible.
Summary
In this chapter, you have seen the structure of the Identity Management provisioning framework and the steps for installing it. Later you learned about the process of creating the Identity Management provisioning profile or response file. At this stage, we created the Provisioning response file, which will be used later as the source profile for creating an Identity Management environment. The wizard allows you to create many response files for different topologies. If you copy the file to another server, you should be able to provision an Identity Management environment using the same file in plain text with different variables and their respective values. At the end of this chapter, you read about the importance of various screens of the response file and learned which values you should choose.