
The discussion of Fusion Applications Administration is incomplete without mentioning patching activities. Patching is a mundane but invariably essential task for any Enterprise Application environment. Each shipped application or technology stack could have platform-specific or generic bugs or security vulnerability that’s undetected or not exposed at the time of the release. The Oracle Support and Development teams are constantly working on improving the applications or technology components due to issues encountered and reported by customers or as result of sophisticated security scans. Oracle releases fixes for these bugs in the form of patches and patch bundles. Some of these patches are security-related, critical patch updates and are mandatory, whereas others need to be applied on an on-demand basis if the same issue is encountered in your environment.
We will begin this chapter by looking at how to plan, prepare, apply, monitor, and verify patches on your Fusion Applications instance. In the later sections, we will look at how to maintain the applications environment by running a specialized utility called AD Administration. At the end of this chapter we will look at another critical administrative activity—backing up and restoring the Fusion Applications environment. In that section, you will see how to plan for the optimal backup strategy for your organization and effectively restore or recover the complete environment or specific components based on requirement.
Understanding Patching Fundamentals
Before we look at the patching procedures, we must first understand the basics of Fusion Applications patches, since there are multiple types of patches applicable to a Fusion Applications environment. Depending on each type of patch we will need to invoke a specific patching method or select the best possible method from multiple possible options, if available. In this section we will first understand different types of patches for Fusion Applications followed by various patching methods. In the later sections we will look at major patching methods in details with the help of example patches. In each section we will explore the directory structure of relevant generic patch and learn how the patching mechanism processes the patch directories.
Types of Patches
In this section we will look at the different types of patches available for overall Fusion Applications environment or its individual components. Some patches address a specific bug while other types of patches include consolidated lists and are released by Oracle at specific times of the year. Fusion Applications patches are mainly classified into two categories—technology and functional patches. Based on the type of patch, you may need to use different patching mechanisms as well. Let’s look at types of patches followed by various patching methods in the next section.
Fusion Applications Technology Patches
As we know, Fusion Applications is based on the Oracle Fusion middleware technology so when we talk about Fusion Applications technology patches, we will essentially look at Fusion middleware and database-related patches. Every new release of Fusion Applications also includes essential middleware and database patches. Depending on the specific issue with the Fusion Applications technology stack you may find one-off patches for Fusion middleware or database and these patches can be applied on the individual middleware product home.
In addition to one-off patches, Oracle releases Critical Update Patches (CPU) for every product every three months. These patches include recommended vulnerability fixes in addition to other mandatory patches. Critical Patch Updates are released on the Tuesday closest to the 17th day of January, April, July, or October. The following are the example dates for CPUs. Since CPUs are cumulative in nature, you can download the latest CPU for any middleware or database product and it will include all the previous fixes for the selected product.
14 April 2015
14 July 2015
20 October 2015
19 January 2016
Although Fusion middleware CPUs can be applied on any installation of Fusion middleware, Oracle releases special patches named P4FA (Patches for Fusion Applications) built on the Fusion middleware stack. These patches are released as a bundle that includes cumulative FMW Critical Patch Updates as well as other fixes tested for the Fusion Applications platform. P4FA patch bundles include middleware products like WebLogic, WebCenter, Identity Management, ADF, BI, SOA, and so on, as well as important database-related patches. It is recommended that you apply P4FA patches instead of regular middleware CPUs for Fusion Applications unless they are specifically required to resolve any urgent issue related to the applications technology stack. P4FA patches are released every month and are cumulative in nature, so you can download the latest P4FA patch and skip any previous missed FMW CPU or P4FA patches.
Fusion Applications Functional Patches
Similar to the technology stack patches, you may also need to apply one-off patches for resolving application-specific functional issues. These patches contain application files and/or database scripts for one or more product families or individual products and address a specific issue.
In addition to one-off functional patches, Oracle releases AOO (aggregated one-off) patches on a weekly basis and include existing one-off patches. Apart from aggregate one-offs, Oracle also releases functional patch bundles every month, which include all the AOOs. Unless you have a critical issue and you cannot wait for the patch bundle, you should always apply patch bundles for each product family.
Patches for Oracle Middleware Extensions for Fusion Applications
Since the Fusion Applications functional patches address issues specific to Fusion Applications product families, the middleware extensions for Fusion Applications that are located outside of the Fusion Applications home are not included in these functional patches. The patches for the Oracle middleware extensions include Applications core functional and database artifacts and are released in a similar package as Oracle E-Business Suite patches. They can be applied using the traditional AutoPatch utility. We will look at the patching methods of each of these patch types in the next section.
Note that the P4FA patches also include Applications core patches and soon we will see how the patching utilities are aware of each types of patches included in the bundle and deploy individual utilities for each of the included patches.
Patching Methods
Since Fusion Applications involves a number of components and accordingly various types of patches, the methods to apply each of these patches varies depending on the components impacted by the patch as well as whether the patch is a one-off or a bundle. Although the underlying patching mechanism might be common across multiple patching methods, selecting the appropriate patching method helps you save time and reduce errors. Let’s review the various patching methods available for Fusion Applications followed by a detailed discussion of the most frequently used methods.
OPatch
OPatch is the most commonly known patching utility that we have already discussed earlier for database and middleware technology stack patching. OPatch is used to apply one-offs, critical patch updates, and bundle patches for database and Fusion middleware patches. You must use the recommended version of the OPatch utility for applying the patch. You must also set the appropriate product home directory before applying OPatch, since the same utility is used by multiple product families.
AutoPatch
If you have worked as an administrator for products like Oracle E-Business Suite then you may already be familiar with the AutoPatch utility, which is used to apply most of the application functional patches. In Fusion Applications, you do not manually use AutoPatch for applying regular functional patches. The next utility that we will discuss will invoke AutoPatch automatically based on the patch requirement. However, when you are applying patches for middleware extensions for Fusion Applications or for the Functional Setup Manager then you may need to run AutoPatch manually to apply those specific patches.
Fusion Applications Patch Manager
The Fusion Applications Patch Manager (fapmgr ) is a specialized tool that applies Fusion Applications related functional patches. This tool acts as a wrapper for the traditional AutoPatch utility and provides much more advanced control and management functionalities for seamless application of Fusion Applications patches. As discussed earlier, despite the complex architecture of Oracle Fusion Applications, this utility makes it easy to patch and maintain the Applications environment with the help of extensive validation and reporting capabilities.
The FASPOT Utility (Fusion Applications Smart Patch Orchestration Tool)
With the recent release of P4FA bundle patches, Oracle provides a specialized utility named FASPOT (Fusion Applications Smart Patch Orchestration Tool), which completely simplifies patching of all Fusion middleware components included in the P4FA bundle. This utility eliminates the need of manually applying CPUs for each middleware component, which is otherwise a highly error-prone activity due to the volume of patches to be applied as well as the number of middleware and database components involved in patching. The FASPOT utility is aware of the Fusion middleware components for Fusion Applications as well as Identity Management tiers. At this moment, FASPOT does not support RDBMS patches, so the included RDBMS patches need to be applied prior to starting the FASPOT utility.
Oracle Identity Management Patch Manager
The Oracle Identity Management Patch Manager is another tool to simplify patching of all products within Identity Management. Identity Management Patch Manager ( idmpatchmgr ) and Identity Management Patch Manager ( idmpatch ) are tools included in the Identity Management patching framework and they allow patch application on multiple nodes with capabilities to run pre- and post-patching steps, start and stop of services, and minimizing overall downtime required for Identity Management components patching. This tool is automatically installed while provisioning the Identity Management environment using the Identity Management Provisioning wizard.
Figure 16-1 shows a summary of all the patching methods for each component of a Fusion Applications environment as discussed. Depending on the component type as well as the patch type, you need to decide the appropriate patching method to be selected.

Figure 16-1. Patching methods for the Fusion Applications environment components
Applying Technology Stack Patches
In this section we will look at how to efficiently apply Fusion Applications technology patches that are commonly known as P4FA (Patches for Fusion Applications) using FASPOT. Although you can apply the technology stack patches included in the P4FA bundle individually using the OPatch tool, you will see how you can achieve reduced downtime and error-free patch application using this method. In the later sections we will look at patching methods for other types of patches.
P4FA (Patches for Fusion Applications) Directory Structure
Before we start applying a Fusion Applications technology patch bundle (labeled as P4FA), let’s first understand what a P4FA patch looks like. As we already know, it contains Critical Patch Updates (CPUs) and any additional required patches for Fusion middleware and RDBMS related to a Fusion Applications deployment. Although RDBMS patches should be applied manually before the other patches, all required patches are bundled in the same patch ZIP file. Figure 16-2 shows a typical directory structure for a P4FA patch.

Figure 16-2. P4FA patch directory structure
Most P4FA patches come in multipart ZIP files. Extract the ZIP files labeled 1of4, 2of4, and so on, in a single patch directory. Let’s look at the structure of the extracted patch directory.
README files: The README files list the directories and files included in the patch. They might advise you to apply patches individually by reading each patch README files but you may use the FASPOT utility instead.
patches4fa: This is the root directory suggesting that it is a P4FA patch. It contains another top-level directory named dist.
FASPOT: This directory contains the latest FASPOT utility in ZIP format. We will look at this directory in the next section.
prepatch: Many of the included patches require one or more prepatches. This directory contains these patches for some of the products.
rel92oneoffs: This is the main patch directory. It includes one-offs and CPU and PSU patches for middleware products and RDBMS. Each of the product directories includes one or more subdirectories specific to the type of patches included in the P4FA bundle.
Note
It is recommended that you extract the P4FA patch on a shared file system that’s accessible by all Fusion Applications nodes with Fusion middleware components as well as all Identity Management nodes. This allows the utility to apply the related patches on the given host based on the configuration files created during the preparation phase.
FASPOT Utility Directory Structure
As you saw in the previous section, each P4FA patch contains the latest version of the FASPOT utility in a ZIP file. You can extract it anywhere on the file system but it is recommended that you extract the tool on a shared Patch Staging directory. We will look at the Patch Staging directory in the next section of applying a P4FA patch using the FASPOT utility. Let’s look at the directory structure of the FASPOT utility, as shown in Figure 16-3.

Figure 16-3. FASPOT directory structure
Let’s take a quick look at the files and subdirectories included with the FASPOT utility.
env: This directory contains an important property file named faspot.properties, along with a template file with sample values. You need to enter the complete Fusion Applications instance related details in this file so that the faspot.sh utility can correctly identify the components and their locations. We will look at this file during the patching preparation phase in the next section.
tools: As the name of the FASPOT utility suggests, the patch application is orchestrated by the ANT utility similar to what you saw during the provisioning orchestration process. The tools directory contains important utilities and programs like ANT, JDK, and so on, that are required during the patching process.
config: This directory contains various sub-directories for the Fusion middleware products. The files are updated once you have created the environment properties file and run the local environment configuration steps using the FASPOT utility. Once these directories are populated, the faspot.properties file is no longer referenced until the environment configuration is manually run again.
patch_log_dir: By default this directory does not exist in the supplied FASPOT ZIP file. This directory is created during the environment configuration phase. It creates important log files that contain the status of each phase of patch application.
README.txt: The README.txt file for the FASPOT utility contains a wealth of information on how to apply a P4FA patch using the FASPOT utility.
setEnv.sh: This script contains environment variables to set up the JAVA and ANT environment. However, the faspot.sh script also contains the required variables.
build.xml: This is an important Orchestration build file used by ANT to process the tasks required for each phase.
faspot.sh: This is the main FASPOT utility that we will use to apply P4FA patches. Note that at this moment there is no Windows version available for the FASPOT utility.
FASPOT (P4FA) Patching Steps
As you saw earlier, the FASPOT utility is introduced to reduce the hassles of manually applying 100+ patches included in each P4FA patch along with the required post-steps. Prior to introduction of the FASPOT utility, it required lengthy planning and preparation before we could apply the P4FA bundle patches. In this section we will see how quickly we can accomplish this using FASPOT. However, it is not a single step procedure as one may expect from the previous description. Some of the steps that we will follow in the preparation phase may not need to be run every time but are still recommended to review the environment configuration every time you apply a P4FA patch using FASPOT if there have been any changes.
Figure 16-4 shows a summary of tasks required in order to complete a P4FA patch application cycle using the FASPOT utility.

Figure 16-4. Fusion Applications technology patch bundle application
As you can see in Figure 16-4, you can divide the overall patch application in four major stages.
1. Preparation: This phase includes downloading and extracting the multipart patch, preparing the property file with the Fusion Applications environment information, creating patch staging and work areas and preparing the local environment, and populating individual properties files related to each middleware product to be patched.
2. Database Patches Application: FASPOT does not currently support RDBMS patches due to multiple possible architectures including RAC, non-RAC, minimum or higher versions of database in your environment. However, all the required patches for minimum supported database versions, including exadata patches, are included in the patch bundle under the rdbms directory. You need to apply database patches along with post-steps at this stage.
3. Identity Management (IDM) Patches Application: We need to apply the Identity Management related patches followed by the IDM post-steps in this phase. Although IDM and FMW (Fusion middleware) patches for Fusion Applications nodes are separate build targets in the FASPOT patching orchestration process, we can run some phases of both of them in parallel.
4. Fusion Middleware (FMW) Patches Application on Fusion Applications Nodes: Next we need to run FMW patches related to the Apply and Post-Apply phases on Fusion Applications nodes, which will patch the Fusion middleware components on each application and web node.
Let’s look at each of these steps along with an example P4FA patch.
Downloading P4FA Patches
The first step is to identify, locate, and download the latest P4FA patch. As discussed earlier, each P4FA patch is cumulative in nature and includes all the fixes included in the previous P4FA bundles, so you need to download the latest patch only. In order to download the patches, log in to the Oracle Support portal and navigate to the Patches tab. Figure 16-5 shows the Patch Search screen. Let’s explore how to locate a P4FA patch bundle using this screen.
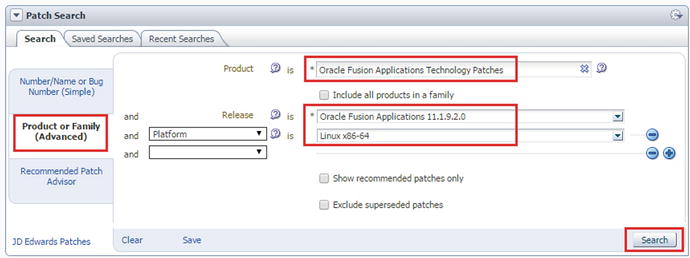
Figure 16-5. Searching for the Fusion Applications technology patch bundles (P4FA)
In the Patch Search screen, click on the Product or Family (Advanced) tab to search based on product family, platform, and so on. As shown in Figure 16-5, enter the Fusion Applications Technology Patches as the product, the version of your Fusion Apps instance, the required platform (Linux x84-64 for example), and then click Search. Figure 16-6 shows the search results based on this query. Note that you may get different results based on the latest P4FA patches at the time of search.

Figure 16-6. Selecting the latest P4FA patch
In the Patch Search Results screen, you may see more than one P4FA patch applicable to your environment. The patch description may be in the following format.
P4FA for REL <Release> ONEOFFFS SYSTEM PATCH <version>.<patch_creation_date(YYMMDD)>
For example:
P4FA for REL 9.2 ONEOFFFS SYSTEM PATCH 11.1.9.2.150404
Note that the date shown is the patch creation date, not the release date, so you may see a difference here. As you can see in Figure 16-6, we have P4FA patches released in February, March, and April so we will download the April patch only. The P4FA patches come in multiple parts, so you need to download all the parts and extract them into a single directory.
Setting Up the FASPOT Utility
Since the FASPOT utility needs to be applied on all IDMs as well as on the FA nodes with the Fusion middleware components, you must create the patch staging area on a shared location. This location could temporarily be created and moved later if security is a concern. In this example we have created a shared location at /FA_PATCH_STAGE and all required P4FA patches are going to be created in the rel92_patches directory under the staging directory. Since the P4FA patch bundle includes all required patches in ZIP format in each product directory, we must allocate a patch work area under the shared staging directory where the FASPOT utility can extract the patches before applying to the respective product homes.
[root@idmhost ∼]# mkdir -p /FA_PATCH_STAGE/rel92_patches
[root@idmhost ∼]# mkdir /FA_PATCH_STAGE /WORK
Assign ownership of the patch stage directory to the Fusion middleware owner user.
[root@idmhost ∼]# chown -R fusion:dba /FA_PATCH_STAGE
Now locate the FASPOT utility ZIP file under patches4fa/dist in the extracted patch directory. Extract the FASPOT utility under the /FA_PATCH_STAGE directory or whichever shared location you want. Now we need to create the environment property file (faspot.properties) manually so that the utility is aware of the IDM and FMW environment for the Fusion Applications instance. Let’s make a backup of the existing sample file first.
[fusion@idmhost ∼]$ cd /FA_PATCH_STAGE/FASPOT/env/
[fusion@idmhost env]$ cp -pr faspot.properties faspot.properties.bak
Although this file requires quite a lot of parameters to be set and a small mistake may lead to having to rerun through all of the preparation steps, let me give you some pointers to the parameters to be looked at in general. However, it is strongly recommend that you make sure no other parameters are left out based on the current version of the FASPOT utility at the time you are applying the patch. Let’s first confirm the changes in faspot.properties file related to the patching utility.
[fusion@idmhost env]$ grep PATCH faspot.properties
#PATCH_DOWNLOAD_DIR should contain the following folders
PATCH_DOWNLOAD_DIR=/FA_PATCH_STAGE/rel92_patches/11.1.9.2.150404/20904765/patches4fa/dist
PATCH_WORK_DIR=/FA_PATCH_STAGE/WORK
ATGPF_ADPATCH_WORKERS=4
Now make sure all URLs are updated and confirm the complete list with the following command.
[fusion@idmhost env]$ grep URL faspot.properties
Next make sure all the required passwords are set correctly. Look for the PASS string only since some parameters have PASSWD while others have PASSWORD in the parameter names.
[fusion@idmhost env]$ grep PASS faspot.properties
Next make sure that the hostnames for the IDM and FMW components are set correctly.
[fusion@idmhost env]$ grep HOST faspot.properties
Make sure the path for each component home directory is set correctly.
[fusion@idmhost env]$ grep HOME faspot.properties
Make sure all required domains are included since the sample file may not have all the domains as per your provisioned environment.
[fusion@idmhost env]$ grep DOMAIN_HOME faspot.properties
Next, confirm that the required database-related properties are set correctly. This includes IDM, OID, and FA databases.
[fusion@idmhost env]$ grep DB faspot.properties
Caution
Note that even if you have same database for your OID and IDM components (idmdb), the IDM provisioning process created the TNS entry named OIDDB with the same values as IDMDB. Hence, you should leave the value for OID_DB in the faspot.properties file to oiddb unless you have manually changed the TNS entry in <OID_INSTANCE>/config/tnsnames.ora.
Finally, make sure all the required port values for each component is set as per your environment.
[fusion@idmhost env]$ grep port faspot.properties
Preparing the Patch Stage Directory
The next step is to create the Patch Stage and Work Area directories. Instead of manually unzipping all patches for each product, you can use the prepare-patch-stage target of the FASPOT utility to seamlessly prepare the patch as well as the prepatch directories in the work area. Since the FASPOT utility is currently available on the Linux/Unix platform only, all references to FASTPOT effectively refer to the faspot.sh script.
Let’s invoke the faspot.sh script to prepare the patch stage directory first. Note that you may need to change the directory to the location where you extracted the FASPOT utility. You can change the log filename to any desired format. Here we are using <target-name>.log for ease of understanding. Since the actual script output may be quite lengthy, we show truncated output that lists only the important messages that need to be noticed.
[fusion@idmhost ∼]$ cd /FA_PATCH_STAGE/FASPOT/
[fusion@fahost FASPOT]$ ./faspot.sh -Dlogfile=prepare-patch-stage.log prepare-patch-stage
Buildfile: FA_PATCH_STAGE/FASPOT/build.xml
prepare-patch-stage-pre-check:
[echo] The required files for prepare-patch-stage are present in the /FA_PATCH_STAGE/rel92_patches/11.1.9.2.150404/20904765/patches4fa/dist
prepare-patch-stage:
[move] Moving 1 file to FA_PATCH_STAGE/FASPOT/env
[move] Moving 1 file to FA_PATCH_STAGE/FASPOT/env
[echo] **********PATCH_WORK_DIR**** - [/FA_PATCH_STAGE/WORK]
clean-up:
[echo] Cleaning up DIR - [/FA_PATCH_STAGE/WORK]
[delete] Deleting directory /FA_PATCH_STAGE/WORK
[echo] Creating Fresh DIR - [/FA_PATCH_STAGE/WORK]
[mkdir] Created dir: /FA_PATCH_STAGE/WORK
[echo] STARTED : Copying patches to /FA_PATCH_STAGE/WORK
p4fa-copy:
[echo] Processing P4FA Patches
[copy] Copying 158 files to /FA_PATCH_STAGE/WORK
patch-unzip:
[delete] Deleting: /FA_PATCH_STAGE/WORK/prepatch/atgpf/generic/install_ps6_16928612.zip
chmod-dir:
[echo] STARTED : Changing permissions(775) of files and directories under /FA_PATCH_STAGE/WORK/prepatch/atgpf/generic
[echo] COMPLETED : Changing permissions(775) of files and directories under /FA_PATCH_STAGE/WORK/prepatch/atgpf/generic
[echo] One-off Patches are extracted in /FA_PATCH_STAGE/WORK/prepatch/atgpf/generic
...
...
prepare-patch-stage-post-check:
[echo] The required files for prepare-patch-stage are present in the /FA_PATCH_STAGE/WORK
BUILD SUCCESSFUL
Total time: 40 minutes 18 seconds
As you can see from this output, the faspot.sh utility copies the patches from the rel92oneoffs directory to the work area in prepatch as well as individual patches in the work directory. Then it proceeds to unzip the patches and deletes the ZIP files from the work directory (PATCH_WORK_DIR). At the end of this step, the required patches for the FASPOT utility are present in the work directory. The patch download directory (PATCH_DOWNLOAD_DIRECTORY) is no longer referenced.
Preparing the Local Environment Configuration
The next step in the preparation phase is to prepare the local environment configuration that populates product-specific property files for each product’s subdirectories in the env directory of the FASPOT utility. Note that the required product subdirectories are present in the FASPOT/config directory even before this step and they include the properties file template. Once you run the prepare-local-env target using the FASPOT utility, it populates the <product>-env.properties file for each of the middleware products using the parameters specified earlier in the faspot.properties file. Note that any changes in the faspot.properties file from this point onward are not reflected in the configuration directory. They are therefore not effective in any further FASPOT patching activities. So if you find any incorrect information in the faspot.properties file, you must rerun this step in order to populate the product-specific properties files.
[fusion@fahost FASPOT]$ ./faspot.sh -Dlogfile=prepare-local-env.log prepare-local-env
Buildfile: FA_PATCH_STAGE/FASPOT/build.xml
prepare-local-env-pre-check:
[echo] The required files for prepare-local-env are present in the /stage/WORK
prepare-local-env:
[echo] STARTED : Creating FA_PATCH_STAGE/FASPOT/patch_log_dir
create-patchlogdir:
clean-up:
[echo] Cleaning up DIR - [FA_PATCH_STAGE/FASPOT/patch_log_dir]
[echo] Creating Fresh DIR - [FA_PATCH_STAGE/FASPOT/patch_log_dir]
[mkdir] Created dir: FA_PATCH_STAGE/FASPOT/patch_log_dir
...
...
[copy] Copying 4128 files to FA_PATCH_STAGE/FASPOT/patch_log_dir
[copy] Copied 10169 empty directories to 6825 empty directories under FA_PATCH_STAGE/FASPOT/patch_log_dir
[copy] Copying 27 files to FA_PATCH_STAGE/FASPOT/patch_log_dir
...
...
[echo] SUCCESS : NO FAILURES FOUND IN TARGET LOG FILES00
[touch] Creating FA_PATCH_STAGE/FASPOT/patch_log_dir/audit_status_logs/logs/prepare-local-env.log-fahost.suc
prepare-local-env-post-check:
[echo] The required files for prepare-patch-stage are present in the FA_PATCH_STAGE/FASPOT/patch_log_dir
BUILD SUCCESSFUL
Total time: 5 minutes 12 seconds
As you may notice, patch_log_dir also gets created at this stage. We have seen this directory while discussing the FASPOT directory structure. By default, this directory is not available in the shipped directory structure but gets created at this stage.
Applying Database Patches
Before proceeding to the IDM or FMW patches application, you must manually apply RDBMS patches using the latest version of OPatch, which is also included in the rdbms directory. You need to apply all the required generic or platform-specific patches, including the one-offs as well as the PSU (Patch Set Update) patches. Since the database patching requires setting the RDBMS Oracle home and applying patches using OPatch in the same way as you saw in Chapter 4 during database preparation for Fusion Applications installation, this does not require any further explanation here.
Running the Prerequisites Check
Before applying patches on the IDM or FMW nodes, you must run a prerequisites check on all the nodes in order to detect any conflicts or incorrect information in the properties file. This gives you an opportunity to fix the faspot.properties file and rerun the local environment step.
Running Identity Management Prerequisites Check
Let’s first run the prerequisites check on the Identity Management nodes using the idm-prereq-check build target name. Run the following command on the IDM node from the FASPOT installation directory. Make sure that all previous steps have been completed and the same FASPOT directory was used while creating the local environment files.
[fusion@idmhost FASPOT]$ ./faspot.sh -Dlogfile=idm-prereq-check.log idm-prereq-check
Buildfile: /mnt/hgfs/FA_PATCH_STAGE/FASPOT/build.xml
idm-prereq-check:
[echo] Directory path validations...
dirpath-check-list:
[echo] Performing dirpath check for oid
[echo] Valid Host. Continue Dir Path check execution
...
...
opatchlock-check-list:
[echo] Performing opatch lock check for oid
[echo] Valid Host. Continue OPatch Lock Check ...
opatchlock-prereq-check:
[echo] Performing Opatch Lock Check for /app/oracle/products/dir/oid...
[echo] SUCCESSFUL : No Opatch Lock found at ORACLE_HOME=/app/oracle/products/dir/oid.
...
...
load-oim:
[echo] Loading of oim-env.properties
host.check:
[echo] Current Hostname is : idmhost.paramlabs.com
[echo] Component target Hostname is : idmhost.paramlabs.com
[echo] Validating host before component target execution
[echo] Valid Host. Continue executing component target
oim-prereq-check:
[echo] Opatch lock check for OIF components...
opatchlock-prereq-check:
[echo] Performing Opatch Lock Check for /app/oracle/products/app/idm...
[echo] SUCCESSFUL : No Opatch Lock found at ORACLE_HOME=/app/oracle/products/app/idm.
...
...
dbconnection_check:
[sql] Executing commands
[sql] 1 of 1 SQL statements executed successfully
[echo] Checking DB Connections for OIM-mdsDB
dbconnection_check:
[sql] Executing commands
[sql] 1 of 1 SQL statements executed successfully
BUILD SUCCESSFUL
Total time: 31 seconds
The prerequisites check should be quick. If the status of this check is FAILED, you must fix all mentioned issues before proceeding to the next step. Make sure that the OPatch version for each Identity Management product home matches the same or minimum required OPatch version of the Fusion Applications nodes. If the OPatch version of the IDM nodes is older, you may get false errors related to prerequisite patches existence, as follows.
FASPOT-EC-1055 - PREREQ_PATCH_ID - 16178493 NOT found in inventory
If you look up the log files you may see following error.
Syntax Error... Unrecognized Command or Option: failed to parse arguments "unknown option '-customLogDir'"
Please use the option 'opatch lsinventory -help' to get correct syntax
OPatch failed with error code 14
As you can see, the older versions of OPatch do not recognize arguments like -customLogDir and failures in OPatch commands show false errors related to prerequisite patches. In this case, you can rename the existing OPatch directories on the IDM node and replace them with a higher version OPatch directory from the Fusion Applications nodes. Then you can rerun this step.
Running Fusion Middleware Prerequisites Check
The next step is to run the prerequisites check on the Fusion Applications nodes that have Fusion middleware components using the fmw-prereq-check build target. Run the following command on each FMW node using the same shared location.
[fusion@fahost FASPOT]$ ./faspot.sh -Dlogfile=fmw-prereq-check.log fmw-prereq-check
Buildfile: FA_PATCH_STAGE/FASPOT/build.xml
fmw-prereq-check:
[echo] Directory path validations...
dirpath-check-list:
[echo] Performing dirpath check for atgpf
[echo] Valid Host. Continue Dir Path check execution
dirpath-prereq-check:
[echo] Performing directory path check for /app/oracle/fusionapps/atgpf...
[echo] SUCCESSFUL : Directory Path DIR_PATH=/app/oracle/fusionapps/atgpf existing for atgpf component
dirpath-prereq-check:
[echo] Performing directory path check for /app/oracle/fusionapps/jdk6...
[echo] SUCCESSFUL : Directory Path DIR_PATH=/app/oracle/fusionapps/jdk6 existing for atgpf component
...
...
check-string-in-file:
[copy] Copying 1 file to FA_PATCH_STAGE/FASPOT/patch_log_dir/logs/prereq-check
[echo] COMPONENT_ID - 11.1.9.2.0 found in inventory
[echo] COMPONENT_VERSION_ID = true
BUILD SUCCESSFUL
Total time: 1 minute 11 seconds
Similar to the IDM prerequisites check, if you encounter any errors or mismatching values, you must fix the issues, update the faspot.properties file, and rerun the prepare-local-env target before rerunning the prerequisites check on the IDM and FMW nodes.
Applying Identity Management Patches
In order to apply Identity Management patches, you must make sure that the application and web tier are shut down while database should have already been started after RDBMS patching. We can also apply IDM and FMW patches in parallel but if the patches are relatively small and sufficient downtime is available, it is better to apply the patches one-by-one in order to make sure each phase completes without any issues. This also leaves enough room for troubleshooting patches on one server instead of focusing on multiple servers at the same time.
Execute the following command to run the idm-patch-apply target on the IDM hosts. The script output is truncated here to display major milestones only.
[fusion@fahost FASPOT]$ ./faspot.sh -Dlogfile=idm-patch-apply.log idm-patch-apply
Buildfile: /mnt/hgfs/FA_PATCH_STAGE/FASPOT/build.xml
idm-patch-apply:
[echo] STARTED : Performing patch pre-reqcheck for IDM components
idm-prereq-check:
[echo] Directory path validations...
dirpath-check-list:
[echo] Performing dirpath check for oid
[echo] Valid Host. Continue Dir Path check execution
dirpath-prereq-check:
[echo] Performing directory path check for /app/oracle/products/dir/oid...
[echo] SUCCESSFUL : Directory Path DIR_PATH=/app/oracle/products/dir/oid existing for oid component
...
...
oid-patch-apply:
opatch.check:
[echo] Opatch exists = true
napply:
[echo] Applying using napply /app/oracle/products/dir/oid
[echo] Applying PATCHES in /stage/WORK/label-patches/pltsec/linux64
[echo] Applying PATCHES in /stage/WORK/label-patches/pltsec/linux64 is completed
[echo]
[echo] Checking the APPLY PATCH STATUS in log file
[echo] APPLY PATCH SUCCESSFUL
[echo] OID_LINUX64_STATUS - 0
...
...
check-string-in-file:
[copy] Copying 1 file to /mnt/hgfs/FA_PATCH_STAGE/FASPOT/patch_log_dir/logs/failure
[echo] SUCCESS : NO FAILURES FOUND IN TARGET LOG FILES
[touch] Creating /mnt/hgfs/FA_PATCH_STAGE/FASPOT/patch_log_dir/audit_status_logs/logs/idm-patch-apply.log-idmhost.suc
BUILD SUCCESSFUL
Total time: 32 minutes 28 seconds
Once the overall IDM patches application is successful, the tool will create a flag file named idm-patch-apply.log-<hostname>.suc to indicate successful completion. You must fix all the issues in patching before moving to the post-steps execution.
Applying Fusion Middleware Patches
The process of applying Fusion middleware patches using the FASPOT utility is identical to the one you saw seen while applying IDM patches. The build target name for applying FMW patches is fmw-patch-apply. Run the following command on the FMW hosts in order to apply patches to the middleware homes on the current host.
[fusion@fahost FASPOT]$ ./faspot.sh -Dlogfile=fmw-patch-apply.log fmw-patch-apply
Buildfile: FA_PATCH_STAGE/FASPOT/build.xml
fmw-patch-apply:
smartclone-check:
[echo] SC_ENABLED_STATE - REGULAR_POD
[echo] SC_ENABLED_STATE - REGULAR_POD
[echo] STARTED : Performing patch pre-reqcheck for FMW components
fmw-prereq-check:
[echo] Directory path validations...
dirpath-check-list:
[echo] Performing dirpath check for atgpf
[echo] Valid Host. Continue Dir Path check execution
dirpath-prereq-check:
[echo] Performing directory path check for /app/oracle/fusionapps/atgpf...
[echo] SUCCESSFUL : Directory Path DIR_PATH=/app/oracle/fusionapps/atgpf existing for atgpf component
...
...
p4fa-label-apply:
check-string-in-file:
[copy] Copying 1 file to FA_PATCH_STAGE/FASPOT/patch_log_dir/logs
check-string-in-file:
[copy] Copying 1 file to FA_PATCH_STAGE/FASPOT/patch_log_dir/logs/failure
load-pfcore:
[echo] Loading of pfcore-env.properties
[echo] ORACLE_HOME - /app/oracle/fusionapps/applications
host.check:
[echo] Current Hostname is : fahost.paramlabs.com
[echo] Component target Hostname is : fahost.paramlabs.com
[echo] Validating host before component target execution
[echo] Valid Host. Continue executing component target
fmw-apply-label:
...
...
check-string-in-file:
[copy] Copying 1 file to FA_PATCH_STAGE/FASPOT/patch_log_dir/logs/failure
[echo] SUCCESS : NO FAILURES FOUND IN TARGET LOG FILES
[touch] Creating FA_PATCH_STAGE/FASPOT/patch_log_dir/audit_status_logs/logs/fmw-patch-apply.log-fahost.suc
BUILD SUCCESSFUL
Total time: 7 minutes 31 seconds
Move on to the post-steps execution only once the FMW patches are applied successfully and the success flag called fmw-patch-apply.log-<hostname>.suc is created.
Applying Identity Management Patches Post-Steps
If you have applied Fusion middleware patches manually, you would know that the process of identifying and applying manual post steps from a large number of patches is tiresome and error-prone. With the FASPOT utility, you need to run a build target named idm-patch-postinstall in order to apply all required post-install steps for the patches that have been applied on the IDM nodes. Run the following command to apply post-patching steps on the IDM hosts.
Note
Make sure to bring up the IDM components before applying post-patching steps since the steps may require you to communicate with the middleware components.
[fusion@idmhost FASPOT]$ ./faspot.sh -Dlogfile=idm-patch-postinstall.log
idm-patch-postinstall
Buildfile: /mnt/hgfs/FA_PATCH_STAGE/FASPOT/build.xml
idm-patch-postinstall:
[echo]
[echo] #######################################################
[echo] STARTED : Performing Post Install redeployment actions for OID Components
load-oid:
[echo] Loading of oid-env.properties
host.check:
[echo] Current Hostname is : idmhost.paramlabs.com
[echo] Component target Hostname is : idmhost.paramlabs.com
[echo] Validating host before component target execution
[echo] Valid Host. Continue executing component target
...
...
check-string-in-file:
[copy] Copying 1 file to /mnt/hgfs/FA_PATCH_STAGE/FASPOT/patch_log_dir/logs/failure
[echo] SUCCESS : NO FAILURES FOUND IN TARGET LOG FILES
[delete] Deleting: /mnt/hgfs/FA_PATCH_STAGE/FASPOT/patch_log_dir/audit_status_logs/logs/idm-patch-postinstall.log-idmhost.dif
[touch] Creating /mnt/hgfs/FA_PATCH_STAGE/FASPOT/patch_log_dir/audit_status_logs/logs/idm-patch-postinstall.log-idmhost.suc
BUILD SUCCESSFUL
Total time: 1 minute 52 seconds
The post-steps may complete fairly quickly. Once the execution status is successful and the completion flag file idm-patch-postinstall.log-<hostname>.suc is created, proceed to the FMW post-patching steps.
Applying Fusion Middleware Patches Post-Steps
The last step in applying the P4FA patch bundle using the FASPOT utility is to apply Fusion middleware post-patching steps. The target name to execute is fmw-patch-postinstall. Run the following command on Fusion Applications nodes to apply the included patches specific to the middleware homes.
[fusion@fahost FASPOT]$ ./faspot.sh -Dlogfile=fmw-patch-postinstall.log fmw-patch-postinstall
Buildfile: FA_PATCH_STAGE/FASPOT/build.xml
fmw-patch-postinstall:
[echo]
[echo] #######################################################
[echo] STARTED : Performing Post Install and Redeployment actions for FMW Components
load-pfcore:
[echo] Loading of pfcore-env.properties
[echo] ORACLE_HOME - /app/oracle/fusionapps/applications
host.check:
[echo] Current Hostname is : fahost.paramlabs.com
[echo] Component target Hostname is : fahost.paramlabs.com
[echo] Validating host before component target execution
[echo] Valid Host. Continue executing component target
pfcore-patch-postinstall:
smartclone-check:
[echo] SC_ENABLED_STATE - REGULAR_POD
[echo] SC_ENABLED_STATE - REGULAR_POD
[echo] Executing PFCORE Post Patch Steps - Configure
[echo] Executing PFCORE Post Patch Steps - Bootstrap
[echo] Execution of PFCORE Post Patch Steps was SUCCESSFUL
...
...
check-string-in-file:
[copy] Copying 1 file to FA_PATCH_STAGE/FASPOT/patch_log_dir/logs/failure
[echo] SUCCESS : NO FAILURES FOUND IN TARGET LOG FILES
[touch] Creating FA_PATCH_STAGE/FASPOT/patch_log_dir/audit_status_logs/logs/fmw-patch-postinstall.log-fahost.suc
BUILD SUCCESSFUL
Total time: 11 minutes 58 seconds
Once the Fusion middleware post-patching steps are completed successfully and the success flag fmw-patch-postinstall.log-fahost.suc has been created, the FASPOT patching process is complete. Now you can do a smoke test of application functionality and the issues that are expected to be resolved before releasing the environment to the users.
Applying Applications Patches
Fusion Applications one-off patches, AOOs, or patch bundles may include database or middleware artifacts depending on the included bug fixes. Before you look at how to apply an applications patch, let’s explore how a Fusion Applications patch looks. Figure 16-7 explains the generic directory structure of an applications patch.

Figure 16-7. Directory structure of an applications patch
As you can see in Figure 16-7, each Fusion Applications patch contains two main sections.
Database Artifacts: The database artifacts directory <patch_number>_DB contains subdirectories and a unified driver file similar to a standalone database artifacts patch that can be applied using the AutoPatch utility.
Middleware Artifacts: The Middleware artifacts directory contains the directory structure in a format that can be accessed and applied by the OPatch utility.
Apart from database and middleware artifacts directories, there are two important XML files in the patch directory.
uw<patch_number>.xml: This file contains the overall information about the patch, including patch type, translation, language, and platform attributes, bug fixes included, prerequisite patches, and impacted components list.
obj<patch_number>.xml: This file contains the patch objects manifest, which includes details about each database and middleware artifact included in the patch. The details for each artifact include the artifact name, type, product family, location, version, required action, and so on.
Using Fusion Applications Patch Manager
If you have used Oracle E-Business Suite patching mechanisms then you may already know that Applications patching is a niche domain and involves thorough understanding of the applications suite. Although Fusion Applications patching also involves similar tools such as AutoPatch, applying patches on complex architecture such as Fusion Applications that involves multiple architectural components, products, and artifacts could be generally seen as a complex process. Thanks to the Fusion Applications Patch Manager (fapmgr), the patch application has been quite simplified as well as less error-prone due to the various pre-patching validations and reports. In fact, if you have worked with AutoPatch for the E-Business Suite then you may find it even more comfortable applying Fusion Applications patches with the help of the Fusion Applications Patch Manager tool.
Let’s first understand the Fusion Applications patching process using the fapmgr tool. Figure 16-8 lists the high-level steps involved in Fusion Applications patching.

Figure 16-8. Steps for patching using Fusion applications patch manager
Let’s now have a quick look at the high-level steps of patching using the Fusion Applications Patch Manager (fapmgr) and later we will discuss these steps in detail by applying an example patch.
Preparing for Patching
1. Run patch status report: You first need to check whether the patch is applied by running the Patch Status report before proceeding with any of the steps. Only if the patch is not already applied can you download the patch.
2. Run the Patch Impact Report: This report provides an excellent overview of the impact of applying this patch on your instance. It suggests if any prerequisites are required to be applied before this patch can be applied. It also lists the product families, servers, and files that will be impacted by this specific patch. It also helps in deciding the downtime length based on the impact report.
3. Validate the patch: Patch validation is automatically done as part of the patch application phase, but it is recommended to do a manual validation before actually applying the patch or taking downtime. The validation process does a simulation of actual patch application by checking the required prerequisites, taxonomy, and platform information, as well as any conflicts.
Applying Patches
4. Apply the patch using the fapmgr tool: Once the patch is validated, it may ask whether the patch can be applied online or offline. Accordingly you may apply the patch now. We will look at various optional parameters for the Apply phase in the next section.
5. Monitor the patch progress: You can monitor the patch progress using the built-in online patch progress report, the diagnostic report feature, or by manually running it depending on the version of Fusion Applications.
Post-Patching Verification
6. Run the patch status report: Once the patch is applied, you may want to confirm it by running the Patch Status report again for the same patch number.
7. Verify application manually: Before releasing the system to the users you may need to do a smote test for application functionality as well as confirm whether the issues that the particular patch was required to fix have indeed been resolved.
Preparing Fusion Applications Environment File
Before applying Applications patches we must first source the Fusion Applications environment file to set all the required OS environment variables. The default location for the environment file is $APPL_TOP/lcm/ad/bin/APPSORA.env. Let’s first determine whether the file exists.
[fusion@fahost ∼]$ cd /app/oracle/fusionapps/applications/lcm/ad/bin/
[fusion@fahost bin]$ ls -l APPSORA.env
ls: APPSORA.env: No such file or directory
If the file does not exist, you can create it manually using the adsetenv.sh script in the same directory so that you can use it in future.
[fusion@fahost bin]$ ./adsetenv.sh
Successfully created: APPSORA.env
adsetenv succeeded.
Now you can confirm that the file has been created.
[fusion@fahost bin]$ ls -l APPSORA.env
-rw-r--r-- 1 fusion dba 4420 Apr 15 22:59 APPSORA.env
Let’s source this file to set the environment variables. Add the following line to the Fusion user’s OS profile (for example, .bash_profile) to source it every time the user logs in.
[fusion@fahost bin]$ ./app/oracle/fusionapps/applications/lcm/ad/bin/APPSORA.env
We can test whether the variables have been set correctly. For example:
[fusion@fahost bin]$ env | grep APPL_TOP
APPL_TOP=/app/oracle/fusionapps/applications
APPL_TOP_NAME=FUSION
Running Pre-Patch Reports
Fusion Applications Patch Manager provides a number of reporting features, including listing all applied patches, looking for specific patch, specific components, as well as running Patch Impact Reports. Here we will look at pre-patch reports that are mainly required to understand whether the required patches are already applied and if they are not applied, what the impact is of applying the same.
Running Applied Patches Report
Fusion Applications Patch Manager can be used to list all the patches that have been applied on the Fusion Applications system. This can be used as an inventory of patches if Oracle Support requires it to resolve a particular issue. The following is an example of the running and applied patches report using the listpatches option.
[fusion@fahost bin]$ ./fapmgr.sh report -listpatches
...
Report Name: Patches Applied
Report for: FUSION [/app/oracle/fusionapps/applications]
Product Family (OUI Component) :: oracle.fusionapps.atgpf (oracle.fusionapps.atgpf)
Patch No. : 19526766
Language : American English
Patch Type : PATCH-SET
Date Applied (mm-dd-yyyy hh:mm:ss) : 10-28-2014 05:07:18
Bugs Fixed : 19526766
Patch No. : 19526765
Language : American English
Patch Type : PATCH-SET
Date Applied (mm-dd-yyyy hh:mm:ss) : 02-21-2015 04:57:11
Bugs Fixed : 19526765
...
Oracle Fusion Applications Patch Manager completed successfully.
List Applied Patches for Specific Components
If you want to run the applied patches report for specific components only, the same command allows you to filter the required components. Let’s first see how to get the list of all components using the famgr.sh script. The output of the script will include the internal name of each component along with version, product family name, and so on.
[root@fahost bin]# ./fapmgr.sh report -listcomps
...
Report Name: Product Families
Report for: FUSION [/app/oracle/fusionapps/applications]
...
OUI Component : oracle.fusionapps.scm
Version : 11.1.9.2.0
Product Family : Oracle Fusion Supply Chain Management 11.1.9.2.0
Description : Oracle Fusion Supply Chain Management
OUI Component : oracle.fusionapps.prj
Version : 11.1.9.2.0
Product Family : Oracle Fusion Projects 11.1.9.2.0
Description : Oracle Fusion Projects
...
OUI Component : oracle.fusionapps.fin
Version : 11.1.9.2.0
Product Family : Oracle Fusion Financials 11.1.9.2.0
Description : Oracle Fusion Financials
OUI Component : oracle.fusionapps.crm
Version : 11.1.9.2.0
Product Family : Oracle Fusion Customer Relationship Management 11.1.9.2.0
Description : Oracle Fusion Customer Relationship Management
OUI Component : oracle.fusionapps.com
Version : 11.1.9.2.0
Product Family : Oracle Fusion Common Artifacts 11.1.9.2.0
Description : Oracle Fusion Common Artifacts
...
Oracle Fusion Applications Patch Manager completed successfully.
Now since we have the internal name of each component, we can filter the list of patches based on one or more components from this list in a comma-separated format, as follows.
[root@fahost bin]# ./fapmgr.sh report -listpatches -comps oracle.fusionapps.com
...
Started validating the OPatch version.
Completed validating the OPatch version.
Started validating the Database connection.
WLS ManagedService is not up running. Fall back to use system properties for configuration.
Completed validating the Database connection.
Report Name: Patches Applied
Report for: FUSION [/app/oracle/fusionapps/applications]
Product Family (OUI Component) :: Oracle Fusion Common Artifacts (oracle.fusionapps.com)
Patch No. : 19840904
Language : American English
Patch Type : Standard
Date Applied (mm-dd-yyyy hh:mm:ss) : 04-16-2015 01:09:43
Bugs Fixed : 19840904
...
Oracle Fusion Applications Patch Manager completed successfully.
List for Specific Patch or Bug Number (Patch Status Report)
In most cases you may need to check whether a particular patch or bug fix is already applied. This is required to make a decision on whether the patch or bug fix needs to be downloaded and applied. Use the following syntax to run the Patch Status report. Note that Language is an optional parameter.
./fapmgr.sh report -isapplied -patch <Patch_Number>[ :<Language> ]
or
./fapmgr.sh report -isapplied -bug <Bug_Fix_Number>[ :<Language> ]
Let’s use an example patch to see if it is already applied.
[fusion@fahost bin]$ ./fapmgr.sh report -isapplied -patch 19898891
Oracle Fusion Applications Patch Manager Version 11.1.9.2.0
Copyright (c) 2009, 2013, Oracle and/or its affiliates. All rights reserved.
Archiving existing log files from [/app/oracle/instance/lcm/logs/11.1.9.2.0/FAPMGR] to [/app/oracle/instance/lcm/logs/11.1.9.2.0/FAPMGR/logarchive/REPORT-
PATCHIMPACT/20150419201529].
Started validating the OPatch version.
Completed validating the OPatch version.
Started validating the Database connection.
WLS ManagedService is not up running. Fall back to use system properties for configuration.
Completed validating the Database connection.
Report Name: Patch Status
Report for: FUSION [/app/oracle/fusionapps/applications]
Bug No. : 19898891
OUI Component : NA
Status : Not Applied
Patch No. : NA
Date Applied (mm-dd-yyyy hh:mm:ss) :
...
Oracle Fusion Applications Patch Manager completed successfully.
The result confirms that the patch has not been applied so we can download and apply it.
Validating Patch List from Database Tables
Since Fusion Applications database records all the applications patches that have been applied in the environment, you can directly query these two tables to check the status of the patch.
AD_APPLIED_PATCHES: This table lists all the patches that have been applied to the system with one record each patch regardless of whether it is one-off or bundle/maintenance patch. Once you apply a patch, an entry is added to this table along with patch application date.
AD_BUGS: This table lists all the bug fixes that have been applied on the Fusion Applications instance. For example, if you have applied a bundle patch that included various bug fixes or patches, each of them is listed in this table along with the patch application date. Technically this table includes more details but if you applied a patch manually then both these tables will have an entry.
Let’s view the contents of these tables by running example queries against them.
SQL> SELECT PATCH_NAME, PATCH_TYPE, LAST_UPDATE_DATE FROM FUSION.AD_APPLIED_PATCHES;
PATCH_NAME PATCH_TYPELAST_UPDATE_DATE
--------------- -------------------- ---------------------------------------
19526766PATCH-SET28-OCT-14 05.02.46.000000 AM
19526766PATCH-SET28-OCT-14 05.07.18.000000 AM
19222260PATCH-SET28-OCT-14 05.10.04.000000 AM
19222260PATCH-SET28-OCT-14 05.10.54.000000 AM
11410231706 MAINTENANCE-PACK 28-OCT-14 06.19.03.000000 AM
11410231706 MAINTENANCE-PACK 28-OCT-14 08.53.41.000000 AM
20123584PATCH-SET17-APR-15 03.55.12.000000 PM
20123584PATCH-SET17-APR-15 04.03.45.000000 PM
19898891SNOWBALL 19-APR-15 08.44.45.000000 PM
19898891SNOWBALL 19-APR-15 08.45.04.000000 PM
19526765PATCH-SET21-FEB-15 04.55.28.000000 AM
18951938PATCH-SET21-FEB-15 04.59.03.000000 AM
18951938PATCH-SET21-FEB-15 04.59.58.000000 AM
19526765PATCH-SET21-FEB-15 04.57.12.000000 AM
SQL> SELECT BUG_NUMBER, APPLICATION_SHORT_NAME, LAST_UPDATE_DATE FROM FUSION.AD_BUGS;
BUG_NUMBER APPLICATION_SHORT_NAMELAST_UPDATE_DATE
--------------- ------------------------- -----------------------------------
19526766atgpf 28-OCT-14 05.07.18.000000 AM
19222260fsm28-OCT-14 05.10.54.000000 AM
11410231706 ofat 28-OCT-14 08.54.03.000000 AM
20123584atgpf 17-APR-15 04.47.41.000000 PM
19898891fin19-APR-15 08.45.05.000000 PM
18951938fsm17-APR-15 04.50.42.000000 PM
19526765atgpf 21-FEB-15 04.57.12.000000 AM
Running a Patch Impact Report
Once the patch has been downloaded from Oracle Support portal, you can extract it to any directory. We will refer to this patch directory as patchtop during the example patch application. The first report that you need to run on the downloaded patch is the Patch Impact Report. This report essentially compares the files included in the patch with the files on your system. It achieves this by comparing the patch files with Current View Snapshot of your system. The Current View Snapshot basically keeps an inventory of your current file system and every change to the file system, especially after the patch application and so on, this snapshot gets updated. However, you can manually update the snapshot as well. We will look at the snapshots in the AD Administration section of this chapter.
Use the following command to run a Patch Impact Report for the downloaded patch.
[fusion@fahost bin]$ ./fapmgr.sh report -patchimpact -patchtop /home/fusion/Patches/19898891/
...
Started validating the OPatch version.
Completed validating the OPatch version.
Started validating the Database connection.
WLS ManagedService is not up running. Fall back to use system properties for configuration.
Completed validating the Database connection.
Started running apply pre-reqs.
Please monitor OPatch log file: /app/oracle/instance/lcm/logs/11.1.9.2.0/FAPMGR/opatch/opatch/19898891_Apr_19_2015_20_34_01/ApplyPrereq2015-04-19_20-34-18PM_1.log
All apply pre-reqs for middleware artifacts have passed.
Patch Impact Report
Patch Number: 19898891
Oracle Fusion Applications Oracle Home: /app/oracle/fusionapps/applications
Language: NA
Platform: Generic
Bug Fixes
Bug No. : 19898891
Bug Description : REL92:BYPASS JERS LOCK VALIDATION FOR EXTRACT OBJECT AND REFERENCE OBJECT CHANGE
Exists in Oracle Home : No
Oracle Fusion Applications Prerequisite Bug Fixes
No prerequisite bug fixes required.
Prerequisites on other products: Although Patch Manager does not enforce cross-product prerequisite patches, you should apply them before applying patch #19898891
No prerequisites for other products found.
Product Families Impacted
Product Family : oracle.fusionapps.fin
Product : xla
Lba : FinXlaAmsAcctRules,FinXlaAmsDescriptionRule,FinXlaAmsEventModels,FinXlaAmsJlts,FinXlaAmsMappingSet
Patch contains the following artifacts that impact the following run-time servers
Artifact Type : DB
Domain(Servers) : fusiondb
Expectation/Impact : The database must be running. Artifacts like schema,seed data will be updated.
Artifact Type : Flexfields(NameSpace)
Domain(Servers) : NONE
Expectation/Impact : Flexfield namespaces will be merged.
Artifact Type : Flexfields(FndSetup.ear)
Domain(Servers) : CommonDomain(HelpPortalServer_1)
Expectation/Impact : Impacted managed servers will be bounced.
...
Files included in the patch
File Name : xla_slam_sddyn.sql
File Type : DB
File Version : /st_fusionapps_11.1.9.2.0fin/1
...
File Name : SvcFinXlaAmsDescriptionRuleModel_MiddleTier.jar
File Type : JEE
File Version : st_fusionapps_11.1.9.2.0fin/20141209170255
...
Oracle Fusion Applications Patch Manager completed successfully.
The output of the Patch Impact Report provides a list of bug fixes included in the patch, a list of prerequisite bug fixes required by the patch, files included along with version details, the servers and product families that will be impacted by the patch. This information is crucial to prepare for the downtime for affected product families and servers as well as to know which patches need to be applied before proceeding with the selected patch.
Validating the Patch
Validating a patch manually is an optional but recommended practice while applying patches using Fusion Applications Patch Manager. This saves troubleshooting time during the patch application by manually checking the prerequisites, file versions, validating SOA composites, and database by running a mock pass of the patch application. It can also suggest whether the patch can be run in online or hotpatch mode if you have passed those arguments while running validation. It also suggests if the patch is being applied online then which managed servers will be bounced at the end of patching activity. This greatly helps you identify downtime requirement for applications. Any conflicting patches or missing prerequisites are also listed here. Validation also checks taxonomy details, which confirm whether the required applicable products have been provisioned.
The command to validate a patch is as follows. You can add the -online and -hotpatch switches if you want to make sure the patch can be applied online and if so whether can be applied in hotpatch mode.
[fusion@fahost bin]$ ./fapmgr.sh validate -online -patchtop /home/fusion/Patches/19898891/
...
Completed validating the OPatch version.
Started validating the Database connection.
WLS ManagedService is not up running. Fall back to use system properties for configuration.
Completed validating the Database connection.
Started validating taxonomy URL.
Completed validating taxonomy URL.
Started checking pre-requisite bug fixes for the patch.
Completed checking pre-requisite bug fixes for the patch.
...
Validation successful.
Completed validating the Database components of the patch.
Started checking if the middleware portion of the patch will make any impact to the system.
Completed checking if the middleware portion of the patch will have an impact on the system.
Started running apply pre-reqs.
...
All apply pre-reqs for middleware artifacts have passed.
Started checking for the files that will not be deployed.
Completed checking for the files that will not be deployed.
Completed running apply pre-reqs.
Skipping execution, as the mode is not APPLY.
Submitting tasks for parallel execution.
...
Executing validate task [JEEPatchaction_stopManagedServers] with ID [49]. Monitor the log file :
/app/oracle/instance/lcm/logs/11.1.9.2.0/FAPMGR/fapcore_validate_jeepatchaction_stopmanagedservers_49_20150419203455.log
validate Task [ Name: JEEPatchaction_stopManagedServers ID: 49 ] completed with status [ SUCCESS ].
...
Tasks [3] completed out of [3].
Successfully completed execution of all tasks.
Started running deployment pre-reqs.
...
All deployment pre-reqs for middleware artifacts have passed.
Completed running deployment pre-reqs.
Validation of patch is SUCCESSFUL.
You can apply the patch either in online or offline mode successfully.
Generating Diagnostic Report
...
Oracle Fusion Applications Patch Manager completed successfully.
Applying the Patch
Once the patch has been validated against your environment, you may need to decide on whether downtime is required and if so for which applications. You might also determine whether the patch can be applied as a hotpatch. In order to decide this, you must first understand the difference between various modes available for applying patches using the Fusion Applications Patch Manager.
Offline Mode: Assumes that all the affected managed servers are down and once the patch is complete, you need to manually start all those affected servers. You may either keep them down at the beginning or bounce after the patch application but the users should not be accessing the application during this time. Additionally, any post-steps like deployment of SOA, BI, or other middleware artifacts, or flexfields needs to be done manually after the patch application. You may avoid offline mode unless a validation step confirms that the patch cannot be applied online.
Online Mode: Although the name suggests that application will always be available, this is not true. The difference between online and offline mode is that during online mode, you need not shut down the affected managed servers manually. Instead, the Patch Manager takes care of bouncing the required servers. It also completes all post-patching steps including deployment of all middleware artifacts. In order to run a patch in online mode, you must first validate the patch for checking whether it can be run online followed by running the Patch Manager Apply phase with the -online option. Additionally you must specify the command-line option -stoponerror so that if there are any errors during patch or post-patching steps, it may stop any further action. You can then fix the problem and restart the patch.
Maintenance Mode (Only for Fusion Applications 11g Release 8): This was introduced in Oracle Fusion Applications version 11.1.8 and was replaced by the hotpatch option in version 11.1.9. So if you are patching Fusion Applications 11.1.8, then you can use the maintenance mode to apply patches in a controlled environment by changing the user application status to read only mode. In this mode, users can access the application and view data but it disables transactions at the application level. Maintenance mode can be enabled by using the profile option FND_MAINTENANCE_MODE, which can be set to ENABLED, DISABLED, or WARNING to display warnings about upcoming maintenance window based on the FND_MAINTENANCE_START_TIME and FND_MAINTENANCE_END_TIME parameters.
Hotpatch Mode (for Fusion Applications 11g Release 9 onward): From Fusion Applications 11g Release 9 (11.1.9.x) onward, you can use the hotpatch mode, which is an extension of maintenance mode and allows you to apply patches even when there are active users and ongoing transactions in the Applications. However, not all patches can be applied in hotpatch mode. You must verify whether the patch can be applied in hotpatch mode by validating the patch by passing the -online and -hotpatch options, as seen earlier. All changes in hotpatch mode are applied and users are automatically directed to new versions after the changes are applied, the affected Enterprise schedulers are paused based on maintenance start and estimated end times.
You may optionally add another parameter called -workers <number> as the command-line argument for the fapmgr.sh script to specify the number of parallel workers if the patch involves any database tasks as well. By default, the workers value is automatically selected based on your system configuration, including operating systems, CPUs, and virtual CPUs. If the number you entered is not within the permissible range for your environment then the script may prompt you to enter another value.
Let’s now proceed to apply the same patch that you validated earlier for applying online. As mentioned earlier, since you are using -online option, we will pass the -stoponerror option. Note that from Fusion Applications 11g, Release 9 onward, the Patch Manager (fapmgr) uses parallel processing of any non-dependent tasks, hence improving overall patch application time.
[fusion@fahost bin]$ ./fapmgr.sh apply -online -patchtop /home/fusion/Patches/19898891 -stoponerror -workers 4
...
Started validating the OPatch version.
Completed validating the OPatch version.
Started validating the Database connection.
WLS ManagedService is not up running. Fall back to use system properties for configuration.
Completed validating the Database connection.
Started validating taxonomy URL.
Completed validating taxonomy URL.
Started checking pre-requisite bug fixes for the patch.
Completed checking pre-requisite bug fixes for the patch.
Reference number for the current Oracle Fusion Applications Patch Manager run is 143.
Started validating the Database components of the patch [19898891(US)].
Patch validation is in progress. This might take a while.
Monitor the adpatch log file : /app/oracle/instance/lcm/logs/11.1.9.2.0/FAPMGR/adpatch_validate_19898891_20150419203607.log.
Validation successful.
Completed validating the Database components of the patch.
Started checking if the middleware portion of the patch will make any impact to the system.
Completed checking if the middleware portion of the patch will have an impact on the system.
Started running apply pre-reqs.
Please monitor OPatch log file: /app/oracle/instance/lcm/logs/11.1.9.2.0/FAPMGR/opatch/opatch/19898891_Apr_19_2015_20_36_13/ApplyPrereq2015-04-19_20-36-39PM_1.log
All apply pre-reqs for middleware artifacts have passed.
Started checking for the files that will not be deployed.
Completed checking for the files that will not be deployed.
Started identifying Post Apply tasks.
Completed identifying Post Apply tasks.
Submitting tasks for parallel execution.
Diagnostic report is generated at /app/oracle/instance/lcm/logs/11.1.9.2.0/FAPMGR/FAPMgrDiagnosticsSummary_apply_20150419203607.html. This will be updated every 5 mins.
Executing apply task [JEEPatchaction_stopManagedServers] with ID [59]. Monitor the log file :
...
Tasks [1] completed out of [5].
apply Task [ Name: OfflinePatching_applybits ID: 60 ] completed with status [ SUCCESS ].
...
apply Task [ Name: DeployInventoryAction_updateDeployInventory ID: 62 ] completed with status [ SUCCESS ].
Tasks [5] completed out of [5].
Successfully completed execution of all tasks.
Generating the data fixes XML file.
Generated patch inventory file: /app/oracle/instance/lcm/faPatchInventory/fusionAppsPatchHistory.xml
Generated patch inventory file: /app/oracle/fusionapps/applications/admin/fusionAppsPatchHistory.xml
...
Oracle Fusion Applications Patch Manager completed successfully.
Monitoring the Patch Application Using Online Patch Progress Report
Until Fusion Applications 11g Release 9, the Online Patch Progress Report had to be run separately using the -patchprogress option in the Fusion Applications Patch Manager script. From version 11.1.9 until now, it is integrated into the Apply phase. As you can see in the Apply phase output shown previously, you may notice he following lines related to the Online Patch Progress Report or diagnostic report.
Diagnostic report is generated at /app/oracle/instance/lcm/logs/11.1.9.2.0/FAPMGR/FAPMgrDiagnosticsSummary_apply_20150419203607.html. This will be updated every 5 mins.
During the current patch application session, the Online Patch Progress Report filename remains the same (FAPMgrDiagnosticsSummary_<Phase>_<Timestamp>.html), but this file is updated every five minutes. You can refresh the report file to see the current status of each task. Once the patch is complete, the same report is referred to as a diagnostic report. Note that these tasks are not same as workers in the AutoPatch tool.
Figure 16-9 shows an example of the Online Patch Progress Report for this example patch.

Figure 16-9. Example of an online patch progress report
As you can see in Figure 16-9, the Patch Progress report shows a summary of the phase followed by any failures, errors, or warnings encountered during the current patch apply session. This is followed by detailed information on each phase, along with individual tasks within the phase. Next, it displays the list of pending tasks in the wait queue. Note that the diagnostic report that’s created at the end of patch’s Apply session does not include this last section of pending tasks.
Verifying the Applied Patch Status
Once the patch application is successful, you can run the Patch Status Report again to make sure that the patch has been applied and registered in the database and inventory.
[fusion@fahost bin]$ ./fapmgr.sh report -isapplied -patch 19898891
...
Started validating the OPatch version.
Completed validating the OPatch version.
Started validating the Database connection.
WLS ManagedService is not up running. Fall back to use system properties for configuration.
Completed validating the Database connection.
Report Name: Patch Status
Report for: FUSION [/app/oracle/fusionapps/applications]
Bug No. : 19898891:US
OUI Component : oracle.fusionapps.fin
Status : Applied
Patch No. : 19898891
Date Applied (mm-dd-yyyy hh:mm:ss) : 04-19-2015 20:39:01
...
Oracle Fusion Applications Patch Manager completed successfully.
Manually Applying Patches
Although you should use the Patch Automation tools as much as possible, sometimes you might be required to apply a specific patch using the traditional OPatch or AutoPatch utilities depending on whether the one-off is specific to Fusion Applications in a supported format for these utilities. Let’s look at both of these utilities.
Manual Patching Using AutoPatch (adpatch.sh)
If you have managed an Oracle E-Business Suite (EBS) instance then you would already be aware of the AutoPatch (adpatch) utility. The AutoPatch utility is quite similar to Fusion Applications but in the case of Fusion Applications patching, you need to make sure to run adpatch.sh from APPL_TOP depending on the type of patch and impacted component. Each adpatch session can be monitored and partly controlled using a utility called the AD Controller (adctrl). First we will look at the directory structure of a generic patch followed by how to apply the same using adpatch utility. Later we will see how to monitor the patch progress using the adctrl utility.
Directory Structure of an Applications Core Patch
Before looking at how to apply a patch manually using AutoPatch, let’s understand the structure of an Application core or Functional Setup Manager database artifacts-related patch. Such patches can be applied manually using AutoPatch (adpatch ). Figure 16-10 shows an example directory structure of one such patch.

Figure 16-10. Structure of an ATGPF or functional setup manager patch
The Applications core patch looks very similar to an Oracle E-Business Suite patch. It contains a unified driver file named u<Patch_Number>.drv, which contains the list of database execution tasks as well as application artifacts copy and deployment steps. The README.txt file contains important information about prerequisites, installation steps, and whether manual post-patching steps are required.
Applying the Patch Using adpatch
Similar to EBS patches, which no longer have separate copy, database, and generate driver files because they have been replaced by unified driver, Fusion Applications artifacts-related patches also have a unified driver containing all required actions for the patch.
The adpatch utility can read the driver file to first determine any dependencies or pre-requisites for the patch. Next it compares the file versions of existing files with those included in the patch and determines whether the files need to be copied or no action needs to be taken. Before copying the files it makes a back up of the existing files being changed. After the copy portion is complete, it updates the required database objects and executes the included scripts. However, you must make full backup of file system and database before applying the patch since there is no direct rollback available for most patches. It is advisable to update the current view snapshot before applying any patch using adpatch for the first time to save time.
Note
Note that AutoPatch utility is located at APPL_TOP/lcm/ad/bin/adpatch while the wrapper script is located at ATGPF_HOME/lcm/ad/bin/adpatch.sh. You must invoke the wrapper script adpatch.sh from ATGPF_HOME for applying an Applications core patch in order to detect the appropriate APPL_TOP. The same applies to the AD Controller utility, which is discussed next.
Use the following syntax to apply a patch using the adpatch utility interactively.
$ATGPF_HOME/lcm/ad/bin/adpatch.sh [patchtop=<Path_to_Patch_Dir] [driver=u<Patch_Number>.drv] [workers=<number>]
By running the adpatch.sh script without an argument, AutoPatch will initiate an interactive session by prompting for each required parameter. You can select the patch top, number of workers, name of driver files, and so on, for the other parameter. You can change them at the prompt or leave them set to the default values. Alternatively, you can specify interactive=no at the command line and put all the required parameters in the defaults.txt file located at APPLICATIONS_CONFIG/atgpf/admin/.
Using the AD Controller to Monitor Patch Progress
During an ongoing adpatch session, you can monitor the progress of the patch using a utility named AD Controller (adctrl) from the same location from where the adpatch session was invoked. This utility is same as the one used for E-Business Suite patch monitoring. AD Controller can monitor the status of each worker, the task being performed by each worker, as well as control the status of the worked by restarting failed workers after reviewing the worker log file and resolving the underlying issue with the relevant database task execution. Although you can restart a failed worker using AD Controller, if you want to restart a failed adpatch session then you can run the adpatch.sh script with the restart=yes parameter.
Starting an AD Controller session requires the following. The script will prompt you to confirm or modify the APPL_TOP value. Make sure to enter ATGPF_HOME instead of the default APPL_TOP (FA_ORACLE_HOME).
[fusion@fahost bin]$ $ATGPF_HOME/lcm/ad/bin/adctrl.sh
...
Your default directory is '/app/oracle/fusionapps/atgpf'.
Is this the correct APPL_TOP [Yes] ?
...
Filename [adctrl.log] :
Start of AD Controller session
AD Controller version: 11.1.9.2.0
...
Note that these selections will work only if there is an existing AutoPatch session going on and the FND_INSTALL_PROCESSES table has already been created. The following is the AD Controller menu along with a short description for each of the options.
AD Controller Menu
1. Show worker status: Lists the current status of each of the configured workers. The status could be Wait (default), Assigned, Running, Completed, Failed, Fixed, Restart, or Restarted, depending on status of the current task being handled by the worker process.
2. Tell worker to restart a failed job: If the assigned task (e.g. a SQL execution) for the worker failed or completed with an error then the worker status shows as FAILED. Review the log file for the specific worker, identify and resolve the underlying issue, and then manually instruct the worker to restart the failed job using this option.
3. Tell worker to quit: If the worker process has hung or has encountered some issue or if you want to shut down the workers or complete the manager process then you can use this option to stop one or more of the worker processes.
4. Tell manager that a worker failed its job: If you have to terminate a hung database session or any other spawned task manually then you can terminate the spawned process using OS commands first. Then you can inform the manager that a worker has failed its job to manually change the status to FAILED. Now you may proceed to either restart the job or terminate the worker using the next option if the worker process has also hung.
5. Tell manager that a worker acknowledges quit: If you have manually killed a worker process due to any specific issue then you must manually update the manager that the worker has quit and acknowledge it.
6. Restart a worker on the current machine: Once the worker process and all spawned processes for the specific worker have terminated, you can restart the worker on the machine. Make sure to clean up all the processes related to the worker before restarting the worker to avoid duplicate workers with the same ID.
7. Exit: Use this option to exit the AD Controller session. All worker processes continue to run and you can launch AD Controller again any time later if the patching or AD Administration session (to be discussed next) is still going on.
Manual Patching Using OPatch
At times you may need to apply a one-off patch to resolve specific issues related to Fusion middleware before the monthly P4FA patch has been released. In this case you may apply the patch manually using the traditional OPatch utility. The one-off patch might contain middleware artifacts for Fusion Applications Core or Functional Core.
You learned earlier how to apply OPatch so make sure to set the correct ORACLE_HOME and apply one or more patches using OPatch. The version of OPatch should match the OPatch in the Applications home directory. Alternatively you can use the OPatch binaries from FA_ORACLE_HOME/OPatch or APPL_TOP/OPatch and point the inventory from Oracle home to the product being patched.
Performing Maintenance Tasks
Apart from patching, as an administrator you are required to make sure that the application file system and database are in correct shape especially after maintenance activities like patching. Oracle Fusion Applications comes with a specialized utility called AD Administration ( adadmin ) to help you perform some of these maintenance activities effortlessly. Some of the tasks are required to be performed on a regular basis, a few tasks can be invoked by other utilities, and the rest of the tasks are invoked on a demand basis. We will have a quick overview of the features of AD Administration utilities and the major tasks you will need to do often during day-to-day administration of a Fusion Applications environment.
Using AD Administration Utility
Similar to AutoPatch, AD Administration also can help you work with both Applications Core as well as Fusion Applications Homes depending on where the utility has been invoked. You also can do this by manually overriding the APPL_TOP parameter value. You need to use the wrapper script adadmin.sh, which internally calls the adadmin utility from Fusion Applications Oracle home by setting the appropriate parameters and command line-arguments. Selecting the appropriate APPL_TOP helps you maintain the application files snapshot accordingly.
Use the following commands to invoke the AD Administration utility. If you look at the prompts in the truncated output, notice that it first confirms the correct APPL_TOP followed by prompting for the adadmin log filename, batch size, database details, and so on. You may choose to leave the values to the defaults or change as per your environment and logging requirements.
[fusion@fahost ∼]$ cd $APPL_TOP/lcm/ad/bin
Or
[fusion@fahost ∼]$ cd $ATGPF_HOME/lcm/ad/bin
[fusion@fahost bin]$ ./adadmin.sh
...
...
Your default directory is '/app/oracle/fusionapps/applications'.
Is this the correct APPL_TOP [Yes] ?
AD Administration records your AD Administration session in a text file
you specify. Enter your AD Administration log file name or press [Return]
to accept the default file name shown in brackets.
Filename [adadmin.log] :
Start of AD Administration session
AD Administration version: 11.1.9.2.0
...
Log level = NOTIFICATION:1.
Please enter the batchsize [1000] :
Applications System Name [FUSION] : FUSION *
Do you currently have files used for installing or upgrading the database
installed in this APPL_TOP [Yes] ? Yes *
Do you currently have Java and HTML files for HTML-based functionality
installed in this APPL_TOP [Yes] ? Yes *
Do you currently have Oracle Fusion Applications forms files installed
in this APPL_TOP [Yes] ? Yes *
Do you currently have concurrent program files installed
in this APPL_TOP [Yes] ? Yes *
APPL_TOP Name [FUSION] : FUSION *
You are about to use or modify Oracle Fusion Applications product tables
in your ORACLE database 'fusiondb'
using ORACLE executables in '/app/oracle/dbclient'.
Is this the correct database [Yes] ?
...
Reading AD_LANGUAGES to see what is currently installed.
Currently, the following language is installed:
CodeLanguageStatus
US American EnglishBase
Your base language will be AMERICAN.
...
The following is the AD Administration main menu, which may look familiar to those who have managed Oracle E-Business Suite applications. However, the main tasks in the menu are less than the one in EBS because the standardization of application development interface. There are only a few Administration tasks in AD Administration that you may need to do regularly as compared to the traditional application suite.
AD code level : [11.1.1.5.1]
AD Administration Main Menu
--------------------------------------------------
1.Maintain snapshot information
2.Maintain Applications Database Entities menu
3.Exit AD Administration
Enter your choice [3] : 1
Let’s look at the administrative tasks that can be performed using each of these options in the AD Administration main menu.
Maintaining Snapshot Information
We have seen the important role that snapshots play while applying patches since snapshots contain a virtual image of the complete Applications file system at any given point of time. This includes information about every file that’s supplied by Oracle as part of Applications Suite with version headers and does not include C binaries and log files. Although at the database level, Oracle keeps track of every file that was ever introduced at the Fusion Applications file system level, the snapshots only include the list of files present at the time of snapshot. Any new or modified files are not included in that specific snapshot.
We can have two types of snapshots—Current View Snapshot and Named Snapshot. As the names suggest, the Current View Snapshot should be updated every time there is a change in the Oracle provided application files to keep a current inventory of files at any point of time. The Named Snapshots are created at a specific point in time and are never updated. However, these snapshots compare the Oracle homes at different points in time or with different instances. You can create, delete, export, or import snapshots as well.
Let’s look at the list of options in the Maintain Snapshot Information menu.
Maintain Snapshot Information
1. List snapshots : Use this option to list all the existing snapshots for each Applications file system. For example:
List of snapshots :
Snapshot ID Name APPL_TOPApplications System
----------- ----------------------------------------
1CURRENT_VIEW ATGPF FUSION
1001 CURRENT_VIEW FUSION FUSION
2. Update current view snapshot: Use this option to refresh the current view snapshot for the selected APPL_TOP. If you want to update the current view snapshot for a different APPL_TOP then you need to exit and restart adadmin using other APPL_TOP.
3. Create named snapshot: Use this option to create a named snapshot for the selected Application home. Once it’s complete, this snapshot will be added to the list of snapshots.
4. Export snapshot to file: You can specify an output file to export a snapshot from a list of available snapshots for review or future import purpose.
5. Import snapshot from file: This option allows you to select a snapshot export file and update relevant snapshot database tables based on the file.
6. Delete named snapshot(s): If you no longer require any old named snapshot then you can delete them using this option.
Database Tables Associated with Snapshots
All the snapshots related information is stored in the relevant database tables and if there are any issues with AD Administration utility, you can manually validate the details at the database level as well. The following are the important tables related to snapshots.
Snapshots-related tables
AD_SNAPSHOTS: This table contains the list of all snapshots including current as well as named snapshots.
AD_SNAPSHOT_FILES: This table contains the list of every file included in the specific snapshot. Note that the list of files can vary across snapshots if some files were created or removed at any point.
Individual files-related tables
AD_FILES: This table includes a record for each application file that was ever part of any snapshot. Even if a file was deleted later, the entry from this table is not removed for historical purposes and mapping with previous named snapshots.
AD_FILE_VERSIONS: This table includes every version for each file. Each file can have one or more entries in this table depending on how many times it was changed.
Bugs- and patches-related tables
AD_SNAPSHOT_BUGFIXES: This table records the list of patches applied at the time of snapshot creation or update.
AD_BUGS: We saw this table earlier during patching and this table gets updated every time the patch has been applied and the current view snapshot is updated.
Maintaining Applications Database Entities
For a proper functioning of Fusion Applications it is essential that the database objects are always valid and appropriate grants, synonyms exist in order to allow required access to business objects. A DBA could manually check such integrity of database but it is always recommended to let the Fusion Applications AD Administration utility validate it based on the expected database structure. Even though you can compile the invalid objects manually, you should use the Compile Invalid Objects menu option in AD Administration since it takes care of compiling prerequisite dependency objects first followed by the dependent objects in order to maintain integrity of the database.
You should regularly do health checks of database objects using AD Administration in addition to your regular database administration activities. Especially if the required grants or synonyms are missing, regular database queries may not be able to determine that if it has not caused any invalids. The AD Administration utility can validate them based on built-in rules.
Let’s look at the options available in the Maintain Applications Database Entities menu.
Maintain Applications Database Entities
1. Compile Invalid Objects: When you apply large patches or perform migration, a number of objects can become invalid. You can use this option to compile any Fusion Applications related invalid objects. This option first internally executes the $APPL_TOP/lcm/ad/db/sql/adutlrcmp.sql script to compile all invalid objects in database. Then it generates a list of all invalid objects in the FUSION schema and runs the $APPL_TOP/lcm/ad/db/sql/adallinvobj.sql script against the FUSION schema to compile those objects. After compilation is complete, it generates HTML reports for any pending invalid objects that could not be compiled at the following location.
<INSTANCE_TOP>/lcm/logs/<verision>/FAPMGR/adadmin_prepatch_invalidobjects.html
2. Health Check: The next important option in the Maintain Applications Database Entities menu is Database Health Check. Ideally this task should precede invalid objects compilation since the report generated by Health Check option lists the invalid objects in a database that may require you to run the previous task Compile Invalid Objects. As you can see in Figure 16-11, the database Health Check report runs the script $APPL_TOP/lcm/ad/db/sql/adhlcheck.sql and generates the report with a list of important deviations in terms of system- or object-level privileges, current list of invalid objects, and so on. This report is generated at <INSTANCE_TOP>/lcm/logs/<verision>/FAPMGR/ad_health_check_report.html. Based on this report you may need to run other adadmin tasks, such as Compile Invalid Objects, Re-Create Grants for FUSION Schema, or any manual activities.

Figure 16-11. Health check report of Fusion applications database
3. Re-create grants for FUSION schema: This option ensures the required grants for FUSION schema objects and ensures that necessary roles are assigned to the FUSION_RUNTIME schema.
4. Maintain multi-lingual tables: Since Oracle Fusion Applications supports multi-lingual tables, for each base table there is a corresponding table with the _TL postfix. Based on the active languages installed on the Fusion Applications environment, there must be a corresponding record in these tables for each record of translation-enabled tables. This procedure prompts for selecting from the list of languages for which you want to synchronize the missing language transaction records to MLS (Multi-Lingual Support) tables. This task should not be run on a regular basis since it is executed automatically whenever a new language gets installed. You may run this task manually only when you have a valid justification and confirmation from support team that the data needs synchronization.
Tip
While you’re responding to the prompts during any of the selected tasks and you want to exit AD Administration utility, answer the prompt with the abort value instead of pressing CTRL+C to cleanly exit the utility.
Backup and Restore
Backup is one of the most essential tasks for an administrator regardless of whether you are managing database, applications, middleware, storage, or operating systems. Since Fusion Applications comprises multiple technology stack components and various code artifacts, backing up a Fusion Applications environment includes multiple backup methods and strategies. You must consider the complete list of components and servers in your instance topology, including Identity Management and Fusion Applications database, application, directory, web servers, and file servers, if any. You must have regular online backup strategies as well as ad hoc offline backup strategies. Having well documented backup policies is essential for a Fusion Applications environment. This also helps to reduce time when recovering or restoring specific component or complete environment.
Note
It is recommended to keep copies of the backup on different hosts, devices, or mount points than those where any of the Fusion Applications components are hosted.
When you are planning Fusion Applications backup strategy, you must consider the following components for each online (hot) and offline (cold) backup policies.
Database components
Middleware components
Fusion Applications product directories
Oracle software inventory specific files
Types of Files to Be Backed Up
Before looking at strategies of backup and restore, it is essential to understand the types of files in the Fusion Applications environment that you need to back up. Depending on the type of the files you may be able to decide whether they require regular backup or ad hoc. This list is generic and applies to both Fusion Applications as well as Identity Management tier nodes. Note that this is generic list and any custom directories, code, or other artifacts created in your environment for third-party integration or any other purpose should be taken care of in addition to this list.
Applications, Web, and Directory Tier
We will begin by looking at the file system of application, web and directory tiers that contain Fusion middleware components-related home directories and configuration files. It is possible that you may include these files from each tier in separate backup groups or policies but the underlying classification remains the same. We can mainly classify these files in two main categories based on the frequency of change, static files, and configuration files. Let’s look at which directories are a part of each of these types.
Static Files
Certain files on applications as well as web tier do not change frequently; hence, we call them static files. However, the term static is only relative since they are not always static in nature. So you need to take backup of these files when we are applying any changes to these files. Let’s look at which files are considered static in a Fusion Applications environment.
Oracle key common files
oraInst.loc file: This file is located at /etc on the Linux Operating System and at /var/opt/oracle for Solaris. The file contains the pointer to current inventory directory location. Oracle Installer refers to this location for identifying the local inventory directory. This file should not change in normal circumstances.
beahomelist file: This file is located at the $HOME/bea location, where $HOME refers to the middleware owner user’s home directory. This file contents the list of Middleware homes on the Application Server nodes.
Oracle Software Inventory: The inventory directory is generally located at the middleware owner user’s home directory unless a different directory was specified during installation. For example, /home/fusion/oraInventory. You can verify the location of the correct inventory directory in the oraInst.loc file, as explained. This directory contains list of all Oracle software installed along with the home directories and versions of each installed component.
Applications Base: This is the root directory specified at the time of installation. This directory contains various important subdirectories, including middleware home (for both application and web tiers). For example, /app/oracle.
Middleware Home: This is the home directory for all Fusion middleware components. It also contains other Oracle homes, including Fusion Applications home, Oracle Common, and so on. It mainly contains the binary files that are generally static in nature unless a patch is applied. For example, /app/oracle/fusionapps.
Fusion Applications Home (on FA nodes only): This is the root directory for all Fusion Applications Product Families and standalone products. This includes J2EE code, executables, templates, and so on, related to each product. For example, /app/oracle/fusionapps/applications.
DB Client Home (on FA nodes only): This directory contains the Oracle Client to be used by the middleware components. As of Fusion Applications 11g Release 9, it contains the 11gR1 client to connect to the 11gR2 database. For example, /app/oracle/dbclient.
Configuration Files
Configuration files are generally specific to the node or instance and can be edited for various reasons including performance tuning, changing logging levels, adding or removing managed servers in cluster, parameter changes, and many other reasons. Although changing these files might not have affect until you restart, it is best practice to make a backup of these files before and after any such change. The following are some of the examples of directories containing Configuration files.
Applications Configuration Directory: This directory contains topology-specific domains directories and directories for instances of individual middleware components. For example, /app/oracle/instance.
Domains directory: This directory contains individual sub-directories for each domain containing the configuration files, startup/shutdown related wrapper scripts, admin server, and managed servers configuration, startup parameters, and so on. For example, /app/oracle/instance/domains/<hostname>.
Middleware component instances: The application configuration directory also contains subdirectories for individual instances of middleware components like BI, ESS, and so on.
Database Tier
There are several ways a database tier backup can be taken, depending on the type of infrastructure, storage, disaster recovery setup, and existing database backup policies. In this section, we will only look at the file system backup for database binaries and configuration files.
Static Files
Oracle Key Common Files
oratab : This directory exists on all servers but in recent versions it is mainly used by Oracle Database hosts. This includes information about the list of Oracle databases configured on the host along with home directory and automatic startup flags.
oraInst.loc: As discussed in the previous section, this directory contains location pointers for the Oracle Inventory directory.
Oracle Software Inventory: Contains the central inventory directory for all Oracle software on the host.
ORACLE_HOME Directory: This is the Oracle home directory for the database server software and includes required binary files.
GRID_HOME directory (for RAC): This is the home directory for the Oracle Clusterware software and includes required binary files.
Configuration Files
TNS_ADMIN directory: This directory contains important network configuration files such as tnsnames.ora, listener.ora, sqlnet.ora, and so on.
ORACLE_HOME/dbs directory: This directory contains configuration files like parameter files, password files, optional SPFILEs, and so on. Although any changes in these files are not reflected without restarting, these files could be modified online and must be backed up before changed.
Oracle Cluster Registry files (for RAC): In case of Oracle RAC, you may need to take backups of important shared files like OCR, voting disks (included in OCR backup from 11gR2), and so on.
Backing Up the Fusion Applications Environment
Let’s discussed two main types of strategies for backing up a Fusion Applications environment, namely offline and online backups. Depending on whether your organization uses an Enterprise Backup Management suite, you may configure these backups to run as scheduled or on an on-demand basis. The backup frequency and retention period should match your organization’s backup policy, especially if there are any internal or legal requirements for retaining backup for a specific period of time.
Note
You can also back up and restore the Fusion Applications environment using a simple interface of Enterprise Manager Cloud control, but it requires Oracle Secure Server configuration. Also, all the nodes in the selected topology must be configured as secure backup clients.
Offline Backup
It is recommended to take offline backups before and after performing critical activities, including applying large bundle patches, upgrades, migrations, or OS upgrades that already involve an approved downtime. Offline backups are always consistent and the restoration is quick and generally error-free as compared to online backups. You can use the Enterprise Backup Suites used by your organization or use manual file backup by creating a tar backup at the OS level and moving the files to a secure location.
As the name suggests, while taking offline backups, the application must be offline and not accessible by any users or background processes. All services must be shut down before initiating an offline backup. If you are planning to take a cold backup of your database, shut down the databases as well. Let’s look at what files need to be backed up as part of an offline backup.
Application, Web, and Directory Tier
Shut down all application and web servers and take a back up of all the static files, including key Oracle files, middleware-related binary files, and configuration file-related directories. You can create a single tar backup for each top-level directory since the subdirectories will be included. While restoring you can select complete or partial archives to be restored. For example, if you take an Applications base cold backup, you need not take a Fusion Applications Oracle home backup but you can still restore partial backup from the tar file later.
Database Tier
While talking offline backups for your environment, it may require the database also to be offline to make sure that it’s not being accessed and that no background jobs are running. However, depending on your organization policy you may want to take a complete cold backup or hot backup by making sure no transactions are happening on the database. Ideally, cold backups are required when you need to perform a complete restore in case of a failure. Restoring an offline database backup is much quicker as compared to online backups since it involves restoring the physical database files and the Oracle home and does not require recreating indexes that otherwise consume a lot of time. The disadvantage of database cold backup is that the restore is always full and you cannot restore specific objects. However, while performing mission-critical activities like upgrade or migration, it is mandatory to take cold or offline backup to revert back to the original state in the shortest possible time.
In order to take a database offline backup, you need to back up the ORACLE_HOME directory as well as the database files (data files, redo logs, and control files), the grid infrastructure home (in the case of RAC), and the cluster registry files (in the case of RAC).
Online Backup
We read that offline backups need to be taken on a demand basis when you are performing critical activities that include changes in static as well as configuration files. But in order to achieve the highest recoverability, you must schedule regular backups of all configuration files that are generally not static. Such online backups must be done at least once daily when you do not expect any configuration related changes, preferably at night or at a time suitable per your organization’s policy. In addition to this whenever an administrator is making changes to configuration files or through Enterprise Manager Console, an online backup must be taken before and after the change. The same applies when you are applying patches that do not require offline backups but involve post-steps that affect the application configuration files, so you could take online backup before and/or after the patching activity. Let’s look at which files need to be backed up during an online backup.
Application, Web, and Directory Tier
Since online backups are taken only when you are expecting configuration related changes, you need not take backup of static files. You can schedule online backups the of Configuration directory on both Identity Management as well as Fusion Applications nodes. You can either create shell scripts to create tar backups of these files and copy them to secure external locations or use your enterprise backup software to configure backup of the selected directories every night or another scheduled time. Whenever you need to take an on-demand online backup, you can rerun the scripts manually or run online backup through your organization’s enterprise backup tool.
Database Tier
Online backup of Oracle Database can be done through RMAN as well as data pump export backup of the entire database. You can either select a full or incremental backup for RMAN. Since the newer versions of Oracle database (12c onward) will support fine-grained recovery, including individual tables or objects, it is advisable to move to catalog-based RMAN backups for online backup instead of export data pump backups for possible partial recovery.
For file system backups on the database tier, you should back up the configuration file-related directories, including TNS_ADMIN, ORACLE_HOME/dbs, Oracle Cluster Registry (OCR) files. If password files and/or SPFILEs are stored in a shared location, those directories also should be backed up as part of an online backup.
Take a consolidated view of all these directories, their backup types, and their mappings in a single diagram. Figure 16-12 shows the static as well as configuration directories for Fusion Applications and Identity Management nodes and classifies the files based on the suggested inclusions in online and offline backup.
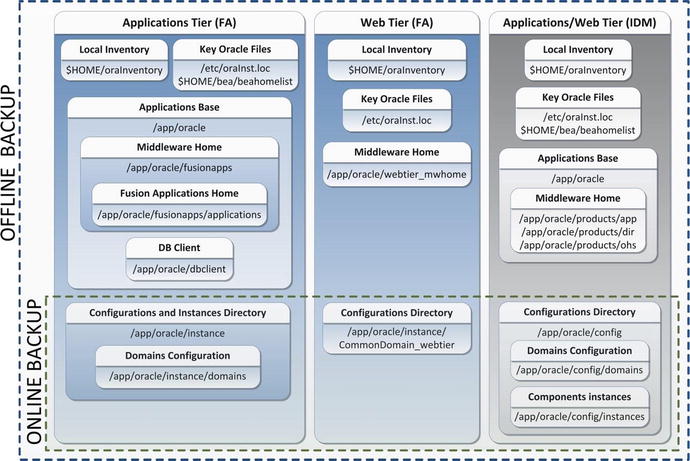
Figure 16-12. Suggested backup configuration for FA and IDM components
Restoring Fusion Applications Environment
The purpose of a sound backup strategy is to make sure that you have the required files available if there’s an accidental loss or a failed maintenance activity, a business request, or any other justifiable reason. Depending on the situation you may need to recover the file system to as recent state as possible or restore it to a specific point in time backup. With enterprise backup solutions or storage based replication solutions, you can recover until near no loss state but here we will look at how to recover or restore the application from the backups we have discussed here.
Complete Restore
Complete Restore is one of the simplest and straightforward methods of restoring the file system. All you need to do is restore the offline backup and restore the backdated consistent full file system backup. The next step should be to replace the configuration files using the latest online backup to apply the latest changes on the old consistent backup. Another alternative is to restore the static directories from the latest offline backup and then restore the configuration directories from the latest online backup. We will see a partial restore in the next section of partial restore. Figure 16-13 summarizes the complete restore option in a typical scenario.
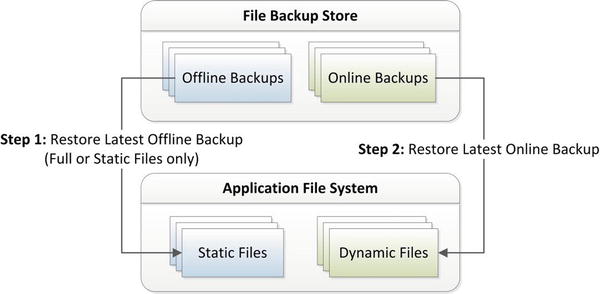
Figure 16-13. Typical file system full restore scenario
A typical scenario for a Complete restore is when you are applying major patches to an application or OS level and your go-live decision is based on complete success. If there’s a failure you may want to go back to an earlier state with complete restore. Other than that, if there’s a storage issue or a disk crash and your file system is lost completely or partially, you may want to perform a complete restore of the static configuration files considering your configuration files are not changed since the last online backup.
Note
You may not need to restore the database in many cases even if you are performing a full restore of the application file systems. For example, if you had file system loss due to a storage issue, you may only want to restore the file system without rolling back any database transactions. If a major patch bundle fails, you might need to do database restore as well. Depending on scenario you might need to take a decision on whether database restore is required.
Partial Restore
Since complete restore is required only in a disaster situation or major activity fail that forces you to completely roll back the changes. In most cases you may need to recover only part of the file system or database depending on the issue or business request. Although you can take a separate backup for individual directories, technically you do not need to do this and the method described previously to take top-level directory backup is sufficient only to restore any subdirectories beneath them.
Database Partial Restore
In case of a partial restore, it is best that you have a hot/online backup configured for your system in order to restore specific objects without data loss. Although you can restore partially from the offline backup (static tables) as well using additional temporary databases, in both online as well as offline backup scenarios, you may have certain limitations. For example, if you do not have RMAN backup configured and you have only daily export dump backup available, you may be able to restore only until the last export dump backup. Also in case of RMAN fine-grained recovery is only available from Oracle Database 12c onward, for 11gR2 database, so you need to restore a tablespace to another temporary database and then export specific tables from the same. However, if you have a proper backup mechanism for database and archive log backups, you should be able to perform complete, partial, or point-in-time restore using on several methods.
File System Partial Restore
If you want to restore only the Fusion Applications Oracle home, the complete middleware home, applications base, specific instance or specific domain, then you just need to extract the relevant directory structure from the top-level tar backup. In fact, if you are using any Enterprise Backup Management tool then you may not need to restore from tar backup since such tools allow you to select specific subdirectories or files from the list of earlier backups on disk or tapes.
Let’s take an example of partial restore from a top-level directory tar backup. For example, you need to restore only Fusion Applications Oracle home from the last offline backup. Since you already have backup of an Applications base directory /app/oracle as oracle_<date>.tar, you can simply run the following command by specifying the base directory from where you want to restore the files, which in this case is oracle/fusionapps/applications.
[fusion@fahost ∼]$ cd /app
[fusion@fahost app]$ tar -xvf oracle_25042015.tar oracle/fusionapps/applications
oracle/fusionapps/applications/
...
oracle/fusionapps/applications/common/
oracle/fusionapps/applications/common/templates/
oracle/fusionapps/applications/common/templates/applications/
oracle/fusionapps/applications/common/templates/applications/oracle.apps.prc.SupplierPortalServer_template.jar
...
After this partial restore, the rest of the files will remain unaffected. Make sure to shut down all components that may be using the files being restored before starting the restore activity. Once restore is complete, start these components and validate that everything is running as expected and make sure the issue for which restore was initiated has been resolved. After the restore is complete and the application test is successful, you must create another backup as soon as possible in order to prepare a baseline backup.
Summary
Although this concludes the important list of day-to-day administrative tasks being covered in this book, Fusion Applications administration may involve efforts from various other teams. When your role overlaps with other teams like the IT security team, Identity Management consultants, and application development teams, the overall administration may include advanced tasks that not have been discussed here. This chapter gives you an overview of the installation and ongoing administration tasks for managing a Fusion Applications environment.
In this chapter you learned about some of the regular activities in the Fusion Applications administrator’s role. The chapter started with understanding the types of patches that exist for the complete Fusion Applications environment, including Fusion middleware as well the applications artifacts. Following that, you saw the types of patching methods available for each of the different types of patches. You saw multiple ways of applying an applications or middleware patch, including manual applications as well as using patch-automation utilities.
Later you saw how to preform regular maintenance tasks related to the Applications file system and database using AD Administration. You should now know that you can maintain the integrity of the Fusion Applications instance using the adadmin utility. You learned how to use the AD Control utility to monitor the progress of various AD utilities.
Finally, you learned about the recommended practices for backup and restore of the complete Fusion Applications environment. You explored the classification of files based on the frequency of change and learned to best prepare a backup strategy according to each file type. You also learned about the relationship between restore and recovery of file systems based on specific scenarios and learned how to perform full or partial restores in the shortest possible time.