
In the previous chapter, we learned about the steps required to provision an Identity Management environment using the provisioning framework bundled with the Fusion Applications installation repository. At this stage we already have an installed and running instance of Oracle Identity Management. At the beginning of this chapter we will see how to manually validate each Identity Management component. Later, we will look at the post-provisioning actions required to tune the default parameters in order to use the Identity Management instance for Fusion Applications. We will also look at some post-steps required to fix some issues related to earlier versions of the Identity Management installer. By the end of this chapter, your Identity and Access Management infrastructure will ready to be used with Oracle Fusion Applications.
Validating the Oracle Identity Management Installation
Once Oracle Identity Management provisioning is complete, we will make sure that all the components are configured and running as expected before going ahead with post-provisioning configurations.
Validating the OID and OVD
Let’s confirm that OID is running fine. We will see the status of the processes first. Log in as the Fusion Software owner user (in this example, fusion) and run the following command.
[fusion@idmhost ∼]$ /app/oracle/config/instances/oid1/bin/opmnctl status
Processes in Instance: oid1
--------------+--------------+-------+-------
ias-component | process-type | pid | status
--------------+--------------+-------+-------
ovd1 | OVD | 14778 | Alive
oid1 | oidldapd | 15011 | Alive
oid1 | oidldapd | 14999 | Alive
oid1 | oidldapd | 14910 | Alive
oid1 | oidmon | 14780 | Alive
EMAGENT | EMAGENT | 14777 | Alive
In this output, you may see a number of OID processes (depending on configuration) and an OVD process. Make sure that both the SSL and non-SSL ports are accepting LDAP requests. The syntax used is as follows.
ldapbind -h <OID/OVD host> -p <OVD/OID non-SSL port> -D "cn=orcladmin" -q
ldapbind -h <OID/OVD host> -p <OVD/OID SSL port> -D "cn=orcladmin" -q -U 1
These commands will prompt you for the directory administrator user that you entered during the IDM provisioning response file creation. Let’s validate OVD first using both SSL and non-SSL ports.
[fusion@idmhost bin]$ ldapbind -h idmhost.paramlabs.com -p 6501 -D "cn=orcladmin" -q
Please enter bind password:
bind successful
[fusion@idmhost bin]$ ldapbind -h idmhost.paramlabs.com -p 7501 -D "cn=orcladmin" -q -U 1
Please enter bind password:
bind successful
Next we will validate OID using both SSL and non-SSL ports.
[fusion@idmhost bin]$ ldapbind -h idmhost.paramlabs.com -p 3060 -D "cn=orcladmin" -q
Please enter bind password:
bind successful
[fusion@idmhost bin]$ ldapbind -h idmhost.paramlabs.com -p 3131 -D "cn=orcladmin" -q -U 1
Please enter bind password:
bind successful
Validating the Oracle HTTP Server
Let’s make sure that the HTTP processes are running and accepting incoming requests. Invoke the opmnctl script from the <INSTANCE_TOP>/ohs1/bin directory.
[fusion@idmhost ∼]$ /app/oracle/config/instances/ohs1/bin/opmnctl status
Processes in Instance: ohs1
--------------+--------------+-------+-------
ias-component | process-type | pid | status
--------------+--------------+-------+-------
ohs1 | OHS | 16798 | Alive
Now let’s launch the OHS base URL http://<OHS Host>:<OHS port> to see the static homepage of Oracle Fusion Middleware 11g. For example, http://idmhost.paramlabs.com:7777 .
You should be able to see a screen like the one shown in Figure 7-1. This validates the Oracle HTTP Server installation.

Figure 7-1. Oracle HTTP Server homepage
Validating the Oracle Directory Service Manager
Although in the next section, we will make sure through the WebLogic Administration console that the wls_ods1 managed server is in the RUNNING state, we need to manually create directory connections to OID and OVD in order to make sure that we are able to connect to them using the Oracle Directory Service Manager (ODSM).
Creating ODSM Connections to the Oracle Virtual Directory
Before you can manage the Oracle virtual directory, you must create connections from ODSM to the Oracle virtual directory instance. To do this, proceed as follows:
1. Access ODSM using http://<OVD HOST>:<OHS port>/odsm.
For example, http://idmhost.paramlabs.com:7777/odsm .
2. To create connections to the Oracle virtual directory, click on Connect to a Directory. Since there is no saved connection information yet, click on Create a New Connection, as shown in Figure 7-2.
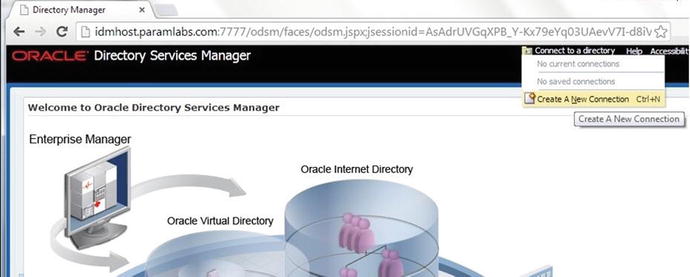
Figure 7-2. Oracle Directory Service Manager: Create a New Connection
Note
Use of the Oracle Virtual Directory load balancer virtual host from ODSM is not yet supported, so you must provide an OVD hostname to connect.
3. Provide the following information in the dialog box shown in Figure 7-3 to create a direct connection to OVD. It will save the information in ODSM.
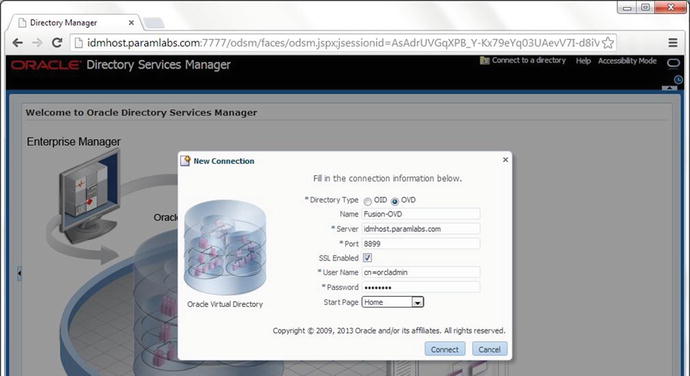
Figure 7-3. New Connection details screen
Host: idmhost.paramlabs.com
Port: 8899 (The Oracle Virtual Directory proxy port, OVD_ADMIN_PORT)
It is recommended to Enable the SSL option.
User: cn=orcladmin
Password: <password that was provided during response file creation>
4. Click Connect to save the connection information in ODSM and connect to the Oracle virtual directory.
5. Since we have selected SSL, if you do not have a valid SSL certificate installed for the selected domain, then you may see the Certificate Trust Validation screen shown in Figure 7-4. Click Always if you do not want to manually validate trust every time you connect to the Oracle Virtual directory. Select This Session Only if you want to manually validate the certificate trust on each connection from ODSM.

Figure 7-4. Certificate Trust Validation
6. You should now see the Oracle Virtual Directory Dashboard, as shown in Figure 7-5. Make sure that all adapters and listeners are available.

Figure 7-5. Oracle Virtual Directory homepage
Creating ODSM Connections to the Oracle Internet Directory
Before you can manage the Oracle Internet directory, you must create connections from ODSM to each of your Oracle Internet directory instances. To do this, proceed as follows.
1. Access ODSM using http://<OID Host>:<OHS port>/odsm.
For example, http://idmhost.paramlabs.com:7777/odsm , as per our installation.
2. Click on Connect to a Directory, as shown in Figure 7-6. You will see the already created OVD connection here, but since there is no existing OID connection, we will create one here.

Figure 7-6. Oracle Directory Service Manager: Create a New OID Connection
3. Click on Create a New Connection. Enter the information in the pop-up screen shown in Figure 7-7 to connect to OID and save the information in ODSM for future reference (except the password).

Figure 7-7. New Connection details screen
Host: OID hostname (For example idmhost.paramlabs.com)
Port: OID non-SSL port (3060)
Deselect the SSL option.
User: cn=orcladmin
Password: <password that was specified during response file creation>
4. Click Connect to save the connection information in the ODSM and connect to the Oracle Internet directory. ODSM will now show the Oracle Internet Directory Dashboard, as shown in Figure 7-8.

Figure 7-8. The Oracle Internet directory homepage
Browse through the dashboard and make sure you are able to browse through the identity store.
Validating Admin and Managed Servers
Let’s validate the status of the Administration Server and all the configured managed servers in WebLogic domain IDMDomain. Follow these steps to do so.
1. Log in to WebLogic Administration console at the following URL using the WebLogic Administrator user weblogic_idm, as shown in Figure 7-9.

Figure 7-9. OAM credentials collector page (redirected from the WebLogic Administration console URL)
http://<AdminHost>:<OHS port>/console. For example, http://idmhost.paramlabs.com:7777/console
2. You will now see the Admin server homepage, as shown in Figure 7-10. Click on Servers.

Figure 7-10. Oracle WebLogic Server Administration console homepage
3. You can see that all servers except OIF are running, as shown in Figure 7-11. This is the default configuration after IDM provisioning since Oracle Identity Federation (OIF) is optional for this setup and we will not start it unless we are going to use it. Oracle Identity Federation is required only when you are going to use directories across multiple domains. That allows Identity Management to communicate with multiple external identity providers.

Figure 7-11. Summary of the WebLogic servers
4. Now log in to the Oracle Enterprise Manager Fusion Middleware Control at http://<Admin Host>:<OHS port>/em using the weblogic_idm user. For example, http://idmhost.paramlabs.com:7777/em .
5. You will see the Accessibility Features screen, as shown in Figure 7-12 if you are connecting to the Enterprise Manager for the first time. This preference can be changed later as well. We will look at accessibility options, including Screen Reader mode, in Chapter 11 when we look at the applications interface.

Figure 7-12. Oracle Enterprise Manager Accessibility Preference screen
6. You can see the Enterprise Manager homepage, as shown in Figure 7-13. All components except OIF should have running status.

Figure 7-13. Oracle Enterprise Manager (Fusion middleware control) homepage
Browse through the Enterprise Manager interface to see the configuration of the WebLogic domain and other components, including OID, OHS, and so on.
Validating the Oracle Identity Manager
The next component to be validated is the Oracle Identity Manager (OIM). You can validate the OIM as follows.
1. Log in to http://<OIM Host>:<OHS port>/oim using the OIM administrator user xelsysadm.
For example, http://idmhost.paramlabs.com:7777/oim .
2. You can now see Oracle Identity Manager dashboard, as shown in Figure 7-14.

Figure 7-14. Oracle Identity Manager Self Service dashboard
Browse through the interface to see the various features.
Validating the Oracle Access Manager
Now validate the Oracle Access Manager (OAM) by logging into the OAM console as follows.
1. Log in to the Oracle Access Manager console as the Oracle Access Manager administration user oamadmin at the following URL.
http://<OAM Host>:<OHS port>/oamconsole
For example, http://idmhost.paramlabs.com:7777/oamconsole .
2. You should now be able to see the Oracle Access Manager 11g homepage, shown in Figure 7-15.

Figure 7-15. Oracle Access Manager console homepage
Browse through the interface to review the configuration.
Validating the Oracle SOA Instance
Let’s launch the Oracle SOA Platform homepage to make sure it lists the available services.
1. To launch the SOA homepage, open the URL http://<IDM Host>:<OHS port>/soa-infra.
For example, http://idmhost.paramlabs.com:7777/soa-infra .
2. It will prompt for authentication via a pop-up dialog box, as shown in Figure 7-16. Enter the WebLogic Administration user weblogic_idm credentials here.

Figure 7-16. Oracle SOA login screen
3. You should see the Oracle SOA Platform homepage, as shown in Figure 7-17.

Figure 7-17. Oracle SOA homepage
Performing the Post-Provisioning Configuration
We need to make a few changes to the Identity Management environment to fix certain issues with the earlier versions of installer and to tune some Identity Management component settings so they are suitable for use with Fusion Applications.
Correcting the Data Source Configuration
Due to a bug in an earlier version of Identity Management provisioning, you need to make changes to the following data sources through the WebLogic Administration console.
EDNLocalTxDataSource
mds-oim
mds-owsm
mds-soa
oamDS
oimJMSStoreDS
OraSDPMDataSource
SOALocalTxDataSource
Note
This is applicable only for the installer bundled with Fusion Applications 11.1.7. The installer has been fixed in later versions. If you are installing the latest version of Fusion Applications, you can skip this section.
To make these required changes, proceed as follows.
1. Log in to WebLogic Administration console at http://<hostname>:7777/console. For example, http://idmhost.paramlabs.com:7777/console .
2. Now log in with the username weblogic_idm and the password that you provided before provisioning.
3. Click Lock & Edit.
4. Navigate to Services ➤ Data Sources, as shown in Figure 7-18.

Figure 7-18. Oracle WebLogic Administration console
5. Click on the data source from the list of data sources to be updated, as shown in Figure 7-19. For example, EDNLocalTxDataSource.

Figure 7-19. Summary of JDBC data sources
6. Click on the Transaction tab, as shown in Figure 7-20.

Figure 7-20. Example Data Source Configuration screen
7. Deselect Supports Global Transactions, as shown in Figure 7-21. If it is already deselected, no action is necessary.

Figure 7-21. Example Data Source Transaction tab
8. Click Save.
9. Repeat Steps 4-7 for all the listed data sources in the beginning.
Note
We had to change the checkbox only for oamDS in this example. It was already deselected for all other data sources.
10. Click Activate Changes. You will see the confirmation message shown in Figure 7-22.
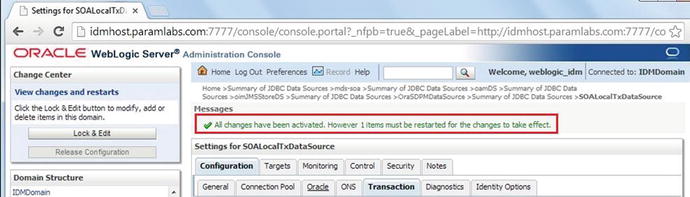
Figure 7-22. Post-activation confirmation message
11. Restart all the WebLogic managed servers.
Updating the Oracle HTTP Server Runtime Parameters
We need to tune the Oracle HTTP Server default parameters to support the Identity Management environment for Fusion Applications. Let’s change at the parameters as follows.
1. First, back up the httpd.conf file, which is located at <OHS_INSTANCE>/config/OHS/<instance_name>/.
[fusion@idmhost ∼]$ cd /app/oracle/config/instances/ohs1/config/OHS/ohs1/
[fusion@idmhost ohs1]$ cp -p httpd.conf httpd.conf.bak
2. Now edit the httpd.conf file and find an entry that looks like this:
<IfModule mpm_worker_module>
3. Update the values in this section as follows:
<IfModule mpm_worker_module>
ServerLimit 20
MaxClients 1000
MinSpareThreads 200
MaxSpareThreads 800
ThreadsPerChild 50
MaxRequestsPerChild 10000
AcceptMutex fcntl
</IfModule>
4. Leave all remaining values unchanged. Save the file.
Let’s verify the changes by comparing them with original file.
[fusion@idmhost ohs1]$ diff httpd.conf httpd.conf.bak
164,169c164,168
< ServerLimit 20
< MaxClients 1000
< MinSpareThreads 200
< MaxSpareThreads 800
< ThreadsPerChild 50
< MaxRequestsPerChild 10000
—
> MaxClients 150
> MinSpareThreads 25
> MaxSpareThreads 75
> ThreadsPerChild 25
> MaxRequestsPerChild 0
Backing Up the IDM Configuration File
Upon completion of Identity Management provisioning, it creates a specialized property file named idmsetup.properties that contains all the IDM configuration parameters at <CONFIG_DIR>/fa. Back up this file using the –p option to preserve the file timestamp. Optionally, you can also move to the Fusion Applications primordial host if it is already available. Or you can move the file while creating Fusion Applications provisioning response file.
[fusion@idmhost ∼]$ cd /app/oracle/config/fa/
[fusion@idmhost fa]$ ls -ltr idmsetup.properties
-rw-r–r– 1 fusion dba 3548 Dec 22 13:16 idmsetup.properties
[fusion@idmhost fa]$ cp -p idmsetup.properties idmsetup.properties.backup
Post-Provisioning Steps for the Oracle Identity Manager
You need to perform the following task so that the Oracle Identity Manager (OIM) works correctly after provisioning due to a bug in the IDM provisioning framework.
Adding an Oracle Identity Manager Property
We must add an Oracle Identity Manager property. Let us have a look at the steps involved in the same.
1. Log in to the WebLogic console at http://<idmhost>:<OHS port>/console.
2. Navigate to Environment ➤ Servers. You will see the Summary of Servers screen, as shown in Figure 7-23.

Figure 7-23. WebLogic Managed Servers Summary screen
3. Click the Lock & Edit button.
4. Click on the wls_oim1 server in the Servers Summary table.
5. Click on the Server Start tab, as shown in Figure 7-24.

Figure 7-24. OIM managed server settings
6. You will see the Server Start page, as shown in Figure 7-25.

Figure 7-25. OIM Settings - Server Start tab
7. Append the following to the Arguments field at the end, as shown in Figure 7-26.

Figure 7-26. Edit OIM Server Start arguments
-Djava.net.preferIPv4Stack=true
8. Click Save and then click Activate Changes button. You will see a confirmation message, as shown in Figure 7-27, that suggests that you restart the managed server.

Figure 7-27. Post-activation confirmation message
9. Restart the wls_oim1 managed server through the administration console.
Post-Provisioning Steps for Oracle Access Manager
Now let’s look at the required post-provisioning steps for the Oracle Access Manager (OAM).
Updating the WebGate Agents Configuration
In order to use Identity Management for Fusion Applications, we need to update the maximum number of WebGate connections, OAM Security Models, and other configuration parameters of WebGate profiles.
We need to perform the following steps on WebGate agent profiles.
1. Log on to the Oracle access manager console as the Oracle Access Manager admin user (oamadmin) at URL http://<IDM host>:<OHS port>/oamconsole.
For example, http://idmhost.paramlabs.com:7777/oamconsole .
2. Click the System Configuration tab.
3. Expand to Access Manager Settings ➤ SSO Agents.
4. Click OAM Agents and select Open from the Actions menu, as shown in Figure 7-28.

Figure 7-28. Oracle Access Manager WebGates screen
5. In the Search window, click Search to perform an empty search. This will return all the WebGates, as shown in Figure 7-29.

Figure 7-29. OAM Agents list
6. Click IAMSuiteAgent.
7. Set the security value to the security model in the OAM Configuration screen of the Identity Management provisioning wizard, as shown in Figure 7-30. In this case, it is Simple. Note that this should already be set for Webgate_IDM and Webgate_IDM_11g, so we will do this only for the remaining profiles.

Figure 7-30. IAMSuiteAgent Properties screen
8. Go back to the OAM Agents screen by clicking on its tab.
9. Select a WebGate agent. For example, Webgate_IDM.
10. Set Maximum Number of Connections to 20 for a two OIM instances topology and 10 for a single OIM instance topology.
11. Set the AAA Timeout Threshold to 5.
12. In the User Defined Parameters box, set client_request_retry_attempts to 11.
13. If the following logout URLs are not listed, add them.
/oamsso/logout.html
/console/jsp/common/logout.jsp
/em/targetauth/emaslogout.jsp
14. Click Apply to save the changes.
15. Repeat Steps 9-14 for each WebGate. Figures 7-31 and 7-32 show the changes required for both WebGates.

Figure 7-31. Webgate_IDM Properties screen

Figure 7-32. Webgate_IDM_11g Properties screen
16. Restart the managed server called wls_oam1 from the WebLogic Administration console.
Creating Oracle Access Manager Policies for WebGate 11g
In order to allow WebGate 11g to display the credential collector, you must add /oam to the list of public policies.
Proceed as follows in order to achieve this.
1. Log in to the OAM console at http://<IDM Host>:<OHS port>/oamconsole.
For example, http://idmhost.paramlabs.com:7777/oamconsole .
2. Select the Policy Configuration tab.
3. Expand Application Domains ➤ IAM Suite.
4. Select Resources.
5. Click Open or just double-click on resources, as shown in Figure 7-33.

Figure 7-33. Oracle Access Manager IAM Suite Resources screen
6. Click New Resource.
7. Provide the following values as shown in Figure 7-34. Leave all other fields at their default values.

Figure 7-34. Create New Resource screen
Type: HTTP
Description: OAM Credential Collector
Host Identifier: IAMSuiteAgent
Resource URL: /oam
Protection Level: Unprotected
Authentication Policy: Public Policy
8. Click Apply.
Note
If you are planning to use Oracle Identity Federation (OIF), which is optional in Identity Management for Fusion Applications, you should do it at this stage.
This concludes the IDM host-related setup. At this stage, we have an Identity Management instance running independently that can be integrated into a new instance of Fusion Applications. We will now move on to Fusion Applications host setup in the next chapter.
Summary
This chapter you learned how to validate all components of an Identity Management environment after the completion of the provisioning process. Later you learned about the post-provisioning configuration required for each Identity Management component in order to use this environment for Fusion Applications. Note that this environment can be used only for any new installation of Fusion Applications. However, once the Fusion Applications environment has been provisioned, it will contain identity and policy information of Fusion Applications. Afterward, it can only be used for that instance of Fusion Applications.
This chapter concludes the Identity Management installation and configuration. In the next three chapters, we will look at the provisioning process of the Fusion Applications nodes.