
As you saw in previous chapter, you can run multiple installation tasks in parallel. For the purposes of clarity, we will run through the Fusion Applications installation in sequence by completing the Identity Management related tasks first followed by the Fusion Applications related tasks. In Chapters 5-7, we will go through the Oracle Identity Management provisioning process using an example installation. In order to provision an Identity Management environment, you must already have a database in place with all the required schemas created as a prerequisite. In this chapter, we will look at creating a new blank database for Identity Management and then we will see how to create an Identity Management repository in this newly created database.
Installing the Database for IDM
As you saw in Chapter 3, you must create an Oracle database for Identity Management before starting the IDM provisioning process. The current version of the Identity Management provisioning framework does not support creating a new Identity Management database as of Oracle Fusion Applications Release 9. However, future releases of the IDM provisioning framework may support installation of a new IDM database right from the same wizard. Note that the Fusion Applications provisioning wizard already supports creating a new applications transactional database directly, so the following steps are specific to the Identity Management database only.
Overall, you have three options to create a blank Identity Management database.
1. IDM provisioning wizard: Once we look at the Identity Management provisioning framework, you will notice that the option to create a database for IDM is currently disabled in the current releases. However, it will be enabled in future releases so then we should be able to use IDM Provisioning wizard to create a new Identity Management Database. This option will take care of all required patches and other prerequisites automatically and will create a blank database with certified versions and patches. Once it’s available, you should use only this option for creating an Identity Management database.
2. Manual installation: Manually install an Oracle 11g version (11.2.0.3 or 11.2.0.4 or later based on the selected release requirement) on a single database node or RAC. In this case, you will need to manually apply Patch Set Updates (PSU) and other patches to bring the database to the supported level. Be careful while selecting this option since you may need to make sure that all required parameters and patches are in place to avoid any issues related to known bugs during installation or normal operation.
3. Use the Fusion Applications provisioning wizard as a workaround: You may want to use the Fusion Applications provisioning wizard as a workaround and create a blank single node database on Identity Management database node. This step relieves you from having to manually apply patches, PSUs, and so on, since the installer automatically applies all recommended patches and configuration. This method saves time but it is not recommended for production installation since this option is specifically tailored to an application transactional database. For demo systems this may serve the purpose. In order to use this option you may need to temporarily install the Fusion Application provisioning framework on a database node as well.
Option 1 is not yet available. Option 3 is simple but not suggested by Oracle so we will skip it in this section, but you can refer to Chapter 8 to learn about this option and, if necessary, use it as a workaround on IDM node. In this example, we will use option 2, which is the manual installation of the Oracle 11g Database.
We will prepare the Identity Management database with the recommended patches in the following four steps.
1. Install a blank database using the media provided in the Fusion Applications installation repository.
2. Apply the PSU (Patch Set Update) manually (if included along with the installation media) to bring the database to the supported version.
3. Apply all recommended patches included along with the installation media.
4. Set the recommended parameters that are specific to the Identity Management database.
Although you most likely how to install an Oracle 11gR2 database from standard installer, we will quickly go through the screens for the sake of completeness. Start the database installer from the media located at <INSTALLATION_REPOSITORY>/installers/database/Disk1:
[fusion@idmdbhost ∼]$ cd /stage/installers/database/Disk1/
[fusion@idmdbhost Disk1]$ ./runInstaller &
Figure 4-1 shows an optional screen for most Oracle products. We will look at some common screens like this once and then skip to the next chapters in order to avoid any repetitions.

Figure 4-1. Configure Security Updates email configuration screen
If you wish to receive an email update about the Oracle product being installed, you can enter an email in the field. If you want to receive security updates directly in your existing Oracle support account then you may enter the credentials in the next field. Otherwise uncheck the checkbox. Click Next to continue with the installer. It may prompt you for confirmation if you have not entered any information in this screen. Now you will be taken to the Download Software Updates screen shown in Figure 4-2.

Figure 4-2. Download Software Updates screen
Since we are going with bundled database software and patches, skip the updates download for now. Select Skip Software Updates and click Next to move to the Installation Options screen shown in Figure 4-3.
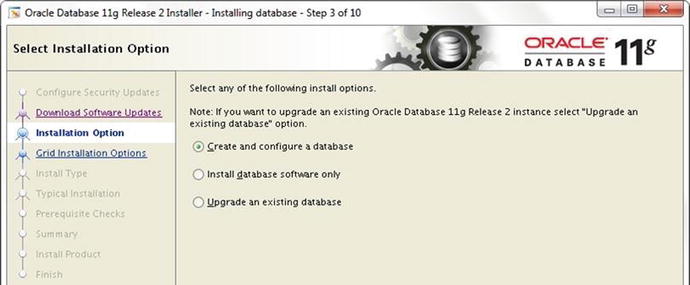
Figure 4-3. Select Installation Option screen
Note
Note that the server must have an Internet proxy configured in order to send the information to Oracle in both of these screens. If there is no outside connectivity, skip both screens. It may prompt you to confirm before you can skip.
You can create a database now or later since we need to later apply recommended patches in order to bring to supported level with Fusion Applications. Following are the available options shown in Figure 4-3. The Upgrade Database option is not applicable since this is fresh installation.
Option 1: Create and configure the database in a single step and then apply the patches and PSU (Patch Set Update) on the database home. You will need to manually run upgrade scripts on the database later to bring it to same level as the database home.
Option 2: Install the database software only first. Then apply all patches and PSU on the database home. Once the database is on the required version, create a database directly on upgraded version.
You can choose whichever option you are comfortable with. We will be looking at Option 1 in this example installation. Select Create and Configure a Database and click Next.
From the System Class screen, select the Server Class option and click Next. In the Grid Installation Options screen, select the Single Instance Database Installation option. You may also select RAC if you are installing the database on an existing Oracle Grid infrastructure. Next you will be promoted to select the install type. You may select Advanced Install to edit detailed parameters related to memory, database files, locations, passwords, and so on. In this example we are only looking at basic database installation, so we use the Typical option. Let’s skip to installation parameters screen for Typical Installation type, as shown in Figure 4-4.

Figure 4-4. Installation location and configuration details screen
At this point the installer prompts you to provide the installation location and the following details.
Oracle Base: The ORACLE_BASE location value. It will be the base location for various Oracle products and components. Select /app/database here. If the /app directory does not exist, then installer will not be able to create this path, so create the directory as the root user and change the owner to database installer user.
[root@idmdbhost ∼]# mkdir /app
[root@idmdbhost ∼]# chown fusion:dba /app
Software Location: The ORACLE_HOME location for the database. This value will be automatically populated based on ORACLE_BASE value. Typically it will be <ORACLE_BASE>/product/11.2.0/dbhome_1. Change it if required.
Storage Type: File system or Automatic Storage Management. We have selected File System in this example.
Database File Location: The location where the database files will be created. For example, /app/database/oradata.
Database Edition: You must select Enterprise Edition only here.
OSDBA Group: The operating system DBA group with administrative privilege on Oracle products (applicable to Linux/Unix). For example, dba.
Global Database Name: Enter a unique name for your database either in <database_name.domain_name> or <database_name> format. For example, idmdb.paramlabs.com or idmdb.
Administrative Password/Confirm Password: Choose a password for the SYS, SYSTEM, SYSMAN, and DBSNMP accounts.
The next screen will prompt you to specify a location and OS group for creating a new inventory directory, as shown in Figure 4-5.

Figure 4-5. Oracle Inventory details screen
Specify the location of the inventory directory. This is already filled in, as shown in Figure 4-5, so change it if required. Select the oraInventory group name. Any users in this group will be able to create a new inventory entry in this directory. Typically, you can select from the dba and oinstall groups, depending on the default group of your Oracle-related users. Click Next to continue.
The installer now checks for various prerequisites, including operating system version, kernel parameters, disk space, memory, and so on. Once it’s complete, it will automatically move to the Summary screen shown in Figure 4-6.

Figure 4-6. Pre-install summary screem
The pre-install summary screen will show the responses you entered. Review the values and click Back if you want to modify anything. Click Save Response File if you want to install the software later or for documentation purposes. Once you review and confirm everything, click Install to start the database installation process. The wizard will now proceed to the Install Product screen, as shown in Figure 4-7.

Figure 4-7. Database installation progress screen
The Install Product screen shows the current phase of the installation and the current activity being performed in the phase. The installer takes multiple actions in each of the phases, including software installation, database creation, running network configuration assistant, and so on. Once the database is created, the installer prompts you to run configuration scripts (root scripts) as the root user or a user with root privileges, as shown in Figure 4-8.

Figure 4-8. Root scripts confimation prompt
As you can see in Figure 4-8, the installer prompts you to run two scripts on the database node as the root user. If you run the scripts you’ll see the output shown in Figure 4-9.

Figure 4-9. Root scripts execution through the console
The first script creates the oraInventory directory and a pointer file for the inventory. The second script creates env files with environment variables set in the local bin directory. The database entry is also added to the /etc/oratab file with the database’s hostname and auto startup details. Once you click OK, you will see a confirmation screen with post installation information, as shown in Figure 4-10.
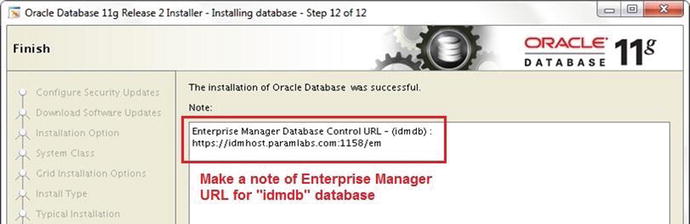
Figure 4-10. Installation completion screen
The final completion screen shows the URL of the configured Enterprise Manager. Save this URL for future reference. You can always get this URL by running the emctl status dbconsole command on the OS prompt. You can find the log of this install session at the following location:
<Inventory_Location>/logs/installActions<timestamp>.log
Set the ORACLE_SID, ORACLE_HOME, ORACLE_UNQNAME, and PATH variables in your shell profile file so that the parameters will be always set automatically when you log in.
Installing the Latest Version of the OPatch Utility
You can download the latest version of OPatch or the one included with the media. In order to install the new version of OPatch, rename the existing OPatch directory under ORACLE_HOME and then unzip the contents of the bundled patch to the same directory.
Let’s check the current version of OPatch first using the $ORACLE_HOME/OPatch/opatch version command. We will check the version again after copying the new files in the next step.
[fusion@idmdbhost database]$ /app/database/product/11.2.0/dbhome_1/OPatch/opatch version
Invoking OPatch 11.2.0.1.7
OPatch Version: 11.2.0.1.7
OPatch succeeded.
Now will install the latest version from the patch included in the media.
[fusion@idmdbhost ∼]$ cd $ORACLE_HOME
[fusion@idmdbhost ∼]$ mv OPatch OPatch_11201
[fusion@idmdbhost dbhome_1]$ unzip /stage/installers/database/opatch/p6880880_112000_Linux-x86-64.zip
Let’s make sure the version of OPatch is updated.
[fusion@idmdbhost dbhome_1]$ /app/database/product/11.2.0/dbhome_1/OPatch/opatch version
OPatch Version: 11.2.0.3.4
OPatch succeeded.
Apply a Database Patch Set Update
Depending on the version of Oracle Fusion Applications, the installer media will include the required Patch Set Update (PSU), which needs to be applied on the Identity Management database in order to bring it to the supported level. The PSU included with the Fusion Applications 11g, Release 9 media selected for this example is 11.2.0.4.3 Patch Set Update (Patch 18522509). Hence, we will apply this patch to the database. The patch may be different depending on the version of Fusion Applications you are installing.
Before proceeding, you need to stop the database services.
1. Stop Enterprise Manager Console.
[fusion@idmdbhost psu]$ emctl stop dbconsole
2. Stop Database Listener.
[fusion@idmdbhost psu]$ lsnrctl stop LISTENER
3. Shut down the database.
SQL> shutdown immediate;
Let’s apply the PSU and related patches. Change the directory to <Installation_Repository>/installers/database/psu:
[fusion@idmdbhost ∼]$ cd /stage/installers/database/psu/
Run OPatch for patch number 18522509:
[fusion@idmdbhost psu]$ $ORACLE_HOME/OPatch/opatch apply 18522509
...
Verifying environment and performing prerequisite checks...
OPatch continues with these patches: 17478514 18031668 18522509
Do you want to proceed? [y|n]
y
...
Please shutdown Oracle instances running out of this ORACLE_HOME on the local system.
(Oracle Home = '/app/database/product/11.2.0/dbhome_1')
Is the local system ready for patching? [y|n]
y
...
OPatch completed with warnings.
We have now upgraded the Oracle home binaries, but since we already have a database configured, we must run catbundle.sql to update the metadata and load modified SQLs in the existing database. The script is located at $ORACLE_HOME/rdbms/admin.
[fusion@idmdbhost ∼]$ cd $ORACLE_HOME/rdbms/admin
Start the database now.
[fusion@idmdbhost admin]$ sqlplus / as sysdba
Connected to an idle instance.
SQL> startup
Run the catbundle.sql script as follows.
SQL> @catbundle.sql psu apply
Check the following log file for errors:
/app/database/product/11.2.0/dbhome_1/cfgtoollogs/catbundle/catbundle_PSU_IDMDB_APPLY_2015Feb21_00_54_12.log
Let’s make sure that the database software version is as expected.
SQL> select * from v$version;
BANNER
--------------------------------------------------------------------------------
Oracle Database 11g Enterprise Edition Release 11.2.0.4.0 - 64bit Production
PL/SQL Release 11.2.0.4.0 - Production
CORE 11.2.0.4.0 Production
TNS for Linux: Version 11.2.0.4.0 - Production
NLSRTL Version 11.2.0.4.0 - Production
Apply Database Patches
Once the PSU is applied, you can apply other mandatory patches for the Oracle database. The patches are included in the <Installation_Repository>/installers/database/patch directory.
[fusion@idmdbhost Disk1]$ cd /stage/installlers/database/patch/
[fusion@idmdbhost patch]$ ls -ltr
total 8
drwxrwxrwx 1 root root 0 Dec 18 2013 17357979
drwxrwxrwx 1 root root 0 Dec 19 2013 17036973
drwxrwxrwx 1 root root 0 Dec 20 2013 17209410
drwxrwxrwx 1 root root 0 Jan 10 2014 17775506
drwxrwxrwx 1 root root 0 Jan 12 2014 11733603
... and more
Let’s apply all these patches in one go. Invoke opatch with the napply option to apply all of them together.
[fusion@idmdbhost patch]$ /app/database/product/11.2.0/dbhome_1/OPatch/opatch napply
Oracle Interim Patch Installer version 11.2.0.3.4
...
Verifying environment and performing prerequisite checks...
OPatch continues with these patches: 17357979 17036973 17209410 17775506 11733603 14084247 18154779 18135678 13073613 13498243 17982555 16980342 16907774 12716670 17811789 18700740 14285317 18418934 18966843 16524926 19194799 18767554 19238601 19249319
Do you want to proceed? [y|n]
y
...
Please shutdown Oracle instances running out of this ORACLE_HOME on the local system.
(Oracle Home = '/app/database/product/11.2.0/dbhome_1')
Is the local system ready for patching? [y|n]
y
...
Patches 17357979,17036973,17209410,17775506,11733603,14084247,18154779,18135678,13073613,13498243,17982555,16980342,16907774,12716670,17811789,18700740,14285317,18418934,18966843,16524926,19194799,18767554,19238601,19249319 successfully applied.
OPatch Session completed with warnings.
...
OPatch completed with warnings.
The typical option in the Oracle Database installation configures the listener on default port 1521. It is optional but recommended to change the default listener port to a new value as part of database security best practices. We will change the default port in this example to 1531.
Change the default listener name and port in listener.ora.
Update listener port and listener entry in tnsnames.ora.
Change the LOCAL_LISTENER parameter in the SPFILE database to point to the new listener.
Restart the database and listener.
Now the TNS entry for the Identity Management database looks as follows.
IDMDB =
(DESCRIPTION =
(ADDRESS = (PROTOCOL = TCP)(HOST = idmdbhost.paramlabs.com)(PORT = 1531))
(CONNECT_DATA =
(SERVER = DEDICATED)
(SERVICE_NAME = idmdb)
)
)
Edit Recommended Database Parameters
IDM must have an open_cursors parameter set to 800. If you installed a new database using Fusion Applications provisioning framework then the value would be set at 500; otherwise, the current default value will be 300. In both cases we need to set it to 800. Make sure to use the scope=both option in order to retain the change after the database restarts.
SQL> show parameter open_cursors
NAME TYPE VALUE
------------------------------------ ----------- --------
open_cursors integer 300
SQL> alter system set open_cursors=800 scope=both sid='*';
System altered.
We need to set the processes parameter to at least 500. Change that as well in SPFILE.
SQL> show parameter processes
NAME TYPE VALUE
------------------------------------ ----------- ------------------------------
processes integer 150
SQL> alter system set processes=500 scope=spfile;
System altered.
Tip
If you created the Identity Management database using Fusion Applications provisioning framework then you may want to reduce the database memory target. The default SGA target is set to 9 GB through the Fusion Applications provisioning framework database creation scripts. You can leave it unchanged if you have enough memory on Identity Management database server to accommodate it.
Restart database to bring the parameters in effect from SPFILE.
Create XA Views as Prerequisites of the Repository Creation Utility
OIM requires Oracle XA related views in order to allow distributed transaction processing. However, by default these required views are not created in a fresh database. To avoid an expected error related to the XA view in RCU, we need to create the required XA views v$xatrans$ and v$pending_xatrans$ first using the xaview.sql script located in the RDBMS admin directory.
[fusion@idmdbhost bin]$ cd $ORACLE_HOME/rdbms/admin/
[fusion@idmdbhost admin]$ sqlplus / as sysdba
SQL> @xaview.sql
DROP VIEW v$xatrans$
*
ERROR at line 1:
ORA-00942: table or view does not exist
DROP VIEW v$pending_xatrans$
*
ERROR at line 1:
ORA-00942: table or view does not exist
View created.
View created.
Running the IDM Repository Creation Utility
The Repository Creation Utility (RCU) for the Oracle Identity Management components is only available for Linux and Windows platforms. Earlier versions of Fusion Applications installer media used to ship with Linux RCU only for Identity Management components but recent versions have both Linux and Windows versions included in the installation media.
If you are using Windows-based RCU then the Windows machine should be able to communicate with the database host. The required database ports need to be opened from the network firewall. We will use Linux RCU in this step since the database host includes the Linux operating system.
Before starting the RCU, you need to install JDK on the host from the ZIP file provided in the media. This will create a folder named /app/oracle/jdk6 and this will be our JAVA_HOME, which will be used for RCU and other Java-based installers.
[fusion@idmdbhost ∼]$ mkdir /app/oracle
[fusion@idmdbhost ∼]$ cd /app/oracle/
[fusion@idmdbhost oracle]$ unzip /stage/installers/jdk/jdk6.zip
Let’s create a directory to extract the RCU files.
[fusion@idmdbhost ∼]$ mkdir -p /app/oracle/provisioning/fmw_rcu
[fusion@idmdbhost ∼]$ cd /app/oracle/provisioning/fmw_rcu
Unzip the RCU that ships with the installation.
[fusion@idmdbhost fmw_rcu]$ unzip /stage/installers/fmw_rcu/linux/rcuHome.zip
Let’s launch the Repository Creation Utility now.
[fusion@idmdbhost ∼]$ cd /app/oracle/provisioning/fmw_rcu/bin
[fusion@idmdbhost bin]$ ./rcu &
The Welcome screen is informative only and provides information on the purpose of this utility. No action is necessary on this screen. Click Next to continue with the wizard. Next you will be prompted to select the RCU option, as shown in Figure 4-11.

Figure 4-11. Create or drop a repository from this selection screen
This screen of Identity Management RCU provides two options to choose from.
Create: This is the default option for the RCU. This option is used to create the necessary database objects and seed the repository data, which is the sole purpose of the utility.
Drop: This option should be selected if you faced any issues with the RCU or the latter part of IDM provisioning. Since the current release of IDM provisioning wizard does not support automatic cleanup and restore, we may need to use this option to bring the database back to its original state and restart the complete provisioning process if it encountered any issues.
Once you have dropped the existing repository, you need to launch the same screen again with the Create option in order to recreate the repository.
Since we are running RCU for the first time, select Create and the click Next to proceed to the Database Connection Details screen, as shown in Figure 4-12.

Figure 4-12. Database Connection Details screen
This screen prompts for the connection details for the database in which the repository needs to be created. The following information must be entered.
Database Type: Identity Management RCU is a common utility for all Fusion Middleware components and since some of these components support non-Oracle databases like Microsoft SQL Server, IBM DB2, MySQL, and so on, you may see them in the drop-down menu. However, we must select Oracle Database since most of our selected components support Oracle Database only.
Host Name: For single node databases, enter the name of the host where you installed the blank Identity Management database. For RAC, enter the name of SCAN hostname. In this case, it is single node database so we will enter idmdbhost.paramlabs.com.
Port: The default value for the port is 1521. If you are using non-default port for your Identity Management database, then enter the value that you have configured. In this case, we are using port 1531.
Service Name: In the case of the RAC database, enter Service Name while in case of Single Node database, enter SID value here. In this case, it is idmdb.
Username and Password: Enter the credentials of SYSDBA privilege. We will enter SYS user here.
Role: We must select the SYSDBA role here for the SYS user.
Enter these details and then click Next to proceed to the Prerequisites Check screen, as shown in Figure 4-13.

Figure 4-13. Prerequisites check pop-up screen
You will now see a pop-up screen that shows the prerequisites results for the Repository Creation Utility. If there are any errors in the previous screen where you provided database connection details, you may see failure in the validation here.
Once the prerequisites check completes, click OK to proceed. The next screen allows you to select the components for which you want to create the repository, including required the tablespaces and schema shown in Figures 4-14 and 4-15.

Figure 4-14. Repository components selection screen for creating new schemas

Figure 4-15. Repository components selection screen for creating new schemas (continued)
This screen prompts for the following values:
Create a New Prefix: This is the Schema Prefix for the new schemas to be created except for the Oracle Internet Directory. As of now, OID does not support a prefix so any database can host only a single instance of OID. The schema name for OID is ODS by default and this cannot be changed. All the remaining schema names have the mandatory prefix of FA.
Caution
For Fusion Applications 11.1.6 and earlier, it was recommended to use EDG or ISA as the schema prefix, but from release 11.1.7 onward, it is mandatory to use FA. Likewise, the Identity Management provisioning wizard requires the database schema prefix to be FA.
Oracle Fusion Middleware Components Selection: Although the RCU includes many components other than what we need here, you should select only following components.
Oracle Internet Directory
Oracle Identity Federation
Oracle Identity Manager
Oracle Access Manager
Note that following components will be automatically selected when you select the ones listed here due to dependencies shown in Figures 4-14 and 4-15. You don’t have to select them manually.
Metadata Services (dependency with Oracle Identity Manager)
Audit Services (dependency with Oracle Access Manager)
SOA Infrastructure (dependency with Oracle Identity Manager)
User Messaging Service (dependency with Oracle Identity Manager)
Make the appropriate selections shown here and then click Next to continue with the wizard. Now you may again see a prerequisite check screen based on the previous selection, as shown in Figure 4-16.

Figure 4-16. Example of a failed prerequisites check
This screen shows the validation status and duration for each of the components selected. The prerequisite checks might fail if you have not followed the database-creation steps mentioned in previous section properly. Figure 4-16 shows an example of a failed prerequisites check screen for reference. In this case, the prerequisites check for Oracle Identity Manager failed.
Click OK to see the error message details, which will take you back to the previous screen, as shown in Figure 4-17.

Figure 4-17. Example error message screen after failed prerequisite checks
The error message will appear in the previous screen under the Messages textbox after the pop-up is closed. The error message in this case is the following.
Error: XATRANS Views are not installed on this Database. This is required by the OIM Schema
Action: Install view XAVIEWS as SYS user on this Database.
Refer to the Oracle Database Release Documentation for installation details.
RCU-6092:Component Selection validation failed.
To fix this error, run the following SQL to create XA views if they were missed during the database-preparation step earlier.
[fusion@idmdbhost bin]$ cd /app/database/product/11.2.0/dbhome_1/rdbms/admin/
[fusion@idmdbhost admin]$ sqlplus / as sysdba
SQL> @xaview.sql
DROP VIEW v$xatrans$
*
ERROR at line 1:
ORA-00942: table or view does not exist
DROP VIEW v$pending_xatrans$
*
ERROR at line 1:
ORA-00942: table or view does not exist
View created.
View created.
Once the view creation is complete, click Next to rerun the prerequisites check, as shown in Figure 4-18.

Figure 4-18. Successful prerequisites check screen
Once again it will show the pop-up for the prerequisites check status and the timing for each component. This time the prerequisites check should complete successfully. Click OK to continue. The next screen prompts you to select a password for each repository schema to be created, as shown in Figure 4-19.

Figure 4-19. Schema Passwords selection screen
As you can see, the wizard creates main schemas based on the selection and creates corresponding AUXILIÇARY schemas for certain components. It provides three options for password selection. The passwords must contain at least eight characters with a combination of alphabetical, numerical, and/or special characters.
Same Password for All Schemas: This option assigns the same password to all the main and auxiliary schemas.
Use Main Schema Passwords for Auxiliary Schemas: This option allows you to select passwords for main schemas and the related auxiliary schemas will be assigned the same password as the main schema.
Specify Different Passwords for All Schemas: This option enables all password textboxes and you can assign individual passwords for each schema as long as they confirm to the password complexity requirement.
Caution
Identity Management provisioning framework suggests you have the same password for all schema passwords during provisioning. You can change the passwords later, but until IDM provisioning is complete, it is recommended you keep the schema passwords the same.
We have selected to have the same password for all schemas. Click Next to continue to the Map Tablespaces screen, as shown in Figure 4-20.

Figure 4-20. Map Tablespaces screen
There are other options—such as Additional Tablespaces and Manage Tablespaces—that allow you to select different names and types, or add or modify data filenames and sizes, as well as other tablespace-related operations.
Once you click Manage Tablespaces, the screen shown in Figure 4-21 comes up. This screen collects the information about the tablespaces, while the actual operation is performed in the next screen.

Figure 4-21. The Manage Tablespaces screen
Review this screen and modify the values if required. Click OK to close the window and you’ll be returned to the previous screen. Now click Next to proceed with the tablespaces creation. The wizard prompts for confirmation to create the tablespaces, as shown in Figure 4-22.
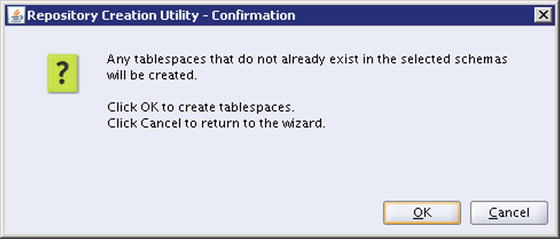
Figure 4-22. Confirmation message screen for creating new tablespaces
If you are ready to proceed, click OK to confirm the tablespace creation. Once confirmed, the screen shown in Figure 4-23 appears. It shows the status of the tablespaces creation activity along with the timing information.

Figure 4-23. Tablespaces Creation completion and timing details screen
If there are any errors encountered during tablespaces creation due to any incorrect information provided in an earlier screen, this screen shows a failure icon while the previous screen gets populated with the actual error message in the lower Messages textbox. Once the tablespaces are created successfully, click OK to proceed to the Summary screen, as shown in Figure 4-24.

Figure 4-24. Summary information of schemas to be created along with tablespace mapping
This screen provides the overall summary of the selected RCU configuration before actually creating repository, including database connection details, schema prefix selected, and the list of components selected along with the schema name as well as its default and temporary tablespaces.
Review the information. If you find something that needs correction then click the Back button to modify the values provided earlier. If everything looks fine then click Create to start creating the repository schemas. Now you can see a pop-up screen shown in Figure 4-25 with the status of the repository creation progress for each component selected along with its timing information.

Figure 4-25. Repository Creation progress and timing information
Depending on the specification of database host, it may take a few minutes to complete. The screen will close automatically once the repository is created. Once RCU completes its tasks, you will see the Completion Summary screen shown in Figure 4-26. It provides the status summary along with timing information for each component selected, as well as overall execution time. It also provides the location and name of the log files. You can review the logs to understand what happens behind the scenes during repository creation.

Figure 4-26. Repository creation completion summary
Review the summary and click Close. Once the RCU is complete, you can log in to the database and check the newly created schemas, tablespaces, and so on. Table 4-1 shows summary information about all the new schemas and tablespaces created after RCU completion.
Table 4-1. Summary Table of Fusion Middlleware Components and Schemas After RCU
Component | Schema | Default Tablespace | Temporary Tablespace |
|---|---|---|---|
Oracle Internet Directory | ODS ODSSM | OLTS_DEFAULT OLTS_SVRMGSTORE | TEMP TEMP |
Oracle Identity Management | FA_IAU FA_IAU_APPEND FA_IAU_VIEWER FA_MDS FA_OAM FA_OIF FA_OIM FA_ORASDPM FA_SOAINFRA | FA_IAS_IAU FA_IAS_IAU FA_IAS_IAU FA_MDS FA_OAM FA_IAS_OIF FA_OIM FA_IAS_ORASDPM FA_SOAINFRA | FA_IAS_TEMP FA_IAS_TEMP FA_IAS_TEMP FA_IAS_TEMP FA_OAM_TEMP FA_IAS_TEMP FA_OIM_TEMP FA_IAS_TEMP FA_IAS_TEMP |
Summary
In this chapter, you learned about various options available to prepare the Identity Management Database as of Fusion Applications 11g, Release 9 and the expected options to be available in future releases. You also looked at the Repository Creation Utility for Identity Management. At this point you should be able to log in to the Identity Management database and check that the related schemas have been created in the database. You can monitor and manage the Identity Management database using the Oracle Database Enterprise Manager console or using Enterprise Manager Cloud Control if it is configured in your environment. We will look at configuring Cloud Control for the Fusion Applications environment in Chapter 14.
In the next chapter, we will have a look at the tasks required for creating an Identity Management Provisioning response file before proceeding with the actual provisioning process.