
![]()
Importing and Exporting Data
Unless you’re starting an application from scratch, odds are you’re going to need to import data into Neo4j to work with. There are a number of ways to do this, so we’ll go through a number of these, and also, how to get your data out of Neo4j, if you want to do that, anyway.
Since you can’t export data if you don’t have any in the first place, let’s start with importing data, shall we?
Importing Data
As mentioned before, there are a number of ways to import data into Neo4j, the easiest of which is to just write the needed Cypher code to import the nodes you need. In the last chapter, this technique was used to create some basic data structures, and it can be used in any other application to do the same. This approach does has a number of advantages, including instant feedback. If you made an error in your code, you accidentally type something wrong, or there is some other issue, this can be seen straight away, especially if you return the created node after the query.
Using the browser to import data also allows you to see how the data is shaping up, as you can import the data in chunks and relate it as needed. This is the process used in the previous chapter, and provided you aren’t importing 100s or 1000s of nodes (that’d be a lot of queries) then this method will work just fine.
Import from a CSV Using Cypher
If you have your data in a nice CSV format (Or you can convert your data to CSV) then Neo4j can help you out. There is a built-in Cypher command that allows data to be imported from a CSV, with a number of options to tailor the import for your needs. A CSV can be loaded via https, http, ftp, and file:// so whether your file is remote or local, it can be used.
Before diving right in and importing the CSV, it’s a good idea to ensure the CSV is valid. If there’s a problem with your CSV, then it may cause issues with the import, so it’s best to rule out issues with the CSV, by validating it. This is especially important when you aren’t the one who generated the CSV. There are a number of tools available to validate CSVs, so this process can be easy, if there aren’t any errors to fix, that is.
CSV Lint
This tool, which can be found online at csvlint.io, allows you to validate your CSV to check for errors, from either a remote or local file. Not only does the site check for validation errors in the CSV, it also gives you recommendations on how to make it better. For example, if you’re hosting your CSV and it’s being served with the wrong content header, it’ll mention this, and give a recommendation on how to solve it. An example of this can be seen in Figure 6-1, which is based on the CSV used in the Neo4j documentation.
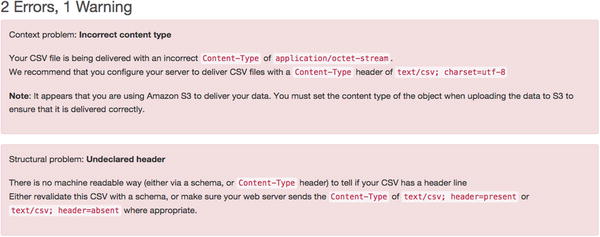
Figure 6-1. Recommendations after using csvlint.io to validate a CSV
The two errors mentioned in Figure 6-1 are both related to how the file is being served from the server. The first is essentially saying, the file is being served with a vague content header. The one being used here is “application/octet-stream” which is a binary file, but since there’s a header for CSV “text/csv” then this should be used, as it’s way more specific. The second error is referencing the header row of the CSV (so all of the column headings) and whether or not it’s present. Tools that use CSVs will generally have to work out if there is a header row present within the file or not, but if the correct header is sent, then this check won’t need to be done. If you know your CSV has a row of column headings, then make sure to use “text/csv; header=present” when serving the file, and “text/csv; header=absent” if not.
As well as this feedback to help clean up your CSV, there’s also an option to “Download standardized CSV” which gives an option to download a CSV that has the errors fixed. Of course, it’d be recommended to again, check the CSV it gives you to ensure the structure of the data is correct, and it’s still in the same format that was initially desired. Of course, you can keep using the site to check for errors until your CSV is clean and ready to use.
This tool is currently in alpha (at the time of writing it is, anyway) but it is still very helpful to get some useful feedback on your CSV file, especially with the service being hosted. If you’re authoring your own CSV rather than exporting it, then there’s also some good advice on writing CSVs that can be found at http://csvlint.io/about to help make the process even easier.
This CSV tool is downloaded rather than hosted, but has a lot of features that make that worth it. You can find Papa Parse on GitHub at https://github.com/mholt/PapaParse and also at papaparse.com. This tool is written as JavaScript and can be run in the browser. It has quite comprehensive documentation, and also an interactive demo page (http://papaparse.com/demo) which can be used to test out the features it has. Speaking of features, it has a good list of them a section of which can be seen in Table 6-1.
Table 6-1. Some of the features of Papa Parse
Feature | Explanation |
|---|---|
CSV→JSON and JSON→CSV | You have the ability to convert a CSV to JSON, but also to convert from JSON to CSV, so there’s a lot of freedom there. |
File handling | Papa Parse can handle files in a number of ways. You can open a local file, or even download a remote one. If your file is rather large, it may be worthwhile to stream it rather than just straight downloading it, and Papa Parse can handle that too. |
Auto-detect delimiter | This is very useful when working with CSVs, as the delimiter can differ from the standard comma and be anything, but Papa Parse can work that out for you. |
Multi-threaded | If a file is parsing for a long time, it could make the page non-responsive. To get around this, it’s possible to use a worker, which will keep the page active. |
Header row support | Whether or not your CSV has a header row, Papa parse can work with that. If you tell it you have a header row, the data will be keyed by it; otherwise indexes will be used. |
Type conversion | Unless you state otherwise, everything in the CSV will be parsed as a string, as this is the safest way to deal with data, because everything can be a string. If this isn’t good enough, `dynamicTyping` can be turned on within Papa Parse, and any booleans or integers that are detected will be parsed as the correct type, and not string. |
Graceful error handling | If your CSV happens to have errors in the rows, then it’ll try it’s best to carry on, then returns stats of the failed row when the import is complete. Rather than just a vague error, Papa Parse will give a reason it couldn’t parse a row, and also the number, so any errors can be manually addressed if needed. |
The demo on the website can actually be used to parse data passed to it, but this will only work for small amounts of data, but for optimal results, it’d be better to run Papa Parse locally which gives more flexibility on the features used. Using Papa Parse allows you to validate your CSV before using it with Cypher, but it also means you can use it to convert JSON data to a CSV, which means that the data can then be imported with Cypher, and used within Neo4j, which is a bonus.
Load a CSV into Cypher
With a valid CSV now in place, it’s time to actually use it with Cypher. To import the CSV, the LOAD CSV clause will be used in Cypher, which can load a file from either a local filesystem, or a remote endpoint. If you’re hosting your file, it could be worth testing it before trying to import it, if you haven’t already, that is. When working with local files, there are a couple of rules that need to be respected. First, if your file is local, you must declare the file:// protocol directly, and then build the path up from ‘/‘ on the machine. On OSX/UNIX, you would need to use the following for a local file “file:///path/to/data.csv” whereas the same url on Windows would be “file:c:/path/to/data.csv”. It can be a bit tricky to get these right sometimes, especially if you’re using a virtual environment. The way around this (and the easier option for loading CSVs) is to load the file over HTTP, which can be a remote, or local file.
To load a CSV locally, some form of web server will be required to run on `localhost` to serve the file. When the server is running on localhost, just place the file in the root of the directory being used by the server, which will allow it to be loaded via “http://localhost/data.csv”. Of course, if the file cannot be in the root, simply adjust the URL as needed, or it’s easier to host the file remotely, just replace the local address with a remote one, and Cypher will work in the same way.
If you’re unsure whether or not Cypher will be able to run the file, then don’t worry, you can test the CSV without having to import anything. By using a simple Cypher query, you can read the first few rows from the CSV, which will either show the rows on success, or give an error on failure. The query in question is as follows:
LOAD CSV FROM "http://localhost/file.csv" AS row WITH row
RETURN row
LIMIT 5;
You can also just get a count of the rows in the CSV to double-check things, which can be done like so:
LOAD CSV FROM "http://localhost/file.csv" AS line WITH row
RETURN COUNT(*);
If Cypher cannot load the file, you will receive a message telling you the resource cannot be loaded, with an error code of `Neo.TransientError.Statement.ExternalResourceFailure`, so if you get an error, you’ll know straight away. Being able to review the first few lines of the CSV is useful for a number of reasons, the same goes for the row count, too. It allows you to ensure the file is in the expected location first, but then allows you to see what Cypher classes in are the first few rows, or the total number of rows, depending on your need. If you see in the preview that there seems to be an error in the rows, or something doesn’t seem right, it means the CSV can be reviewed, and potentially fixed before it’s imported, which leads to less errors overall.
One thing that can cause an issue is the use of a non-standard delimiter, which would mean the rows won’t be interpreted properly by Cypher, as by default it looks for a comma separator. For argument’s sake, let’s assume this CSV has a non-standard separator, so rather than a comma, a semi-colon is being used.
If a LOAD CSV query was run without telling Neo4j what the delimiter was, then it’d assume it was a comma, and therefore would fail, or get some very odd results if it didn’t. In some cases, it’s easier to use a different delimiter than to escape all of the commas in your file, so if you were importing big chunks of text, a different delimiter other than a comma would be helpful. Anyway, to tell Cypher you’re using a non-standard delimiter, just add the FIELDTERMINATOR cause to the query, which looks like so:
LOAD CSV FROM "http://localhost/file.csv" AS line WITH line FIELDTERMINATOR ’;’
Now, when the CSV is processed it’ll pick up the correct delimiter and process the file correctly, which is what we want. With the correct delimiter now specified, the data can be tested to ensure it works correctly, so the previous query can be reused to test the file again before it’s imported, which is done like so:
LOAD CSV FROM "http://localhost/file.csv" AS line WITH line FIELDTERMINATOR ’;’
RETURN line
LIMIT 5;
At this stage, the CSV being used should be valid, and in the correct location, so it’s finally ready to start importing the contents into Neo4j. With this example, I’ll be using a locally hosted CSV as that’s the easiest way to load it, or at least for me, anyway. The CSV in question is a list of people with a number of properties. Rather than listing them all, the contents of the CSV is as follows:
id,First Name,Middle name(s),Surname,D.O.B,Favourite Animal ,Favourite Colour,friend_id
1,Chris,D.,Kemper,28/11/88,Dog,Red,2
2,Kane,Phil,Scott,2/10/90,Dog,Yellow,
3,Dave,,James,5/5/75,Shark,Pink,1
5,Claire,North,West,20/2/70,Fish,Green,
8,Andy,,Green,19/1/80,Dog,Purple,3
9,Charlotte,Sue,Lee,7/5/88,Giraffe,Orange,12
10,Sterling,Mallory,Archer,5/9/48,Ocelot,Blue,
11,Peter,,Gray,10/7/90,Snake,Red,10
12,Sarah,Jennifer,Mitchell,15/9/80,Cat,Yellow,
The data being specified here is a list of people with various attributes attached, such as a date of birth, and a favorite animal. For ease, I’ll be hosting the CSV locally, so it can be accessed over localhost. In this case, this CSV will only require the creation of one label, Person, which means when it comes to importing the nodes, the query is nice and simple.
Before importing data, it’s always a good idea to create some constraints on the data, to ensure certain properties are always unique. Adding contrasts also gives another benefit that we know of already, in the form of creating an index, which helps make getting the data out of Neo4j a lot faster. Let’s create a constraint on this data for good measure. Since we’re dealing with people, there are chances for duplication on pretty much every field, as people do have the same name, and also like the same things, so constraints shouldn’t be added on those, unless your application requires otherwise, of course. There is an Id column in the file here, which is required to be unique, so a constraint works perfectly here:
CREATE CONSTRAINT ON (p:Person) ASSERT p.id IS UNIQUE;
With the constraint place, the data is now ready to be imported and you can be confident the id of each person will be unique, which is just what we want for the import.
That data now needs to be imported by using LOAD CSV, but in this case, with the addition of WITH HEADERS. This allows for the CSVs headers to be referenced by their keys in the query, which makes things easier than using index. If you were to load a CSV without headers, instead of using the column header you would just use the index, so the first would be 0, and then moving up from there. To reference the index, just treat the variable like an array, so you’d index a row by using square brackets. If you’ve aliased the CSV row with ‘AS row`, to use a value from that row via an index, it would be row[0], rather than row.name, for example. A full example would look something like the following, depending on your data.
LOAD CSV WITH HEADERS FROM ‘http://localhost/people.csv’ AS row
CREATE (:Person {
        id: row.id,
        first_name: row.`First Name`,
        middle_name: row.`Middle name(s)`,
        surname: row.`Surname`,
        dob: row.`D.O.B`,
        favourite_animal: row.`Favourite Animal`,
        favourite_colour: row.`Favourite Colour`
})
It’s also possible to assign properties using the SET clause, rather than having one big CREATE. The same result as above can be converted to use SET like so:
CREATE (p:Person {id: row.id})
SET p.first_name: row.`First Name`
        p.middle_name: row.`Middle name(s)`,
        p.surname: row.`Surname`,
        p.dob: row.`D.O.B`,
        p.favourite_animal: row.`Favourite Animal`,
        p.favourite_colour: row.`Favourite Colour`
})
The main difference here (other than the use of SET, of course) is that before the alias for the node was emitted as it wasn’t needed (so just :Person) whereas here, it’s `p`. This is so that the same node can be used later in the query to have values assigned to it, using (you guessed it) SET. Using SET can make your code easier to lay out, and if you need to use any functions on the data (such as TOINT()), this keeps each property on its own line, making the code easy to read, which is always a bonus.
Running either of these queries will give the same results, and will import all of the nodes using the values from the CSV, creating a node and then applying properties to it, and even though the data in the CSV is unique and will import fine, if two nodes had the same id, the second would fail as that id is taken. This data sample is quite small, but what if you want to import a large amount of rows? Well, if you want to import large amounts of data, you’ll need to make at least one change, potentially two, depending on how Neo4j is set up. The first thing is to ensure Neo4j has enough RAM to be able to process the import.
![]() Note When it comes to importing, the more RAM the better, as it’ll make your import faster. You’ll want to have 3–4GB of RAM allocated to Neo4j, but if you can assign more then do that. To update the amount Neo4j has at its disposal, the `neo4j-wrapper.conf` must be modified, which is located within the `conf` directory of Neo4j. The properties we’re looking to update are `wrapper.java.initmemory` and `wrapper.java.maxmemory`.
Note When it comes to importing, the more RAM the better, as it’ll make your import faster. You’ll want to have 3–4GB of RAM allocated to Neo4j, but if you can assign more then do that. To update the amount Neo4j has at its disposal, the `neo4j-wrapper.conf` must be modified, which is located within the `conf` directory of Neo4j. The properties we’re looking to update are `wrapper.java.initmemory` and `wrapper.java.maxmemory`.
What’s actually being updated here is the amount allocated to Java heap, but there’s also another set of memory values that need to be updated, which are the memory-mapping values. When you’re doing an import, data is stored within these two locations so it can be reused within the remaining parts of the import. This is why more RAM is better, as it means more data can be stored within it, and the data doesn’t need to be looked up again, which slows things down. Within the `neo4j.properties` file (within config, once again) the following values should be updated:
# Default values for the low-level graph engine
neostore.nodestore.db.mapped_memory=50M
neostore.relationshipstore.db.mapped_memory=500M
neostore.propertystore.db.mapped_memory=100M
neostore.propertystore.db.strings.mapped_memory=100M
neostore.propertystore.db.arrays.mapped_memory=0M
In these two places there is a total of 4.75GB of RAM required, but on a Windows machine, this is slightly different. On Unix-like systems and OS X, these two values are separate, whereas on Windows, they’re one combined value. In this case, 750MB allocated to the memory-mapping will come out of the 4GB assigned for the Java heap, so if you’re on Windows, be sure to update this value to be inclusive of both values. In this example, you’d set the value on Windows 750MB to 1GB higher to account for this.
With these values set and updated, Neo4j can now be restarted so these values can take effect. With the RAM sorted out it’s time to make the other change, which is an optional one within Cypher. It’s possible to run an import in batches rather than just in one go, which is achieved by using PERIODIC COMMIT. Using this clause wraps a transaction around however many rows are specified, which when you’re dealing with a large amount of rows will be required for the import to be successful.
Using PERIODIC COMMIT is easy, and can be done with the addition of one line before LOAD CSV is called. If the previous example were to use PERIODIC COMMIT, it would look like so:
USING PERIODIC COMMIT 500
LOAD CSV WITH HEADERS FROM ‘http://localhost/people.csv’ AS row
CREATE (:Person {
        id: row.id,
        first_name: row.`First Name`,
        middle_name: row.`Middle name(s)`,
        surname: row.`Surname`,
        dob: row.`D.O.B`,
        favourite_animal: row.`Favourite Animal`,
        favourite_colour: row.`Favourite Colour`
})
With the addition on PERIODIC COMMIT it now means the query is done in 500 row batches. Now the CSV will be processed by transactions that will be committed every 500 rows. If you have more RAM at your disposal this value could be increased to 1000 (or even 10000) if required.
For each transaction, all of data will be stored in RAM, so if you don’t have enough RAM to handle 1000 rows, then the import will fail. You can of course run lots of smaller transactions, but this will take a lot longer, so how many rows are handled within the transaction is totally dependent on the CSV size, and how the RAM for Neo4j is allocated.
When you’re importing data, you may well also want to import relationships, and that can be achieved using LOAD CSV. To ensure the import is as efficient as possible, it’s advised that creating nodes and relationships aren’t done within the same query, so create your nodes first, and then relate them. Depending on how your data is set it, your relationships could either be in the same CSV as your nodes in the form of joining ids, or potentially in another file. In this case, our relationships are within the same file, so the first step is to use LOAD CSV once again, but this time to relate the nodes, rather than create them.
USING PERIODIC COMMIT 500
LOAD CSV WITH HEADERS FROM ‘http://localhost/people.csv’ AS row
MATCH (p:Person {id: row.id})
MATCH (friend:Person {id: row.friend_id})
MERGE (p)-[f:FRIENDS_WITH]->(friend)
WHERE row.friend_id IS NOT NULL;
Since this data has already been imported, reading the same CSV again means the data is all already there, so we can just use MATCH to bring back the related nodes. To avoid clogging up the database, the `friend_id` values were never imported, as they’re only needed to relate the nodes. This way, the same CSV can just be used again, so any reference fields can be left in and not imported, which makes cleaner data.
The query itself is simple enough. We’re matching the person and friend based on their Ids, but only where `friend_id` isn’t null. This ensures the query is only applied when the values required for it to run are there, which reduces on errors, and for the sake of large files, saves time as it’ll skip rows that aren’t suitable.
Although sometimes imports can be one-offs, this isn’t always the case. It may well be that the client actually hadn’t finished with the CSV when you imported it, and they’ve now added a bunch of new rows and updated some of the existing values. It may also be that because of how this system works, giving a client a CSV of data they can edit works out to be easier than getting it in another format. Regardless of the reason, there may come a time that you need to update existing Neo4j data via a CSV, and this is very possible.
To ensure we can create and update nodes, the previous query used will need to be modified. Otherwise Neo4j will attempt to create duplicate nodes, and then fail because of the constraint. The update Cypher code looks like the following:
LOAD CSV WITH HEADERS FROM ‘http://localhost/people.csv’ AS row
MERGE (p:Person { id: row.id })
ON CREATE SET
        p.first_name: row.`First Name`,
        p.middle_name: row.`Middle name(s)`,
        p.surname: row.`Surname`,
        p.dob: row.`D.O.B`,
        p.favourite_animal: row.`Favourite Animal`,
        p.favourite_colour: row.`Favourite Colour`
ON MATCH SET
        p.first_name: row.`First Name`,
        p.middle_name: row.`Middle name(s)`,
        p.surname: row.`Surname`,
        p.dob: row.`D.O.B`,
        p.favourite_animal: row.`Favourite Animal`,
        p.favourite_colour: row.`Favourite Colour`,
        p.updatedOn = timestamp()
The query looks very different, but that’s for good reason. First, CREATE is no longer used, instead MERGE is. The MERGE clause is very powerful, and we can use it to create new nodes if needed, but then also update a node if it matches. In this query, it’ll try to find a person by their id, if that person exists, it’ll update the properties on that person with those from the CSV and also set an updated date. If the node doesn’t exist, then it’ll create a node with the specified properties. This is made possible thanks to the ON CREATE and ON MATCH clauses, which are one of the reasons MERGE is so powerful.
This query can now be used with a new CSV, or an existing one, as it does both updates and creates, which when you’re working on an import, those are the actions you want to be able to accomplish.
A CSV isn’t always the best format to export your data and it’s just easier to import the data using your choice of programming language. If the data being imported is actually an export from another system, it could be possible to have this in a more structured format, such as JSON. This means you can still iterate over the data, but it can be processed in whichever way suits the application.
The data being used may also be live, and Neo4j is simply being used to bring some additional functionality to an application, so frequent imports are required. If this is the case, then this live data may be available via an API or an HTTP endpoint. This means you could write an importer that checks the URL every day to see if there is any additional data. The data here would be structured in a way to make the import easier, so that you can create nodes, but also then create relationships too, as they’re needed.
To allow for flexibility when importing data this way, it’s important to create constraints on the database. This will ensure no duplicates happen, and keeps the queries fast as a constraint uses an INDEX under the hood, so it’s a win/win. The constraints would also be needed to make relationships possible. To ensure the data can be as flexible as possible, you’d need to be confident that you wouldn’t get duplicates, so that each relationship call worked as expected. A basic example of this would be as follows
[{
    "nodes" : [
        {
            "label" : ["Person"],
            "identifier" : "shortname",
            "properties" : [
                {
                    "name" : "name",
                    "value" : "Chris Kemper",
                    "type" : "string",
                },
                {
                    "name" : "shortname",
                    "value" : "chrisdkemper",
                    "type" : "string",
                }
            ]
        },
        {
            "label" : ["Person"],
            "identifier" : "shortname",
            "properties" : [
                {
                    "name" : "name",
                    "value" : "Kane Kemper",
                    "type" : "string",
                },
                {
                    "name" : "shortname",
                    "value" : "kjck",
                    "type" : "string",
                }
            ]
        }
    ],
    "relationships" : [
        {
            "type" : "RELATED",
            "nodes" : [
                {
                    "shortname" : "chrisdkemper"
                },
                {
                    "shortname" : "kjck"
                }
            ],
            "properties" : []
        }
    ]
}]
In the JSON here there are two arrays, nodes and relationships. In this case, the nodes within the nodes array would be created or updated, and once this process is finished, the relationships would be processed. Each node also has an identifier which can be used to look up the node to see if it exists, which in this case is the `shortname` property. The `shortname` would always be unique thanks to the constraint, so this can be relied on. If the node did exist, the properties contained within it would be updated, or if the node didn’t exist it would be created with those properties.
The properties exist in an array format, as well as the type of the value, in this case they’re both strings. This means if you had a particular field type, it could be parsed to ensure it’s stored within Neo4j correctly. This isn’t really an issue with strings as this is the default type, but for fields such as integers, the type would need to be explicitly set.
Within the relationship array, there is one item, which contains a type, nodes, and properties. The type here is in reference to the relationship type, and would be used in the same way as the `shortname` field to ensure the relationships are unique. The nodes portion of the JSON object contains information needed to search for the nodes and then relate them. In this case it’s the `shortname` property and the corresponding values for the two nodes that will also be created. You’ll notice no direction is specific here, and that’s because the ordering of the nodes array dictates the direction, so in this case, the first node will be related to the second with an outward relationship. There is also a properties array here, which will be used to add properties to the relationship should they need to be added.
The code using this data would use Cypher queries to create the needed nodes and relationships, and also to query for existing items. How the code would interact with Cypher would be up to you, whether this is direct with Curl, or potentially using the neo4jphp Neo4j wrapper written in PHP, created by jadell (which can be found at https://github.com/jadell/neo4jphp) or something similar. With a connection to Neo4j in place the import would then iterate over the code, taking advantage of Cyphers MERGE and CREATE UNIQUE clauses to ensure the data is unique.
Having the data structured in this way allows for the importer using it to be used as often as you’d like, as the process will only create unique nodes, and the constraint will enforce this. Of course the logic for the importer can be completely custom and you may actually want to create duplicate nodes, in which case the constraints can be removed. This is the freedom that comes from creating your own importer, it also means you can reuse this as much as you’d like. It also means any desired changes can be made whenever they’re required, which gives more flexibility than Cyphers’ CSV import method, should you need it.
If you had a lot of projects that required data to be imported on a regular basis, it could also be useful to create a standalone application that could be included within your applications as and when it’s needed. If a standalone application exists, it means it can be pulled down as needed and then removed to save space in the repository. If you happen to be building an open source application, or one that’ll be shared online, bundling the importer with the code gives anybody using the project the option to import the data. Be sure to include documentation on how to use the importer if you do this though, so any unfamiliar users won’t be caught out.
At some point or another, there’ll be a time when you want to export data from a Neo4j database. This could be for a backup, or even to use within another application, but at some point you’ll no doubt want to export some, or all of the data within a database. There sadly isn’t a way to just export the entirety of the database using the core Neo4j tools, but there are a couple of options.
Backing up the Database
If you’re wanting to backup the data, or clone the database for use in another Neo4j application, then this is possible without too much hassle. The first step is to locate the database, which is set via the `org.neo4j.server.database.location` property within the `neo4j-server.properties` file. Unless this value has been changed, it should be `data/graph.db` which on an Ubuntu machine, means the file is located at /var/lib/neo4j/data/graph.db. With the file located, the next step is to stop the Neo4j service from running so that the database won’t change while you’re copying it, which is done using the following command:
service neo4j-service stop
Depending on your setup, the use of `sudo` may be required at the start of the command, to get around any permission errors. If this is the case for you, some kind of permission error will be returned, such as:
start-stop-daemon: warning: failed to kill 1131: Operation not permitted
rm: cannot remove ‘/var/lib/neo4j/data/neo4j-service.pid’: Permission denied
When the command runs successfully, nothing is returned. To double-check Neo4j definitely isn’t running, you can use `service neo4j-service status` which will return the state of Neo4j, and what we’re looking for is `* neo4j is not running`. Now that Neo4j isn’t running, it’s just a case of zipping up the directory, moving it to where it’s needed, and then finally, starting Neo4j once again.
If you haven’t done so already, cd into the directory containing the Neo4j db, which in my case is `/var/lib/neo4j/data/`. From within that directory, the graph.db directory needs to be zipped up somehow; one method is to use the following to turn the directory into a .tar file, and then, to zip that file, which is done using two commands.
tar -cvf graph.db.tar graph.db
This will create the `graph.db.tar` file for you, the next step is to zip this directory, which can be done using:
gzip graph.db.tar
This creates a `graph.db.tar.gz` file, and now all that’s left is to move it to where it’s needed, or store it as a backup. To get this file back to normal, the commands just need to be run in reverse. First, unzip the file using `gunzip graph.db.tar.gz` and then untar the file using `tar -xvf graph.db.tar`, which will leave you with a ready to use graph.db file.
There may again be a need to use `sudo` here if you don’t have the needed permissions, so if you’re presented with an error similar to the following, you’ll need `sudo`.
tar: graph.db.tar: Cannot open: Permission denied
tar: Error is not recoverable: exiting now
Getting Data from the Neo4j Browser
When using the Browser that comes with Neo4j, you have the ability to export the results of Cypher queries to SVG, PNG, JSON, or CSV. This could be potentially used as an export method, however the query run would be custom depending on which data you wanted returned from the database. For example, say you wanted to export the entire database, a good start would be to run the following Cypher query, and then export the result, theoretically.
MATCH (n) RETURN n;
In the Browser this will return every node and relationship in the database, but if you were to export this query as JSON, you would be given the same response as if you had queried the database using Curl. An example of the output can be seen here:
{
  "columns": [
    "n"
  ],
  "data": [
    {
      "row": [
        {
          "name": "Chris"
        }
      ],
      "graph": {
        "nodes": [
          {
            "id": "171",
            "labels": [
              "Person"
            ],
            "properties": {
              "name": "Chris"
            }
          }
        ],
        "relationships": [

        ]
      }
    },
    {
      "row": [
        {
          "name": "Kane"
        }
      ],
      "graph": {
        "nodes": [
          {
            "id": "172",
            "labels": [
              "Person"
            ],
            "properties": {
              "name": "Kane"
            }
          }
        ],
        "relationships": [

        ]
      }
    }
  ],
  "stats": {
    "contains_updates": false,
    "nodes_created": 0,
    "nodes_deleted": 0,
    "properties_set": 0,
    "relationships_created": 0,
    "relationship_deleted": 0,
    "labels_added": 0,
    "labels_removed": 0,
    "indexes_added": 0,
    "indexes_removed": 0,
    "constraints_added": 0,
    "constraints_removed": 0
  }
}
This data sample is from a database consisting of two nodes with `Person` labels, with the `name` property values of `Chris` and `Kane`, which are also related together with a `RELATED_TO` relationship. Each of the returned nodes is added as a result row, with the labels, and properties of that node included. There aren’t however any relationships mentioned, so if you needed the data and the relationships, they would need to be explicitly returned. Although you may need everything included in the returned JSON, odds are you would only want the information on what is actually returned from the query, and in this case that’s nodes.
If you were to return the data as a CSV rather than JSON, then the data returned would be different. An example of this can be seen below:
n
"{“”name“”:“”Chris“”}"
"{“”name“”:“”Kane“”}"
The first row of the CSV is the column heading, which matches the return value of `n` from the `MATCH (n) RETURN n;` query. The remaining rows of the file are JSON, but since this is a CSV file, the quotes have been escaped, so if you were to open this in a spreadsheet application, or parse it as a CSV, the JSON would then be valid. Using the CSV option does remove a lot of the clutter from the JSON response, but a lot of information is also lost, such as the labels for the nodes, and the actual id of the node.
Although both of these approaches can be used to export data via the Browser, each has their advantages, and disadvantages. The JSON export contains information that is potentially un-needed but is badly structured, and the CSV format loses some key information. Of course it is totally possible to then tailor the query using either export method, to ensure everything that you need to have returned, is returned.
This method of exporting data may not be perfect, but unless the browser has been explicitly disabled, it means that anytime a quick export is needed, it can be achieved with no additional tools through the Browser. In addition, if your particular export query ends up being quite complex, it can then be saved and used later to save on time and effort.
Write Your Own Data Exporter
Although other tools can make things easier for you, it may be easier to export the data yourself, so why not do that? It may be that the Cypher based export isn’t detailed enough, or the structure the data is given in requires too much alteration to be useful by using Curl directly. These problems could be solved by exporting the data yourself, using a small script. Since you’ll know what format you need your data in, it means it can be queried in the best way to fit the data. For example, if you know you only want nodes that have a particular label, then these can be targeted especially. The same also goes for the properties on these nodes, and also the relationships. Any part of the export can be tailored to meet the needs of the application using it.
This approach does mean additional time, as the export tool will need to be created, but it also means this tool will be tailored to its particular application, and that the export would be repeatable. This means there won’t be the hassle of worrying about the process of exporting data from Neo4j anymore, as you’ll have already built the functionality. When the time comes that a new project requires its data exported, the knowledge from the first exporter can be used to help with the second. In some cases the exporter could simply be moved to another project and configured to work with that application with minimal effort.
Although this approach has a big up-front cost in building it in terms of the time taken, the export process only needs to meet your needs, and that’s it. This means the tool could be completely terminal driven to save on building a user interface, or if it did have one, it could be very basic in design. All the process has to do is export data in the write format, the other factors only become important if other people are going to see the export tool.
Summary
In this chapter we’ve been through how to handle your data within Neo4j via importing and exporting data. Whether you’re starting a new project and are batch importing some data, or you’re importing data from a previous project, we’ve been through it. Then after it’s all in, we’ve also covered how to get your data out of Neo4j as well as how to back up the database.
When you’re importing data, the CSV file is really important, and we’ve been over a few ways to ensure your CSV is valid before importing it, which saves headaches and unexpected errors later and always helps.
Importing data can be a pain, but knowing you can create an update query within Cypher that will create or update nodes as needed, as well as being able to create relationships makes it easier. If you have to run an import multiple times, sometimes with new data, sometimes with updated rows, that’s all covered.
Of course you aren’t always importing data, so exporting has also been covered. Sadly, Neo4j isn’t the most equipped when it comes to exporting data, but you can still get your data exported, and that’s the important thing. You’ll also always have the option of exporting small datasets via the Browser, so if you ever need a quick export, don’t forget the Browser is your friend.
Now that data moving in and out of the database has been covered, it’s time to cover how to use data to create recommendations, calculate distances, and more. That’s exactly what the next chapter is about. Now it’s time to see the power Neo4j has to offer as we move into Chapter 7, Using data in Neo4j.