
![]()
Building an Application with Neo4j
It’s time to put Neo4j to use in a proper application, and in this chapter we’ll be doing just that. We’ll be going from setting up the location plugin, right up to how to use it in location queries. The application will be in the form of a location app. To cover any location-based copyright issues, we’re going to base ourselves in Antarctica for this chapter. Although it may not be feasible to have a travel system like one being built here in Antarctica, it’s a big wide-open space that allows for the locations to be added. To begin with, we’ll be going with busses (which I’ll get to in a minute) as a transport system and adding some bus stops to the system.
To make things easier I’ve written some commands to take care of importing data into the application, so when you go through the code (which will be available on github) you’ll be able to add your own sample data as well. The commands in place (that will be explained individually as needed) are to import Bus Stops for a small sample location, which will be built on as the chapter progresses.
In the application, Cypher will be used wherever possible when communicating with Neo4j. This means that if you’d like to apply the same logic in your own application, then the Cypher query used is available for you to use.
To ensure the example site always works, changes may need to be done to the example site to keep it up and running. When performing these changes, code samples used in the chapter may no longer make sense, or may no longer exist in the new application. Since there’s a chance of this happening, any code sample will include a PHP comment, an example of which can be seen below:
/**Sample:CodeSample01**/
The comment will always have “Sample:” before it, then an ID after. Using this system, if you’re referencing a sample in the chapter, search for the sample value and if it changes locations or gets modified, the comment will also be moved. If this does happen, an explanation of why will be there, so any changes can be made accordingly. The changes will be available via github (https://github.com/chrisdkemper/sample-neo4j-php-application) as well, so the commit history will also be available. The code on github is a Vagrant box, which contains the environment required to run the website, so all you’ll need to do is run `vagrant up` and Vagrant will do all of the hard work for you.
With that out of the way, it’s time to get into setting up the application, which starts with setting up the location plugin.
Before you can do location-based queries you need to have the spatial plugin installed and ready to use. The code available from github will install the plugin as part of the provisioning process, but the instructions will be covered either way. To begin with, you need to get the plugin, which is available at: https://github.com/neo4j-contrib/spatial. The project offers many ways to install the plugin, but the easiest is to use one of the pre-built archives. The archive needed is named based on the Neo4j version, so get whichever one you need, in this case it’s the one for 2.3.0.
The process of installing the plugin will be similar regardless of the system Neo4j runs on (stop the server, install the plugin, etc.), but in this case the instructions for an Ubuntu server will be used. If you aren’t running Ubuntu, then your plugins directory will be located wherever you’ve installed Neo4j. With the archive downloaded, you then need to stop Neo4j from running, which can be done like so:
service neo4j-service stop
Once the service is stopped, the archive needs to be unzipped in the plugins directory (which is /var/lib/neo4j/plugins on Ubuntu) so that the .jar files sit within the plugins directory. The archive can be unzipped by using the following command, which may need to be installed (with apt-get if your system doesn’t have it: apt-get install unzip)
unzip /vagrant/neo4j-spatial-XXXX-server-plugin.zip -d /var/lib/neo4j/plugins
In this example, the path and name would need to be modified to meet your needs, but the basic command is there. If you’re able to unarchive the directory another way, moving the .jar files can be done like so:
mv /vagrant/neo4j-spatial/*.jar /var/lib/neo4j/plugins
With the plugin files in place, it’s time to start Neo4j again which is done with the following command:
service neo4j-service start
That’s it. With Neo4j running again the Spatial plugin is now running and ready to be used.
Setting up the spatial index
With the plugin installed, the next step is to create a spatial index to utilize it. This needs to be done for the queries to work, and also for the nodes to be found by Cypher. To create the index, the following JSON needs to be posted to the endpoint http://localhost:7474/db/data/ext/SpatialPlugin/graphdb/addSimplePointLayer
{
        "layer":"geom",
        "lat":"lat",
        "lon":"lon"
}
In this JSON, you can see the keys “lat” and “lon” which in this case, have the same as values. The values to those keys needs to be what you’re calling your latitude and longitude properties on your nodes. This ensures the correct data is collected from the nodes added to the index. The value for “layer” is “geom”, which is the name of the layer. This can be replaced with another name if you require, but make sure the name used is consistent for all steps, or it won’t work. If you were to change the name of the index, in the following examples just replace “geom” with your choice of name.
The next index that needs to be added is for Cypher, and requires data to be posted to http://localhost:7474/db/data/index/node/ and also has another requirement. To allow this to work, the nodes that will be in the index need to have an id field that matches their node id. This can be done by using a query like the following:
MATCH (n) WHERE id(n) = 0 SET n.id = id(n) RETURN n
You would of course need to change 0 for whichever node id you wanted to update, but this would allow the node to be given the property. This could also be done with a label if required for mass updates, which would be achieved using the following code for a Place label:
MATCH (n:Place) WHERE id(n) = 0 SET n.id = id(n) RETURN n
With the nodes given their id property (by whichever means) the index needs to be created, but posting the following JSON to the previously mentioned URL.
{
        "name":"geom",
        "config":{
                "provider":"spatial",
                "geometry_type":"point",
                "lat":"lat",
                "lon":"lon"
        }
}
This index allows Cypher to be able to communicate with the spatial index, allowing the queries to be possible. With the indexes in place, that’s pretty much it. The next step is to then add nodes to the index so they can be queried. This is achieved by sending a POST request to http://localhost:7474/db/data/ext/SpatialPlugin/graphdb/addNodeToLayer, with the following JSON:
{
        "layer":"geom",
        "node":"http://localhost:7474/db/data/node/0"
}
The layer is kept as “geom” as it has been throughout the example, and the other value needed is the node. The value here is the url of the node in the database, which (when it isn’t escaped) looks like so http://localhost:7474/db/data/node/0 with 0 being the id of the node.
Those are all the steps needed to get up and running with the spatial plugin, but as mentioned, the creation of these has been added into commands so they don’t need to be run on this system.
What the App is Being Built On
The website application itself will be built on PHP, using the Silex micro-framework. Before we go any further, it’s worth mentioning that you don’t need to know PHP for these examples, it just happens to be my language of choice and isn’t required for Neo4j. For those who aren’t familiar with PHP, you may notice in that the opening PHP tag (<?php) isn’t closed in some cases. For files that contain only PHP, it’s recommended to omit the closing tag for various reasons, so that’s why it’s missing. For its comments, // can be used for a single line comment, but can equally be started with /* and ended with */. You’ll see examples of both in this chapter, and also in the application itself, so if you weren’t aware of what PHP comments were before, you know now.
With that out of the way, it’s time to talk a little about Silex, the framework being used to build the application. Siliex is a framework inspired by Sinatra (built on Symfony2 and Pimple), so if you are familiar with Sinatra/Flask/Expressjs/SparkJava/Scalatra/etc. these examples may feel familiar.
There will be some samples of PHP, but this will be explained where required. There are a number of commands that have been created to add sample data, so these will be run. With the data available to query, it’ll then be time to start doing some Cypher queries.
How the Data will be Structured
Breaking down how the data is structured is better done by the different labels of the data, so with this in mind, the headings for the different labels can be found below.
Each of the locations in the application are classed as “Place” nodes, which contain the location information. These places will also have names, so they can be identified by other processes. With any given place, if there is, for example, a bus stop, then a node of that type (“BusStop” in this case) will be related to it. This means if a location has many transport options, it’ll keep relationships down.
To allow for the journey planning aspect of the application, the timetables will hold a lot of the power. A timetable will be related to any of the “Place” nodes it has on its route with the STOP_ON_JOURNEY relationship. On this relationship, there will be a property of time with the value (in minutes) of how far along the journey that “Place” is. This allows the application to use these values to calculate travel time, but also keeps the hops been different “Places” small. The data being related in this way means that if different timetables connect two different places, then the trip can still be planned.
The timetable itself will also have a name, and will store a list of the days, and also the times it runs. This means that if the same route is used multiple times, it saves on duplication. This also provides the ability to use the times for journey planning purposes.
Transport
The transport node is the mode of transport being used and has a name and a type. For example, for a bus, you could use a name of “A1” with the type of “bus”. The transport node then relates to any timetables it uses with the RUNS_ON relationship.
Building the Application
The application itself will be built using PHP, and hosted on a local web server powered by Nginx. This is then wrapped in an ubuntu server, which is provided via a Vagrant box. Rather than just all custom PHP a micro framework called Silex will be used to make some of the base operations easier, such as URL routing and template management. Silex will essentially be used to glue all of the different aspects of the application together, which will be discussed a little later in the chapter.
To give a better overview on the application itself, Figure 8-1 shows how the files within the src directory are laid out, which is where the majority of the code lives.
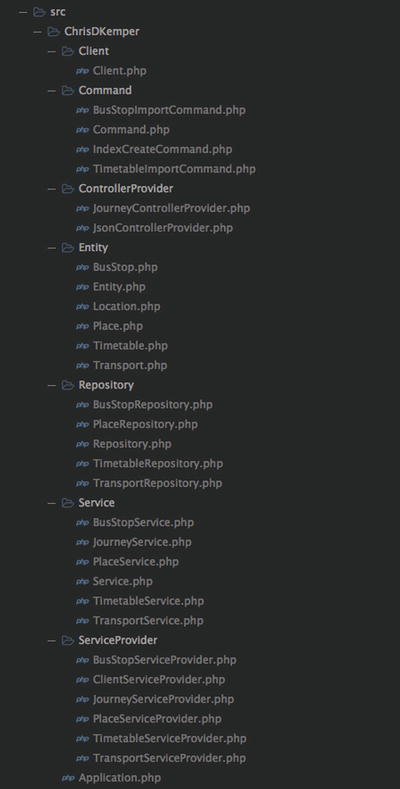
Figure 8-1. The src directory of the application
Each of the folders are named based on what they contain, but those aspects will be covered a little later. Since this is a book on Neo4j, and not on PHP, I won’t be going into too much detail about how all of the different aspects of the application work. In these cases, all you need to be aware of is that the code does what is described and it all works. Some aspects of the application (such as communicating with Neo4j) are quite important and will be explained more thoroughly, and, any Cypher used will be included and explained.
With that out of the way, it’s time to get started with the application and get Silex installed, which is done via the use of Composer, a PHP dependency manager. Any packages installed with Composer are bundled together in an autoloader, which essentially loads the classes to be ready for use after a single file is included.
The dependencies for Composer are managed in a composer.json file located in the route of the application directory. This then downloads all of the code required to meet the requirements of the file is downloaded into a directory called vendor. The following example is the file used within this project:
{
        "require" : {
                "silex/silex": "~1.2",
                "symfony/twig-bridge": "~2.6",
                "symfony/console": "~2.6",
                "knplabs/console-service-provider": "dev-master"
        },
        "autoload": {
                "psr-0": {
                        "ChrisDKemper": "src/"
                }
        }
}
The “require” portion of the JSON contains the installation of the four different packages needed for the application. Included in the list are the extended version of Twig (used for templating) and Console, which is a symfony component that allows for command lines commands to be created with PHP. The “autoload” component loads in the custom code written for the application, which sits within the “ChrisDKemper” namespace.
Installing Composer
Since were using Composer to install dependencies, Composer itself will need to be installed on your system. There are a number of ways to install Composer, but the following command will install Composer global on your system, which is useful if you happen to use it for a number of projects.
curl -sS https://getcomposer.org/installer | php
mv composer.phar /usr/local/bin/composer
If the above command fails, then it may be down to permission issues, in which case try the mv line preceded with sudo. There are other ways to install Composer which can be found at https://getcomposer.org, the Composer website. After Composer has been installed just run the following command to get the dependencies installed
composer install
Once Composer has finished doing its work you’ll be ready to go.
Setting Up Silex
A default Silex application would be initiated with the following code, which would be in the index.php file located in the web directory of your server, or whichever folder your web server uses. It’ll be broken up in the different lines, then shown as a whole.
require_once __DIR__.’/../vendor/autoload.php’;
The first thing to note in this file is the inclusion of autoload.php, which is how the autoloader created by Composer is made available to the application.
$app = new SilexApplication();
The main Silex application is loaded here, and assigned to the $app variable which allows for its functionality to be accessed.
$app->get(’/’, function() use($app) {
    return ’Hello’;
});
This is an example of a route within Silex which in this case is a GET route for ‘/‘, that returns the string ‘Hello’ when accessed. The second parameter of the function, after the route (/) is the callback function, which is followed by use. The use of use allows for the $app variable to be available within the function, because without the use, $app would be out of scope, so to allow it to be used, it’s passed in with use. Although this is a GET route (signified by $app->get), you can have different route types to meet your needs, for this application there will be use of both GET and POST requests.
$app->run();
The application is executed last in the file and any routes or functionality added before this point will be available when the file is served from the server. This all comes together to form the following file:
<?php
require_once __DIR__.’/../vendor/autoload.php’;

$app = new SilexApplication();

$app->get(’/’, function() use($app) {
    return ’Hello’;
});

$app->run();
All of this together in a file called index.php would show ‘Hello’ on the screen.
To make adding features easier to Silex it offers the ability to register Service Providers, which allow for chunks of functionality to be added at the same time. In the application, these are used to add functionality required for the different entity types, which are essentially the different node labels that were previously mentioned. Service Providers are also used to add set features, such as implementing templating.
Although a basic example of Silex has been covered, it’s not the one used in this application. The file itself is quite similar, which can be seen below:
$app = require __DIR__ . ’/../app/bootstrap.php’;
$app->run();
/**Sample:Index.php**/
To keep the bootstrapping of the application away from running it, the $app variable is now created from the contents of the bootstrap.php file. This file contains all of the main functionality of the application, including any routes used, as well anything else required for the website to run. Like the Silex example, the file will be broken up into sections and explained to give an overview of the functionality offered by the application.
require_once __DIR__.’/../vendor/autoload.php’;

$app = new ChrisDKemperApplication(array(’debug’ => true));
This segment is the same as the Silex example in the sense that it’s creating the main application, but in this case an extended version of the application is created instead. This application class sits within the ChrisDKemper namespace, and allows for the application to be tweaked when it’s created. The extended application adds the templating functionality to Silex and also adds the ability for service providers to be used.
/*
 * Register the client to communicate with Neo4j
 */
$app->register(new ChrisDKemperServiceProviderClientServiceProvider(), array(
    ’client.username’   => ’neo4j’,
    ’client.password’   => ’password’,
    ’client.transport’  => ’localhost’,
    ’client.port’       => 7474,
    ’client.https’      => false
));
The first service provider is for the Client class, which is how the application communicates with Neo4j. Details required by the client are supplied here, allowing them to be easily updated, should the environment the application is hosted on change. The functionality of the Client class will be explained in more detail a little later, but the ClientServiceProvider added to Silex here simply makes the functionality of the class available to the rest of the application.
/*
 * Register the console application
 */
$app->register(new KnpProviderConsoleServiceProvider(), array(
    ’console.name’              => ’App’,
    ’console.version’           => ’1.0.0’,
    ’console.project_directory’ => __DIR__.’/..’
));
The ConsoleServiceProvider is a third party service provider which is used to enable the Symfony Console component for use within the application. It grants the ability to create terminal commands to be written with PHP, which is utilized to create various helper commands for the website.
/*
 * Register the Place service provider
 */
$app->register(new ChrisDKemperServiceProviderPlaceServiceProvider());

/*
 * Register the BusStop service provider
 */
$app->register(new ChrisDKemperServiceProviderBusStopServiceProvider());

/*
 * Register the Timetable service provider
 */
$app->register(new ChrisDKemperServiceProviderTimetableServiceProvider());

/*
 * Register the Transport service provider
 */
$app->register(new ChrisDKemperServiceProviderTransportServiceProvider());
Here we have service providers, which add a Repository and a Service for a different node type, sharing the name of the service provider. Having the different node types separated off makes it easier to get, for example, all of the Place nodes within the site, as you’d just query the Place service. Each of these different node types work in the same way, with the exception of the Place service, which has some additional functionality. How the Services and Repositories work, and how they’re put together will be covered in more detail later, but these service providers add that functionality to Silex.
/*
 * Since the homepage is static, pointless putting it in a provider
 */
$app->get(’/’, function () use ($app) {
    return $app[’twig’]->render(’index.twig’);
});

/*
 * Journey routes
 */
$app->mount(’/journey’, new ChrisDKemperControllerProviderJourneyControllerProvider());

return $app;
The final code segment is responsible for registering the routes used within the application. The first of which is the same as the basic Silex example, but rather than returning ‘Hello’ it returns a Twig template. The other routes are supplied by the JourneyControllerProvider which is a collection of the different routes. Each of the routes within the provider are mounted on ‘/journey’ meaning that will proceed any of the specified routes. For example, a ‘/plan’ route exists within it, and to access that particular route, you would need to use the URL ‘/journey/plan’. With the controllers added, the application is then returned for use in the index.php file.
Communicating with Neo4j
Although there are a lot of different Neo4j clients available to use, for the sake of the book I opted to use curl commands and Cypher. This gives the code the most re-usability regardless of the platform, as all that needs to change is how the curl request is done. Rather than using large curl command blocks, a number of different functions have been created to make certain actions within the site easier, and as with the other examples, will be broken up into sections and explained. The file in question is located at /src/ChrisDKemper/Client/Client.php (based on the layout of the code within the repository) and started as follows:
<?php namespace ChrisDKemperClient;

class Client
{
        protected $curl_headers = array();
        protected $base_url = ’http://localhost:7474’;
        protected $cypher_uri = ’db/data/transaction/commit’;
        protected $spatial_uri = ’db/data/ext/SpatialPlugin/graphdb/addSimplePointLayer’;
        protected $index_uri = ’db/data/index/node/’;
        protected $spatial_node_index = ’db/data/ext/SpatialPlugin/graphdb/addNodeToLayer’;
First, the namespace of the file is set to help with the autoloading, then the class is declared, and it’s followed by a number of protected properties for the class. The various properties with the _uri suffix are URLS needed to perform certain actions on Neo4j, such as creating indexes, or running Cypher queries
public function __construct($username, $password, $transport = ’localhost’, $port = 7474, $https = false)
{
        /**Sample:Clientconstruct**/
        //Set the default headers
        $this->curl_headers = array(
                CURLOPT_CUSTOMREQUEST => "POST",
                CURLOPT_RETURNTRANSFER => true,
                CURLOPT_HTTPHEADER => array(
                                ’Content-Type: application/json’
                        )
        );

        //Set the base_url
        $this->base_url = sprintf("%s://%s:%s",
                false == $https ? ’http’ : ’https’,
                $transport,
                $port
        );

        //Set auth header
        $this->curl_headers[CURLOPT_USERPWD] = sprintf("%s:%s", $username, $password);
}
This is the _construct function, which allows you to perform actions when the class is created. The data that has been passed through here was originally supplied in the bootstrap.php file, and is the information required to communicate with Neo4j. Each of the requests all share certain common headers, so to save on duplicated code, these are set in here in a way they can be shared throughout the class. One of the headers is the authentication header, which is created using the supplied username and password. In the construct function, the base url needed for the queries is constructed using any information supplied; otherwise it defaults to http://localhost:7474.
public function cypher($cypher_query)
{
        /**Sample:Cyphermethod**/
        //Set up a statement for the transaction
        $data = array(
                        ’statements’ => array(
                                array(’statement’ => $cypher_query)
                        )
                );

                //Use the preset cypher uri to send the query
        return $this->send($this->cypher_uri, $data);
}
The previous code is the cypher method within the client class, which is used a lot throughout the application. This method allows for cypher queries to be easily done by only taking the cypher query as an argument. It then sets up the required code needed to run a Cypher statement, and then passes that to a base send method, which actually makes the request. The layout for the Cypher transaction is the same as in previous examples.
public function createSpatialIndex($name = "geom", $lat = "lat", $lon  = "lon")
{
        /**Sample:createSpatialIndex**/
        //Set up a statement for the transaction
        $data = array(
                    "layer" => $name,
                    "lat"   => $lat,
                    "lon"   => $lon
                );

                //Use the preset cypher URI to send the query
        return $this->send($this->spatial_uri, $data);
}
There we have a function to help create a spatial index on the Neo4j instance. The method takes three arguments: layer name, lat, and lon. The layer name is as described, but the lat and lon values are to see what the longitude and latitude values properties are called on the node. The data is then set up in the correct format for the query, the URI, and payload of the function as passed to the send method, which makes the request and returns the response.
public function createCypherIndexForSpatial($name = “geom”, $lat = “lat”, $lon = “lon”)
{
        /**Sample:createCypherIndexForSpatial**/
        $data = array(
                        "name" => $name,
                        "config" => array(
                                "provider" => "spatial",
                                "geometry_type" => "point",
                        "lat"   => $lat,
                                "lon"   => $lon
                        )
        );

                return $this->send($this->index_uri, $data);
}
To allow for the spatial index to be queryable by Cypher, another index needs to be created. To make this easier it’s been made into a method on the client that takes a name, lat and lon as an argument. These details need to match that of the spatial index that has previously been created, so the defaults here reflect the same default values as the method used to create the spatial index. Like that method, the data for the query is formatted correctly, then passed to the share send method to perform the query, then the result is returned.
public function spatialAddNodeToLayer($name, $node)
{
        /**Sample:spatialAddNodeToLayer**/
        $data = array(
                        ’layer’ => $name,
                        ’node’  => $node,
                );

                return $this->send($this->spatial_node_index, $data);
}
When applicable nodes are created (the ones with location information) they must be added to the spatial index so they can be queried, which requires sending a request to the spatial plugin. Like the other commands, this command sets up the data required to accomplish this action, then passes it to the send method with the correct url. The data needed here is the name of the layer that the node is being added to, and also the Neo4j URL for the node.
public function getBaseUrl()
{
        return $this->base_url;
}
This is a small method to get the base url used for the queries. Although the base url is stored as a variable, it cannot be accessed outside of the class directly, therefore if it’s needed outside of the class, it either needs to be public, or have a method to return it. In this case, I’ve opted for the method to return it.
protected function send($uri, $data)
{
        /**Sample:clientSend**/
        $data_string = json_encode($data);

        $url = $this->base_url . "/" . $uri;
        $query = curl_init($url);

        //Add the post data to the query
        $this->curl_headers[CURLOPT_HTTPHEADER][] = ’Content-Length: ’ . strlen($data_string);

        //Add the headers to the query
        foreach($this->curl_headers as $header => $value)
        {
                curl_setopt($query, $header, $value);
        }

        curl_setopt($query, CURLOPT_POSTFIELDS, $data_string);

        $result = curl_exec($query);
                curl_close($query);

                return json_decode($result, true);
        }
}
This is the main method within the client, as it’s the one that actually performs the queries. To avoid code duplication, a shared method was used which allows for the more specific commands to pass in the URL they need the request to be sent to, and the data to send. Since the rest of the queries are structured the same (same headers, authentication, etc.) it makes sense to use a shared function. The first thing that happens is that the supplied data is then converted to JSON to be sent to Neo4j, as that is the required format for it. The next few lines of code pull in the default headers to the curl request (that were set when the Client class was created), as well as setting the necessary headers for posting data via curl. With the headers set up, the request is then executed, curl is closed, and the decoded JSON output is returned to whichever function has called it.
Now that the client has been explained, it’s time to go into how it’s actually used. The main communication between the application and Neo4j are done using Repositories and Services. The client is passed into the repository, to allow the repository to communicate with Neo4j, and then various methods are exposed to make getting data out of Neo4j easier. The repositories just interact with Neo4j and don’t apply any real business logic, and this is where the Services come in. A Service will take a repository as an argument, so it can get the required information from Neo4j, then apply any required changes to make it suitable for use within the application. This means that when you want to get some data for a particular type of node, such as BusStop, then you get that data by using the BusStop service, which in turn calls the BusStop repository, which then asks Neo4j for the data via the Client.
Since the Repositories are the main place that communication between Neo4j and the application take place, it makes sense to run through them to see how they work. They are all set up using extension, where there is a base repository that does all of the work, and that repository is extended to customize for the different types, should this be required. In this case the repositories that extend the base aren’t very complex at all, and all follow the same pattern, which we will cover in the moment.
Below we have the Repository file (/src/ChrisDKemper/Repository/Repository.php broken up into sections and explained as needed.
<?php namespace ChrisDKemperRepository;

use
    ChrisDKemperClientClient
;

/**
* The base repository
*/
class Repository
{
        protected
                $client,
                $label = ’’
        ;

        public function __construct(Client $client)
        {
                $this->client = $client;
        {
In this class we first see the namespace declaration, followed by the inclusion of the client class via use. Using use just means that rather than going ‘new ChrisDKemperClientClient’, ‘new Client’ can be used. The client is already built before the repository is created, so it’s then assigned to the client property within the class. There is also a label property, which is blank. This is how the extended repositories work, they simply change this label value which then changes the nodes that will be returned by the repository.
public function create($properties)
{
        /**Sample:repositoryCreate**/
        $query_data = array();

        foreach($properties as $key => $value)
        {
                $value = is_string($value) ? sprintf(’"%s"’, $value) : $value;

                if(is_array($value)) {
                        if(is_numeric($value[0])) {
                                $value = sprintf(’[%s]’, implode(’,’, $value));
                        } else {
                                $value = sprintf(’["%s"]’, implode(’", "’, $value));
                        }
                }

                $query_data[] = sprintf(’%s : ’, $key) . $value;
        }

        $query_string = implode(", ", $query_data);

        //Run the create query
        $cypher = sprintf("CREATE (n:%s {%s}) RETURN id(n);", $this->getLabelQuery(), $query_string);

        $data = $this->client->cypher($cypher);

        $id = $data[’results’][0][’data’][0][’row’][0];

        //Update the node to have a self referencing id
        //Run the create query
        $cypher = sprintf("MATCH (n) WHERE id(n) = %s SET n.id = id(n) RETURN n, id(n), labels(n);", $id);

        $data = $this->client->cypher($cypher);

        $node = $data[’results’][0][’data’][0][’row’][0];
        $node[’id’] = $data[’results’][0][’data’][0][’row’][1];
        $node[’label’] = $data[’results’][0][’data’][0][’row’][2];

        return $node;
}
One of the main methods within the repository is the create method, which is used for creating nodes. The labels for the created nodes are taken from the label property within the repository, so if you extend it, then the nodes created will have that label. For example, the BusStop repository extends the base repository and has a label value of ‘BusStop’.
An array of properties to be stored on the node are passed into the method. These are then iterated over and processed to be used within a cypher query. Since you need to supply, for example strings wrapped in quotes, you cannot handle each property value the same. The code in this method assumes all of the properties are correctly formatted. With the properties processed, this is then added to the cypher query, and creates a node with the label.
When the node is created, just the ID is returned. Another query is then run immediately after, to ensure the node has the `id` field required for the location plugin. The cypher used to set this id is as follows:
MATCH (n) WHERE id(n) = 0 SET n.id = id(n) RETURN n, id(n), labels(n);
In this case the code has been substituted again with an id of 0. In the code though, the ID is returned from the previous query so it can be used right away without any issue. This query also returns all of the information about the node so that it can be passed further down the application.
public function one($id)
{
        /**Sample:repositoryOne**/
        $query_string = sprintf("MATCH (n:%s) WHERE id(n) = %s RETURN n, id(n), labels(n);", $this->getLabelQuery(), $id);

                $data = $this->client->cypher($query_string);

                if(empty($data[’results’][0][’data’])) {
                        return array();
                }

                $node = $data[’results’][0][’data’][0][’row’][0];
                $node[’id’] = $data[’results’][0][’data’][0][’row’][1];
                $node[’label’] = $data[’results’][0][’data’][0][’row’][2];

                return $node;
}
This method is used to retrieve a node based on its Id, so if you just need a particular node, then it can be retrieved. As with the other queries in the repository, the label is also supplied to the Cypher query, which gives it that additional bit of filtering when it comes to retrieving the node. If the Id of the node is correct, but the label doesn’t match then a node won’t be returned. This essentially means that if you want to access a particular node type, this must be done from the specific repository. Either way, the query is done using the cypher method once again, and the data is formatted in a way that it will be usable by the rest of the application, and is then returned.
public function all()
{
        /**Sample:repositoryAll**/
                $query_string = sprintf("MATCH (n:%s) RETURN n, id(n), labels(n);", $this->getLabelQuery());

                $data = $this->client->cypher($query_string);

                $nodes = array();

                foreach($data[’results’][0][’data’] as $row)
                {
                        $node = $row[’row’][0];
                        $node[’id’] = $row[’row’][1];
                        $node[’label’] = $row[’row’][2];
                $nodes[] = $node;
                }

                return $nodes;
}
The all method is utilized when you’d like all of the nodes with a certain label to be returned. In the method, a basic MATCH query is performed which matches any nodes with the given label. Of course, in the base repository this would return all of the nodes, as no label exists, but in the repositories that extend this one, they’ll have a label set, which allows the filter to work. Any applicable nodes are then processed and finally returned.
public function find($property, $value)
{
        /**Sample:repositoryFind**/
                if(empty($value)) {
                        return array();
                }

                if(is_array($value)) {
                        if(is_numeric($value[0])) {
                                $value_string = sprintf(’IN [%s]’, implode(’ ,’, $value));
                        } else {
                                $value_string = sprintf(’IN [’%s’]’, implode(’’ ,’’, $value));
                        }
                } else {
                        if(is_int($value)) {
                                $value_string = sprintf(’ = %s’, $value);
                        } else {
                                $value_string = sprintf(’ = ’%s’’, $value);
                        }

                }

                $query_string = sprintf("MATCH (n:%s) WHERE n.%s %s RETURN n, id(n), labels(n);", $this->getLabelQuery(), $property, $value_string);

                $data = $this->client->cypher($query_string);

                if(empty($data[’results’][0][’data’])) {
                        return array();
                }

                $node = $data[’results’][0][’data’][0][’row’][0];
                $node[’id’] = $data[’results’][0][’data’][0][’row’][1];
                $node[’label’] = $data[’results’][0][’data’][0][’row’][2];

                return $node;
}
Sometimes you need to make a node based on a property value, and this method allows that to happen. It takes a property name and a value as an argument, then does a query accordingly. Since properties can have many different types, a number of checks are done to ensure the data is formatted correctly. For example, if the data is an array, then it’s covered for use with Cypher’s IN clause. In addition to setting up the in, it also checks what the type of the first item in the array is. This is to ensure that if integers are passed in, they’re supplied without quotes and that strings are supplied with quotes.
All of this processing is to ensure the WHERE clause of the query is formatted correctly. The resulting node is then built up from the result and returned.
private function getLabelQuery()
        {
                return is_array($this->label) ? implode(":", $this->label) : $this->label;
        }
}
This method is a little helper method to format the labels in the correct way. If the label happens to be an array, then the label needs to be separated by a colon to work with Cypher, such as Label:Anotherlabel. To save on doing this check every time, it’s placed into another method, so the change can be made in one place, rather than in every other method that uses it. If there is just a single label available in the repository, then this method will just return the label name.
Whole file here?
As mentioned, this repository does all of the work other than including the labels, so many different node types can be created without having to duplicate the functionality of the base repository. To show how little is done when extending the repository, the contents of the BusStopRepository.php (/src/ChrisDKemper/Repository/BusStopRepository.php) are as follows:
<?php namespace ChrisDKemperRepository;

/**
* The repository for BusStops
*/
class BusStopRepository extends Repository
{
        protected
        $label = ’BusStop’
        ;
}
The only code in the file, other than the object declaration is the setting of $label to ‘BusStop’. This value is then used when accessing the methods of the base repository, so whether you’re using the create or find methods, the value of $this->label will be ‘BusStop’.
As previously mentioned, the repositories are not called directly, but instead are called via the service. These services call the specified repository under the hood, and then apply certain logic or formatting to the data before it is returned to the application. The services used to fetch nodes implement four methods: create, one, all, and find. These methods take the same arguments as the respective functions in the repository so allow for the same data to be retrieved. Once the data is retrieved via the repository, it’s then formatted into arrays of entities, depending on the type of data being managed. For example, the BusStop service file (/src/ChrisDKemper/Service/BusStopService.php) contains the following:
<?php namespace ChrisDKemperService;

use
        ChrisDKemperEntityBusStop
;

class BusStopService extends Service
{
        public function create($properties = array())
        {
                /**Sample:serviceBusStopCreate**/
                $node = $this->repository->create($properties);

                if($node) {
                        return new BusStop($node);
                }

                return false;
        }
The first method in the class is the create method, which (just like the repository) takes an array of properties as an argument. You’ll see here that no processing is done of the properties, they’re simply passed to the repository, where all of the actual work is done. The result is then saved to a variable, and if that variable isn’t false a new BusStop is returned. This class represents the BusStop entity. The entities in this case are just empty classes that allow access to the properties that exist on a node. Whenever nodes are returned, the individual nodes are returned as an entity of the respective type, meaning properties can be accessed in the same way, no matter what the node type is.
public function one($id)
{
        /**Sample:serviceBusStopOne**/
        $node = $this->repository->one($id);

        if($node) {
                return new BusStop($node);
        }

        return false;
}
Just like with the repository implementation of this method, the only argument is a node id. This is then used to query the underlying repository and return the result it comes back with (wrapped in a BusStop class, of course), provided said result isn’t fault.
public function find($property, $value)
{
        /**Sample:serviceBusStopFind**/
        $node = $this->repository->find($property, $value);

        if($node) {
                return new BusStop($node);
        }

        return false;
}
As with the previous methods, all of the work here is done within the repository and the property and value arguments are passed through to the repository. If there is a resulting node, then this is returned wrapped in the entity class.
public function all()
{
        /**Sample:serviceBusStopAll**/
        $nodes = $this->repository->all();

        if(empty($nodes)) {
                return array();
        }

        $busstops = array();

        foreach ($nodes as $node)
        {
                $busstops[] = new BusStop($node);
        }

        return $busstops;
        }
}
The all service is probably the most basic service, as it simply just gets all of the nodes from the repository and puts them in a list, or returns an empty array if no nodes exist.
Each of the other node services work in the same way, the only difference being the name of the entity being returned from the methods, which in this case is BusStop. The Place service however does go against this pattern slightly, as it requires additional information that the other nodes don’t. The reasoning for this is that Place nodes are very important in the application, as they’re the ones that have all of the location information. Also, without any additional information, there’d be no way of knowing if a Place was a Bus Stop, or any other transport type, so some additional processing is required. The ‘one’, ‘find’, and ‘create’ methods are the same as the BusStop example, however the all method is as follows:
public function all()
{
        /**Sample:servicePlaceAll**/
        $nodes = $this->repository->all();

        if(empty($nodes)) {
                return array();
        }

        $places = array();

        foreach ($nodes as $node)
        {
                $place = new Place($node);
                $cypher = sprintf("MATCH (n)-[:LOCATED_AT]-(t) WHERE id(n) = %s RETURN labels(t)", $place->id);
                $data = $this->client->cypher($cypher);

                foreach($data[’results’][0][’data’] as $row)
                {
                $label = $row[’row’][0][0];

                if( ! in_array($label, $place->label)) {
                        $place->label[] = $label;
                }
                }

                $places[] = $place;
        }

        return $places;
}
The first half of this method functions the same as the others, as it gets all of the nodes from the repository. Rather than just retuning each node though, this code does some additional processing. The Cypher query that is performed is getting all of the labels of the related nodes that have the LOCATED_AT relationship with that particular place. This allows for different styling to be used on the frontend of the website, and gives some additional context on what different transport types a Place has access to.
There is one additional service that is used within the website which is the Journey service, which isn’t tied to nodes like the others are. This service is used within the application to perform certain location-based queries easily, and its methods are as follows:
public function closestPlace($lat, $lon, $km = 5.0)
{
        /**Sample:serviceJourneyClosestPlace**/
        $cypher = sprintf(’START n=node:geom("withinDistance:[%s,%s,%s]") RETURN n, id(n), labels(n)’, $lat, $lon, $km);

        $data = $this->client->cypher($cypher);
        $row = $data[’results’][0][’data’][0][’row’];

        $node = $row[0];
        $node[’id’] = $row[1];
        $node = array_merge($node, $row[2]);
        $node[’label’] = $row[3];
        $place = new Place($node);
        return $place;
}
Unlike the other services, this one has the Client passed in when it’s created, allowing it to communicate with Neo4j directly. It also doesn’t take a repository either. This uses Neo4j spatial to find the closest node within a given distance. Since only the Place nodes have location data, it can be assumed that any nodes returned will be places, so they can be returned in the correct entity wrapper.
public function closestTransport($lat, $lon, $km = 10.0, $type = ‘’)
{
        /**Sample:serviceJourneyClosestTransport**/
        if( ! empty($type)) {
                $type = $type . ":";
        }

        $cypher = sprintf(’START place=node:geom("withinDistance:[%s,%s,%s]") WITH place MATCH (place)-[:LOCATED_AT]-(transport%s) RETURN place, id(place), labels(place), transport, labels(transport) LIMIT 1’, $lat, $lon, number_format($km, 1), $type);

        $data = $this->client->cypher($cypher);
        $row = $data[’results’][0][’data’][0][’row’];
        $node = $row[0];

        $node = array_merge($node, $row[3]);
        $node[’id’] = $row[1];

        $node[’label’] = $row[4];
        $place = new Place($node);

        return $place;
}
The closestTransport method is an extended version of the closestPlace method, and is a little more complex. The Cypher query still looks for the closest node using the supplied information, but when this is found, it then uses WITH to get the nodes related with the LOCATED_AT relationship. The rest of the code then takes the data from both the returned place and transport nodes, merges them together, then returns the processed Place.
public function shortestPath($from_nid, $to_nid)
{
        /**Sample:serviceJourneyShortestPath**/
        $cypher = sprintf(’MATCH (from:Place),(to:Place), p = shortestPath((from)-[:STOP_ON_JOURNEY*..15]-(to)) WHERE id(to) = %s AND id(from) = %s RETURN p’, $from_nid, $to_nid);

        $result = $this->client->cypher($cypher);
        $data = $result[’results’][0][’data’][0][’row’][0];

        return $data;
}
This method is quite important, and actually does the journey planning between two different nodes within the database. It simply takes two node ids as arguments (from and to, respectively) and then uses the shortestPath function to calculate the shortest path between the two. Thanks to the way the nodes are related, they can only ever be connected via a Timetable node, using the STOP_ON_JOURNEY relationship. This means that the only information needed to work out the path is the respective node ids, and that’s it. The resulting path between the two nodes is then returned to be used as required by the application.
Routes
This application only has a four different routes, one of which is the homepage (defined in the bootstrap file). The other three routes are used to help with planning journeys, which are explained below:
The main route of the application is the one used for planning journeys, and to achieve this it expects two sets of co-ordinates, to and from. Each of these represent the location of the where you’d like to start and end a journey in the form of a longitude and latitude. Rather than going through the full route, the most important parts will be mentioned, starting with getting the nodes required to use the previously mentioned shortestPath method on the journey service.
$from_node = $app[’journey.service’]->closestTransport($from[’lat’], $from[’lon’], 10.0);
$to_node = $app[’journey.service’]->closestTransport($to[’lat’], $to[’lon’], 10.0);
$path = $app[’journey.service’]->shortestPath($from_node->id, $to_node->id);
Using the location data from the supplied to and from nodes, the application is able to find the closest transport node for each location, then with the resulting IDs plan a journey between them. After this stage, we’re left with the path between the two nodes, but the path itself isn’t too useful so it needs to have some additional processing done on it. The path that is returned works off the following pattern:
/* Pattern used:
 *
 * Place node (start location)
 * Relationship between start Place and Timetable
 * Timetable node (used to get the time/transport)
 * Relationship between Timetable and end Place
 * Place node (end location)
 *
 */
Provided a successful route can be planned, any stops on the journey will follow this pattern, meaning that the shortest length of a path is 5. The reason behind this is that there is always a start place and an end place, with the timetable node and its relationships in between. This means that if there were an additional Place, the path would be structured as follows:
/* Pattern used:
 *
 * Place node
 * Relationship between start Place and Timetable
 * Timetable node
 * Relationship between Timetable and middle Place
 * Place node
 * Relationship between middle Place and Timetable
 * Timetable node
 * Relationship between Timetable and end Place
 * Place node
 *
 */
This means that the amount of stops on a journey can be worked out by doing the length of the path -1, divided by four. Knowing this pattern allows for the output to be structured in terms of stopping of the journey, rather than just the raw path, as this may not be too useful. With the path then covered into stops, it’s then iterated over once more to get the details of the Timetable node that links the different places together which allows for additional processing to be done based on the properties of said node. Once everything is formatted correctly, the resulting journey is then returned as JSON for use on the front-end of the website.
This is a simple route, and simply works out what the closest mode of transport is, based on the location supplied to it. This route then uses the closestTransport method on the Journey service to get the resulting node, which is then returned to the front end of the website.
Unlike the other routes which are POST, this route is GET, and exists only to supply the front end of the website with all of the different Place nodes, so they can be plotted on a map. To do this, the all method on the Place service is used, and any nodes returned are then processed and returned to the application as JSON.
Each of these routes can be found in JourneyControllerProvider.php (/src/ChrisDKemper/ControllerProvider/JourneyControllerProvider.php) if you’d like to have a look at how they work in more detail. Alternatively, you can search for Sample:JourneyController within the project to find the routes that way.
Commands
To both make things easier and allow for sample data to be loaded into the application, the website has a couple of command line commands it uses to perform certain tasks. These tasks perform different actions, and exist to make the process of performing those actions easier. Rather than going over each line of these files, each command will be explained, and any important functionality or Cypher queries that they do will be mentioned; otherwise all you need to be aware of is that the commands do what they say they do.
Create Indexes
As mentioned earlier, certain indexes are required to allow for spatial queries to take place on Neo4j, and to manage these a small command called IndexCreateCommand (/src/ChrisDKemper/Command/IndexCreateCommand) has been created. This command can be run on the command line by using the following line in Terminal, within the project directory:
php bin/console index:create
This command takes advantage of some of the methods that were created on the Client, to make creating the required indexes for the site easier. Below are the two main lines from the command, which call the required methods on the client to create the intended index.
/**Sample:IndexCreateCommand**/
$spatial_data = $client->createSpatialIndex();
$cypher_index = $client->createCypherIndexForSpatial();
The main action within this command comes from calling the “createSpatialIndex” and “createCypherIndexForSpatial” methods on the client as mentioned before. This is just a wrapper to save running these commands manually, but it still exists to allow for the application to be run from an empty database.
Before the application can be of any use, it needs some data. Since everything is built around places, we need to get some of those in first. To do this, a command has been written that imports nodes as “Places” if they don’t already exists, and then creates a BusStop node and relates it back to the place. This takes place with the BusStopImportCommand, which also can be run on the command line via the following command which needs to be run in the root directory of the application:
php bin/console busstop:import
Within the command, the first check that happens is to see whether or not the Place exists within Neo4j or not. A query is done to see if a Place exists with the same name. This is important as you cannot have a BusStop without a Place (as the BusStop relates to the Place) so the place either needs to be fetched (by its name), or created. When the place doesn’t exist, the place node is created (with location information) and is then added to the spatial index via the spatialAddNodeToLayer method on the previously included client.
With the Place node either created or fetched, a BusStop node is created and then related to the node. The Cypher code used to relate the two nodes is as follows:
/**Sample:BusStopImportCommand**/
MATCH (a:BusStop),(b:Place)
WHERE id(a) = 0 AND id(b) = 1
CREATE UNIQUE (a)-[r:LOCATED_AT]->(b)
RETURN r
This query is adapted from the code, and the 0, and 1 IDs are substituted in for actual IDs in the code, but this example would relate the two nodes, provided that `a` (0) is a BusStop and `b` (1) is a place. When this command runs, it’ll go through this process for every BusStop, ensuring it has a Place node to relate to, then creating and relating the nodes as required.
With the sample bus stations in, it’s time to add some timetables. This command works in a similar way to the previous commands in that it creates the required node (Timetable, in this case) and relates it as needed and that’s it. The command to import the timetables is called TimetableImportCommand and can be found at /src/ChrisDKemper/Command/TimetableImportCommand.php.
Although this command works similarly to the others, it has a bit more information, as it has both the information for the Timetables, but also for the times for these timetables as well. After the data has been included, the first action to take place is the creation of the Timetable nodes. The timetables have a name, the days of the week the timetable runs on, and the times that the timetable runs on. The timetable is created with this information, and is returned to the command, ready to use.
With the timetable node created, it then needs to be related to the different places it calls at, which it does using the “STOP_ON_JOURNEY” relationship. On this relationship there is also a property of “time” which indicates the amount of time it’ll take for the journey to get to that particular “Place”. The Cypher used to achieve this can be seen below.
/**Sample:TimetableImportCommand**/
MATCH (a:Timetable),(b:Place)
WHERE id(a) = 0 AND id(b) = 1
CREATE UNIQUE (a)-[r:STOP_ON_JOURNEY {time : 100}]->(b)
RETURN r;
This code is run for each of the place nodes on the timetable, with the values for the node ids and time being altered as needed. With the Timetable all linked up to the places it calls it, there now needs to be a Transport node, which is related to the Timetable. This gives the freedom for a Transport to run multiple timetables, and the Cypher used to relate the transport to its timetable can be seen below.
MATCH (a:Transport),(b:Timetable)
WHERE id(a) = 0 AND id(b) = 1
CREATE UNIQUE (a)-[r:RUNS_ON]->(b)
RETURN r;
This code then creates the RUNS_ON relationship between the Transport and the Timetable, allowing for the service that runs a particular timetable to be retrieved based on this relationship.
Setting up the Website with Commands
When the website is first provisioned after being downloaded from the github repository, the database will have no nodes in it, so the commands will need to be run in order to seed it with some sample information. As previously mentioned there have been commands created to make these processes easier, so to fill the database with test information, run the following commands in order from the root of the project directory:
php bin/console index:create
php bin/console busstop:import
php bin/console timetable:import
These are the commands that have been previously covered, and will get the website ready to run.
What it looks like
After a lot of set up, it’s finally time to see how the website looks, and what it’s made up of. Since the purpose of this website is to make journeys, the main view is a full screen map. On the map, there will be a number of different markers on the map, which are the Bus Stops that have been previously imported and will be red. There will also be a blue marker on the screen, which is the “From” marker.
Since this is a Neo4j book, like the construction of the base application, I won’t go into too much detail on exactly how everything was put together, but rather will give an overview, and explain any particular bits that are worth mentioning. The map used by the website is Openstreetmap (OSM), which is available by the leaflet.js javascript library. This library makes interacting OSM very easy, and (at least in my opinion) it’s very nice to work with. In addition to leaflet, Jquery is used to make some of the interactions on the site a bit easier. There are a number of AJAX requests that are sent by the front end of the website, and Jquery makes that very easy. The only other item worth mentioning is the use of Twitter Bootstrap, which is used for styling the website. The JavaScript and CSS can be found within the web directory of the project, so feel free to have a look in there if you’d like some additional insight into how the website was put together.
When the website first loads, the javascript will create a new map using Leaflet. With the map created, using jQuery a GET request will be sent to ‘/journey/points’ to retrieve all of the Places within the system. It then plots each of these onto the map, as well as storing any of the additional properties for the place, to be shown when clicked. If you click on one of the location markers, it’ll reveal any information it has about that marker in a sidebar panel, which will appear if it isn’t already visible.
The “Form” marker (which can also be dragged around) can also be clicked, which presents two options “Find closest Transport” and “Plan from closest Transport”. The first option pretty much does what it says, when the button is clicked; it sends a request to the “/journey/closest” endpoint with the longitude and latitude of the current location. The query is then processed by the controller, and the closest station is returned, which is displayed in the information panel on the page.
Pressing the “Plan from closest Transport” button adds another (draggable) marker to the page, which is used to represent the “To” portion of the journey. If the “From” marker is clicked again, the “Plan from closest Transport” will be replaced with “Set start position to marker” which, when clicked, updates the “From” position within the website. This means that the marker can be moved around and reset, to allow for different journeys to be planned really easily.
Finally, when the “To” marker is clicked, only one option is available, which is “Plan to here”. When this option is clicked, a request is sent to “/journey/plan” with the longitude and latitude of the start and end locations of the journey. The resulting journey is then displayed in the information panel of the site.
Using the markers, you can then move them around and plan different journeys very easily.
Summary
This chapter has covered a fair bit of ground, from the installation of the spatial plugin and how to get it functioning, right through to having a website that returned planned journeys. Although this application is written in PHP, it shows what’s possible within Neo4j, with very little effort. Since the application code is available at https://github.com/chrisdkemper/sample-neo4j-php-application, it’s possible to look through the code and see how everything is wired together, to see what you can potentially re-use for your own projects. Although the full application code hasn’t been laid out, enough has been shown to illustrate how the site works, whether you’re familiar with PHP or not. With that in mind, the Client was created using curl, to give the code as much reusability as possible.
Using the data structure and the Cypher alone, the queries can easily be adapted for your own use. Plus, the application will grow over time, so any new features will be available on github, and if you’d like to find a particular code sample, just search the project for the corresponding comment and any changes made since the book was printed will be explained.