
![]()
The objectives of this chapter are to
- Learn ways to transfer data between the client mobile application and the server
- Learn ways to securely pass data
- Learn how to use tools to monitor the network and the data
- Learn different data formats
This chapter discusses data access in hybrid mobile applications and service-oriented architecture. The major focus is on accessing JSON and XML data in hybrid application(s) through web services and Windows Communication Foundation (WCF) Service. We also discuss ways to secure this communication. Let’s start by discussing various ways to transfer data.
Exploring Data Access Possibilities
If we consider only server-side endpoints to transfer data, there are many options available from Microsoft, .NET, Java, and PHP. As discussed earlier, for hybrid applications, it does not matter which server-side technology or tools you use. As long as the server returns data to the client application in an understandable and well-known format—such as JSON, XML, String, or Arrays—the client side is always happy.
Tables 6-1, 6-2, and 6-3 list the technology and languages provided for data access on the server side.
Table 6-1. Microsoft: Data Access on the Server Side

Let’s look at sample code snippets. All code snippets assume that we need to transfer the Employee class object from server side to client.
// comments added in the code denotes important statement
Employee class layout is like:
public class Employee
{
    public int No { get; set; }
    public string Name {  get; set; }
    public string Address { get; set; }
}
The code snippet for the handler:
//Code is written in file with .ASHX extension
public class TestHandler : IHttpHandler
    {
        public void ProcessRequest(HttpContext context)
        {
           //IMPORTANT: One can set contentType in the following line:
            context.Response.ContentType = "application/json";
            JavaScriptSerializer jss = new JavaScriptSerializer();
            context.Response.Write(jss.Serialize(new Employee()));
        }

        public bool IsReusable{ get{ return false; }}
    }
The code snippet for web services:
// Code is written in file with .ASMX extension
 [Webservice]    //This line conveys this class is available for call remotely
public class TestWebService
{
  [Webmethod]   //This line conveys; that this method is available for calling
  public Employee GetEmployee()
  {
     return new Employeee();
  }
}
Code snippet for WCF services:
//Code is written in file with .SVC extension
//The following line conveys that implementation of this interface
//is available for call remotely
[ServiceContract]
public interface ITestWCFService
{
   //The following line conveys; that method implementation is available for calling
   [OperationContract]
   Employee GetEmployee()
}

//The following is actual implementation of an interface inside class
public class TestWCFService:ITestWCFService
{
  public Employee GetEmployee()
  {
     return new Employeee();
  }
}
The code snippet for the Web API controller in ASP.NET MVC:
// Code is written in plain code file (eg. C# files like .cs extension)
// APIController is base class offered by ASP.NET MVC Framework
public class ValuesController:ApiController
{
 //While calling The following method; use url like - "http://<server>/api/values/<id>"
 //GET conveys that only "GET" requests can reach to this method
  public Employee Get (int id)
  {
     return new Employeee();
  }
}
Table 6-2. Java / Oracle: Data Access on Server Side
|
(+/–) |
Servlet |
Web Services |
|---|---|---|
|
(+)points |
Easiest option available for data transfer. Content type of the response can be set manually. You can even set it to XML / JSON. GET, POST request data can be collected using QueryString and getParameter() method respectively This can be clubbed with any back-end business logic written using EJB or any legacy code! Host is web server. |
Old and easy option available for data transfer. Data is always passed using SOAP format. Internally uses XML over Http Plain Old Java Objects are formed automatically while data is received from client. Conversion tools like JaxB, JiBX can be used to create POJO. Deserialization part is handled automatically. Host is web server. REST is supported through REST APIs; also known as JAX-RS |
|
(–) points |
Only HTTP carrier can be used Security of data is not automatically given; rather provided through Java APIs Primarily used for HTML like output generation. |
Only HTTP carrier can be used. Data security is applied through code. |
The code snippet for servlet returning employee’s data in JSON format:
public class TestServlet extends HttpServlet {
 protected void doGet(HttpServletRequest request,
        HttpServletResponse response)
 {
        //set contentType to anything here. The following code sets up type to 'json'
        response.setContentType("application/json");

        // The following, employee related data is written in JSON format
        // One may use custom code for achieving the same or
        // use 'jsonobject' class
        response.getWriter().write("{Name:'James',Address:'London'}");
}

protected void doPost(HttpServletRequest request,
        HttpServletResponse response)
        // TODO Auto-generated method stub
        doGet(request, response);
    }
}
The code snippet for Java web service endpoint using the Java API for XML Web Services (JAX-WS):
import javax.jws.WebService;

//The following code '@Webservice conveys that the code open for call remotely
@WebService
public class TestWebService
{
    //The following code '@WebMethod' conveys that the method is open for call remotely
    @WebMethod
    public Employee GetEmployee() {
        return new Employee();
    }
}
Table 6-3. PHP: Data Access on Server Side
|
(+/–) |
PHP Page Using Content Type |
|---|---|
|
(+)points |
Easiest option available for data transfer. Web server is a host. Content type of the response can be set to anything including XML / JSON. REST support can be added optionally. PUT and DELETE request complex implementation needs to be handled. |
|
(–)points |
Only HTTP carrier. Data security needs to be provided through code. |
The code snippet for the PHP endpoint using content type JSON:
<?php
   //The following line conveys about content type being returned from PHP
    header("Content-Type:application/json");

   //return employee data
    echo  '{"No":1,"Name":"sachin","Address":"mumbai"}';
?>
Usually, data can be easily transferred in the form of XML or JSON from the server side by simply setting the content type. However, in an earlier section, we discussed many ways to achieve the same. At a high level, if we try to categories most the techniques, we see two groups:
- SOAP-based communication
- REST-based communication
What is the difference between the two? What are the advantages and disadvantages of each? Let’s look at this now.
SOAP is the default protocol for accessing web services. It’s been in the technology market for a while. SOAP was developed by Microsoft. SOAP is a bit difficult to use in some languages, while in others, it’s a piece of cake. SOAP relies completely on XML to transfer data. Microsoft’s goal in developing the SOAP protocol was to replace older technologies that don’t work well on the Internet; an example of such a technology is Distributed Component Object Model (DCOM).
After launching the first draft of SOAP, Microsoft handed over the details to a community called the Internet Engineering Task Force (IETF), where it was standardized and made open to the technology world. Many standards were built around SOAP afterward, such as WS-Policy and WS-ReliableMessaging, and so forth.
SOAP-based web services also completely rely on a concept called Web Service Description Language (WSDL), which is a file that contains all the information any client ever requires to call the service. This information includes information such as where to call, how to call, and what data to pass on.
A call to SOAP-based services through JavaScript is difficult. The formation of a request in JavaScript with XML is not handy at all. If the response comes in the form of XML, then before DOM version 2, very difficult and nonstandard ways of dealing with XML were used. What happened in DOM2? We got an extra object, since then called XmlHttpRequest [XHR], along with documents, Windows, and Navigator into the DOM tree. So, compared to SOAP, which relies on XML, REST simply relies on URL.
REST is new to the market compared to SOAP. A call can be given to the server using a REST URL, but you have to use the HTTP 1.1 verbs GET, POST, PUT, and DELETE. SOAP web services only use XML, whereas REST uses different data formats, including JSON, RSS (Really Simple Syndication) feeds along with XML.
So, what you should you prefer: SOAP or REST? The consultant’s answer is—It depends!
The decision depends on many factors, such as the following:
- The technology used on the server side and whether it supports REST (being new)
- The technology used on the client side
- Whether the client understands JSON or XML
- The protocol used for communication
- And more
Tips to GET or SET Data
To pass data between the client and the server, two techniques or verbs are used very frequently: GET and POST. Other —like DELETE, PUT, and HEAD—are not as frequently used because they have specific purposes.
As HTTP is a protocol, data travels in packets. A packet has a header and a body. If the data travels in the header, then it’s a GET request. If the data travels in the body, then it’s a POST request. POST is safe compared to GET, because GET data can be seen in the URL.
Table 6-4 is a basic comparison between GET and POST requests.
Table 6-4. GET and POST Comparison
|
GET |
POST |
|---|---|
|
• Data entered travels in the header part of the HTTP • Data can be seen in the URL itself, so not safe. • This method should not be used to transfer critical data • Only ASCII data is allowed to be passed • If one does refresh the page or hits back button, then it does not cause any harm • Contents passed using this method is allowed for caching • Data + URL <= 2048 characters |
• Data entered travels in the body part of the HTTP • Data cannot be seen directly. However, with the tools like fiddler it can be seen. • This method is generally used to transfer critical data like username and password • No restrictions • If one does refresh the page or hits back button; then it does re submit the content • Contents passed using this method does not get cached • Generally, a maximum size of 4GB is recommended. |
Let’s look at certain tools that help debug and test client-side code. We will use the hybrid application developed in Chapter 4 as a base for debugging and testing.
- Start the Visual studio editor.
- Click File Menu
 Open File.
 - A file opens and a dialog box appears.
- Browse to the <local drive>ApressCH04HelloClient folder.
- Select index.html from the folder and click Open.
The content looks like what is shown in Figure 6-1.

Figure 6-1. Open first HMAD project
- Make sure that there is still a reference to live server-side code, such as http://bonaventuresystems.com/Apress/BeginningHMAD/CH04/SayHello.ashx.
- Run this file using the F5 key to check whether it still works.
Output like what’s shown in Figure 6-2 must appear in the open default browser.

Figure 6-2. Recheck the code
Now, that we are sure that the code is still working, let’s test network traffic with tools such as the browser’s built-in helper and Telerik Fiddler.
- Enter the URL for the index page (see Figure 6-2) in the Google Chrome browser.
- Press Ctrl+Shift+i or press the F12 key. This action opens UI Developer Tools (see Figure 6-3).

Figure 6-3. Developer Tools in Chrome
- In the Developer Tools, click the Network tab, as shown in Figure 6-4.
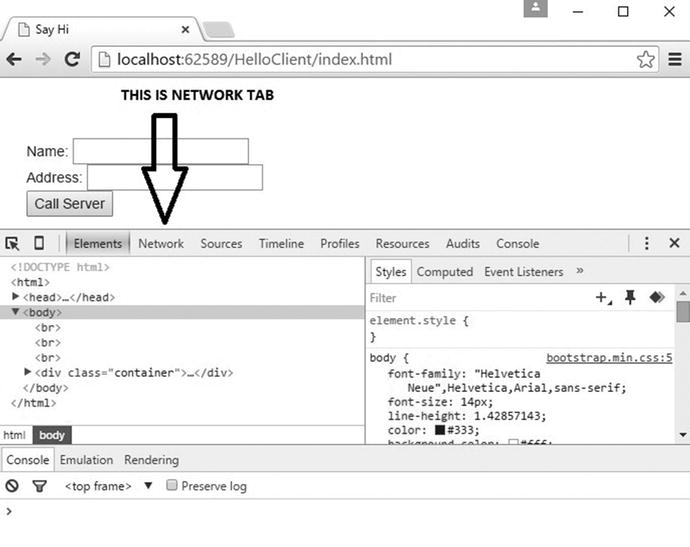
Figure 6-4. Developer Tool: Network
- Refresh the index.html page by pressing Ctrl+F5.
- Note the change in the Network tab.
The Network tab displays downloadable resources, like JQuery and Bootstrap files; without these resources, index.html cannot function. The Network tab also displays other information (see Figure 6-5).

Figure 6-5. Developer Tools: Network
- As shown in the Figure 6-5, you can click a specific request to see more details.
- To test, click the index.html entry listed. All entries are mentioned in Figure 6-5.
More details are shown in Figure 6-6.

Figure 6-6. Developer Tools: Request details
- Make a note of the request method mentioned as GET
- From the response header, it is clear that output received is of type text/html.
- The details also contain who returned this output; this conveys which technology the server has used.
- Note the content-length specified.
- Look at the response and preview details. It shows more markup and the HTML source, as shown in Figures 6-7 and 6-8.
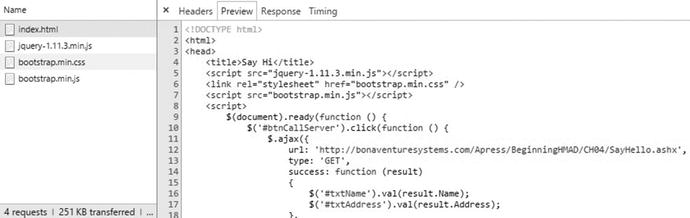
Figure 6-7. Developer Tools: Response and Preview details
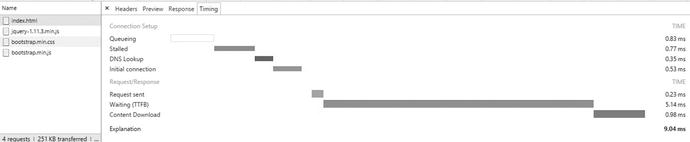
Figure 6-8. Developer Tools: Time tab
You can get more information on where the delay is in entire cycle of request and reply. At this time, if someone clicks the Call Server button, one more request is added in the pool on the left side (see Figure 6-9).

Figure 6-9. Developer Tools: New request on Call ServerClick
Now, if you want to see the response contents, click the Response tab. It shows data in JSON format, as shown in Figure 6-10.

Figure 6-10. Developer Tools: JSON after GET
In Figure 6-11, a call to SayHello.ashx was made as a GET call using AJAX.

Figure 6-11. Developer Tools: Explicit GET AJAX Call
What will happen if we make the same changes to POST? The results are shown in Figure 6-12. Data passed (if any) travels in the body of the HTTP packet. As you can see in Figure 6-12, nothing changes except the request method as POST. Pulling data out of the body is automatically done by the browser. The browser first dissects the content type and then decides what to do with it.

Figure 6-12. Developer Tools: Explicit POST AJAX Call
You can also use Telerik Fiddler to the do the same job. However, it is more advanced than the default supplied browser-based developer tools. Telerik Fiddler can help to generate a request to do tests only. You may even dissect HTTPS details to a certain extent with the help of Telerik Fiddler.
Let’s use Fiddler and have a glimpse.
- Download free copy of Fiddler at http://www.telerik.com/fiddler.
- Do the step-by-step installation procedure. After installation, start Fiddler. The default fiddler UI looks like what’s shown in Figure 6-13.

Figure 6-13. Telerik Fiddler
- Open Google Chrome and start browsing index.html, as shown in Figure 6-2. Note the call to index.html and the dependent resources being tracked, as shown in Figure 6-14.

Figure 6-14. Telerik Fiddler: default session tracking
- Switch back to Google Chrome and click the Call Server button. Notice the changes in the request and response header. Observe the same in Figure 6-15. Keep it in mind that we are tracking an AJAX call through external components.

Figure 6-15. Telerik Fiddler: AJAX call being tracked
So far, we have used Fiddler for tracking the calls over network. We can also use fiddler for raising different kind of requests as if client.
- Select the Composer tab. Do the actions shown in Figure 6-16.

Figure 6-16. Telerik Fiddler: Composer window
- From the Composer window, select POST as the request type. Enter the index.html URL at the location indicated by an arrow. Click the Execute button. This action takes you back to the Inspectors window (see Figure 6-17).

Figure 6-17. Telerik Fiddler: Inspectors window
This is similar to when we explicitly offered a POST call to server. By using Composer, we can save a lot of time when testing calls to the server over multiple verbs.
Browser-based Debug, Monitor, and Trace
Debugging is needed to find logical errors in code. For managed code like C#, Java editors provide very rich support for debugging. However, JavaScript remains ignored by many editors. Today, browsers do have extended support for debugging JavaScript. Let’s look at the support given by Google Chrome. Similar support is provided by other browsers.
Let’s use our first hybrid mobile application to learn about debugging.
- Browse index.html to the Google Chrome browser.
- Make sure that code for the Call Server button click is still working.
- Open the code for index.html in Visual Studio.
- Add a debugger to the AJAX code inside index.html, as shown in Figure 6-18.

Figure 6-18. Add debugger inside JavaScript code
- Open Developer Tools. Press the F12 key on the keyboard or click the Customize and Control Google Chrome button in the right corner of the address bar. Select More tools Developer Tools.
- Once the Developer Tools are open, the Chrome browser looks like what’s shown in Figure 6-19.

Figure 6-19. Google Chrome with Developer Tools
- Click the Call Server button. Based on whether the response is successful or not, the code breaks into the respective function. We have the debugger added in both the callback functions—on success and on error. As seen in Figure 6-20, the call back is successful and the code pauses in the success function.
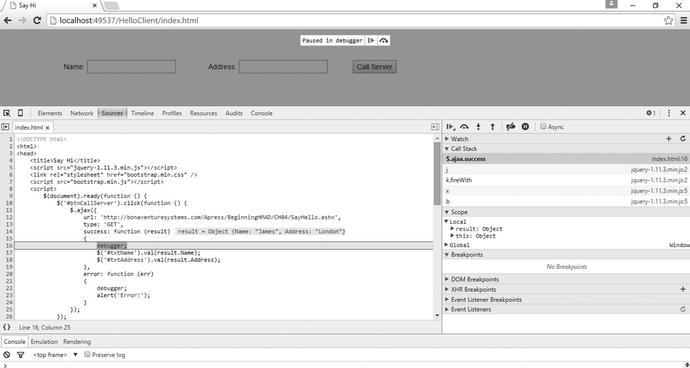
Figure 6-20. Debugger in success function
- You can check the values received from the server by querying through the Console window. Open the Console window using the Console tab (see Figure 6-21) .

Figure 6-21. Result manipulation using Console window
- Query to the result variable and manipulate the same based on the need.
- After all the changes mentioned in Figure 6-21 are done, click the Resume Script Execution button (visible in the index.html) or press F8 to continue the execution (see Figure 6-22).

Figure 6-22. Resume Script Execution
Changes to the result received can be observed in UI (see Figure 6-23).

Figure 6-23. UI after result manipulation
Similarly, you can debug and manipulate with Firefox, IE (EDGE), and other browsers.
Code and Data Security
Now let’s discuss another important concept in hybrid mobile applications. For hybrid apps, UI testing can be easily done with the help of browsers only. It is preferable that the code be written in JavaScript or JQuery. The deployable output in Android and Windows Phone hybrid applications is an internally compressed file. You can uncompress and find internal files like index.html. Afterward, finding JavaScript or JQuery code inside the index.html file is not tough.
Similar issuess are faced by web programmers when most of the code is written in JavaScript. Since JavaScript runs on the browser, you can read the JavaScript code contents by viewing the source.
How to protect JavaScript code? Two options exist:
- Do not provide the entire code. Load the JavaScript in pieces. Download pieces from the server side on demand. The benefit is that it becomes difficult to understand the entire functionality in one go.
- Obfuscate and minify JavaScript code with the help of obfuscation and bundling tools.
Providing JavaScript files or resources on demand is a feature of server side and custom logic. However, obfuscation and minification of JavaScript can be done through tools. Let’s talk about the frequently used tools for minification:
- JSMIN by Mr. Douglas Crockford (well known for JSON).
- JSMIN can be downloaded from http://www.crockford.com.
- As per crockford.com, JSMIN minimizes the JavaScript contents and makes it difficult to read. It is not for obfuscation.
- Google Closure Compiler
- This is a called a compiler yet it compiles JavaScript code to better JavaScript. It’s a program written in Java.
- It does parse and minify JavaScript.
- Download it from https://developers.google.com/closure/compiler/.
- YUI Compressor
- A code compressor from Yahoo!. It’s a command-line utility developed using Java.
- It can be downloaded from http://yui.github.io/yuicompressor/.
- ShrinkSafe: DOJO Toolkit
- A code compressor from DOJO. It is a utility developed on Java.
- Offline version at http://svn.dojotoolkit.org/src/util/trunk/ shrinksafe/shrinksafe.jar.
- Online version can be referred from http://shrinksafe.dojotoolkit.org.
To demonstrate what minification means, consider the following JavaScript code and store it in the sample.js file because it may be asked as an input by the compressor. Figure 6-24 explains.

Figure 6-24. Sample page
- Now visit http://shrinksafe.dojotoolkit.org, which is the online version of ShrinkSafe. ShrinkSafe’s web page user interface is shown in Figure 6-25.

Figure 6-25. ShrinkSafe web page
- As highlighted in the Figure 6-25, click Choose file. The browser file dialog box will appear.
- Browser to the sample.js file created earlier.
- Click Shrink em! This shrinks the contents from the sample.js file and automatically downloads the compressed file.
JavaScript obfuscation is a process through which we make JavaScript unreadable! This protects your code and prevents it from being stolen. The obfuscation process is done through a utility called the Obfuscator. While doing obfuscation, some obfuscators shrink the size of the JavaScript, which makes the JavaScript code download faster. So, obfuscation does many good things.
There are many obfuscators available on the market. To demonstrate the process, let’s consider the following JavaScript code snippet from a case study appended after last chapter in this book. Save this script in the sample.js file. The code snippet size on disk is 932 bytes.
var modulesSize = $(jsonResult.survey.Modules.Module).size();
for (modulescnt = 0; modulescnt < modulesSize; modulescnt++) {
                            moduleData = null;
                            if (modulesSize == 1) {
                     moduleData = jsonResult.survey.Modules.Module;
                            }
                            else {
                   moduleData =  jsonResult.survey.Modules.Module[modulescnt];
                            }
                            ModuleText = moduleData.ModuleText[0].value;
                            ItemsCount = null;
                            ItemsData = null;
                            ItemsCount = $(moduleData.Items).size();
                            for (itemscnt = 0; itemscnt < ItemsCount; itemscnt++) {
                                if (ItemsCount == 1) {
                                    ItemsData = moduleData.Items;
                                }
                                else {
                                    ItemsData = moduleData.Items[itemscnt];
                                }
                           }}
Now, let’s do the obfuscation.
As discussed earlier, there are many obfuscators, such as JScrambler and Jasob. You must pay for most of these tools. The price varies from $30 to $50 annually. However, we will evaluate it through a trial edition. Let’s use JSOB obfuscator.
- Go to http://www.butterflyfile.com/jasob-javascript-obfuscator.
- Click the Download Now button. This action downloads jsob.exe.
- Install it on your Windows machine. During installation, please use the trial option.
- After installation, start Jasob using the shortcut on the desktop or by browsing through the program files.
- The UI appears as shown in Figure 6-26.

Figure 6-26. Jasob JavaScript Obfuscator
- Select File Open. This action opens a dialog box.
- Using the Open dialog box, browse to sample.js file Select. Click Open.
- Click Analyze Source Files, as shown in Figure 6-27.
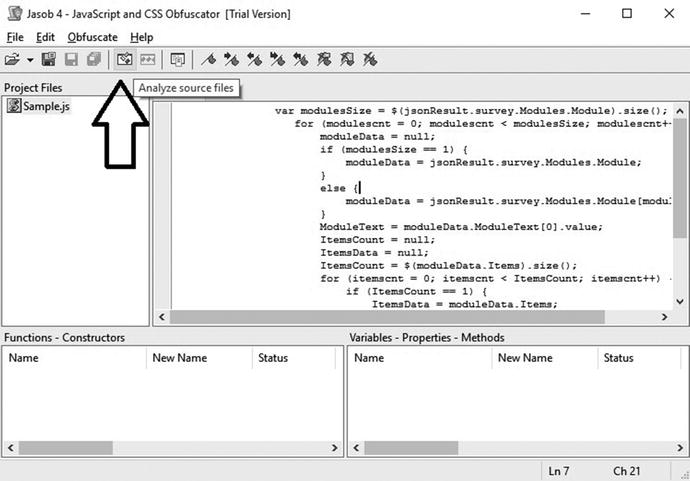
Figure 6-27. Jasob: analyze source file
This analyzes variables, which are lines that can be reduced and further obfuscated. More details can be observed in Figure 6-28. Also note that the Obfuscate Source File button is now activated.

Figure 6-28. Jasob: analyze and obfuscate source file
- Now, click the Obfuscate Source File button.
- This obfuscates the sample.js contents and opens them in the Obfuscated tab (see Figure 6-29).

Figure 6-29. Jasob after obfuscation
After obfuscation, the code looks like this:
Code Snippet: Size of the code on disk = 509 bytes
-----------------------------------------------------------------------
var modulesSize=$(jsonResult.survey.Modules.Module).size();for(modulescnt=0;modulescnt<modulesSize;modulescnt++){moduleData=null;if(modulesSize==1){moduleData=jsonResult.survey.Modules.Module;}else{moduleData=jsonResult.survey.Modules.Module[modulescnt];}ModuleText=moduleData.ModuleText[0].value;ItemsCount=null;ItemsData=null;ItemsCount=$(moduleData.Items).size();for(itemscnt=0;itemscnt<ItemsCount;itemscnt++){if(ItemsCount==1){ItemsData=moduleData.Items;}else{ItemsData=moduleData.Items[itemscnt];}}}
-----------------------------------------------------------------------
   var modulesSize = $(jsonResult.survey.Modules.Modul
If you notice, the size of the code has drastically reduced to 509 bytes from 932 bytes and has no or less readability. So, using minification and obfuscation, we can successfully make JavaScript secure with a lower size. Obfuscation can protect code, but it may not help in the security of data, which comes dynamically from the UI.
How do we securely pass data to and from the server? There are multiple ways:
- HTTPS: Use Secure HTTP for data transfer. With HTTPS, it indirectly becomes the browser’s responsibility to pass data securely. The job of checking a server’s authenticity belongs to the browser. The typical steps followed in HTTPS communication are noted in Figure 6-30.

Figure 6-30. HTTPS communication
- HTTPS is always recommended for critical data transfer.
- Obscure security mechanism (i.e., a complete custom approach like assembling data in a way it won’t be understood easily while passed from and to the server. Customization may need lot of code. However, this approach is not recommended for very critical data.
- Data hashing algorithm like Message Digest Ver.5 (MD5) or Secure Hash Algorithm Ver. 1 (SHA1)
- This is an integrity check algorithm. Data is passed along with the hash code. The other end checks data integrity by applying similar algorithms and then by comparing the old hash against the new hash.
- No direct implementation exists for MD5 or SHA1in JavaScript. However, you can code for the same or evaluate and use helper libraries given by:
> Joseph Myers (http://www.myersdaily.org/joseph/javascript/md5-text.html)
> Paul Johnston
(http://pajhome.org.uk/crypt/md5/)
> Masanao Izumo
(https://gist.github.com/dsc/2970392)
- Token-based approach: Send a time-based token to the client in the initial response and validate the client against some calculations received back.
For credentials (like the username and password, which needs to be passed to server), the usage of a POST request is always advised.
Encode or encrypt? Many people get confused about these terms. The purpose of encoding data is to transform data in such a way that the data-receiving party can understand it. Keep it in mind, encoding never assures security. ASCII, binary, and Unicode are forms of encoding.
Encryption, however, makes data secure.
Summary
This chapter discussed the different ways available to transfer data in a hybrid mobile applications. We also learned the basics of GET and POST request.
The next chapter discusses responsive CSS and related style classes.