![]()
How to Advertise with HMAD
The objectives of this chapter are to
- Understand why to use advertisements
- Learn about earning through advertisements
- Learn the different advertisement frameworks
- Learn how to set up and use AdMob account
- Understand the guidelines
This chapter is interesting because it deals with money-earning techniques. Do you regularly purchase mobile apps from an app store? Many of us are always looking for free apps. Specifically, Android lacks good applications available for free.
What’s in it for a developer or a company that creates free applications? How do they earn money? Is advertisement money sufficient to drive a big company or an individual?
Well, again, we have the consultant’s answer for all questions. It depends. It depends on many factors: How good is your app? How do you market your app? How big is the audience for your app?
Let’s take one crazy example of earning through ads. Have you heard of a game called Flappy Bird (https://en.wikipedia.org/wiki/Flappy_Bird)?
Flappy Bird is a game developed by Vietnam-based developer Dong Nguyen. In this game, the player tries to control a bird flying through rows of bars/pipes. The goal is to help the bird fly through obstacles. This game was developed with advertisements as a source of income. The game gained insane popularity in the iStore. Per Wikipedia, the developer claims to earn $50,000 per day.
The point of this example is that if the work is quality and if the application can reach a maximum audience, then the sky is the limit for earning through ads.
Current Market Trends
If you have knowledge about the Web, specifically HTML and JavaScript, then you can develop hybrid applications targeting well-known platforms.
The current market trend is in Android. Mobiles based on Android are available at a low cost. The advertisement business mostly works in volume. Whether it’s android, iPhone, or Windows—free is always preferred over paid. How do you offer quality work for free? The solution lies in ads!
Currently, even individual software vendors and freelancers prefer to develop applications for well-known platforms—with only a PC, an Internet connection, and an app store account as investments.
Wait, did I mention fees for advertisement providers? No, but most of the well-known ad providers do provide services for free.
Many of us have heard of Google AdSense. Google AdSense APIs are for web sites. AdMob APIs are from Google but for mobiles. There are many advertisement solution providers, including PubMatic, Microsoft pubCenter, Apple iAd, InMobi, and more. Now, which one to choose? You may prefer to choose ad providers that pay more.
People prefer assurance. People prefer ad solutions from companies like Google, Microsoft, and Apple because these are the giants in the market. Business also depends on the number of ad vendors the ad solution provider has. If you use X ad service provider, then few or no ads may be available in a specific geographical region. In such cases, if you stick with single advertisement vendor, then you may not have any business because it directly depends on whether the ad solution provider has ads in a specific region.
Could you engage your app with many solution providers at the same time? How would you do this? You can use an ad mediator. With an ad mediator, you can register multiple advertisement solution providers for a single app. You can then decide the percentage of ads to flow from a particular provider; for example: 50% AdMob, 30% PubMatic, 20% iAd.
A monetize dashboard is available with an ad mediator, in which you can check the business made from various providers on a period basis. Based on the report, you can change the percentages to make more business.
Do you get paid while testing the app? The short answer is No. Ad solutions providers can detect simulation programs, but you do not get payment from advertisements shown while testing the app.
It may make anyone crazy if a genuine click on an ad is considered by ad providers as fake, simulated, or deliberate click. To differentiate between a testing app and a production-level app, ad providers ask developers to place a flag that indicates whether the application is in test mode or in release mode. The flag names differ from provider to provider.
Google AdSense (Google AdMob for Mobiles)
AdMob is one a very popular advertisement provider for mobile applications— native as well as hybrid.
According to Google:
- AdMob has paid over $1 billion to developers since July 2012
- Over 200 billion ads are shown globally per month
- More than 1,000,000 advertisement vendors use AdMob
- More than 650,000 apps use AdMob as their ad solution provider
- Payments are processed in the local currency
Let’s set up a Google AdMob account to get ads for the hybrid application developed in Chapter 4. If you already have an AdSense account, it can be easily linked with AdMob.
Mobile Ad Frameworks: A Quick Comparison
Many advertisement frameworks can be used by mobile applications. Some of these ad frameworks are compared in Table 9-1. Note that the payment information in Table 9-1 is subject to change by the ad provider. Information about banner ads and interstitial ads is covered later in this chapter.
Table 9-1. Ad Frameworks

Using the AdMob Framework
Let’s create an AdMob id and learn how to include ads in our mobile application. We will also deploy this app on mobile and test it. AdMob was chosen because it is easy to set up. You may evaluate other frameworks and use any of them.
The following are the important steps to note in this procedure:
- App registration
- Injecting an ad plug-in
- Including advertisements in the application
- Testing
- Deployment
To create an AdMob ID, do the following:
- Visit the AdMob web site at https://apps.admob.com.
- You may be asked to log in with Google credentials or you may be redirected to another URL if already logged in.
- A signup page appears, as shown in Figure 9-1, at https://apps.admob.com/admob/signup.

Figure 9-1. Create AdMob account
- The signup screen asks whether to continue with the logged in account or any other account.
- Click Yes. Use [email protected], as highlighted in Figure 9-1.
- Next, AdMob asks you to complete profile information to create a Google AdSense account.
- Complete the information as an individual or business account—whichever is appropriate. I did it as shown in Figure 9-2.

Figure 9-2. AdMob new user registration process
- Click Continue.
- If the account that you logged in with is associated with Google AdWords, then nothing new; otherwise, you have to provide information (like what’s shown in Figure 9-3) to create an AdWords account.
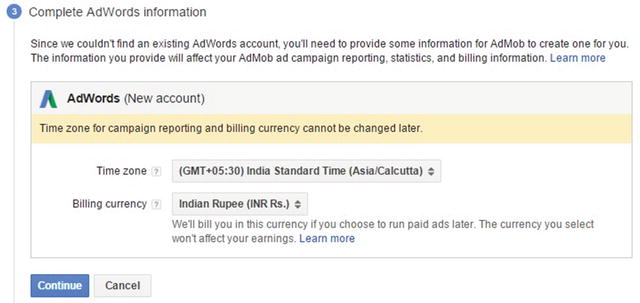
Figure 9-3. AdMob time and currency configuration
- Click Continue.
- Next, you have to go through AdMob program and policies. After accepting AdMob’s program policies, click the Create AdMob account (see Figure 9-4).

Figure 9-4. AdMob account creation final Step
- Click Get Started, as shown in Figure 9-5.
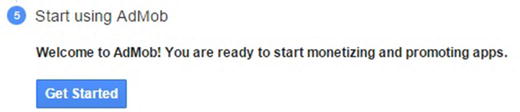
Figure 9-5. AdMob: Getting Started
- You arrive at the home page at https://apps.admob.com/#home. Note that there is a publisher id for the account (see Figure 9-6).

Figure 9-6. AdMob profile home page
- Look for the Monetize tab, highlighted in Figure 9-6.
- Click the Monetize tab. You see an application to use AdMob’s advertisements. You can use the search option if the application is already registered with Google Play, iTunes, or the App Store.
- The test application that we created in Chapter 4 doesn’t fit the criteria. So we can use the “Add your app manually” option, highlighted in Figure 9-7.

Figure 9-7. AdMob: Monetize app
Suggestion: Use the same name for the app that is in the properties panel of Telerik AppBuilder. The application identifier in the properties is also preferred.
Note the following highlighted parts.
- Publisher ID
- Monetize tab
- Add you app manually
- The app name copied from the AppBuilder project (double click the Properties icon inside the Apress Project under Solution Explorer), as shown in Figure 9-8.

Figure 9-8. Adding AdMob plug-in for mobile application
- Now, switch context back to AdMob. After all the information is completed, click Add app.
This action brings up a very interesting screen. Now, you have to choose the ad formats. The two well-known formats are banner and interstitial.
Banners are small ads that are shown at the bottom or the top of the screen (see Figure 9-9).

Figure 9-9. Banner ad
In the same window, you can configure whether to allow only text-based ads or images, as shown in Figure 9-10.

Figure 9-10. AdMob: Configure banner ad
The refresh rate conveys whether to automatically refresh after a certain interval or to not refresh at all. The “Text ad style” option can be customized. You can also choose the color and text displayed in the ad.
Provide an “Ad unit name” as shown in Figure 9-10, because it may help later when there are a greater number of ads configured.
Interstitial ads are shown on a full screen. You can have a choice for ad size and style. You can make a choice which kind of ads should be supported: text, images, or videos.
Offer a value in the “Ad unit name” text box. I entered Apress Test Banner. The final configuration is shown in Figure 9-11.

Figure 9-11. AdMob: Final configuration
Note that, you can set up many ads this way. Notice the highlighted “Ad unit id” in Figure 9-11, which is the unique identifier. It is used while displaying ads in a hybrid application. For native SDK, there are instructions options that you can receive by email (see Figure 9-11).
This takes us to the final window, where all ad units are shown together in Figure 9-12.

Figure 9-12. AdMob dashboard
Make a note of ad unit id, which you’ll use to link ads to the app. Meanwhile, after AdWords registration, you receive an e-mail from Google, informing that your account is set up. It also informs you when payment information has changed (see Figure 9-13).

Figure 9-13. AdMob confirmation e-mail
You can follow the steps given in the e-mail and complete the information. Keep in mind that account payments are covered in the AdMob’s terms and conditions. This is discussed later.
Now let’s integrate ads with the project created in Chapter 4.
- Open https://platform.telerik.com. Open Apress Project. The project structure is shown in Figure 9-14.
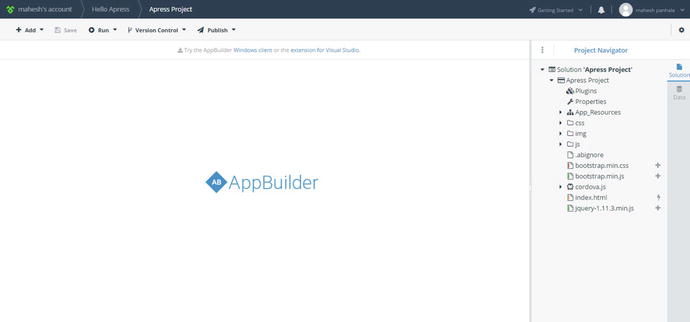
Figure 9-14. AppBuilder project structure
- Double-click Properties
 Plug-ins Install Plugins from Marketplace, as shown in Figure 9-15. (If you don’t recall the plug-ins, I recommend reading Chapter 5.)
Figure 9-15. AppBuilder plug-in addition
- In the dialog box, find the AdMob plug-in and click Install (see Figure 9-16).

Figure 9-16. AdMob plug-in installation
- After installation, the plug-in is shown in parent windows (see Figure 9-17).

Figure 9-17. AdMob plug-in installation confirmed
- Go to Project Explorer and find a default file named index.js inside the js folder. Open the file (see Figure 9-18).

Figure 9-18. AppBuilder project structure
This is the file with the publisher and ad ids generated earlier. There is default code inside this file. Replace the code inside the OnDeviceReady function, as described in Figure 9-19.

Figure 9-19. Integrating AdMob-specific code
The highlighted code in Figure 9-19 has very important job to do. It mentions the publisher and ad combined value. Before that, we just ensured in the if loop that the plug-in used for advertisements is available and loaded in memory.
bannerAtTop: true denotes that the banner ad will be displayed at the upper side of the screen.
isTesting: true conveys to AdMob that ads need to be shown for testing of the application. AdMob then keeps sending test ads to the application.
- Navigate back to Project Explorer to open index.html (see Figure 9-20).

Figure 9-20. AppBuilder Project Explorer
- Open the index.html file for small modifications, such as the addition of code lines. The code lines mentioned and highlighted in Figure 9-21 make sure that Cordova and any plug-ins are loaded. The App.Initiate() line is responsible for loading of Cordova.js and plug-ins.

Figure 9-21. Project reference to Cordova file
- Save the contents.
- Now, that almost everything is ready, click Run Build (see Figure 9-22).

Figure 9-22. Building project
- On the next pop-up screen, select Android, and click Next (see Figure 9-23).

Figure 9-23. Build process continued
Make sure you compile the code in Debug mode because this is a trial account! Afterward, AppBuilder compiles the application and makes it available for download (see Figure 9-24).
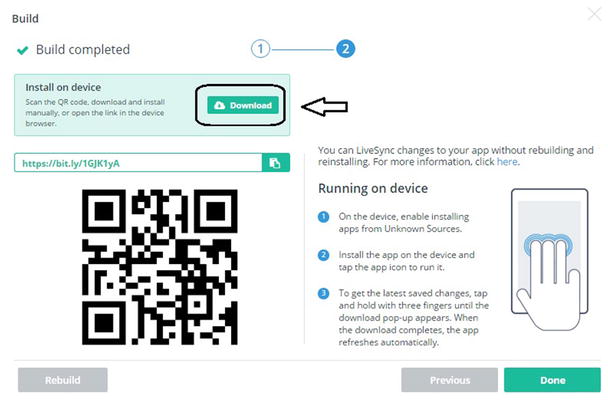
Figure 9-24. Build completed
Now, download the Android-based APK file and install it. I have installed it on a Samsung Note 2 Android tablet. Being from unknown source, you may get a warning, but if allowed, everything goes smoothly.
The following are the installation steps.
- Installation starts with a warning (see Figure 9-25).

Figure 9-25. App installation
- Installation continues after manually, allowing installation permission (see Figure 9-26).

Figure 9-26. App installation continued
Figure 9-27 shows the installation in progress.

Figure 9-27. App installation continued
Figure 9-28 shows the installation completed.

Figure 9-28. App installation complete
- Click Done.
- Start the application. The Telerik logo is displayed because we are using the trial edition (see Figure 9-29). In the final version, it can be removed by navigating to Project Explorer.

Figure 9-29. App started
Finally, the application with the test banner appears on the screen, as seen in Figure 9-30.

Figure 9-30. App running with advertisement
Isn’t it easy to show ads? These ads are all for testing, which means you won’t get paid by clicking these ads. Why? Remember that I mentioned isTesting: true in the index.js file earlier. For the final deployable version, make sure that isTesting is set to false. You can track earning from ads in the Monetize tab in the AdMob dashboard, as shown in Figure 9-31.

Figure 9-31. AdMob dashboard
You can also easily select ads through meditation as an AdMob option. Payments are made directly as per the terms mentioned when setting up an account. More information about payment criteria and terms are available at https://support.google.com/admob/checklist/2998383.
Let’s make a note of the do’s and don’ts while using ads in a project.
Don’t
- Don’t deploy an application on the test device with IsTesting false. When detected, an ad provider may block the account!
- Don’t put ads in a location where it is banned! Respect each app provider’s policies. For example, in Android, showing interstitial ads while the app is closing is against the ad policy. The solution is to try to place the ad between the navigation or as a banner ad.
Do
- Use an ad mediator, if possible.
- Pay close attention to deploying ads using iAd. iAd’s policies are little complex compared to other providers.
Summary
This chapter covered how to integrate an ad framework into a hybrid application. You learned the basic differences between the various ad frameworks available in market.
The next chapter discusses working with third-party APIs.