![]()
Deploying and Scheduling Packages
Any DTS (Data Translation Specification) package that you want to automate and any process that integrates with MSMQ (Microsoft Message Queuing) must be deployed via the Scribe Console. Processes are deployed either into individual collaborations or directly into the Integration Server. Once deployed, they can be managed, modified, and monitored (Chapter 8 covers monitoring). This chapter outlines the tools and functionality necessary to deploy, schedule, and maintain your processes.
When you have a DTS package that is fully tested in the Workbench and is ready to be scheduled and automated, you must deploy it to a specific collaboration within the Scribe Console. A collaboration is a logical grouping of processes and allows for organization similar to a file management application like Windows Explorer.
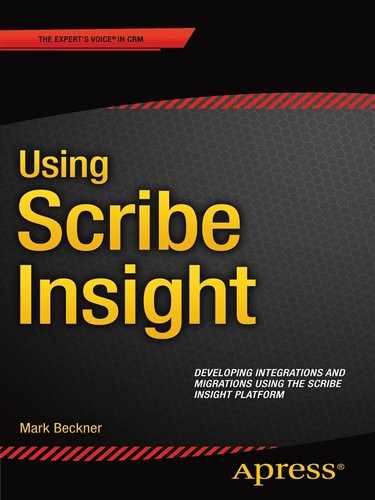
Scribe creates a single collaboration which is called Default. You can (and should) create additional collaborations in order to group and manage your processes. In order to create a collaboration, you can right-click the Collaborations folder in the Console and select New Collaboration. The New Collaboration Wizard will open. This wizard consists of two screens. The first is a splash page introducing the wizard. You can click the Next button to pass this. The second is where you create the collaboration. You can set the properties shown in Figure 5-1. Once you have completed this, click Finish and your collaboration will appear in the Console.
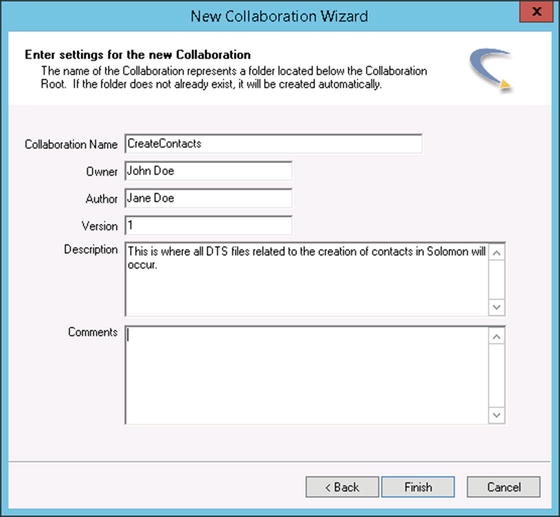
Figure 5-1. Setting the properties for a collaboration
Typically, your collaborations should be grouped by functionality. For example, if you have a DTS process that consists of several linked DTS files (see Chapter 4 for more details on linking) that move contacts from one system to another, you could create a collaboration called “CreateContacts.” If you had several processes that created contacts, you might want to keep each of these separate from one another and create several collaborations: “CreateContactsFromERP,” “CreateContactsFromSQL,” and so on. By keeping things separated, you can more easily manage your deployed solutions.
![]() Note A collaboration looks for all of its DTS files in a directory by the same name as the collaboration. This directory can be found in the C:UsersPublicPublic DocumentsScribeCollaborations folder, as shown in Figure 5-2.
Note A collaboration looks for all of its DTS files in a directory by the same name as the collaboration. This directory can be found in the C:UsersPublicPublic DocumentsScribeCollaborations folder, as shown in Figure 5-2.

Figure 5-2. A unique folder for each collaboration
Deploying and Scheduling a DTS Package
When you have a DTS package that has been fully tested and developed, you can deploy it to the Console. Once in the Console, it can be configured to trigger on a timed basis, via a queue, or via several other options. Starting with a DTS file, you can take the following steps to perform a deployment:
- Click the Integration Processes folder under the collaboration within which you want to deploy your DTS file. This demonstration will use a custom collaboration called CreateContact.
- Click Add on the toolbar header. The configuration for Step 1 will appear, as shown in Figure 5-3.
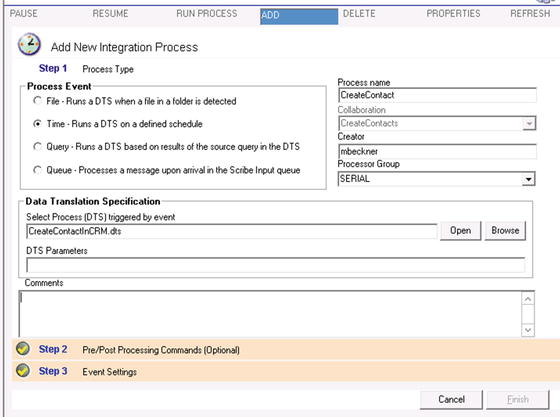
Figure 5-3. The first step of deployment
- Click the Browse button and select the DTS you want. The DTS must be in the folder that corresponds with your collaboration, as shown in Figure 5-2.
 Note If you get a permissions error when trying to add a DTS, you will need to click the Security option under the Administration folder. On the pane that opens in the right side of the window, click the File Management tab. Click the option called Provide access to ALL folders on this server, or use the user interface to give specific access to specific folders.
 - Set Process Type to Time (as shown in Figure 5-3 above). This will allow the DTS to be configured to run on a defined schedule.
Note You can also trigger off of a file dropping in a folder, a query executing, or a message arriving on the queue. For processes that trigger off of a queue, see the section “Deploying a DTS That Subscribes to the Queue,” and also Chapter 6’s discussion on queues.
- Click Step 2. Here you can define any scripts that need to run before or after the job running. You can also pass in parameters to the DTS.
Note Scripts that are referenced in the configuration section of Step 2 of the deployment can be batch files, VBScript, or a variety of other scripting language (the current list includes .vbs, .vbe, .js, .jse, .wsf, .wsh, .com, .bat). Parameters that are passed into the DTS are similar to command-line parameters (see Scribe documentation for a full list).
- Click Step 3: this is where the scheduling will occur for a time-based process. As shown in Figure 5-4, the frequency and the start time are available for configuration. The DTS can be run once at a specific date and time, or on a recurring basis. Set the DTS to run one time only for purposes of this walk-through.
Figure 5-4. Scheduling the timed DTS
- Click Step 4. Often it is helpful to set the DTS Status property to Paused so that you have time to configure other processes related to it before it executes. For now, set this to Paused, as shown in Figure 5-5.
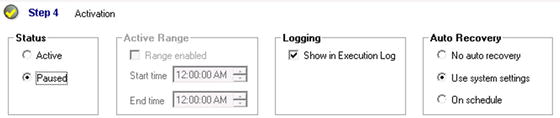
Figure 5-5. Setting the initial status of the DTS
- Click Step 5. Alerting can be set up here. For now, leave the default settings. See Chapter 8 for a brief discussion on setting up alerts and monitors.
- Click Finish.
Your DTS package is now deployed. You can see its status in the main view of the Integration Processes folder under the CreateContacts collaboration. It will be in a status of Paused. You can manually start the process or run the process to kick it off. See the section “Process Management” for information on how to do this.
You have the ability to pause, resume, manually run, and delete deployed DTS processes. You can work with processes individually, or you can manage them at the integration process or collaboration level. This section outlines the options available to manage your processes at various levels within the Console.
Pausing and Resuming Processes
If you want to pause or resume a process, you can do this via several methods. One option is to right-click the individual process and select the option you want from the context menu. Another option is to use the buttons in the management view window, as shown in Figure 5-6.
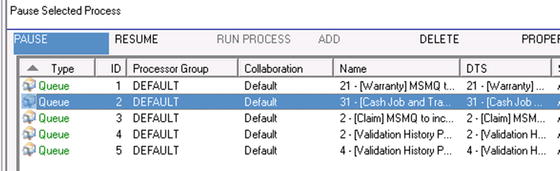
Figure 5-6. Using the Pause button to pause an individual process
![]() Note When processing large numbers of items in a solution that uses MSMQ, you may see that system resources are being consumed and timeouts are occurring. You can use the pause functionality strategically to manage resources. For example, assume that you have a first DTS that pulls from SQL and publishes to a queue. A second DTS picks up items from the queue and pushes them to a target system. You are dealing with over a million records. You can run the first DTS and let it push ~100K records to the queue, and then pause it to allow the second DTS to work through the records on the queue. By pausing the process, you will free up system resources.
Note When processing large numbers of items in a solution that uses MSMQ, you may see that system resources are being consumed and timeouts are occurring. You can use the pause functionality strategically to manage resources. For example, assume that you have a first DTS that pulls from SQL and publishes to a queue. A second DTS picks up items from the queue and pushes them to a target system. You are dealing with over a million records. You can run the first DTS and let it push ~100K records to the queue, and then pause it to allow the second DTS to work through the records on the queue. By pausing the process, you will free up system resources.
In addition to pausing and resuming processes at the individual DTS process level, you can also pause/resume all processes within a specific integration process or collaboration. Figure 5-7 shows the context menu available in the Integration Processes folder within a collaboration, while Figure 5-8 shows how you can pause or resume an entire collaboration.
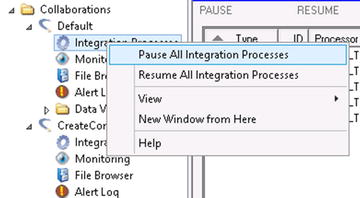
Figure 5-7. Pausing/resuming all processes

Figure 5-8. Pausing/resuming a collaboration
![]() Note Pausing the collaboration will pause all processes, not just integration processes. It will also pause monitors and other components that may be set up within a collaboration.
Note Pausing the collaboration will pause all processes, not just integration processes. It will also pause monitors and other components that may be set up within a collaboration.
Manually Running a Process
Running a process manually allows you to force a process to run without having to wait for the configured time to pass or another trigger to occur. You can force a process to run by right-clicking it in the Integration Processes view and selecting Run Process, as shown in Figure 5-9. Other options are also available from this context menu.
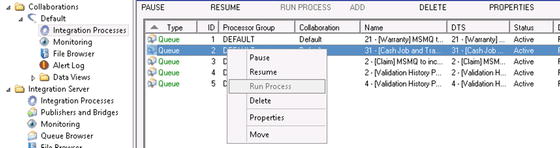
Figure 5-9. The context menu on individual processes
![]() Note When you run a process manually using the Run Process option, it may not start immediately. Sometimes the process will kick off instantly; other times it can take several minutes for the action to take place. Monitor the value in the Status column of the integration to see what is taking place. You can click Refresh to watch for when it moves to an Active state, indicating that the processes have been started.
Note When you run a process manually using the Run Process option, it may not start immediately. Sometimes the process will kick off instantly; other times it can take several minutes for the action to take place. Monitor the value in the Status column of the integration to see what is taking place. You can click Refresh to watch for when it moves to an Active state, indicating that the processes have been started.
Deleting a Process
You can delete an integration process that has been deployed either by right-clicking it and selecting Delete or by using the DELETE button on the toolbar. Using either option will prompt you before the deletion occurs, as shown in Figure 5-10.
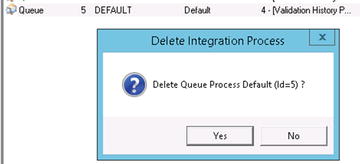
Figure 5-10. Deleting a process will prompt prior to taking place
![]() Note Occasionally, when you have set up and configured a DTS to run as an integration process within a collaboration, the process will not run as expected. Even when checking that everything is set up the way you would expect, it will not process properly. When something like this occurs, delete the process and start over by creating it again.
Note Occasionally, when you have set up and configured a DTS to run as an integration process within a collaboration, the process will not run as expected. Even when checking that everything is set up the way you would expect, it will not process properly. When something like this occurs, delete the process and start over by creating it again.
In addition to handling processes at the individual process level, the integration process, and the collaboration level, you can also pause the entire set of Scribe services and running artifacts. This can be done by setting a sleep period, which defines a window of time on a daily basis during which all Scribe processes will be paused (and which will resume after the period has passed).
You can set the sleep period by clicking Site Settings underneath the Administration folder in the Scribe Console. In the pane that opens, click the Sleep Period tab. Click the Enable sleep range option in order to set the start and end time, as shown in Figure 5-11. Click the SAVE button on the toolbar when complete.
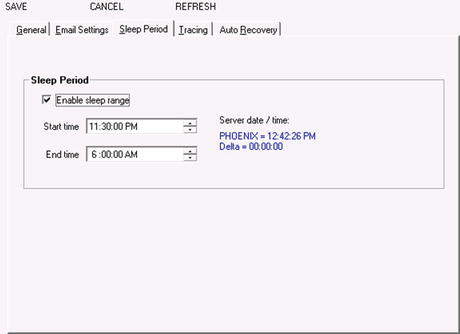
Figure 5-11. Setting the sleep period in Site Settings
![]() Note Processes that are running will continue to run, even if the sleep period has been entered. These processes will pause once they have completed. If you have long-running processes that you do not want to run during the sleep period, make sure to extend your sleep period. For example, if you have a process that takes 15 minutes to run, and you want all processes paused at midnight, set your sleep period to start at 11:30 (30 minutes early). This will give your 15-minute process plenty of time to complete prior to the sleep period.
Note Processes that are running will continue to run, even if the sleep period has been entered. These processes will pause once they have completed. If you have long-running processes that you do not want to run during the sleep period, make sure to extend your sleep period. For example, if you have a process that takes 15 minutes to run, and you want all processes paused at midnight, set your sleep period to start at 11:30 (30 minutes early). This will give your 15-minute process plenty of time to complete prior to the sleep period.
Deploying a DTS That Subscribes to the Queue
You have seen how a DTS can be set up to be deployed as a timed process. DTS files can also be deployed to subscribe to XML messages that arrive on the MSMQ (see Chapters 6 and 7 for detailed information about developing queue-based solutions). The steps are similar to those outlined earlier in this chapter for a time-based process, but they differ in several ways.
![]() Note Please review the sections on queues in Chapters 6 and 7. We discuss concepts in this section that are discussed in more detail in those chapters.
Note Please review the sections on queues in Chapters 6 and 7. We discuss concepts in this section that are discussed in more detail in those chapters.
In Step 1 of the deployment configuration, select a Process Event type of Queue, as shown in Figure 5-12.
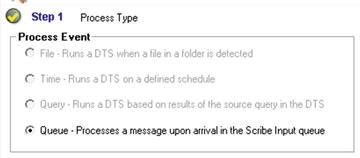
Figure 5-12. A Process Event type of Queue is specified
With Queue selected as the Process Event type, Step 3 will now have a different set of configurable settings. Compare the settings in Figure 5-13 with those in Step 3 for the time process, shown in Figure 5-4.
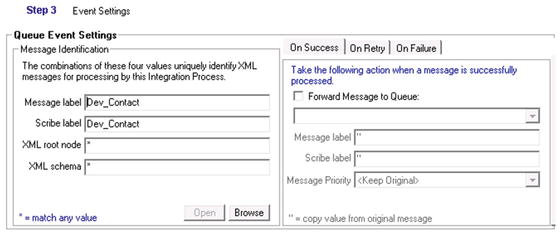
Figure 5-13. The Queue subscription properties
In the queued version, you must specify the filter to determine which messages in the queue will be subscribed to by the DTS that is being deployed. In order to do this, set the Message label and Scribe label properties equal to the values that are in the XML messages (see Chapters 6 and 7 for detailed information about XML and queues) that you want to subscribe to in the queue. In the message shown in Figure 5-14, the ScribeLabel and MessageLabel attributes are set to “Dev_Contact,” so this is the value that you would put in both properties of Step 3.
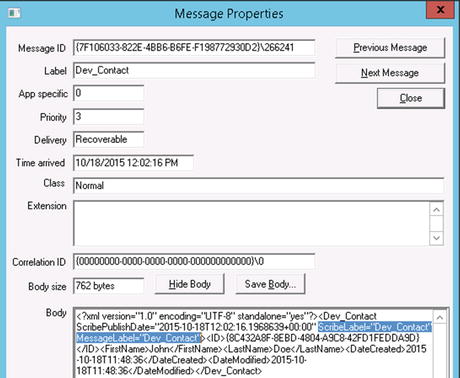
Figure 5-14. The label attributes in the published XML
![]() Note You can set the properties to a wildcard value of *. If all the Message Identification properties are set to *, no filtering will take place, and all messages that arrive in the queue will be processed by the DTS that is being configured.
Note You can set the properties to a wildcard value of *. If all the Message Identification properties are set to *, no filtering will take place, and all messages that arrive in the queue will be processed by the DTS that is being configured.
The ScribeLabel and MessageLabel (as well as several others) are default values that are created whenever you are generating an XDR/schema from Scribe. The schema is then set as the target or source in the DTS, and the fields can be mapped to or from. See Chapter 6 for more information on generating XDRs.
Deploying a Set of Linked DTS Files
When you have two or more DTS files that are linked together (see more about linking in Chapter 4), only the first DTS in the series needs to be deployed to the Console and configured to run. However, all the files need to be placed in the file folder that corresponds to the collaboration where the first file was deployed.
Take the scenario where you have three linked DTS files. The first file is deployed as a timed integration process in the Console to a collaboration called CreateContact, as shown in Figure 5-15. The second and third files are not deployed but are copied to the CreateContact file directory, as shown in Figure 5-16.

Figure 5-15. The first DTS in a linked series is deployed to the Console

Figure 5-16. The remaining DTS linked files are placed in the same directory
![]() Note When naming DTS files that are linked together, it can be helpful to identify the order in which they execute. For example, if you have three files, the first could be prefixed with “Step 1,” the second with “Step 2,” and the third with “Step 3.” Being able to quickly look at the names to understand the order will be helpful in development and deployment.
Note When naming DTS files that are linked together, it can be helpful to identify the order in which they execute. For example, if you have three files, the first could be prefixed with “Step 1,” the second with “Step 2,” and the third with “Step 3.” Being able to quickly look at the names to understand the order will be helpful in development and deployment.
Conclusion
The automation of DTS packages is necessary for virtually any integration scenario. When dealing with migrations and one-time loads of data, running mappings and loads directly through the Scribe Workbench may be adequate, but for scheduling processes, large data sets, and multithreaded integrations, the Scribe Console and Integration Server are required. The ability to deploy DTS packages, set schedules, subscribe to items in the queue, and manage processes within the Console are all critical to your success when working with Scribe Insight.