
This chapter covers what a connection pooler is and how it helps database connections. We include installation and configuration of external connection poolers like pgBouncer on each cloud vendor, as well as external connection poolers like DBCP on all cloud venders. Apart from learning about the external tools, you’ll learn how to set up connection poolers at the application level.
Connection Pooling
To get started with connection pooling, you learn how connections are handled in PostgreSQL. When an application or an application server (aka, a client) sends a request to PostgreSQL database for a connection, the postmaster listens to it first.
It is similar to a listener for Oracle. The postmaster listens to the connection and forks another backend process for it. The client connection now has a process in the operating system.
What Is Forking ?
Forking is the process of creating a child process that looks identical to the parent process that created it. This child process is also called a fork. Both the parent and the child process have the same code segment, but with a different address space. The child process has a different process ID. In a multiprogramming operating system, semaphores are used to control access to a common resource. The same semaphores as parent processes will be open in child process.
An example of forking in Linux
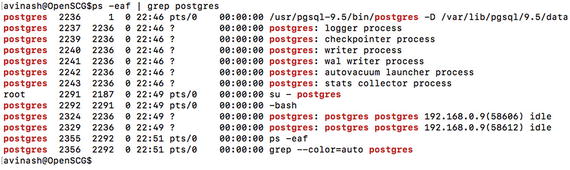
In Figure 11-1, note that the process ID of the parent postgres process is 2236.
Child processes created for the client connections
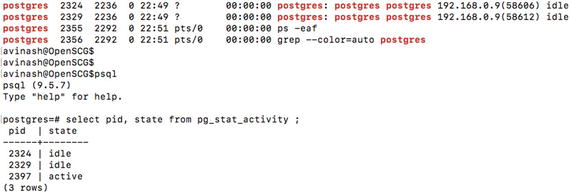
Every child process created for the client connections can be observed in pg_stat_activity, as shown in Figure 11-2.
Understanding Why Process Creation Is Costly
Several system resources are involved in creating a process in the operating system. Likewise, once a client connection is closed or terminated, it involves several system resources in closing a child process. Consider a critical production database server that takes over 1000 transactions per second. For every client request, a process needs to be opened and closed by the server. Creating or forking a process for every client connection in such a production database system is very costly and time consuming . More time is consumed while creating address space, file descriptors the same as parent processes, and semaphores for the child process.
What Is Connection Pooling and How Can It Help?
Connection pooling is a mechanism that uses a cache of connections that are maintained on the database server. This helps applications reuse the already established connections on a database.
Reusing the already existing connections avoids the time consumption involved in starting and stopping processes for every client request. Applications either use a built-in connecting pooling mechanism or external connection poolers . These connections poolers establish a pool of connections to the database and keep them persistent until a timeout. Applications can configure the minimum number of connections that always exist in the pool and the maximum number of connections that a pool of connections can reach up to. A connection pooler provides better performance between an application and a database when compared to an application without an connection pooler.
PgBouncer
PgBouncer is an open source, lightweight connection pooler that is designed and built for PostgreSQL databases. Applications that do not support native connection pooling can implement pgBouncer-like external connection poolers to achieve better performance results. Just as with the definition of connection pooling, pgBouncer establishes a pool of connections upon client requests, having all the established connections placed back into the pool when the client disconnects. This pool of connections can be reused by further client requests.
PgBouncer can understand the startup parameters on the PostgreSQL database. It also detects changes to the startup parameters and ensure that the parameters remain consistent for clients. The startup parameters include timezone, datestyle, client_encoding, application_name, and standard_conforming_strings.
Session pooling
Transaction pooling
Statement pooling
Let’s begin by understanding what mode you should use while using pgBouncer.
Session Pooling
This is one of the most widely used modes, as it is a polite method. When a client connects, a server connection is created on the DB server and it is assigned to the client connection. That server connection or child process stays with the client for the entire duration until the client disconnects. This mode supports all PostgreSQL features.
Transaction Pooling
We have seen PgBouncer performing better with transaction pooling. In Transaction pooling, a server connection is assigned to the client only during a transaction. If the transaction is over, the server connection will be placed back into the pool. Unlike session mode, transaction mode does not let a client connection stay until the client is disconnected. A server connection will be assigned for every transaction and taken back once it is over.
There are a few features that could break if the application does not cooperate. For example, transaction mode does not support prepared statements. Prepared statements reuse the execution plan and the cache of the first SQL. In this mode, the client connection is disconnected once the first transaction is over. The next SQLs cannot take the advantage of an SQL being prepared. If your application logic does not support all of its logic to be completed within a single transaction but depends on the entire session that got established, transaction pooling is not a good choice. You should instead look for session pooling .
Statement Pooling
Statement pooling is the most aggressive. It does not support transactions with multiple statements. For every statement, a server connection is assigned and the connection is placed back into pool when the statement is finished. This is mainly used for auto-commit of every statement of the client. If you are using transactions with multiple SQLs or sessions with multiple transactions, this pool may not be the right choice for you.
When Should You Think About a PgBouncer?
PostgreSQL is observed to have scaling issues with connections if the native application pooler is not configured properly or if there is no application pooler. There is a general rule that PostgreSQL scales up to 350 transactions per second without any connection pooler and the performance is optimal. This number may be higher or lower depending on your application logic, server configuration, and other reasons. There is no such hard limit as to when you should implement a connection pooler. However, with increasing demand of connection traffic from an application, we must think about introducing the correct connection pooler. This is because every connection established directly is a process fork with a resident memory of up to 10 MB or more. If you have 1000 connections, you should be able to save around 9 to 10GB of RAM.
Most of the production database environments deal with several tens of application servers. Each individual application server may have either built-in connection poolers or external connection poolers. Consider an example where 20 app servers establish over 10 connections every second to the database on an average. You may need to have a connection pooler on every app that establishes a minimum of 10 connections to the database, which can go up to 20 or 30 assuming the highest transaction peak. If you observe that the active connections on the database at any given time are not more than 50, this is because not all app servers are expected to get the same load. You may still need to have several idle connections opened on the database. There is a cost to maintaining those idle connections.
We have observed several situations in real-time scenarios where the application pooler fails to terminate the maximum pool of connections established during a huge peak due to the timeout settings. There are also situations where the process memory area created by the previous statement is held in memory but not released. This is mostly useful in prepared transactions or prepared statements. The prepared transactions require the SQL to be pre-cached so that further SQLs reuse the cached buffers. This has been observed to be a pain point. If the memory used by the previous transaction is not released, you would always see a lot of memory being used even when you have 3 to 10 active connections on the database. There could be some settings on the application pooler that allow you to reset the cache created by the transaction upon its disconnect. This is configurable with a few poolers and may not be configurable across the board. PgBouncer allows you to have parameters in place that take care of resetting the memory used by the previous SQLs.
One of the most difficult tasks with connection poolers on application servers is high availability. When a master or primary database is down, you need to promote its slave to the master and ensure that all the app servers connect to the newly promoted master. This involves modification of the connection strings on all application servers with great downtime.
If your application servers connect to a pgBouncer, it just involves modification of one connection string. That redirects all connections to the newly promoted master. We discuss the steps involved in setting up a high availability cluster using pgBouncer that also serves the purpose of connection pooler in this chapter.
Installing PgBouncer
If you have very few application servers, you may want to build pgBouncer on all of them. However, in an environment that has several tens of application servers, you may need to build pgBouncer externally and have all the application servers connect to it. See the following instructions on how to install and configure pgBouncer in a Linux environment .
- 1.
Have the latest pgdg repo installed on your virtual machine. Pgdg repo contains a list of Postgres software being used by users in their production environments. You have to install the pgdg repo that suits your operating system and the PostgreSQL database version.
Say that you need PostgreSQL 9.6 on CentOS 7.3 OS. In that case, you would use the following link and click on the PostgreSQL version that suits your needs.
Figure 11-3 should help you understand how you can choose the pgdg repo that has all the software that’s built and tested for the PostgreSQL version you choose.
Let’s assume that you need PostgreSQL 9.6. Click on it to proceed.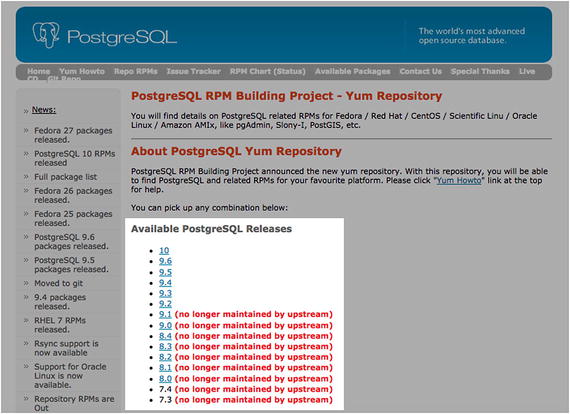 Figure 11-3
Click on PostgreSQL 9.6 to proceed
- 2.Now you get an option to choose the operating system on which you want PostgreSQL or its tools to be installed (see Figure 11-4). Select the OS on which you need to install pgBouncer (same as with the PostgreSQL database OS).
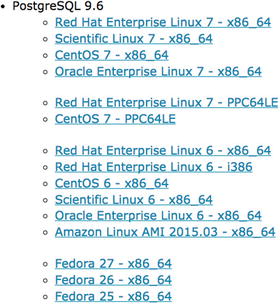 Figure 11-4
Choose the operating system to install PostgreSQL
- 3.
Now you can either click on the OS version that suits you or copy the link. If you click on it, it will download the rpm for you. Instead, right-click on CentOS 7 - x86_64 and choose Copy Link Address. This link can be directly used in the pgBouncer server .
This is how the link appears when you copy it for CentOS 7:
- 4.
Get the pgBouncer ready with a hard disk of at least 30GB. As we do not want to store several days or years of pgBouncer logs, we may need very small storage. pgBouncer is a single process. Thus, you may not need a very huge server configuration to set it up. A server configuration with 8GB RAM and four CPUs may be good for a database that takes over 1000 to 2000 or more transactions per second .
- 5.
As a root user, install the pgdg repo rpm on the pgBouncer server.
Here is the command to install it. As you can see in the command, we can directly use the link to download the pgdg repo rpm and yum will download and install it automatically.
# yum install https://download.postgresql.org/pub/repos/yum/9.6/redhat/rhel-7-x86_64/pgdg-centos96-9.6-3.noarch.rpm
You may press Y when asked for confirmation to install the pgdg repo. Once it’s installed, you should be able to see a new repo file created in the /etc/yum.repos.d directory. See Figure 11-5.
[root@localhost yum.repos.d]# ls -alrth | head -4total 44K-rw-r--r--. 1 root root 1012 Sep 20 2016 pgdg-96-centos.repo-rw-r--r--. 1 root root 2.9K Nov 29 2016 CentOS-Vault.repo-rw-r--r--. 1 root root 1.3K Nov 29 2016 CentOS-Sources.repo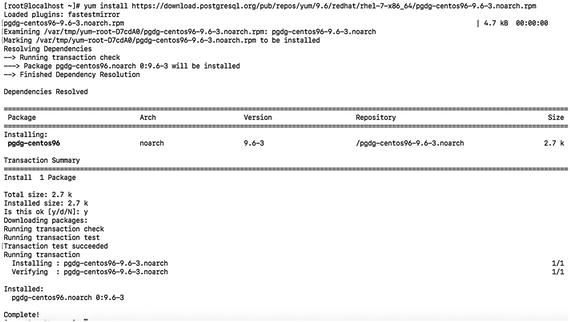 Figure 11-5
The new repo file created in the /etc/yum.repos.d directory
- 6.
Now search for the pgBouncer software and install it. These commands help you list the package named pgbouncer and install it. See Figure 11-6.
# yum list pgbouncer# yum install pgbouncer -y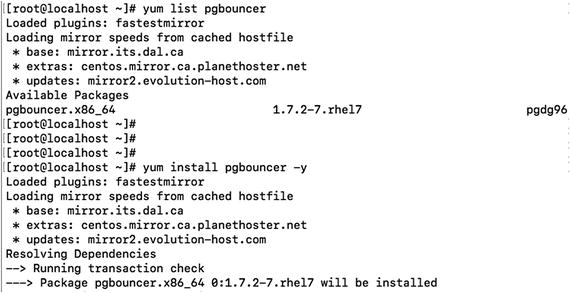 Figure 11-6
Finding and installing the pgBouncer software
- 7.
If you observe Figure 11-7 closely, you can see that a user by the name pgbouncer has been automatically created for pgbouncer.
Verify that pgBouncer is installed. The following command verifies the version of pgBouncer installed.
# su - pgbouncer$ pgbouncer --version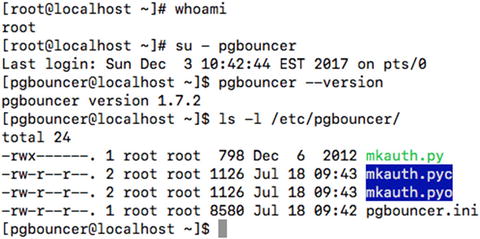 Figure 11-7
The user pgbouncer has been automatically created for pgbouncer
All the configuration files of pgBouncer are located by default in the /etc/pgbouncer directory.
- 8.
Create all the required directories needed by pgBouncer, if they don’t already exist. Here are the directories needed to log pgBouncer error logs and messages and the directories to create the socket files or lock files of pgBouncer:
mkdir -p /var/log/pgbouncer/mkdir -p /var/run/pgbouncer/chown -R pgbouncer:pgbouncer /etc/pgbouncer/chown -R pgbouncer:pgbouncer /var/log/pgbouncer/chown -R pgbouncer:pgbouncer /var/run/pgbouncer/ - 9.
Change the configuration file to let your application connect through pgBouncer to master or slave PostgreSQL servers. The following example pgBouncer file should help you build a better pgBouncer setup the first time. However, you may still need to make modifications depending on your application requirements.
$ cat /etc/pgbouncer/pgbouncer.ini[databases]master = host=MasterServerIP port=5432 dbname=testingslave = host=SlaveServerIP port=5432 dbname=testinglisten_addresses = *[pgbouncer]logfile = /var/log/pgbouncer/pgbouncer.logpidfile = /var/run/pgbouncer/pgbouncer.pidlisten_addr = *listen_port = 6432auth_type = md5auth_file = /etc/pgbouncer/cfg/pg_authadmin_users = postgresstats_users = postgrespool_mode = sessionserver_reset_query = DISCARD ALLignore_startup_parameters = extra_float_digitsserver_check_query = select 1max_client_conn = 200default_pool_size = 10log_connections = 1log_disconnections = 1log_pooler_errors = 1server_lifetime = 600server_idle_timeout = 60autodb_idle_timeout = 3600Let’s try to understand all these parameters to understand and build it better .
Under the [databases] section, you need to give the alias names to your master and slave DB servers. I refer to my master DB server as master and the slave DB Server as slave. You can give an alias of my choice that helps you identify the name and determine if it is a master or a slave.listen_addresses: Same as with PostgreSQL, you see a parameter that allows you to let only a fixed range of IPs or all IPs connect through pgBouncer to your DB Server. However, this does not bypass the pg_hba.conf file on your DB server. Restricting IPs through this setting may allow you to avoid pgBouncer, by allocating a connection from the pool for an IP that is not allowed to connect a master or slave DB server.
listen_port: This is the port on which your pgBouncer should listen for connections. The default port of pgBouncer is 6432. You can always modify it and choose a port that is not being used by any other service on the pgBouncer server.
logfile: You pass the log file name where pgBouncer can log errors and messages .
pidfile: This is the location/filename where pgBouncer creates a file that contains the process ID of the pgBouncer service. This file will be updated upon restart with a new pid.
auth_type: Defaults to md5. This can be modified if needed. Encrypted passwords are sent over the wire.
auth_file: This is the name of the file used to load the usernames and passwords. This contains the list of users who can connect to the database through pgBouncer. This file contains two fields—username and password—surrounded by double quotes.
For example:
"app_user_reads" "md5abcd1234efgh5678""app_user_writes" "md5abcd5678efgh1234"To get the list of users and md5 passwords of database users, you can run the following SQL in the database and store the output in this file.
select '"'||usename||'" "'||passwd||'"' from pg_shadow;admin_users: Defaults to null. This is the list of users who can run all commands on the console.
stats_users: List of DB users who can run read only queries on the console, such as SHOW commands.
pool_mode: This is the parameter that lets you choose the mode from the list of three modes possible for pgBouncer, as discussed earlier .
server_reset_query: This cleans the changes made to a database session leaving the session in a no cached state. DISCARD ALL cleans all the cache. DEALLOCATE ALL simply drops prepared statements. This parameter is not needed for transaction mode.
max_client_conn: The maximum number of client connections allowed, including all the pools that can be created.
default_pool_size: A pool is created for every combination of user/database. The number of connections to be allowed per such pool can be configured using this parameter. The default is 20.
min_pool_size: The number of connections to be always maintained in the pool considering peak loads that could request more connections.
log_connections: Log all successful connections. Default is 1.
log_disconnections: Log all connection disconnections. Default is 1.
server_lifetime: This is the time after which the pooler closes the server connections that have connected longer than this.
server_idle_timeout: Drops all the connections that have been idle since these many seconds .
autodb_idle_timeout: If database pools are unused for these many seconds, they are freed.
- 10.
Now start pgBouncer using service or do so directly.
# service pgbouncer startOr
$ pgbouncer -d /etc/pgbouncer/pgbouncer.ini
How Does PgBouncer Work?
Let’s say a user with the username abc established a connection for the first time to the pgBouncer from an application. PgBouncer would check if this user authentication was successful by reading its auth file. Once the user is authenticated successfully, pgBouncer establishes a pool of connections to the database. It would not just open one connection to the database. It would opens a default_pool_size number of connections.
If the application sends another session using the same user, the pool of connections will be used and one connection from the pool will be assigned to the application again. If the first connection is completed from the application, it disconnects from pgBouncer. But pgBouncer would not disconnect from the database until a timeout occurs. So, if application establishes another connection from the same user, the connection the from pool would be reused.
High Availability While Using PgBouncer
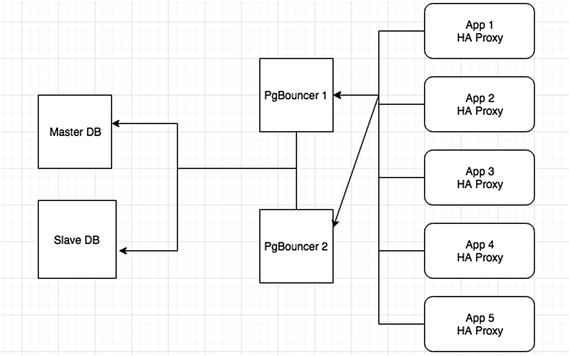
Design for high availability with pgBouncer
As you can see in Figure 11-8, you can configure two pgBouncer servers and install HAProxy on all the app servers. Choose two servers that belong to two different regions and that have pgBouncers installed in them. Now, HAProxy should connect to any of the available pgBouncer servers. This way, application connections are always redirected to the master or slave DB via at least one of the available pgBouncers, thus ensuring high availability.
Connection Pooling on AWS
PostgreSQL can be installed on AWS either by choosing RDS or an EC2 instance. It is much easier to configure and set up a secured and high performance PostgreSQL instance on AWS. Similarly, you may choose to build your application servers on EC2 instances or your own data centers.
While using your PostgreSQL instance that is being hit with several hundreds or thousands of transactions per second, you may choose to involve an external connection pooler such as pgBouncer. This is because the connection pooler would reuse the connections established to the database and avoid the time and resource costs involved in starting and stopping processes. For more details on the need for connection pooling, see the “Connection Pooling” section of this chapter.
There is no such service for PostgreSQL connection pooling on AWS. Instead, you may choose to install pgBouncer like external connection poolers on either the DB servers or on a separate EC2 instance. It is very easy to install pgBouncer on an EC2 instance.
- 1.
Create an EC2 instance that is in the same region as the DB server. To ensure high availability, create multiple (two) pgBouncer instances.
- 2.
Download and install the latest pgdg repo from yum.postgresql.org.
# yum install https://download.postgresql.org/pub/repos/yum/9.6/redhat/rhel-7-x86_64/pgdg-centos96-9.6-3.noarch.rpm - 3.
Search for the pgBouncer package and install it.
# yum list pgbouncer# yum install pgbouncer -yThese are the steps that you need to follow to install pgBouncer on an EC2 instance. The step-by-step process of installing pgBouncer is explained in this chapter in the “Installing pgBouncer” section .
Connection Pooling for Rackspace Cloud Servers
There is no separate connection pooler from Rackspace for their cloud or dedicated servers.
You can use external poolers like pgBouncer for PostgreSQL installed on Rackspace cloud machines. The steps to install and configure pgBouncer are already described in this chapter in the “Installing PgBouncer” section.
You can also use an application level pooling for the PostgreSQL database. If you are using applications based on Java, widely used ORM frameworks like Hibernate provide built-in as well as pluggable connection pooler interfaces. The Postgres JDBC driver supports connection pooling as a DataSource Implementation. Documentation is available at https://jdbc.postgresql.org/documentation/head/ds-ds.html .
However, neither JDBC driver-provided pools or Hibernate-provided pools are recommended for production use. Instead, the most widely used and advanced connection poolers like C3P0 or DBCP are recommended for production use. See http://commons.apache.org/proper/commons-dbcp/ .
Connection Pooling for Google Cloud Instances
There have been many discussions about implementing or using a connection pooler against Google cloud SQL instances. However, they never end up with a solution. The whole concept is that database connections in a cloud-hosted environment should be managed differently than those on a conventional server. In particular, be aware that your database instance may be taken offline while not in use, and any pooled connections would be closed. We recommend that you create a new connection to service each HTTP request, and then you reuse it for the duration of that request (since the time to create a new connection is similar to that required to test the liveness of an existing connection).
However, Google cloud is still open for discussions around connection pooling. They are really interested to know about requirements or use cases that help to understand the need of connection pooling to implement it.
One option is the commons DBCP pool (with straight JDBC, no JDO/JPA). It has a facility for testing a connection before returning from the pool, which prevents any errors if the database instance goes “to sleep”. The test query adds 10-15ms seconds before every query, which is acceptable to most of the requirements. DBCP has more efficient ways to check for dead connections (e.g., every x seconds while sitting in the pool), but these can't be used because they involve starting up new maintenance threads that are not allowed in AppEngine.
Of course, this will prevent any errors, but it will not keep some requests from taking upward of 15 seconds while they wait for the database instance to come up. You can deal with that by having your monitoring server hit an URL every five minutes that involves a database call, so even in periods of very low activity, the database should stay on.
See more at http://commons.apache.org/dbcp/configuration.html .
Here’s how we wire up our data source and transaction manager in Spring:
If you want to install PgBouncer on Google cloud virtual machines, follow the steps explained in the “Installation of pgBouncer” section after you create the machine and connect to it.
Connection Pooling for Azure Cloud Instances
Like some of the other venders, there is no special connection pooler implemented for Azure database for PostgreSQL instances or PostgreSQL installed on virtual machines. You need to use external pooling software like pgBouncer or pool the connections at the application level. Since you have learned about pgBouncer in this chapter, can consider implementing it in this case.
Once you have connected to your Azure cloud virtual machine, you can follow the steps explained in the “Installation of PgBouncer” section.
Use Python to connect and query data: https://docs.microsoft.com/en-us/azure/postgresql/connect-python
Use Node.js to connect and query data: https://docs.microsoft.com/en-us/azure/postgresql/connect-nodejs
Use Java to connect and query data: https://docs.microsoft.com/en-us/azure/postgresql/connect-java
Use Ruby to connect and query data: https://docs.microsoft.com/en-us/azure/postgresql/connect-ruby
Use PHP to connect and query data: https://docs.microsoft.com/en-us/azure/postgresql/connect-php
Use .NET (C#) to connect and query data: https://docs.microsoft.com/en-us/azure/postgresql/connect-csharp
Use the Go language to connect and query data: https://docs.microsoft.com/en-us/azure/postgresql/connect-go
If you are using applications based on Java, the most widely used and advanced connection poolers, like C3P0 or DBCP are recommended for production use. See http://www.mchange.com/projects/c3p0/ and http://commons.apache.org/proper/commons-dbcp/ .
Summary
The chapter talked about the need for connection pooling and how it saves connection timing during new connections. It covered external connection pooling tools, like PgBouncer and DBCP, and other options for connection pooling, like setting up poolers in application code. In the next chapter, we are going to talk about monitoring. We will cover default monitoring provided by each cloud vendor for cloud servers/virtual machines and PostgreSQL services.