
- 1.
We must consider the placement of the sensor and the connection to the network that we which wish to sense, such as wired direct connection, traditional 802.11 WIFI, Bluetooth, or other lightweight protocols.
- 2.
We must examine the visibility that can be obtained from the selected network connection and/or the physical location of the sensor. In other words, what network traffic will be visible from a specific vantage point?
- 3.
Will multiple sensors be required to derive a complete picture of the network that we wish to monitor?
- 4.
Certainly, the cost and long-term viability of the platform we intend to deploy need to be considered.
Since this book is focused on using the Raspberry Pi as the sensor, we also need to consider the advantages and limitations of the Pi. We have chosen this platform and the Python programming language based on cost, simplicity, and versatility. Certainly, depending upon the amount of network traffic, along with the speed of the networks that will be monitored, the Pi might not have the performance required. However, since all of the software is written in Python, as more powerful Raspberry Pi or other Linux platforms (small and lightweight or large and high performance) become available, the solution can be scaled to meet the needs.
Basic Configuration (as of This Writing)
We will be using a Raspberry Pi 3 Model B version 1.2 as described back in Chapter 1 and pictured in Figure 1-6 for the examples in the book. We do this to provide a bit more detail on the configuration and to introduce you to the Raspberry Pi and the Raspbian OS commands, which allow us to do a bit of probing.
Note
All the commands executed from the Pi were done from the /home/pi directory. In the default state the default user is pi.
The following line is what the default prompt should look like. Depending on the installation and configuration of your Pi, this might vary slightly.
Note
The ~ (tilde) character is shorthand for the /home/pi directory. Thus, commands are entered directly after the $, allowing you to get some basic but valuable information about your Pi.
Get Information About the Pi CPU
The command retrieves the basic information regarding the Raspberry Pi CPU.
Note the Pi 3 Model B has four cores. This will become important in later chapters when we utilize the Python multiprocessing library to enhance performance.
Get Information Regarding Pi Memory
Another crucial factor regarding the capabilities of the Raspberry Pi is the amount of RAM memory onboard, and more importantly the memory available for use by our application. You can obtain this information using the following command.
Notice, unlike the static information regarding the CPU, this is a live report regarding memory usage. As you can see we have a little over 700 MB of fee memory available along with just under 100 MB of free swap memory.
Get Information Regarding the Current Free Memory Only
Digging a bit deeper, this command provides a more targeted result providing us data regarding free memory and the used and free swap space.
Get Information Regarding Pi Filesystem
Obtaining information regarding the current active Pi filesystem will help to define the onboard storage we have available.
This command provides the information on how the Pi is configured and most importantly how much free space we have available. Performing simple arithmetic (1024 × 8792304; the available blocks × 1K), we see that we have a little over 9 GB available. This make sense as I’m using a 16GB SD Card on this Pi. If you need more space, then you can choose a larger SD Card for your application. Note, the official maximum size is 32GB.
Get Information Regarding USB Devices and Interfaces
We can of course add more storage to the Pi using the available USB expansion slots as well.
I ran this command twice for you. The first is with no external USB devices inserted, and the second is with one added.
Now, to execute the same command after inserting the external USB SanDisk Cruzer:
Get Information About the Version of Linux
This command provides us information about the core version of Linux we are using, but also provides information regarding the current c++ compiler and crosstool that are installed. It is important to keep your Pi updated, including the operating system and development platform.
Upgrading Your Pi
Like other more traditional computing platforms, keeping your Pi up to date is an important process. This will ensure that you are running the latest version of software and that security updates are current. In addition, I also update the pip environment for the same reasons (pip is the tool that we use for installing and managing Python packages, such as those found in the Python Package Index.) Here are examples for both:
This will download and install updates to any packages that have updates available (based on the information obtained from the apt-get update command).
---- Truncated for brevity ----
Using the dist-upgrade will update Pi kernel and firmware.
Finally, as mentioned in the preceding, we need to keep the Python package installer up to date as well, in order to update any third-party Python packages we may use.
Important
One final note after executing these updates! You need to reboot the Pi. The command to do that is
Advancing PacketRecorder.py
- 1.
Convert port numbers to common port names including known malicious ports
- 2.
Convert MAC addresses to known manufacturers including known suspicious MAC addresses
- 3.
Look up country code based on IP addresses
- 4.
Record the average packet size for each unique connection
- 5.
Update the interface to the PacketRecorder by using the built-in argparse library. This will allow us to create a command-line interface to the PacketRecorder and supply our desired options.
You can always find the latest command-line execution and parameters by typing the following:
Notice that I moved to the current working directory containing the PacketRecorder.py source code along with the needed additional support files. The installation of the full project is available from the source code for this book. Go to www.apress.com/9781484236994 and click the Source Code button.
Step 1: Creating the Lookups
During the examination of observed packets, it is important not to overwhelm that process with significant code, databases, and so on. Remember, the purpose of the PacketRecorder.py application is to create a baseline of a “normal operating” network. This will in fact generate a detailed network device-level asset map for the environment that we are monitoring. This map should be compared to other available device maps (such as those generated by NMAP, administration documentation, etc.).
Thus, our approach is to preprocess lists of known good/bad ports, country codes, and manufacturer indices, and create a fast lookup of those values that can be easily added to the observations dictionary. We can of course generate anomalies identified during the baselining process as well.
Each of the lookups is processed in a comparable manner that starts with the conversion of online data into dictionary objects. We perform this operation as a preprocessing step. Depending upon the complexity of the online data source, the parsing and preparation of these dictionaries can be either simple or quite complex. However, we only perform this preprocessing operation periodically to keep our dictionary lookups up to date.
Once the preprocessing step is complete, we convert the resulting dictionary objects into serialized data (Python pickle files) that are loaded on to the Pi. In this manner the Pi does not require access to the Internet during baselining or operational sensing phases.
- 1.
Manufacturer IEEE (Institute of Electrical and Electronics Engineers) OUI lists: http://standards-oui.ieee.org/oui.txt
- 2.
IANA for the known port number/name translations www.iana.org/assignments/service-names-port-numbers/service-names-port-numbers.xhtml
- 3.
Maxmind’s Country Location Database http://dev.maxmind.com/geoip/legacy/geolite/
Ports Dictionary Creating Example
The following script demonstrates the processing of the IANA text ports list and conversion into a Python dictionary. Once the dictionary is created, the serialization of the dictionary is recorded in the file “ports.pickle”.
Execution of the Script
To demonstrate the execution of the script, I have copied the source code and PortList.txt file to my local windows system.
Note
The creation of the lookups does not need to be done on the Raspberry Pi; this process can be created on Windows, Linux, or Mac.
When you download the Raspberry Pi installation files from GIT-HUB it will include the required pickle files. Therefore, you will not need to perform this operation. The sample is provided here to explain how the dictionaries are serialized into pickle files (see Listing 3-1).
Directory for Execution of the CreatePortPickle.py script
At this point the script is executed and listing of the resulting directory, which includes the portTest.pickle file.
You might notice that the .pickle file is larger than the original PortList.txt file. This is normal, as the keys and internal structure of the dictionary may be larger. However, the efficiency gained through their use in the actual packetRecorder.py script is significant.
Utilizing the Pickle Files in PacketRecorder.py
Ethernet Packet Type
MAC Address to Manufacturer Lookup
Transport Protocol Lookup
Port Name Lookup
Country IP Address Lookup
The following code snippets provide the code for each of the lookup-related classes.
Instantiating and Accessing the Lookup Methods
The next step is to instantiate each of the classes into locally useable objects and then use the associated lookup functions when processing the observed packet.
Note
We perform this instantiation as part of the packetProcessor Class constructor, so the lookup methods are available during packet processing.
Code Snippet to Instantiate the Classes into Objects
Using the Lookups During Packet Processing
Now that the objects self.traOBJ, self.ethOB, self.portOBJ, self.ouiOBJ, and self.cc have been created, we can put them to use during normal packet processing. I have chosen to depict a couple of these here to give an example of how they are utilized.
Sample IPv4 Processing Conversion (Excerpt)
This excerpt depicts the conversion of the source and destination IP addresses into country location and converts the protocol number of the IPv4 packet into the associated country name.
Convert the Port Numbers into Port Names (Excerpt)
Executing the Updated PacketRecorder.py
In each chapter, as we advance and integrate new capabilities into PacketRecorder.py baselining capability, and into the ultimate sensor, I will be providing sample output from the latest version.
Note
that the name of the PacketRecorder.py was changed to pr.py for simplicity.
The command line requests that pr.py execute for 1 minute using the -m option. The -C option requests that a separate country report be generated.
Script Execution
- 1.
Port Name
- 2.
Manufacturer
- 3.
Average Packet Size
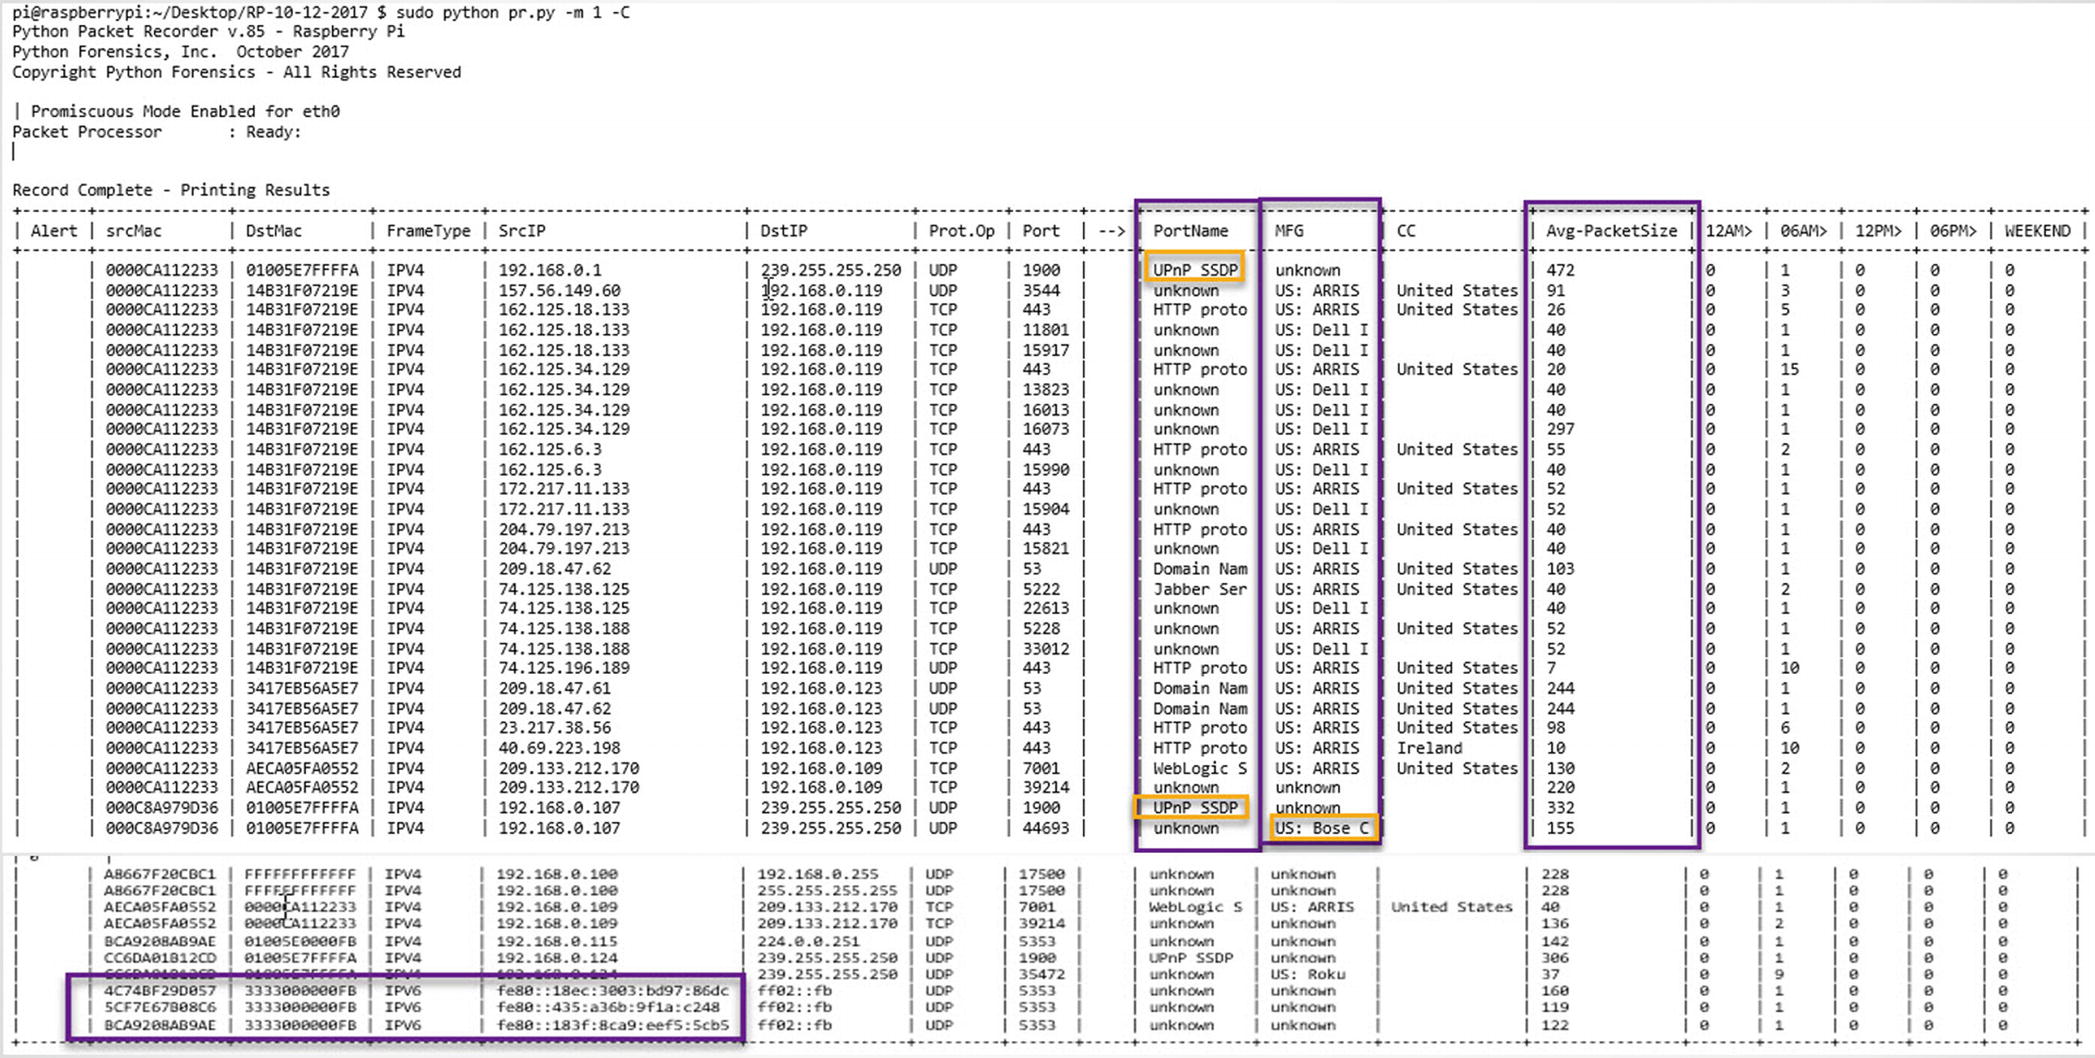
Packer recorder
Foreign Country Hits (Outside the United States)

Foreign country report
Summary
This chapter provided an examination of the Raspberry Pi using several special Raspbian Pi command-line tools. We also considered both the advantages and some potential limitations of the Pi based on available memory and filesystem space.
Ethernet packet type
MAC address to manufacturer lookup
Transport protocol lookup
Port name lookup
Country IP address lookup
Recording of IPv6 packets
Recording of ARP packets
Recording of average packet size observed for each unique connection
Finally, a command-line execution that directs the execution of the script
We also added a second report option for generating a report relating to country IP addresses outside the United States. In the next version, we will add an allowed/blacklisted country list to generate even more data regarding the external connections made.
In Chapter 4, we will develop the sensor script, which will utilize a prerecorded baseline (generated by PacketRecorder) and report on anomalies between the baseline and the live environment. We will also generate a specific report that isolates IoT-based protocol observations versus other network traffic.