Everything you have done so far in this book has been related to Linux. Maybe you’re a seasoned Windows user and you have never used any Linux distribution, but it really doesn’t matter. You can learn common Linux commands in no time. The same is true for the Python programming language and elementary algebra.
You might be asking, “Why should I take the trouble to learn Linux commands? Can I not practice my ethical hacking skills with any tool?”
My answer is, “No, you cannot move in the right direction if you don’t know elementary Linux commands.” In fact, after a certain stage, you will have to master Linux programming because without mastering Linux programming, you cannot master ethical hacking or penetration testing as a whole. In the coming chapters, you will find many examples where you have to open the Kali Linux terminal and type commands. For example, when you work with hacking tools and frameworks such as Nmap or Metasploit, you have to use the terminal. So, it is good to get acquainted with some elementary Linux commands now.
Let me give you a real-life example. You have installed Kali on your VirtualBox. Now you need to configure it to its full potential so that you can use it. Specifically, when you need to update and upgrade your Kali distribution, you have to open the sources.list file and uncomment a few lines. If you know a few elementary Linux commands, this will take not take more than a few minutes. Either you can do it on a terminal using vim or nano or you can use the built-in Leafpad text editor. Either way, it’s a must. But it’s good to know that Linux programming is easy to learn.
In this chapter, you’ll learn some common Linux commands. These commands will tell you about the computer itself. They will tell you the location of the file system, or where you are on your computer. You’ll also learn how to change the permission of a file system, copy a file, or permanently remove a file. You will also learn how to add a new user to your system and get a list of files that are currently in the directory where you are, including the hidden files.
In a nutshell, you will learn to do basic operations through your keyboard without using your mouse pointer. If you are already a seasoned Linux programmer, you can skip this chapter.
Finding the Kali Terminal

Kali Linux applications
On the top of the list is Iceweasel, the default browser of Kali. It’s an extension of the normal Mozilla Firefox, so don’t expect it will keep you anonymous. The logo has changed recently, so when you install Kali Linux, you will be greeted by the new logo, but basically, it is Firefox.
Next follows the command-line tool, in other words, the terminal. You will need this tool often in the coming lessons. The command-line tool basically deals with all types of keyboard inputs. Good programmers hardly use a mouse pointer. They are more comfortable using this terminal and typing in the necessary commands. The Files folder is next, and after that, you can clearly see the important hacking tools such as Metasploit, Armitage, Burp Suite, Maltega, and so on. You’ll take a close look at those tools in the coming chapters.
Let’s start with the command tool by opening it. You can make it look bigger by pressing Ctrl+Shift and pressing the + key. To make it smaller, press Ctrl+Shift and the - sign.
Navigating the File System
Your first command will be pwd (print working directory). It will show your current position in the file system.
This means you are in the root directory. That’s quite natural since you have logged in as the superuser, or root.
Let’s type ls to show the list of what’s in this directory. What does that ls command mean? It stands for “listing.” You tell Kali to show the listing of files and folders that you have in the root directory, and in a fraction of a second, it shows you all it has.
You have not downloaded anything, so the directory is empty.
The next big task is to learn to create another user. Let’s create another user called sanjib.
Congratulations! You have just successfully created a new user called sanjib. You notice that you were asked for the password and had to retype the UNIX password.
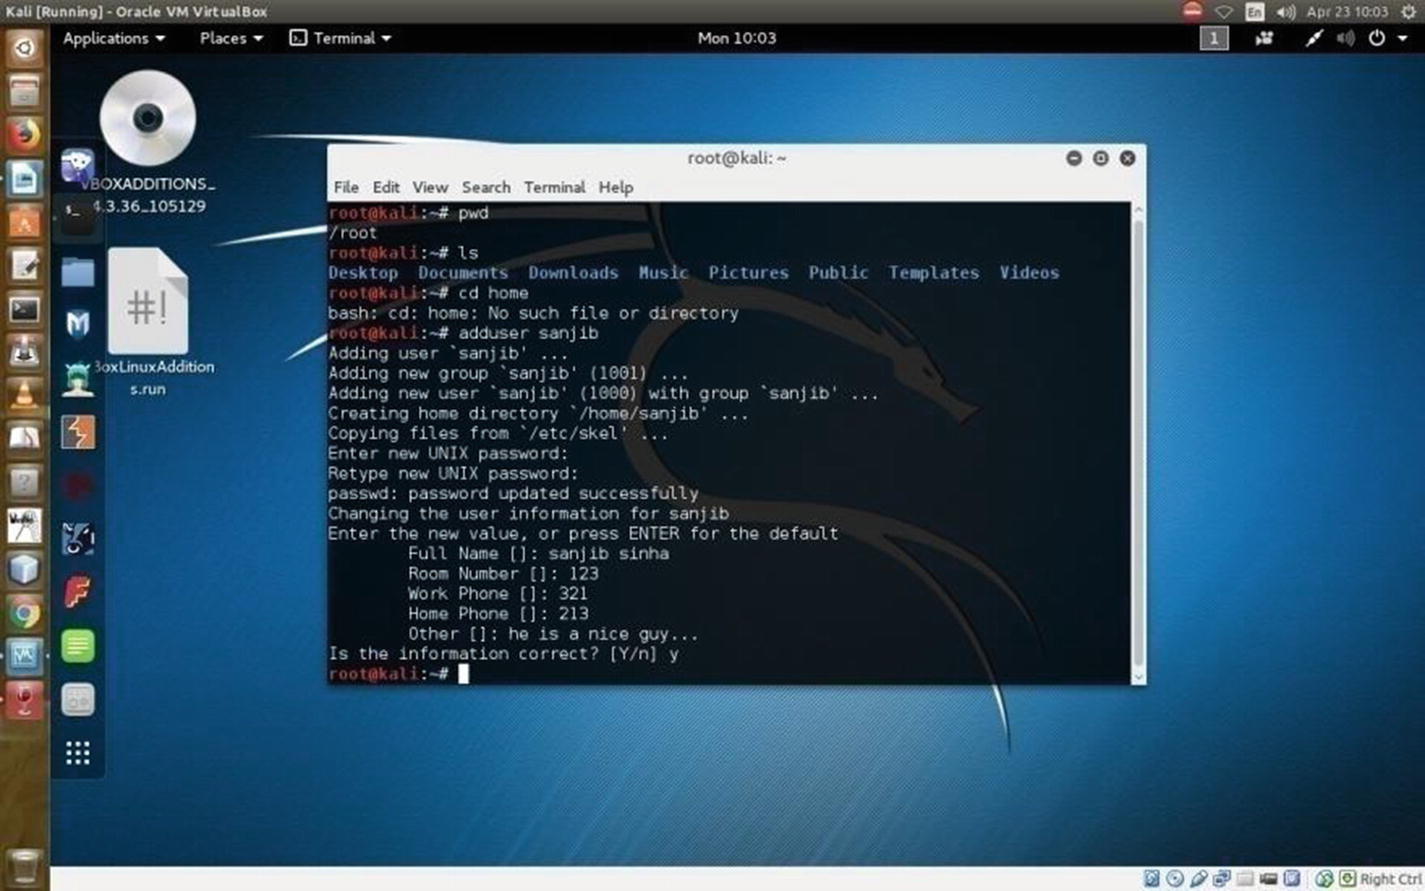
Adding a user in Kali Linux through commands
Now change the directory to home and issue the ls command again. This directory has one folder called sanjib and a file. The folder sanjib means the system itself has a user called sanjib. You have created that user as the root or administrator, so you can log in as sanjib if you want.
When you are in the sanjib directory, you can see the current position by issuing the pwd command .
In the terminal, you can use ls -a to view the hidden files.
There is a difference between ls -r and ls -R . The ls -r command will list in reverse order, and ls -R will list the directory tree in a recursive order, showing subdirectories.
The ls -s and ls -S commands are not the same. The ls -s command will give you a simple listing of file sizes. If you want to sort them according to their sizes, use ls -S.
The ls -X command will list by extension name.
If you want to know more about the ls command , please issue the man -ls command on your terminal. This is true for any other command you want to know in detail.
You can create several users on a Linux system so that from various machines they can log into their files and folders. However, the users will never have root privileges. They can’t penetrate the administrator’s space, but the root user or administrator can always see the users’ space and watch what they are doing. Also, a root user or an administrator can always create and delete any user.
You can now see what is happening in your newly installed Kali Linux. You can change the directory and look what sanjib has in the directory Downloads . Currently, the user sanjib has nothing in that folder; it is empty.
Next you’ll learn about cp command . This command stands for “copy.” You can copy a file from one destination to the other. You have seen that in the home directory you have a file called VBoxLinuxAdditions.run . Let’s copy this file to the Documents directory of user sanjib.
Here I have changed directory to sanjib/Documents and issued the ls command to see the listing. It shows the file. So, everything is working properly.
This spits out everything about that command, and the output is very verbose. It tells you about any command in full detail.
Another important command is mv . With this command, you can move any file from one folder to another folder. This command is more or less like a cp command, but this command completely moves the file from one place to the other. Another important command is cat . You can read any text file with the help of this command, as you’ll see in the next example.
Working with Text Files
In this section I’ll show another trick that is often used in Linux. Suppose you want to write a text file quickly. You can use nano, which comes with every Linux distribution. Just type nano in your terminal, and it will open up a text editor on the terminal.
This will tell nano to open the file. You can edit any portion by pressing Ctrl+O and saving it. Then you can exit the file by pressing Ctrl+X.
It will read your file on the terminal itself.
Usually, seasoned programmers like to work on the terminal and use a text editor like vi, vim, or nano, which are extremely popular because they are fast and easy to work with.
Searching Files
Now you’ll learn an important Linux command called grep . This command searches inside a file, and it does it in an interesting manner. Let’s first see what I have in my root directory.
As you can see, I have changed the directory to /etc/apt and am showing the listing in Ubuntu. You can issue the same command in your Kali Linux and see the difference.
You will see many files here, and for this example you are interested in the sources.list file of Ubuntu. You can use the cat command to read the file, but I have something different in mind.
Say you want to search for a particular word. The command grep along with another command | (pipe) will help you do this.
You actually tell the terminal to display the content of sources.list first and then pipe that term to your searching process. Let’s see how it works.
In the future, you will need to use this grep command extensively to scan a network for a particular word.
Writing to the Terminal
Another important command is echo . This command literally “echoes” everything you write on your terminal. You can also do something more with this command. You can change a text file with this command.
You first echoed some text on the terminal and then used the redirect command (>) to put that text into the file novel.txt. Then, you used the cat command to read the file novel.txt and find out that the file has been changed.
Working with Directories
No, it is not. In this case, if you write that way, the Linux terminal understands something else. It comprehends that you want to create two separate directories. One is Ethical, and the other is Hacking. It creates two directories in that way. So, let’s remove them first, and next you will create a meaningful directory.
To remove a directory, you must have root privileges. This means you need to be an administrator or superuser of the system. On Ubuntu, if you want to be a root or superuser, you issue the command sudo first. In Kali Linux, it is su. Nevertheless, in both cases, once you write that command, the system will ask for the password through the terminal.
Let’s see how it works.
It worked; two directories have been removed successfully. Let’s try to understand this more. You already know that the rm command stands for the word remove. But what about the -rf command that follows it? The command -rf means “do it recursively with force.” Generally, this -rf command is used to remove directories. You have to be careful about using this command. In Linux, once you have used this command, the file or directory is deleted permanently. It is next to impossible to retrieve them. It is wise to be careful about using it.
First, you made the directory Ethical-Hacking. Then, you used cd to go inside it, and with the help of ls you checked that the directory is empty. Afterward, you issued the touch command to create two files: file1 and file2. Again, you issue the ls command to check that two files have been created successfully.
Setting File Permissions
In ethical hacking, anonymity is a big deal. In the coming chapter of building Kali Linux server, you’ll learn about it in great detail. Here, you need to understand that in the process of being anonymous, it is good to be a regular user rather than the root user. As the root or superuser, you have learned to add a user in your virtual Kali Linux. Basically, you set a password, shut down Kali Linux, reboot, and log in as the new user. It is a good practice.
As the root or superuser, you can add as many users as you want. You can delete them any time. You can restrict their activities from any angle. As an administrator, you can add a user who will not be able to log in after six months. You can create groups and set a rule so that entry is restricted. Some users can enter into that group. Some can’t.
A user is not permitted to access or tamper any file of the root or superuser. However, as a superuser, you can always change the file permissions. It is an important concept from every angle. On the Internet, the concept of file permissions is extremely important.
Read: The file can be read.
Write: The file can be written to.
Execute : If a file is executable, you can perform an action by running it. Suppose you’ve written a simple Python program. This program will take inputs from users and give outputs. After writing a Python file, you can make it executable.
The first part (the first three characters) is for the owner of the file.
The second part is for group permissions.
The third part is for the superuser.
I have already created another user called sanjib and have logged in as sanjib. So, the permissions you see here are for this user.
Look how you use the chmod command to change the file permission to executable. Once you have changed the file permission to executable, it changes the color to green. You can also change the file permission by using numbers such as 775; you will find tons of free reading materials on this topic. I encourage you to do more research on this topic because file permission is an integral part of Linux security programming.
When you run the file, it asks you to type your name, and it gently spits back the output.
Another important command is chown . Since Linux is a multiuser OS, as a system administrator you must keep an eye on everything. You need to be careful about who is allowed to access a file and how they can access it. If you feel a file should not belong to a certain user, you can change the owner of the file.
By issuing chown root myfile, you have changed the owner of the file. Likewise, you can change the group by changing group1 to group2.
This will change the owner and the group at the same go. Now again sanjib is the owner of this file; however, the group has been changed.
In this chapter, you learned a few basic Linux commands. You have an idea of how a Linux system works and how you can use your terminal or command line to operate your system.
In the learning process of ethical hacking, you will find learning Linux programming extremely useful. In the future, you will need to learn a few more Linux commands. Your knowledge of Linux or any other operating system must be commendable if you want to be an expert ethical hacker.