The first release of Kali Linux made the hacking community sit up and take notice. In 2012, this Debian-based Linux distribution introduced new architectural patterns with more than 300 hacking-related tools specialized for penetration testing and digital forensics.
Kali 2.0 was introduced to the hacking community in 2016. This time it included even more hacking-related tools, with many updates and new desktop environments such as Xfce, KDE, and more. Offensive Security Ltd. maintains and funds Kali Linux now, and the number of tools has exceeded 600 and continues to grow.
However, the real benefit is when you combine Kali Linux and Python in a creative manner. One is a Debian-based Linux distribution for penetration testing purposes, and the other is a great programming language with a huge library available (Figure 5-1) for penetration testing and digital forensics.
As you see, they have one thing in common, and that is related to information security. Quite naturally, this combination has fast become the best tool combination to use in ethical hacking.
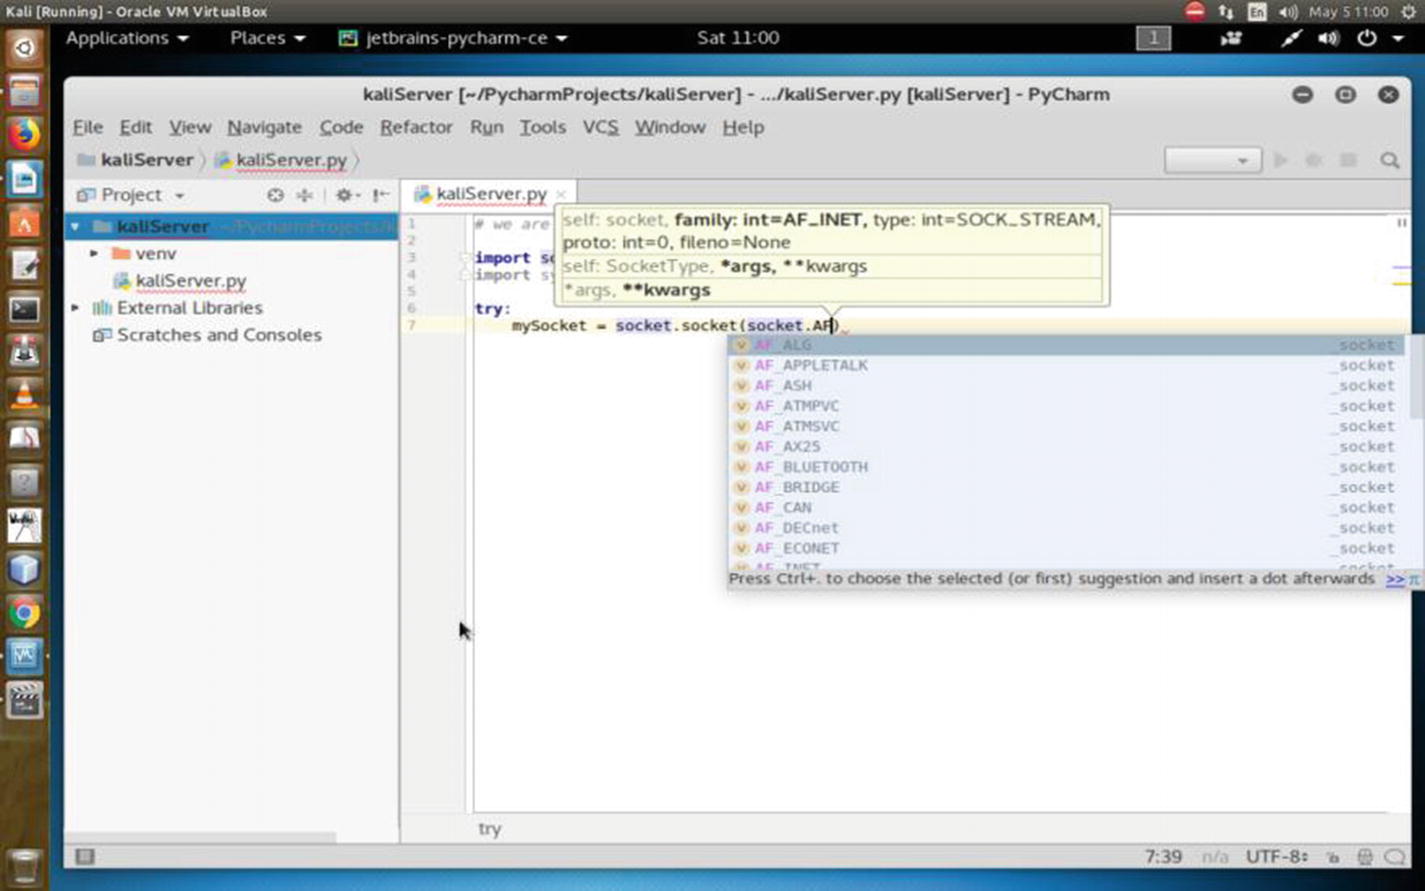
Writing a Python Socket library script in Kali Linux
Why Do You Need a Web Server?
In the coming chapters, you will see how this knowledge of building a web server helps you understand many hacking-related processes including sniffing, SQL mapping, and using frameworks like Metasploit and Armitage.
A simple real-life example will make this clear. Suppose you are going to exploit a remote system by sending a malicious link. In this case, you need your own web server because the target will click the link and connect with your server through a certain open port so that a session is created on the target machine. Once that session is created, you can enter the target system through the shell using your web server. (I will show how to do this in detail in Chapter 15.)
It is always a good practice to hide your tracks from the beginning. To that, you need to keep your anonymity intact throughout the operations phase. Therefore, you need to make your web server anonymous. So, in the first half of this chapter, you will learn how to build your own server, and in the second half, you will learn how to hide your tracks by making yourself anonymous.
Before building a web server, you should know a few things about sockets.
Introducing Sockets
On a computer network, there are internal endpoints that are meant for sending and receiving data within a node. A socket is the representation of these endpoints.
Basically, sockets are virtual endpoints of a communication channel between two processes. Here, a “process” could be a program. These programs or processes may stay on the same or different machines. You may simply call it network communication.
Sockets are the fundamental things behind these network applications. An example is when you open any web site in your browser and your browser creates a socket and connects to that remote web server. There is a socket on that web server also. That web server accepts the connection and sends your browser the web page that you have requested.
Beginning the Web Server
You will now build a Kali Linux web server that listens to a certain port and connects to the client.
The output says that the socket has been created; the act of binding has been done. Then it has been put into listening mode. At this point, try to connect to this server from another terminal using the telnet command .
The port is 8080 (in fact, you can choose any port like 8888 instead 8080). It is common to use predefined port numbers. The standard ones are usually booked up like 80 for HTTP and 443 for HTTPS. Port numbers range from 0 to 65535; however, 0 to 1023 are reserved. They are designated as well-known ports.
Congratulations! You have successfully created your Kali Linux web server by using the Python Socket and System libraries .
Diving into Sockets
Let’s delve into sockets in more detail. You’ll also see more examples of how you can connect to a remote web server like Google. You will also rewrite your old code of creating a local web server in a different way.
By the way, the term socket is also used for an internal endpoint of local interprocess communication (IPC). It is not over a network. You need to understand how Python handles this interprocess communication.
At the lower level, you can access the basic socket support, like you created in your own server. In a different sense, it is nothing but the underlying operating system that allows you to implement the client and the server for both—the connected and the connectionless protocols. For a connected or connection-oriented client-server protocol, all packets will follow the same path. In a connection-less protocol, this path will be random. In both cases, packets will be transferred from one device to the other. Connection-oriented protocols are faster than the connection-less because traffic congestion is greater in the latter. Connection-oriented protocols are also more reliable. The main difference is in the connection-oriented protocol. Until one party ends the connection, the connection does not terminate. But in the connection-less protocol, once a packet is sent, the connection terminates, and it waits for further requests.
Python also provides a higher level of access through its rich variety of libraries. Using these libraries, you can target specific application-level protocols such as HTTP, FTP, and other protocols.
Therefore, sockets are the bidirectional endpoints of protocols that open up communication channels between the clients and the servers. Sockets also serve the processes, where the process is working with the local client and the remote server is residing on a different continent.

Kali Linux web server working through Python script
INET sockets account for at least 99 percent of the sockets in use. You have used this type of socket in the Python code where you created the socket. This Internet socket is IP protocol based, which is why most web traffic uses this protocol.
socket.SOCK_DGRAM
socket.SOCK_RAW
socket.SOCK_RDM
socket.SOCK_SEQPACKET
These constants represent the socket types, used for the second argument to the socket() method . However, only SOCK_STREAM and SOCK_DGRAM are more useful. This is because SOCK_STREAM represents a connection-oriented protocol, and SOCK_DGRAM represents a connection-less protocol.
Depending on the context, the meaning of sockets may vary. Usually, a “client” socket is an endpoint of a conversation, and a “server” socket is more like a switchboard operator. The browser in your machine is an example of a client application. It uses client sockets exclusively. But the web server uses both server sockets and client sockets. In the previous code, after getting connected, Google does the same thing.
Here Python’s socket() method returns a socket object whose methods implement the various socket system calls.
A pair (host, port) is used for the AF_INET address family, where the host is a string representing either a hostname in an Internet domain notation like google.com or an IPv4 address like 100.50.200.5 and port is an integer. You have just seen this in the previous code. For the AF_INET6 address family, a four-tuple (host, port, flow info, scope ID) is used.
If you don’t have any Python background, please read the Python documentation. A tuple is an immutable list of collections.
Socket objects have many methods. They start with the socket.accept() method . They accept a connection. The socket must be bound to an address and listening for connections. The socket.close() method closes the socket.
Once you close the socket, all future operations on the socket object will fail. The remote end will receive no more data (after the queued data is flushed). You used the socket.connect(address) method in the previous example. This method connects to a remote socket at the address.

Connecting to the remote host from the Kali server

Unable to find the remote host; local server not running
In the next section, you’ll learn how to install PyCharm and the Wing IDE to create some more Python code for further penetration testing.
After that, you’ll see how to install the desktop environment.
Before the configuration part begins, you’ll take a quick look at the encrypted Kali version and see how you can install it on your machine. This installation process is as same as the normal installation; however, there are some exceptions.
As the book progresses, you’ll be introduced to more resources to master Kali Linux, the penetration testing distribution.
Installing PyCharm and the Wing IDE Editor

PyCharm in Kali Linux
Installing PyCharm or the Wing Python editor is extremely easy.
I personally prefer PyCharm because the community edition has more features and it’s free. Wing is also good, and a personal version is available, but you will miss many features that are available in the professional version.
In both cases, the professional versions usually come with more features.
Carefully consider the options before using either PyCharm or Wing. The Wing professional version comes with a full-featured Python IDE.
The Wing personal version is a free Python IDE for students and hobbyists. But it has a simplified debugger, full-featured editor (that you need), and limited code inspection and navigation; finally, it gives you freedom for the project management.
The professional version of PyCharm is also a full-featured IDE for Python and web development, whereas the community edition is free and a lightweight IDE for Python and scientific development.
Go to the PyCharm web site and download the zipped community version.

PyCharm installing in Kali Linux
How to Stay Anonymous
How long you can remain anonymous is using a trade-off.
With the help of anonymity, what you’re doing is another big deal. Here comes the moral part. As an anonymous person, you cannot steal data or attack a legal system.
What type of technology are you using? Is it tenable? Can it maintain the persistence of the anonymity?
The last big trade-off is the physical address. After all, that is the endpoint. Every anonymity ends at the hardware used for doing some anonymous tasks. Once it’s located, your anonymity ends. You can also hide that by changing your MAC address.
You need to stay anonymous for one single reason; in penetration testing, you have to use your Kali Linux server again and again. It’s not that you will have to build your server manually by using Python. Many hacking-related tools automatically build it while sniffing or exploiting a target.
Therefore, hiding your tracks or keeping your anonymity in ethical hacking is one of the prerequisites that you should keep in mind.
In this second, you’ll get a brief introduction to anonymity. I’ll discuss only the technology part of it. Ethical hacking involves a few tricks to keep you anonymous. Even in a VirtualBox environment, it’s a good practice to take every precaution to hide your IP addresses and other stuff. Let’s begin with the Tor browser.
First, you need to install the Tor browser (Figure 5-7). You can download it from https://torproject.org . To make yourself anonymous in a VirtualBox environment, you have to log in as a user; don’t log in as root or the superuser. In some cases, you need the root privilege; when you need it in Kali Linux, issue the su command and type the root password. You will definitely need it when you have to change some core functionalities of Kali Linux. You also will need it when you want to download new packages or update your distribution.

Tor browser in Kali Linux Download folder
Tor maintains your anonymity through several proxies. Behind these proxies, you can hide your true identity. But Kali Linux also gives you a special opportunity to change the configuration at the root so that you can hide your true identity while browsing the Web using Tor.
Changing Your Proxy Chain
In this case, you need to configure your proxychains.conf file . You will find this file in your etc folder.
Open the configuration file using the Leafpad text editor.

Proxychains.conf file in Kali Linux
Uncomment the line where dynamic_chain is located. After that, comment out strict_chain and random_chain one after the other, before testing the proxy.
The advantage of choosing dynamic_chain over others is clearly stated. If your connection does not get one working proxy, then it automatically jumps to the other. The other two don’t give you that opportunity to route your traffic.
Let me explain it more. Suppose you have two proxies in place: A and B. What happens in the case of strict_chain is that when you browse web pages, your connection is routed through A and B strictly. This means A and B should be in order and live. Otherwise, your connection simply fails. In the case of dynamic_chain , this does not happen. If A is down, then it jumps to take B. For that reason, you are going to use dynamic_chain so that if one proxy is down, the other may replace it.
This is an important line to be considered seriously. You see I have uncommented proxy_dns. This will protect against leaking DNS data. You can’t allow DNS data to be leaked. In other words, your real IP address should not be leaked by chance. That is why I have uncommented this line so that your proxies are in the proper place working without any hitches.
This means the first word is the type of the proxy. It should be socks5 . The second one is the host. The third one is the port, and the last two words stand for username and password in case you pay for it. Sometimes people buy VPN services; in such cases, the service provides the login credentials. Another important thing is that you must separate the words using either a Tab or space.
- 1.
Open your terminal and type the following:
- 2.
It will fail if you don’t start it. Type the following to start the service:
This search engine does not usually track IP addresses. Your browser will open, and you can check your IP address. You can also see the DNS leak test result. Let’s do that by typing dns leak test in the search engine. There are several services; you can click any one of them to see what it says.
I found that www.dnsleaktest.com is working to find out my original IP address and fails to find out. It shows an IP like 8.0.116.0, and it is from Germany. This is wrong as I am currently staying near Calcutta.
You can simultaneously test this in your normal browser, and you’ll find your actual IP address.
I have discussed the Tor browser and proxy chains. You have seen how you can use them. Another important concept in this regard is a virtual private network (VPN). Before moving to the VPN section, you will learn how to set the DNS settings because that will help you hide your IP address using VPN.
Working with DNS Settings
A DNS server normally checks the traffic filtering. So, if you can change your DNS server settings in your root, you can misguide that reading.
How can you do that?
In your terminal, there is every possibility that it’ll show something else. This is your home gateway. It will show what kind of router you’re using. Basically, you’ll change this so that when you again test your IP address, the DNS server can’t filter the traffic properly.
I have changed it. Why have I changed this? Let me explain.
You need to understand the concept of a name server first. What does a name server do? The LAN IP address actually forwards the traffic to DNS servers, which in turn resolve the queries and send the traffic back accordingly.
In doing this, it records the amount of traffic going through your home gateway. You don’t need that. Why don’t you need that? You need to be anonymous. So, that is the main reason behind changing this name server.
You can do that through a virtual private network.
This will open the configuration file where you will change the name server address. I've opened it on my Ubuntu terminal. But you need to change it on your Kali Linux virtual machine.
Ubuntu is used for demonstration purpose because my Kali Linux dhclient.conf file has already been changed before. But the command is the same.
Another thing is important here. You need to check whether the media connection is enabled. Open your Mozilla browser; in Kali Linux, it is Iceweasel. You can find it in the top-right panel. Then from Preferences, select Advanced ➤ Network ➤ Connection item; finally, select Use System Proxy Settings.
Using a VPN
You can also search for a free open virtual private network. Remember, people often pay a hefty price for this because they use many proxy layers to guard their real identity.
But no VPN is secure all the time. Why are they not secure? It is because, sometimes, a country’s national security is under attack and server companies are pressured to give out information about their users. So, all along I have tried to emphasize one thing: never try to break the law. Ethical hacking is all about staying within the law.
Let’s download the open VPN from www.vpnbook.com . In the right panel, you’ll find the name of the providers. It varies, and from which country you’ll download really doesn’t matter as long as it works.
While downloading, you’ll notice that a combination of username and password is given. Copy them and save them somewhere as you’ll need them when you run the virtual private network on your machine.
While downloading the openvpn zipped folder, you will get a username and password. Please write it down in a separate text file so that when you run the previous code, you can issue the credentials.
If the machine says “openvpn command not found,” you will have to install it. Installing anything through the terminal is quite easy in Linux. Search the Web, and you’ll find tons of tutorials that will guide you through the process. Usually, this is done with the apt-get command.
When you try to run openvpn, it will ask for the username first. Then it’ll ask for the password. Once this process is complete, it’ll try to build the connection. Unless you get a message “initialization complete,” you can’t open your browser. It may take several minutes.
If you’re not lucky, this message won’t crop up. In that case, it says “connection failed.”
Once you get the message “initialization complete,” you can open the browser and search through www.duckduckgo.com .
In my case, once the initialization process was complete, I opened the Kali Linux web browser and found that the IP address had been changed. So, it has made me completely anonymous.

A different IP is being shown by the virtual Kali Linux web browser. On the top is my host web browser and original IP address.
Your first job will be to check the DNS leak. Go for it, and you'll definitely find a changed IP address.
This means you have successfully connected through the virtual private network, and your original ISP DNS server is completely hidden.
Changing Your MAC Address
You have learned many tricks so far, all about anonymity. But let’s always try to go to a higher level. Changing the MAC address falls into that category.
In a simple way, it is your hardware address. Basically, it’s not the hardware address of your machine, but it’s the hardware address of your network card through which you’re connected to the outer world.
Let’s start the Kali Linux virtual machine and open the terminal. Issue the command ipconfig .
In your case, the output could be different. You’re concerned about the hardware address of your network, and you want to change it.
In some cases, it is different. They are network cards; they could be Ethernet cards, wireless cards, wireless adapters, and so on.
But this address is extremely important as it is used to identify you on the vast Web. The first three digits are the symbols that represent the manufacturer.
As you see, it shows two MAC addresses; one is current, and the other is permanent. You may ask why I’m checking this here. I have checked it once by issuing the command ifconfig .
It’s because the command ifconfig will show only the current MAC address. It won’t show the permanent MAC address. In other words, when you have changed the MAC address and issued the ifconfig command, it’ll show only the changed one, not the permanent one. The permanent one is basically the hardware address or physical address. When you change the current setting, the permanent one will reflect that. This is also called MAC spoofing . It’s like you are pretending to be some other physical device that you are not.
These allow you to change the MAC address but not the vendor. In this case, there is every possibility of losing your anonymity. The first three sets (-a, -A, -p) belong to the net card manufacturer, and since that has not been changed, you can be identified.
The third line in the previous code (-p, --permanent Reset to original, permanent hardware MAC) is quite self-explanatory in its meaning. It says you can change back to the original MAC address.
Why is this important? It is because you can change the MAC address completely.
The first setting (0006) is the serial number. The second one is the MAC address. You can change your vendor address. You can use any of these addresses and pretend to be using this company.
Ethical hackers sometimes use that trick, although not for any illegal purposes. Usually, in penetration testing, when you are working for a client, you do not need to change the physical address. After all, you are not going to do anything illegal. What you are going to do is completely legal, and you will get the necessary consent from your client.