In 2006 the Auditor security collection and Whax merged to create Backtrack. The creators were trying to provide a special Linux distribution that would help people do penetration testing in a more useful way.
Within one year, Backtrack evolved into a full-blown Linux distribution with kernel 2.6.20, and it added support for Metasploitable 2 and 3. It also redesigned the menu structure. In 2007, Backtrack 2 appeared as a Linux distribution meant for penetration testing.
In 2008, Backtrack 3 appeared; this time the kernel was 2.6.21.5, and two specialized hacking tools were added: Saint and Maltego.
In 2010, Backtrack 4 with kernel 2.6.34 came out with massively improved hardware support.
The next year was important in the journey of Backtrack. In 2011, Backtrack 5 appeared; this time it was based on Ubuntu Lucid LTS, and the kernel was 2.6.38.
A massive change was brewing. In March 2013, Backtrack Linux became Kali Linux. The support for Backtrack ended. It was now Debian based, and the platform had been rebuilt completely.
In this chapter, you will learn more about Kali Linux and explore all the major hacking tools it offers. You will learn about the various hacking categories and which tools belong to which categories. This will be a brief introduction; as you progress through the book, you will learn how the tools function in detail.
More About Kali Linux Tools
When you installed Kali Linux, you probably found that Kali Linux is designed to be used as a single root user. You can create extra users for doing penetration testing. Quite naturally, as a security person, you want to be anonymous. However, this single, root user scenario has been created for a reason. Kali Linux is not meant for general users. It was created to meet the requirements of professional penetration testers and security auditors.
As you progress through this book, you will find that many tools you will use for penetration testing need root privilege. Kali Linux has come up with a minimal and trusted set of repositories to maintain the integrity of the system. In the configuration part, it was discussed in detail. Don’t change the sources.list file without knowing the actual consequences, and you must resist the temptation to add repositories.
You should resist this enticement for one particular reason. You don’t know whether a package’s trustworthiness is guaranteed by the Kali Linux development team. If it’s not, it might even break your system. So always be careful about adding any new package or repository.
Since Kali Linux is aimed at penetration testing and security auditing, it contains hundreds of tools that are meant for security-related tasks. The following sections highlight the categories and the main tools that belong to those categories.
There are more than 600 tools available currently in Kali Linux, and more tools are being added regularly. The category list starts with information gathering.
Information Gathering
Information gathering is a vital step before starting penetration testing. In an ideal world, pen testers begin their work by collecting information. This requires a lot of effort and patience. You will explore some of the major tools to do this in detail later. This category has many tools that work differently, but the purpose is the same: to gather information. The subcategories include DNS analysis, DNS identification, host identification, IP identification, and others.
The major tools are DMitry, dnmap, dnsenum, dnsmap, DNSRecon, dnstracer, dnswalk, Faraday, Fierce, Firewalk, Ghost Phisher, hping3, iSMTP, Maltego Teeth, masscan, Miranda, MSFConsole, nbtstat nbtscan, Nikto, Nmap, SPARTA, theHarvester, and many more.
Let’s take a quick look at nbtscan, which can find hostnames and domains. The tool nbtstat does the same job.
nbtscan using an IP address in virtual Kali Linux
You can keep a record of the IP addresses listed in a text file. You do not need to type the IP addresses repeatedly. You can just scan the whole text file and see the output. You can perform many more tasks for gathering information using these tools. I have dedicated a separate chapter for information gathering. You will learn more about the tools there.
Vulnerability Analysis
Is your system vulnerable? Is your web site application secure enough? You can analyze them with lots of tools available in Kali Linux. These tools are meant for extreme vulnerability analysis. This category has a few subcategories such as Cisco tools, fuzzing tools, stress testing, and others. The major tools are BBQSQL, BED, cisco-auditing-tool, cisco-global-exploiter, cisco-ocs, cisco-torch, copy-router-config, DBPwAudit, jSQL Injection, Nmap, openvas, Oscanner, Powerfuzzer, sfuzz, SidGuesser, SIPArmyKnife, sqlmap, Sqlninja, sqlsus, THC-IPV6, Yersini, and many more.
Wireless Attacks
The wireless attacks category has multipurpose tools aimed at attacking clients as opposed to access points. Some of them are Airbase-ng, Aircrack-ng, Airdecap-ng and Airdecloak-ng, Aireplay-ng, Airmon-ng, Airodump-ng, airodump-ng-oui-update, Airolib-ng, Airserv-ng, Airtun-ng, Asleap, Bluelog, coWPAtty, crackle, Easside-ng, Fern Wifi Cracker, gr-scan, KillerBee, Kismet, Reaver, Wesside-ng, Wifi Honey, and many more.
Web Applications
To protect your web application, you need an integrated platform for performing security testing of your web applications. Kali Linux has many tools that perform these tasks. Its various tools work seamlessly together to support the entire testing process. It starts with an initial mapping and analysis of an application’s attack surface and then proceeds to finding and exploiting security vulnerabilities. The major tools are apache-users, Arachni, BBQSQL, Burp Suite, DirBuster, fimap, FunkLoad, Grabber, jSQL Injection, Maltego Teeth, Nikto, Paros, ProxyStrike, Recon-ng, sqlmap, Sqlninja, Uniscan, Vega, WebScarab, Webshag, WebSlayer WPScan, XSSer, and many more.
WPScan working in virtual Kali Linux
WPS Tools
Sometimes you need to find out the WPA/WPA2 passphrases that are used to protect WiFi Protected Setup (WPS). To execute a robust and practical attack against WPS, many tools are used. This is called stress testing . This category also has many tools that are designed to be tested against a wide variety of access points and WPS implementations. Reaver is one of them. Reaver takes four to ten hours to guess the correct WPS pin, and it recovers the passphrase.
The other major tools are DHCPig, FunkLoad, iaxflood, Inundator, inviteflood, ipv6-toolkit, mdk3, SlowHTTPTest, Termineter, THC-IPV6, and THC-SSL-DOS.
Exploitation Tools
Another subcategory consists of exploitation tools. This type of tool mainly focuses on web browsers. Web-borne attacks against clients are a growing concern. In such situations, there is only one open door, and that is the web browser, so naturally it comes under attack. Keeping that context in mind, you need to harden the network perimeter and overall client system. Attackers use browsers to attack the main system. Therefore, client-side attack vectors should be considered while designing such tools. Tools such as Armitage, BeFF, Metasploit, and Termineter are good examples.
Forensic Tools
The word forensics is connected with scientific tests used by the police when trying to solve a crime. In computer security, the same thing happens. Suppose some attackers have deleted your important files and you want to recover them. Forensic tools are used in this situation.
The most common default file systems in Linux distributions are the ext3 and ext4 file systems. Information is stored in the partition’s journal. Forensic tools are used to recover the information from the partition’s journal and make data recovery possible. Many tools are available in this category; they are Binwalk, bulk-extractor, Capstone, chntpw, Cuckoo, dc3dd, ddrescue, DFF, diStorm3, Dumpzilla, extundelete, Foremost, Galleta, Guymager, iPhone Backup Analyzer, p0f, pdf-parser, pdfid, pdgmail, peepdf, RegRipper, Volatility, Xplico, and many more.
Sniffing and Spoofing
The sniffing and spoofing category has two subcategories: network sniffers and spoofing and man-in-the-middle (MITM) attacks. Tools belonging to this category mainly deal with the weaknesses in network protocols. There are many types of different network protocols. However, there are different types of weaknesses also.
To sniff the weakness, you need to analyze the network traffic. Penetration testers and malware analysts use a configurable DNS proxy (also called fake DNS) to analyze the traffic.
There are many tools in this category, and they act differently. Some of them perform layer 2 attacks. There are many DNS proxies, and they point all DNS queries to a single IP address or implement only rudimentary filtering. These types of proxies can be used to send a fake request for an attacker’s site instead of a real host. The request should be pointed to a local machine for interception so that you can use those responses later.
The tools include Burp Suite, DNSChef, fiked, hamster-sidejack, HexInject, iaxflood, inviteflood, iSMTP, isr-evilgrade, mitmproxy, ohrwurm, protos-sip, responder, rtpbreak, rtpinsertsound, rtpmixsound, sctpscan, SIPArmyKnife, SIPp, SIPVicious, SniffJoke, THC-IPV6, VoIPHopper, WebScarab, Wifi Honey, Wireshark, xspy, Yersinia, zaproxy, and others.
Password Attacks
This category has mainly four subcategories: online attacks, hashtools, password profiling, and word lists. The name suggests what this category is for. These tools combine several cracking modes in one program. Moreover, they are fully configurable for some particular needs.
In some cases, you can use the same crackers everywhere. There are several types of Unix crypt(3) hash types. (You will learn about hashing and cryptography later.) These hash types include traditional DES-based, bigcrypt, BSDI extended DES-based, FreeBSD MD5-based (also used on Linux and in Cisco IOS), and OpenBSD Blowfish-based.
These tools can autodetect the hash types. They are acccheck, BruteSpray, Burp Suite, CeWL, chntpw, cisco-auditing-tool, CmosPwd, creddump, crowbar, crunch, DBPwAudit, findmyhash, gpp-decrypt, hash-identifier, Hashcat, HexorBase, THC-Hydra, John the Ripper, Johnny, keimpx, Maltego Teeth, Maskprocessor, multiforcer, Ncrack, oclgausscrack, ophcrack, PACK, patator, phrasendrescher, polenum, RainbowCrack, rcracki-mt, RSMangler, SecLists, SQLdict, Statsprocessor, THC-pptp-bruter, TrueCrack, and many more.
Maintaining Access
Maintaining access is another vital category that includes CryptCat, Cymothoa, dns2tcp, http-tunnel, HTTPTunnel, Intersect, Nishang, polenum, PowerSploit, pwnat, sbd, shellter, U3-Pwn, Webshells, Weevely, Winexe, and some others.
Reverse Engineering
Reverse engineering is another major category that requires a lot of study of how malware families work. These tools let you create descriptions of malware families based on textual or binary patterns. Some packages contain a command-line interface. They are apktool, dex2jar, diStorm3, edb-debugger, jad, javasnoop, OllyDbg, smali, Valgrind, YARA, CaseFile, Dradis, MagicTree, Metagoofil, Nipper-ng, pipal, RDPY, and some others.
Hardware Hacking
Hardware hacking is the final category covered here. There are several good tools in this category such as android-sdk, apktool, Arduino, Sakis3G, smali, and some others.
Exploring Kali Linux from the Inside
Before moving any further, I would like to remind you a few basic components of computer architecture. As you progress, you will encounter those terms repeatedly. I would like to clarify them for the beginners, especially, before the real exploration begins.
Machine Language
The computer only understands machine language. This is a pattern of zeros and ones. When these zeros and ones make a large string, it becomes incomprehensible. To remember those series of numbers, Assembly was designed. Actually, this language was a kind of helper language. It was made to assist programmers with some patterns of text so that they could remember those series of zeros and ones. Higher-level languages like C came much later. And Python is much younger, belonging to the category of higher-level languages.
Purists think that a good ethical hacker should know Assembly well. I think that would be really demanding for a newcomer. So, don’t worry about the Assembly language now; learn Python first.
In this section, I’ll give you a quick introduction to computer memory and the register. This will help you understand how the hacking tools work.
Registers
You have probably heard about registers. Their primary job is to store data temporarily. They are part of computer memory. Another part is random access memory (RAM).
In almost every process of ethical hacking, these parts play major roles. The smallest amount of data that you can store is 1 bit, which is like an atom of memory. It is either a zero or a one in memory. Consider four bits; it looks like either 0000 or 1111. This chunk of four bits (or a nibble) adds together and forms a byte. You can keep on adding bytes to get bigger results. Quite naturally, a 64-bit addressable is 64 bits wide, and the number of bytes is much larger than the 32-bit addressable.
In RAM, you can get any piece of data or collection of many bytes. That is why the term random access is used. However, RAM is very volatile, and once you turn off your computer, the memory loses the data immediately.
In many Kali Linux hacking tools, you will find that processes run in parallel. You do not want to overwrite one process with another, so each process should have access to its own areas in memory. This is called segmentation .
Remember, the computer breaks down memory into small segments. When processes load into memory, they are broken down into six main sections; they are .text , .data, .bss, heap, stack, and environment. Each section has a specific task. One section stores initialized variables, another section stores uninitialized variable, and so on. The environment section is writable.
Usually, each section stays in a particular position to make things run correctly. There is a memory space called a buffer that holds the data until any process starts handling it. A pointer is a special piece of memory that holds the addresses of other pieces of memory. Memory decides how fast a computer responds to a request and completes tasks. Virtual memory is a technique that computers use to supplement the memory space by using some of its storage space.
Why Is Understanding Memory So Important?
Our aims are twofold. You have already installed either VirtualBox or VMware Player. Whatever your choice, you need to supply enough memory to your host and guest operating systems. You need to have an equal amount of RAM for your host operating system as well as for your guest operating systems. If your operating system is Linux like Ubuntu, you need to reserve at least 2GB for it; the more RAM, the better. For the guest systems, the minimum memory requirement for a Kali Linux guest is 1GB or more. For a Metasploitable guest, the minimal requirement is 512MB or more. Per Windows guest, 1GB or higher is recommended.
The ordering of memory location depends on binary signals. Two states define a binary signal; either it is on (it is also called high) or off (it is called low). Let’s think about the great information gathering and vulnerability analysis tool Nmap. It uses raw IP packets to determine what hosts are available on the network. The official binary packages of Nmap are available for every operating system.
What Happens When NMAP Scans a Network
What happens when Nmap scans a network or a single host? Consider a single host where it has a certain type of central processing unit architecture and other systems within the hardware that exchange binary signals. These signals are expressed in hexadecimal numbers that correspond to the pattern of zeros and ones. Other hacking tools in Kali Linux can also know the services that the host is offering. They learn this just by reading the pattern of signals. They know about the operating system, which is running, and many other features.
In a host, some locations are always reserved for specific purposes and functions. They are vital for the functioning of the assembly language programs that enter directly into the CPU memory locations for their operations. The functioning of Assembly language programming actually controls an immeasurable bulk of electronically managed devices. That is why purists opine that if you want to dig deep into ethical hacking, you need to learn Assembly language programming.
Editors
Whether you do some Assembly programming or write some Python scripts, you need to know about built-in text editors like vim or nano. Sometimes you need to update or edit existing files in Kali Linux using those text editors.
Opening VIM text editor in virtual Kali Linux
Quitting vim is easy. Just press Esc and then type :wq. It will automatically save the file. You can also edit the same file in the nano text editor. That is a useful command-line text editor that comes with Kali Linux.
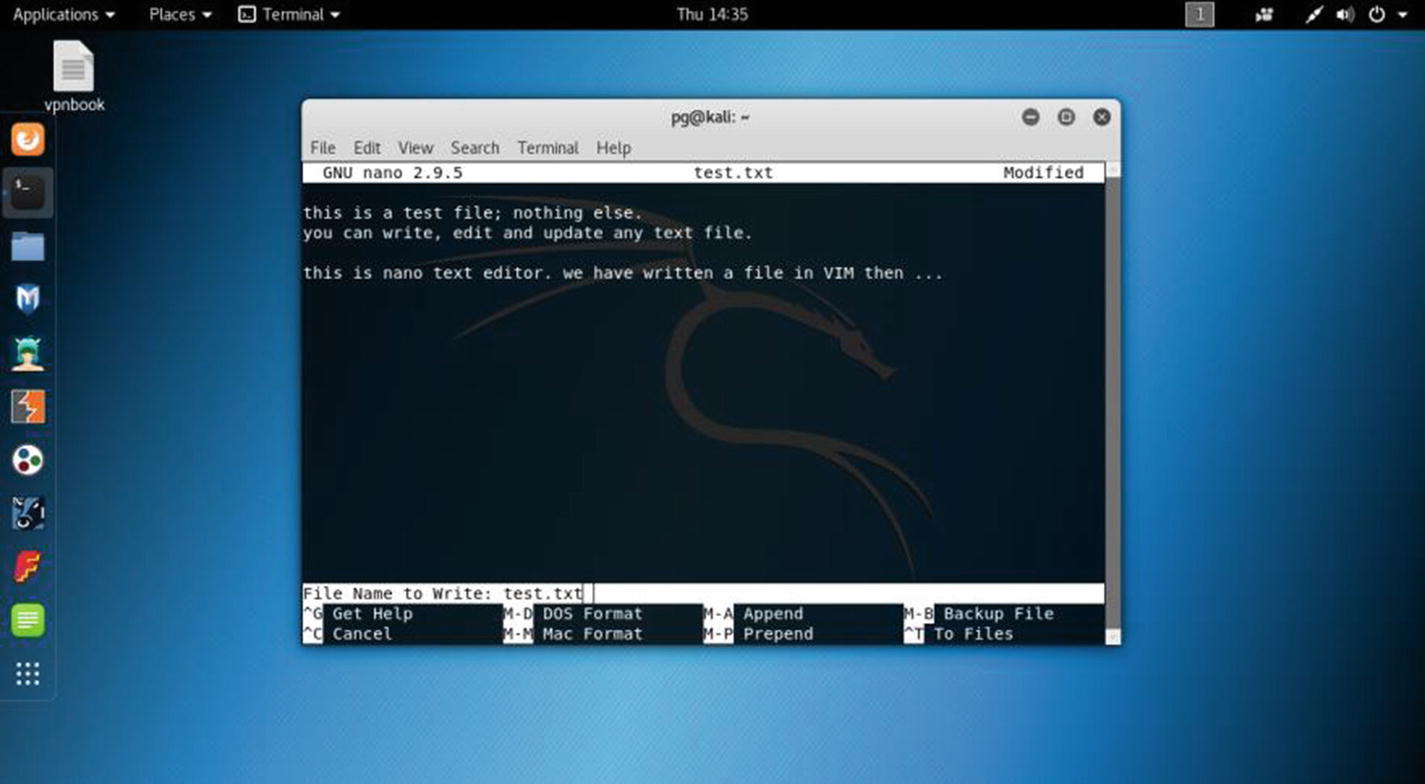
Opening the nano text editor in virtual Kali Linux
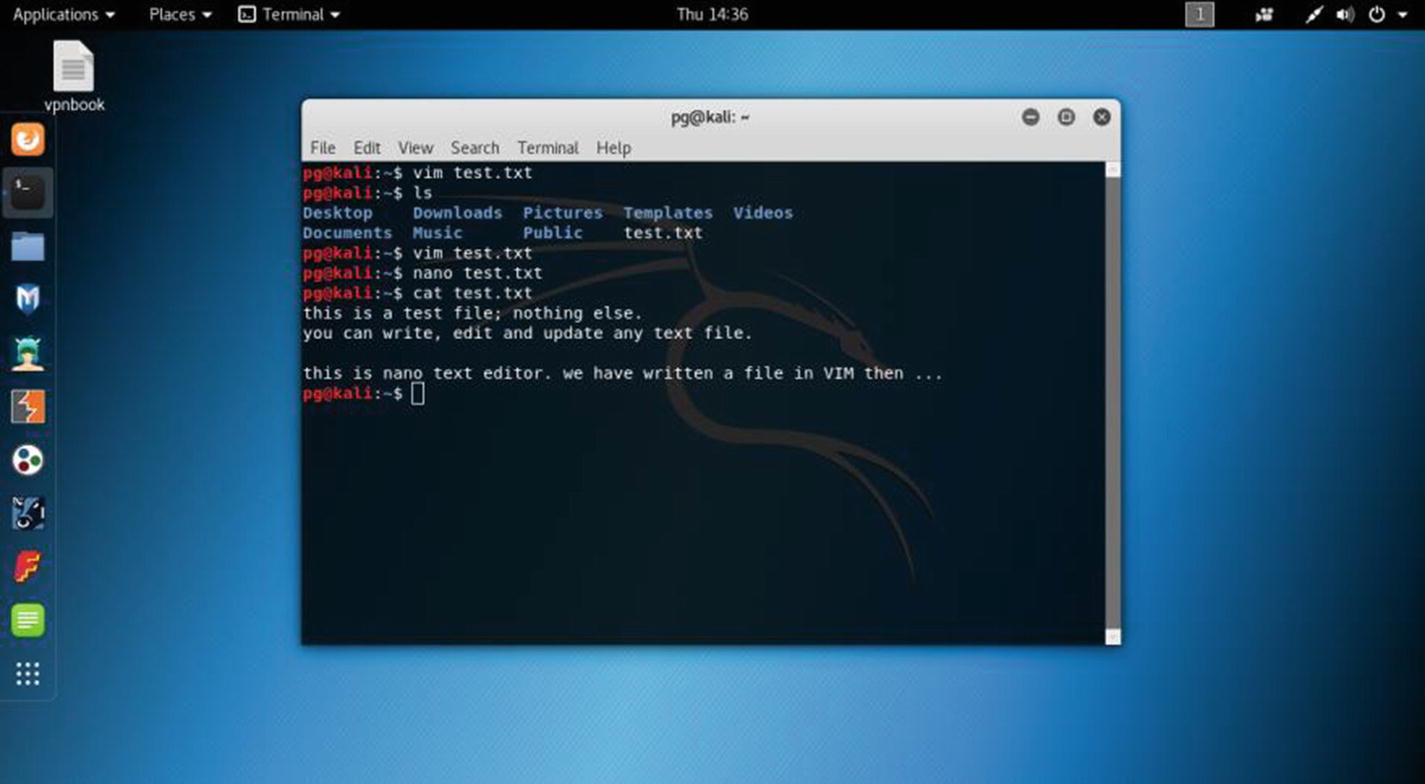
Using the cat command to read text in virtual Kali Linux
Now you can read the text file on the terminal. Usually, it is useful to write files in the designated directory, so all you have to do before you write a text file is to plan it accordingly. Suppose you want to write a file in the Documents directory. Then go to that directory by using the cd command . If you are unsure about where you are now, type pwd, and it will show your present position in the Kali Linux file system.
Since no graphical component is attached to these command-line-based text editors, they are super-fast and easy to use.
Tip
For persistent performance, you need to go to the Settings section, click the Power link, and change the power setting (Figure 6-6). Change the Blank Screen mode to Never. Also, change the automatic suspend to Off.
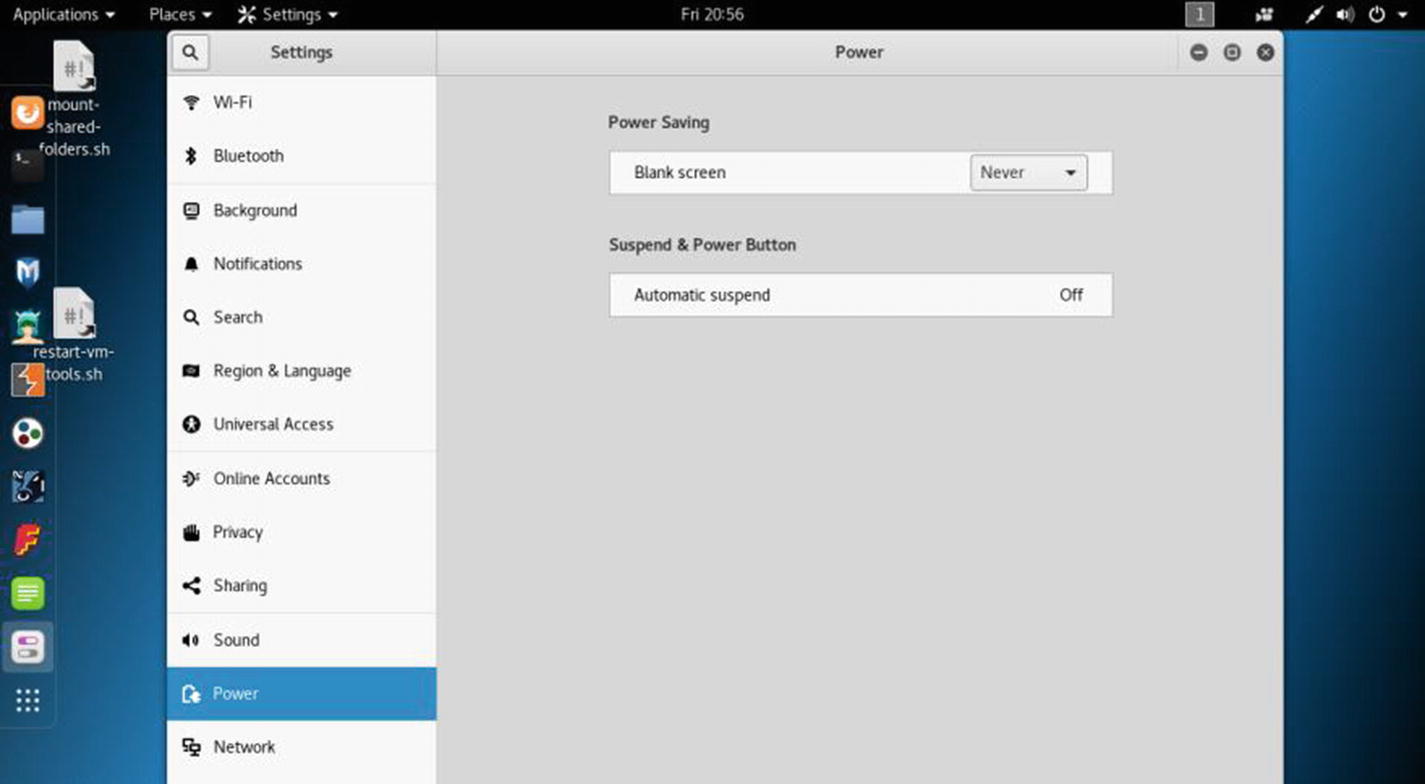
Changing the power setting in virtual Kali Linux
Hacking Tools

The Applications menu in virtual Kali Linux
Along with the Firefox ESR, terminal, and Files directory, a few famous hacking tools show up on the screen (Figure 6-7). They are Metasploit, Armitage, Burp Suite, Maltego, Beef XSS framework, and Faraday IDE.
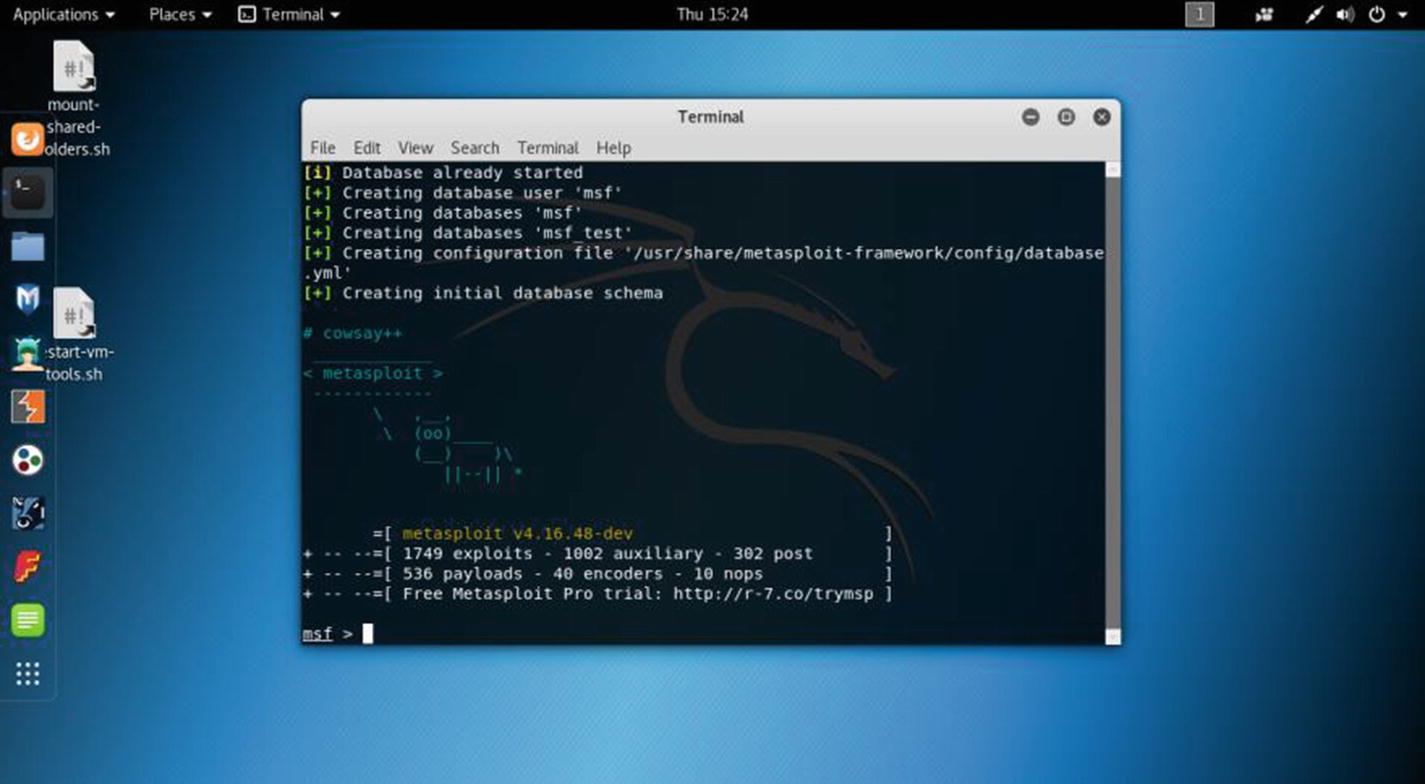
Opening Metasploit in virtual Kali Linux
Using Metasploit you can perform penetration testing. It enables you to find, exploit, and validate vulnerabilities .
Why is Metasploit so important?
As a penetration tester, you need an infrastructure and tools to perform penetration tests and extensive security auditing. The advantage of Metasploit is that Rapid 7 is constantly updating its modules and adding open source community support. It is therefore one of the most important tools for penetration testing. You will always get the latest exploits available through them. I’ll cover Metasploit in depth in Chapter 12.
Armitage has a close relationship with Metasploit. It’s a scriptable tool for Metasploit. It can envisage the targets and recommends the necessary exploits. The most valuable part of Armitage is that it can expose the post-exploitation features in the framework. It can capture data and downloaded files. If you work in a team, you can communicate through the shared event log.
The role of Burp Suite is quite different. In the previous hacking tools list, you saw that it belongs to the category that protects your web application. You need an integrated platform for performing the security testing of your web applications. Burp Suite fits ideally in that genre. It has various tools that work seamlessly together to support the entire testing process. Burp Suite begins with an initial mapping and analysis. The analysis of an application’s attack surface is important; you need to find the vulnerabilities first, and then you will exploit them. You can control the full testing manually as well as automatically.
An organization always wants to know the actual threat perception to their environment. The Maltego platform conveys a clear picture. Points of failure always exist within the infrastructure of an organization. Maltego has a unique advantage to demonstrate the complexities of even a single point of failure.
The Browser Exploitation Framework (BeEF) is a popular penetration tool that mainly focuses on the web browser. Currently, many attacks happen through the browser. Any environment has always one open door: the web browser. Usually, an attack starts with the browser and spreads throughout the main system. Using client-side attack vectors, BeEF allows a pen tester to assess the security threat.
Faraday is used mainly for security auditing. It started with a unique idea of launching a multiuser penetration test IDE. During a security audit, a large volume of data is generated. In a single integrated penetration test environment (IPE) that data can be indexed, analyzed, and distributed. Moreover, you can reuse the available tools. Without a good IDE, programming is almost impossible; Faraday is like an IDE but for the penetration testers. The design is extremely simple.
This was a brief picture of Kali Linux from the inside. You will learn more about these tools along with the others in the coming chapters.
Staying Updated with SSH
Secure Shell (SSH) is a kind of cryptographic network protocol. It is meant for operating network services securely, although it is not secure all the time. Especially the default port 22 can be a victim of a man-in-the-middle (MITM) attack . An MITM can be done by using tools like Ettercap. Ettercap intercepts network communication between two systems without either system noticing the interception. It can then alter that communication maliciously.
The specialty of SSH is that you can log in to your home computer remotely. From any Windows machine, sitting outside your home, you can open the terminal of your Virtual Kali Linux system, enter it, and keep on working into it. The SSH server of virtual Kali Linux just needs to be in running mode so that it can let the client enter the system.
Usually, in a client-server architecture, the client is any remote Windows machine, and the virtual Kali Linux machine is the SSH server that listens to the port that you have chosen. In Telnet, the password is sent in plain text. Any packet analysis can make it insecure. SSH is much safer than Telnet; MITM attacks to break the SSH protocol are difficult to conduct and require high skills. And they rarely happen. Moreover, you do not need to use SSH all the time to access your system remotely. I will also discuss how to secure your SSH in the coming section.
The latest Kali Linux comes with an SSH server; but by default, it remains in the blacklisted init scripts. If you enable a port that listens to the SSH server, you can remotely access your home Kali Linux from another remote machine.
Any SSH client such as Putty will allow you to remotely log in to your Kali Linux system; it will be a secure connection over an unsecured network. You need another computer to test it. You can also do it in your virtual lab. You will log into Kali Linux from the host Windows system.
Let’s learn how to stay updated in your Kali Linux with the SSH client.
Getting Started
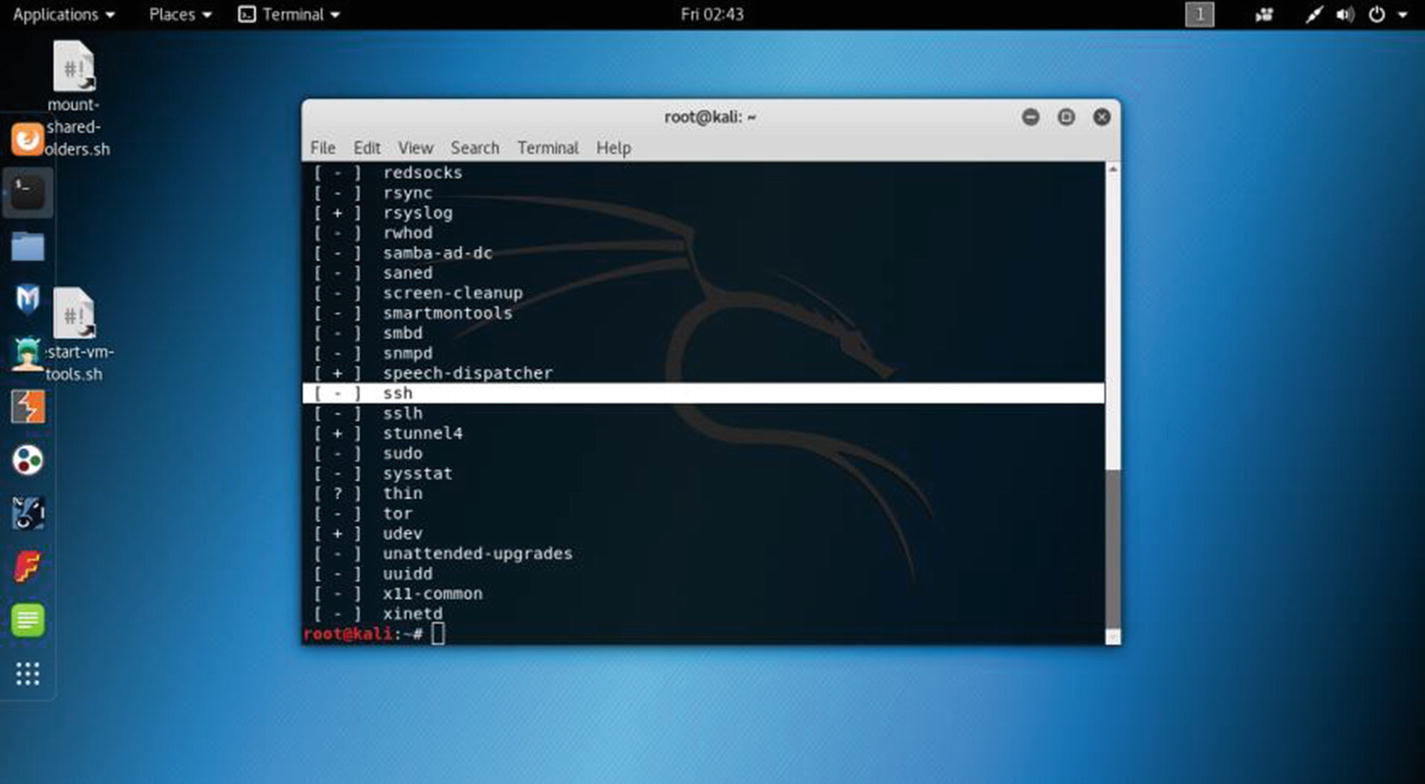
Opening all services’ status in virtual Kali Linux
The service --status-all command output will show you the + sign this time.
For the next step, open your Kali Linux terminal to see the status of the SSH server.
The status shows that the SSH server is running, and it is listening to the default port of 22.
Note
As noted, this is not secure. You’ll correct this in the upcoming sections.
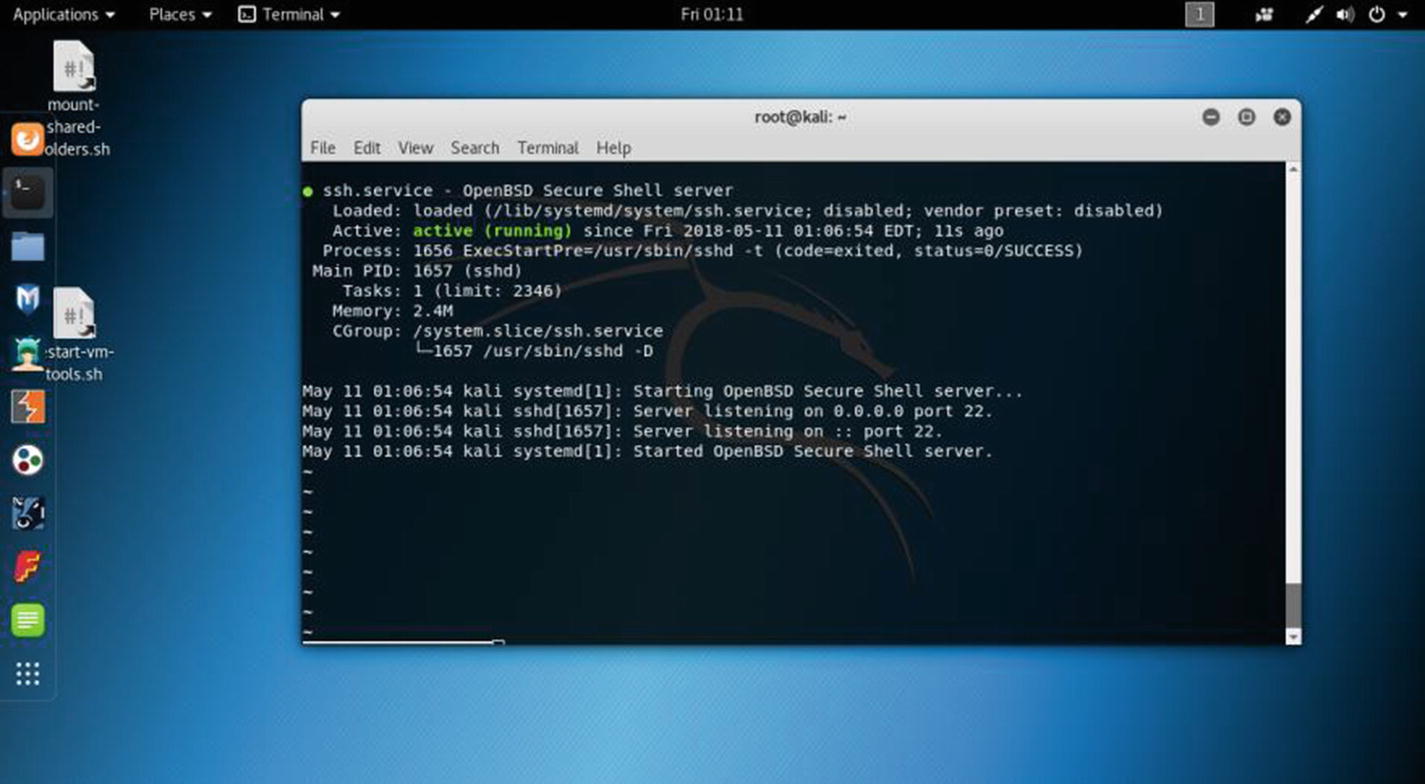
The SSH server is running in virtual Kali Linux
Let’s see how the status output looks in your terminal.
Working with Blacklists and Whitelists
Press Ctrl+C to exit and check whether SSH is disabled in your init script. There are two lists: a blacklist and a whitelist. Kali Linux by default is a blacklist SSH server for extra security. So, you need to “comment it out” in the blacklist and make it enabled in the whitelist. To open the lists, you need to go to the /usr/sbin folder.
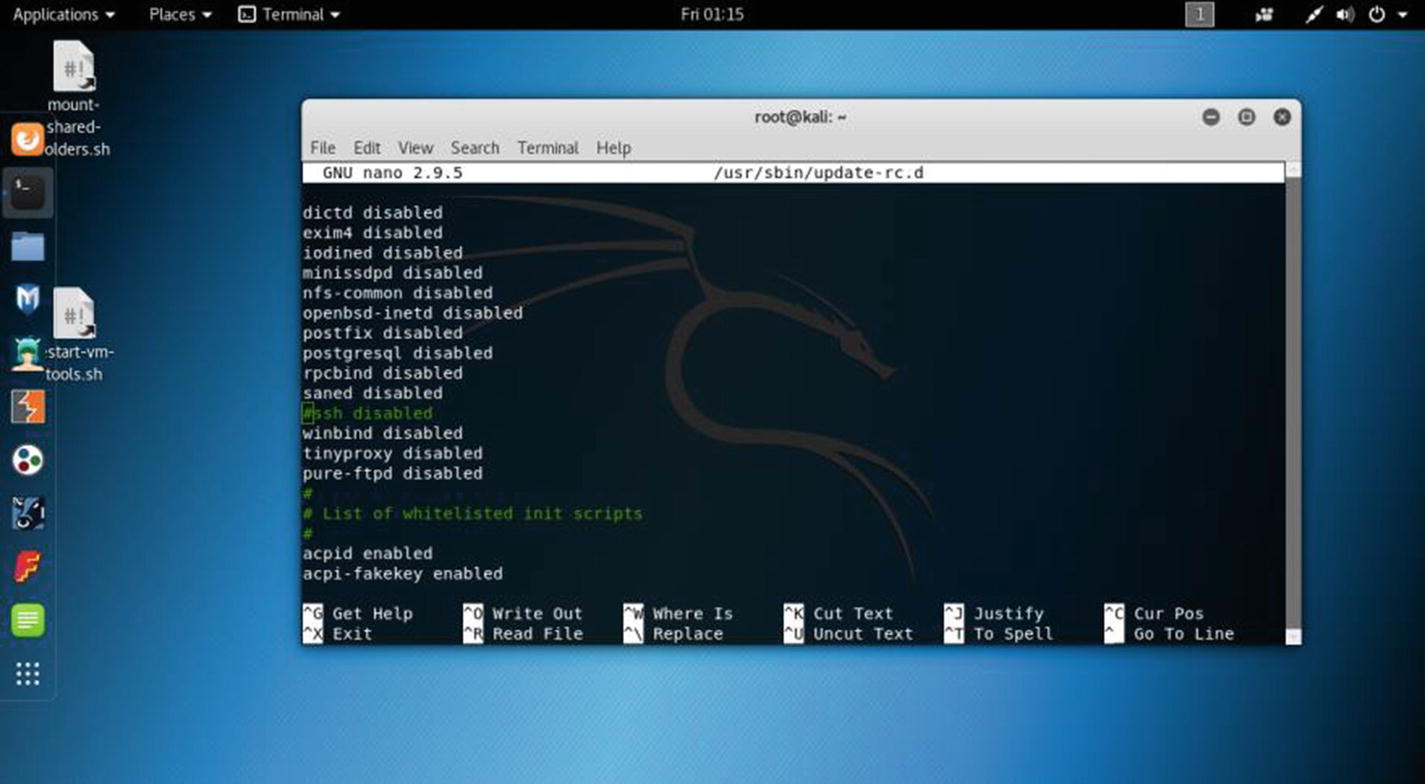
The blacklisted init scripts in virtual Kali Linux
Securing SSH
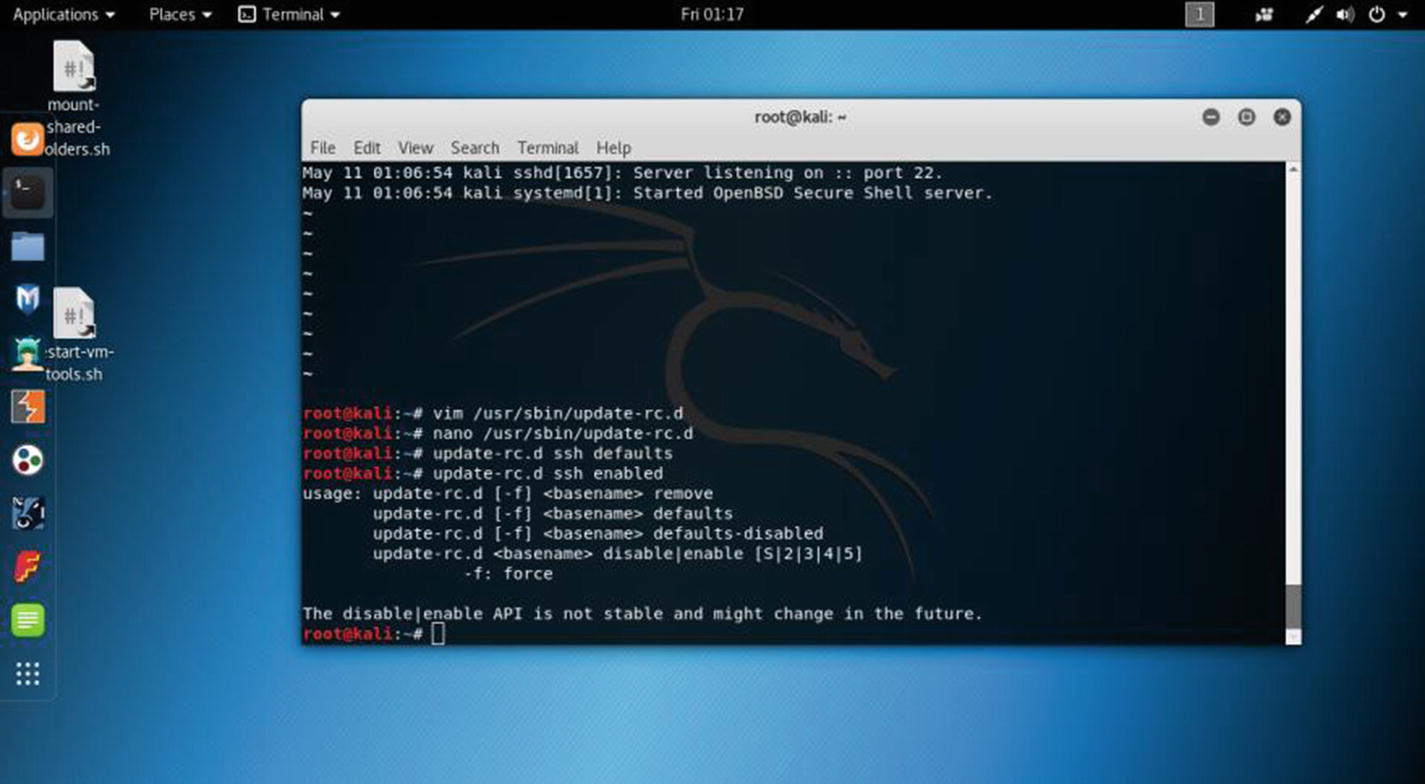
Updating the SSH server in virtual Kali Linux
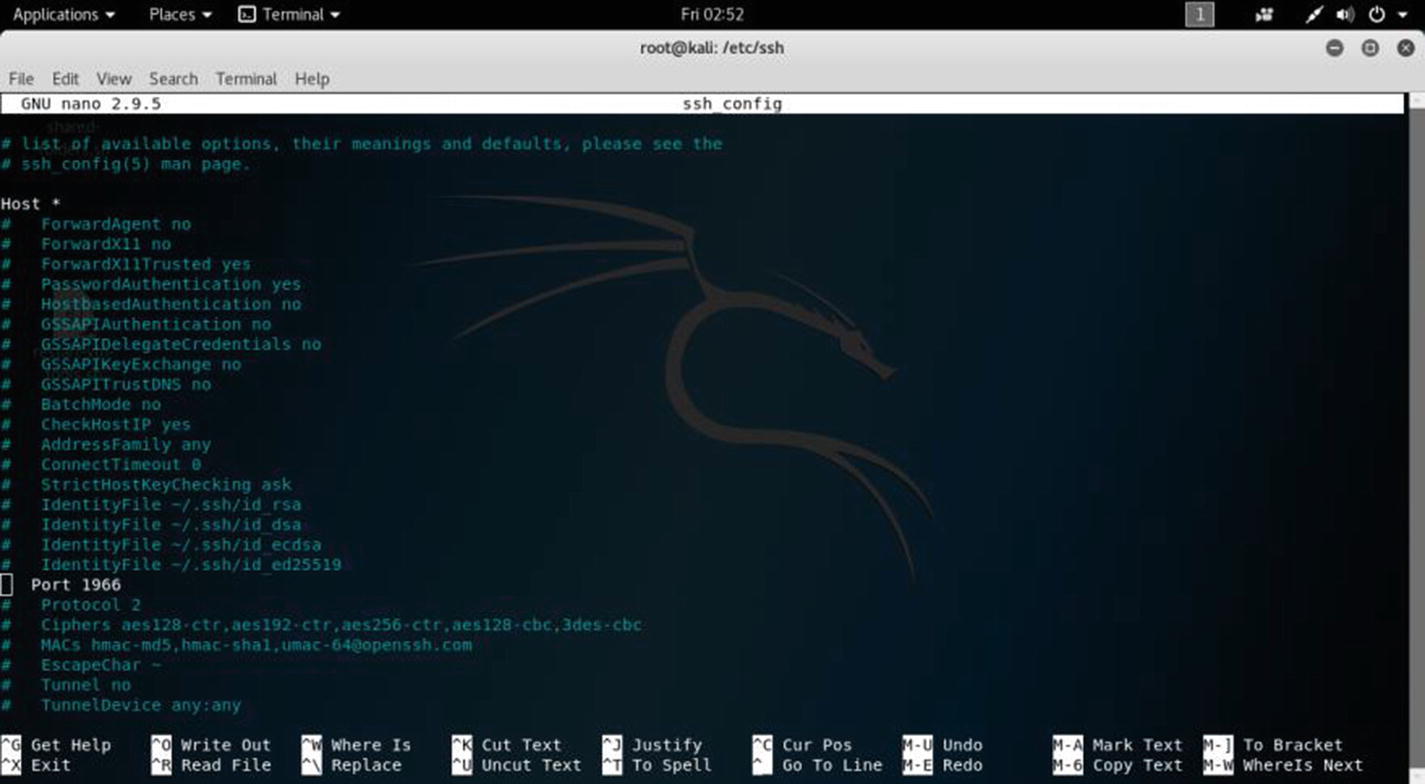
Changing the port in virtual Kali Linux
In the output, you will find one line where port 22 is commented out. You need to “uncomment” it first. Then you can change it. I have changed it to 1966 just to show you an example, although I will maintain the default port 22 and connect through that port remotely.
Note
It is not mandatory that you always have to create an RSA key pair. Sometimes, security people do that for extra security. For your virtual lab, you do not need to change the default system. You can test from any machine including the host Windows machine using the default port of 22.
Connecting to Kali Linux Over SSH
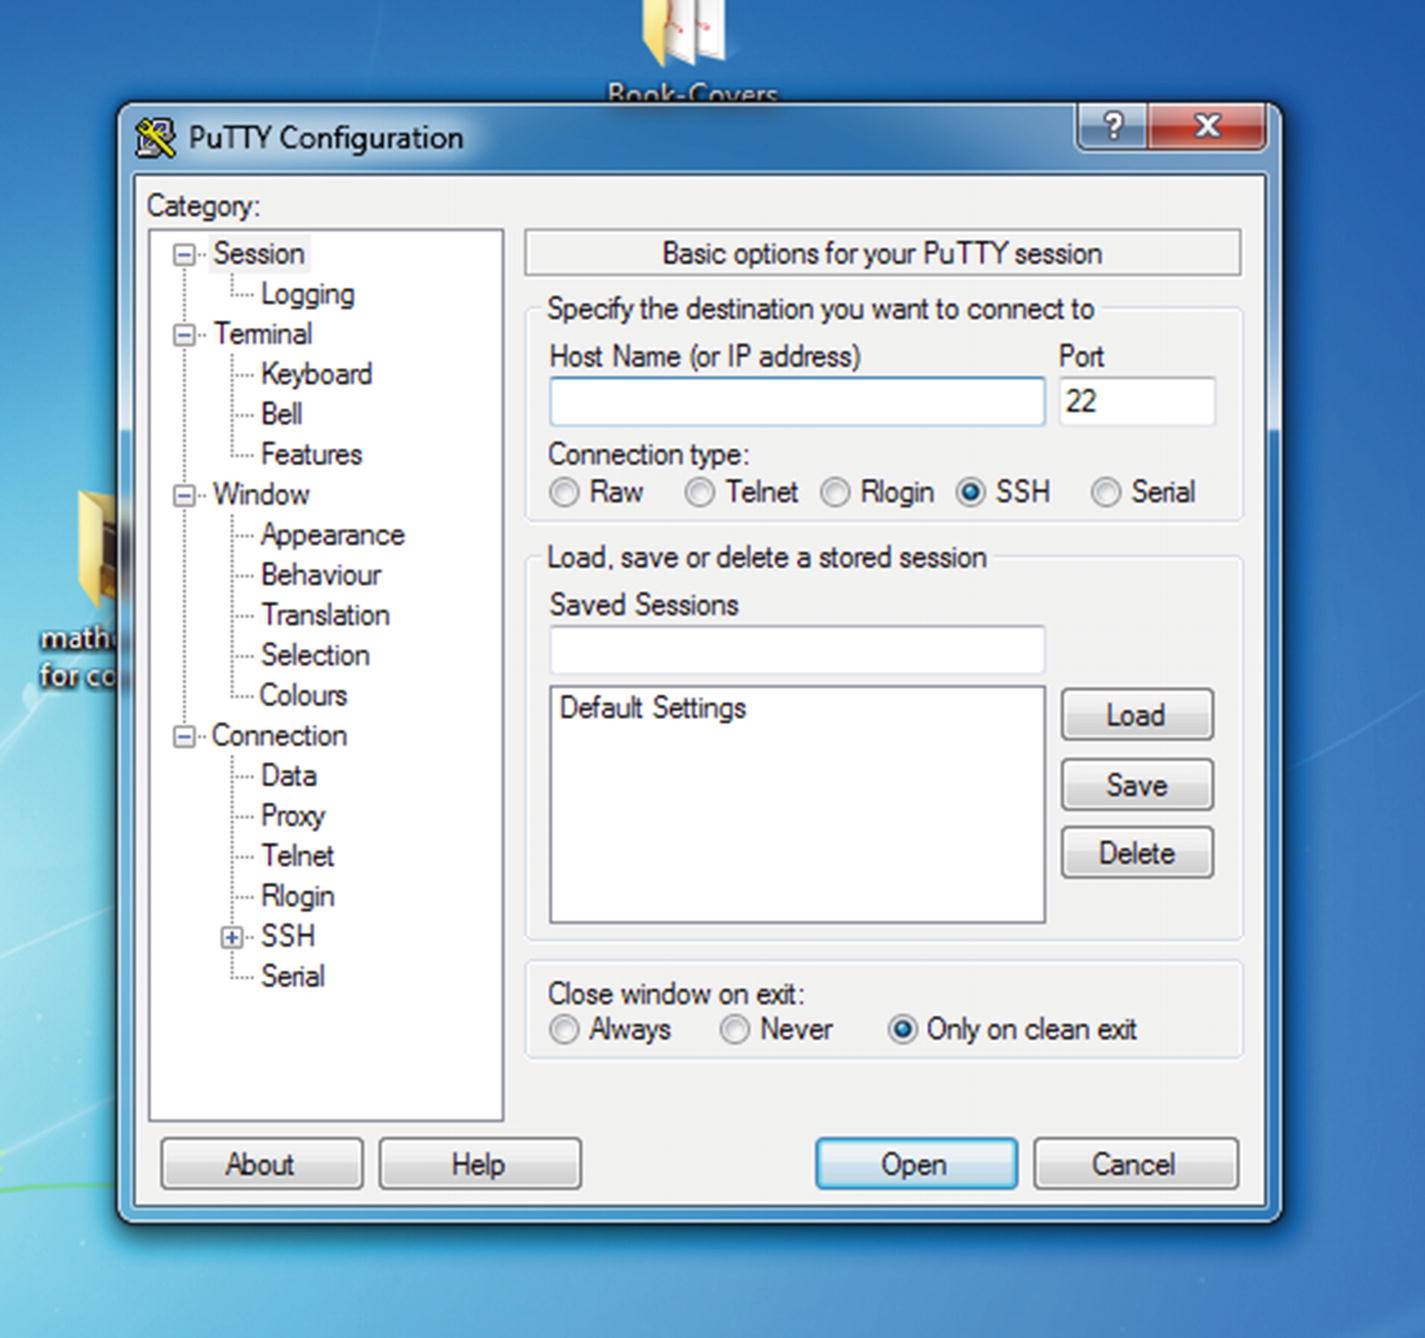
Opening Putty on any remote Windows PC
Next you need to provide the IP address of your virtual Kali Linux. Knowing the IP address is easy. You have already learned it. Type ifconfig on your Kali Linux terminal and copy the address.
Once you provide the IP address and click the Open button, Putty will start connecting to your Kali Linux SSH server through the port 22.
Figure 6-15 shows the host Windows connecting to the virtual Kali Linux system and opening the Kali Linux terminal remotely.
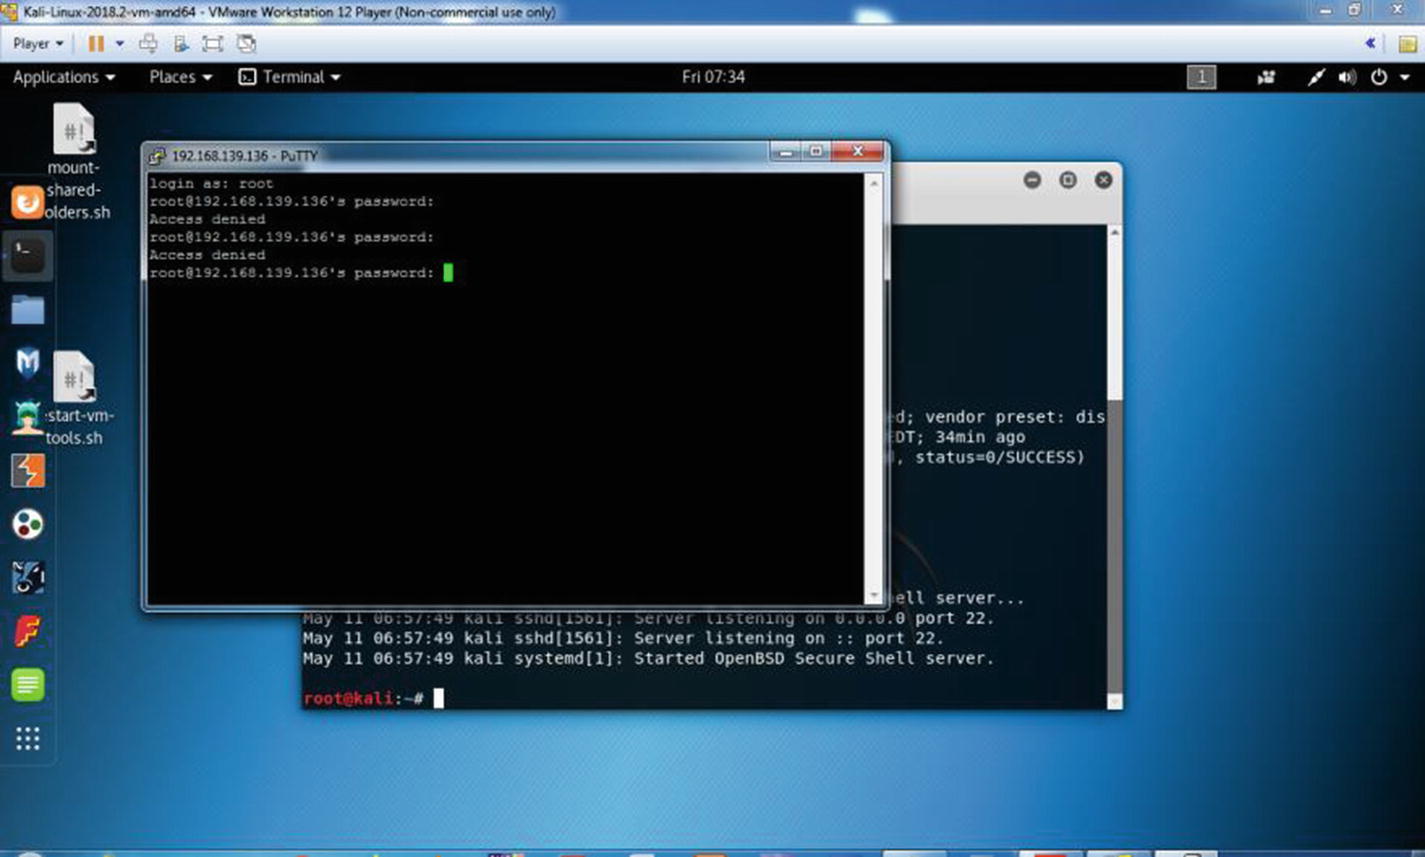
Connecting to the virtual Kali Linux remotely using Putty
You won’t get any graphical access; it will be through terminal. However, that is enough for a seasoned information security person to keep working remotely.