When a database is first created, for a given amount of time, the tables in the database will remain small. Depending on the nature of the data stored in the table or the amount of time that has passed, you may find yourself in a situation where one or more of your tables have experienced a significant amount of growth since the table was first created. There can be many motivations for managing the relative age of the data stored in a table or how data is stored overall. The goal of this chapter will be to focus on organizing your data in a way that can be managed long term. While many companies also have the goal of improving performance when it comes to managing data, that will not be the focus of this chapter.
SQL Server provides the functionality to separate or sort your data into various groups or categories. When it comes to managing data growth, this data is normally sorted by date. You are not limited to organizing your data by a given date, but for the purposes of this chapter, that will be my focus. You will first want to figure out how to organize your data, not only how the data will be grouped but also how the data will be stored. Setting up the functionality for sorting and storing your data will allow you to start moving your data into those various groups that you have created. There are options available on how to group the data, and you have the possibility of using multiple different ways to store your data. This allows you to design a solution that can support a highly transactional throughput for recent data and allow older data to be designed in a way to support reporting.
Partitioning
Looking at one of your database tables, you may find that this table has grown to a size that has made it difficult to manage. Ideally, you would identify these tables before they had grown to that size. In either scenario, you are looking at a table where you would like to better manage archiving data or maintaining indexes. Conceptually you will want to think about how you access this data. To make the process of organizing this data more efficient, you will want to choose a column that will always be used when accessing this data. The process of organizing this data by some value is called partitioning.
The first step in partitioning will be figuring out how you want to consistently access your data. I will be working with the dbo.RecipeHistory table. For the purposes of this chapter, this table represents information about when recipes have been used over the past 2 years. I may decide for legal, user experience, or other reasons that I want to start the process of archiving some of this historical information. Since this is a historical table, I will be choosing to partition, that is, organize or sort, this data based upon the DateCreated. Choosing how this data will be partitioned leads to the next decision that must be made.
Once I have decided how the data will be sorted, I also need to decide specifically what data will be sorted together in groups. The groups of data that are sorted together are called ranges. One thing to consider when choosing ranges to be partitioned is to think about how frequently data will be accessed within each range. For most applications, that would mean that recent data was accessed frequently and data that was much older was accessed less frequently. If I had 5 years of recipe history data, there may be a business reason why I would have data for this long of a period, but for day-to-day operations I may normally only access information on a daily, weekly, monthly, or annual basis.
Knowing how the data is accessed in general will allow me to determine the ranges I will use to partition the data. Once you figure out the ranges on how you would like to store your data, you will need to create filegroups. Filegroups can also benefit you by allowing you to choose how you store your data. You can keep more frequently used data in filegroups on faster storage. You can also keep less frequently used data on filegroups in slower storage. This can allow you to change how your data is stored in a way that allows you to save money. The filegroups operate like a logical structure as to how the data will be sorted. When you are using a database that does not have any additional filegroups, you will see that there is a single filegroup named primary. The T-SQL code to create these filegroups is shown in Listing 15-1.
ALTER DATABASE Menu
ADD FILEGROUP RecipeHistory2018;
ALTER DATABASE Menu
ADD FILEGROUP RecipeHistory2019Q1;
ALTER DATABASE Menu
ADD FILEGROUP RecipeHistory2019Q2;
ALTER DATABASE Menu
ADD FILEGROUP RecipeHistory2019Q3;
Listing 15-1
Create Filegroups
In this example, I have created four different filegroups. The first filegroup that was created will hold all the recipe history prior to 2019. The next two filegroups are each for the first two quarters of the calendar year in 2019. The third filegroup is designed for the third quarter of 2019. Once I create the filegroups, I will need to create any files that will be used by the filegroups. For the example in this chapter, we will be creating one file per filegroup. You can create these files using T-SQL in Listing 15-2.
ALTER DATABASE Menu
ADD FILE
(
NAME = RecipeHistFG2018,
FILENAME = 'D:SQLDataRecipeHistFG2018.ndf',
SIZE = 50MB
)
TO FILEGROUP RecipeHistory2018;
ALTER DATABASE Menu
ADD FILE
(
NAME = RecipeHistFG2019Q1,
FILENAME = 'D:SQLDataRecipeHistFG2019Q1.ndf',
SIZE = 50MB
)
TO FILEGROUP RecipeHistory2019Q1;
ALTER DATABASE Menu
ADD FILE
(
NAME = RecipeHistFG2019Q2,
FILENAME = 'D:SQLDataRecipeHistFG2019Q2.ndf',
SIZE = 50MB
)
TO FILEGROUP RecipeHistory2019Q2;
ALTER DATABASE Menu
ADD FILE
(
NAME = RecipeHistFG2019Q3,
FILENAME = 'D:SQLDataRecipeHistFG2019Q3.ndf',
SIZE = 50MB
)
TO FILEGROUP RecipeHistory2019Q3;
Listing 15-2
Add Filegroups to Menu Database
Looking at the preceding T-SQL code, I am altering the Menu database and adding a file to the database. When I create the file, I specify the logical name, the filename and file path, the file size, and the filegroup associated with that file.
The filegroups and the files determine where our data will be saved. I must configure how to save that data to those files and filegroups. There are couple different database objects that need to be created in T-SQL before data can be stored in the filegroups. You have already determined how you want the data sorted, and now all you need is to issue T-SQL commands so that SQL Server also knows how to sort this data. This first step is to create a function that tells SQL Server how to sort data for a partition. This type of function is known as a partition function. In Listing 15-3, you can see the T-SQL code to create the partition function.
CREATE PARTITION FUNCTION RecipeHistFunc(DATETIME)
AS RANGE RIGHT FOR VALUES
(
'01/01/2019',
'04/01/2019',
'07/01/2019'
);
Listing 15-3
Create Partition Function
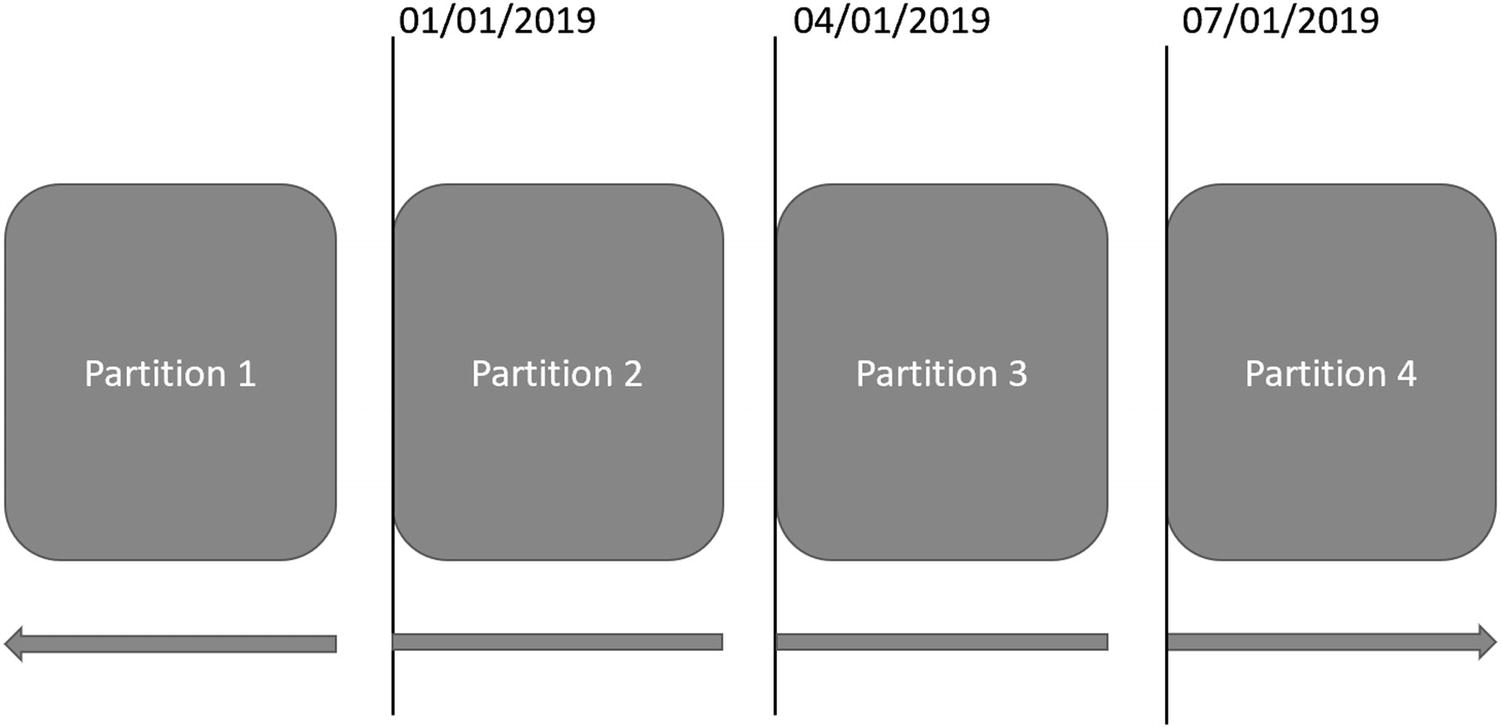
In Listing 15-3, I specified the range of the function as RIGHT. The range is directly related to the values provided as part of the partition function. In the case of a right range, this signifies that the value is on the right-hand side of the boundary when separating your partitions. When using the T-SQL code from Listing 15-3, any value up to January 1, 2019, will end up in the first partition. The second partition will contain all values beginning exactly with January 1, 2019, up to April 1, 2019. However, any data from April 1, 2019 until right before July 1, 2019, will exist in the third partition. As the partition function is currently designed, all data that is created on or after July 1, 2019 will end up in the fourth partition. An example of what right partitions would look like can be seen in Figure 15-1.
Figure 15-1
Partition Using Right Range
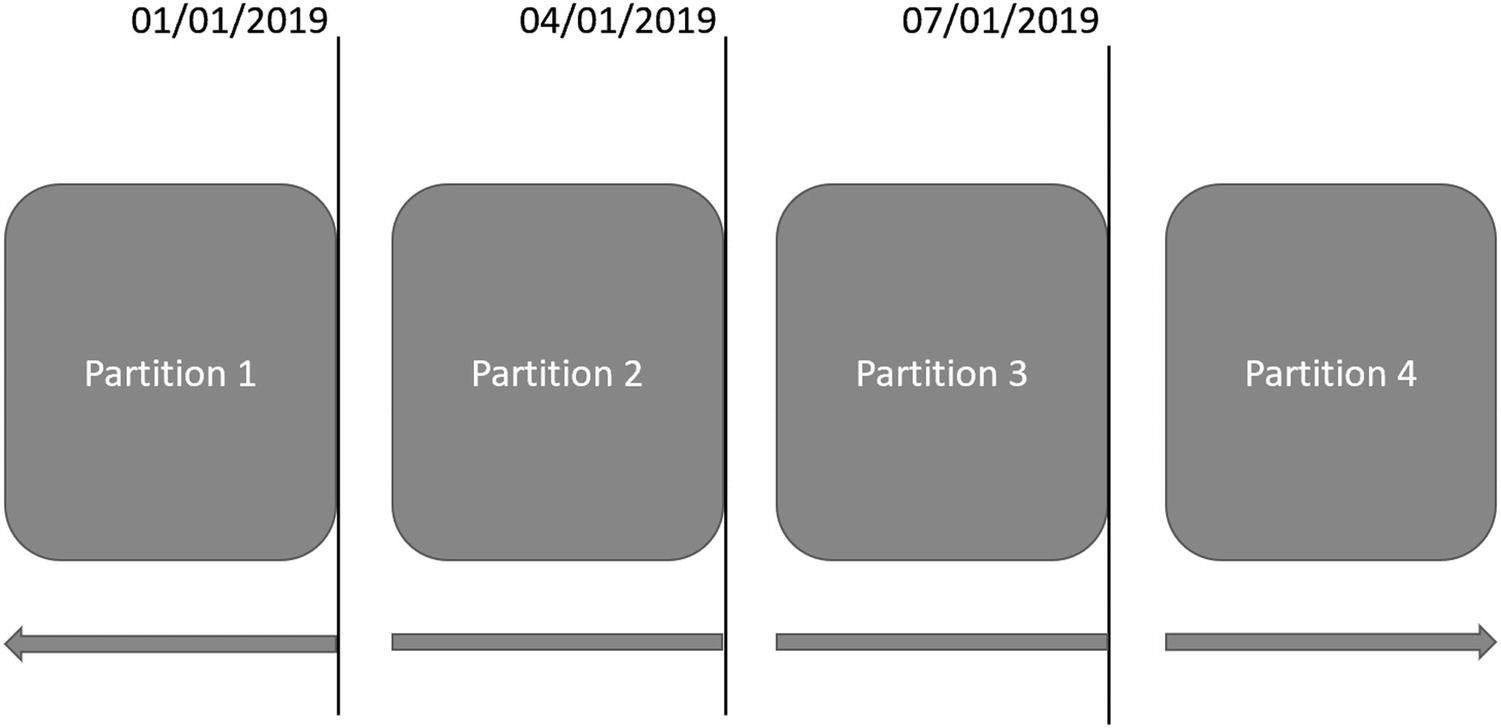
The other option when creating a partition function is specifying the range as LEFT. If I had specified a left range or not specified left or right, the first partition would include any values up to and including January 1, 2019. In Figure 15-2, you can see how the partitions would look if I had used a left range.
Figure 15-2
Partition Using Left Range
With the data we are using, the data type is DATETIME2(7). If I were to use the left range, any data happening 1 millisecond after midnight on January 1, 2019, would have ended up in the second partition. You can see how important it is to understand your data and your data types when creating partition functions.
Creating a partition function is helpful. A partition function lets SQL Server know how to partition the data. However, you also need to indicate how SQL Server should use that partition function. This is where you will want to create a partition scheme. A partition scheme maps a specific partition function to filegroups. You can see the T-SQL code to create a partition scheme in Listing 15-4.
CREATE PARTITION SCHEME RecipeHistRange
AS PARTITION RecipeHistFunc TO
(
RecipeHistory2018,
RecipeHistory2019Q1,
RecipeHistory2019Q2,
RecipeHistory2019Q3
);
Listing 15-4
Creation Partition Scheme
The partition scheme has a specific name and references a partition function to use. One difference you can see between the partition function and the partition scheme is that the partition function specified three values. However, the partition scheme has four values. Since we specified that the range on the partition function was right, all values before the first date in the partition function specified will end up in the first filegroup. Reviewing the T-SQL code between Listing 15-3 and Listing 15-4, you can see that the first value specified in the partition function correlates with the begin date for the first quarter of 2019.
Before we get into applying this partition scheme to a specific data table, we will want to get familiar with some additional aspects associated with partitions. Almost any time someone talks about partitions, they also specify that partitions are not necessarily something that is used to improve performance. There are many reasons that partitions may not improve performance, and some of those reasons are because partitions may not always be properly implemented. When considering partitioning, you want to focus on what data column you will be using to partition your data. This is known as the partitioning column. The reason that you will want to be aware of your partitioning column is because this partitioning column will determine how you write your T-SQL code going forward.
The reason that you will want to use your partitioning column in all your T-SQL code is due to how SQL Server uses partitions. Once you have partitioned your data, SQL Server will search through partitioned data differently than non-partitioned tables. Once a partition has been implemented, SQL Server will use the partition to figure out which section of the table has the data that a query is requesting. If I search for a record by date, SQL Server will very quickly know exactly which partition to access to find the data. However, if I do not specify a date and I am looking for information about a specific recipe, SQL Server will look through every partition to find the information I have requested. Selecting a good partitioned column is important when implementing partitioning in your database. If you do not choose a column that is frequently or almost always used as part of your queries, you may incur additional performance overhead associated with having a partition.
It is generally advised that you should not implement partitioning primarily to improve performance. While the overall goal is to simplify managing your data over time, you can implement some functionality in order to increase the possibility of improving performance. One such method is in how you index your partitioned table. You will want to create indexes that are segmented like the partition on your table. These indexes are known as aligned partitioned indexes. Aligned partitioned indexes can be clustered or non-clustered. There are different requirements depending on if the aligned partitioned index is unique. However, the general outcome is the same. Both types of aligned partitioned indexes will include a reference to the partitioned column. In the case of a unique aligned clustered or non-clustered index, the partitioned column must be part of the index. On the other hand, when creating a non-unique aligned index, you do not have to specify the partitioned column. If the partitioned column is not part of the aligned index, SQL Server will add a reference back to the partitioned column as part of the index.
There is also the possibility of creating indexes that are not segmented like your partition. However, these indexes can have their own partition. These are considered non-aligned partitioned indexes. There are some specific cases where you would want to use this type of index, such as confirming that every value in a column that is not the partitioning column is unique. However, I would limit the use of non-aligned partitioned indexes as your queries that rely on indexes may perform worse as the entire table may need to be scanned to find all relevant records. Since the non-aligned partitioned index is not part of the partition function on the table, you do not need to specify the partition column as part of the index.
Ultimately, the goal when using partitioning is to reduce the number of records SQL Server is accessing when trying to read or update data. You can write your queries in such a way that SQL Server can quickly determine exactly which partitions have the data requested. When SQL Server generates an execution plan ignoring specific partitions, this is known as partition elimination. SQL Server can treat a very large table like many smaller tables. In so doing, SQL Server only needs to interact with a subset of the partitioned table. This is your best chance to improve performance as a result of partitioning. However, in order to have your queries take advantage of partition elimination, you will need to reference the partitioning column in your query. Otherwise, SQL Server will not know which partition to access.
Previously in this section, I created new filegroups and added those to the current database. I also created a new partition function and scheme. In Listing 15-5, you can see the T-SQL to add a new partition.
ALTER DATABASE Menu
ADD FILEGROUP RecipeHistory2019Q4;
ALTER DATABASE Menu
ADD FILE
(
NAME = RecipeHistFG2019Q4,
FILENAME = 'D:SQLDataRecipeHistFG2019Q4.ndf',
SIZE = 50MB
)
TO FILEGROUP RecipeHistory2019Q4;
ALTER PARTITION FUNCTION RecipeHistFunc(DATETIME2)
AS SPLIT RANGE ('10/01/2019');
ALTER PARTITION SCHEME RecipeHistRange
NEXT USED RecipeHistory2019Q4;
Listing 15-5
Add New Partition to Existing Partition
In order to create a new partition, I need to take the existing partition function and break the existing partition at a specified point. Before running the T-SQL code in Listing 15-5, the last range in the partition function included all data on and after July 1, 2019. The SPLIT RANGE code on the last partition takes the last partition beginning on July 1, 2019, and breaks it into two partitions. The partition is separated on the date October 1, 2019, provided in Listing 15-5. The previous partition is then split into two partitions. The first of these two partitions includes all dates beginning on July 1, 2019, up to but not including October 1, 2019. The second partition covers all dates on October 1, 2019, and later.
Most of the preceding database code follows the same logic as shown previously in this chapter. I create a new filegroup and add the file to the database. I also need to change the partition scheme to let SQL Server know the next filegroup that should be used as part of the partition scheme. Once that is complete, I can update the partition function. This will allow SQL Server to save data in the correct filegroup based upon the new specifications.
Partitioned Tables
While we have created filegroups, files, partition functions, and partition schemes, none of this partitioning logic has been applied to any data within the databases. We either have the option of creating a new table or partitioning an existing table. For this example, I will start with creating a new table that is partitioned as part of the table creation. You can see the T-SQL to create the partitioned table in Listing 15-6.
CREATE TABLE dbo.RecipeHistory
(
RecipeHistoryID BIGINT NOT NULL IDENTITY(1,1),
RecipeID SMALLINT NOT NULL,
RecipeHistoryStatusID TINYINT NOT NULL,
DateCreated DATETIME NOT NULL,
DateModified DATETIME NULL,
CONSTRAINT pk_RecipeHistory_RecipeHistoryID
PRIMARY KEY NONCLUSTERED
(RecipeHistoryID, DateCreated),
CONSTRAINT fk_RecipeHistory_RecipeID
FOREIGN KEY (RecipeID)
REFERENCES dbo.Recipe(RecipeID),
CONSTRAINT fk_RecipeHistory_RecipeHistoryStatusID
FOREIGN KEY (RecipeHistoryStatusID)
REFERENCES
dbo.RecipeHistoryStatus(RecipeHistoryStatusID)
)
ON RecipeHistRange (DateCreated);
Listing 15-6
Create Partitioned Table
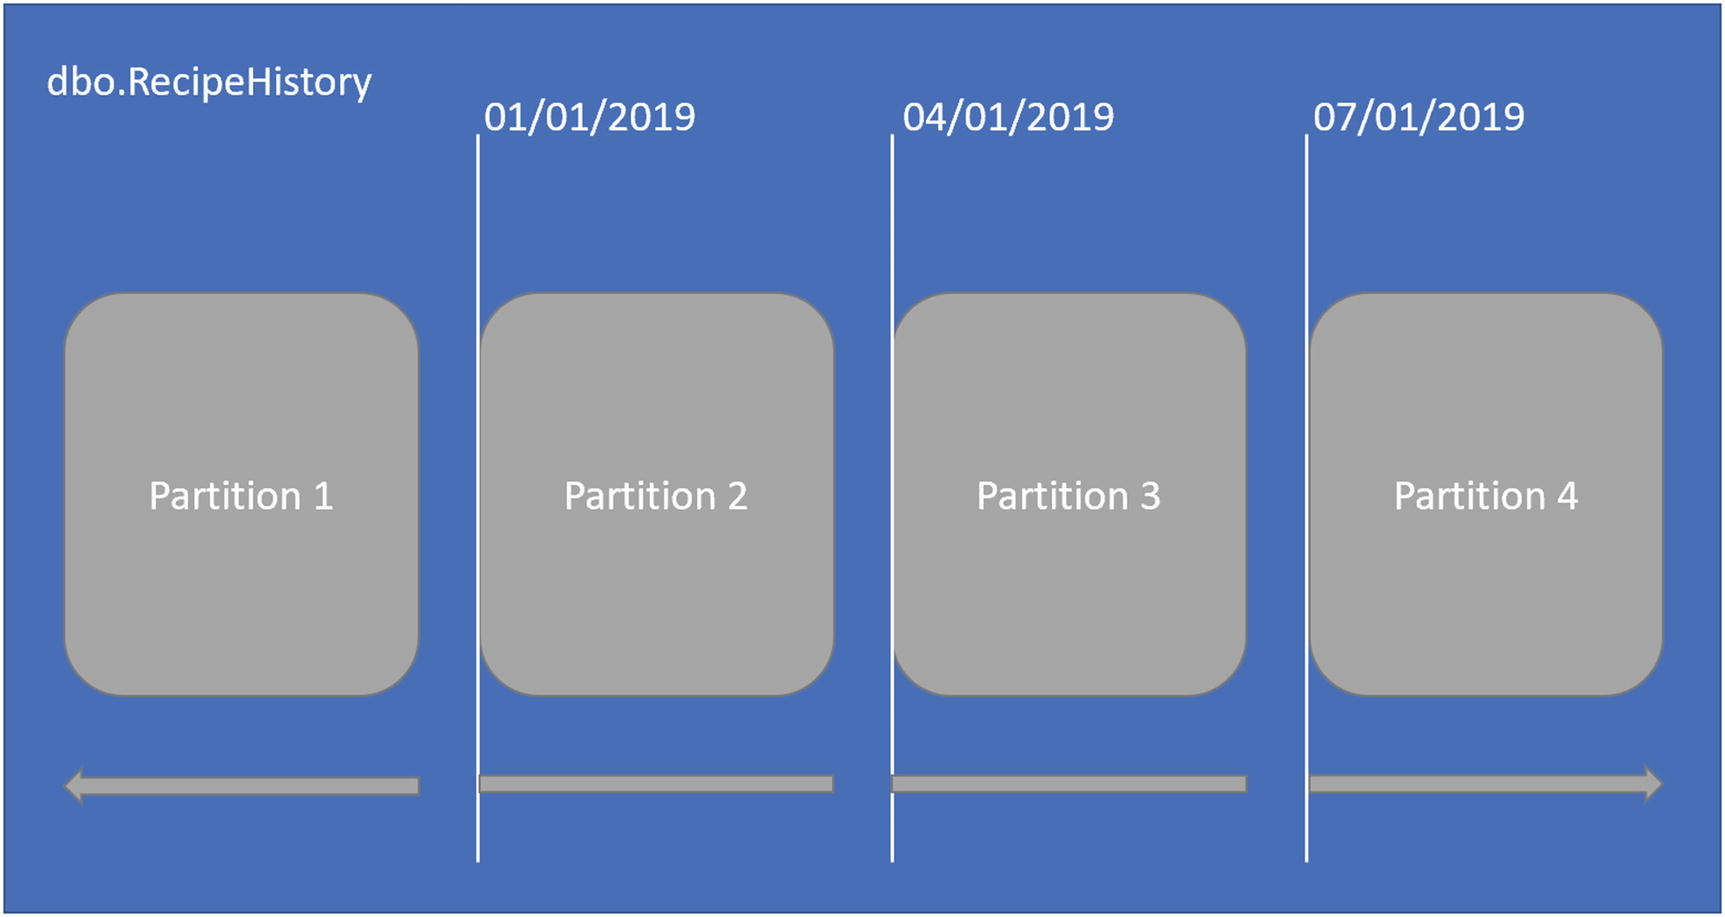
In the preceding code, the last line indicates that the table should be created on the partition scheme from Listing 15-4. Once the partitioned table is created in Listing 15-6, the structure of the table will look like Figure 15-3.
Figure 15-3
Partitioned Table Data Structure
Inside of the partitioned table, you can see each partition clearly. Within the partitioned table, you can also see how the right range on the partition function has broken out the data into each partition. You can confirm how the table is partitioned by running the query in Listing 15-7.
SELECT tbl.[name] AS TableName,
sch.[name] AS PartitionScheme,
fnc.[name] AS PartitionFunction,
prt.partition_number,
fnc.[type_desc],
rng.boundary_id,
rng.[value] AS BoundaryValue,
prt.[rows]
FROM sys.tables tbl
INNER JOIN sys.indexes idx
ON tbl.[object_id] = idx.[object_id]
INNER JOIN sys.partitions prt
ON idx.[object_id] = prt.[object_id]
AND idx.index_id = prt.index_id
INNER JOIN sys.partition_schemes AS sch
ON idx.data_space_id = sch.data_space_id
INNER JOIN sys.partition_functions AS fnc
ON sch.function_id = fnc.function_id
LEFT JOIN sys.partition_range_values AS rng
ON fnc.function_id = rng.function_id
AND rng.boundary_id = prt.partition_number
WHERE tbl.[name] = 'RecipeHistory'
AND idx.[type] <= 1
ORDER BY prt.partition_number;
Listing 15-7
View Partitions for Partitioned Table
The preceding query shows the table name, the partition scheme used on the table, the partition function used on the table, the partition number, value to partition the data, and the number of rows in each partition. Figure 15-4 shows the results from the query in Listing 15-7.
Figure 15-4
Data for Partitioned Table
The preceding results were taken immediately after the partitioned table was created. You can see that the partition scheme used is RecipeHistRange and the partition function is RecipeHistFunc. The preceding boundary values match the ranges specified in Listing 15-3 when the partition function was created. Looking at the value in the rows column from Figure 15-4 above, you can see all the values are 0. This is because there are no rows in the table.
I inserted data from a pre-existing table into the partitioned table. Executing the same query from Listing 15-7, I can see how the data has been stored in the partitions. In Figure 15-5, you can see the number of rows per partition.
Figure 15-5
Data Added to Partitioned Table
In Figure 15-4, I showed the row counts per partition before any data was added to the dbo.RecipeHistory table. Figure 15-5 shows the number of rows per partition after the table is fully populated. The first partition has 203,493 rows. We know the actual number of rows in the partition, but we may still want to confirm that the table is partitioning data as we would expect. In Listing 15-8, I have written a query to count the number of records by date ranges.
SELECT
SUM(
CASE WHEN DateCreated < '1/1/2019'
THEN 1
ELSE 0
END
) AS Partition1,
SUM(
CASE WHEN DateCreated < '4/1/2019'
THEN 1
ELSE 0
END
) AS Partition2,
SUM(
CASE WHEN DateCreated < '7/1/2019'
THEN 1
ELSE 0
END
) AS Partition3,
SUM(
CASE WHEN DateCreated >= '7/1/2019'
THEN 1
ELSE 0
END
) AS Partition4
FROM dbo.RecipeHistory;
Listing 15-8
Query to Confirm Row Counts
The first column in the query returns a count of records that have a created date before January 1, 2019. Assuming the partition function is partitioning data as we would expect, the number of rows shown for the first partition from Figure 15-5 should match the value returned for column one from Listing 15-8. The query results from Listing 15-8 are shown in Figure 15-6.
Figure 15-6
Query Results Showing Row Count
Each column in Figure 15-6 shows the number of records that exist in each date range. The first column represents the number of records with a date created before January 1, 2019. The second column is the number of records with a created date starting on January 1, 2019, up to but not including April 1, 2019. The third column follows a similar pattern for records with a date created of April 1, 2019, all the way until July 1, 2019. The last column is for all records created on or after July 1, 2019. Comparing the values in these four columns to the rows column from Figure 15-5 can help us confirm that our partition function is working as expected. In our case, the value from the rows column from Figure 15-5 does correspond to the column values from Figure 15-6. This confirms that our data is being partitioned as expected.
We have verified that the data is getting sorted into the correct partition. However, we have not confirmed that we have any data that has a value that matches the exact date for our range partitions. One way we can verify this is to run a query, like the one in Listing 15-9, that shows the number of records with the exact date and time as the one specified for our partition function.
SELECT COUNT(*)
FROM dbo.RecipeHistory
WHERE DateCreated = '1/1/2019'
Listing 15-9
Query to Confirm Range Function
When I run the preceding query, I end up getting 14,720 results returned. This lets me know that my partition function is working as expected. If I had zero results returned, I might not be certain on which partition any records with the exact date and time of January 1, 2019, 12:00:00:00.000 would end up. However, since my partitions show the correct counts by date and time grouping, I know my partition is working as expected.
Previously in this section, we created an empty partitioned table. Once we partition the table, we have are ready to manage the growth of this table over time. This process of managing data growth is not a one-time occurrence but something that will need to be maintained going forward. In the case of the table, we will need to add partitions going forward. This process will be like the one shown in Listing 15-5. Adding partitions to an existing partitioned table is not the only time that we may need to partition tables. You may also find yourself in a situation where you did not originally intend to partition a table, but for any number of circumstances, you may now find you need to partition the table. In Listing 15-10, you can see the T-SQL code required to change a non-partitioned table to a partitioned table.
CREATE CLUSTERED INDEX ix_RecipeHistory_DateCreated
ON dbo.RecipeHistory (DateCreated)
ON RecipeHistRange (DateCreated);
Listing 15-10
Add Partition to Existing Table
Prior to implementing the partition, all the data in the table is ordered by the primary key. In this case, the primary key is the RecipeHistoryID. However, once we partition the table, we will want the table segmented by the created date. This requires changing how the data in the table is stored. To get SQL Server to update how the data is stored, you will need to drop the original primary key. At that time, you can create a new non-clustered primary key along with the date created. Including the date created as part of the partitioning column on the primary key is necessary for the partitioned table. Once this is done, you can create a clustered index on the date created. This index will be created on the partition scheme. You will want to be aware that adding this non-aligned primary key to the table will prevent you from using partition switching on this table.
If all the data in your existing non-partitioned table exists within one of the partitions on your new table, you have the option to easily move the data from the non-partitioned table to the partitioned table. Listing 15-11 shows the T-SQL code necessary to accomplish this task.
ALTER TABLE dbo.RecipeHistory
WITH CHECK ADD CONSTRAINT ck_RecipeHistory_MinDateCreated
CHECK
(
DateCreated IS NOT NULL
AND DateCreated >= '08/01/2018'
);
ALTER TABLE dbo.RecipeHistory
WITH CHECK ADD CONSTRAINT ck_RecipeHistory_MaxDateCreated
CHECK
(
DateCreated IS NOT NULL
AND DateCreated < '10/01/2019'
);
ALTER TABLE dbo.RecipeHistory
SWITCH TO dbo.RecipeHistoryArchive
PARTITION RecipeHistory2018Q4;
Listing 15-11
Switch All Data Out of Non-Partitioned Table to Partitioned Table
To switch the data from the non-partitioned table, you will first need to prove that all the data in the non-partitioned table fits inside of the partition that you will be using on the partitioned table. You will first need to create constraints on the partitioning column that match the range for the partition. Once the constraints have been created, you can switch all the data from the non-partitioned table into the partition specified on the partitioned table.
If I have two partitioned tables, I may want to move a partition from one table to another. This process can be referred to as partition switching. The T-SQL code required to do this is less complex than the code from Listing 15-11. In Listing 15-12, I have written database code that will switch the partition from the current table to a new archive table.
ALTER TABLE dbo.RecipeHistory SWITCH
PARTITION 1
TO dbo.RecipeHistoryArchive
PARTITION 1;
Listing 15-12
Switch Out of Partitioned Table to Another Partitioned Table
For this example, I have moved the records from the fourth quarter of 2018 from the dbo.RecipeHistory table to the dbo.RecipeHistoryArchive table. In order to switch a partition from one table to partition in a different partitioned table, you must specify the partitions for each table. The partition in the target table must also be empty in order for this T-SQL code to execute. This method is a particularly straightforward and easy method of managing your data growth over time. If you create a specific data management plan and move data from your main OLTP tables to an archive table, you can keep all your data but also allow your highly transactional tables to maintain only the most relevant data for your business.
Now that we have covered how to partition new and existing tables, I want to look at what partitioning can mean for query execution. Data is usually recorded in the order that each transaction occurred. This can correlate to a specific time period, but that may not always be the case. In addition, even though data is recorded in a specific order, there are often reasons why the business may want to look at data based on a specific date range. I may want to look at the recipes that were started for a specific date range. Issuing the query in Listing 15-13, I can look at the dbo.RecipeHistory table to find this information.
SELECT RecipeHistoryID,
RecipeID,
RecipeHistoryStatusID,
DateCreated
FROM dbo.RecipeHistory
WHERE DateCreated BETWEEN '10/7/18' AND '10/9/18';
Listing 15-13
Access Data Before Partitioning Table
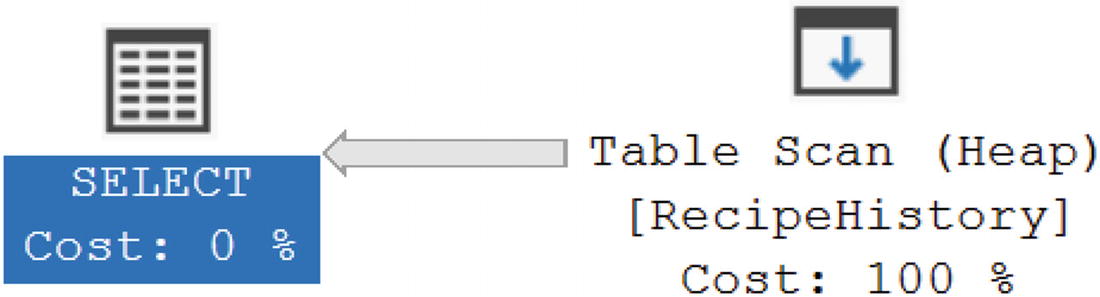
After querying the dbo.RecipeHistory table for a specific date range, I can also review how SQL Server executed that T-SQL code to find the data I requested. The execution plan in Figure 15-7 shows how the data was retrieved.
Figure 15-7
Execution Plan for Unpartitioned Table
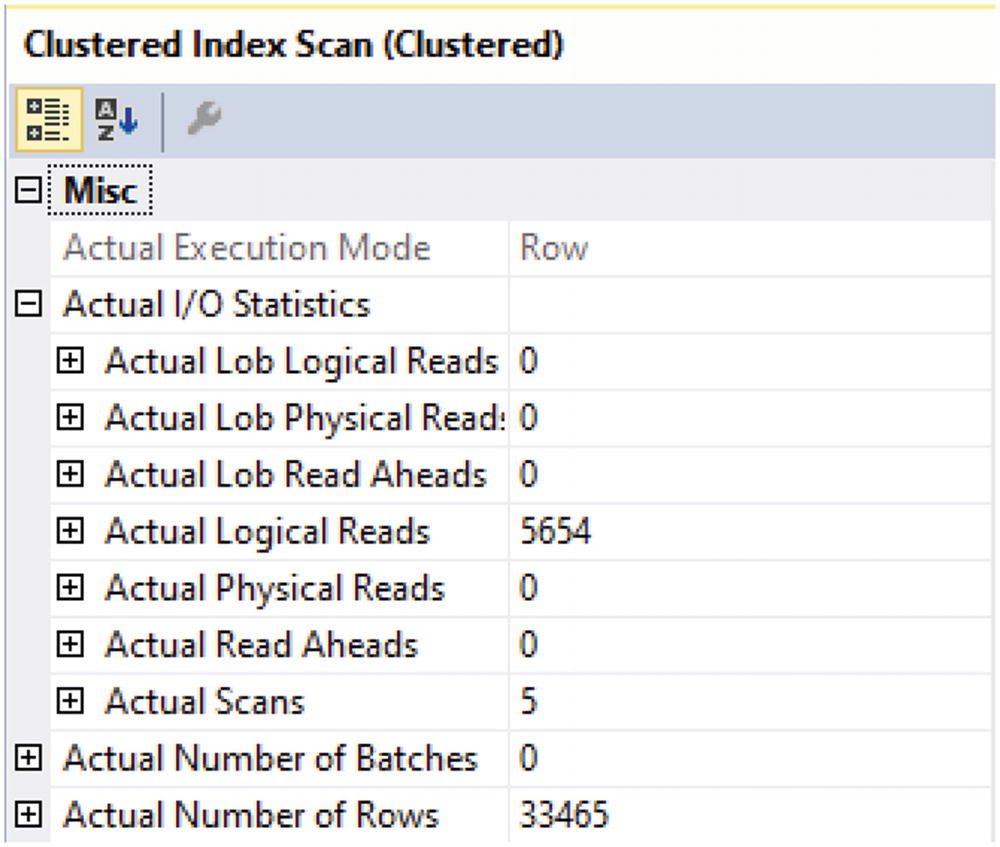
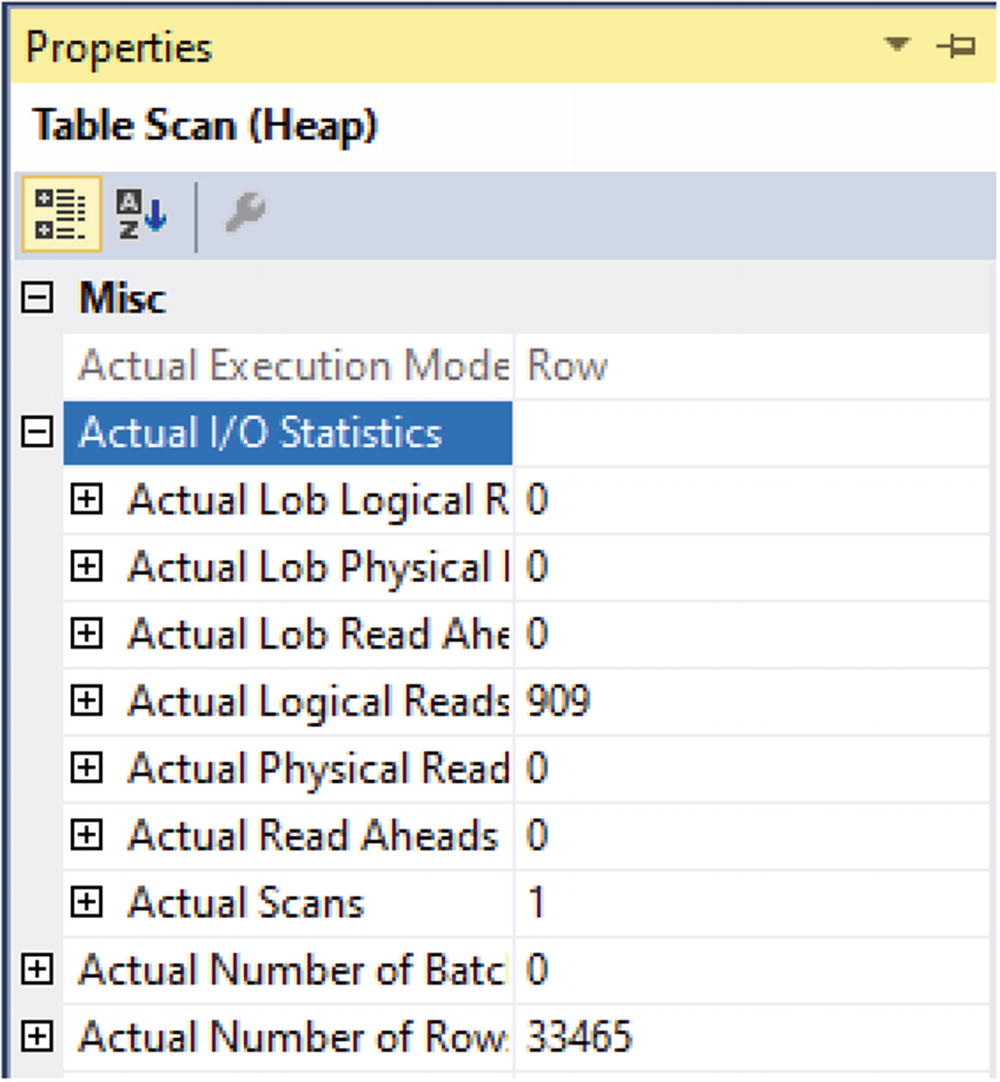
The dbo.RecipeHistory table was not partitioned when this query was executed, and the table was ordered by the clustered primary key. In this case, that is the RecipeHistoryID. While the data may have been stored in the order the records were created, SQL Server has no way to know that is true based on how the table is configured. To make sure that SQL Server retrieves all data based on the date created, SQL Server will need to review each record in the table. This is represented earlier with the Clustered Index Scan operator on the execution plan. Figure 15-8 shows some of the properties associated with the query from Listing 15-3.
Figure 15-8
Reads Associated with Clustered Index Scan
The number of total records returned for this query is 33,465. The total number of local reads is 5,654. This represents the total number of pages that were accessed to determine the number of records that met the criteria for this query.
The preceding values represent how SQL Server would execute a query on a non-partitioned table. We can compare the performance of the query in Listing 15-13 between a non-partitioned and partitioned table. We can add a partition to the dbo.RecipeHistory table and compare the results to the preceding non-partitioned table. I will first need to drop the existing primary key and add a new non-clustered primary key like the one from Listing 15-10. Since this table no longer has a clustered index, I will get an execution plan like the one in Figure 15-9 if I try to rerun the query from Listing 15-13.
Figure 15-9
Partitioned Table Without Clustered Index on Partitioning Key
If you forget to add a new clustered index on the partitioning column including the partition range, you will end up with a heap. In this case, the result is a full scan of the table to find any records that matches the date criteria specified. While you might expect the number of logical reads to be the same for this example and the previous example, Figure 15-10 shows a different result.
Figure 15-10
Reads for Query Partitioned Table Without Clustered Index on Partitioning Key
In the first example, Figure 15-8 shows 5,654 logical reads to find all records in dbo.RecipeHistory that match the date range specified. Partitioning the table and replacing the original primary key with both the RecipeHistoryID and DateCreated has caused the number of logical reads to drop from 5,654 to 909 shown in Figure 15-10. While the number of logical reads has dropped significantly, it is not ideal to perform queries where full Table Scans are required on the partitioning column of the partitioned table. The point is to make sure you have a clustered index on your partitioned table that can take advantage of the partitioning column.
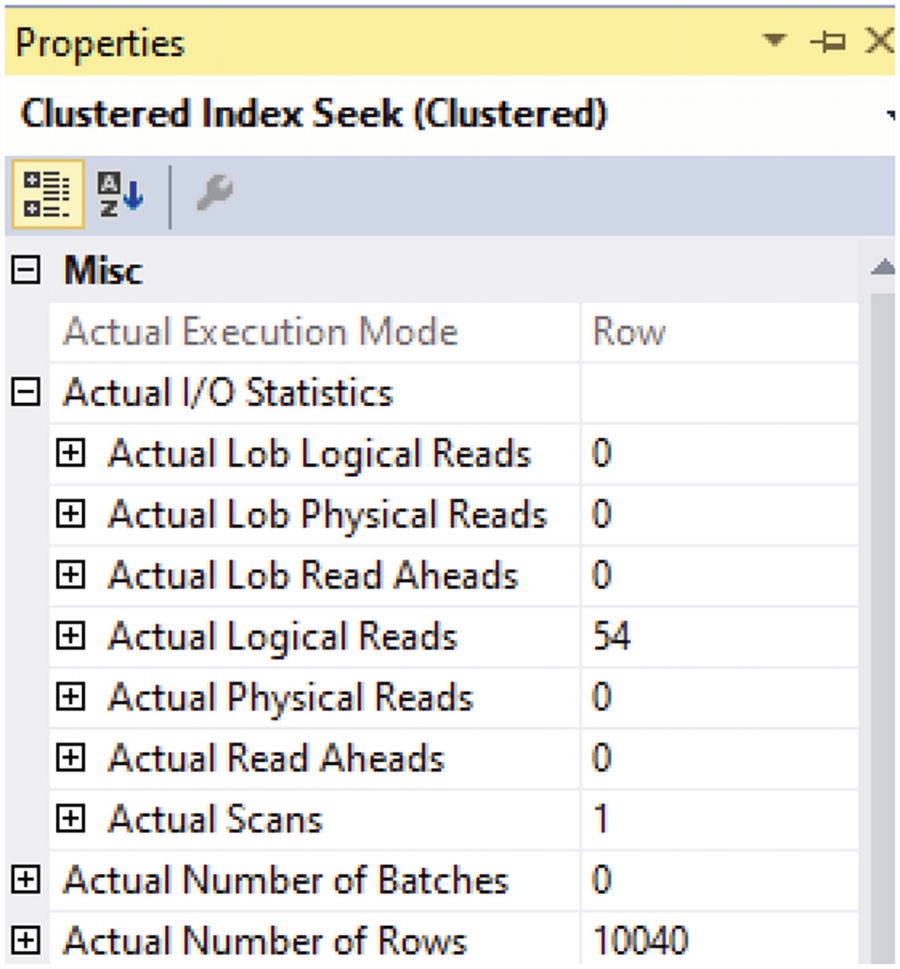
To take better advantage of your partitioned table, you will want to include a clustered index on your partitioned table. This included having a clustered index that is aligned on the partition scheme by the partitioning key. Once you have done this, you can run the T-SQL code from Listing 15-13. You will get an execution plan like the one in Figure 15-11.
Figure 15-11
Partitioned Table with Clustered Index on Partitioning Key
You can see that SQL Server now uses a Clustered Index Seek to find the correct data. We can also look at the properties for this operator to see what kind of impact having a clustered index that includes the partitioning key really has. You can see the I/O statistics and rows return in Figure 15-12.
Figure 15-12
Reads for Query Partitioned Table with Clustered Index on Partitioning Key
When we originally ran this query on a non-partitioned table, there were 5,654 logical reads. After partitioning table without a clustered index, the number of logical reads dropped to 909. While the lower number of logical reads does not indicate with certainty that the performance will be better, we can confirm that SQL Server will read less data querying a partitioned table with a clustered index on the partitioning column. Now that there is a clustered index on the partition table, the total logic reads has dropped from 909 to 186 logical reads, as shown in Figure 15-12 above.
Creating a partitioned table correctly is only part of the challenge if you want to see improved performance as a result. The main way this can be done is by writing T-SQL code that includes criteria that allows for partition elimination. The data code in Listing 15-14 is an example of T-SQL code that does not specify the partitioning column as part of the criteria.
SELECT RecipeHistoryID,
RecipeID,
RecipeHistoryStatusID,
DateCreated
FROM dbo.RecipeHistory
WHERE RecipeID = 4
AND RecipeHistoryStatusID = 2;
Listing 15-14
Access Data Without Using Partitioned Column
As a result, this query will be executed on all partitions in the table. Even if there is an index for the columns specified, the query will still need to look at the data in each partition separately to confirm that all data requested is returned. Once you decide on a partitioning column, you should include the partitioning column in all your queries so that you can take advantage of the partitioned table.
Partitioned Views
You can break a single table up into multiple segments by creating a partitioned table. Conversely, you all have the option of combining several smaller tables together in a way that will allow them to act like one large table. The tables that are joined in this manner can be partitioned or not. Similarly to creating a partitioned table, you also have the option of creating a partitioned view.
Like partitioned tables, you should not expect the use of partitioned views to necessarily mean that you will get better performance from the queries that will use this database object going forward. However, there are some design principles that may allow you to see improved performance. When using partitioned tables, we had the concept of partition elimination. The same sort of concept can be seen with partitioned views. In Listing 15-15, I am creating two tables on the same partitioning scheme.
CREATE CLUSTERED INDEX ix_RecipeHistory2018_DateCreated
ON dbo.RecipeHistory2018 (DateCreated)
ON RecipeHistRange (DateCreated);
Listing 15-15
Create Tables for Partitioned View
While each of these tables is on the same partitioning scheme, there is nothing to limit the type of data that will be stored in these tables. The first table is intended to store data for 2019, and the second table is for data from 2018. However, I need to add constraints to these tables to ensure that the correct records exist in each table. In Listing 15-16, you can see the constraints that will be added to both tables.
ALTER TABLE dbo.RecipeHistory2019
WITH CHECK ADD CONSTRAINT ck_RecipeHistory2019_MinDateCreated
CHECK
(
DateCreated IS NOT NULL
AND DateCreated >= '01/01/2019'
);
ALTER TABLE dbo.RecipeHistory2019
WITH CHECK ADD CONSTRAINT ck_RecipeHistory2019_MaxDateCreated
CHECK
(
DateCreated IS NOT NULL
AND DateCreated < '01/01/2020'
);
ALTER TABLE dbo.RecipeHistory2018
WITH CHECK ADD CONSTRAINT ck_RecipeHistory2018_MinDateCreated
CHECK
(
DateCreated IS NOT NULL
AND DateCreated >= '01/01/2018'
);
ALTER TABLE dbo.RecipeHistory2018
WITH CHECK ADD CONSTRAINT ck_RecipeHistory2018_MaxDateCreated
CHECK
(
DateCreated IS NOT NULL
AND DateCreated < '01/01/2019'
);
Listing 15-16
Add Constraints to Tables
The table for 2019 now has a constraint that only allows records with a DateCreated from January 1, 2019, up to but not including January 1, 2020. There is also a constraint on the table for 2018 with similar logic so that only records that were created in 2018 can be stored in this table.
You now have tables for two different date ranges, and you have applied constraints to these tables. The next step is creating a partitioned view. The process of creating a partitioned view is relatively simple and consists of adding a UNION ALL between each select statement on the underlying tables. An example of creating a partitioned view can be found in Listing 15-17.
CREATE VIEW dbo.vwRecipeHistory
AS
-- Select data from current read/write table
SELECT RecipeHistoryID,
RecipeID,
RecipeHistoryStatusID,
IsActive,
DateCreated,
DateModified
FROM dbo.RecipeHistory2019
UNION ALL
-- Select data from partitioned table
SELECT RecipeHistoryID,
RecipeID,
RecipeHistoryStatusID,
IsActive,
DateCreated,
DateModified
FROM dbo.RecipeHistoryPartition2018;
Listing 15-17
Create Partitioned View
Notice that the column lists are in the same order for both SELECT statements used within the partitioned view. This is a requirement of creating a partitioned view. You must also specify the full column list of the table when creating a partitioned view. Once the partitioned view has been created, you may want to see how querying a partitioned view works.
Earlier in the chapter, in Listing 15-13, we queried the dbo.RecipeHistory table on the date range between October 7, 2018, and October 9, 2018. We can query the partitioned view for the same date range as shown in Listing 15-18.
SELECT RecipeHistoryID,
RecipeID,
RecipeHistoryStatusID,
DateCreated
FROM dbo.vwRecipeHistory
WHERE DateCreated BETWEEN '10/7/18' AND '10/9/18';
Listing 15-18
Access Data Using Partitioned Column
The T-SQL code is very similar between Listing 15-13 and Listing 15-18. This shows how easy it can be to shift to using a partitioned view instead of the current table names in your queries. However, what we are really interested in confirming is seeing how the execution plan has changed with the use of a partitioned view. Figure 15-13 shows the execution plan that is generated as a result of running the query in Listing 15-18.
Figure 15-13
Execution Plan for Partitioned View
Like the partitioned table referenced earlier in this chapter, the execution plan for the partitioned view also uses a Clustered Index Seek. Even though the partitioned view includes both the 2019 and 2018 tables, you can see from the execution plan that SQL Server only used the 2018 table when finding the results from the query in Listing 15-18. We can also look at the properties of the Clustered Index Seek in Figure 15-14.
Figure 15-14
Reads for Query Partitioned View with Clustered Index on Partitioning Key
You can see based on the number of rows returned that the data in the 2018 table is different from the partitioned tables referenced previously in this chapter. You can also see that the relative number of logical reads is low and trends similarly to the partitioned table earlier in this chapter.
The T-SQL code executed in Listing 15-18 accessed the partitioned view based on the partitioned column in each of the tables and on the constraint specified for each of the tables. We saw that SQL Server was able to quickly determine which table to access when querying the data. There may be times where we may want to run a query that does not include the partitioning column like the one in Listing 15-19.
SELECT RecipeHistoryID,
RecipeID,
RecipeHistoryStatusID,
DateCreated
FROM dbo.vwRecipeHistory
WHERE RecipeID = 4
AND RecipeHistoryStatusID = 2;
Listing 15-19
Access Data Without Using Partitioned Column
The preceding query is searching for a specific recipe that has a certain status. However, there is no indication that any of these records will exist in a specific table within the indexed view. Since SQL Server does not have the ability to rule out certain date ranges as part of the query, we get the execution plan in Figure 15-15.
Figure 15-15
Execution Plan for Partitioned View
You can see that in this execution plan, SQL Server must access both the table containing 2018 data and the table containing 2019 data. In this example, you can see that there is no benefit on the number of tables accessed as part of this request.
Using partitioned views can help you take more than one table and combine them together into one database object. By accessing this single database object, you can simplify your T-SQL code across multiple ranges. You have also seen that using a partitioned view can be beneficial in limiting the number of tables accessed, but if you do not use the partitioning column as part of your queries, you will still need to access all tables included in the view. While partitioned tables break one table up into multiple segments and partitioned views combined tables together into one database object, you may find advantages to combining them both.
Hybrid Workloads
Companies have been using databases for many years and may have acquired a significant amount of data. Often, these same companies may be generating reports from this data. In many cases, these same companies may not have prioritized building a data warehouse. For these situations, one database is often trying to perform two tasks at the same time. The first role is to continue to store transactional data. However, the second role is to also act as a data warehouse for analytical processing. In many situations, the database design needed for transaction processing does not match the best design for analysis processing. While a company may be willing to move toward a data warehouse some day, you may find yourself in a situation where you need to implement designs that can function well with this hybrid workload.
In combining partitioned and non-partitioned tables with a partitioned view, we can give ourselves some additional flexibility. Using a partitioned view will allow us to use a single database object and name to access any data for a specific purpose. In our example, we will continue to work with the data recorded as a result of recipes being started. Since a partitioned view allows us to combine several tables together, we can investigate how those tables can be created. One advantage of using multiple tables is that each table can use different indexes. This difference in indexes can change both how data is stored and accessed. We can also have the option to make some tables as read only which can also signify that we do not intend to add any additional data to these tables.
We will be creating a partitioned view to access all the recipe history data. The first table we can create is only to hold all the older data that we want to archive. We can also partition this table to allow for partition elimination when searches are performed based on the partitioning key of the table. In Listing 15-20, you can see the T-SQL needed to create our partitioned table for archived data.
The preceding partitioned table is created like many of the partitioned tables already included in this chapter. Like the partitioned tables created earlier in this chapter, this table was also created on the partition scheme RecipeHistRange. Now that we have a partitioned table, I want to create a non-partitioned table for data that is being actively used by the application right now. The table created in Listing 15-21 is an example of a non-partitioned table.
CREATE TABLE dbo.RecipeHistory
(
RecipeHistoryID INT NOT NULL,
RecipeID SMALLINT NOT NULL,
RecipeHistoryStatusID TINYINT NOT NULL,
DateCreated DATETIME NOT NULL,
DateModified DATETIME NULL,
CONSTRAINT pk_RecipeHistory_RecipeHistoryID
PRIMARY KEY (RecipeHistoryID),
CONSTRAINT fk_RecipeHistory_RecipeID
FOREIGN KEY (RecipeID)
REFERENCES dbo.Recipe(RecipeID),
CONSTRAINT fk_RecipeHistory_RecipeHistoryStatusID
FOREIGN KEY (RecipeHistoryStatusID)
REFERENCES
dbo.RecipeHistoryStatus(RecipeHistoryStatusID)
);
Listing 15-21
Create Table for Active Data
The creation of this table does not specify that partition scheme of RecipeHistRange. This table will be a standard table created on the PRIMARY filegroup in the database.
Once the underlying tables have been created, we can create a single database object that can allow us to access both tables. This will be the same as the partitioned view created in the previous section. Listing 15-22 has the T-SQL code needed to create a partitioned view.
CREATE VIEW dbo.vwRecipeHistory
AS
-- Select data from current read/write table
SELECT RecipeHistoryID,
RecipeID,
RecipeHistoryStatusID,
DateCreated,
DateModified
FROM dbo.RecipeHistory
UNION ALL
-- Select data from partitioned table
SELECT RecipeHistoryID,
RecipeID,
RecipeHistoryStatusID,
DateCreated,
DateModified
FROM dbo.RecipeHistoryPartition;
Listing 15-22
Create Partitioned View
The preceding partitioned view allows us to keep the most recent and highly active data in a table without partitions. This table can be specifically indexed to allow for the best write speeds. Any other tables included in the partitioned view can be indexed based on their usage. The partitioned table included in the preceding partitioned view may only include inactive data. As a result, we may expect this data to only be read going forward. Knowing this, we can use a different strategy to index this table.
Reviewing what we have already covered, I want to show the behavior of SQL Server when querying a non-partitioned table. The query in Listing 15-23 shows a query to find all records for a specific date range in the dbo.RecipeHistory table.
SELECT RecipeHistoryID,
RecipeID,
RecipeHistoryStatusID,
DateCreated
FROM dbo.RecipeHistory
WHERE DateCreated BETWEEN '10/7/18' AND '10/9/18';
Listing 15-23
Access Data Before Partitioning Table and View
The preceding query will be run on a non-partitioned table. At the time of the query execution, this table is ordered by the original primary key which is the RecipeHistoryID. As a result, the execution plan from the query in Listing 15-23 is shown in Figure 15-16.
Figure 15-16
Execution Plan for Unpartitioned Table
Based on the execution plan in Listing 15-16, you can see that SQL Server uses a Clustered Index Scan to find the relevant records. This is because there is no index that includes the DateCreated. With the table not being partitioned by date, SQL Server also needs to go through the entire table to find the data records that satisfy the query in Listing 15-23.
After running this query, we can review additional information about the operators in the execution plan. Specifically, I want to look at the number of logical reads and rows returned for this query execution. Looking at Figure 15-17, you can see the logical reads and number of rows.
Figure 15-17
Reads Associated with Clustered Index Scan
We can see that this query returned 33,465 rows with a total number of 5,654 pages read as logical reads. We will be comparing these values to the performance associated with a partitioned view that contains both a partitioned and non-partitioned table.
Previously, in Listing 15-22, I created a partitioned view that contained a partitioned table for all 2018 data records and non-partitioned table for all 2019 data records. To compare how a partitioned view performs differently than a non-partitioned table, I can run the query in Listing 15-24.
SELECT RecipeHistoryID,
RecipeID,
RecipeHistoryStatusID,
DateCreated
FROM dbo.vwRecipeHistory
WHERE DateCreated BETWEEN '10/7/18' AND '10/9/18';
Listing 15-24
Access Data Using Partitioned Column in Partitioned Table
The preceding query looks for the same data records as the query from Listing 15-23. However, this query is accessing a partitioned view instead of a non-partitioned table. The partitioned view is composed of a partitioned table for all of 2018 and a non-partitioned table containing data for 2019. In Figure 15-18, we can see the execution plan generated for this query.
Figure 15-18
Execution Plan for Partitioned View
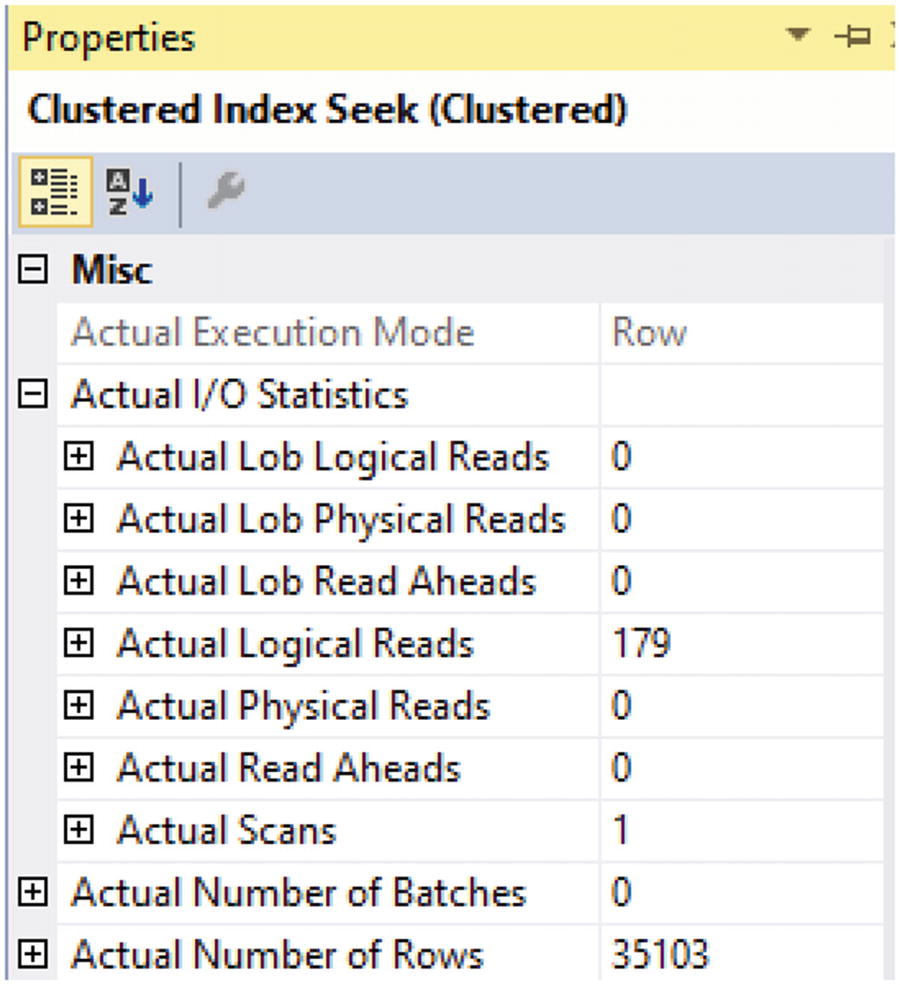
One of the important things to note is that this execution plan uses a Clustered Index Seek instead of a Clustered Index Scan. This lets us know that SQL Server could determine where to find the relevant data records efficiently and without having to go through all or most of the records in the table. Another thing that stands out is that the Clustered Index Seek is performed on the partitioned dbo.RecipeHistory2018 table. I can also look at the properties associated with the Clustered Index Seek to get additional information. In Figure 15-19, we can see the number of logical reads and the number of records returned.
Figure 15-19
Reads for Query Partitioned View with Clustered Index on Partitioning Key
The total number of rows returned is 10,040 with a total number of 54 data pages read from memory. The decrease in the number of total data pages read from memory indicates that this query is more efficient at finding the relevant data than the query in Listing 15-23.
We have seen how querying a partitioned view on a column that references a partitioned table performs. The next step is to see how querying a partitioned view works when accessing a non-partitioned table. Listing 15-25 shows a query to access data from the non-partitioned table of the partitioned view.
SELECT RecipeHistoryID,
RecipeID,
RecipeHistoryStatusID,
DateCreated
FROM dbo.vwRecipeHistory
WHERE DateCreated BETWEEN '5/7/19' AND '5/9/19';
Listing 15-25
Access Data Using Partitioned Column Not in Partitioned Table
The preceding query is returning the same columns as the queries from Listings 15-23 and 15-24. The criteria in the WHERE clause is accessing data from 2019 instead of 2018. To see how this change in dates affects the execution plan generated, we can see the difference in Figure 15-20.
Figure 15-20
Execution Plan for Partitioned View Not on Partitioned Tale
Similarly, in Figure 15-20, the preceding execution plan will use a Clustered Index Seek on the dbo.RecipeHistory table. While the execution plans between the partitioned and non-partitioned tables are similar, how much data is retrieved from SQL Server can vary between the two execution plans. Looking at Figure 15-21 can show us how much data is accessed for the query in Listing 15-25.
Figure 15-21
Reads for Query Partitioned View on Non-partitioned Table
In Figure 15-21, you can see there are 179 data pages read from memory and 35,103 records returned. This performance is still much better than the performance when all data existed in a single non-partitioned table.
We have confirmed that partitioned views work well for both queries that access partitioned tables and non-partitioned tables within the partitioned view. Like partitioned tables, it is still best to query data using the columns that are part of the partition. In Listing 15-26, I will query the partitioned view using columns that are not part of the partition.
SELECT RecipeHistoryID,
RecipeID,
RecipeHistoryStatusID,
DateCreated
FROM dbo.vwRecipeHistory
WHERE RecipeID = 4
AND RecipeHistoryStatusID = 2;
Listing 15-26
Access Data Without Using Partitioned Column
You can see that instead of referencing a date for the preceding query, I want to return all records for RecipeID of 4 that have a RecipeHistoryStatusID of 2. There is no date provided, and SQL Server will need to access all tables within the partitioned view. We can see the execution plan for the query in Listing 15-26 in Figure 15-22.
Figure 15-22
Execution Plan for Partitioned View Not on Partitioning Key
As expected, the execution plan shows a Clustered Index Scan on dbo.RecipeHistory and dbo.RecipeHistory2018. There is no date range provided in Listing 15-26 which causes SQL Server to access both tables in the partitioned view. The criteria for the query does not take advantage of any indexes on the tables which causes the need for a Clustered Index Scan. The key point here is to use the partitioning column as much as possible. This gives you the best chance to take advantage of any performance gains associated with partitioning your data.
The longer your applications and databases are in use, you will find yourself facing new challenges in managing the data generated. When working with hybrid workloads, you may find that you need too many different methods to manage and access your data. Combining tables and partitioned tables together in a partitioned view can give you some of the flexibility you need. Breaking your data up into multiple non-partitioned and partitioned tables can allow you to create different indexes on the tables based on how you will be accessing the data within those tables. This sort of strategy can allow you to keep a table with only recent data separate from any data used for reporting purposes. The table containing recent and current data can then be configured to maximize application performance.
One of the options available within SQL Server is the use of partitioning. You have the option to partition information into various filegroups. You can also create partition functions and partition schemes that help SQL Server determine how to segment data. Once the partition scheme is applied to a column on a table, the table is now a partitioned table. The column used for the partition scheme is known as the partitioning key. When queries are designed to use the partitioning key, SQL Server can use partition elimination to find the records that meet the query criteria. In addition to using partitioned tables, you also have the option of using partitioned views. Partitioned views can allow you to combine multiple database objects into a single object that can be referenced by your application code. When running a query, SQL Server will determine which objects need to be accessed to meet the query criteria. You can also combine non-partitioned tables and partitioned tables into the same partitioned view. This method may be able to help you if you find yourself in the situation where your database needs to be able to handle both transactional and analytical based queries.