
Chapter 11. Administration: Setup
Accumulo is designed to run on a large number of servers and includes several features designed to make administrating and maintaining large clusters tractable for administrators.
In particular, dynamic load balancing and automatic recovery from common types of hardware failure help keep Accumulo healthy even in clusters of over a thousand machines, in which hardware failures are common.
Preinstallation
Here are the ways in which the software environment should be set up to support installing Accumulo. For suggestions on selecting appropriate types of hardware and sizing a cluster, see “Hardware Selection”.
Kernel Tweaks
A few low-level kernel settings that can dramatically impact the responsiveness of the cluster might need to be tuned for scaling up the per-machine resources allowed when more than 100 machines are in a cluster.
Swappiness
Tablet servers should be given enough operational memory to avoid swapping. Swapping is bad because it can cause a tablet server to have to wait while the kernel retrieves from disk some page of memory that was swapped out. This delay can interfere with Accumulo’s ability to determine the responsiveness of the tablet servers and to keep all the data online.
To help avoid swapping, it is recommended that the Linux vm.swappiness setting be set low to instruct the kernel to not be eager at all when it comes to swapping pages from memory out to disk.
Note
In Linux kernels prior to version 3.5, setting vm.swappiness to 0 would instruct the kernel to avoid swapping except when not swapping would cause an out-of-memory error.
In kernel 3.5 and later, setting vm.swappiness to 0 instructs the kernel not to swap ever and to allow the out-of-memory errors to occur.
Setting the value to 1 instructs the kernel to behave the same way kernels previous to 3.5 did with swappiness set to 0.
To set swappiness low temporarily, do the following:
echo 1 > /proc/sys/vm/swappiness
And to make the setting persist across system reboots, do:
echo "vm.swappiness = 1" >> /etc/sysctl.conf
If it is undesirable to set swappiness to 1 on a system, ensure that it is set to a low enough value to avoid tablet servers swapping.
Number of open files
Accumulo needs to be able to create enough threads, network sockets, and file descriptors to respond to user requests. All of these require resources from the kernel, which are limited by the number of open files allowed.
To set this, edit /etc/security/limits.conf or add a specific file under /etc/security/limits.d/ and add the following lines:
accumulo  nofile  soft  65536
accumulo  nofile  hard  65536
Native Libraries
Because Java garbage collection can cause pauses that make it difficult to determine the status of a process, Accumulo employs its own memory management for newly written entries. This requires the use of binary libraries compiled for the specific architecture on which Accumulo is deployed. In older versions of Accumulo, binary libraries for the Linux x86-64 architecture were provided in the distributed files. If you are deploying to another architecture, or using version 1.6, these libraries must be built after installation.
If the binary libraries are not available, Accumulo will fall back on a pure-Java implementation, but at the cost of decreased performance and stability.
Linux Filesystem
Accumulo stores data in HDFS, which in turn stores blocks of data in the underlying Linux filesystem. Popular Linux filesystems include ext3, ext4, and XFS.
Accumulo 1.4 and earlier versions required the ability to write to a local directory to store write-ahead logs. A directory must be created for this purpose and must be writeable by the accumulo user. It can improve performance to put write-ahead logs on separate disks from disks storing HDFS data. These directories are specified in the accumulo-site.xml file described in “Server Configuration Files”.
Accumulo 1.5 and later versions store these files in HDFS so no additional directories need to be created.
System Services
Accumulo relies on several system services to operate properly:
- Domain Name Service (DNS)
-
Hadoop requires that domain names of machines be resolvable from domain to IP address and from IP address to domain name.
- Network Time Protocol (NTP)
-
When an Accumulo table is configured to use a
TimeTypeof milliseconds (MILLIS), Accumulo’s tablet servers rely on system time for applying timestamps to mutations that do not otherwise have a timestamp provided. With many machines in a cluster, some machines are bound to have clocks that are off. Running NTP daemons can help keep clocks closer in sync and avoid situations in which assigned timestamps jump forward as tablets are migrated from one server to the next. Tablet servers ensure that the timestamps they assign never decrease for any given tablet. - Secure Shell (SSH)
-
Accumulo ships with scripts that use SSH to start and stop processes on all machines in a cluster from a single node. This is not required, however, if another means of starting and stopping processes is used, such as init.d scripts.
To keep your Accumulo data secure, you also need to ensure that these services are secure just like any other system built on top of Hadoop. For the scope of this book, we cover a few important details in “Security”.
Software Dependencies
Accumulo depends on several software packages. First, Accumulo is written in Java. Java versions 1.6 and 1.7 have been tested and are known to work. The Sun/Oracle JDK is used more often in production, although OpenJDK is often used for development.
Apache Hadoop
Accumulo 1.6 binaries are built against Apache Hadoop 2.2.0, and should work with Hadoop versions 2.2.x and 1.2.x with little to no modification. To build against a different version see “Building from Source”.
Depending on the version of HDFS that is installed, different HDFS settings need to be configured in order to ensure that Accumulo can flush write-ahead logs to HDFS safely.
The append or sync directive should be set to true.
This setting requires that HDFS clients confirm that data has been transferred to DataNode processes successfully before returning.
Necessary settings for different versions of HDFS are summarized in Table 11-1.
| Hadoop version | Setting | Default |
|---|---|---|
0.20.205 |
dfs.support.append |
must be configured |
0.23.x |
dfs.support.append |
defaults to true |
1.0.x |
dfs.support.append |
must be configured |
1.1.x |
dfs.durable.sync |
defaults to true |
2.0.0-2.0.4 |
dfs.support.append |
defaults to true |
Setting dfs.datanode.synconclose to true will help avoid data loss in the event of catastrophic failure, such as losing power to all nodes at once.
This setting causes the write-ahead log to ask disks to sync writes to disk before returning, which is safe but also incurs a performance penalty.
If an uninterruptible power supply is used so that machines can be shut down safely in the event of total power loss, dfs.datanode.synconclose can be set to false.
This should be set in the hdfs-site.xml configuration file, and HDFS should be restarted afterwards.
Apache ZooKeeper
Apache ZooKeeper is a distributed directory service designed to keep information completely replicated and synchronized across a small number of machines. Hence it is a highly available system for keeping small amounts of data. Accumulo uses ZooKeeper to store configuration information and to coordinate actions across the cluster. See Appendix C for additional information on Accumulo’s use of ZooKeeper.
ZooKeeper version 3.3.0 or later should be used.
The only configuration option of ZooKeeper that is regularly changed is the number of connections per client machine. The default is 10. Changing this is a matter of adding the line:
maxClientCnxns=250
to the zoo.cfg file. Versions of ZooKeeper 3.4.0 or later do not require this change.
Installation
After Hadoop and ZooKeeper are installed, Accumulo can be installed. Accumulo versions prior to 1.6 provided precompiled RPM and deb packages. For version 1.6.0 and later, the development team made the decision to no longer officially support these.
Tarball Distribution Install
Accumulo can be downloaded as a Gzipped TAR file from a mirror at http://accumulo.apache.org/downloads/.
Extract the tarball to the desired location and ensure that the files are owned by the user that Accumulo processes will run as. As of Accumulo1.6, native libraries must be built from source. Follow the instructions in “Building native libraries” for building these and proceed to “Configuration”.
Installing on Cloudera’s CDH
Cloudera provides a popular commercial distribution of Hadoop called CDH (the Cloudera Distribution for Hadoop) that ships Accumulo 1.6 as part of CDH version 5. Accumulo is packaged as an optional parcel in the Cloudera Manager that can be installed as part of the general installation process (Figure 11-1).

Figure 11-1. Selecting the Accumulo parcel during CDH5 install
Selecting Accumulo from the list of additional parcels and clicking Continue will begin the installation process (Figure 11-2).
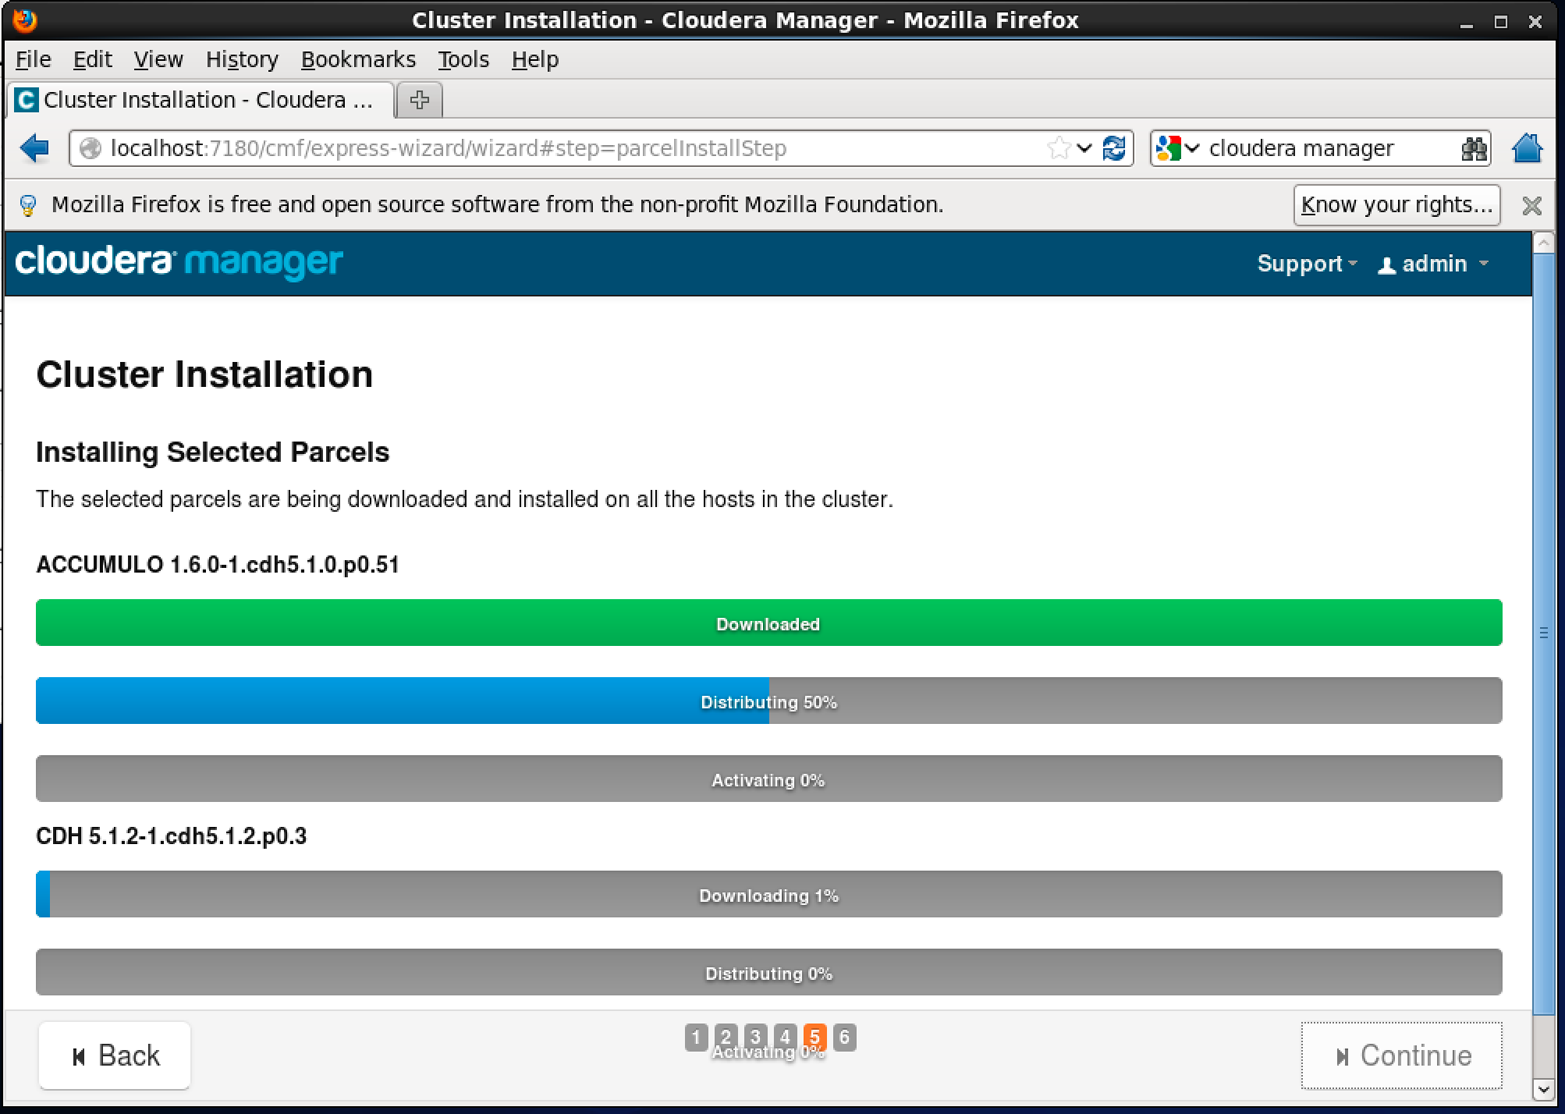
Figure 11-2. Installing the Accumulo parcel
Accumulo is now an available service. Next we need to add the service to our cluster, which will configure and start up Accumulo. From the main Cloudera Manager page, select the Add Service option. This will show a list of services to be installed (Figure 11-3). Selecting Accumulo will install Accumulo and all its dependent services, including HDFS and ZooKeeper.
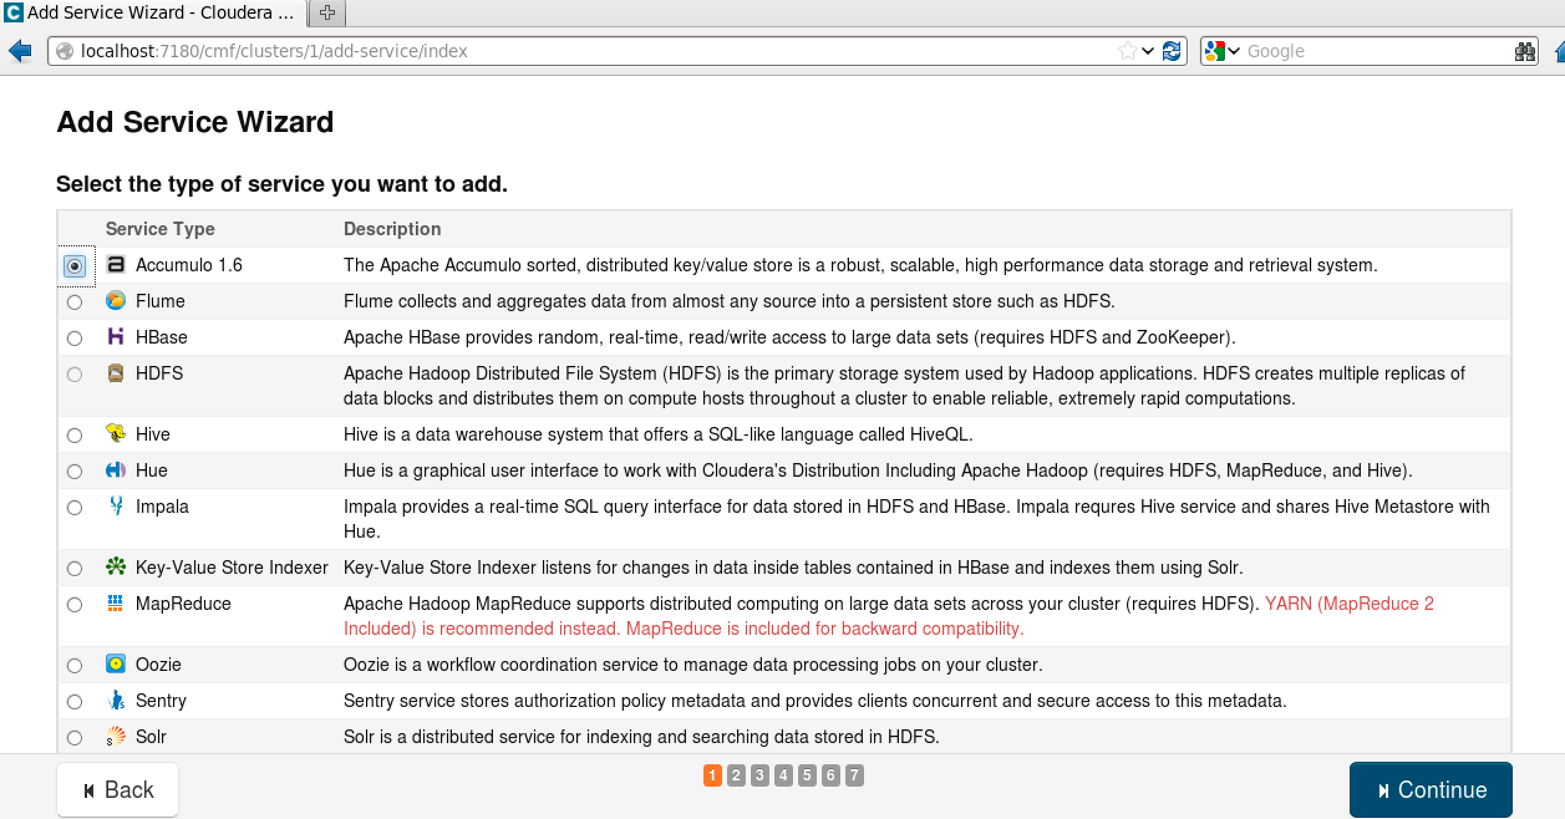
Figure 11-3. Adding the Accumulo service to the cluster
The Add Service Wizard will prompt you to assign roles to various machines in the cluster. These include which machines will run the master process, tablet server processes, etc. (Figure 11-4).
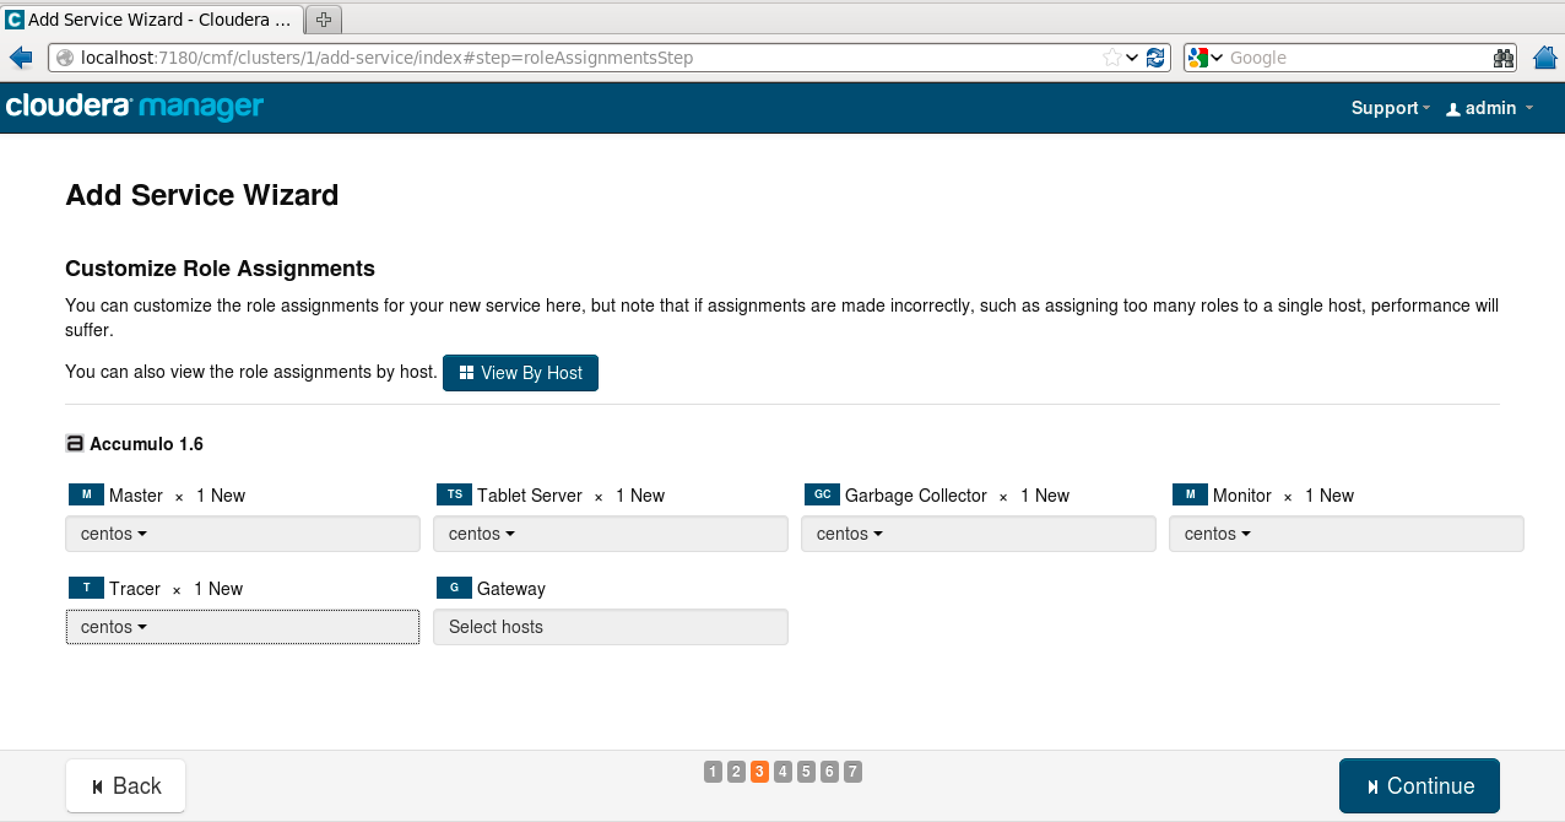
Figure 11-4. Assigning Accumulo roles to machines
Next the wizard will prompt for any configuration options that should be set before starting the service (Figure 11-5).
This is a good opportunity to set things like the Instance Secret.
Other options have good starting defaults.
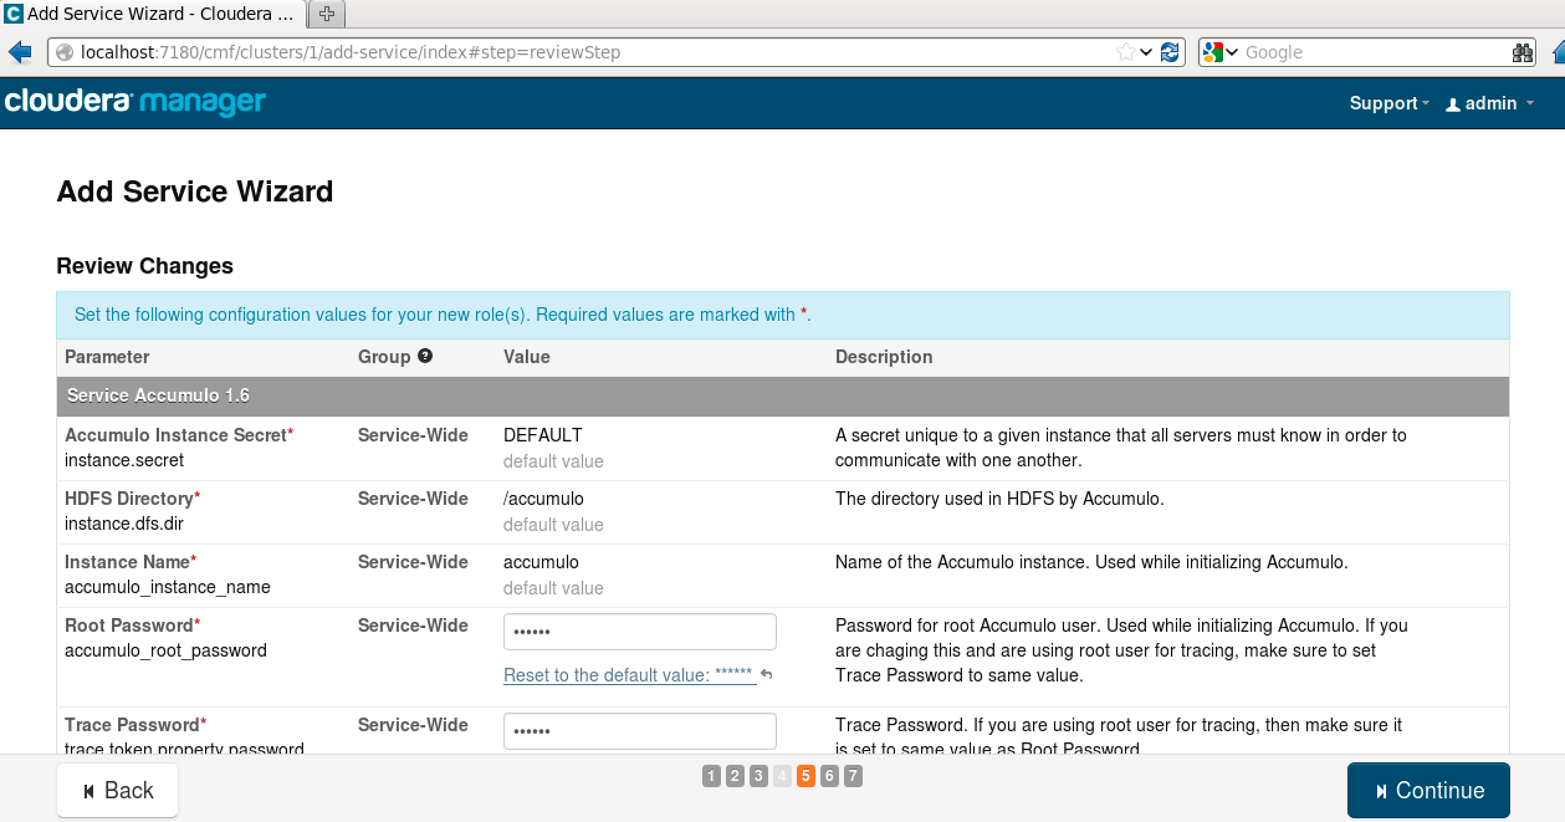
Figure 11-5. Setting configuration options before installing the Accumulo service
Finally, the wizard will start Accumulo and dependent services, if any are not already started (Figure 11-6).
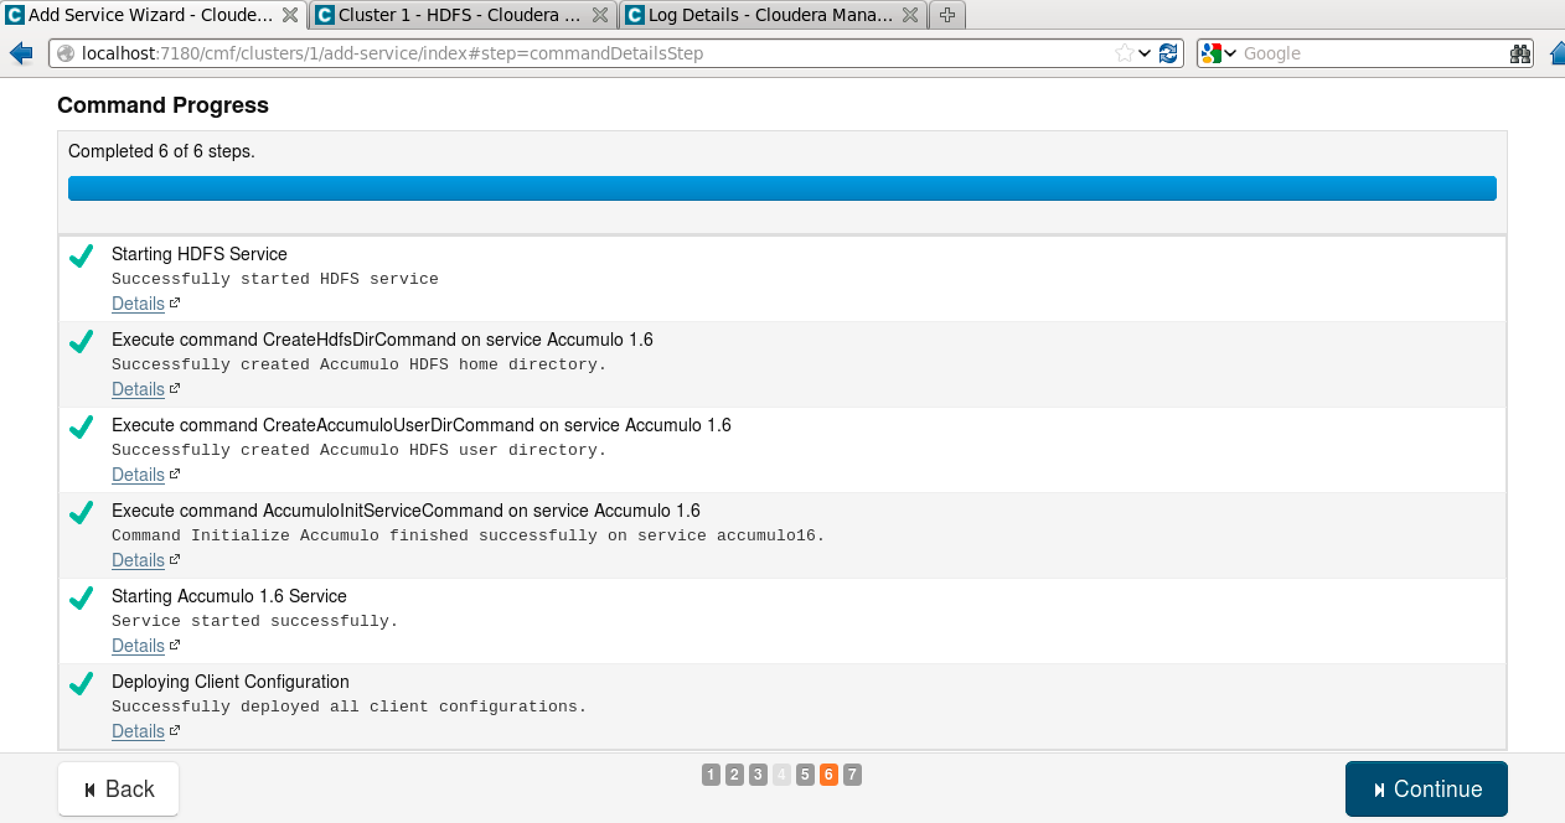
Figure 11-6. Services are started by the Add Service Wizard
After installation Accumulo will show up as a service on the main view of a cluster in the Cloudera Manager (Figure 11-7).
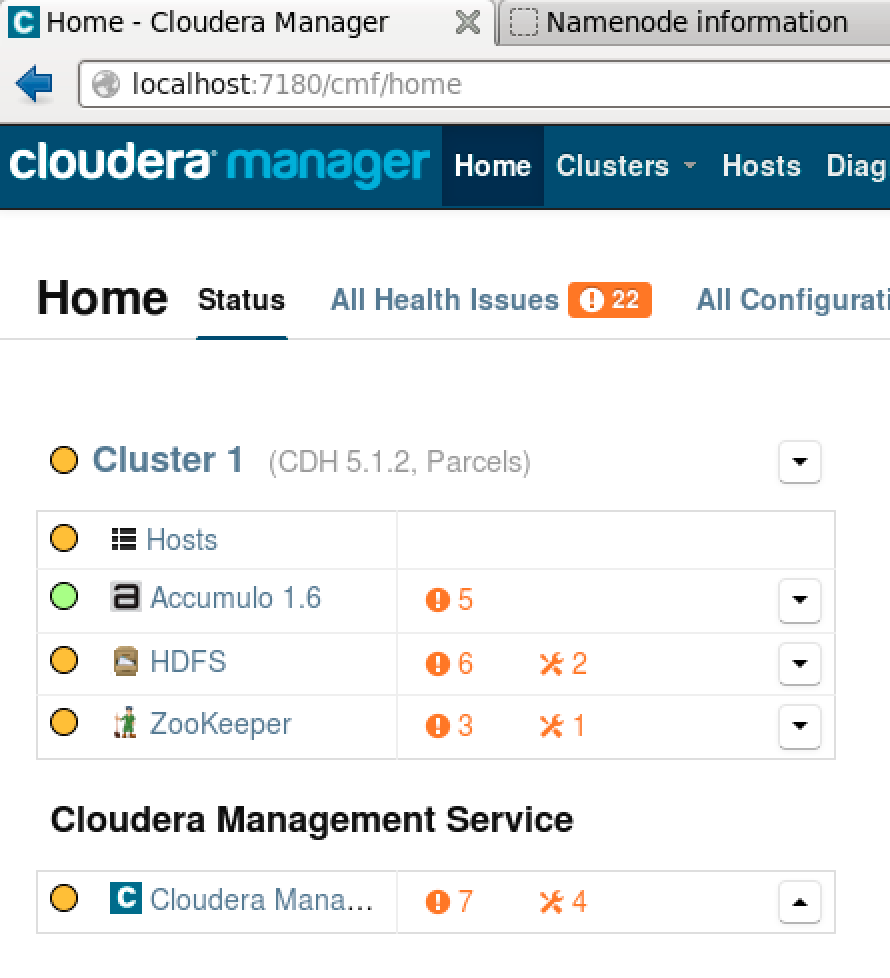
Figure 11-7. Accumulo in the overall Cloudera cluster view
You can see Accumulo-specific details by clicking the Accumulo 1.6 link, which will display the Accumulo Service details page (Figure 11-8). There is also a link to the Accumulo monitor.
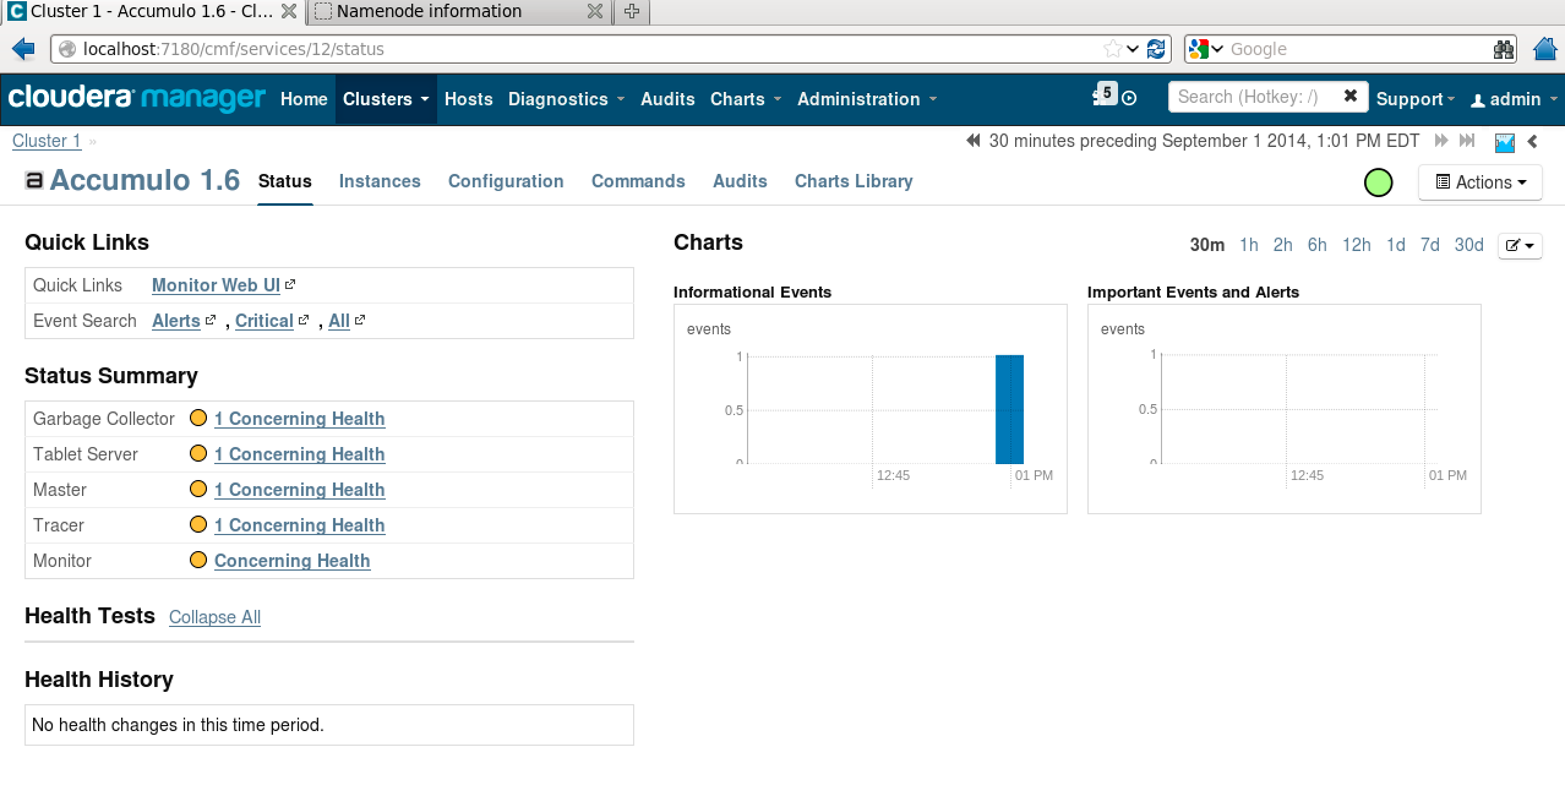
Figure 11-8. Viewing the Accumulo service in Cloudera Manager
Further configuration of the Accumulo service can be done via the Configuration tab at the top of the service details page (Figure 11-9).
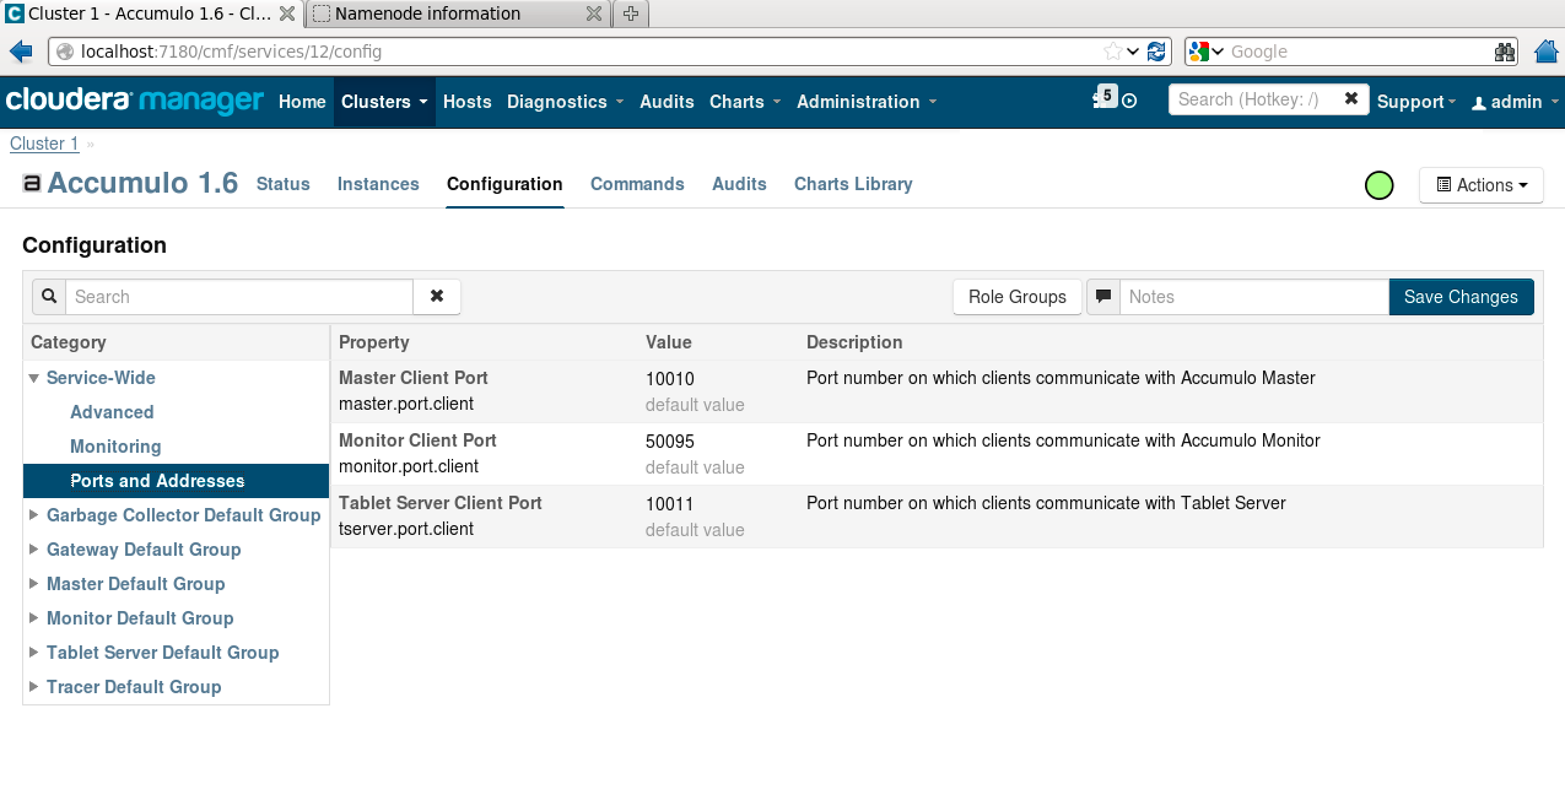
Figure 11-9. Additional Accumulo configuration
After installation, the Accumulo files are located in /opt/cloudera/parcels/ACCUMULO.
The commands in the bin/ directory will be part of the PATH.
Configuration files are in /etc/accumulo/conf.
Custom JARs should be placed in /opt/cloudera/parcels/ACCUMULO/lib/accumulo/lib/ext/ if you’re not using HDFS to distribute files, as detailed in “Using HDFS”.
Installing on Hortonworks’ HDP
The Hortonworks Data Platform (HDP) is a distribution of Hadoop and other scalable data processing technologies that emphasizes open source contribution. HDP 2.1 ships with Accumulo 1.5.1 as an optional RPM.
On each machine to participate in the accumulo cluster, run:
# yum install accumulo
This will install the Accumulo JARs and configuration files customized for use with HDP:
Setting up Install Process
Resolving Dependencies
--> Running transaction check
---> Package accumulo.x86_64 0:1.5.1.2.1.5.0-695.el6 will be installed
--> Finished Dependency Resolution
...
Total download size: 11 M
Installed size: 13 M
Is this ok [y/N]: y
Downloading Packages:
...
accumulo-1.5.1.2.1.5.0-695.el6.x86_64.rpm
Running rpm_check_debug
Running Transaction Test
Transaction Test Succeeded
Running Transaction
  Installing : accumulo-1.5.1.2.1.5.0-695.el6.x86_64
  Verifying  : accumulo-1.5.1.2.1.5.0-695.el6.x86_64
Installed:
  accumulo.x86_64 0:1.5.1.2.1.5.0-695.el6
Complete!
The RPM will install Accumulo in /usr/lib/accumulo, and put configuration files in /etc/accumulo/conf. Configuration files appropriate for the memory available on servers can be copied from /etc/accumulo/conf/examples. For example, to copy the files that configure Accumulo to use 3 GB of RAM we would do:
# cp /etc/accumulo/conf/examples/3GB/standalone/* /etc/accumulo/conf/
The accumulo-site.xml and accumulo-env.sh files can be adjusted according to the instructions in “Configuration”, but the directory references are already set up according to the HDP layout.
Next we need to make the directory in HDFS that our configuration files expect:
# hdfs dfs -mkdir -p /usr/accumulo/data
HDP instructions recommend changing permissions on the data directory to grant access to all users. This should be restricted to only the accumulo user for production environments:
# hdfs dfs -chmod -R 777 /usr/accumulo/data
Next we’ll change the ownership of the Accumulo data directory:
# sudo -u hdfs hdfs dfs -chown -R accumulo:hdfs /usr/accumulo/data
We can now initialize Accumulo. We need to do this only once and from one machine:
# /usr/lib/accumulo/bin/accumulo init
[util.Initialize] INFO : Hadoop Filesystem is hdfs://sandbox.hortonworks.com:8020
[util.Initialize] INFO : Accumulo data dir is /user/accumulo/data
[util.Initialize] INFO : Zookeeper server is localhost:2181
[util.Initialize] INFO : Checking if Zookeeper is available. If this hangs, then
    you need to make sure zookeeper is running
Instance name : hdp
Enter initial password for root (this may not be applicable for your security
    setup): ******
Confirm initial password for root: ******
[Configuration.deprecation] INFO : dfs.replication.min is deprecated. Instead,
    use dfs.namenode.replication.min
[Configuration.deprecation] INFO : dfs.block.size is deprecated. Instead, use
    dfs.blocksize
[master.Master] INFO : Loaded class :
    org.apache.accumulo.server.security.handler.ZKAuthorizor
[master.Master] INFO : Loaded class :
    org.apache.accumulo.server.security.handler.ZKAuthenticator
[master.Master] INFO : Loaded class :
    org.apache.accumulo.server.security.handler.ZKPermHandler
[security.AuditedSecurityOperation] INFO : Initialized root user with username:
    root at the request of user !SYSTEM
Accumulo can be started with the start-all.sh script. See Chapter 12 for more details on this process:
[root@sandbox conf]# /usr/lib/accumulo/bin/start-all.sh
Starting monitor on localhost
Starting tablet servers .... done
Starting tablet server on localhost
[server.Accumulo] INFO : Attempting to talk to zookeeper
[server.Accumulo] INFO : Zookeeper connected and initialized, attemping to talk
    to HDFS
[server.Accumulo] INFO : Connected to HDFS
Starting master on localhost
Starting garbage collector on localhost
Starting tracer on localhost
[root@sandbox conf]#
The default RPM may not ship with native libraries built. See “Building native libraries” for more information on building native libraries, which will provide better performance.
Installing on MapR
MapR is a distribution of Hadoop that includes a completely redesigned, proprietary, distributed filesystem, called MapR-FS, that takes the place of HDFS. The MapR distribution includes additional features for security and enterprise integration such as NFS compatibility.
Accumulo 1.6 can be installed on MapR version 3.1 or 3.0 using the following steps (also see these instructions):
# wget http://mirror.cc.columbia.edu/pub/software/apache/accumulo/1.6.1/
  accumulo-1.6.1-bin.tar.gz
# tar -xzf accumulo-1.6.1-bin.tar.gz
# mkdir /opt/accumulo
# mv accumulo-1.6.1 /opt/accumulo/
Create a volume for storing Accumulo data. This volume will take the place of the /accumulo directory in HDFS and has additional capabilities, such as snapshots, mirroring, and quotas:
# maprcli volume create -name project.accumulo -path /accumulo
We’ll disable the MapR filesystem’s compression because Accumulo compresses data by default:
# hadoop mfs -setcompression off /accumulo
We’ll create a configuration directory containing mostly links to the original MapR configuration files, with the exception of core-site.xml, so we can alter it without affecting other services:
[accumulo-1.6.1]# mkdir hadoop
[accumulo-1.6.1]# mkdir hadoop/hadoop-0.20.2
[accumulo-1.6.1]# cd  hadoop/hadoop-0.20.2
[hadoop-0.20.2]# ln -s /opt/mapr/hadoop/hadoop-0.20.2/* .
[hadoop-0.20.2]# rm conf
rm: remove symbolic link `conf'? y
[hadoop-0.20.2]# mkdir conf
[hadoop-0.20.2]# cd conf
[conf]# ln -s /opt/mapr/hadoop/hadoop-0.20.2/conf/* .
[conf]# cp core-site.xml t
[conf]# mv t core-site.xml
mv: overwrite `core-site.xml'? y
Adding the following properties to core-site.xml will tell the MapR filesystem to disable read/write caching, because Accumulo does its own caching:
<property><name>fs.mapr.readbuffering</name><value>false</value></property><property><name>fs.mapr.aggregate.writes</name><value>false</value></property>
Edit the following lines of /opt/mapr/conf/warden.conf to allow Accumulo to use up to 2 GB of memory:
service.command.os.heapsize.max=2750   (from 750)
service.command.os.heapsize.min=2256 (from 256)
Next we’ll configure Accumulo. Follow the instructions in “Server Configuration Files” for copying configuration files and “Building native libraries” on building native libraries. Then return here for MapR-specific configuration.
Edit accumulo-env.sh to point to the proper Hadoop and ZooKeeper directories:
test-z"$HADOOP_PREFIX"&&exportHADOOP_PREFIX=/opt/accumulo/accumulo-1.6.1/hadoop/hadoop-0.20.2/test-z"$ZOOKEEPER_HOME"&&exportZOOKEEPER_HOME=/opt/accumulo/accumulo-1.6.1/hadoop/hadoop-0.20.2/lib
Edit accumulo-site.xml with following properties:
<property><name>instance.zookeeper.host</name><value>maprdemo:5181</value><description>comma separated list of zookeeper servers</description></property><property><name>tserver.port.client</name><value>9996</value></property><property><name>master.walog.closer.implementation</name><value>org.apache.accumulo.server.master.recovery.MapRLogCloser</value></property><property><name>tserver.wal.blocksize</name><value>562M</value></property>
Now Accumulo can be initialized as described in “Initialization”.
Running via Amazon Web Services
Amazon Web Services (AWS) provide a set of scripts for spinning up an Accumulo cluster that runs on virtual machines in Amazon’s EC2 (Elastic Compute Cloud).
This involves first setting up a ZooKeeper cluster using Apache Whirr, and then using the Elastic MapReduce command-line tools.
To setup a ZooKeeper cluster using Apache Whirr, use the following commands:
$ ssh-keygen -t rsa -P '' -f ~/.ssh/id_rsa_whirr
$ bin/whirr launch-cluster --cluster-name=zookeeper
--instance-templates='1 zookeeper'
--provider=aws-ec2
--identity=$AWS_ACCESS_KEY_ID
--credential=$AWS_SECRET_ACCESS_KEY
The Security Groups must be configured to allow the Accumulo machines to connect to ZooKeeper processes on these machines. See the AWS documentation on EC2 security groups for Linux instances.
Obtain the EMR CLI tools:
 $ elastic-mapreduce --create --alive --name "Accumulo" --bootstrap-action
 s3://elasticmapreduce/samples/accumulo/accumulo-install.sh
 --args "IP,DBNAME,PASSWORD" --bootstrap-name "install Accumulo"
 --enable-debugging --log-uri s3://BUCKETNAME/accumulo-logs/
 --instance-type m1.large --instance-count 4 --key-pair KEY
Use your own values for IP, DBNAME, PASSWORD, BUCKETNAME, and KEY:
- IP
-
The IP address of one of the ZooKeeper nodes.
- DBNAME
-
The name that will be used as the Accumulo instance name.
- PASSWORD
-
The password to use for the Accumulo root account.
- BUCKETNAME
-
The name of an S3 bucket that will be used store Accumulo logs.
- KEY
-
The name of an EC2 SSH key-pair.
The --instance-type parameter describes the type of Amazon virtual machine to be used.
m1.large machines work well because they have local storage disks and a modest amount of memory and CPU.
m1.xlarge instance types have also been used to build Accumulo clusters in EC2 but may not be completely configured for these scripts.
Once the script starts running, you will see a line of output similar to:
Created job flow j-1XIYVOM2PGH3R
This identifier can be used to obtain the address of the Accumulo master node:
$ elastic-mapreduce --list j-1XIYVOM2PGH3R
j-1XIYVOM2PGH3R     Waiting  ec2-23-22-183-67.compute-1.amazonaws.com
  Accumulo
  PENDING        Setup Hadoop Debugging
$ ssh [email protected]
The Accumulo instance is running at this point.
Building from Source
Accumulo is distributed under the Apache open source license, so the source code can be downloaded and modified to suit a particular need. Any modifications to the source code, or to use options different from those that were used to create the binary distributions, will require building Accumulo from source.
Several tools make this process easier. Specifically, the Java SDK and Maven build tool should be installed. Java JDK version 1.6 or 1.7 and Maven version 3.0.4 will work.
To build from source, first download the source packages from a mirror listed on the Apache Accumulo website.
Source code is found in the file ending in src.tar.gz. Once downloaded it can be unpacked via:
tar -xzf accumulo-1.6.x-src.tar.gz
This will create a directory containing all the source files.
Building a tarball distribution
To compile the source into binaries, change into this directory via:
cd accumulo-1.6.x
Type:
mvn package -P assemble
This will build a distribution compiled against Hadoop 2.2.0. The distribution should run with any supported version of Hadoop without being recompiled. However, if desired it is possible to compile with a different version by supplying appropriate options. To build for a different version compatible with Hadoop-2, for example Hadoop 0.23.5, use the option:
mvn -Dhadoop.version=0.23.5 package -P assemble
To build for Hadoop 1, use the profile option and also specify the version of Hadoop. For example:
mvn -Dhadoop.profile=1 -Dhadoop.version=1.1.0 package -P assemble
Once the build process is complete, there will be a TAR file distribution in accumulo-1.6.x/assemble/target/accumulo-1.6.x-bin.tar.gz similar to the binary distributions available from the Accumulo website.
This tarball can be copied into the appropriate location and the instructions in “Tarball Distribution Install” can be followed to complete installation. Most installations will also want to use the native libraries, described in the next section.
Building native libraries
Native libraries are written in C++ and must be built for a specific architecture. The binary distributions come with native libraries prebuilt for the GNU Linux x86-64 architecture. If you are building from scratch or simply for a different platform, the native libraries can be built as follows.
Before building the native libraries, install the appropriate build tools. These include make and g++. Make sure these are installed.
For CentOS, g++ is installed via the gcc-c++ package.
The Java development kit packages should also be installed. On CentOS this requires java-1.7.x-openjdk-devel or java-1.6.x-openjdk-devel, where x is the latest minor version number.
JAVA_HOME may need to be set appropriately. For example:
export JAVA_HOME=/usr/lib/jvm/java-1.7.0-openjdk.x86_64/
Once these packages are installed, the native libraries can be built via a script distributed with Accumulo:
[centos@centos accumulo-1.6.0]$ bin/build_native_library.sh
g++ -m64 -g -fPIC -shared -O2 -fno-omit-frame-pointer -fno-strict-aliasing -Wall
-I/usr/lib/jvm/java-1.7.0-openjdk-1.7.0.65.x86_64/include
-I/usr/lib/jvm/java-1.7.0-openjdk-1.7.0.65.x86_64/include/linux -Ijavah
-o libaccumulo.so nativeMap/org_apache_accumulo_tserver_NativeMap.cc
Successfully installed native library
[centos@centos accumulo-1.6.0]$
In older versions of Accumulo, after downloading the source code as outlined in the previous section, type:
cd server/src/main/c++
make
The native libraries will be found in the Accumulo install directory under lib/native/:
[centos@centos accumulo-1.6.0]$ ls lib/native/
libaccumulo.so
Accumulo will attempt to use these if they are present. If they are not, messages will appear in the logs warning that the native libraries could not be found. If Accumulo is configured to run using native libraries, and they are not available, Accumulo may fail to start, because the nonnative Java-based libraries will cause the JVM to use more memory than is allocated.
The following section provides more information on configuring Accumulo.
Configuration
Configuring Accumulo is a process similar to configuring Hadoop, involving editing several files and distributing them across all the machines participating in an Accumulo cluster. In addition, after initialization and startup there are quite a few settings that are stored in ZooKeeper that can be modified to affect changes across the cluster without restarting.
File Permissions
Accumulo stores primary data in HDFS, including its write-ahead logs.
In HDFS the user that runs Accumulo processes must have the ability to read and write to files and directories under the directory specified as instance.dfs.dir in accumulo-site.xml, which defaults to /accumulo.
The user must also be able to create this directory, which means writing to the HDFS root directory if the default directory is unchanged.
It is recommended to create a directory that the accumulo user has permission to write to (e.g., /user/accumulo), and to make the instance.dfs.dir a subdirectory of this directory (e.g., /user/accumulo/accumulo).
For example:
hdfs dfs -mkdir /user/accumulo/accumulo
Note
As of Accumulo version 1.6, the instance.volumes setting should be used instead of instance.dfs.dir. The instance.volumes property expects a comma-separated list of HDFS URIs in which it will store data.
This setting can be set to reference your NameNode with a value like hdfs://namenode:9001/accumulo to configure Accumulo similarly to the default instance.dfs.dir configuration.
Accumulo needs to be able to write application logfiles for debugging and monitoring. If you use the accumulo user to start Accumulo processes, these directories should be writable by the accumulo user.
For a Debian-based system these logs are in the /var/log and /var/lib directories:
sudo mkdir /var/log/accumulo
sudo mkdir /var/lib/accumulo
sudo chown -R accumulo:accumulo /var/log/accumulo
sudo chown -R accumulo:accumulo /var/lib/accumulo
Server Configuration Files
Accumulo ships with some examples based on various memory configurations. To start with these example files, copy the files into Accumulo’s conf directory (such as /etc/accumulo/conf/):
cd /etc/accumulo/conf
sudo cp -r examples/3GB/native-standalone/* .
Accumulo needs to know how to talk to HDFS and ZooKeeper in order to start up. Two files, accumulo-env.sh and accumulo-site.xml, control most of Accumulo’s startup settings. These two files should be copied to each machine that will run Accumulo processes and should be kept in sync if anything changes.
Caution
If you copy configuration files from a directory called native-standalone/, the native libraries must be built or Accumulo can fail to start. This is because the native libraries will handle their own memory allocation, and if they are not found, Accumulo reverts to using Java data structures, which will require more memory than the JVM is configured to provide. See “Building native libraries” for details on building these libraries.
You can configure Accumulo to run without the native libraries by allocating more memory to the JVM in which the tablet server runs, so that it exceeds the amount of memory specified for the tserver.memory.maps.max property, set in the accumulo-site.xml file.
The memory dedicated to the tablet server JVM is specified in the accumulo-env.sh file on the line that defines ACCUMULO_TSERVER_OPTS.
Specifically, the -Xmx option should be set higher than tserver.memory.maps.max.
Beware, however, that tablet servers will not perform as well as they would when using native libaries, and if tablet servers are configured to use several gigabytes of memory, JVM garbage-collection pauses can interfere with the tablet servers’ ability to respond quickly enough to requests.
Heterogeneous clusters made of machines with differing hardware can have configuration files that differ in their memory settings, for example. However, properties such as the instance secret and hostnames of ZooKeeper must be the same.
accumulo-env.sh
Set the following system variables in the accumulo-env.sh file to the appropriate values for your system.
If you are using Debian packages this file will be mostly configured already.
The only setting you may need to change is the HADOOP_CONF_DIR if you’re using Hadoop 2.0 or later:
JAVA_HOME-
Should be the directory that contains bin/java.
HADOOP_HOME-
Should contain Hadoop JARs and a lib/ directory.
HADOOP_CONF_DIR-
Should contain the files core-site.xml, hdfs-site.xml, etc.
For Hadoop 2.0, comment out the line:
 # test -z "$HADOOP_CONF_DIR" && export
 HADOOP_CONF_DIR="$HADOOP_PREFIX/conf"
and uncomment:
 test -z "$HADOOP_CONF_DIR" && export
 HADOOP_CONF_DIR="$HADOOP_PREFIX/etc/hadoop"
ZOOKEEPER_HOME-
Should contain a zookeeper.jar file.
- Memory settings
-
Settings for various hardware configs. Also see “Tablet Server Tuning”:
- 4 GB RAM
-
- Tablet server
-
-Xmx1g -Xms1g - Master
-
-Xmx1g -Xms1g - Monitor
-
-Xmx1g -Xms256m - GC
-
-Xmx256m -Xms256m - Logger
-
-Xmx1g -Xms256m(1.4 and below only) - General options
-
-XX:+UseConcMarkSweepGC -XX:CMSInitiatingOccupancyFraction=75 - Other processes
-
-Xmx1g -Xms256m
- 16 GB RAM
-
- Tablet server
-
-Xmx4g -Xms4g - Master
-
-Xmx4g -Xms4g - Monitor
-
-Xmx1g -Xms256m - GC
-
-Xmx1g -Xms1g - Logger
-
-Xmx1g -Xms256m (1.4 and below only) - General options
-
-XX:+UseConcMarkSweepGC -XX:CMSInitiatingOccupancyFraction=75 - Other processes
-
-Xmx1g -Xms256m
- 64 GB RAM
-
- Tablet server
-
-Xmx16g -Xms16g - Master
-
-Xmx8g -Xms8g - Monitor
-
-Xmx1g -Xms256m - GC
-
-Xmx2g -Xms2g - Logger
-
-Xmx1g -Xms256m(1.4 and below only) - General options
-
-XX:+UseConcMarkSweepGC -XX:CMSInitiatingOccupancyFraction=75 - Other processes
-
-Xmx1g -Xms256m
- 96 GB RAM
-
- Tablet server
-
-Xmx32g -Xms32g - Master
-
-Xmx8g -Xms8g - Monitor
-
-Xmx1g -Xms256m - GC
-
-Xmx2g -Xms2g - Logger
-
-Xmx1g -Xms256m(1.4 and below only) - General options
-
-XX:+UseConcMarkSweepGC -XX:CMSInitiatingOccupancyFraction=75 - Other processes
-
-Xmx1g -Xms256m
Tip
When you’re allocating memory to tablet servers, you should keep in mind the memory allocated to other processes so as not to oversubscribe the available memory on a machine. Oversubscription can lead to memory pages being swapped out, which can cause servers to be so unresponsive as to be unfit to participate in an Accumulo instance.
Also see “Kernel Tweaks” for the swappiness setting.
accumulo-site.xml
This XML file contains properties, each with a name and a value. Hadoop uses similar files for its configuration. This file tells Accumulo processes which ZooKeeper instance to use for configuration information and the values of various settings to use when starting up. The file should only be readable by the accumulo user when it contains the instance secret. A separate site file without sensitive information can be created for client use.
If you are using Debian packages or RPMs, this file should be mostly configured already.
instance.zookeeper.host-
Write the list of ZooKeeper servers, separated by commas, such as:
zk1.mycluster.com:2181,zk2.mycluster.com,zk3.mycluster.com
instance.secret-
This is a shared secret among processes in a single Accumulo instance. It prevents processes that do not know the secret from joining the instance. It should be changed to a unique value for each installation.
Note
The instance secret is used to control the membership of the cluster, but it is not used to enforce confidentiality.
general.classpaths-
If you are using Hadoop 2.0 or later, make sure all the HDFS and Hadoop common JARs are added to the
general.classpathsproperty. Some systems place HDFS 2.0 JARs in /usr/lib/hadoop-hdfs/ and MapReduce JARs in /usr/lib/hadoop-0.20-mapreduce or /usr/lib/hadoop-mapreduce. tserver.port.clientandtserver.port.search-
Some installations will require changing the default port number on which some processes listen, if the ports are already taken by other processes. In particular, the default tablet server port, 9997, may be taken by a Java Management Extensions (JMX) listener or other process. If so, the tablet server can be configured to listen on a different port by setting
tserver.port.clientto a specific port number or by settingtserver.port.searchtotrue, in which case the tablet server will try the successively higher port numbers until finding an open port.
Be sure to reference “Tablet Server Tuning” for other properties that could be configured in accumulo-site.xml when you tune tablet servers.
Client Configuration
In addition to inheriting settings from accumulo-site.xml, Accumulo clients can be configured via a Java properties file in the home directory of the user that Accumulo client processes run as. Typically this will be accumulo. This properties file allows each Accumulo client to be configured separately, rather than having them all inherit the same settings from server configuration files or settings stored in ZooKeeper.
The properties file is located at $HOME/.accumulo/config. Each line of the properties file can specify one property and one value, separated by a tab character. Lines beginning with an octothorp (#) are ignored.
For example:
# turn on SSL
instance.rpc.ssl.enabled true
We’ll look at an example using this configuration file when we discuss SSL in “Configuring SSL”.
Deploying JARs
Accumulo processes are started from JAR files distributed as part of the installation. These live in $ACCUMULO_HOME/lib.
In addition, any Java classes that customize Accumulo, such as iterators and constraints must be distributed to servers across the cluster so that tablet servers and clients can load them.
There are several ways to get the Accumulo JARs and custom JARs onto servers.
Using lib/ext/
In $ACCUMULO_HOME/lib/ there is a directory called ext/ that Accumulo processes monitor for custom JARs. Accumulo has its own Java class loader that can reload updated classes without restarting the JVM. Simply placing new JARs into this directory will allow processes to load them, and to update them if they’ve been loaded already.
This requires copying the custom JARs onto every server, using a command such as scp.
An alternative is to have Accumulo look in HDFS, which allows JARs to be uploaded once into HDFS and then retrieved by all processes that need them.
Custom JAR loading example
The code examples that are described in this book can be built into a JAR file via the following Maven commands:
[user@host accumulo-examples]$ mvn compile package
...
[INFO]
[INFO] --- maven-jar-plugin:2.3.2:jar (default-jar) @ accumulo-examples ---
[INFO] ------------------------------------------------------------------------
[INFO] BUILD SUCCESS
[INFO] ------------------------------------------------------------------------
[INFO] Total time: 2.954s
[INFO] Finished at: Mon Sep 01 13:49:33 EDT 2014
[INFO] Final Memory: 24M/310M
[INFO] ------------------------------------------------------------------------
Now there is a JAR file in the target/ directory that can be deployed to tablet servers in order to load custom filters, combiners, etc. We’ll copy it into $ACCUMULO_HOME/lib/ext/ next:
cp accumulo-examples-0.0.1-SNAPSHOT.jar lib/ext/
Now we can use any class in that JAR. For example, we can add the custom constraint defined in our example code:
[centos@centos accumulo-1.6.0]$ bin/accumulo shell -u root
Password: ******
Shell - Apache Accumulo Interactive Shell
-
- version: 1.6.0
- instance name: test
-
- type 'help' for a list of available commands
-
root@test test> createtable test
root@test test> constraint -a -t test
          com.accumulobook.advanced.ValidHeightWeightConstraint
Added constraint com.accumulobook.advanced.ValidHeightWeightConstraint
          to table test with number 2
root@test test>
Note
Accumulo does not have to be stopped in order for processes to begin using the classes in new JAR files in lib/ext/. Accumulo deploys its own Java class loader to manage loading newer versions of classes when they become available. This is not the case for JAR files in lib.
Using HDFS
In addition to lib/ext/, Accumulo can load JARs from HDFS by using the Apache VFS class loader. The advantage of using HDFS is that administrators can manage custom JARs by uploading them once to HDFS from where all Accumulo processes can access them, instead of copying JAR files to the local filesystem of each server.
The relevant configuration option is:
<property>
  <name>general.vfs.classpaths</name>
  <value></value>
</property>
Administrators can provide a comma-separated list of HDFS paths that contain JAR files.
For example, to add classes from our example code to a path in HDFS, we would first upload the JAR file to a directory in HDFS that Accumulo processes can read:
[centos@centos ~]$ hdfs dfs -mkdir /accumulo/ext
[centos@centos ~]$ hdfs dfs -put accumulo-examples-0.0.1-SNAPSHOT.jar
                   /accumulo/ext/
Next we would add the path to the accumulo-site.xml file:
<property>
  <name>general.vfs.classpaths</name>
  <value>hdfs://centos:8020/accumulo/ext/.*.jar</value>
</property>
Note
The general.vfs.classpaths property cannot be modified by updating the property in ZooKeeper.
It must be set in accumulo-site.xml.
After starting Accumulo, we should be able to use classes from our uploaded JAR:
root@test> constraint -a -t test
    com.accumulobook.advanced.ValidHeightWeightConstraint
Added constraint com.accumulobook.advanced.ValidHeightWeightConstraint to table
    test with number 2
root@test>
Setting Up Automatic Failover
Essential to running a large cluster is Accumulo’s ability to tolerate certain types of failure. When certain processes fail, their workload is automatically reassigned to remaining worker nodes or backup processes on other machines. In general, setting up automatic failover for Accumulo processes is simply a matter of running an instance of a process on more than one server.
- Tablet servers
-
The master process ensures that any tablets that were being served by a failed machine are reassigned to remaining tablet servers, which perform any recovery necessary by reading from write-ahead logs. For more on this process see “Recovery”.
- Masters
-
A master process must be running in order for tablet server failover to happen. If no master is running, most client operations can proceed, but if any tablet server fails while the master is down, some tablets will be unavailable until a master process is started.
To avoid a situation in which tablets can become unavailable, multiple masters processes can be run to ensure that at least one master is running at all times. For this purpose, the $ACCUMULO_HOME/conf/masters file should contain the hostnames of the machines on which master processes are run.
The master processes use ZooKeeper to coordinate electing an active master and to elect a new active master in the event that the active master fails.
- Garbage collectors
-
The garbage collector process is not critical to client operations but must run to ensure aged-off, deleted, and redundant data is removed from HDFS.
Initialization
Before Accumulo is started for the first time, an Accumulo instance must be initialized. This can be done on a machine that can connect to both ZooKeeper and HDFS, via the command:
accumulo init
This command should be run under the user account under which later Accumulo processes will be run, such as the accumulo user.
Be sure to verify that the init script is using the correct values for ZooKeeper servers and the Hadoop filesystem:
INFO: Hadoop Filesystem is hdfs://[your-namenode]:8020
INFO: ZooKeeper server is [your-zookeeper]:2181
If an error occurs, such as “java.io.IOException: No FileSystem for scheme: hdfs,” check that the path to the Hadoop HDFS JARs are included in the general.classpaths setting in the accumulo-site.xml file.
This script will create an entry in ZooKeeper that will be used to coordinate all configuration information for this Accumulo instance. In addition, the script will create a directory called /accumulo in HDFS, in which all table data will be stored.
If the accumulo user cannot write to the root directory of HDFS, an error will be thrown. Ensure that the accumulo user can create the /accumulo directory in HDFS, or create it beforehand and grant ownership to accumulo. Alternatively, configure Accumulo to use a different directory that the accumulo user has permission to write to by changing the instance.dfs.dir property in accumulo-site.xml as described in “File Permissions”.
After initialization, there will be three tables in Accumulo: accumulo.root, accumulo.metadata, and the trace table. See Chapter 10 for more information on how Accumulo makes use of those tables.
To reinitialize
If for some reason you want to reinitalize an Accumulo cluster, the /accumulo directory (or whichever directory is specified as instance.dfs.dir) in HDFS must be moved or deleted first.
Deleting /accumulo will erase all data in any existing Accumulo tables.
This can be done via the command:
hadoop fs -rmr /accumulo
Or you can simply move the directory:
hadoop fs -mv /accumulo /new path
After this is done, the accumulo init script can be run again.
Accumulo processes should be stopped before you run the init script.
The script will prompt for an instance name.
If the instance name has ever been used before, the script will prompt to delete the existing entry from ZooKeeper.
Answering Y will remove any information previously associated with that instance name, at which point initialization will proceed normally.
Multiple instances
An Accumulo instance is a logical grouping of processes into one cooperative application. It is possible for multiple Accumulo instances to share a ZooKeeper cluster and an HDFS cluster. The instances must have unique instance names and they must be configured to use different directories in HDFS.
Additionally, if processes that belong to two different Accumulo instances are located on the same server, they must be configured to use different TCP ports to communicate.
The port properties to configure depend on the type of process, and include master.port.client, tserver.port.client, gc.port.client, monitor.port.client, monitor.port.log4j, and trace.port.client.
Running Very Large-Scale Clusters
Accumulo is designed to run on clusters of up to thousands of machines. There are some things to consider when running at very large scale that may not be an issue on smaller clusters.
Networking
As a distributed application, Accumulo relies heavily on the network that connects servers to one another. Like Apache Hadoop, Accumulo does not require exotic networking hardware, and it is designed to operate well on commodity-class networking components such as Gigabit Ethernet and 10 Gigabit Ethernet. Modern Hadoop configuration recommendations include considering 10 Gigabit Ethernet for reduced latency.
Limits
The largest clusters begin to be bottlenecked not by any component of Accumulo but by the underlying subsystems on which it runs. In particular, a single HDFS NameNode becomes a bottleneck in terms of the number of update operations that the entire cluster can perform over time. This limit can be observed by looking at the time that the Accumulo garbage collector takes to complete one pass. If the garbage collector is taking over five minutes to run, the NameNode is likely a bottleneck.
Accumulo 1.6 introduces the ability to run Accumulo over multiple NameNodes to overcome this limitation. See “Using Multiple HDFS Volumes”.
Metadata Table
Accumulo’s metadata table (called accumulo.metadata in Accumulo 1.6) is a special table designed to store the current location and other information about each tablet of every other table. As such it plays an important role in the operation of every Accumulo application.
By default, the metadata table is configured to be scalable and to provide good performance for even large clusters. Understanding how the configuration of the metadata table affects performance and scalability can help you fine-tune your cluster. In large Accumulo clusters the metadata table can be split and hosted by additional tablet servers in order to scale with the number of clients performing metadata lookups.
The default configuration for the metadata table is different from that of other tables. It is tuned for high performance and availability, and to take advantage of its relatively small size.
To improve query performance, the size of compressed file blocks is reduced from 100 K to 32 K, the data block cache is enabled so that the frequent reads by clients are serviced very quickly from data cached in memory, and the major compaction ratio is set to 1.
To increase availability and decrease the possibility of data loss, the file replication is increased to 5 (or the maximum replication defined in HDFS if that is less than 5, or the minimum replication defined in HDFS if that is greater than 5).
The split threshold is decreased from 1 GB to 64 MB because the metadata table is so much smaller than data tables, and because we want the metadata tablets spread onto multiple tablet servers for better read and write throughput.
Two locality groups are configured, so that columns that are accessed together frequently can be read more efficiently.
Tip
The metadata table configuration generally does not need to be adjusted. If your metadata table is heavily taxed early on, before it has gotten large enough for it to naturally split onto a desired number of tablet servers, you could lower the split threshold temporarily to obtain more metadata tablets.
The metadata table’s design is not a limiting factor in the scalability of Accumulo. Going by the following simple calculation in the Bigtable paper, the metadata table can address more data than can be stored in HDFS:
Each METADATA row stores approximately 1KB of data in memory. With a modest limit of 128 MB METADATA tablets, our three-level location scheme is sufficient to address 234 tablets (or 261 bytes in 128 MB tablets).
Tablet Sizing
Having fewer, larger tablets can reduce the overhead of managing a large-scale cluster. This can be achieved by increasing the split threshold for splitting one tablet into two. Tablets that are tens of gigabytes in size are not unreasonable.
To increase the tablet split threshold, change the table.split.threshold in the shell:
user@accumulo myTable> config -t myTable -s table.split.threshold=20GB
File Sizing
For the same reason that larger tablet sizes can reduce overhead, it can be useful to increase the block size in HDFS to a value closer to the size of tablets. This reduces the amount of information the NameNode has to manage for each file, allowing the NameNode to manage more overall files.
To increase the block size for a table, set table.file.blocksize:
user@accumulo> config -t mytable -s table.file.blocksize=1GB
Caution
Be careful not to confuse table.file.blocksize, which controls the size of HDFS blocks for a given table, with tserver.default.blocksize, which controls the size of blocks to cache in tablet server memory.
Using Multiple HDFS Volumes
Accumulo version 1.6 and later can store files using multiple HDFS volumes, potentially on multiple NameNodes. There are several options for doing this. One is to configure Accumulo to run over two or more separate HDFS instances, each with a NameNode and a set of DataNodes, and DataNodes each store data for only one NameNode (Figure 11-10). In this case, DataNodes are not shared between NameNodes and they operate without any knowledge of one another. Accumulo simply keeps track of which files live in which HDFS instance.
Caution
Support for using multiple HDFS volumes is new and tooling for controlling distribution and customization is limited.
Accumulo does this by using full path names to all the files under management, including the hostname of the NameNode of the HDFS cluster in which each file lives. After Accumulo is informed of the list of NameNodes to use in the configuration file, no other configuration is necessary. Accumulo will automatically distribute files across HDFS clusters evenly.
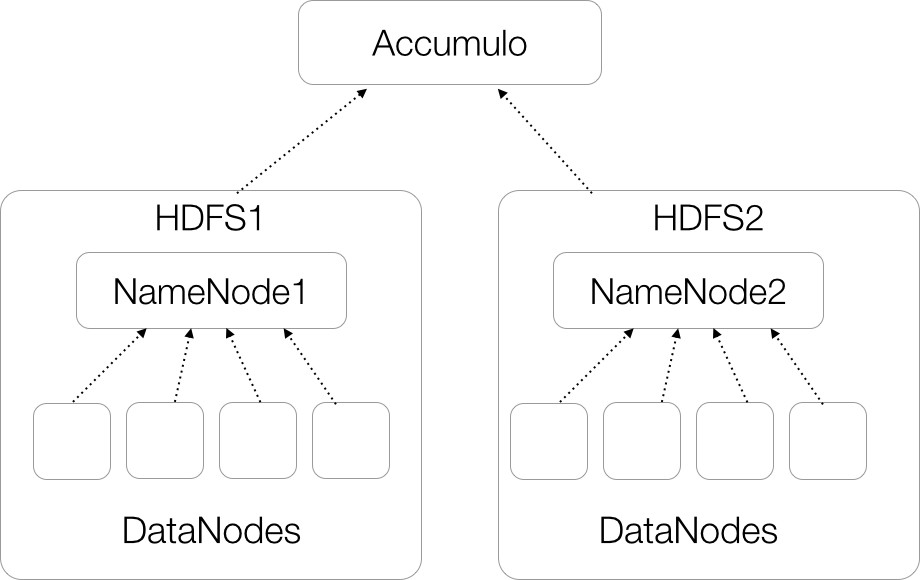
Figure 11-10. Accumulo on multiple HDFS clusters
Another option is to use NameNode federation, in which a set of DataNodes are shared between two or more NameNodes (Figure 11-11). Federation can make it easier to keep the data in HDFS balanced because each NameNode can see the information on every DataNode and place data based on the load of all the DataNodes.
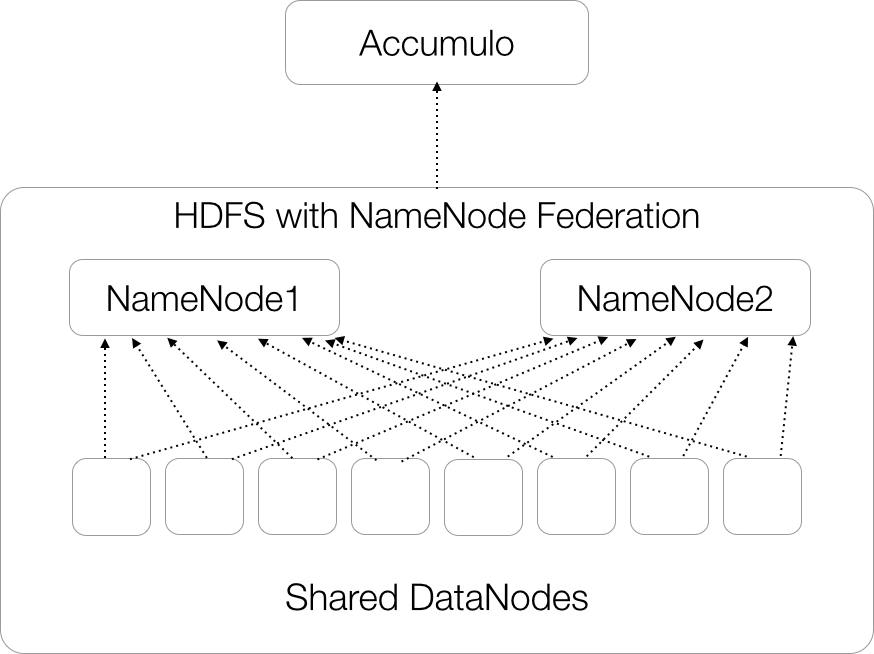
Figure 11-11. Accumulo on an HDFS cluster using NameNode federation
In either of these cases, the configuration of Accumulo is the same. A list of NameNodes to use is specified in the accumulo-site.xml file under the instance.volumes property:
<property><name>instance.volumes</name><value>hdfs://namenode1:9001/accumulo,hdfs://namenode2:9001/accumulo</value></property>
Accumulo instances that utilize multiple NameNodes are capable of scaling to extremely large sizes, beyond a few thousand nodes to ten thousand or more. With modern hard drives each server could have up to 30 TB raw, 10 TB after replication, and a cluster of 10,000 servers could store up to 100 PB. Accumulo provides a single unified view of all of this data, and lookups remain fast because of the ordering of the keys in each table.
Handling NameNode hostname changes
Because Accumulo keeps track of the hostname of the NameNode when using multiple NameNodes, special care must be taken when moving a NameNode to a new hostname.
If a NameNode is moved from namenodeA to namenode1, an additional configuration property, instance.volumes.replacements, must be added and Accumulo must be restarted in order for Accumulo to be able to talk to the new NameNode:
<property><name>instance.volumes.replacements</name><value>hdfs://namenodeA:9001/accumulo hdfs://namenode1:9001/accumulo</value></property>
If more than one NameNode changes hostnames this way, each pair of NameNode hostnames should be listed, with commas separating pairs of hostnames and spaces separating individual hostnames:
<property><name>instance.volumes.replacements</name><value>hdfs://namenodeA:9001/accumulo hdfs://namenode1:9001/accumulo, hdfs://namenodeB:9001/accumulo hdfs://namenode2:9001/accumulo</value></property>
Security
Accumulo works to protect data from unauthorized access. Like any security measures, the features Accumulo provides must be coordinated with other system security measures in order to achieve the intended protection.
There are three requirements for Accumulo to guarantee that no data is exposed in an unauthorized manner:
-
Data is properly labeled when inserted by Accumulo clients.
-
Accumulo clients present the proper authorization tokens when reading data.
-
Supporting systems listed in “System Services” and supporting software are secured.
Column Visibilities and Accumulo Clients
Accumulo will authenticate a user according to the user’s credentials (such as a password), and authorize that user to read data according to the column visibilities present within that data and the authorizations granted to the user. All other means of accessing Accumulo table data must be restricted.
Supporting Software Security
Because Accumulo stores data in HDFS, access to these files must be restricted. This includes access to both the RFiles, which store long-term data, and Accumulo’s write-ahead logs, which store recently written data. Accumulo should be the only application allowed to access these files in HDFS.
Similarly, HDFS stores blocks of files in an underlying Linux filesystem. Users who have access to blocks of HDFS data stored in the Linux filesystem would also bypass data-level protections. Access to the file directories on which HDFS data is stored should be limited to the HDFS daemon user.
Unnecessary services should be turned off.
The accumulo-site.xml file should not be readable except by the accumulo user, because it contains the instance secret and the trace user’s password. A separate conf/ directory with files readable by other users can be created for client use, with an accumulo-site.xml file that does not contain those two properties.
Network Security
IPTables or other firewall implementations can be used to help restrict access to TCP ports.
Accumulo uses the port numbers listed in Table 11-2 by default. These should be reachable by Accumulo clients as well as by one another.
| Setting name | Port number | Purpose |
|---|---|---|
monitor.port.log4j |
4560 |
The listening port for the monitor’s log4j logging collection |
tserver.port.client |
9997 |
The port used for handling client connections on the tablet servers |
master.port.client |
9999 |
The port used for handling client connections on the master |
trace.port.client |
12234 |
The listening port for the trace server. |
n/a |
42424 |
Accumulo proxy server port |
gc.port.client |
50091 |
The listening port for the garbage collector’s monitor service |
monitor.port.client |
50095 |
The listening port for the monitor’s HTTP service |
Accumulo tablet servers must be able to communicate with HDFS DataNodes and the NameNode.
Only trusted client applications should be allowed to connect to ZooKeeper and Accumulo tablet servers.
Configuring SSL
As of Accumulo 1.6.0, the Secure Sockets Layer (SSL) cryptographic protocol can be configured to secure communications among Accumulo server processes and among server and client processes. This prevents anyone with access to the network devices from reading data as it is passed from servers to clients or servers to other servers.
To configure Accumulo to communicate over SSL, each client and server should have:
-
Cryptographic x.509 certificates generated
-
Certificates stored in Java KeyStore files
-
SSL properties configured in accumulo-site.xml for servers and in the client config file for clients
The SSL configuration properties are described in Table 11-3. The client config file is described in “Client Configuration”.
The Java truststore should contain the public certificate of the authority that has signed all of the server certificates.
| Setting name | Default | Purpose |
|---|---|---|
instance.rpc.ssl.enabled |
false |
Enable SSL |
instance.rpc.ssl.clientAuth |
false |
Require clients to present SSL certs as well as servers |
rpc.javax.net.ssl.keyStore |
$ACCUMULO_CONF_DIR/ssl/keystore.jks |
Path to keystore |
rpc.javax.net.ssl.keyStorePassword |
[empty] |
Keystore password (if empty, uses Accumulo instance.secret) |
rpc.javax.net.ssl.keyStoreType |
jks |
Keystore type |
rpc.javax.net.ssl.trustStore |
$ACCUMULO_CONF_DIR/ssl/truststore.jks |
Path to truststore |
rpc.javax.net.ssl.trustStorePassword |
[empty] |
Truststore password (if empty, uses no password) |
rpc.javax.net.ssl.trustStoreType |
jks |
Truststore type |
If Accumulo is configured to require clients to present certificates, each client must also have a keystore and truststore file. Configuring clients to use a keystore is not done in the accumulo-site.xml file, because clients typically should not have access to this file. Client configuration properties can be specified in a properties file (each line containing a “name-value” pair) in the user’s home directory in a file named ~/.accumulo/config or in the file $ACCUMULO_CONF_DIR/client.conf.
An example client configuration is:
 instance.rpc.ssl.clientAuth true
 instance.rpc.ssl.enabled true
 rpc.javax.net.ssl.keyStore path_to_keystore
 rpc.javax.net.ssl.keyStorePassword keystore_password
If you are using your own Certificate Authority (CA), a separate truststore file containing the public key of the CA can be distributed to servers and clients as well, specified by the following:
 rpc.javax.net.ssl.trustStore path_to_truststore
 rpc.javax.net.ssl.trustStorePassword truststore_password
Separately, Accumulo’s monitor web page can be configured to use HTTPS instead of HTTP. This is independent of whether Accumulo is using SSL for RPC. This is done by configuring the monitor to use a keystore and truststore with the following properties, similar to setting the RPC properties:
monitor.ssl.keyStore
monitor.ssl.keyStorePassword
monitor.ssl.trustStore
monitor.ssl.trustStorePassword
An example of creating a set of certificates from our own CA is as follows. First we’ll create a Certificate Authority and place its public key in a keystore file, which will call the truststore:
[centos@centos ~]$ openssl genrsa -des3 -out root.key 4096
Generating RSA private key, 4096 bit long modulus
...............................++
..............................................................................
      ......++
e is 65537 (0x10001)
Enter pass phrase for root.key:
Verifying - Enter pass phrase for root.key:
[centos@centos ~]$ ls
root.key
Next we’ll create a certificate request:
[centos@centos ~]$ openssl req -x509 -new -key root.key  -days 365
                         -out root.pem
Enter pass phrase for root.key:
You are about to be asked to enter information that will be incorporated
into your certificate request.
What you are about to enter is what is called a Distinguished Name or a DN.
There are quite a few fields but you can leave some blank
For some fields there will be a default value,
If you enter '.', the field will be left blank.
-----
Country Name (2 letter code) [XX]:US
State or Province Name (full name) []:DC
Locality Name (eg, city) [Default City]:Washington
Organization Name (eg, company) [Default Company Ltd]:Accumulo Corp
Organizational Unit Name (eg, section) []:Developers
Common Name (eg, your name or your server's hostname) []:Cert Auth
Email Address []:[email protected]
[centos@centos ~]$ ls
root.key  root.pem
Now we can generate a Base-64 encoded version of our PEM file:
[centos@centos ~]$ openssl x509 -outform der -in root.pem -out root.der
The Base-64 encoded certificate now can be imported into our Java keystore:
[centos@centos ~]$ keytool -import -alias root-key -keystore truststore.jks
                         -file root.der
Enter keystore password:
Re-enter new password:
Owner: [email protected], CN=Cert Auth, OU=Developers,
          O=Accumulo Corp, L=Seattle, ST=Washington, C=US
Issuer: [email protected], CN=Cert Auth, OU=Developers,
          O=Accumulo Corp, L=Seattle, ST=Washington, C=US
Serial number: abd68bf897fcf631
Valid from: Sun Sep 14 15:57:19 GMT-05:00 2014 until: Mon Sep 14 15:57:19
          GMT-05:00 2015
...
Trust this certificate? [no]:  yes
Certificate was added to keystore
[centos@centos ~]$ ls
root.der  root.key  root.pem  truststore.jks
The root.der file can be deleted. The root.key file should be protected because it is used to authorize client and server certificates.
The truststore.jks file should be copied to servers and clients that will communicate using certificates generated by this CA’s keys. This way, processes can verify that the certificates presented are authentic.
With our new CA, we can generate certificates for all the machines that will participate in our Accumulo cluster, including servers and clients.
First, we’ll generate a server key:
[centos@centos ssl]$ openssl genrsa -out server.key 4096
Generating RSA private key, 4096 bit long modulus
..............................................................................
      ..........................................................................
      ..................++
...........................................................................++
e is 65537 (0x10001)
Next we’ll create a certificate request that we can use with our CA to create a server certificate:
[centos@centos ssl]$ openssl req -new -key server.key -out server.csr
You are about to be asked to enter information that will be incorporated
into your certificate request.
What you are about to enter is what is called a Distinguished Name or a DN.
There are quite a few fields but you can leave some blank
For some fields there will be a default value,
If you enter '.', the field will be left blank.
-----
Country Name (2 letter code) [XX]:
State or Province Name (full name) []:
Locality Name (eg, city) [Default City]:
Organization Name (eg, company) [Default Company Ltd]:
Organizational Unit Name (eg, section) []:
Common Name (eg, your name or your server's hostname) []:
Email Address []:
Please enter the following 'extra' attributes
to be sent with your certificate request
A challenge password []:
An optional company name []:
[centos@centos ssl]$ ls
root.key  root.pem  server.csr  server.key  truststore.jks
Now we’ll use our CA keys to generate a server certificate from the certificate request:
[centos@centos ssl]$ openssl x509 -req -in server.csr -CA root.pem
                       -CAkey root.key -CAcreateserial -out server.pem -days 365
Signature ok
subject=/C=XX/L=Default City/O=Default Company Ltd
Getting CA Private Key
Enter pass phrase for root.key:
[centos@centos ssl]$
[centos@centos ssl]$ ls
root.key  root.pem  root.srl  server.csr  server.key  server.pem  truststore.jks
Next we’ll make a PKCS12 file from our server certificate that we can use to import into our keystore:
[centos@centos ssl]$ openssl pkcs12 -export -in server.pem -inkey server.key
                       -certfile server.pem -name 'server-key' -out server.p12
Enter Export Password:
Verifying - Enter Export Password:
[centos@centos ssl]$ ls
root.key  root.pem  root.srl  server.csr  server.key  server.p12  server.pem
      truststore.jks
Let’s import the PKCS12 file into our keystore:
[centos@centos ssl]$ keytool -importkeystore -srckeystore server.p12
                       -srcstoretype pkcs12 -destkeystore server.jks
                       -deststoretype JKS
Enter destination keystore password:
Re-enter new password:
Enter source keystore password:
Entry for alias server-key successfully imported.
Import command completed:  1 entries successfully imported, 0 entries failed
          or cancelled
We can remove the .p12 file because it’s no longer needed:
[centos@centos ssl]$ rm server.p12
The server.jks, server.key, and truststore.jks files should be moved to the Accumulo server and protected by changing ownership of the files to the user that Accumulo processes run as, and restricting access to only that user. The absolute local filesystem paths to and pass phrases for the truststore.jks and server.jks files should be put into the accumulo-site.xml file, as described in Table 11-3.
After this configuration process, Accumulo will employ SSL in communications between clients and servers, and between servers.
Encryption of Data at Rest
Accumulo controls access to data for client programs that are configured to pass user authorizations as part of scan operations. Cryptography can be used to secure data from those with physical access to storage components in which data is stored.
As of Accumulo version 1.6.0, data stored on disk can be encrypted via pluggable modules, with the exception of data stored in HDFS as part of the tablet server recovery process. An example implementation ships with Accumulo, although it stores the master key for all encryption keys in HDFS along with encrypted files.
To configure Accumulo to use encryption when storing files, add the following properties to accumulo-site.xml:
<property>
  <name>crypto.module.class</name>
  <value>org.apache.accumulo.core.security.crypto.DefaultCryptoModule</value>
</property>
<property>
  <name>crypto.cipher.suite</name>
  <value>AES/CFB/NoPadding</value>
</property>
<property>
  <name>crypto.cipher.algorithm.name</name>
  <value>AES</value>
</property>
<property>
  <name>crypto.cipher.key.length</name>
  <value>128</value>
</property>
<property>
  <name>crypto.secure.rng</name>
  <value>SHA1PRNG</value>
</property>
<property>
  <name>crypto.secure.rng.provider</name>
  <value>SUN</value>
</property>
<property>
  <name>crypto.secret.key.encryption.strategy.class</name>
  <value>org.apache.accumulo.core.security.crypto.
               CachingHDFSSecretKeyEncryptionStrategy</value>
</property>
<property>
    <name>crypto.default.key.strategy.cipher.suite</name>
    <value>AES/ECB/NoPadding</value>
</property>
Kerberized Hadoop
Apache Hadoop can be deployed using Kerberos to control the processes that are allowed to participate in the cluster. To use Accumulo with a kerberized HDFS instance, you must create an Accumulo principal:
kadmin.local -q "addprinc -randkey accumulo/[hostname]"
Principals can then be exported to a keytab file. There can be a separate keytab file for each server, or all principals can be globbed into a single keytab file as follows:
kadmin.local -q "xst -k accumulo.keytab -glob accumulo*"
The keytab file for a server must be stored locally on that server, owned by the accumulo user with file permissions 400.
A suggested location for the keytab file is the $ACCUMULO_HOME/conf directory.
The absolute local path to the the keytab file on each server must be specified in the accumulo-site.xml file, as well as the principal.
The placeholder _HOST can be used for the hostname, but the realm must be specified:
<property>
  <name>general.kerberos.keytab</name>
  <value>$ACCUMULO_CONF_DIR/accumulo.keytab</value>
</property>
<property>
  <name>general.kerberos.principal</name>
  <value>accumulo/_HOST@[realm]</value>
</property>
Application Permissions
Accumulo has the concept of a user permission, but more often these are associated with a particular application that may provide access to multiple users. Accumulo clients can do their own authentication of multiple users and also look up any associated authorization tokens, which they then faithfully pass to Accumulo tablet servers when doing scans.
Before any user can read any data, however, an account must be created, authorization tokens assigned, and access to tables granted. Administrators can work with application developers to determine the right level of access for the account and how to determine the set of authorization tokens to grant to the account.
To create an account in the shell, run the createuser command:
root@accumulo> createuser myapp
Enter new password for 'myapp': *****
Please confirm new password for 'myapp': *****
To allow this account to read a particular table, run:
root@accumulo> grant Table.READ -t mytable -u myapp
root@accumulo> System permissions:
Table permissions (!METADATA): Table.READ
Table permissions (mytable): Table.READ
To grant authorizations to an account, run:
root@accumulo> setauths -u myapp -s myauth
root@accumulo> getauths -u myapp
myauth
To see what permissions a user account has, run:
root@accumulo> userpermissions -u myapp
Once this has been done, an Accumulo client identified by the myapp account can connect to Accumulo, passing in the password specified, and perform scans against the mytable table and pass in the myauth authorization token . If a client tries to read from another table, or tries to write to mytable, or tries to pass in a different authorization token, it will receive an Authorization exception.
A list of available permissions can be seen via the systempermissions and tablepermissions commands.
See “Permissions” for more on permissions.