
Chapter 16. Backups & File History
There are two kinds of people in the world: those who have a regular backup system—and those who will.
You’ll get that grisly joke immediately if you’ve deleted the wrong folder by accident, made changes you regret, or (worst of all) had your hard drive die. All those photos, all that music you’ve bought online, all your email—gone. It’s painful.
Yet the odds are overwhelming that, at this moment, you do not have a complete, current, automated backup of your computer. Despite about a thousand warnings, articles, and cautionary tales a year, guess how many people do? About 4 percent. Everybody else is flying without a net.
If you don’t have much to back up—you don’t have much in the way of photos, music, or movies—you can get by with copying stuff onto a flash drive or using a free online backup system like Dropbox or your OneDrive. But those methods leave most of your stuff unprotected: all your programs and settings.
What you really want, of course, is a backup that’s rock-solid, complete, and automatic. You don’t want to have to remember to do a backup, to insert a drive, and so on. You just want to know you’re safe.
If you use Windows in a corporation, you probably don’t even have to think about backing up your stuff. A network administrator generally does the backing up for you.
But if you use Windows at home, or in a smaller company that doesn’t have network nerds running around to ensure your files’ safety, you’ll be happy to know about the various tools that come with Windows 10, all dedicated to the proposition of making safety copies.
What’s confusing is that there are three different backup mechanisms in Windows these days, some of which Microsoft is trying to de-emphasize by hiding them. Here’s a quick overview:
System images. A complete clone of your entire hard drive, including all your files, all your apps, and Windows itself. Strangely buried in Windows 10, but useful—the only option that will get you back up and running if your entire drive dies (or gets stolen).
System Restore. A “snapshot” of your copy of Windows, as it was when it was last working well. You can rewind to a snapshot when, for example, a new app or upgrade seems to foul things up.
File History. For rewinding individual documents to earlier drafts—or recovering them if they’ve gotten deleted or damaged.
Note:
Of course, these are only the backup features of Windows 10 itself. You can also buy non-Microsoft backup programs, many of which have more features.
This chapter covers these three systems in order.
System Images
When your hard disk crashes, you lose more than just your personal files. You also lose your operating system—and all the programs you’ve installed, and all their updates and patches, and all your settings and tweaks. It can take you a very long time to restore your PC to that state.
A system image solves the problem easily. This feature (called Complete PC Backup in the Windows Vista days), creates a perfect snapshot of your entire hard drive at this moment: documents, email, pictures, and so on, plus Windows, and all your programs and settings. Someone could steal your entire hard drive, or your drive could die, and you’d be able to install a new, empty one and be back in business inside of an hour.
It’s a good idea to make a fresh system image every few months, because you’ll probably have installed new programs and changed your settings in the interim.
Note:
For the techies scoring at home, a system image is a .vhd file, the same kind that’s created by Microsoft’s Virtual PC software—and, therefore, you can mount it using Virtual PC, if you like.
Make the Image
To make a system image, open the old Control Panel (type control pan into the ![]() search box). Open “Backup and Restore (Windows 7).” Never mind that “Windows 7” part—it still works in Windows 10.
search box). Open “Backup and Restore (Windows 7).” Never mind that “Windows 7” part—it still works in Windows 10.
Choose “Create a system image” (Figure 16-1, top); proceed as shown in Figure 16-1.
No matter where you store the image, you’ll need a lot of empty disk space. Not as much as your entire PC drive, because you won’t be backing up empty space or temporary files. But a lot.
Note:
You can keep multiple system images around—representing your PC’s world at different times—if you back up to discs or hard drives. If you save to a network location, though, you can keep only the most recent system image.

Figure 16-1. Top: On this Control Panel screen, start the process with “Create a system image.”
Bottom: Your options: a hard drive (must be NTFS formatted), a stack of CDs or DVDs, or (if you have the Pro or Enterprise editions of Windows) another computer on the network.
When you hit Next, you’re offered a list of all your computer’s drives and informed how much storage space the backup will need. You may, if you wish, include other drives as part of the system image, so that they’ll be restored, too, if the worst should come to pass. (Your Windows drive is automatically selected; you’re not allowed to include the drive you’re saving the image onto.)
Choose “Start backup”; the backup begins. You’ll be prompted if you need to insert new discs.
Restore the Image
Suppose disaster strikes: Your hard drive is trashed. Fortunately, restoring your entire system using a system image is very easy. You just have to open the Windows Recovery Environment (“Windows Recovery Environment”):
If your PC is running, hold down the Shift key as you hit Restart. (To find the Restart button, select
 →
→ .)
.)If the PC won’t even start up, start up from a Windows DVD, flash drive, or system repair disk. At the Windows Setup screen, hit Next; then choose “Repair your computer.”
Once you see the “Choose an option” screen, click Troubleshoot, then “Advanced options” and then System Image Recovery. (You can see this sequence of screens illustrated in Figure 15-11 in Figure 15-11.)
In the System Recovery Options dialog box that appears, choose an administrator’s account. Enter the appropriate password, and then click Continue.
On the next screen (Figure 16-2), choose “Use the latest available system image (recommended),” and click Next. (Of course, if you have some weird agenda, you can also choose an older system image using the other option here.)
When prompted, find the drive or disc that contains your system image.
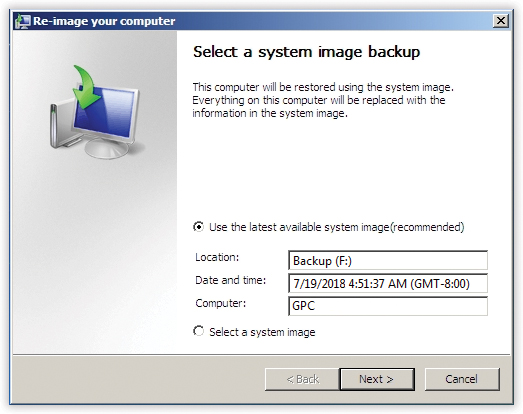
Figure 16-2. Here’s the payoff for your diligent system imaging. Windows is about to turn your current, messed-up computer back into the model of PC health it was the day you made the image.
When you click Next, you see the “Choose additional restore options” dialog box, which offers some complicated options. The key element worth inspecting is the “Format and repartition disks” option:
If this option is turned on, then every disk and partition will be formatted and partitioned to match the system image. (If this box is turned on and dimmed, then you have no choice.)
If you can’t turn on this checkbox—it’s dimmed and unchecked—then you’re probably restoring a system image from one partition to another on the same disk. Clearly, Windows can’t erase the disk it’s operating from.
The “Only restore system drives” option does what it says: leaves your other drives alone.
When you click Finish and then Yes in the confirmation box, the long, slow restoration process begins. And the rest, as they say, is history recreated.
Just remember that this process reformats your hard drive, and in the process wipes out all your data and files. They’ll be replaced with the most recent snapshot (system image) you’ve made. Of course, you may well have a regular backup that’s more recent; you can restore that as the final step.
Note:
If you were thinking of using a system image to turn a new PC into a replica of your old, crashed one, be warned: You can’t restore a system image to a new PC’s hard drive if it’s smaller than the old one. (Yes, even if the data on the backup drive would easily fit on the target drive.)
System Restore
As you get more proficient on a PC, pressing Ctrl+Z—the keyboard shortcut for Undo—eventually becomes an unconscious reflex. In fact, you can sometimes spot Windows veterans twitching their Ctrl+Z fingers even when they’re not near the computer—after knocking over a cup of coffee, locking the keys inside the car, or blurting out something inappropriate in a meeting.
Windows offers the mother of all Undo commands: System Restore. This feature alone can be worth hours of your time and hundreds of dollars in consultant fees.
The pattern of things going wrong in Windows usually works like this: The PC works fine for a while, and then suddenly—maybe for no apparent reason, but most often following an installation or configuration change—it goes on the fritz. At that point, wouldn’t it be pleasant to be able to tell the computer, “Go back to the way you were yesterday, please”?
System Restore does exactly that. It “rewinds” your copy of Windows back to the condition it was in before you, or something you tried to install, messed it up. Best of all, System Restore doesn’t change your files. Your email, pictures, music, documents, and other files are left up to date.
Tip:
If your PC manages to catch a virus, System Restore can even rewind it to a time before the infection—if the virus hasn’t gotten into your documents in such a way that you reinfect yourself after the system restore. An up-to-date antivirus program is a much more effective security blanket.
In fact, if you don’t like your PC after restoring it, you can always restore it to the way it was before you restored it. Back to the future!
Turning on System Restore
In the latest versions of Windows 10, the System Restore feature comes turned off. It’s not protecting you until you turn it on.
To do that, open the System Protection dialog box shown in Figure 16-3. Choose Configure, and then “Turn on system protection.” Use the slider to designate a maximum amount of disk space you’re willing to dedicate to this feature (see the box on the facing page.) Click OK.
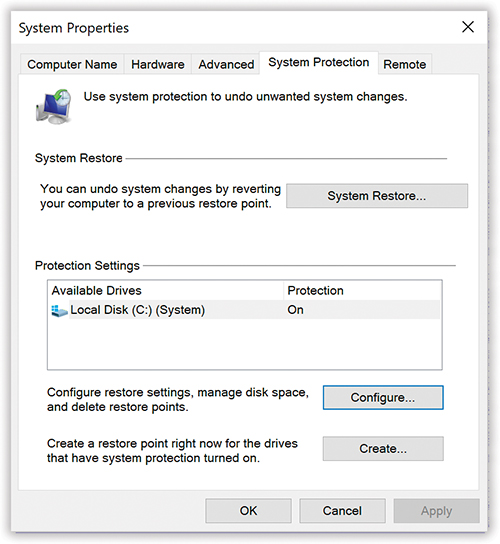
Figure 16-3. Here’s your command center for all System Restore functions.
To get here: Start typing restore into the search box until you see “Create a restore point.” Choose it.
Hit Configure to turn this protection feature on. Use Configure to delete all restore points and limit disk space.
Select System Restore to perform the actual rewinding of your system.
System Restore will now take periodic memorized snapshots, called restore points, of your copy of Windows. In particular, Windows will create landing points for your little PC time machine at the following times:
Every time you install a new program, a new device driver, or a Windows Update.
Whenever you feel like it—for instance, just before you install a new component.
When the worst comes to pass, and your PC starts acting up, you can use System Restore to rewind your machine to its configuration the last time you remember it working well.
Manual Restore Points
To create one of these checkpoints manually, open the System Protection dialog box (Figure 16-3). At the bottom of that box, hit Create to make and name a new manual restore point. (Windows adds a date and time stamp automatically.)
Performing a System Restore
If something goes wrong with your PC, here’s how to roll it back to the happy, bygone days of late last week:
Open the System Protection dialog box (Figure 16-3).
The steps are described on the previous pages.
Click System Restore.
The “Restore system files and settings” welcome screen appears (Figure 16-4, top).
Windows is suggesting that you rewind only as far as the most recent change you made to your machine—a software installation, for example. In Figure 16-4 at top, you can see that the most recent restore point was made when you installed a new device driver. If your computer suddenly started acting up, well, you’ve got your culprit.

Figure 16-4. Top: Windows suggests rewinding your computer to the most recent change you made to it. Most often, that’s what you want.
Bottom: You can, however, also hit “Choose a different restore point” to view a list of older restore points Windows or you have made, anticipating just this moment. You’re shown the date and time of each restore point, as well as why the restore point was created—for example, because you installed a new piece of software, or because you applied a Windows Update. That’s a clue as to which restore point you should use.
Bottom: You can now see which software elements this system rewind will affect.If that seems like the right restore point, click Next, and then Finish; that’s all there is to it. If it seems like you might want to rewind your computer to an even earlier point, though, read on:
Choose “Choose a different restore point.”
The list of all memorized restore points appears (Figure 16-4, bottom).
Choose a restore point, and then select “Scan for affected programs.”
Now Windows thoughtfully displays a list of which apps and drivers will be affected if you go through with the restore. Remember: Any apps and drivers you’ve installed since that point will be deleted; any apps and drivers you’ve deleted since then will be put back! You’re literally rewinding your computer.
If all looks good, choose Close, and then Next.
You have one more chance to back out: Windows displays the date and time of the restore point, shows you which drives will be affected, gives you another chance to create a password-reset disk, and asks if you really want to go back in time.
Click Finish. In the confirmation box, click Yes.
Windows goes to town, reinstating your operating system to reflect its condition on the date you specified. Leave your PC alone while this occurs.
When the process is complete, the computer restarts automatically. When you sign in again, you’re back to the past—and with any luck, your PC runs smoothly. (None of your emails or files are disturbed.)
If it didn’t work—if you only made things worse—then repeat step 1. At the top of the System Restore welcome screen, you’ll see an option called Undo System Restore. It lets you undo your undoing.
Or, of course, you can click “Choose a different restore point” if you think that maybe you didn’t rewind your PC back far enough and want to try again with a different restore point.
Turning System Restore Off
You really shouldn’t turn off System Restore. It’s incredibly useful to hit rewind and get a smoothly running PC, even if you never do find out what the trouble was.
But if you’re an advanced power user with no hard drive space to spare—is there such a person?—then open the System Protection tab of the System Properties box (shown in Figure 16-3). Click Configure, click “Disable system protection,” and then click OK. (See the box in “POWER USERS’ CLINIC System Restore vs. Your Hard Drive” for details.)
In the “Are you sure?” box, click Yes. That’s it. You’re flying without a net now, baby.
File History
System Restore is an amazing, powerful, career-saving feature—but it’s awfully self-interested. It cares only about protecting Windows.
How can you rewind your documents to their earlier, healthier, or pre-edited conditions?
File History is a time machine for documents in the same way System Restore is a time machine for your system software. It’s an incredible safety net against damage, accidental modification, or late-night bouts of ill-advised editing. It automatically backs up files in your libraries, on the desktop, in your address book, and on your OneDrive. If anything bad happens to the originals, you’re covered. You can also rewind documents to specific dates—if, for example, you decide your novel was better before you tinkered with it last week. It’s a lot like the Time Machine feature on the Mac.
Note:
There was a similar but less sophisticated feature in Windows 7 called either Previous Versions or Shadow Copy, long gone now.
The beauty of File History is that it’s automatic and invisible. And to save time and disk space, File History bothers copying only the files that have changed since the last restore point was created.
Set Up File History
The File History feature has its own dashboard in ![]() →
→![]() →Update & Security→Backup (Figure 16-5, top).
→Update & Security→Backup (Figure 16-5, top).
File History works best if you direct it to create its backups on some other drive—not the one the files are on now. The whole point, after all, is to provide protection against something going wrong—and disk failure is a big something. So you’re supposed to use an external drive—even a flash drive with decent capacity will do—or another computer on the network.
If there’s already a second drive connected to your computer, Windows cheerfully begins using it to store the backups. If you’ve got more than one, hit “Add a drive” and choose it.
And that, dear reader, is it. If the “Automatically back up my files” button is on, then your computer is backing up your files automatically, once every hour. Isn’t peace of mind wonderful?
File History Options
On the ![]() →Update & Security→Backup screen, the “More options” link takes you to a wonderland of additional settings (Figure 16-5, bottom):
→Update & Security→Backup screen, the “More options” link takes you to a wonderland of additional settings (Figure 16-5, bottom):
Back up now. If you can’t wait for the hourly backup, this button lets you trigger a backup now.
Back up my files [when]. Ordinarily, File History quietly checks your computer once an hour. If any file has changed, it gets backed up at the end of the hour. These follow-up backups are quick; Windows backs up only what’s changed.
So, should disaster strike, the only changes you can lose are those you’ve made within the past 59 minutes.
With this drop-down menu, though, you can specify different backup intervals—anything from “Every 10 minutes” to “Every 12 hours” or just “Daily.”
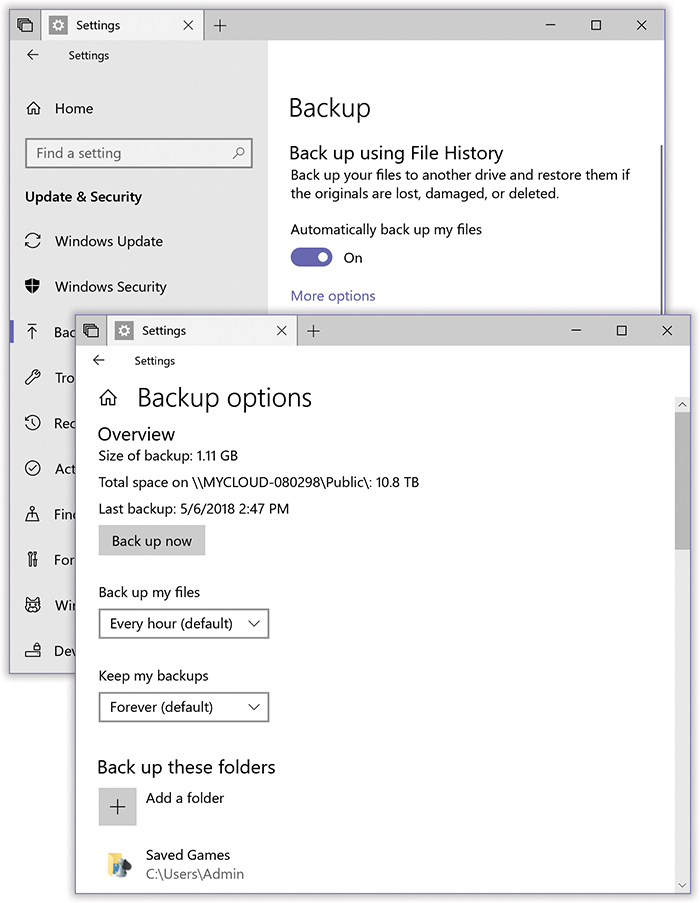
Figure 16-5. Top: Here’s the master panel for File History. It’s where you turn the thing on or off.
Bottom: Here’s the “More options” screen. It’s where you add more folders to back up, or leave out folders of stuff you’ll never need to rewind, to save disk space.Keep my backups [how long]. This menu lets you specify how long you want Windows to hang on to the old versions of your documents. Maybe after a year, for example, it’s OK for those old backups to start self-deleting, to save space on the backup drive. Or “Until space is needed,” meaning that older backups self-delete to make room for new ones when the backup disk is full.
Back up these folders. Unless you start meddling, Windows automatically backs up your entire personal folder—that is, everything in your own account folder: documents, photos, music, videos, settings, and so on (“Start Menu: The Apps List”). But by using the “Add a folder” button, you can tell File History to back up folders that aren’t in your personal folder.
Exclude these folders. The whole point of File History is to have a backup of all your files. It’s conceivable, though, that you might want to exclude some files or folders from the File History treatment. First, you might not want certain, ahem, private materials to be part of your data trail.
Second, you might want to save space on the backup drive, either because it’s not as big as your main drive or because you’d rather dedicate its space to more backups of the essential stuff. For example, you might decide not to back up your collection of downloaded TV shows, since video files are enormous. Or maybe you use an online photo-sharing website as a backup for your photos, so you don’t think it’s necessary to include those in the File History backup.
To omit certain files and folders, choose “Add a folder” (under the “Exclude these folders” heading). In the resulting dialog box, navigate your computer, choose a folder you don’t need backed up, and hit “Choose this folder.”
Back up to a different drive. If you want to choose a different drive for your backups, hit “Stop using drive,” and then choose a new one. (The backups on the original drive are still safe.)
Recovering Files
All right, you’ve got File History on the job. You sleep easy at night.
Then, one day, it happens: Your hard drive crashes. Or you can’t find a file or folder you know you had. Or you save a document and then wish you could go back to an earlier draft. Some kind of disaster—sunspots, clueless spouse, overtired self—has befallen your files. This is File History’s big moment.
Do a ![]() search for file history; in the results list, choose “Restore your files with File History.” The old Control Panel opens up (Figure 16-6, top). Your job is to find the file in question, either because it’s been deleted or because you want to rescue an older version of it. There are four ways to go about it: browsing, Ribboning, searching, or Properties-ing.
search for file history; in the results list, choose “Restore your files with File History.” The old Control Panel opens up (Figure 16-6, top). Your job is to find the file in question, either because it’s been deleted or because you want to rescue an older version of it. There are four ways to go about it: browsing, Ribboning, searching, or Properties-ing.
Browsing for the file
In the window shown in Figure 16-6, double-click folders as usual, looking for the file in its usual place.
If it’s been deleted, of course, you won’t find it—at least, not in today’s listing. But if you click the ![]() button, the entire window slides to the right; you’re viewing endlessly scrolling versions of the current window, going back in time.
button, the entire window slides to the right; you’re viewing endlessly scrolling versions of the current window, going back in time.
If you scroll back far enough this way, you’ll eventually see the missing file reappear. You’ve rewound time to a point before it went missing.
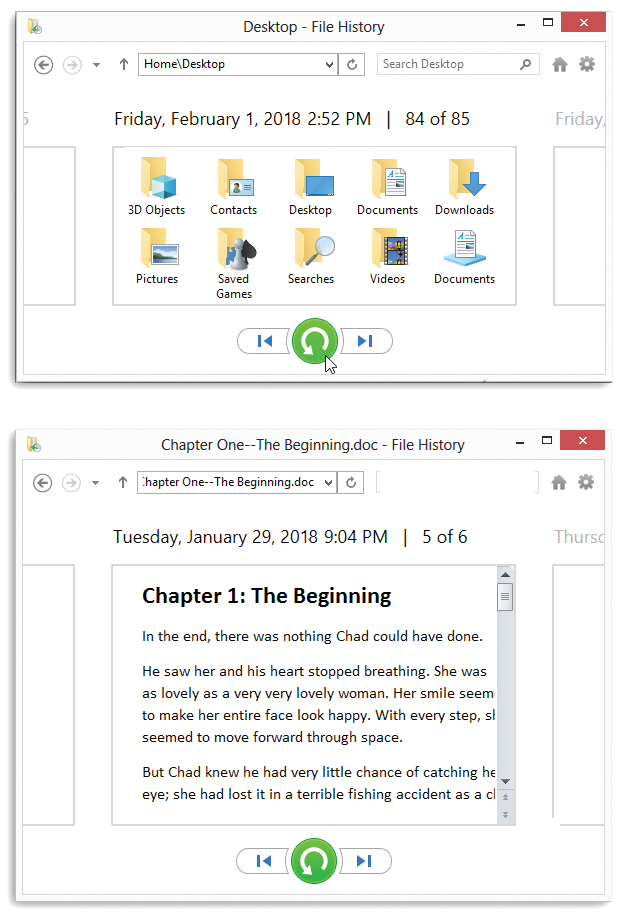
Figure 16-6. Top: This is where you can rewind time.
Locate the missing file by drilling down to the spot where the file used to live.
Move backward and forward in time by clicking the arrow buttons at the bottom of the window. The date and time of each snapshot is identified above the window. If you scroll back far enough, the missing file reappears. Click the Restore button, shown here by the cursor.
Bottom: Double-click any icon to open it, right there in the window. Now you can tell whether this document is the latest version—or the earlier one that you were actually proud of before your editing made things go horribly wrong.
Scrolling back in time is also useful when you want to find an earlier version, or draft, of a document. And how will you know which version you’re looking at? Because you can double-click an icon to open it, right within this window (Figure 16-6, bottom). You can keep clicking the ![]() button even when the document is open, so you can watch its contents change in real (backward) time.
button even when the document is open, so you can watch its contents change in real (backward) time.
Once you’ve found the file in question, click the big green Restore button. Magically enough, the lost or outdated file or folder is brought back from the dead.
File History prides itself not just on recovering files and folders, but also on putting them back where they came from.
Tip:
You can also tell File History to put the file or folder into a new location. To do that, right-click its icon; from the shortcut menu, choose “Restore to,” and then choose the new folder location.
If you recover a different version of something that’s still there, Windows asks if you want to replace it with the recovered version—or if you’d rather keep both versions.
Ribbon rewinding
You don’t actually have to bother with the Control Panel when you want to restore a file. There’s a History button on the Ribbon’s Home tab in every File Explorer window.
In other words, you can start the recovery process by opening the folder that contains (or used to contain) the file you want. Or find the icon of the file you want to rewind. In either case, click that History button. You wind up in exactly the same spot illustrated in Figure 16-6; the recovery process is the same.
Searching for the file
Once you’ve opened the window shown in Figure 16-6, here’s another way to find the missing or changed file: Type into the search box at the top of the window. That’s handy if you can’t remember what folder it was in. See Figure 16-7.
The Properties dialog box
The fourth way to rewind a file or folder is to right-click its icon (or hold your finger down on it); from the shortcut menu, choose “Restore previous versions.” The Properties dialog box opens for that item, where you can click the tab called Previous Versions.
Note:
Question: If you have to click the Previous Versions tab anyway, why choose “Restore previous versions” from the shortcut menu instead of Properties? Answer: Who knows? Both commands do exactly the same thing.
Anyway, the result is a list of previous versions of your document. Each one is date-stamped. To inspect a version to see if it’s the one you want, select it and then hit Open. (You can also use the button’s drop-down menu to choose “Open in File History,” which takes you to the box shown at the bottom of Figure 16-6.)
When you’ve found the one you want, click Restore; Windows cheerfully recovers the older version of that file or folder and puts it back where it used to be (or where the current version sits). Or you can save it into a different folder by using the Restore button’s drop-down menu (“Restore to”).
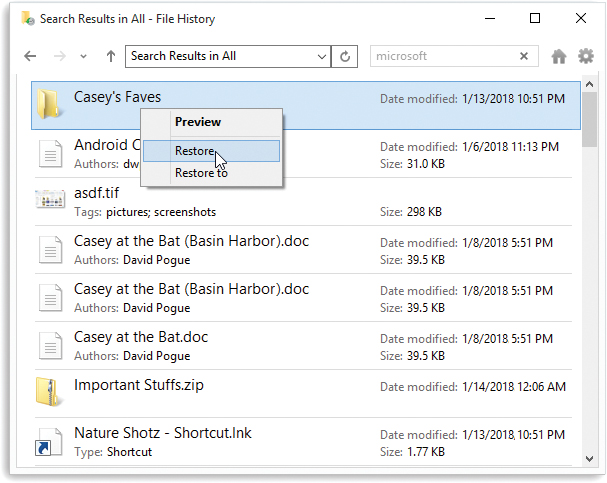
Figure 16-7. When you search in the File History box, you get a list of matches. At this point, you can double-click one of them to see what the file is (and then start rewinding time to find an earlier draft by clicking the  button).
Or you can recover a missing or outdated file by right-clicking it and choosing Restore from the shortcut menu.
The USB Recovery Drive
Here’s the sneaky surprise: Your computer may have come with an invisible “hard drive” (a partition of your main drive). It’s about 5 gigabytes in size.
When the day comes when your computer won’t start up, you’ll be glad you had this “separate” disk. On it, Microsoft has provided some emergency tools for fixing drive or software glitches, restoring files, and even reinstalling Windows.
Better yet, you can create a USB flash drive that does the same thing. That’s handy if (a) your computer does not have a recovery partition, or (b) you wouldn’t mind deleting the recovery partition from your drive, so you can use the space for your own files.
Note:
Techies, the recimg command is no longer in Windows 10.
Do a search for recovery drive; in the results list, choose “Create a recovery drive.”
Authenticate if necessary.
Before you click the first Next button in the Recovery Drive wizard, note the checkbox called “Back up system files to the recovery drive.” If that’s turned on, then your flash drive will be able to reinstall a copy of Windows on your machine—a great safety net. (If you turn this box off, then your flash drive will contain troubleshooting tools only; you’ll have to figure out some other way to reinstall Windows, if it comes to that.)
Be sure that “Copy the recovery partition from the PC to the recovery drive” is selected.
Hit Next. Insert a USB flash drive into your computer.
The message on the screen tells you how much space the flash drive needs—and that the flash drive is about to be erased.
Select the USB drive’s name; hit Next; hit Create.
Windows copies the recovery image and recovery tools to your flash drive. It takes awhile. At the end, you can choose Finish (to keep your PC’s recovery partition) or “Delete the recovery partition from your PC” to free up the disk space.
Using Your Recovery Drive
Should trouble ever strike, you can start up the computer from that flash drive, even if (especially if) it can’t start up normally on its own.
Note:
Truth is, if your PC is having a problem, your first thought should be to use one of the reset options at this point (“Resetting (Erasing) Your Computer”); the recovery process will be faster and more convenient. Proceed with your recovery drive only if the Reset thing doesn’t help get your PC going again.
Turn on the computer with the flash drive inserted. The “Choose an option” screen (Figure 15-10) appears. (Welcome to the Recovery Environment; hope you enjoy your stay.)
Select Troubleshoot and then “Recover from a drive.”
Now the Windows virtual paramedics spin into action. They’ll delete all your files, programs, settings, and drivers, leaving behind only a fresh, clean installation of Windows 10, as though it’s day one.