Chapter 12. Tablets, Laptops & Hybrids
If its recent experiments with Windows show anything at all, it’s that Microsoft is betting on the future of mobile. Fewer and fewer computers will be tethered to desks. More and more will be carried around—and most of them will have touchscreens. Microsoft believes that so strongly that it’s designing all its new apps to have big, fat, widely spaced buttons for finger touches.
But touchscreen friendliness isn’t the only nod Windows 10 makes to easing the lives of road warriors. This chapter covers a motley collection of additional tools for anyone who travels.
Battery Saver
It’s common for smartphones to have a battery-saver mode. That’s where the phone, upon dropping to a low level of battery remaining, switches off a lot of nonessential background activities and features to save power. The screen dims, there are fewer animations, email and Facebook don’t get checked in the background—all in the name of extending your phone’s battery long enough to get you through the day.
And now the same feature comes to Windows laptops and tablets.
You can turn it on manually by opening the Action Center (![]() +A, or tap
+A, or tap ![]() on the taskbar, or swipe in from the right on a touchscreen) and hitting “Battery saver.”
on the taskbar, or swipe in from the right on a touchscreen) and hitting “Battery saver.”
Or you can do it the long way: Open ![]() →
→![]() →System→Battery.
→System→Battery.
Or you can wait until your battery hits 20 percent remaining, which is when Battery Saver kicks in automatically.
In Battery Saver mode, your screen dims (screen brightness is one of the biggest power drains). Apps running in the background go to sleep. You don’t get notifications from apps. Things generally calm down and slow down, and your battery lasts a lot longer.
You can adjust or override most of those features, by the way. In ![]() →
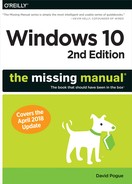
→![]() →System→Battery, you can fiddle with these switches (Figure 12-1):
→System→Battery, you can fiddle with these switches (Figure 12-1):
Turn battery saver on automatically. If you turn off this switch, you can still use Battery Saver—but you’ll have to turn it on yourself.
[percentage slider]. Battery Saver likes to kick in when your battery charge hits 20 percent. But using this slider, you can change that threshold. You can set it to anything from 5 percent to 100 percent. (100 percent would mean “on all the time.”)
Battery saver status until next charge. This option is available only when you’re actually running on battery, and it means “Turn off battery saver when I plug in.”
Lower screen brightness while in battery saver. What if you can’t stand your screen dimming? You can turn off that aspect of Battery Saver here (but of course you won’t get as much battery savings).
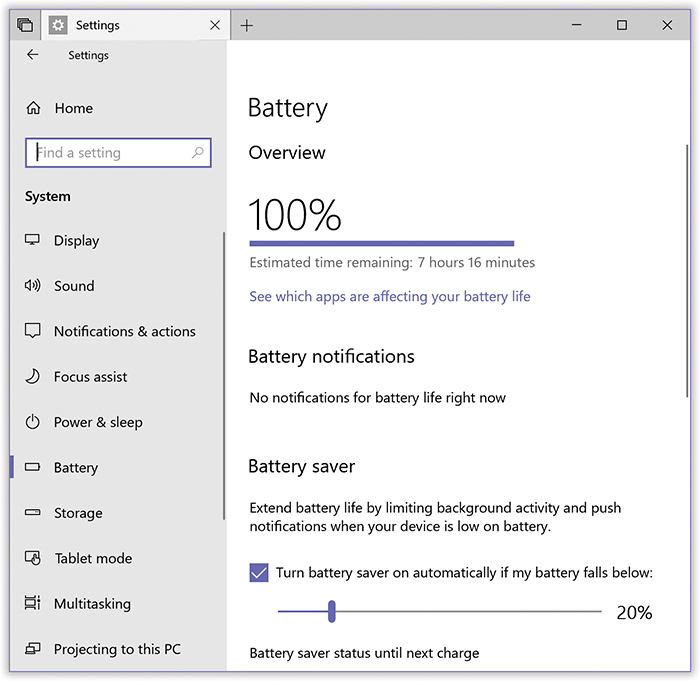
Figure 12-1. Here it is, expressed as a percentage of full, in huge letters: your current battery charge.
If Windows has anything to tell you about your battery (for example, that it needs replacing), you’ll see it here, under “Battery notifications.”
“Battery saving tips” takes you to Microsoft’s web page for battery-saving suggestions.
Battery Detective Work
Windows 10 also offers a screen that sleuths out which apps have been eating up the most power in the past day, two days, or week. It’s all waiting on ![]() →
→![]() →System→Battery; choose “See which apps are affecting your battery life.”
→System→Battery; choose “See which apps are affecting your battery life.”
This screen (Figure 12-2) shows exactly which apps are gulping down the most power. You can specify the time period you’re seeing: “6 hours,” “24 hours,” or “1 week.” And you can limit the list to “Apps with usage” (programs you’ve actually used since the last charge), “All apps,” or “Always allowed apps.”
Figure 12-2. Learn to recognize which apps are the battery hogs, and quit them when possible.
Select an app to take away Windows’ right to manage its battery consumption in the background—like Candy Crush Soda Saga here.
So what are “Allowed apps?”
Windows prefers to manage your apps’ battery usage all by itself. For example, when an app is in the background, Windows might throttle it (slow it down) whenever a foreground app needs to do some processing.
But you can override Windows’ control of your apps, thus turning them into “allowed apps.” They’re programs that are allowed to keep running at full power in the background, even in Battery Saver mode.
To do that, on this screen, select an app’s name to expand its details panel (Figure 12-2). Turn off “Let Windows decide.” You’re giving this app full reign to run at full speed and power, battery be damned.
Some apps (from the Microsoft Store) offer other checkboxes, like “Reduce the work the app can do when it’s in the background” and “Allow the app to run background tasks.” They give you even more control—and take even more control away from Windows’ own app-management smarts.
Trackpad Settings
If your laptop has a trackpad (hint: It does), then visit ![]() →
→![]() →Devices→Touchpad (Figure 12-3). It’s the control center for trackpad settings. They vary by trackpad, but here’s what you’ll find on one of Microsoft’s Surface tablets (which has a “precision touchpad”):
→Devices→Touchpad (Figure 12-3). It’s the control center for trackpad settings. They vary by trackpad, but here’s what you’ll find on one of Microsoft’s Surface tablets (which has a “precision touchpad”):
Touchpad on/off. Yes, you can actually turn off your trackpad. You might do that when you’ve got a mouse connected, so you don’t hit the trackpad by mistake and trigger errant clicks. Then again, just turning off “Leave touchpad on when a mouse is connected” is a more efficient way of addressing that problem.
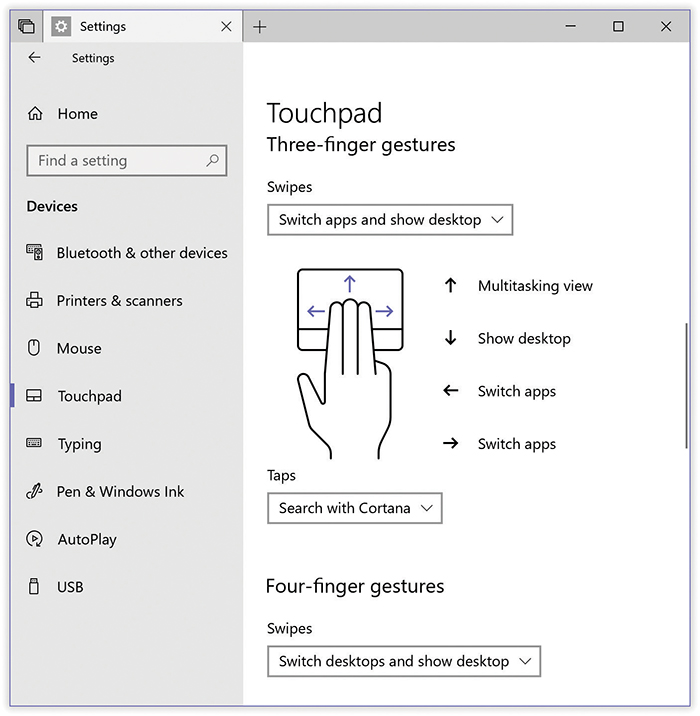
Figure 12-3. The Swipes drop-down menu offers canned sets of gestures for swiping multiple fingers up, down, left, or right. For example, if you choose “Switch apps and show desktop,” then (as the diagram indicates) swiping left or right with three fingers switches apps; three fingers upward opens the Timeline, and three fingers down reveals the desktop.
Change the cursor speed. At the lowest setting, sliding your finger across the entire trackpad barely budges the pointer; at the highest, the cursor screams across the entire screen with barely a hint of finger movement (which might be handy if you have a huge monitor).
Touchpad sensitivity. You get four options for clicking, right-clicking, and selecting, from “Most sensitive” to “Low sensitivity.” If you find yourself accidentally triggering clicks while you’re typing, then choose a lower setting.
Taps. Modern trackpads are multitouch, meaning they can detect more than one simultaneous finger touch. They therefore permit all kinds of cool shortcuts, which you can turn on and off here. You might have “Tap with two fingers to right-click” turned on, for example. This is also where you can designate the lower-right corner of your trackpad as the “right-click” button. (Or, if you find yourself accidentally triggering right-clicks, you can turn these checkboxes off.)
Scroll and zoom. The most involved settings here relate to two-finger scrolling, which—along with mouse scroll wheels—has made scroll bars largely obsolete. Out of the box, “reverse scrolling” is enabled: you drag two fingers up the trackpad, and the page scrolls up. That seems logical if you’re used to scrolling on a tablet or a smartphone, but it feels backward for longtime scroll-bar lovers. Fortunately, you can reverse the scrolling direction by choosing “Down motion scrolls down” here.
Pinch to zoom works just as it does on a phone, at least in some apps (Photos, Edge, Microsoft Office apps, and a few others): Draw two fingers together on the trackpad to zoom out of a photo or document, or spread two fingers apart to zoom in (magnify).
Three-finger gestures, Four-finger gestures. If your laptop offers these choices, and you’re willing to put in the time to learn them, they can make you much faster on your laptop, because your trackpad hand never needs to leave its home base (to use the keyboard, for example). See Figure 12-3.
You can even specify what happens when you tap with three fingers (or four fingers). For example, you might use the drop-down menu to choose Search with Cortana or Action Center, making one of those functions just a three-finger tap away.
Reset your touchpad. If you’ve made a mess of these controls, this button restores the factory settings.
Getting Online
There are all kinds of ways to get onto the Internet these days:
Wi-Fi. Wireless hotspots, known as Wi-Fi, are glorious conveniences, especially if you have a laptop, tablet, or hybrid. Without stirring from your hotel bed, you’re online at high speed. Sometimes for free.
Ethernet. 70 percent of the U.S. Internet population connects over higher-speed wires, using broadband connections that are always on, thanks to cable modems, DSL boxes, or corporate networks.
The beauty of Ethernet connections is that they’re superfast and supersecure. No bad guys sitting across the coffee shop, armed with shareware “sniffing” software, can intercept your email and chat messages, as they theoretically can when you’re on wireless.
Connecting to an Ethernet network is usually as simple as connecting the cable to the computer. That’s it. You’re online, quickly and securely, and you never have to worry about connecting or disconnecting.
Most broadband wired connections require no setup whatsoever. Take a new PC out of the box, plug the Ethernet cable into your cable modem, and you can begin surfing the web instantly. That’s because most cable modems, DSL boxes, and wireless base stations use DHCP. It stands for “dynamic host configuration protocol,” but what it means is “We’ll fill in your Network Control Panel automatically.” (Including techy specs like IP and DNS Server addresses.)
If for some reason you’re not able to surf the web or check email the first time you try, it’s remotely possible that your broadband modem or your office network doesn’t offer DHCP. In that case, you may have to fiddle with the network settings manually. See “The Mobile Hotspot” for details.
Cellular modems. A few well-heeled individuals enjoy the go-anywhere bliss of USB cellular modems, which get them online just about anywhere they can make a phone call. These modems are offered by Verizon, Sprint, AT&T, and so on, and usually cost $60 a month.
To make the connection, turn on the cellular gadget (phone, MiFi, whatever). After about 20 seconds, the name of your private Wi-Fi hotspot shows up in the list, as shown in Figure 12-4.
Mobile Hotspot. Tethering, what Microsoft calls Mobile Hotspot, is letting your cellphone act as a glorified Internet antenna for your PC, whether connected by a cable or a Bluetooth wireless link. See “The Mobile Hotspot”.
Dial-up modems. It’s true: Some people still connect to the Internet using a modem that dials out over ordinary phone lines. They get cheap service but slow connections, and their numbers are shrinking. High-speed Internet is where it’s at, baby!
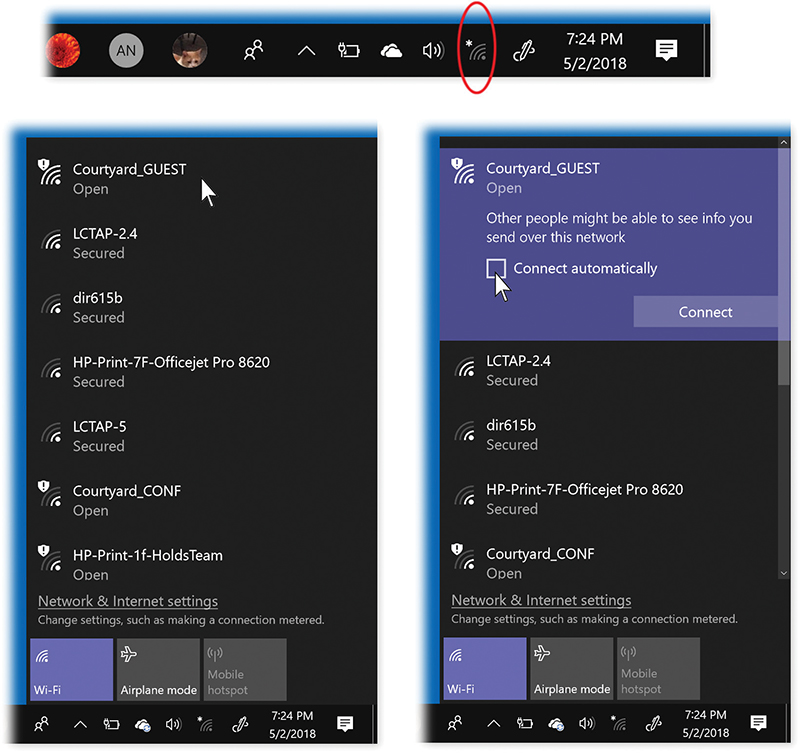
Figure 12-4. Top: Hey, look! Your  icon has an asterisk! There’s Wi-Fi here!
Bottom left: In fact, there are several Wi-Fi networks available. Some display an exclamation point, which means they’re not protected by a password.
Suppose you select one?
Bottom right: You’re offered a Connect button. Because this is an open network, Windows is warning you that nearby hackers could, with the right software tools, be able to “sniff” whatever data you’re sending.
If you don’t want to have to go through all this the next time you’re in this hotspot, turn on “Connect automatically.”
Connecting to a Wi-Fi Hotspot
Almost every computer today has a built-in Wi-Fi antenna, officially known as 802.11 (Wi-Fi) wireless networking technology. Wi-Fi can communicate with a wireless base station up to 300 feet away, much like a cordless phone. Doing so lets you surf the web from your laptop in a hotel room, for example, or share files with someone across the building from you.
Sometimes you just want to join a friend’s Wi-Fi network. Sometimes you’ve got time to kill in an airport or on a plane that has Wi-Fi, and it’s worth a $7 splurge for half an hour. And sometimes, at some street corners in big cities, Wi-Fi signals bleeding out of apartment buildings might give you a choice of several free hotspots to join.
If you’re in a new place, and Windows discovers, on its own, that you’re in a Wi-Fi hotspot, then the ![]() icon sprouts an asterisk. And where is the
icon sprouts an asterisk. And where is the ![]() icon? It’s in two places:
icon? It’s in two places:
On the taskbar (Figure 12-4, top).
On the Quick Actions panel (hit the
 icon on the taskbar).
Figure 12-4 shows you how to proceed. Along the way, you’ll be offered the “Connect automatically” checkbox; if you turn it on, you’ll spare yourself all this clicking the next time your PC is in range. It’ll just hop on that network by itself.
Tip:
If you point to the ![]() taskbar icon without clicking, you see the network’s name. And if you right-click the icon, you get links to a troubleshooting app and the Network & Internet Settings pane.)
taskbar icon without clicking, you see the network’s name. And if you right-click the icon, you get links to a troubleshooting app and the Network & Internet Settings pane.)
Most hotspots these days are protected by a password. It serves two purposes: First, it keeps everyday schlumps from hopping onto that network; second, it encrypts the connection so that hackers armed with sniffing software can’t intercept the data you’re sending and receiving.
When You Can’t Get On
There are a bunch of reasons why your ![]() icon might indicate that you’re in a hotspot, but you can’t actually get online:
icon might indicate that you’re in a hotspot, but you can’t actually get online:
It’s locked. If the hotspot’s icon doesn’t have an exclamation point (
 ), then the hotspot is password-protected. That’s partly to prevent hackers from “sniffing” the transmissions and intercepting messages, and partly to keep random passersby like you off the network. Anyway, you need the password.
The signal isn’t strong enough. Sometimes the Wi-Fi signal is strong enough to make the hotspot’s name show up, but not strong enough for an actual connection.
You’re not on the list. Sometimes, for security, hotspots are rigged to permit only specific computers to join, and yours isn’t one of them.
You haven’t signed in yet. Commercial hotspots (the ones you have to pay for) don’t connect you to the Internet until you’ve supplied your payment details on a special web page that appears automatically when you open your browser.
The router’s on, but the Internet’s not connected. Sometimes wireless routers are broadcasting, but their Internet connection is down. It’d be like a cordless phone that has a good connection back to the base station in the kitchen—but the phone cord isn’t plugged into the base station.
Memorized Hotspots
If you turned on “Connect automatically,” then whenever your laptop enters this hotspot, it will connect to the network automatically. You don’t have to do any tapping at all. Behind the scenes, Windows is capable of piling up quite a list of these hotspots, representing a bread-crumb trail of the hotspots you’ve used at every hotel, airport, coffee shop, and buddy’s house.
You’re welcome to peek at this list at any time—and to clean it out, purging the hotspots you’ll never need again. To see it, proceed as shown in Figure 12-5.
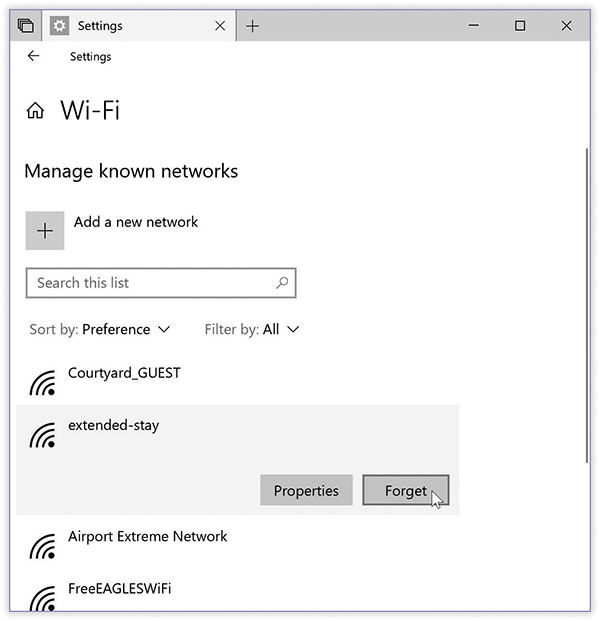
Figure 12-5. To see your PC’s memorized Wi-Fi hotspots, open  →
→ →Network & Internet→Wi-Fi; choose “Manage known networks.”
To remove a memorized hotspot, choose its name and then Forget.
Commercial Hotspots
Choosing the name of the hotspot you want to join is generally all you have to do—if it’s a home Wi-Fi network.
Unfortunately, joining a commercial hotspot—one that requires a credit card number (in a hotel room or an airport, for example)—requires more than just connecting to it. You also have to sign into it before you can send so much as a single email message.
To do that, open your browser. You see the “Enter payment information” screen either immediately or as soon as you try to open a web page of your choice. (Even at free hotspots, you might have to click OK on a welcome page to initiate the connection.)
Supply your credit card information or (if you have a membership to this Wi-Fi chain, like Boingo or T-Mobile) your name and password. Click Submit or Proceed, try not to contemplate how this $8 per hour is pure profit for somebody, and enjoy your surfing.
Connection Management
No matter what crazy combination of Internet connections you’ve accumulated on your computer, Windows represents each one as a connection icon. These aren’t networks or hotspots; these are ways your computer can get online, like Ethernet, Wi-Fi, or Bluetooth. You can view them, rename them, change their settings, or just admire them by opening the window shown in Figure 12-6.
To get there, open the Network Connections window. Here’s one way to go about it: Open ![]() →
→![]() →Network & Internet, choose Wi-Fi, and select “Change adapter options.”
→Network & Internet, choose Wi-Fi, and select “Change adapter options.”
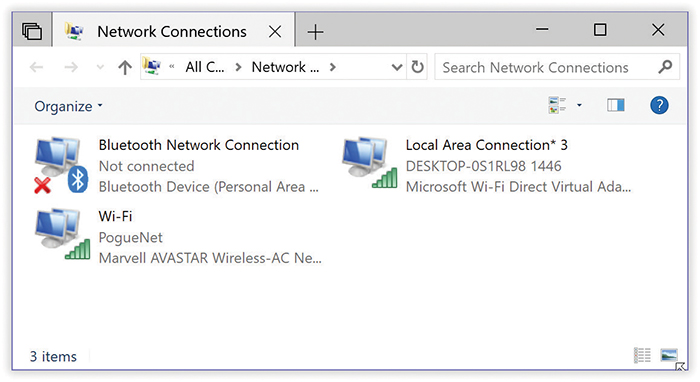
Figure 12-6. These icons’ Properties boxes are crammed with useful information. A dial-up connection icon stores your name, password, phone number, and so on; a broadband or wireless icon stores various technical connection details.
If you ever need to make changes to one of these connections, double-click its icon here, hit Properties, and go nuts.
The Mobile Hotspot
Here’s a wild concept that may take your brain a moment to comprehend. The Mobile Hotspot feature (sometimes called Internet Sharing, or tethering) lets one computer broadcast its Internet connection to any other nearby machines over Wi-Fi. The first computer can be online over an Ethernet wire, using a cellular connection, or even connected to Wi-Fi itself.
Let’s take these scenarios one at a time.
Sharing a Cellular Connection
Suppose your Windows 10 tablet or laptop has a cellular modem inside. It can provide its cellular Internet signal to nearby computers—laptops, for example. The nice part is that they can therefore get online almost anywhere there’s cell coverage. The less-nice part is that the connection isn’t always blazing fast, and you have to pay your cell company for the privilege. (It’s usually $20 or $30 on top of your regular monthly phone plan; for that, you’re allowed to send and receive, say, 2 gigabytes of data each month. If you go over the limit, you pay overage fees. Good luck with that.)
Here’s a typical example: Suppose you have a cellular Surface Pro tablet. You open ![]() →
→![]() →Network & Internet→Mobile Hotspot (Figure 12-7). You turn it on. Where it says “Share my Internet connection from,” you choose the Surface’s cellular connection. You make note of your homemade hotspot’s name and the password Windows makes up for it. (Or hit Edit and make up your own name and password.)
→Network & Internet→Mobile Hotspot (Figure 12-7). You turn it on. Where it says “Share my Internet connection from,” you choose the Surface’s cellular connection. You make note of your homemade hotspot’s name and the password Windows makes up for it. (Or hit Edit and make up your own name and password.)
Tip:
In the future, on the machine doing the broadcasting, you can start or stop the Internet sharing by clicking the Mobile Hotspot tile on the Action Center (“The Quick Action Tiles”).

Figure 12-7. “Mobile Hotspot” means creating a Wi-Fi network from your Internet-connected computer for nearby Wi-Fi gadgets to enjoy. It doesn’t matter how the primary computer is getting its Internet connection, which can be super-handy.
On your laptop, choose your Surface’s name as you would any other Wi-Fi hotspot. Presto: Your laptop is online.
Now, tethering eats up your tablet’s battery like crazy. So you probably shouldn’t count on watching Netflix on your laptop via your tablet.
But for email, emergency web checks, and other mobile crises, tethering is a convenient feature. And when you’re on the road for a couple of weeks, it’s a heck of a lot cheaper than paying your hotel $13 a night for Wi-Fi.
Sharing an Ethernet Connection
You can use Mobile Hotspot for a totally different scenario, too: when one computer has a wired Ethernet connection, and you’d like it to broadcast that signal to nearby machines over Wi-Fi. (This, of course, assumes the main computer also has Wi-Fi circuitry.) Your savings: one Wi-Fi router or repeater.
The steps are the same as described above—except, of course, that for “Share my Internet connection from,” you choose Ethernet.
Sharing a Wi-Fi Connection
Why would anyone want to use the Mobile Hotspot feature to share their Wi-Fi Internet connection with other computers—over Wi-Fi?
Here’s a good reason: So only one person has to pay for the hotel’s or airport’s Wi-Fi. Other family members can slurp down a copy of that connection without having to pay again and again.
This time, of course, you’d choose Wi-Fi from the “Share my Internet connection from” drop-down menu.
Tip:
If you have a Windows phone that you’ve paired with a PC—like a laptop—then you get a special treat. As long as both have Bluetooth turned on, and you’ve paired your phone with the laptop (“Phone”), then the laptop can turn on the previously established Mobile Hotspot feature on the phone automatically, by remote control, so you don’t have to get up and slog across the room.
To make this happen, ensure that “Turn on remotely” is turned on. From now on, when you’re on the laptop, you’ll see the phone’s mobile hotspot listed as an available Wi-Fi network. Just choose its name as usual, confident that it will turn itself on—and then off again, saving battery power, when you’re finished.
Find My Device
There are very few feelings quite as sickening as realizing that you’ve left your laptop or tablet somewhere. Fortunately, Windows 10 has a feature that can help—if your lost machine still has power and is still online. If you suspect your machine has been stolen, you can even lock it remotely, signing off any accounts and ensuring that Location Services is turned on so that you can track its movements.
None of this magic does you any good, however, unless Find My Device is turned on. That switch is in ![]() →
→![]() →Update & Security→“Find my device.”
→Update & Security→“Find my device.”
Later, when the devastating discovery strikes you, visit www.account.microsoft.com/devices.
Once you sign in, you arrive on the Devices page of your Microsoft account web page, which lists each of your machines (Figure 12-8, top). Find the missing one, hit “Find my device,” and proceed as shown in Figure 12-8, bottom.
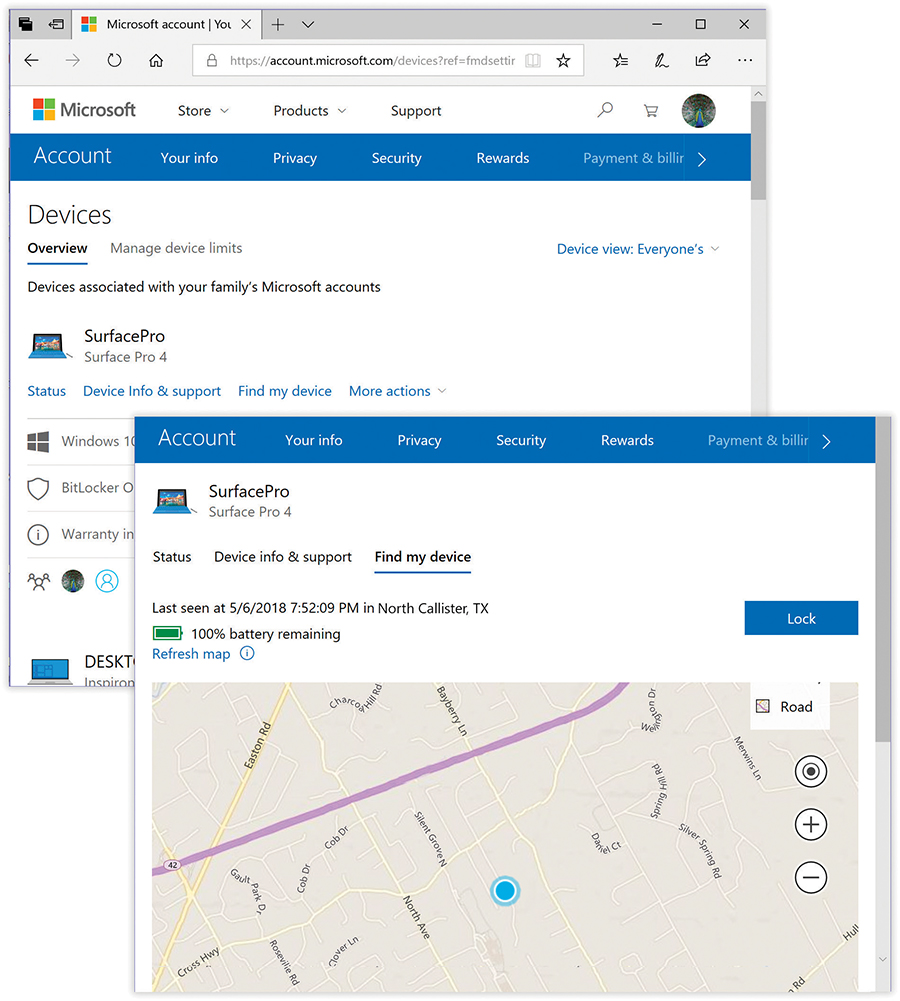
Figure 12-8. Even if your gadget is out of power or shut off, this map shows you its most recently logged location. Alas, you can’t make it beep, display a message, erase it, or change its password remotely. You can, however, use the Lock button to remotely sign out of all accounts, display the Lock screen, and ensure that Location Services is turned on so you can track its movements. Good luck chasing it down.
For Hybrid PCs Only: Tablet Mode (Continuum)
No matter how hard Microsoft’s engineers pound their heads against their conference-room tables, they can’t make one thing change: Touchscreen devices are not the same as regular PCs. Your finger and a mouse are not the same thing. They have radically different degrees of precision.
But grafting together two completely different operating systems, as Microsoft did in Windows 8, was not the solution.
In Windows 10, Microsoft came up with a less drastic approach, designed for hybrid machines: tablets with detachable keyboards, like Microsoft’s own Surface. The solution involves two parts:
Tablet mode. In Tablet mode, you’re pretty much back to Windows 8. The Start menu becomes the Start screen, filling the monitor. Every app runs in full-screen mode—no overlapping windows. The onscreen keyboard pops up automatically when you’re in a place where you can type.
Continuum simply means “Enters Tablet mode every time you detach the keyboard.” Whenever you take your tablet out of its dock, or pull off its keyboard, or fold its keyboard behind the screen, the touch-friendly Tablet mode can kick in automatically.
Note:
You can try out Tablet mode even if you don’t have a touchscreen, although there’s not much point to it. Tablet mode is designed to make Windows 10 more finger-friendly.
Here’s what the two modes do.
Manual Tablet Mode
To turn on Tablet mode, hit the ![]() on your taskbar (or press
on your taskbar (or press ![]() +A) to open the Action Center, and then hit “Tablet mode.”
+A) to open the Action Center, and then hit “Tablet mode.”
Here’s what you’ll see:
Start menu. The most dramatic change in Tablet mode is that the Start menu goes full-screen, as shown in Figure 12-9. But you still have access to your “All apps” menu (hit the
 near the top-left corner), and you still have access to the left side of the Start menu (hit the
  at the top-left corner).
Taskbar. You’ll notice that the taskbar is a bit simpler, too. On the left, only four icons remain: the
button, a  button (returns you to the Start menu from whatever app you’re using), Cortana, and Task View/Timeline. On the right, all you get is the battery, network, volume, Action Center, and clock icons.
In other words, the usual taskbar icons—for open programs, and the programs you use often—are hidden.
Tip:
You can bring them back, however. In ![]() →
→![]() →System→“Tablet mode,” turn off “Hide app icons on the taskbar in tablet mode.”
→System→“Tablet mode,” turn off “Hide app icons on the taskbar in tablet mode.”
Apps full screen. In Tablet mode, every app fills the entire screen. You can still split the screen as described in “Windows Snap—Now with Four Panes!”, though—drag the top edge of an app to the left or right side of your screen. You’ll see the window pop into the space, filling only half the screen. In the other half, you’ll see miniature windows from all your other open apps. Tap one to expand it to fill that half of the screen. You can also drag the black slider between your two windows to give one more room than the other.
Exiting an app. Since every app fills the screen, you won’t have much use for the Minimize and Maximize buttons. All that remains in the upper-right corner of an app window is the
 button—and even that’s hidden.
If you have a mouse or a trackpad, point to the top edge without clicking; you’ll see a title bar slide into view, complete with the
you need to close the app.On a touchscreen, drag your finger all the way down the screen, from above to below, in one smooth motion. You’ll see the app follow, shrink, and disappear.
Figure 12-9. The idea behind Tablet mode is to make Windows much easier to navigate with a finger. Tiny menus and tiny taskbar icons are mostly hidden.
If you buy a Windows tablet, in fact, it starts up in Tablet mode like this out of the box.
Auto-Tablet Mode
Now that you know about Tablet mode, Windows 10 has another offer: Would you like Tablet mode to start up automatically when you take away the keyboard?
(That question makes the most sense if you have a hybrid tablet—one whose keyboard comes off or flips around to the back. For best results, do not try ripping the keyboard off a regular laptop.)
Yes, this is the feature that Microsoft marketing executives call “Continuum,” although that term does not actually appear in Windows.
In ![]() →
→![]() →System→“Tablet mode,” you have two sets of controls. The first set controls what happens when you sign into your account. (In other words, different people may see something different when they sign in.)
→System→“Tablet mode,” you have two sets of controls. The first set controls what happens when you sign into your account. (In other words, different people may see something different when they sign in.)
This drop-down menu offers you a choice of “Automatically switch to tablet mode,” “Go to the desktop,” or “Remember what I used last.”
The second drop-down menu wants to know what happens when you attach or detach your hybrid’s keyboard:
Nothing. Choose “Don’t ask me and don’t switch.”
Automatically switch to or from Tablet mode. “Don’t ask me and always switch.”
Ask before switching. This is the factory setting: When you attach or detach the keyboard, Windows asks if you want to pop into or out of Tablet mode.
And while you’re here: Two switches let you opt to hide all the little app icons on your taskbar, or the entire taskbar itself, when you’re in the Mode.
The Onscreen Keyboard
If your computer has a physical keyboard, or if your tablet has a removable one, great! But touchscreens generally don’t have moving keys. That’s why, whenever you tap in a spot where typing is required, you can summon the onscreen keyboard. Just hit the keyboard button on the system tray (lower right of your screen). Figure 12-10 shows the idea.
Note:
If you don’t see the keyboard icon, then right-click (or hold your finger down on) the taskbar; from the shortcut menu, choose “Show touch keyboard button.”
In general, this keyboard works pretty much like any keyboard you’ve ever used, with a few exceptions:
The keys don’t move. Of course not—it’s a piece of glass! The keys do everything they can, though, to tell you when they’ve been struck. They change color and make little sounds.
It has a symbol/number layout. Two, actually. Tap the “&123” key to change all the letter keys into symbol keys: !, @, %, $, &, and so on. Tap the
 to view a second set of them—less common symbols like ©, <, >, and other currency symbols and brackets. And a numeric keypad appears at the right end of the keyboard.
To return to the regular alphabet keyboard, tap the “abc” key.
It has four different layouts. See the little
 icon at top left? It sprouts a choice of five icons: tablet keyboard, mini keyboard, split two-thumb keyboard, normal keyboard, and handwriting pad (see Figure 12-10).
It’s also a Swype keyboard. On phones, people love the Swype and SwiftKey keyboards; in these systems, you don’t have to tap each key to spell out a word. Instead, you rapidly and sloppily drag your finger across the glass, hitting the letters you want and lifting your finger at the end of every word. The software figures out which word you were going for.
Sounds bizarre, but it’s fast and very satisfying. And pretty—your finger leaves a sort of fire trail as it slides across the glass.
Believe it or not, all the keyboards on your touchscreen Windows 10 machine offer this swipe-to-type keyboard. Try it!
You can remove the margins. Ordinarily, the keyboard stretches all the way across your screen. But the middle row of the pop-out panel circled in Figure 12-10 offers a slightly narrower one that eliminates the side margins. Once those margins are gone, you can drag the keyboard to wherever you want it on the screen.
Tip:
The bottom row of that pop-out panel offers one-tap access to the Region & Language and Typing pages of Settings, described on “Date and Time” and “Typing”.
It has emoji. Tap the smiley-face key (
 ) to change all the letters into a huge array of tiny smileys and other icons, also called emoticons or emoji (Figure 12-10, bottom). These are available wherever you type, but they’re most appropriate when you’re typing in a chat room or maybe an email message. (And even then, plenty of people would argue that they’re never appropriate.)
Figure 12-10. The onscreen keyboard has lots of tricks up its sleeve. When you hit the top-left
key, you get a drop-down menu of different keyboard styles (circled here).
Your options are, from top: normal keyboard, phone-style one-handed keyboard, handwriting palette, split keyboard for tablets—especially one you’re holding with fingers beneath, so you can tap with your thumbs.
Bottom: The full “101-key” layout, complete with symbols and control keys.
You even get a rogue’s gallery of emoticons, for when English just isn’t enough.The bottom row displays buttons for seven pages full of emoji, plus a clock button that displays symbols you’ve used recently for easier retrieval.
Its modifier keys are sticky. If you want to press Shift+D, for example, or Ctrl+N, you don’t have to hold down the Shift or Ctrl key. Just tap the modifier key (Shift, Ctrl, Alt) and then the letter that goes with it.
Caps Lock is there. Just as on a phone, you can lock down the Shift key to type in ALL CAPITALS by double-tapping it. It lights up to show that it’s locked down. (Tap it again to unlock it.)
Its letter keys are hiding numbers, punctuation, and accents. To produce an accented character (like é, ë, è, ê, and so on), keep your finger pressed on that key for about a second.
The comma sprouts a semicolon (;) option, but the period and the question mark—oh, baby. Their secret palettes contain a wealth of other punctuation marks (dash, colon, parentheses, exclamation point, number sign/hashtag, at symbol, slash, hyphen, and so on) that save you from having to call up the special-symbols layout.
Tip:
Most keys on the symbol keyboard sprout variations, too; for example, the $ key offers an array of alternate currency symbols.
The double-space-bar trick is available. If you press the space bar twice, you get a period, a space, and an automatically capitalized next letter—exactly what you want at the end of a sentence. (It’s the same trick that saves you fussing on the iPhone, Windows Phone, Android phones, BlackBerry, and so on.)
Note:
The on/off switch for this feature is in ![]() →
→![]() →Devices→Typing.
→Devices→Typing.
There are cursor keys. See the ” and ’ keys to the right of the space bar? Those don’t mean “greater than” and “less than.” They’re arrow keys. They move your cursor left and right through the text.
There are typing suggestions. When you’ve typed the beginning of a word that Windows can guess—lun, for example—a row of AutoComplete suggestions appears above the keyboard, proposing suggestions: lung, lunch, and luncheon, for example.
If one of those choices is indeed the word you wanted, tap it; Windows inserts it into whatever you were typing. Once you get used to this feature, you can save a lot of time and typos.
You can turn off the suggestions, if you like, in
→→Devices→Typing.There’s a full 101-key PC keyboard layout, too. The standard Windows 10 keyboard layout was designed to make the letter keys big and easy to type. Microsoft chose to hide a lot of the other stuff you’d find on a real keyboard, including numbers, Tab, Esc, and so on.
But if you’d prefer an onscreen version of the real thing, Windows can accommodate you. The standard drop-down menu of keyboard layouts offers the full 101-key PC keyboard (Figure 12-10, bottom).
When you’re finished typing, tap the ![]() at the top right of the keyboard; it goes away, returning the full screen area to your command.
at the top right of the keyboard; it goes away, returning the full screen area to your command.
Keyboard Settings
In ![]() →
→![]() →Devices→Typing, you’ll find a raft of options that govern the onscreen keyboard: “Show text suggestions as I type,” “Add a period after I double-tap the Spacebar,” “Capitalize the first letter of each sentence,” and so on. They’re described in detail in “Typing”.
→Devices→Typing, you’ll find a raft of options that govern the onscreen keyboard: “Show text suggestions as I type,” “Add a period after I double-tap the Spacebar,” “Capitalize the first letter of each sentence,” and so on. They’re described in detail in “Typing”.
In the meantime, note how easy it is to jump to these settings: Tap the ![]() icon at top left of the onscreen keyboard, and then
icon at top left of the onscreen keyboard, and then ![]() .
.
Handwriting Recognition
The accuracy of Windows’ handwriting recognition has come a very long way—which is great news if you have a tablet. Hey, if tablets can decipher doctors’ handwriting, surely you can get your tablet to recognize yours.
In Windows 10, Microsoft has killed off the yellow two-line Input Panel of previous Windows versions. Instead, handwriting transcription is built right into the palette of available keyboards (Figure 12-10, second from top, right). It lets you handwrite text anywhere you can type: Microsoft Word, your email program, a web browser, and so on.
To make Windows recognize your handwriting, open any program where you would otherwise type.
Now open the handwriting panel, which is one of the “keyboards” available from the Keyboards palette shown at top in Figure 12-10. It’s a window that automatically converts anything you write into typed text. To view this panel, start by summoning the regular onscreen keyboard (tap ![]() on the taskbar).
on the taskbar).
Once the onscreen keyboard appears, tap the ![]() key (top left); tap the Handwriting icon (
key (top left); tap the Handwriting icon (![]() ), fourth from left. Now the handwriting panel is ready to use. Just write on the line.
), fourth from left. Now the handwriting panel is ready to use. Just write on the line.
The “digital ink” doesn’t just sit there where you wrote it. A split second after you finish each word, Windows transcribes that word into typed text in your document, converted from your handwriting.
For your inking pleasure, a button at the right end of the panel serves as the Enter key. Hit the … icon at top right to open a miniature palette: left and right cursors, space bar, Backspace, a button to get you the emoji keyboard, and the “&123” button for punctuational and numerical fun. If you tap to pull up one of those other keyboards, just hit the ![]() button to toggle back.
button to toggle back.
Fixing Mistakes
Windows’ handwriting recognition is amazingly accurate. It is not, however, perfect. Fortunately, it’s got some tools to help.
First, don’t miss the row of alternative transcribed words above your handwriting. Tap a word to insert it. Second, if you make a mistake as you write, strike out the word (drag your finger or pen across it, right to left). Windows vaporizes just that word.
Training Windows to Know Your Handwriting
Windows does amazingly well at understanding your handwriting right out of the box. But if you plan to use it a lot, you should train it. You provide samples of your handwriting, and Windows studies your style.
Open ![]() →
→![]() →Devices→Pen & Windows Ink, and choose “Improve recognition.” Proceed as shown in Figure 12-11.
→Devices→Pen & Windows Ink, and choose “Improve recognition.” Proceed as shown in Figure 12-11.
Figure 12-11. Top: The handwriting training wizard offers you the chance to fix certain recognition errors (good if you’ve been at it awhile), or to teach it your general style (best if you’re just starting out).
You’re offered the chance to write either sentences or numbers, symbols, and letters; for best accuracy, you should work through both. More than once, in fact. They’re not brief exercises—the Sentences option involves about 50 screens (bottom)—but it’s all for a good cause.
After working through the exercises, you can start using handwriting recognition—with better accuracy.
Windows Ink Workspace
Microsoft still believes touchscreens are the future. The company can’t believe some people still buy laptops whose screens aren’t touch-sensitive.
So Microsoft continues to sweeten the pot for people who do buy into the touchscreen thing. For example, if you buy a Microsoft tablet or touchscreen laptop, it thanks you by bringing you a wagon full of gifts.
You know the pen that came with your recent Surface tablet? You can program the clicker on the top to do some cool stuff—like opening the Ink Workspace, a collection of pen-friendly apps.
Tip:
You can also open the Workspace by clicking the ![]() icon on the taskbar. If you don’t see it, right-click a blank spot on the taskbar; from the shortcut menu, choose “Show Windows Ink Workspace button.”
icon on the taskbar. If you don’t see it, right-click a blank spot on the taskbar; from the shortcut menu, choose “Show Windows Ink Workspace button.”
They include:
Sticky Notes. Same app described in “Sticky Notes”; this is just a reminder that it’s Ink-enabled, meaning you can jot down words or drawings with your stylus.
Sketchpad. This is a super-simple app for free-form drawing (Figure 12-12). Make sketches, capture brainstorms, use it as the traditional back of a napkin. Its toolbar offers a marker, a pencil, and a highlighter, each with a drop-down menu of color choices. There’s an eraser, too.
Figure 12-12. Left: The entryway to the Windows Ink Workspace is this taskbar panel.
Right: Sketchpad’s coolest feature is a virtual ruler, which you can use as a straightedge. Rotate it with two fingers on the screen, and then make perfectly straight lines by keeping your stylus, cursor, or finger pressed against it. There’s even a protractor, hiding in the Ruler toolbar icon.Screen sketch. The instant you choose this tool, it captures a screenshot—and opens it with the usual drawing tools (same ones as in Sketchpad), so you can draw on it or annotate it. The Share button completes the transaction.
The best part of all of this: You can set up the pen-clicker thing to bring up the Ink Workspace even before you’ve signed in—at the Lock screen. Finally, a tablet is as useful as a legal pad. You’re getting the phone number of somebody attractive? Click your pen and start writing, without first signing in like some kind of nerd.
(All of this, Microsoft says, may also work with other companies’ Bluetooth pens.)
Controlling Your PC, Long Distance
Windows provides several avenues for accessing one PC from another across the network—or across the Internet. If you’re a road warrior armed with a laptop, you may be delighted by these features. If you’re a corporate employee who used to think you could escape the office by going home, you may not.
The three most common scenarios for using these remote access features are (a) helping someone by viewing their screen remotely, (b) controlling your home PC remotely using a laptop, and (c) connecting to your office network from your PC at home.
These pages cover three systems of connecting:
Quick Assist. This feature is for troubleshooting or teaching. It lets you see and take control of someone else’s PC from across the Internet (or lets someone else see and take control of yours). Don’t get any hackery ideas: The other person must be seated at his computer, must give you permission, and can watch everything you do.
Fortunately, Quick Assist is incredibly easy to set up and get going.
Remote Desktop. This feature lets you take control of an unattended PC—presumably your own, back at home. It requires a good deal of setup and some scavenging through the technical underbrush. But when you’re in Tulsa and a spreadsheet you need is on your PC in Tallahassee, you may be grateful to have at least one of these systems in place.
Tip:
For added protection against snoopers, you should use Remote Desktop with a VPN connection.
To make Remote Desktop work, you have to connect to a computer running Windows 10, Windows 8 or 8.1, Windows 7 (Professional and above), Vista (Business and above), XP Pro, or Windows Server. But the machine you’re connecting from can be any relatively recent Windows PC, a Macintosh (you can get a free copy of Remote Desktop for Mac at Apple’s App Store), or even a computer running Linux (you’ll need the free rdesktop client, available from www.rdesktop.org).
Tip:
The world is filled with more powerful, more flexible products that let you accomplish the same things as these Windows features, from software programs like Laplink to websites like www.gotomypc.com.
On the other hand, Remote Desktop is free.
Virtual private networking (VPN). In this system, you use the Internet as a secure link between the host and the remote machine. The remote computer behaves exactly as though it has joined the network of the host system—usually your company’s network.
Quick Assist
You may think you know what stress is: deadlines, breakups, downsizing. But nothing approaches the frustration of an expert trying to help a PC beginner over the phone—for both parties.
The expert is flying blind, using Windows terminology the beginner doesn’t know. Meanwhile, the beginner doesn’t even know what to describe. Every little step takes 20 times longer than it would if the expert were simply seated in front of the machine. Both parties are likely to age 10 years in an hour.
Fortunately, that era is at an end. Windows’ Quick Assist feature lets somebody having computer trouble extend an invitation to an expert, via the Internet. The expert can actually see the screen of the flaky computer, control the mouse and keyboard, and make technical tweaks—running utility software, installing new programs, adjusting hardware drivers, even editing the Registry—by long-distance remote control. Quick Assist really is the next best thing to being there.
The fine print
A few notes about Quick Assist:
It requires that both PCs are running Windows 10 Anniversary Update (the 2016 update) or later.
The expert must have a Microsoft email account, like a Hotmail account.
Quick Assist doesn’t transmit sound.
Quick Assist requires fairly fast Internet connections on both ends.
Tip:
If one of these requirements is a deal killer, you can always use the older Remote Assistance feature, which is similar but more complex to set up. Instructions are on this book’s “Missing CD” at www.missingmanuals.com, in a free PDF appendix called “Remote Assistance.”
Quick Assist security
Now, most people react to the notion of remote assistance with stark terror. What’s to stop some troubled teenager from tapping into your PC in the middle of the night, rummaging through your files, and reading your innermost thoughts?
Plenty. You, the expert, have no access to the other person’s computer until she enters a six-digit code that you provide. The code has a time limit: If she doesn’t respond within 10 minutes, then the electronic door to her PC remains shut.
Finally, she must be present at her machine to make this work. The instant she sees something fishy going on, a quick tap on her Esc key disconnects her.
Making the connection
OK. You, the knowledgeable person (perhaps the owner of a book about Windows 10), have received a panicked call from a clueless relative. Let’s call him Uncle Frank.
You: Open Quick Assist. The quickest way is to type quick assist in the
search box.Hit “Give assistance” (Figure 12-13, top left). Now you’re shown a six-digit security code (top right). You have 10 minutes to communicate it to Uncle Frank; this screen offers to copy it to your Clipboard (so you can text it, for example) or email it.
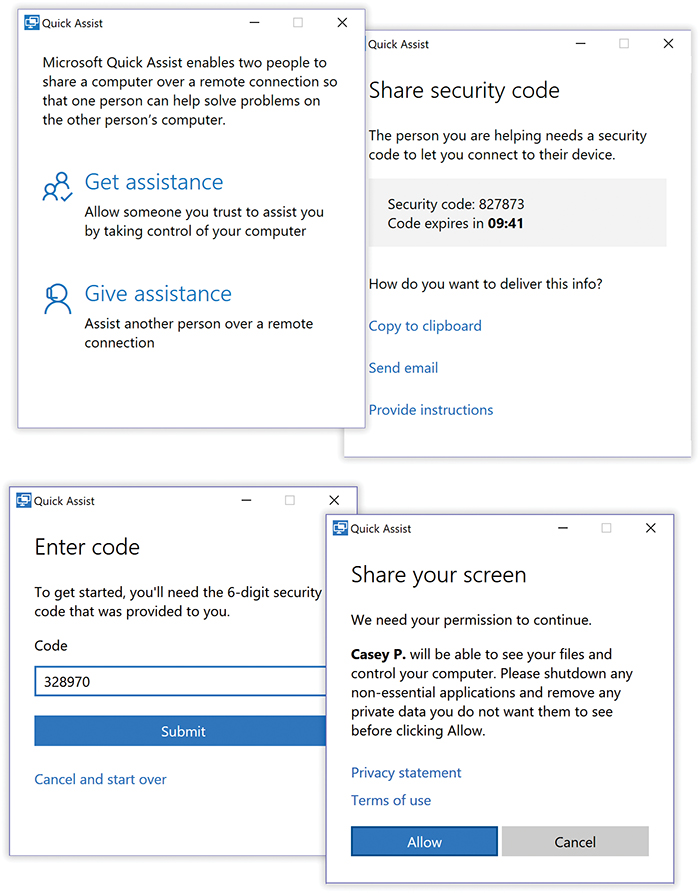
Figure 12-13. Quick Assist really is quick. You encounter only two dialog boxes (top), one of which provides the six-digit code that will establish your authenticity to the struggling Windows fan you’re trying to help. On his end, he encounters only two dialog boxes, too (bottom).
Uncle Frank: Opens his own copy of Quick Assist. Chooses “Get assistance.” Types in that six-digit code and hits Submit (Figure 12-13, lower left). On the “Share your screen” screen, he hits Allow (lower right).
And that is all. A window opens on your screen, bordered in yellow, showing exactly what’s on Uncle Frank’s screen (Figure 12-14). You can now see what he’s doing—and what he’s doing wrong.
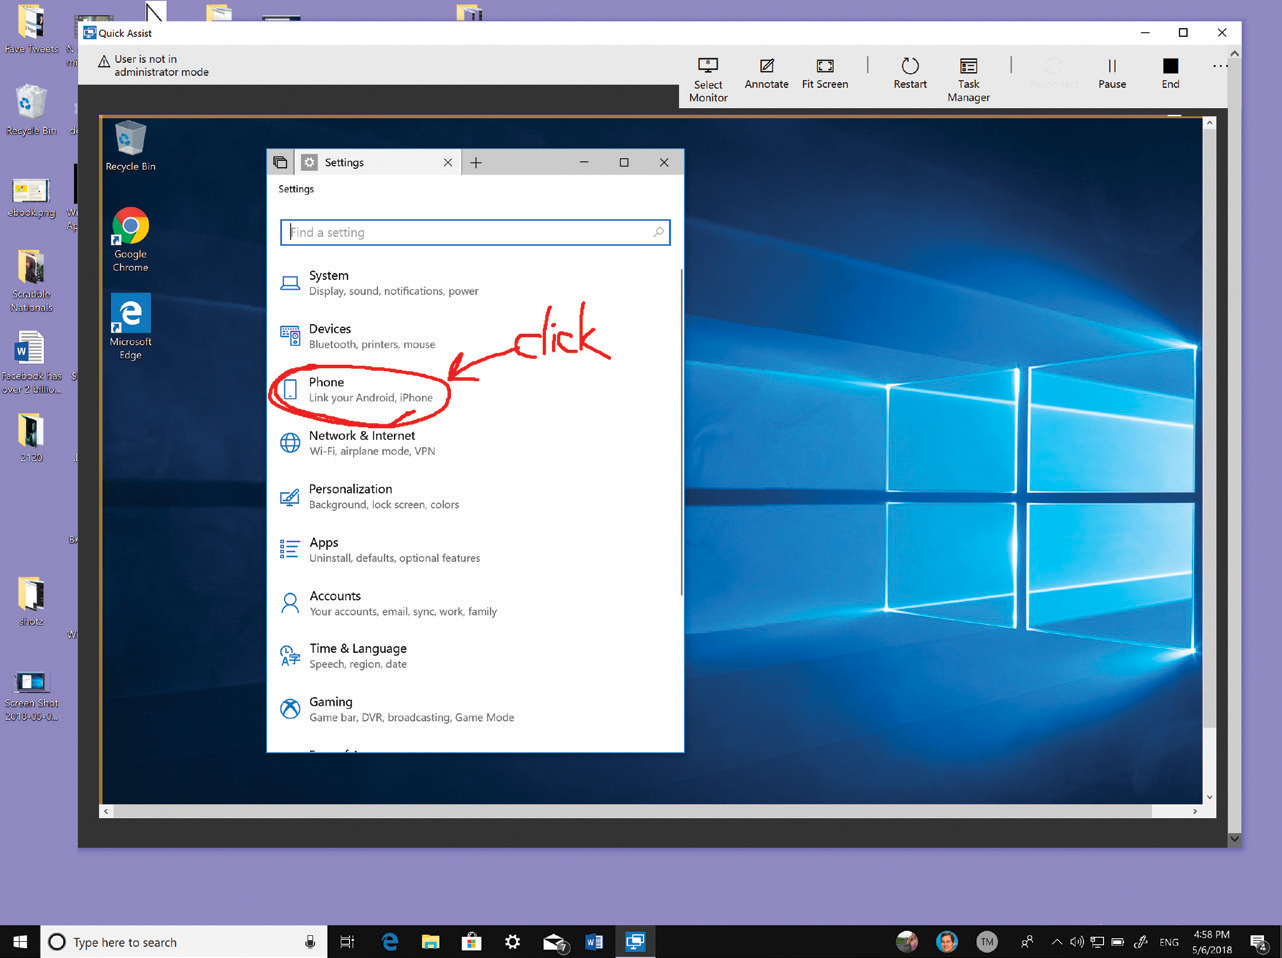
Figure 12-14. This is what your entire screen looks like; Uncle Frank’s screen appears entirely within the big window. (There’s no way to make it fill your entire screen, edge to edge; probably a good thing. Operating someone else’s screen within yours is confusing enough.)
Once you’re connected
To communicate with your troubled comrade, it’s a great idea to talk on the phone. (Yeah, you could use something like Skype, but that might slow down your Quick Assist video.)
Whenever the Quick Assist program’s window is selected, you can use your mouse, keyboard, and troubleshooting skills to do whatever work you need to do. You can do anything to the distant PC that the novice would be able to do—and you can’t do anything the novice isn’t allowed to do. (For example, if the Uncle Frank doesn’t have an administrative account, you won’t be able to do administratory things for him like installing apps or creating accounts.)
Of course, he can use his mouse and keyboard, too—but if you’re both trying to maneuver simultaneously, things can get annoying.
While the helping is going on, you can use these toolbar buttons.
Tip:
If you’re not sure which icon is which, choose … (top right) to make labels appear, as shown in Figure 12-14.
Select Monitor. Available only if Uncle Frank has multiple screens.
Annotate. Turns your cursor into a marker, so you can write on Uncle Frank’s screen. He’ll see any circles, arrows, and other shapes you write, as you write them. You can use the top-left icon to choose a different pen color; there’s an Erase tool up there, too. Hit Exit (top right) to stop annotating (and remove any annotations you’ve just drawn).
Fit Screen. If Uncle Frank’s screen is larger than yours, scroll bars appear so that you can move around his screen. The alternative is for you to use the Fit Screen button to make his screen shrink down small enough to fit yours. (This button becomes Actual Size, which you can use when you’ve had enough of the shrinkage.)
Restart. Restarts his PC. Once it comes to life, he’s offered a one-click invitation to let you reconnect and continue the help session.
Task Manager. Opens Task Manager (“When Programs Die: The Task Manager”) on Uncle Frank’s PC.
Pause. Your screen goes black. (Frankly, Uncle Frank’s Pause button—on the little Quick Assist panel at the top center—probably makes more sense; it lets him do something personal without your seeing. He can also hit the x to end the session.)
When your job is done, choose the black square End button—or wait for your grateful patient to click his own End button.
Remote Desktop
Here’s another remote-access option: Remote Desktop. It’s something like Quick Assist, but it’s designed to let you take control of an unattended PC—like your own computer back home when you’re on the road. You can run its programs, print on its printers, “type” on its keyboard, move its cursor, manage its files, run its programs, and so on, all by remote control. (It’s available only in Windows 10 Pro—not the Home edition.)
If you do decide to use Remote Desktop over the Internet, consider setting up a VPN connection first; using Remote Desktop over a VPN connection adds a nice layer of security. It also means that you become part of your home or office network—and you can therefore connect to the distant computer using its private network address or even its computer name.
Tip:
The computers on the receiving end of the connections require the fanciest versions of Windows Vista, 7, 8, or 10 (not the Home editions). But the laptop you’re using can be running any edition. In fact, it can be running any version of Windows all the way back to 95, and even Mac OS X or Linux.
To install the Remote Desktop client on OS X, download it from Apple’s App Store; on an older version of Windows, visit the Microsoft Download Center (www.microsoft.com/downloads/) and search for “Remote Desktop Connection.” For Linux, get the free rdesktop program at www.rdesktop.org.
Setting up the host machine
To get a PC ready for invasion—that is, to turn it into a host—open ![]() →
→![]() →System→Remote Desktop. Turn “Enable Remote Desktop” on (Figure 12-15, top), and then choose Confirm. Make a note of the PC’s name—it’s right there under “How to connect to this PC.”
→System→Remote Desktop. Turn “Enable Remote Desktop” on (Figure 12-15, top), and then choose Confirm. Make a note of the PC’s name—it’s right there under “How to connect to this PC.”
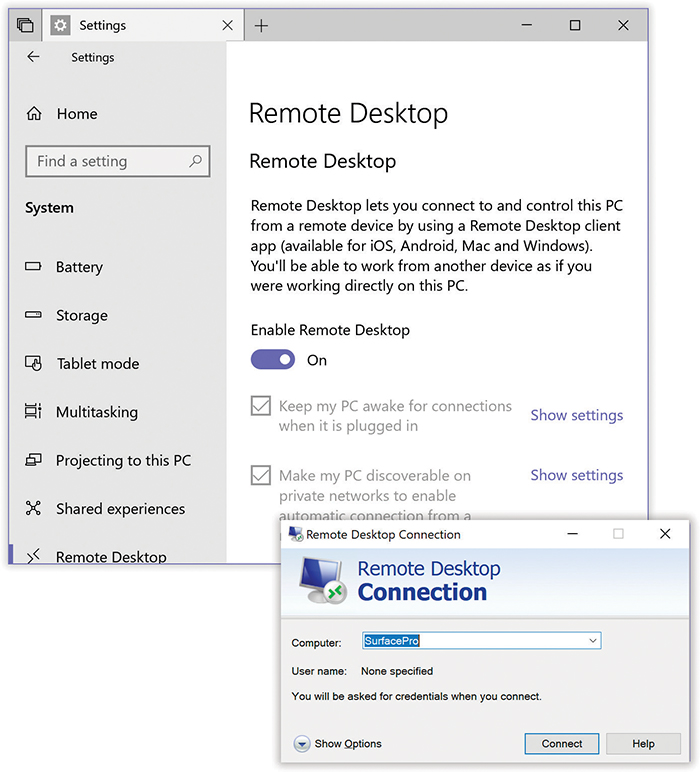
Figure 12-15. Top: Here’s the master switch for Remote Desktop. Your computer back at home is now ready for your Internet visits from afar!
Bottom: Use this little app to dial into your computer back at home. To ensure security, Windows insists that the account you use to sign in have a password.
You can make some settings tweaks while you’re at it:
Keep my PC awake for connections when it’s plugged in. Good. Because once it’s asleep, you won’t be able to connect.
Make my PC discoverable on private networks. Also good, so it’s easy to connect on your home network.
Advanced settings. Here you’ll find the “Require computers to use Network Level Authentication to connect” option. Leave it on—it’s for security. It means nobody can sign in unless she supplies her name and password.
The host computer is now ready for invasion. It’s listening to the network for incoming connections from Remote Desktop clients.
Making the connection
Here’s the amazing part about Remote Desktop: You can connect to your host PC using almost any device: a PC, a Mac, an Android phone, or an iPhone. All you need is the free Remote Desktop “client” program.
Note:
As a first step, you may be required (by your bosses) to connect to the VPN of the distant host computer, as described later in this chapter. If the host computer is elsewhere on your local network—in the same building, that is—you can skip this step.
Open the Remote Desktop program on your phone, tablet, or computer.
The Remote Desktop program for Windows is included with Windows 10. To find it, do a
search for remote; choose Remote Desktop Connections in the results list. The Remote dialog box appears (Figure 12-16, bottom).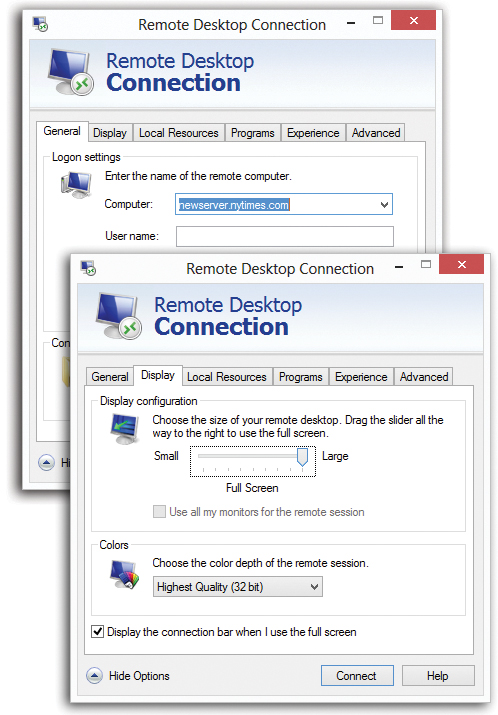
Figure 12-16. Click Show Options (not shown) if you don’t see these tabs.
Once you’ve made them appear, a few useful settings become available (and a lot of rarely useful ones).
On the General tab (top), you can enter—and tell Windows to remember—your name and password for the connection. If you’re connecting to a network outside your building, you’ll probably have to type in its IP address—something only the company’s network nerds can tell you.
On the Display tab (bottom), for example, you can effectively reduce the size of the other computer’s screen so that it fits within your laptop’s. On the Experience tab, you can turn off special-effect animations to speed up the connection.-
Now you’re asked to sign in with your name and password (as it exists on the remote computer).
Enter your name and password; click Connect.
After a moment, the host computer’s screen fills your own (Figure 12-17). Don’t be confused by the fact that all the open windows on the computer you’re using have now disappeared. (Actually, they won’t if you choose “Show options” and then hit the Display tab and choose a smaller-than-full-screen remote desktop size before you connect.)
You can now operate the distant PC as though you were there in the flesh, using your own keyboard (or trackpad) and mouse. You can answer your email, make long-distance printouts, and so on. All the action—running programs, changing settings, and so on—is actually taking place on the faraway host computer.
Tip:
You can even shut down or restart the faraway machine by remote control. Open a Command Prompt and run the command shutdown /s. The computer will shut down in less than a minute.
Keep in mind a few other points:
You don’t need to feel completely blocked out of your own machine. The little title bar at the top of the screen offers you the chance to put the remote computer’s screen into a floating window of its own, permitting you to see both your own screen and the home-base computer’s screen simultaneously (Figure 12-17). You can return to full-screen mode by pressing Ctrl+Alt+Break.
If the host computer is running Windows 8, but you’re on Windows 10, you might wonder: How can I open the App bar, Charms bar, Start screen, and so on? That’s the purpose of the ▾ menu at the left end of the control bar, shown open in Figure 12-17. It lists “App commands” (meaning the App bar), Charms, Snap (meaning “Split the screen between two apps”), “Switch apps” (opens the app switcher at the left side), and Start (opens the Start screen).
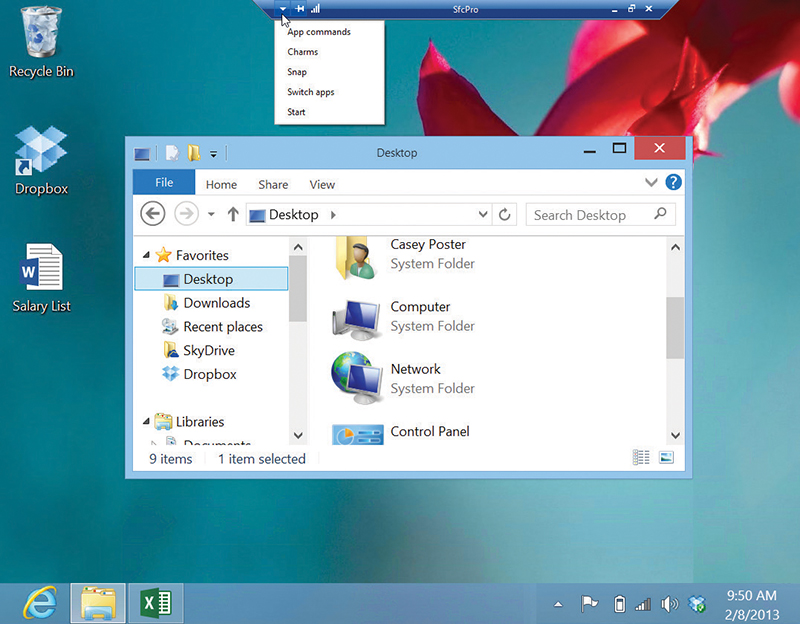
Figure 12-17. The strange little bar at the top of your screen lets you minimize the distant computer’s screen or turn it into a floating window. To hide this title bar, click the pushpin icon
 so that the pin turns horizontal. The bar slides into the top of the screen, out of your way, until you move the cursor to the top edge of the screen.
You can copy and paste highlighted text or graphics between the two machines (using regular Copy and Paste), and even transfer entire documents back and forth (using Copy and Paste on the desktop icons). Of course, if you’ve made both desktops visible simultaneously, you’ll be able to move more quickly between local and remote.
Even Windows can’t keep its mind focused on two people at once. If somebody is trying to use the host machine in person, you’ll see a message to the effect that you’re about to bump that person off the PC.
Similarly, if somebody signs in at the host computer, you get unceremoniously dumped off. (You just get a message that tells you, “Another user connected to the remote computer.”) Fortunately, you don’t lose work this way—your account remains signed in behind the scenes, just as in fast user switching (“Fast User Switching”). When you connect again later (after the interloper has signed off), you’ll find all your programs and documents open exactly as you (or your interloper) left them.
Back at the host computer, nobody can see what you’re doing. The standard Welcome screen appears on the remote PC, masking your activities.
Keyboard shortcuts for the hopelessly confused
When the Remote Desktop Connection window is maximized (fills your entire screen), all the standard Windows keyboard shortcuts operate on the host computer, not the one you’re actually using. When you press the ![]() key, for example, you see the host computer’s Start menu.
key, for example, you see the host computer’s Start menu.
Note:
There’s one exception: When you press Ctrl+Alt+Delete, your computer processes the keystroke.
But in window-in-a-window mode, it’s a different story. Now your current computer “hears” your keystrokes. Now pressing ![]() opens your Start menu. So how, with the remote PC’s screen in a window, are you supposed to operate it by remote control?
opens your Start menu. So how, with the remote PC’s screen in a window, are you supposed to operate it by remote control?
One solution: On the Local Resources tab of the dialog box shown in Figure 12-16, you can specify which computer “hears” your keyboard shortcuts.
Another: Use Microsoft’s alternatives for the key combinations. For example, when the Remote Desktop window isn’t full screen, pressing Alt+Tab switches to the next open program on your computer—but pressing Alt+Page Up switches to the next program on the host computer.
Here’s a summary of the keys that operate the distant computer—a table that can be useful if you’re either an extreme power user or somebody who likes to win bar bets:
| Standard Windows Key Combination | Remote Desktop Key Combination | Function |
|---|---|---|
| Alt+Tab | Alt+Page Up | Switches to the next open program |
| Alt+Shift+Tab | Alt+Page Down | Switches to the previous open program |
| Alt+Esc | Alt+Insert | Cycles through programs in opened order |
| Ctrl+Esc (or |
Alt+Home | Opens the Start menu |
| Ctrl+Alt+Delete | Ctrl+Alt+End | Displays the Windows Security dialog box |
(Actually, you should use the alternative key combination for the Security dialog box whether the Remote Desktop window is maximized or not, because Ctrl+Alt+Delete is always interpreted by the computer you’re currently using.)
Disconnecting
To get out of Remote Desktop full-screen mode, click the Close box in the strange little bar at the top of your screen; if you’re using the floating window, you can click the usual ![]() in the upper right.
in the upper right.
Note, however, that this method leaves all your programs running and your documents open on the distant machine, exactly as though you had used fast user switching. If you sign in again, either from the road or in person, you’ll find all those programs and documents still on the screen, just as you left them.
If you’d rather sign off in a more permanent way, open the Start menu on the other computer, click your account picture, and choose “Sign out.”
Fine-tuning Remote Desktop
Windows offers all kinds of settings for tailoring the way this bizarre, schizophrenic connection method works. The trick is, however, that you have to change them before you connect, using the tabs on the dialog box shown in Figure 12-16.
Here’s what you find:
General tab. Here’s where you can tell Windows to edit or delete credentials (user name and password) from your last sign-in, or to save all the current settings as a shortcut icon, which makes it faster to reconnect later. (If you connect to a number of different distant computers, saving a setup for each one can be a huge time-saver.)
Display tab. Use these options to specify the size (resolution) of the host computer’s display.
Local Resources tab. Using these controls, you can set up local peripherals and add-ons so they behave as though they were connected to the computer you’re using. This is also where you tell Windows which PC should “hear” keystrokes like Alt+Tab, and whether or not you want to hear sound effects played by the distant machine.
Programs tab. You can set up a certain program to run automatically as soon as you connect to the host machine.
Experience tab. Tell Windows the speed of your connection, so it can limit fancy visual effects like menu animation, the desktop wallpaper, and so on, to avoid slowing down the connection.
Advanced. You can control whether Remote Desktop warns you if it can’t verify the identity of a computer, and also whether to connect through a special gateway server (if you need to use one of these, your system administrator will tell you).
Virtual Private Networking
All over the world, frequent travelers connect to distant homes or offices using virtual private networking. VPN is a fancy way of saying, “Your remote computer can become part of your host network over the Internet.”
What corporations like most about VPN is that it’s extremely secure. The information traveling between the two connected computers is encoded (encrypted) using a technology called tunneling. Your connection is like a reinforced steel pipe wending its way through the Internet to connect the two computers.
To create a VPN connection, the host computer has two important requirements. If you’re VPNing into a corporation or a school, it’s probably all set already. Otherwise:
It must be on the Internet at the moment you try to connect. Usually that means it needs a full-time Internet connection, like cable modem or DSL.
It needs a fixed IP address. See the Note below.
On the other hand, the remote computer—your laptop—doesn’t have any such requirements. It just needs an Internet connection.
Note:
Several of the remote-connection methods described in this chapter require that your home-base PC have a fixed, public IP address. (An IP address is a unique number that identifies a particular computer on the Internet. It’s made up of four numbers separated by periods.)
If you’re not immediately nodding in understanding, murmuring, “Ahhhhh, right,” then download the bonus appendix available on this book’s “Missing CD” page at www.missingmanuals.com. The free PDF supplement you’ll find there is called “Getting a Fixed, Public IP Address.”
Setting up your laptop
In general, the big network bosses who expect you to connect from the road have already set up the VPN software at their end. They may even have set up your laptop for you, so that dialing in from the road requires only one quick click.
But if not—if you want to set up your remote PC yourself—here are the steps:
Open
→→Network & Internet→VPN→“Add a VPN connection.”You wind up at the dialog box at top in Figure 12-18.
Fill in the blanks.
You’ll need to know the server name or registered IP address of the VPN host—that is, the computer you’ll be tunneling into.
If you fill in your user name and password now, and turn on “Remember my sign-in info,” you won’t have to retype it every time you connect. (Of course, don’t set up a VPN this way on a public computer at the library or something.) If you’re connecting to a server at work or school, your system administrator can tell you what to type here. If you’re connecting to a computer you set up yourself, specify its public IP address. (See the Note above.)
This is not the private IP address on your home network, and definitely not its computer name (despite the fact that the New Incoming Connection wizard told you you would need to use that name); neither of these work when you’re signed into another network.
It doesn’t matter what you type as the Connection name; that’s just for your reference.
-
You might have noticed, if you’re among the technically inclined, that you did not have to specify things like tunneling setups. Windows can figure that stuff out all by itself, saving you the technical bushwhacking.
Connecting to the VPN
Now, none of what you’ve achieved so far has actually gotten you online. All you’ve done is create a VPN connection—a stored, clickable icon for connecting to the mother ship. When the time comes to make the actual connection, read on.
Open
→→Network & Internet→VPN.Or open the Action Center (
+A) and hit VPN. Either way, the VPN pane of Settings opens up (Figure 12-18, bottom).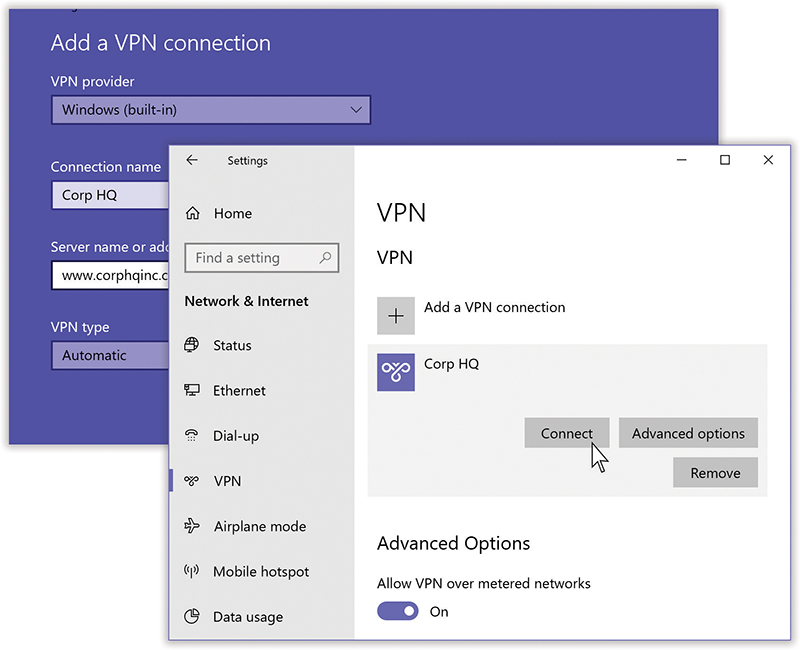
Figure 12-18. Top: Here’s where you set up your VPN connection, using the technical specs provided by the corporate IT person who takes care of you.
Bottom: Once you’ve set up the VPN, it shows up here, in Settings, ready for clicking and connecting.Select the icon of the VPN connection you made earlier, and then click Connect.
If you entered your name and password (and turned on “Remember my sign-in info”) when you created the VPN connection, you hop directly onto the distant network. You’re in!
If not, you’re asked to enter your name and password—take this final step:
Type your user name, password, and, if required by the network administrator, the domain name. Then click OK.
When you make the VPN connection, you’ve once again joined your home or office network. You should feel free to transfer files, make printouts, and even run programs on the distant PC. (If you open the Network icon in your system tray, you’ll see that you’re connected, and you’ll see a Disconnect option.)
Changing your VPN settings
If the VPN connection doesn’t work the first time—it hardly ever does—you can make some adjustments. Just reopen the panel of PC Settings where you created the VPN connection in the first place, tap its name, and then tap “Advanced options.” Keep your company’s highly trained network nerd nearby to help you.
Three Obscure Mobility Features
They’re obscure either because they’ve been replaced by more modern equivalents (but are still part of Windows), or because they’re not available in all Windows 10 versions; in any case, here they are.
Windows Mobility Center
The Mobility Center is a handy, centralized hub for managing everything that makes a laptop a laptop (Figure 12-19): screen brightness, speaker volume, battery status, wireless networking, external projector connection, and so on. The quickest way to get there is to choose its name from the secret Utilities menu (press ![]() +X, or right-click the
+X, or right-click the ![]() button).
button).
Truth is, most of these tiles are now duplicated, in an easier-to-reach format, in the Quick Actions panel described in “The Quick Action Tiles”. But Mobility Center is here if you need it.
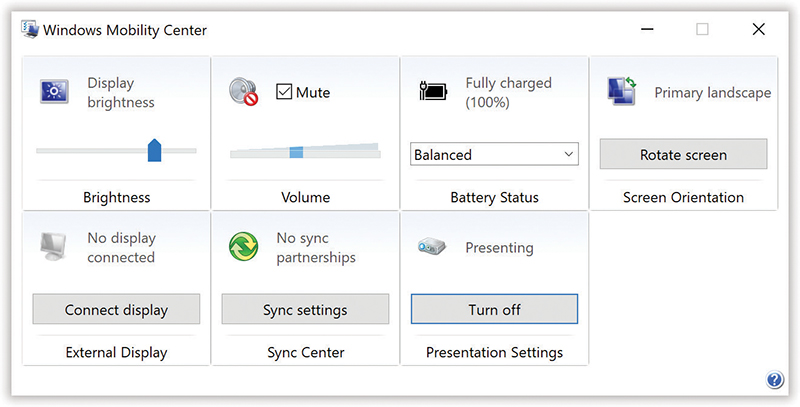
Figure 12-19. Each setting in the Mobility Center is illustrated with a cute little icon—but don’t be fooled. This is so much more than an icon! It’s also a button that, when double-clicked, opens up a Control Panel applet or a configuration page.
Offline Files and Sync Center
The ancient offline files feature is designed for laptop lovers. It lets you carry off files that generally live on your office network, so you can get some work done while you’re away.
Then, when you return and connect your laptop to the office network, Windows automatically copies your edited, updated documents back to their original locations on the network, keeping straight which copies are the most recent.
Truth is, using a VPN or your OneDrive is a newer, much better way to work on documents from afar. But if you’re interested in finding out about how Offline Files works, see the free downloadable PDF appendix “Offline Files” on this book’s “Missing CD” page at www.missingmanuals.com.
Windows To Go
If you work in a corporation—especially if you’re in charge of the computers there—you’ve heard of BYOD. It stands for “Bring your own device,” and it means “employees bringing their own tablets, laptops, and phones to work.”
It sounds like a great idea; why shouldn’t the worker bees enjoy the comfort of their own machines? But system administrators hate BYOD. It means that the unsophisticated peons are bringing in all kinds of unsecure, uninspected, unapproved hardware and software into the carefully controlled corporate environment. They’d much rather issue you a nine-pound, kerosene-powered Dell laptop from 2007 that they’ve personally set up and locked down for your use.
Windows To Go, a feature in the Enterprise edition of Windows 10, offers a clever solution. It lets your IT overlords create a complete Windows world on a flash drive that can be used to start up any laptop—even your own. It contains a copy of Windows, whatever programs the bosses want you to have, documents, the works. (That’s why it requires a flash drive that holds 32 gigabytes or more!)
Note:
If you are the IT overlord, here are the steps for creating a Windows To Go installation for use by your underlings: http://j.mp/YetpTa.
Actually, it doesn’t have to be a laptop. You could start up any recent Windows machine—at home, at work, on the road—from this flash drive and find yourself in the same exact Windows world that your company set up for you.
To use the Windows To Go flash drive, insert it into the not-at-the-office PC’s USB jack while it’s shut down. When you boot it up again, it should start up from the USB drive automatically. If it doesn’t, you may have to adjust your BIOS settings so that it does; ask your network geek or check the PC manufacturer’s website. (Chances are pretty good that your system admin people turned on the BitLocker encryption feature described in “EFS Rules”. You’ll have to enter that password.)
At this point, you don’t see any of your personal stuff. Your laptop’s own hard drive doesn’t even show up. Don’t freak out; this is all in the name of keeping your work stuff and your personal stuff completely separate. When you’re using Windows To Go, your laptop belongs to the corporation; everything else is hidden and offline. There’s no possibility of cross-contamination.
When you shut down and yank out the flash drive, that same computer once again starts up from your own cluttered copy of Windows. The system administrators couldn’t care less. (And if your flash-drive copy of Windows goes wrong somehow—maybe it gets a virus or something—who cares? The system admins can hit a couple of keys and spit out a fresh, virginal copy.)
The fine print goes like this:
Only some flash-drive brands and models are officially compatible. (The list is here: https://bit.ly/2Ibaf3i.)
Some features don’t work when you’ve started up from the flash drive: hibernation, the Windows Recovery Environment, the Refresh and Reset PC commands, and the Windows App Store.
If you knock the flash drive out of the USB jack—or if someone grabs it unthinkingly—Windows To Go simply freezes everything you were doing. Every document remains suspended; video or music playback pauses. If you reinsert the flash drive within 60 seconds, everything picks up exactly where you left off. If not, the system assumes you’ve gone home, and the PC shuts down. No trace of your activity remains on it.