Chapter 2. File Explorer, Taskbar & Action Center
Windows got its name from the rectangles on the screen—the windows—where all your computer activity takes place. You look at a web page in a window, type into a window, read email in a window, and look at lists of files in a window. But as you create more files, stash them in more folders, and open more programs, it’s easy to wind up paralyzed before a screen awash with cluttered, overlapping rectangles.
Fortunately, Windows has always offered icons, buttons, and other inventions to help you keep these windows under control—and Windows 10 positively crawls with them.
The primary tool at the desktop is now called File Explorer (formerly Windows Explorer). That’s the program—the app—that displays the icons of your files, folders, disks, and programs.
Like any well-behaved program, File Explorer has an icon of its own. You can open a File Explorer window either by clicking the manila-folder button on the taskbar or the ![]() icon in the Start menu’s places list, if you’ve put it there.
icon in the Start menu’s places list, if you’ve put it there.
A desktop window opens, and the fun begins.
Universal Window Controls
A lot has changed in Windows since a few years ago. If you’re feeling disoriented, firmly grasp a nearby stationary object and read the following breakdown.
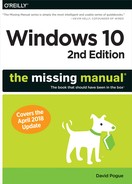
Here are the controls that appear on almost every window, whether in an app or in File Explorer (see Figure 2-1):
Control menu. This tiny icon has sat in the upper-left corner of every File Explorer window since Windows XP. It was invisible (though still functional) in Windows 7, but you can clearly see it now.
In any case, the Control menu contains commands for sizing, moving, and closing the window. One example is the Move command. It turns your cursor into a four-headed arrow; at this point, you can move the window by dragging any part of it, even the middle.
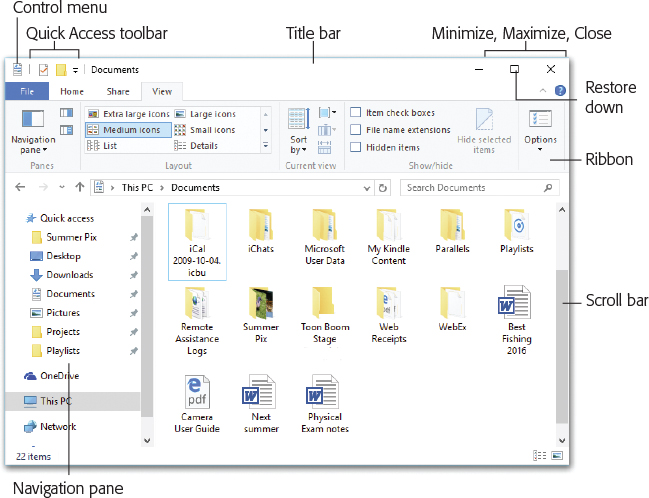
Figure 2-1. All windows have the same basic ingredients, making it easy to become an expert in window manipulation. This figure shows a File Explorer window—a disk or a folder—but you’ll encounter the same elements in application windows.
Why bother, since you can always just drag the top edge of a window to move it? Because, sometimes, windows get dragged past the top of your screen. You can hit Alt+space to open the Control menu, type M to trigger the Move command, and then move the window by pressing the arrow keys (or by dragging any visible portion). When the window is where you want it, hit Enter to “let go” or the Esc key to return the window to its original position.
Tip:
You can double-click the Control menu spot to close a window.
Quick Access toolbar. You can dress up the left end of the title bar with tiny icons for functions you use a lot—like Undo, Properties, New Folder, and Rename. And how do you choose which of these commands show up? By turning them on and off in the Customize Quick Access Toolbar menu (
 ), which is always the last icon in the Quick Access toolbar.
Tip:
As you can see in the ![]() menu, the Quick Access toolbar doesn’t have to appear in the title bar (although that is the position that conserves screen space the best). You can also make it appear as a thin horizontal strip below the Ribbon, where it’s not so cluttered. Just choose—what else?—”Show below the Ribbon.”
menu, the Quick Access toolbar doesn’t have to appear in the title bar (although that is the position that conserves screen space the best). You can also make it appear as a thin horizontal strip below the Ribbon, where it’s not so cluttered. Just choose—what else?—”Show below the Ribbon.”
Title bar. This big, fat top strip is a giant handle you can use to drag a window around. It also bears the name of the window or folder you’re examining.
Tip:
The title bar offers two great shortcuts for maximizing a window, making it expand to fill your entire screen exactly as though you had clicked the Maximize button described below. Shortcut 1: Double-click (or double-tap) the title bar. (Double-click it again to restore the window to its original size.) Shortcut 2: Drag the title bar up against the top of your monitor.
Ribbon. That massive, tall toolbar at the top of a File Explorer window is the Ribbon. It’s a dense collection of controls for the window you’re looking at. You can hide it, eliminate it, or learn to value it, as described starting in “The Ribbon”.
Navigation pane. Some form of this folder tree, a collapsible table of contents for your entire PC, has been part of Windows for years. It’s described in “Navigation Pane”.
Window edges. You can reshape a window by dragging any edge—even the very top. Position your cursor over any border until it turns into a double-headed arrow. Then drag inward or outward to make the window smaller or bigger. To resize a full-screen window, click the Restore Down (
 ) button first.
Tip:
You can resize a window in two dimensions at once by dragging one of its corners. It doesn’t have to be a certain corner; all four work the same way.
Minimize, Maximize, Restore Down. These three window-control buttons, at the top of every Windows window, cycle a window among its three modes—minimized, maximized, and restored, as described on the following pages.
Close button. Click the
 button to close the window. (Keyboard shortcut: Press Alt+F4.)
Tip:
Isn’t it cool how the Minimize, Maximize, and Close buttons are highlighted when your cursor passes over them? That’s not a gimmick; it’s a cue that lets you know when the button is clickable. You might not otherwise realize, for example, that you can close, minimize, or maximize a background window without first bringing it forward. But when the background window’s Close box glows red, you know.
Scroll bar. A scroll bar appears on the right side or bottom of the window if the window isn’t large enough to show all its contents.
Window Management
Windows 10 carries on the window-stunt tradition of previous versions: special shortcuts expressly designed for managing windows. Most of them involve some clever mouse gestures—special dragging techniques. Thanks to those mouse movements and the slick animations you get in response, goofing around with your windows may become the new Solitaire.
Sizing Windows
A Windows window can cycle among three altered states.
Maximized
A maximized window is one that fills the screen, edge to edge, so you can’t see anything behind it. It gets that way when you do one of these things:
Click its Maximize button (
 ).
).Double-click the title bar.
Drag the window up against the top of the screen.
Press
 . If you have a keyboard, that’s an awesome shortcut.
Maximizing the window is an ideal arrangement when you’re surfing the web or working on a document for hours at a stretch, since the largest possible window means the least possible scrolling.
Once you’ve maximized a window, you can restore it to its usual, free-floating state in any of these ways:
Drag the window away from the top edge of the screen.
Double-click the title bar.
Click the Restore Down button (
). (It’s how the Maximize button appears when the window is already maximized.)Press
 .
.
Tip:
If the window isn’t maximized, then this keystroke minimizes it instead.
Press Alt+space, and then R.
Minimized
When you click a window’s Minimize button (–), the window gets out of your way. It shrinks down into the form of a button on your taskbar at the bottom of the screen. Minimizing a window is a great tactic when you want to see what’s behind it. (Keyboard shortcut: ![]() .)
.)
You can bring the window back, of course (it’d be kind of a bummer otherwise). Point to the taskbar button (don’t click) that represents that window’s program. For example, if you minimized a File Explorer (desktop) window, then point to the File Explorer icon. If you have a touchscreen, just touch the program’s taskbar button.
On the taskbar, the program’s button sprouts handy thumbnail miniatures of the minimized windows when you point to it without clicking. Select a window’s thumbnail to restore it to full size. (You can read more about this trick later in this chapter.)
Tip:
There’s a keyboard trick that lets you minimize all your windows at once, revealing your entire desktop. Just press ![]() +M (you can think of as M standing for “Minimize all”). Add the Shift key (Shift+
+M (you can think of as M standing for “Minimize all”). Add the Shift key (Shift+![]() +M) to bring them all back.
+M) to bring them all back.
Restored
A restored window is neither maximized nor minimized; it’s a loose cannon, floating around on your screen as an independent rectangle. Because its edges aren’t attached to the walls of your monitor, you can make it any size you like by dragging its borders.
Moving a Window
Moving a window is easy—just drag the big, fat top edge.
Closing a Window
Microsoft wants to make absolutely sure you’re never without some method of closing a window. It offers at least nine ways to do it:
Click the Close button (the
in the upper-right corner).
Tip:
If you’ve managed to open more than one window, then Shift-click that Close button to close all of them.
Press Alt+F4. (This one’s worth memorizing. You’ll use it everywhere in Windows.)
Double-click the window’s upper-left corner.
Right-click (or hold your finger on) the window’s button on the taskbar, and then choose Close from the shortcut menu.
Point to a taskbar button without clicking. Thumbnail images of its windows appear. Point to a thumbnail; an
button appears in its upper-right corner. Click it.On a touchscreen, tap a taskbar button with your finger. Thumbnail images of its windows appear, with
buttons in their top right corners. Tap .Right-click the window’s title bar (top edge), and choose Close from the shortcut menu. (Touchscreen: Hold your finger down on the title bar instead.)
In a File Explorer window, choose File→Close. That works in most other programs, too.
Quit the program you’re using, sign off, or shut down the PC.
Be careful. In many programs, including most web browsers, closing the window also quits the program entirely.
Hiding All Windows but One
If you’ve become fond of minimizing windows—and why not?—then you’ll love this one. If you give your window’s title bar a rapid back-and-forth shake, you minimize all other windows. The one you shook stays right where it was (Figure 2-2).
Tip:
This shaking business makes a snazzy YouTube demo video, but it’s not actually the easiest way to isolate one window. If the window you want to focus on is already the frontmost window, then you can just press ![]() +Home to achieve the same effect. Press that combo a second time to restore all the minimized windows.
+Home to achieve the same effect. Press that combo a second time to restore all the minimized windows.
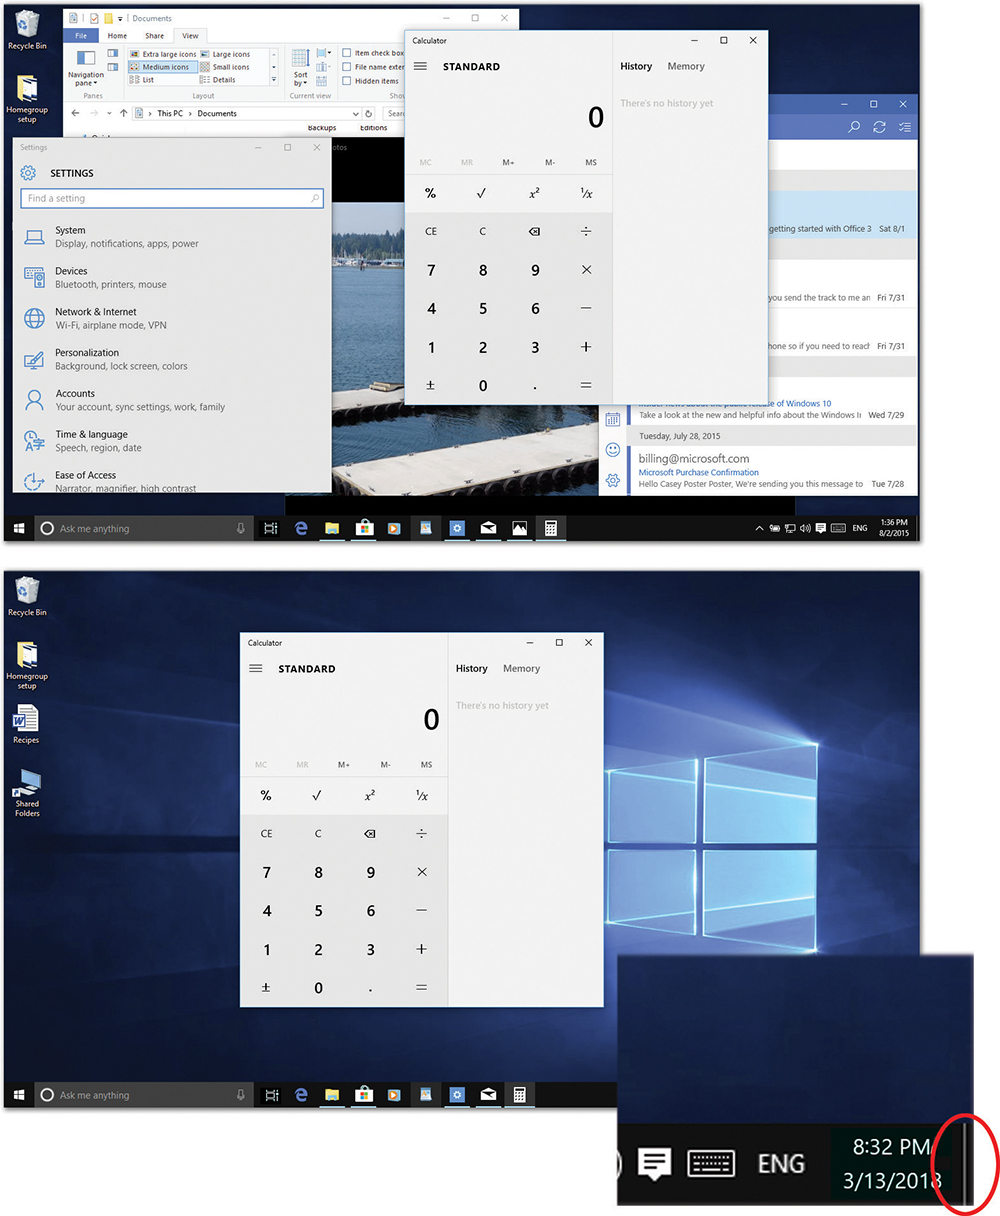
Figure 2-2. Top: OK, this is the state of your screen. You want to have a look at your desktop—but, oy, what a cluttered mess!
Bottom: So you give this window’s title bar a little shake—a wiggle—at least a couple of horizontal or vertical back-and-forths—and boom! All other windows are minimized to the taskbar, so you can see what you’re doing. Give the title bar a second shake to bring the hidden windows back again.
Inset: This is the Show Desktop button. It’s a tiny slice at the far-right end of the taskbar. It makes all windows vanish. Click it again to get them to reappear.
Handily enough, you can bring all the hidden windows back again, just by giving the hero window another title-bar shake.
Note:
Dialog boxes aren’t affected by this shaking thing—only full-blown windows.
Background Windows
When you have multiple windows open on your screen, only one window is active, which affects how it works:
It’s in the foreground, in front of all other windows.
It’s the window that “hears” your keystrokes and mouse clicks.
Its Close button is black. (Background windows’ Close buttons are light gray, at least until you point to them.)
As you would assume, clicking a background window brings it to the front.
Tip:
And pressing Alt+Esc sends an active window to the back. Bet you didn’t know that one!
And what if it’s so far back that you can’t even see it? That’s where Windows’ window-management tools come in; read on.
Tip:
For quick access to the desktop, you can press ![]() +D. Pressing that keystroke again brings all the windows back to the screen exactly as they were.
+D. Pressing that keystroke again brings all the windows back to the screen exactly as they were.
There’s a secret button that does the same thing when clicked or tapped, too. It’s the Show Desktop button—a 3-pixel sliver that occupies the farthest-right portion of the taskbar (Figure 2-2, bottom). Click that spot to make all windows and dialog boxes disappear completely, so you can do something on your desktop. They’re not minimized—they don’t shrink down into the taskbar; they’re just gone. Click the Show Desktop button a second time to bring them back from invisible-land.
Windows Snap—Now with Four Panes!
Here’s a weird, wild feature that not many people know about, probably because there’s no visible sign that it even exists. But you can neatly split the screen between two windows, full height, edge to edge of the monitor, as shown in Figure 2-3. Or, in Windows 10, even four windows. (Eight windows will have to wait until Windows 11.)
And why would you bother? Well, a full-height, half-width window is ideal for reading an article, for example. You wouldn’t want your eyes to have to keep scanning the text all the way across the football field of your screen, and you wouldn’t want to spend a lot of fussy energy trying to make the window tall enough to read without scrolling a lot. This gesture sets things up for you with one quick drag.
But this half-screen trick is even more useful when you apply it to two windows. Now it’s simple to compare two windows’ contents, or to move or copy stuff between them.
Split the screen into two windows
Here’s how Snap works. You can follow along in Figure 2-3:
Mash the first window to the right or left edge of the screen.
Mouse, trackpad, finger: Using the window’s title bar as a handle, drag the window to the right or left edge of the screen (Figure 2-3). When you’ve gone far enough, Windows shows you an outline of the proposed new window shape. Let go.
Keyboard: It’s actually much faster to use the keyboard shortcuts:
 to snap the window against the left side, or
  to snap it against the right.
Tip:
To move the window back again, either hit the same keystroke a few more times (it cycles left, right, original spot, over and over), or use the
 key with the opposite arrow key.
At this point, your window is now hugging the side of your monitor, extending only halfway into it (Figure 2-3, top). But that’s not the end of the magic show.
Adjust the width of the half-window, if you like.
That’s right: Your Windows Snap experience doesn’t have to result in a 50/50 split of the screen. It can be 60/40 or whatever you like, within reason. Just grab the inward edge of the window and drag it as wide or narrow as you like.
Click the miniature of the window you want to fill the other half of the screen.
Thanks to a feature called Snap Assist, you may notice that the other open windows have shrunk down to little index cards, huddling in the empty half of the screen. They’re saying: “Which of us will you pick to fill the empty half?” Click the one you want, and voilà: two windows, perfectly splitting the available screen area (Figure 2-3, bottom).
To end the Snap session, drag a window away from the edge, or press ![]() or
or ![]() .
.
Figure 2-3. Parking two windows side by side is a convenient preparation for copying information between them or comparing their contents—and it’s super-easy.
Suppose you want to split the screen between your Twitter app and your web browser. When you drag a window to the edge of the screen, all other open windows offer themselves as candidates for the other half (top). Click one to make it fill the remaining space (bottom).
Note:
If you’re using two monitors, the ![]() or
or ![]() keystrokes instead make your active window jump to the other monitor. See “Multiple Monitors”.
keystrokes instead make your active window jump to the other monitor. See “Multiple Monitors”.
Split the screen into three or four windows
If you have a big monitor, you might actually use this Windows 10 feature. It lets you cram four windows into quadrants of your screen, neatly filling every available pixel. You feel like you’re some kind of crazy day trader, or maybe a security guard keeping an eye on all the cameras.
Or, if you prefer, you can split the screen among three windows (25 percent, 25 percent, 50 percent).
The steps are similar to the two-pane version. Start with some open windows. Then:
Move the first window into a corner of the screen.
Mouse, trackpad, finger: Using the window’s title bar as a handle, drag the window to the corner of the screen. It’s a little tricky; you have to move the cursor, or your finger, directly into the exact corner. If you don’t see the ghost outline of the proposed new window shape, drag away and try again.
Keyboard: The keyboard shortcut is much faster and more surefire. While holding down the
key, hit  and then
  (for the upper-right corner). Or
  and
and  (lower-left corner). You get the idea. Don’t hit the arrows simultaneously, but one after another.
Tip:
Tweaky but true: Always hit the horizontal arrow first. If you press
and then , you’ll lose your window—because means “minimize this window”!At this point, you have one window filling one quadrant of the screen.
Click the second window; move it into its corner.
Use the same techniques (drag or keyboard).
Move the remaining one or two windows into their corners.
It doesn’t really matter which order you fill the corners of your screen, except in one instance: If you want only three windows to split the screen; see Figure 2-4.
To unsnap, use the opposite keyboard shortcuts. Or drag the window’s top edge with your mouse, trackpad, or finger.
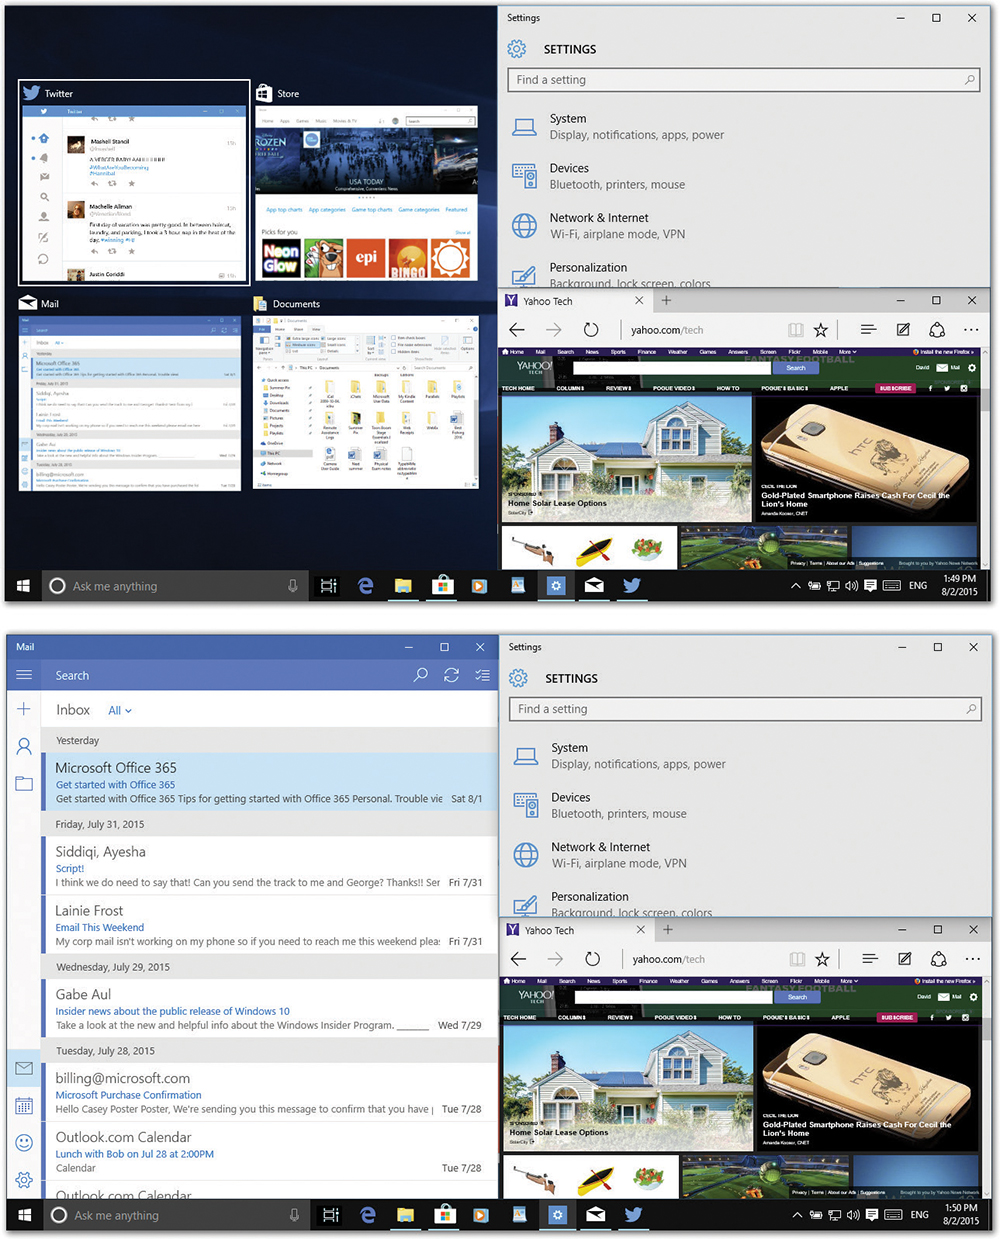
Figure 2-4. Top: If you position the first two windows one above the other, then Snap Assist kicks in. It shows you miniatures of your other windows.
Bottom: If you click one of those miniatures, you get this effect: the screen split among three windows.
The Full-Height Window Trick
This trick has never gotten much love from Microsoft’s marketing team, probably because it’s a little hard to describe. But it can be very useful.
It’s not the same as the Snap thing described previously; this one doesn’t affect the width of the window. It does, however, make the window exactly as tall as your screen, sort of like half-maximizing it.
Grab the bottom edge of your window and drag it down, to the bottom edge of your screen. The window snaps vertically to the top and bottom of your screen but maintains its width and horizontal position.
Tip:
There’s a keyboard shortcut for this feature: Shift+![]() to create the full-height effect.
to create the full-height effect.
To restore the window to its original dimensions, drag its top or bottom edge away from the edge of your screen.
Note:
These window-morphing tricks make a good complement to the traditional “Cascade windows,” “Show windows stacked,” and “Show windows side by side” commands that appear when you right-click an empty spot on the taskbar.
The Ribbon
Windows offers all kinds of crazy ways to shape, sort, group, slice, and dice the contents of a File Explorer window. The controls are hiding in the Ribbon, which is a glorified horizontal toolbar at the top of the window.
Word, PowerPoint, Excel, and other Microsoft programs have Ribbons of their own, but here’s an introduction to the one in File Explorer.
This Ribbon offers several tabs full of buttons. They can differ from window to window; for example, in a window full of pictures, you get buttons that are especially useful for managing picture files (Figure 2-5).
You can collapse the Ribbon to get it out of your way; it is, after all, pretty tall. You do that by clicking the ![]() button at the window’s upper-right corner, or by pressing Ctrl+F1. (Later, you can bring it back by clicking the
button at the window’s upper-right corner, or by pressing Ctrl+F1. (Later, you can bring it back by clicking the ![]() button, or by pressing Ctrl+F1 again. But that might not be necessary; even when the Ribbon is collapsed, its tab names—File, Home, Share, View, and so on—are still visible for quick clicking.)
button, or by pressing Ctrl+F1 again. But that might not be necessary; even when the Ribbon is collapsed, its tab names—File, Home, Share, View, and so on—are still visible for quick clicking.)
Tip:
The Ribbon also goes away in Full Screen mode, in which your File Explorer window fills the entire screen. (Press F11 to start or stop Full Screen mode.)
You can also get rid of it permanently, using the free Ribbon Disabler program. You can download that from this book’s “Missing CD” page at www.missingmanuals.com.
But before you go whole-hog into a Ribbon-cutting ceremony, consider what the Ribbon has to offer.
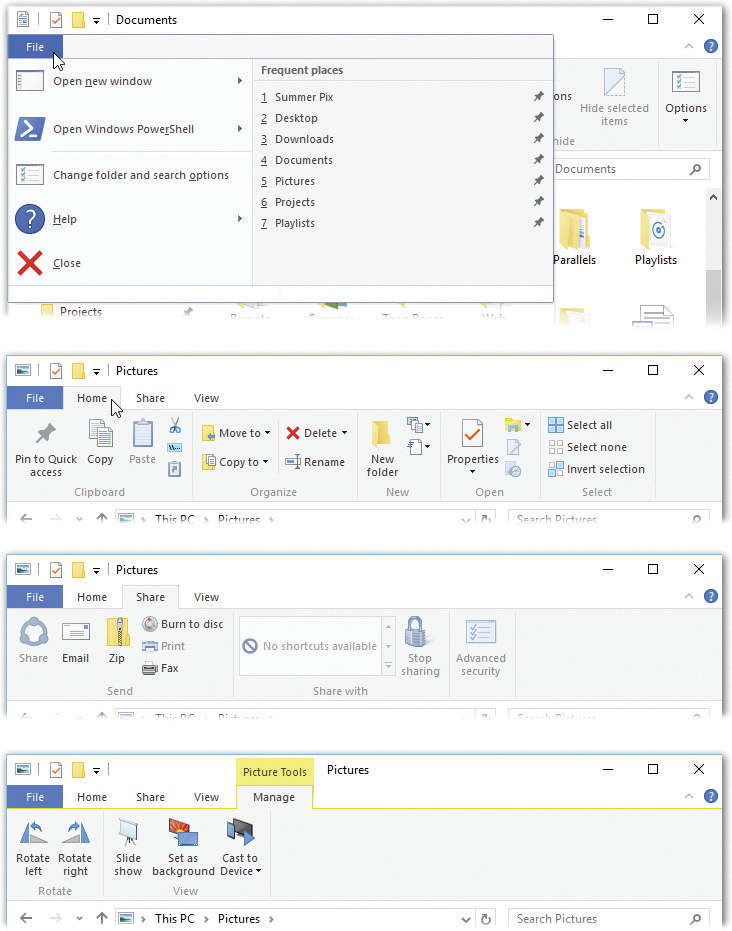
Figure 2-5. The Ribbon, available in every File Explorer window, is teeming with tabs and options.
From top: The File menu; the Home tab of the Ribbon; the Share tab; and one of the peculiar double-decker tabs that show up when you’re looking at a Library, like the Pictures folder.
File Tab
Ha, fooled you! The word File here looks like all the other tabs, but it’s actually a weird kind of menu (Figure 2-5, top). The idea, as always, is to cram every possible command you might want into one central place, so you don’t have to hunt.
Note:
Many of these commands have submenus (a ![]() pointing to the right, containing more commands). But unlike normal submenus, you don’t have to choose one of the subcommands. For example, the “Open new window” command has a submenu, but you can click or tap the “Open new window” command itself. If you do want one of the submenu choices, hit the
pointing to the right, containing more commands). But unlike normal submenus, you don’t have to choose one of the subcommands. For example, the “Open new window” command has a submenu, but you can click or tap the “Open new window” command itself. If you do want one of the submenu choices, hit the ![]() symbol to see them.
symbol to see them.
Here’s a rundown:
Open new window. Creates a duplicate of the window you’re browsing. (The submenu offers another “Open new window” command, plus “Open new window in new process.” A process is a computer’s train of thought. Hard-core PC geeks sometimes like to open a new window, or a second copy of the same one, in a new computer process in case the first one crashes. Not something you’ll do every day.)
Open Windows PowerShell. PowerShell is a command console and scripting language. If you’re a programmer, PowerShell lets you write your own simple programs, called cmdlets (“commandlets”) that can perform all kinds of automated drudgery for you: Copy or move folders, manipulate files, open or quit programs, and so on.
You harness all this power by typing up scripts in PowerShell’s command line interface (which means no mouse, no menus, no windows—all text, like in the DOS days). In short, PowerShell is not for the layperson. If you’re an ambitious layperson, however, a Google search for PowerShell tutorial unveils all kinds of websites that teach you, step by step, how to harness this very advanced tool.
Note:
Until the April 2018 Update came along, this menu also listed Command Prompt. If you prefer that older scripting environment to PowerShell, you can bring it back to this menu. Open ![]() →
→![]() →Personalization→Taskbar, and turn off “Replace Command Prompt with Windows PowerShell in the menu when I right-click the start button or press Windows key+X.”
→Personalization→Taskbar, and turn off “Replace Command Prompt with Windows PowerShell in the menu when I right-click the start button or press Windows key+X.”
Options. Opens the time-honored Folder Options dialog box, described in “The “Folder Options” Options”.
Help. The Help command in the submenu opens a Bing search. The About Windows command just opens a dialog box that identifies which version of Windows you have.
Close. Closes the File Explorer window.
Frequent places. Here, for your convenience, is a listing of important folders in your account (Desktop, Downloads, Documents, Pictures, Music, and so on), plus folders you’ve accessed recently. The idea is to save you some burrowing.
Home Tab
This tab of the Ribbon is, more or less, an exploded view of the shortcut menu that would appear if you right-clicked a desktop icon. But Microsoft research shows that a huge number of Windows fans don’t even know about the shortcut menus—so by putting these commands in the Ribbon, the company hopes to make these useful commands more “discoverable.”
Pin to Quick access. The “Quick access” area lists folders and files you’ve used recently, so it’s easier to get back to them later. By using this command, you can force icons to appear in this folder. See “Quick access list”.
Copy, Paste, Cut. These commands let you copy, cut, and paste icons from one window to another.
Copy path. This command copies the icon’s navigational path to the Clipboard, ready for pasting somewhere. (See “Copying with Copy and Paste”.)
Paste Shortcut. If you’ve copied an icon to the Clipboard, this command pastes a shortcut icon of it—another handy way to make a shortcut (“Shortcut Icons”).
Move to, Copy to. These handy buttons/menus make it quick and easy to move or copy selected icons to another place on your computer. The pop-up menu lists frequently and recently opened folders; you can also hit “Choose location” to specify a folder that’s not listed here. Either way, the beauty is that you can move or copy icons without having to open and position the destination window.
Delete. The pop-up menu offers two commands: “Recycle” (moves the selected icon to the Recycle Bin) and “Permanently delete” (deletes the file forever without its usual stop in the Recycle Bin). The third item, “Show recycle confirmation,” isn’t a command—it’s an on/off switch for the “Are you sure?” message that usually appears when you put something into the Recycle Bin.
Rename. Opens the selected icon’s name-editing box.
New Folder. Makes a new, empty folder in the current window, ready for you to name and fill up with icons.
New item. Here’s a catch-all drop-down menu that lists new things you might want to create in the open window: a new folder, a shortcut (“Shortcut Icons”), a contact (that is, a new person page in the People app), a Microsoft Word document, a Journal document, a text document, a compressed (zipped) folder, and so on. You may see different items here, since different programs can modify this menu to make your life more convenient.
Easy access. Here’s an even more miscellaneous drop-down menu of useful commands; all of them apply to icons you’ve selected in the window. “Include in library” adds the selected icon to one of your libraries (“Libraries”). To understand “Map as drive,” read “Mapping Shares to Drive Letters”.
The remaining commands—“Always available offline,” “Sync,” and “Work offline,” pertain to the offline files feature described in “Offline Files”.
Properties. This button/menu offers two options: “Properties” opens the selected icon’s Properties dialog box, where you can read a wealth of detail about its size, type, and so on. “Remove properties” strips all that stuff out of a file, usually because you’re about to send it to somebody and don’t want them to know about its revision history, modification dates, and so on.
Tip:
You can just click the icon to open the Properties dialog box. That is, you don’t actually have to choose from the submenu.
Open. Do you really need a button that opens the selected icon? Yes, if it’s a type of file that more than one program can open. For example, suppose you have a picture file. Do you want to open it in Photoshop or in the Photos app? This pop-up menu changes to reflect the programs that are capable of opening the selected icon.
Edit opens the highlighted icon in the first program Windows finds that can edit that file type.
History. This button opens a window that tracks the file’s editing history. It’s an essential part of the File History feature described in “File History”; it lets you rewind a certain document to an earlier version.
Select all, Select none. As you’d guess, these commands highlight all the icons in the window, or none of them.
Invert selection. This command swaps what you’ve selected. In other words, if you’ve highlighted files A and B (but not C and D), then this command highlights files C and D and deselects A and B.
View Tab
This tab controls the look, arrangement, and layout of the icons in the window: list view, icon view, sorted alphabetically, sorted chronologically, and so on. “View Tab” has a complete rundown of these options.
Library Tools/Manage Tab
In a few places, you get a bonus tab—with a weird double-stacked title. These tabs appear only when you’ve opened the window of a library—a special class of folders that can display the contents of other folders, wherever they may actually sit on your machine, without having to move them. You can read more about libraries in “Libraries”.
Music Tools/Play Tab
In the navigation list at the left side of a File Explorer window, folders like Music and Pictures await your inspection. Each offers a special Ribbon tab of its own. For example, when you’ve selected a music file in the Music library (either the one Windows gives you or one you’ve made yourself), the window bears a new double-decker tab called Music Tools/Play. These are your options:
Play. Opens your music-playback program and begins playing the highlighted music. (If you’ve never selected a favorite playback program, Windows offers you a list of music programs and invites you to choose one.)
Play all. Opens your playback app and begins playing everything in the window.
Add to playlist. Adds the highlighted music file to a new, untitled playlist in Windows Media Player. The idea is that you can root around here, in a File Explorer window, adding files to a playlist without having to open Media Player first.
Picture Tools/Manage Tab
Opening the Pictures library folder offers a special double-decker tab, too, stocked with commands for controlling pictures. They include these:
Rotate left, Rotate right. Turns the selected photos 90 degrees. Handy if they’re coming up turned sideways because of the way you held the camera.
Slide show. Starts an immediate full-screen slideshow. Click the mouse or tap to go to the next picture; press the arrow keys to go faster forward or backward; press the Esc key to stop the show.
Set as background. Instantly applies the selected photo to your desktop as its new wallpaper!
Cast to Device. If you have an Xbox, a Miracast adapter, or another playback gadget attached to your TV, then you can send a photo or slideshow from your Windows machine to the big screen with this one click.
Tabucopia
Incredibly, that’s not all the tabs. You’ll see other tabs appear when you open certain window types. There’s a Ribbon tab just for the Recycle Bin. There’s a Disk Tools tab (when you open a disk window), a Shortcut Tools tab (for a shortcut), an Application Tools tab (for a program), and so on. Part of the fun is encountering new tabs you’ve never seen before.
The File Explorer Address Bar
When you’re working at the desktop—that is, opening File Explorer folder windows—you’ll find a few additional controls dotting the edges.
In a web browser, the address bar is where you type the addresses of the websites you want to visit. In a File Explorer window, the address bar is more of a “bread-crumbs bar” (that’s a shout-out to Hansel and Gretel fans). That is, it now shows the path you’ve taken—folders you burrowed through—to arrive where you are now (Figure 2-6).
There are three especially cool things about this address bar:
It’s much easier to read. Those
 little brackets are clearer separators of folder names than the olderslash
otation. And instead of drive letters like C:, you see the drive names.
little brackets are clearer separators of folder names than the olderslash
otation. And instead of drive letters like C:, you see the drive names.
Tip:
If the succession of nested folders’ names is too long to fit the window, then a microscopic ![]() icon appears at the left end of the address. Click it to reveal a drop-down menu showing, from last to first, the other folders you’ve had to burrow through to get here.
icon appears at the left end of the address. Click it to reveal a drop-down menu showing, from last to first, the other folders you’ve had to burrow through to get here.
(Below the divider line, you see, for your convenience, the names of all the folders on your desktop.)

Figure 2-6. Top: The notation in the address bar, This PC Documents Summer Pix, indicates that you opened the Documents folder and then opened the Summer Pix folder inside that.
Bottom: If you press Alt+D, then the address bar restores the slash notation of Windows versions gone by so you can type in a different address.
It’s clickable. You can click any bread crumb to open the corresponding folder. For example, if you’re viewing the Casey
Pictures Halloween folder, then you can click the word Pictures to backtrack to the Pictures folder.You can still edit it. The address bar of old was still a powerful tool, because you could type in a folder address directly (using the slash notation).
Actually, you still can. You can “open” the address bar for editing in any of four different ways: (1) Press Alt+D. (2) Click the tiny icon to the left of the address. (3) Click any blank spot. (4) Right-click (or hold your finger down) anywhere in the address; from the shortcut menu, choose Edit Address.
In each case, the address bar changes to reveal the old-style slash notation, ready for editing (Figure 2-6, bottom).
Components of the Address Bar
On top of all that, the address bar houses a few additional doodads that make it easy for you to jump around on your hard drive (Figure 2-7):
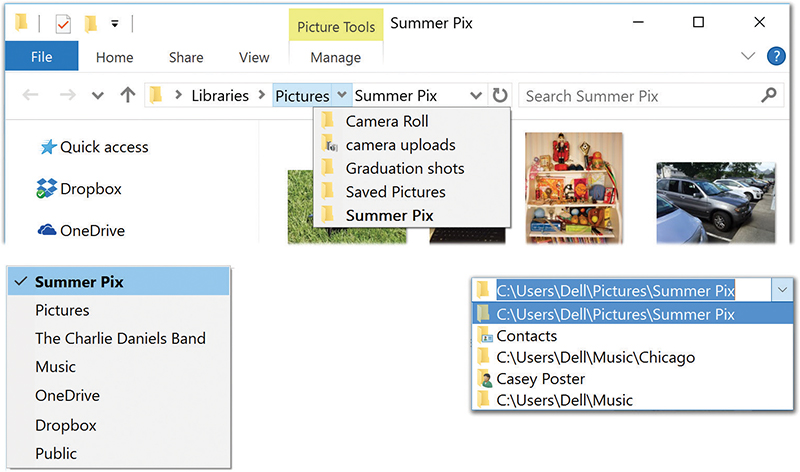
Figure 2-7. The address bar is crawling with useful controls and clickable gizmos. It may take you awhile to appreciate the difference between the little  to the left of the address bar and the to its right, though. The left-side one shows a list of folders you’ve had open recently; the right-side one shows addresses you’ve explicitly typed (and not passed through by clicking).
Back (
 ), Forward (
 ). Just as in a web browser, the Back button opens whatever window you opened just before this one. Once you’ve used the Back button, you can then use the Forward button to return to the window where you started. Keyboard shortcuts: Alt+, Alt+.
Recent pages list. Click the
to the left of the address bar to see a list of folders you’ve had open recently; it’s like a multilevel Back button.Recent folders list. Click the
at the right end of the address bar to see a drop-down menu of addresses you’ve recently typed.Up (
). This delightful button, right next to the address bar, means “Open the parent folder of this one.” It’s a novice-friendly incarnation of the trusty Alt+ keystroke.For example, if you’ve drilled down into the USA
Texas Houston folder, you could hit this button (or Alt+) to pop “upward” to the Texas folder, again for the USA folder, and so on. If you hit enough times, you wind up at your desktop.Contents list. This one takes some explaining, but for efficiency nuts, it’s a gift from the gods.
It turns out that the little
next to each folder name is actually a drop-down menu. Click it to see what’s in the folder name to its left.How is this useful? Suppose you’re viewing the contents of the USA
Florida Miami folder, but you decide that the file you’re looking for is actually in the USA California folder. Do you have to click the Back button, retracing your steps to the USA folder, only to then walk back down a different branch of the folder tree? No, you don’t. You just click the that’s next to the USA folder’s name and choose California from the list.Refresh (
 ). If you suspect that the window contents aren’t up to date (for example, that maybe somebody has just dropped something new into it from across the network), then click this button, or press F5, to make Windows update the display.
Search box. Type a search phrase into this box to find what you’re looking for within this window.
What to Type into the Address Bar
When you click the tiny folder icon at the left end of the address bar (or press Alt+D), the bracket ![]() notation changes to the slash
otation, meaning that you can edit the address. At this point, the address bar is like the little opening in the glass divider that lets you speak to your New York cab driver; you tell it where you want to go. Here’s what you can type there (press Enter afterward):
notation changes to the slash
otation, meaning that you can edit the address. At this point, the address bar is like the little opening in the glass divider that lets you speak to your New York cab driver; you tell it where you want to go. Here’s what you can type there (press Enter afterward):
A web address. You can leave off the http:// portion. Just type the body of the web address, such as www.sony.com, into this strip. When you press Enter (or click the
button to the right of the address box, called the Go button), your web browser opens to the web page you specified.
Tip:
If you press Ctrl+Enter instead of just Enter, you can surround whatever you’ve just typed into the address bar with http://www. and .com. See Chapter 10 for even more address shortcuts along these lines.
A search phrase. If you type some text into this strip that isn’t obviously a web address, then Windows assumes you’re telling it, “Go online and search for this phrase.” From here, it works exactly as though you’d typed into the address/search bar of Windows Edge.
A folder name. You can also type one of several important folder names into this strip, such as This PC, Documents, Music, and so on. When you press Enter, that particular folder window opens.
Tip:
This window has AutoComplete. That is, if you type pi and then press Tab, the address bar completes the word Pictures for you. (If it guesses wrong, press Tab again.)
A program or path name. In this regard, the address bar works just like the Run command (“Run”).
In each case, as soon as you begin to type, a pop-up list of recently visited websites, files, or folders appears below the address bar. Windows is trying to save you some typing. If you see what you’re looking for, click it with the mouse, or press the ![]() key to highlight the one you want, and then press Enter.
key to highlight the one you want, and then press Enter.
Optional Window Panes
Most File Explorer windows have some basic informational stuff across the top: the address bar and the Ribbon, at the very least.
But that’s just the beginning. As shown in Figure 2-8, you can add a new panel to the right side of any File Explorer window. It can take one of two forms: a Preview (of the selected icon) or a panel of Details. Turning one of these panels on may make your window feel claustrophobic, but at least you’ll know absolutely everything there is to know about your files and folders.
The on/off switch for this panel is on the View tab of the Ribbon.
Tip:
You can adjust the size of any pane by dragging the dividing line that separates it from the main window. (You know you’ve got the right spot when your cursor turns into a double-headed arrow.)
Preview Pane
The Preview pane appears either when you click the Preview pane button (shown in Figure 2-8) or when you press Alt+P.
It can be handy when you’re examining common file types like pictures, text files, RTF files, and Office documents. As you click each icon, you see a magnified thumbnail version of what’s actually in that document. (Alas, the Preview pane can no longer play back music and movie files, right in place.)
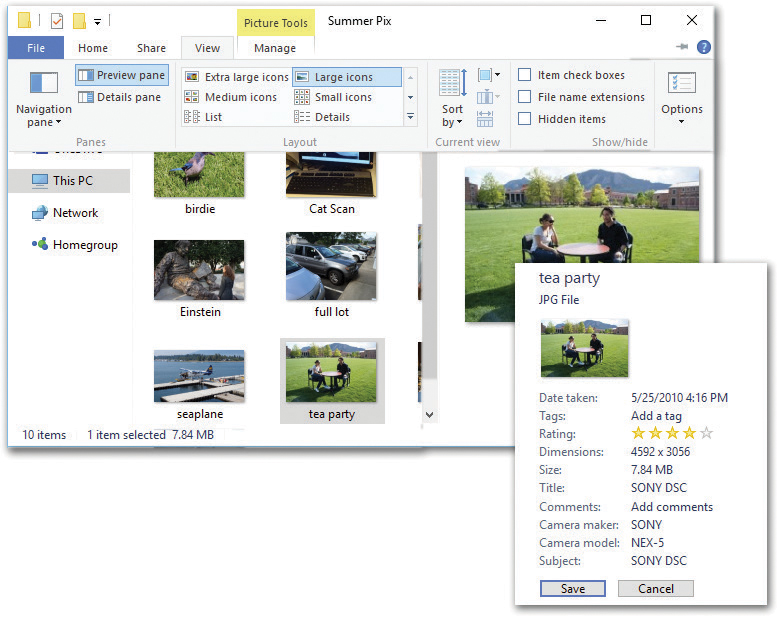
Figure 2-8. Use the View tab of the Ribbon to summon or dismiss the Preview or Details pane at the right side of the window. (You can have only one or the other visible—not both, as you could in Windows 7.)
Choose the name of a pane once to make it appear, a second time to hide it.
Inset: The taller you make the Details pane, the more information you reveal about the selected item.
Now, the Preview pane isn’t omniscient; right out of the box, Windows can’t display the contents of oddball document types like, say, sheet-music documents or 3D modeling files. But as you install new programs, the Preview pane can get smarter. Install Office, for example, and it can display Office files’ contents; install Adobe Acrobat, and it can show you PDF files. Whether or not the Preview pane recognizes a certain document type depends on the effort expended by the programmers who wrote its program (that is, whether they wrote preview handlers for their document types).
Details Pane
To open this panel (Figure 2-8, inset), click “Details pane” on the Ribbon, or press Shift+Alt+P. You get all kinds of information about whatever icon you’ve clicked in the main part of the window: its size, date, type, and so on. Some examples:
For a music file, the Details pane reveals the song’s duration, band and album names, genre, the star rating you’ve provided, and so on.
For a disk icon, you get statistics about its formatting scheme, capacity, and how much of it is full.
For a Microsoft Office document, you see when it was created and modified, how many pages it has, who wrote it, and so on.
If nothing is selected, you get information about the open window itself: namely, how many items are in it.
If you select several icons at once, this pane shows you the sum of their file sizes—a great feature when you’re burning a CD, for example, and don’t want to exceed the 650 MB limit. You also see the range of dates when the icons were created and modified.
What’s especially intriguing is that you can edit many of these details, just by clicking and typing.
Navigation Pane
The navigation pane is the helpful folder map at the left side of a File Explorer window. It’s come a long way, baby, since the folder hierarchy of Windows XP, and even since the navigation pane of Windows Vista. Today it’s something like a master map of your computer, with a special focus on the places and things you might want to visit most often.
Quick access list
At the top of the navigation pane, there’s a collapsible list called “Quick access.”
There used to be something similar called Favorites in earlier Windows versions. But that was (a) confusing, since bookmarks in Microsoft’s web browser are also called Favorites, and (b) not as full-featured as “Quick access.” (Speaking of confusing, the “Quick access” section of a window has nothing to do with the Quick Access toolbar.)
This new list is intended to be one-stop shopping for important folders and disks, in two categories:
Folders and disks that you “pin” here.
Folders and disks you use frequently. Windows chooses them automatically.
“Quick access” displays links to these folders, wherever they happen to be on your machine. You’re never actually moving them.
This list is a big deal. The “Quick access” window, in fact, greets you every time you open a File Explorer window. That’s how important Microsoft considers this list.
Tip:
File Explorer doesn’t have to fill every window with “Quick access.” It can, if you prefer, show you the primary folders of your PC, as it did in the old days. To make that happen, start in a File Explorer window. On the Ribbon’s View tab, click Options. At the top of the resulting Folder Options window, change the “Open File Explorer to” drop-down menu to “This PC,” and click OK.
Taking the time to install your favorite folders here can save you a lot of repetitive folder-burrowing. One click on an item’s name opens the corresponding window. For example, click the Pictures icon to view the contents of your Pictures folder in the main part of the window.
The beauty of this parking lot for containers is that it’s so easy to set up with your favorite places. For example:
Install a new folder, disk, library, or saved search. Drag its icon off of your desktop (or out of a window) into any spot in the “Quick access” list (Figure 2-9, top).
Or right-click the icon of any folder or disk (or hold your finger down on it); from the shortcut menu, choose “Pin to Quick access.”
Or, if the folder or disk window is already open, then right-click the words “Quick access” (at the top of the list); from the shortcut menu, choose “Pin current folder to Quick access.”
Or, if you’ve highlighted a disk or folder icon, click “Pin to Quick access” on the Ribbon’s Home tab (Figure 2-9, bottom).

Figure 2-9. Top: The quickest way to install a folder into the “Quick access” list is just to drag it there, as shown here.
Bottom: But there’s another way, too, that’s not so invisible. On the Home tab of the Ribbon, the “Pin to Quick access” button adds all the selected icons to the list in one fell swoop.Remove an icon from “Quick access.” Right-click its name in the list (or hold your finger down) to open the shortcut menu.
If you put this thing into the menu, choose “Unpin from Quick access.” If Windows put it there (because you use it frequently), choose “Remove from Quick access.” That frequently used item disappears, and won’t reappear, even if you use it all the time.
In either case, you haven’t actually removed anything from your PC; you’ve just unhitched its alias from the navigation pane.
Rearrange the icons by dragging them up or down in the list. Release the mouse when the black horizontal line lands in the desired new location.
Note:
Windows can no longer sort this list alphabetically.
Adjust the width of the pane by dragging the vertical divider bar right or left.
Tip:
If you drag carefully, you can position the divider bar just to the right of the disk and folder icons, thereby hiding their names almost completely. Some people find it a tidier look; you can always identify the folder names by pointing to them without clicking.
Make “Quick access” stop listing the folders and files you use often. In a File Explorer window, click the Ribbon’s View tab. Click Options to open the Folder Options window. Turn off “Show recently used files in Quick access” or “Show frequently used folders in Quick access” to make it stop tracking your file and folder use, respectively. Click OK.
(You’re still free to pin stuff there yourself, if you like; it’s just that Windows will no longer add things it sees you using often.)
Tip:
If you really like the “Quick access” concept, you can add its name to the Start menu’s right side. That’ll give you a quick way to open it whenever the Start menu is open.
Right-click (or hold your finger down on) the actual words “Quick access” at the top of the “Quick access” list. From the shortcut menu, choose Pin to Start.
OneDrive
Here are the contents of your Microsoft OneDrive—your free, 5-gigabyte “hard drive in the sky” (actually, on the Internet). “OneDrive” offers the details.
This PC
The next heading is This PC. (Yes, Microsoft has finally retired the term “My Computer.”) When you expand this heading, you see a list of all your drives (including the main C: drive), each of which is also expandable (Figure 2-10). In essence, this view can show you every folder on the machine at once. It lets you burrow very deeply into your hard drive’s nest of folders without losing your bearings.
Network
The Network heading shows your entire network—Macs, PCs running older Windows versions, Linux boxes, whatever.
Flippy arrows
The navigation list displays only disks and folders, never individual files. To see those, look at the main window, which displays the contents (folders and files) of whatever disk or folder you click.
To expand a folder or disk that appears in the nav pane, double-click its name, or click the ![]() next to its name. You’ve just turned the nav list into an outline; the contents of the folder appear in an indented list, as shown in Figure 2-10. Double-click the folder’s name again to collapse the folder listing.
next to its name. You’ve just turned the nav list into an outline; the contents of the folder appear in an indented list, as shown in Figure 2-10. Double-click the folder’s name again to collapse the folder listing.
Tip:
Windows can, if you like, expand the folder list automatically as you navigate your folders. Open the Music folder with your mouse, for example, and the Music folder’s flippy ![]() is automatically opened, giving you a visual representation of where you are. Sound useful? Turn it on like this: On the Ribbon’s View tab, click Options. On the View tab of the resulting Folder Options dialog box, turn on “Expand to open folder.” Click OK.
is automatically opened, giving you a visual representation of where you are. Sound useful? Turn it on like this: On the Ribbon’s View tab, click Options. On the View tab of the resulting Folder Options dialog box, turn on “Expand to open folder.” Click OK.
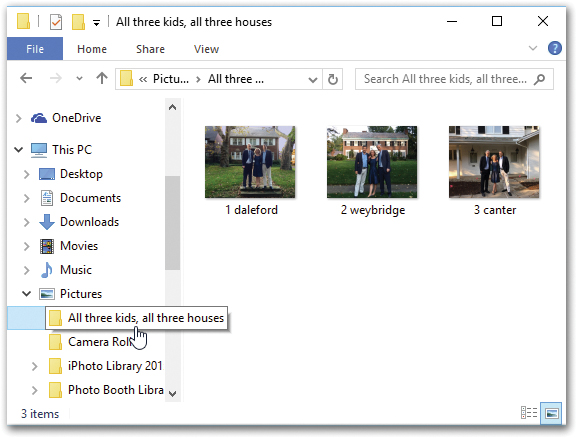
Figure 2-10. When you click a disk or folder in the navigation pane—including the This PC hierarchy—the main window displays its contents, including files and folders. Double-click to expand a disk or folder, opening a new, indented list of what’s inside; double-click again to collapse the folder list. (Clicking the flippy accomplishes the same thing.)
At deeper levels of indentation, you may not be able to read an icon’s full name. Point to it without clicking to see an identifying tooltip, as shown here.
By selectively expanding folders like this, you can, in effect, peer inside two or more folders simultaneously, all within the single navigation list. You can move files around by dragging them onto the tiny folder icons, too.
Tip:
Ordinarily, the nav pane shows only folders that Microsoft thinks you’d be interested in—folders that contain your stuff, for example. But, if you like, it can display more Windowsy folders like the Control Panel and Recycle Bin, too. On the Ribbon’s View tab, click Options; the Folder Options dialog box appears. On the View tab, turn on “Show all folders.” Click OK.
Libraries
Libraries, which debuted in Windows 7, are like folders, with one difference: They can display the contents of other folders from all over your PC—and even from other PCs on your network. In other words, a library doesn’t really contain anything at all. It simply monitors other folders and provides a single “place” to work with their contents.
Note:
If you think that sounds confusing, you’re not alone. So many people were befuddled by libraries that Microsoft hid this feature!
If you decide to try libraries out, you can bring them back easily enough. On the View tab of the Ribbon, open the “Navigation pane” drop-down menu and choose “Show libraries.” Now they’re back.
Windows starts you out with four libraries: Documents, Music, Pictures, and Videos. (You can make libraries of your own, too.)
Sure, XP and Vista came with folders bearing those names, but libraries are much more powerful. The Pictures library, for example, seems to contain all your photos—but in real life, they may be scattered all over your hard drive, on external drives, or on other PCs in the house.
So what’s the point? Well, consider the advantages over regular folders:
Everything is in one spot. When it comes time to put together a year-end photo album, for example, you might be very grateful to find your pictures, your spouse’s pictures from the upstairs PC, and the pictures from your kids’ laptop all in one central place, ready for choosing. Figure 2-11 shows the idea.
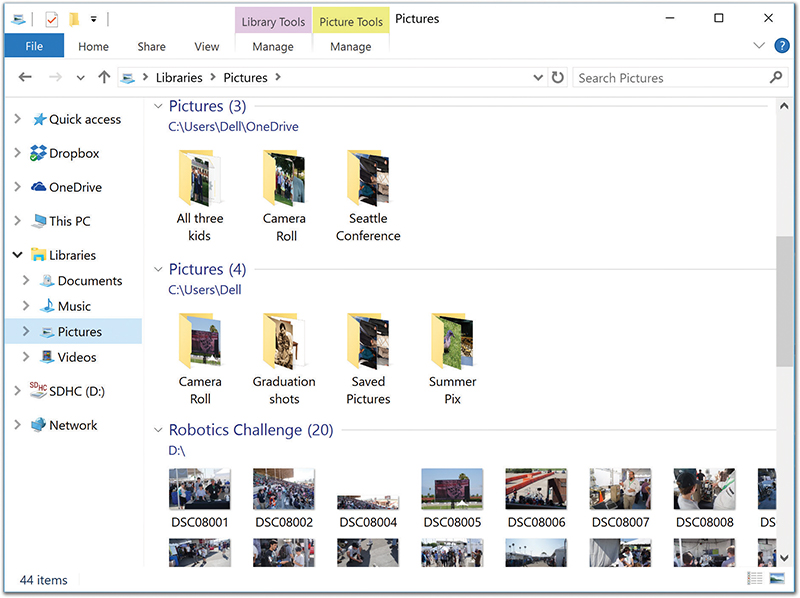
Figure 2-11. The Pictures library window seems to contain a bunch of photo folders, all in one place. But don’t be fooled; in real life, these folders are scattered all over your system.
In this library, for example, there are picture folders from your OneDrive (top row), This PC (middle), and an SD memory card that’s inserted into the computer (bottom).Happy laptop reunions. When you come home with your laptop and connect to the network, you’re instantly reunited with all those music, picture, and video files you store on other drives.
Easy backup or transfer. You can back up or transfer all the files corresponding to a certain project or time period in one fell swoop, even though the originals are in a bunch of different places or reside on different collaborators’ computers.
Manipulate en masse. You can work with the contents of a library—deleting, searching, organizing, filtering—just as you would a folder’s contents. But because you’re actually working with folders from all over your computer and even your network, you can be far more efficient.
Working with Library Contents
To use a library, click its name in your navigation pane. (Try Pictures, for example.)
A special Library Tools tab appears on the Ribbon; that’s how you know you’re in a library and not just a normal folder.
Tip:
Remember, the icons in a library aren’t really there; they’re just a mirage. They’re stunt doubles for files that actually sit in other folders on your hard drive.
Fortunately, when you’re getting a bit confused, there’s a way to jump to a file or folder’s actual location. Right-click its icon in the library; from the shortcut menu, choose “Open file location” (or “Open folder location”). You jump right to the real thing, sitting in its actual File Explorer window.
Adding a Folder to an Existing Library
A library is nothing without a bunch of folders to feed into it. You can add a folder to a library (like Pictures or Music) in any of four ways, depending on where you’re starting.
You can see the folder’s icon. If the folder is on the desktop or in a window, right-click it (or hold your finger down on it). From the shortcut menu, choose “Include in library”; the submenu lists all your existing libraries so you can choose the one you want. Figure 2-12 shows the idea.
You can see the folder’s icon (alternate). Use the right mouse button to drag the folder onto a library’s name in the navigation pane, or into the library’s open window. Release the mouse button. From the shortcut menu, choose “Include in library.”
You’ve opened the library window. If you’re already in the library, you can add a folder to it using the dialog box shown in Figure 2-12, bottom. Click Add, and then find and double-click the folder you want. You see it added to the “Library locations” list in the dialog box. Click OK.
The fine print
All these techniques also work for folders on external drives, USB flash drives, and shared folders on your network. There is, however, some important fine print:
You can’t add a folder that’s on a CD or a DVD.
You can add a folder that’s on a USB flash drive, as long as that flash drive’s icon shows up in the navigation pane when it’s inserted, under the This PC/Hard Drives heading. (A few oddball models appear under Devices With Removable Storage; they’re not allowed.) Furthermore, the folder won’t be available in the library when the flash drive isn’t inserted (duh).
You can’t add a networked folder to a library unless it’s been indexed for searching on the PC that contains it; see “The Search Index” for details on that process.
As an alternative, you can turn on the “available offline” feature for that networked folder. The good news is that the folder can now be part of your library even when the other PC on the network is turned off. The bad news is that you’ve basically copied that folder to your own PC, which eats up a lot of disk space and sort of defeats the purpose of adding a networked folder to your library.

Figure 2-12. Top: To add a regular folder to an existing library, open the library itself. Then, on the Library Tools/Manage tab of its Ribbon, click “Manage library.”
Bottom: This dialog box appears. Here you can add new folders or remove existing ones from the library’s concept of the world.
Removing a Folder from a Library
Getting rid of a folder is pretty straightforward. You can use any of these techniques:
If the library window is open: Use the “Manage library” button shown at top in Figure 2-12. Click the folder’s name and then click Remove.
If the library’s name is visible in the navigation pane: Expand the library to show the folder you want to remove. Right-click the folder’s name (or hold your finger down on it). From the shortcut menu, choose “Remove location from library.”
Remember: You’re not deleting anything important. A library only pretends to contain folders; the real ones are actually sitting in other places on your PC or network, even after the library is gone.
Creating a New Library
The starter libraries (Pictures, Music, Documents, and Videos) are awfully useful right out of the box. Truth is, they’re as far as most people probably go with the libraries feature.
But you may have good reasons to create new ones. Maybe you want to create a library for each client—and fill it with the corresponding project folders, some of which have been archived away on external drives. Maybe you want to round up folders full of fonts, clip art, and text, in readiness for submitting a graphics project to a print shop.
In any case, here are the different ways to go about it:
From the navigation pane. Right-click the word “Library” in any window’s navigation pane, or any blank spot inside a library folder. From the shortcut menu, choose New→Library.
A new, empty library appears, both in the Libraries window and in the list of libraries in the nav pane. It’s up to you to add folders to it, as described earlier.
From a folder. Right-click any folder. From the shortcut menu, choose “Include in library”→“Create new library.” Bing! A new library appears in the Libraries list, named after the folder you clicked. As a handy bonus, this library already contains its first folder: the one you clicked, of course.
Tip:
Once you’ve created a library, you can specify which canned library style it resembles most: General Items, Pictures, Music, Documents, or Videos. (Why does it matter? Because the library style determines which commands are available in the Ribbon. Pictures includes a tab that offers slideshow and rotation tools; Music offers choices like “Play” and “Add to playlist.”)
Anyway, to make this choice, open the library. In the Ribbon, on the Library Tools/Manage tab, use the “Optimize library for” pop-up menu. Click the type you want.
Tags, Metadata, and Properties
See all that information in the Details pane—Date, Size, Title, and so on (Figure 2-13)? That’s known by geeks as metadata (Greek for “data about data”).
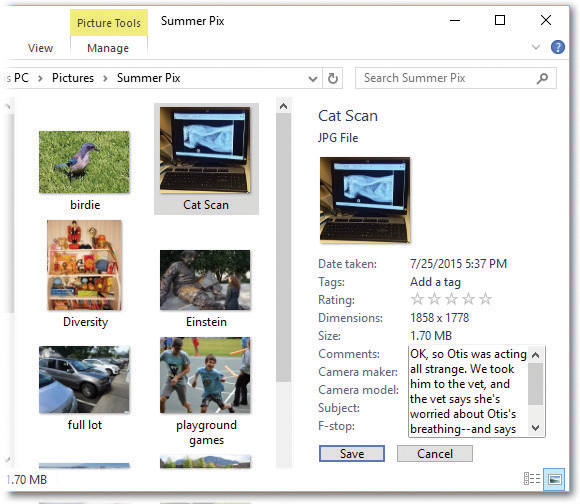
Figure 2-13. Click the information you want to change; if a text-editing box appears, you’ve hit pay dirt. Type away, and then press Enter (or click the Save button at the bottom of the dialog box). To input a list (of tags or authors, for example), type a semicolon (;) after each one.
Different kinds of files provide different sorts of details. For a document, for example, you might see Authors, Comments, Title, Categories, Status, and so on. For an MP3 music file, you get Artists, Albums, Genre, Year, and so on. For a photo, you get Date Taken, Title, Author, and so on.
Oddly (and usefully) enough, you can actually edit some of this stuff.
Some of the metadata is off-limits. For example, you can’t edit the Date Created or Date Modified info. (Sorry, defense attorneys.) But you can edit the star ratings for music or pictures. Click the third star to give a song a 3, for example. Most usefully of all, you can edit the Tags box for almost any kind of icon. A tag is just a keyword. It can be anything you want: McDuffy Proposal, Old Junk, Back Me Up. Later, you’ll be able to round up everything with a certain tag, all in a single window, even though they physically reside in different folders.
You’ll encounter tags in plenty of other places in Windows—and in this book, especially when it comes to searching for photos and music.
Note:
Weirdly, you can’t add tags or ratings to .bmp, .png, .avi, or .mpg files.
Many of the boxes here offer autocompletion, meaning that Windows proposes finishing a name or a text tidbit for you if it recognizes what you’ve started to type.

Figure 2-14. If Windows knows anything about an icon, it’s in here. Scroll, scroll, and scroll some more to find the tidbit you want to see—or to edit. As with the Details pane, many of these text morsels are editable.
Tip:
You can tag a bunch of icons at once. Just highlight them all and then change the corresponding detail in the Details pane once. This is a great trick for applying a tag or a star rating to a mass of files quickly.
Click Save when you’re finished.
Properties
The Details pane shows some of the most important details about a file, but if you really want to see the entire metadata dossier for an icon, open its Properties dialog box (Figure 2-14) using one of these tactics:
Select it. From the Home tab of the Ribbon, click Properties.
Right-click it (or hold your finger down on it). From the shortcut menu, choose Properties.
Alt-double-click it.
If the icon is already highlighted, press Alt+Enter.
In each case, the Properties dialog box appears. It’s a lot like the one in previous versions of Windows, in that it displays the file’s name, location, size, and so on. But in Windows 10, it also bears a scrolling Details tab that’s sometimes teeming with metadata details.
Window Views
Windows’ windows look just fine straight from the factory; the edges are straight, and the text is perfectly legible. Still, if you’re going to stare at this screen for half of your waking hours, you may as well investigate some of the ways these windows can be enhanced.
For starters, you can view the files and folders in a File Explorer window in either of two ways: as icons (of any size) or as a list (in several formats). Figure 2-15 shows some of your options.
Every window remembers its view settings independently. You might prefer to look over your Documents folder in List view (because it’s crammed with files and folders), but you may prefer to view the Pictures library in Icon view, where the icons look like miniatures of the actual photos.
To switch a window from one view to another, you have several options, as shown in Figure 2-15, all of which involve the View tab of the Ribbon.
Tip:
You can point to the icons in the View tab without clicking. The files in the window change as you hover, so you can preview the effect before committing to it.
So what are these various views? And when should you use which? Here you go:
Extra large icons, Large icons, Medium icons, Small icons. In an icon view, every file, folder, and disk is represented by a small picture—an icon. This humble image, a visual representation of electronic bits, is the cornerstone of the entire Windows religion. (Maybe that’s why it’s called an icon.)

Figure 2-15. Here’s a survey of window views in Windows’ desktop world.
From top: Medium icons, List view, Details view, and Content view.
List and Details views are great for windows with lots of files. Extra large icons (not shown) are a great choice if you’re 30 feet away.At larger icon sizes, the contents of your folder icons peek out just enough so you can see them. In the Music folder, for example, a singer’s folder shows the first album cover within; a folder full of PowerPoint presentations shows the first slide or two; and so on.
Small icons put the files’ names to the right of the icons; the other views put the name beneath the icon. You might want one of the large settings for things like photos and the small settings when you want to see more files without scrolling.
Tip:
If you have a touchscreen, you can use the two-finger spreading gesture to enlarge icons, or the pinching gesture to shrink them, right on the glass. If you have a mouse, you can enlarge or shrink all the icons in a window—or switch to any other view—by turning your mouse’s scroll wheel while you press the Ctrl key.
List view. This one packs, by far, the most files into the space of a window; each file has a tiny icon to its left, and the list of files wraps into as many columns as necessary to maximize the window’s available space.
Details view. This is the same as List view, except that it presents only a single column of files. It’s a table, really; additional columns reveal the size, icon type, modification date, rating, and other information.
Microsoft thinks you’ll really dig Details view. It’s so important that there’s a dedicated “Switch to Details view” icon at the lower-right corner of every window.
Furthermore, whenever you’re in Details view, you get two bonus icons on the Ribbon’s View tab: “Add columns” and “Size all columns to fit.” They’re described in the box on the previous page.
Tiles view. Your icons appear at standard size, with name and file details just to the right.
Tip:
Lots of people never even realize they have Tiles and Content view options— because these two choices are normally hidden on the Ribbon! You actually have to scroll that teeny tiny panel of view icons to see them.
Content view. This view attempts to cram as many details about each file as will fit in your window. It’s a table that shows not just a file’s icon and name, but also its metadata (Properties) and, in the case of text and Word files, even the first couple of lines of text inside it. (If you’re not seeing all the file details you think you should, then make the window bigger. Windows adds and subtracts columns of information as needed to fit.)
You’ll get to know Content view very well indeed once you start using the Search feature, which uses this view to display your results when you search in a File Explorer window.
Tip:
At the lower right of every File Explorer window, you see repeats of the two styles Microsoft thinks you’ll find the most useful: Details view and large thumbnails. (As their pop-out tooltip balloons indicate, they even have keyboard shortcuts: Ctrl+Shift+6 for Details, Ctrl+Shift+2 for large thumbnails.) By duplicating these controls here, Windows is trying to save you the effort of opening the Ribbon if it doesn’t happen to be open.
Immortalizing Your Tweaks
Once you’ve twiddled and tweaked a File Explorer window into a perfectly efficient configuration of columns and views, you needn’t go through the same exercise for each folder. Windows can immortalize your changes as the standard setting for all your windows.
On the Ribbon’s View tab, click Options. Click the View tab. Click Apply to Folders, and confirm your decision by clicking Yes.
At this point, all your disk and folder windows open up with the same view, sorting method, and so on. You’re still free to override those standard settings on a window-by-window basis, however. (And if you change your mind again and want to make all your maverick folder windows snap back to the standard settings, then repeat the process but click Reset Folders instead.)
Sorting, Grouping, and Filtering
It’s a computer—it had darned well better be able to sort your files alphabetically, chronologically, or in any other way. But there are other ways to impose order on your teeming icons. Grouping, filtering, and searching can be handy, too.
Sorting Files
Sorting the files in a window alphabetically or chronologically is nice, but it’s so 2014. You can now sort up, down, and sideways.
The trick is to click the “Sort by” drop-down icon, which is on the View tab of the Ribbon. As you can see, it lists every conceivable sorting criterion: Name, Date modified, Type, Size, and on and on. And if those 10 ways to sort aren’t enough, you can choose “Choose columns” from this menu to add even more options to it: Attachments, Copyright, Data rate, and so on.
Sorting in Details view
In Details view, you get another way to sort. See the column headings, like “Name,” “Size,” and “Type”? They aren’t just signposts; they’re also buttons. Click “Name” for alphabetical order, “Date modified” for chronological order, “Size” to view the largest files at the top, and so on (Figure 2-16).
To reverse the sorting order, click the column heading a second time. The tiny triangle turns upside-down.
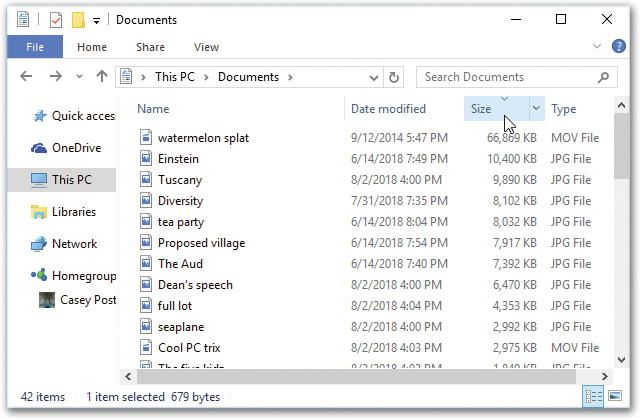
Figure 2-16. You sort a List view by clicking the column headings. Click a second time to reverse the sorting order.
The tiny triangle shows which way you’ve sorted the window: in ascending order (for example, A to Z) or descending order (Z to A).
(Hint: When the smallest portion of the triangle is at the top, the smallest files are listed first when viewed in size order.)
Grouping
Grouping means “adding headings within the window and clustering the icons beneath the headings.” The effect is shown in Figure 2-17 (“Yesterday,” “Earlier this month,” and so on), and so is the procedure. Try it out; grouping can be a great way to wrangle some order from a seething mass of icons.
Don’t forget that you can flip the sorting order of your groups. Reopen that shortcut menu and the “Group by” submenu, and specify Ascending or Descending.
Filtering
Filtering, a feature available only in Details view, means hiding. When you turn on filtering, a bunch of the icons in a window disappear, which can make filtering a sore subject for novices.
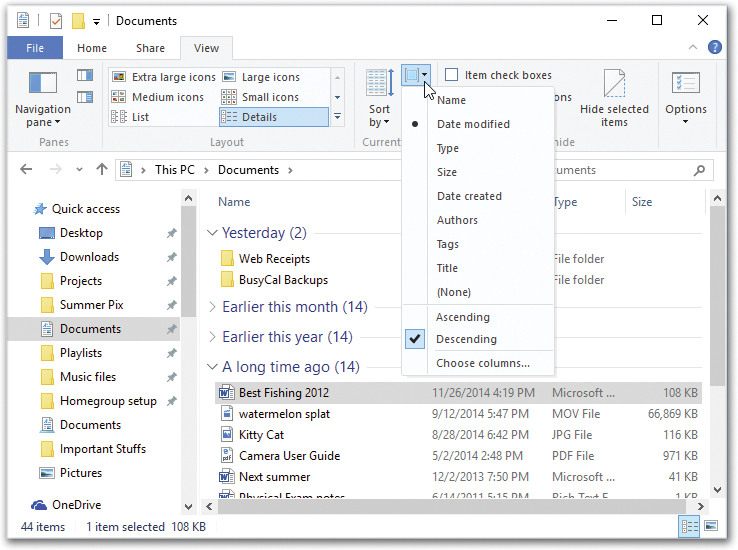
Figure 2-17. To group the icons in a window, use the “Group by” drop-down menu in the Ribbon, on the View tab. (If the window isn’t especially wide, then you might see only the icon for the menu, not the actual words “Group by.”)
You can also find the “Group by” menu by right-clicking a blank spot in the window. Use the shortcut menu that results; that way, you don’t need the Ribbon.
Tip:
In case you one day think you’ve lost a bunch of important files, look for a checkmark next to a column heading. That’s your clue that filtering is turned on and Windows is deliberately hiding something from you.
On the positive side, filtering means screening out stuff you don’t care about. When you’re looking for a document you know you worked on last week, you can tell Windows to show you only the documents edited last week.
You turn on filtering by opening the drop-down menu next to the column heading you want. For instance, if you want to see only your five-star photos in the Pictures folder, then open the Rating pop-up menu.
Sometimes you’ll see a whole long list of checkboxes in one of these pop-up menus (Figure 2-18). For example, if you want to see only the PDF and Word documents in your Documents folder—or only songs by The Beatles in your Music folder—turn on the corresponding checkmarks.
Note:
Filtering, by the way, can be turned on with sorting or grouping.
Once you’ve filtered a window in Details view, you can switch to a different view; you’ll still see (and not see) the same set of icons. The address bar reminds you that you’ve turned on filtering; it might say, for example, “Research notes ![]() LongTimeAgo
LongTimeAgo ![]() DOC file,” meaning “ancient Word files.”
DOC file,” meaning “ancient Word files.”
To stop filtering, open the heading drop-down menu again and turn off the Filter checkbox.
Searching in a File Explorer Window
There’s a search box in the upper-right corner of every File Explorer window. You can use it to search just within the open window, as described in the next chapter.

Figure 2-18. You can turn on more than one checkbox. To see only Word and PDF files in this folder, for example, turn on both checkboxes. In fact, you can turn on checkboxes from more than one heading—PDF files larger than 8,000 KB, for example.
The “Folder Options” Options
In the battle between flexibility and simplicity, Microsoft comes down on the side of flexibility almost every time. Anywhere it can provide you with more options, it does.
File Explorer windows are a case in point, as the following pages of sometimes preposterously tweaky options make clear. The good news: If File Explorer windows already work fine for you the way they are, you can ignore all of this.
But if you’d like to visit the famed Folder Options dialog box, here’s how to do it: On the View tab of the Ribbon, click the Options button. You see the dialog box shown in Figure 2-19.
Here you see an array of options that affect all the folder windows on your PC. When assessing the impact of these controls, earth-shattering isn’t the adjective that springs to mind. Still, you may find one or two of them useful.
General Tab
On the General tab, you find these intriguing options:
Open File Explorer to. When you open a new desktop window, do you want it to start out showing the contents of your “Quick access” list? Or the primary folders of your PC? Use this pop-up menu to decide.
Browse folders. When you double-click a folder, Windows can react in one of two ways. It can either open a second window, overlapping the first, making moving or copying an icon from one into the other a piece of cake. Or it can replace the original window with a new one. This only-one-window-at-a-time behavior keeps your desktop from becoming crowded with windows. If you need to return to the previous window, the Back button takes you there. Of course, you’ll have a harder time dragging icons from one window to another using this method.
Whatever you decide, you tell Windows using these buttons. Click either “Open each folder in the same window” or “Open each folder in its own window,” as you like.
Click items as follows. This option lets you single-click icons to open them instead of double-clicking—a feature that might make life easier if you have a touchscreen. See “Eliminating Double-Clicks”.
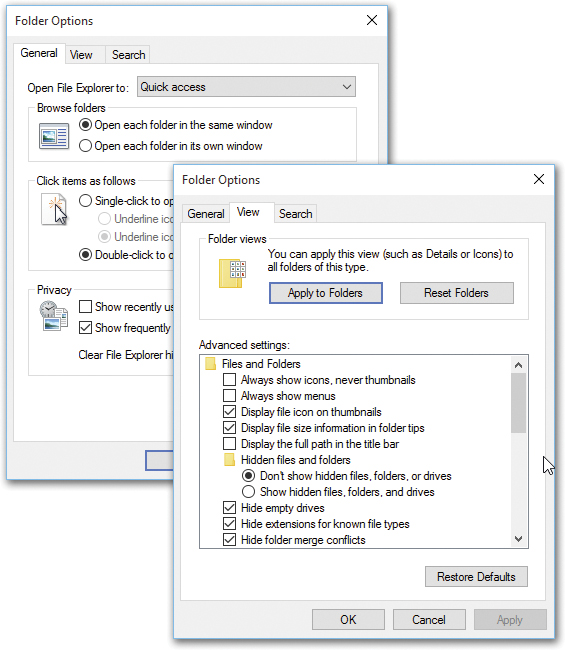
Figure 2-19. Here are the first two tabs of the Folder Options dialog box: General and View.
Some of the options in the View list are contained within tiny folder icons. A double-click collapses (hides) these folder options or shows them again. For example, you can hide the “Don’t show hidden files, folders, or drives” option by collapsing the “Hidden files and folders” folder icon.Privacy. These two checkboxes let you turn off Windows’ tendency to list folders and files you use often in the “Quick access” list; see “Quick access list”.
Clear File Explorer history. If you have a photographic memory and a mind like a supercomputer, you may remember that the
icon at the right end of the address bar shows all the addresses you’ve typed in (the Recent Folders list). This button erases that list.Restore Defaults returns all the options on this dialog box to their factory settings.
View Tab
Here are the functions of the 83,000 tiny checkboxes in the View tab:
Always show icons, never thumbnails. Windows takes great pride in displaying your document icons as documents. That is, each icon appears as a miniature of the document itself—a feature that’s especially useful in folders full of photos.
On a slowish PC, this feature can make your processor gasp for breath. If you notice that the icons are taking forever to appear, consider turning this checkbox on.
Always show menus. This checkbox forces the traditional Windows menu bar (File, Edit, View, and so on) to appear in every File Explorer window, without your having to tap the Alt key.
Display file icon on thumbnails. Ordinarily, you can identify documents (think Word, Excel, PowerPoint) because their icons display the program’s logo (a big W for Word, and so on). But in Windows’ icon views (medium and larger), you see the actual document on the icon—an image of its first page. So does that mean you can no longer tell at a glance what kind of document it is?
Don’t be silly. This option superimposes, on each thumbnail icon, a tiny “badge,” a sub-icon, that identifies what kind of file it is. (It works only on some kinds of documents, however.)
Display file size information in folder tips. A folder tip is a rectangular balloon that appears when you point to a folder—a little yellow box that tells you what’s in that folder and how big it is on the disk. (It appears only if you’ve turned on the “Show pop-up description” checkbox described later in this list.) You turn off this checkbox if you want to see only the description, but not the size. Talk about tweaky!
Display the full path in the title bar. When this option is on, Windows reveals the exact location of the current window in the title bar of the window—for example, (C:)
Users Chris Documents. See “The File Explorer Address Bar” for more on folder paths. Seeing the path can be useful when you’re not sure which disk a folder is on, for example.Hidden files and folders. Microsoft grew weary of answering tech-support calls from clueless or mischievous customers who had moved or deleted critical system files, rendering their PCs crippled or useless. The company concluded that the simplest preventive measure would be to make them invisible (the files, not the customers).
This checkbox is the result. Your personal and Windows folders, among other places, house several invisible folders and files that the average person isn’t meant to fool around with. Big Brother is watching you, but he means well.
In times of troubleshooting or customization, you, the confident power user, can make the hidden files and folders appear by selecting “Show hidden files, folders, and drives” (they show up with dimmed icons, as though to reinforce their delicate nature). But you’ll have the smoothest possible computing career if you leave these options untouched.
Note:
Actually, there’s a much quicker way to turn hidden files on and off. The Ribbon’s View tab has a “Hidden items” button dedicated just to this purpose.
Hide empty drives. For years, the Computer (This PC) window has displayed icons for your removable-disk drives (floppy, CD, DVD, memory-card slots, whatever) even if nothing was in them. Now, though, that’s changed. Because this option comes turned on, you see icons only when you insert a disk into these drives. (It now works like the Mac, if that’s any help.)
Hide extensions for known file types. Windows normally hides the filename extension on standard files and documents (.doc, .jpg, and so on), in an effort to make Windows seem less technical and intimidating. Your files wind up named “Groceries” and “Frank” instead of “Groceries.doc” and “Frank.jpg.”
There are some excellent reasons, though, why you should turn this option off. See “Filename Extensions and File Associations” for more on this topic.
Note:
There’s a dedicated on/off switch for showing filename extensions right on the Ribbon’s View tab (“File name extensions”). It’s a lot easier to reach than the Folder Options dialog box.
Hide folder merge conflicts. When you drag a file into a window that contains an identically named file, Windows warns you; it doesn’t want you to replace one file with another accidentally.
When you drag a folder into a window that contains an identically named folder, however, whether or not Windows warns you is up to you. If you turn this box on, you get no warning—just an insta-replace.
Hide protected operating system files. This option is similar to “Show hidden files, folders, and drives”—except that it refers to even more important files, system files that may not be invisible but are nonetheless so important that moving or deleting them might turn your PC into a $1,000 paperweight. Turning this off, in fact, produces a warning message that’s meant to frighten away everybody but powergeeks.
Launch folder windows in a separate process. This setting opens each folder into a different chunk of memory (RAM). In certain rare situations, this largely obsolete arrangement is more stable—but it slows down your machine slightly and unnecessarily uses memory.
Restore previous folder windows at logon. Every time you sign out of the computer, Windows forgets which windows were open. That’s a distinct bummer, especially if you tend to work out of your Documents window, which you must therefore manually reopen every time you fire up the PC.
If you turn on this useful checkbox, then Windows will automatically greet you with whichever windows were open when you last signed off.
Show drive letters. Turn off this checkbox to hide the drive letters that identify each of your disk drives in the This PC window (in the navigation pane, click This PC). In other words, “Local Disk (C:)” becomes “Local Disk”—an option that might make newcomers feel less intimidated.
Show encrypted or compressed NTFS files in color. This option won’t make much sense until you’ve read “Compressing Files and Folders”, which explains how Windows can encode and compress your files for better security and disk space use. Turning on this checkbox turns the names of affected icons green and blue, respectively, so you can spot them at a glance. On the other hand, encrypted or compressed files and folders operate quite normally, immediately converting back to human form when double-clicked; hence, knowing which ones have been affected isn’t particularly valuable. Turn off this box to make them look just like any other files and folders.
Show pop-up description for folder and desktop icons. If you point to an icon, a taskbar button, a found item in Search, or whatever (without clicking), you get a tooltip—a floating, colored label that identifies what you’re pointing to. If you find tooltips distracting, then turn off this checkbox.
Show preview handlers in preview pane. This is the on/off switch for one of Windows’ best features: seeing a preview of a selected document icon in the Preview pane. Turn it off only if your PC is grinding to a halt under the strain of all this graphics-intensive goodness.
Show status bar. This option refers to the horizontal strip you can summon at the bottom of every File Explorer window. It shows you, in tiny type, how many items are in the window. When you select some of them, it tells you how many you’ve highlighted and how much disk space they take up—a great way to anticipate whether or not they’ll fit on some flash drive or CD.
Use check boxes to select items. This option makes a checkbox appear on every icon you point to with your mouse, for ease of selection. “Checkbox Selection” explains all.
Tip:
There’s an alternative, easier way to access this option: Turn on “Item check boxes” on the Ribbon’s View tab.
Use Sharing Wizard (Recommended). Sharing files with other computers is one of the great perks of having a network. As Chapter 19 makes clear, this feature makes it much easier to understand what you’re doing. For example, it lets you specify that only certain people are allowed to access your files, and it lets you decide how much access they have. (For example, can they change the files or just see them?)
When typing into list view. When you’ve got a File Explorer window open, teeming with a list of files, what do you want to happen when you start typing?
In the olden days, that’d be an easy one: “Highlight an icon, of course!” That is, if you type piz, you’d highlight the file called “Pizza with Casey.jpg.” And indeed, that’s what the factory setting means: “Select the typed item in the view.”
But Windows also has a search box in every File Explorer window. If you turn on “Automatically type into the Search Box,” then each letter you type arrives in that box, performing a real-time, letter-by-letter search of all the icons in the window. Your savings: one mouse click.
The final four options control what appears in the navigation pane at the left side of every File Explorer window. The first, “Always show availability status,” shows whether folders in online drives such as OneDrive (“OneDrive”) are available. The other three options here are described elsewhere in this chapter: “Expand to open folder” (Chapter 4), “Show all folders” (“Libraries”), and “Show libraries” (“POWER USERS’ CLINIC Hiding and Showing Individual Libraries”).
Taskbar 2.0
For years, the taskbar—the strip of colorful icons at the bottom of your screen—has been one of the most prominent and important elements of the Windows interface (Figure 2-20). Today, you can call it Taskbar, Extreme Makeover Edition; it can do a lot of things it’s never done before.

Figure 2-20. The taskbar offers buttons for every program you’re running—and every program you’ve pinned there for easy access later.
Here’s an introduction to its functions, old and new:
The Start menu is back. As you know from Chapter 1, the Start menu is at the far left of the taskbar.
The search/Cortana box is next. Just to the right of the Start menu, the new search box (also known as “Ask me anything” or Cortana) awaits, as described in Chapter 5.
Tip:
The search box does take up a lot of horizontal space—and you don’t really need it. You can hide it and still have full access to Cortana and the search box. Jump ahead to Figure 2-22.
The Timeline (
 ) is new in the April 2018 Update; it’s like the History menu in a web browser, except that it lists every window you’ve ever opened, on every device. See “Task View and Timeline: +Tab”.
The taskbar lists your open programs and windows. The icons on the taskbar make it easy to switch from one open program to another—from your web browser to your email programs, for example—or even to specific windows within those programs.
Note:
App icons are generally hidden in Tablet mode, described in Chapter 12. If you read this chapter and wonder why you’re not seeing some of the things described here, that’s why.
The taskbar is a launcher. You read that right. The taskbar is a mini–Start menu. It’s a launcher for your favorite programs and folders, just like the Dock on the Mac or the Quick Launch toolbar in old Windows versions.
The system tray (notification area) is at the right end. These icons show you the status of your network connection, battery life, and so on, as described in “The System Tray (Notification Area)”.
The Show Desktop button hides at the far-right end. You can read more about this invisible button in “Windows Snap—Now with Four Panes!”.
So what can you do with the little buttons on the taskbar? Read on.
Tip:
You can operate the taskbar entirely from the keyboard. Press ![]() +T to highlight the first button on it, as indicated by a subtle glow. Then you can “walk” across its buttons by pressing the left/right arrow keys, or by continuing to press
+T to highlight the first button on it, as indicated by a subtle glow. Then you can “walk” across its buttons by pressing the left/right arrow keys, or by continuing to press ![]() +T (add the Shift key to “walk” in the opposite direction). Once a button is highlighted, you can tap the space bar to “click” it, press Shift+F10 to “right-click” it, or press the Menu key
+T (add the Shift key to “walk” in the opposite direction). Once a button is highlighted, you can tap the space bar to “click” it, press Shift+F10 to “right-click” it, or press the Menu key ![]() on your keyboard to open the icon’s jump list. Who needs a mouse anymore?
on your keyboard to open the icon’s jump list. Who needs a mouse anymore?
Taskbar as App Switcher
Every open window is represented by a button—an actual miniature of the window itself—that sprouts from its program’s taskbar icon. These buttons make it easy to switch among open programs and windows. Just click one to bring its associated window into the foreground, even if it’s been minimized.
Once you know what to look for, you can distinguish an open program from a closed one, a frontmost window from a background one, and so on (see Figure 2-21).
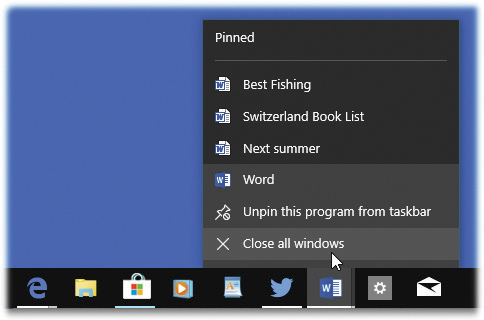
Figure 2-21. An icon without a white underline is a program you haven’t opened yet. A brightened background indicates the active (frontmost) program—Word, in this case.
Right-clicking one of these buttons lets you perform tasks on all the windows together, such as closing them all at once.
Handy Window Miniatures
If you point to a program’s button without clicking, it sprouts thumbnail images of the windows themselves. Figure 2-20 shows the effect. It’s a lot more informative than just reading the windows’ names, as in days of yore (previous Windows versions, that is). The thumbnails are especially good at helping you spot a particular web page, photo, or PDF document.
Tip:
When you point to one of these thumbnails, a tiny Close button (![]() ) appears in each thumbnail, too, which makes it easy to close a window without having to bring it forward first. (Or click the thumbnail itself with your mouse’s scroll wheel, or use your middle mouse button, if you have one.) Each thumbnail also has a hidden shortcut menu. Right-click to see your options!
) appears in each thumbnail, too, which makes it easy to close a window without having to bring it forward first. (Or click the thumbnail itself with your mouse’s scroll wheel, or use your middle mouse button, if you have one.) Each thumbnail also has a hidden shortcut menu. Right-click to see your options!
Full-Size Peeking
Those window miniatures are all fine, but the taskbar can also show you full-screen previews of your windows. It’s a feature Microsoft calls Peek.
Mouse/trackpad: Point to a taskbar button to make the window thumbnails appear. Then, still without clicking, point to one of the thumbnails.
Touchscreen: Tap an app’s taskbar icon to make the window thumbnails appear. Now touch the same taskbar icon a second time and pause; without lifting your fingertip, drag onto one of the thumbnails.
Windows displays that window at full size, right on the screen, even if it was minimized, buried, or hidden. Keep moving your cursor or finger across the thumbnails (if there are more than one); each time you land on a thumbnail, the full-size window preview changes to show what’s in it.
When you find the window you want, click or tap the thumbnail you’re already pointing to. The window pops open so you can work in it.
Button Groups
In the old days, opening a lot of windows produced a relatively useless display of truncated buttons. Not only were the buttons too narrow to read the names of the windows, but the buttons also appeared in chronological order, not in software-program order.
As you may have noticed, though, Windows now automatically consolidates open windows into a single program button. (There’s even a subtle visual sign that a program has multiple windows open: Its taskbar icon may appear to be “stacked,” or its underline may sprout a gray extension, like the second program in Figure 2-22.) All the Word documents are accessible from the Word icon, all the Excel documents sprout from the Excel icon, and so on.
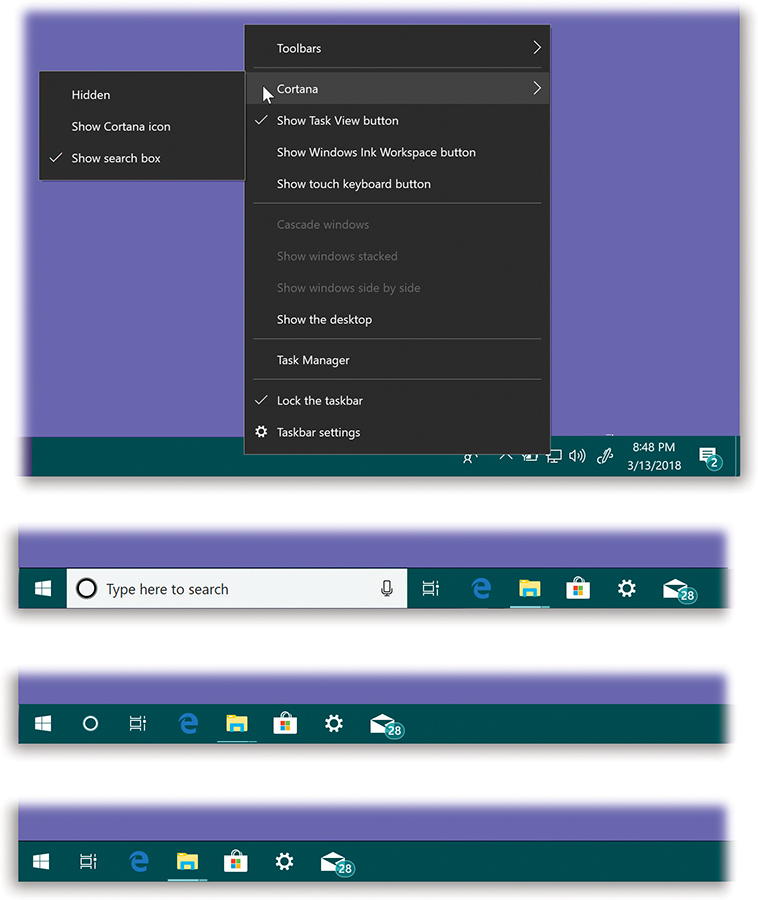
Figure 2-22. Ordinarily, the “Ask me anything” search box (second from top) eats up a big chunk of your taskbar. If you’d rather dedicate that precious real estate to things like your taskbar buttons, then right-click (or hold your finger down on) a blank spot on the taskbar.
The shortcut menu offers a Cortana command. Its submenus include “Show search box” (the usual setup), “Show Cortana icon” (only a circle, third from top), and “Hidden” (bottom). Even if you choose “Show Cortana icon” or “Hidden,” you can still press the various search/Cortana keystrokes, like +S to search or +C to speak to Cortana.
Point to a taskbar button to see the thumbnails of the corresponding windows, complete with their names; click to jump directly to the one you want. (On a touchscreen, tap the taskbar button to see the thumbnails; tap a thumbnail to open it.)
Despite all the newfangled techniques, some of the following time-honored basics still apply:
If a program has only one window open, you can hide or show it by hitting the program’s taskbar button—a great feature that a lot of PC fans miss. (To hide a background window, select its taskbar button twice: once to bring the window forward, then a pause, and then again to hide it.)
To minimize, maximize, restore, or close a window, even if you can’t see it on the screen, point to its program’s button on the taskbar. When the window thumbnails pop up, right-click the one you want, and choose from the shortcut menu. (This option isn’t available without a mouse/trackpad.)
Windows can make all open windows visible at once, either by cascading them (Figure 2-23), stacking them (horizontal slices), or displaying them in side-by-side vertical slices. To create this effect, right-click (or hold your finger down on) a blank spot on the taskbar and choose “Cascade windows” from the shortcut menu. Or choose “Show windows stacked” or “Show windows side by side.”
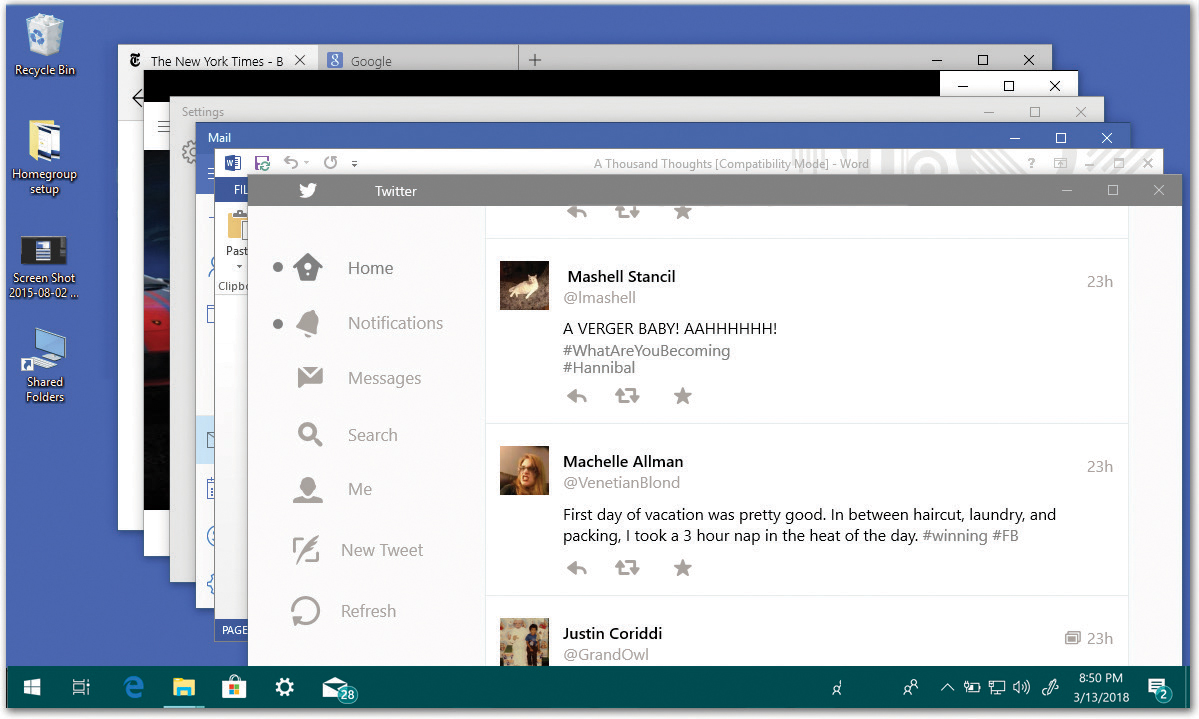
Figure 2-23. Cascading windows are neatly arranged so you can see the title bar for each window. Click any title bar to bring that window to the foreground as the active window.
To hide all open windows in one fell swoop, press
+D. Or right-click a blank spot on the taskbar and choose “Show the desktop” from the shortcut menu. Or point to (or click) the Show Desktop rectangle at the far-right end of the taskbar.To bring the windows back, repeat that step.
Tip:
When the taskbar is crowded with buttons, it may not be easy to find a blank spot to click. Usually there’s a little gap near the right end; you can make it easier to find some blank space by enlarging the taskbar, as described in “Getting the Taskbar Out of Your Hair”.
The Taskbar as App Launcher
Each time you open a program, its icon appears on the taskbar. That’s the way it’s always been. And when you exit that program, its icon disappears from the taskbar.
These days, however, there’s a twist: You can pin a program’s icon to the taskbar so that it’s always there, even when it’s not open. One quick click opens the app. The idea, of course, is to put frequently used programs front and center, always on the screen, so you don’t even have to open the Start menu to find them.
To pin a program to the taskbar in this way, use one of these tricks:
Drag a program’s icon directly to any spot on the taskbar, as shown in Figure 2-24. You can drag them from any File Explorer window or from the desktop.
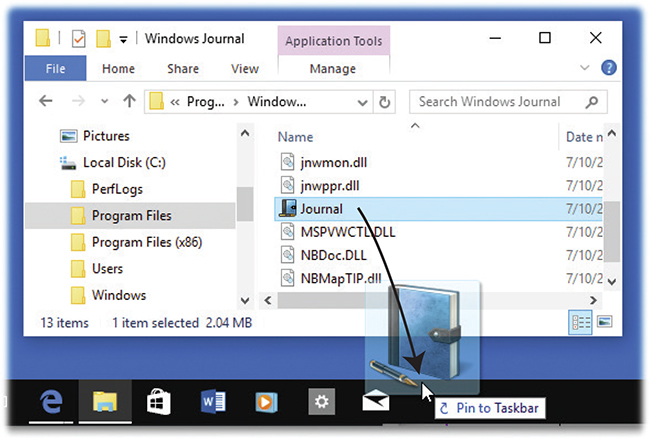
Figure 2-24. To install a program on your taskbar, drag its icon to any spot; the other icons scoot aside to make room, if necessary.
Right-click (or hold your finger down on) a program’s icon, wherever it happens to be.
Tip:
This works even on programs listed on the left side of the Start menu.
From the shortcut menu, choose “Pin to taskbar.” The icon appears instantly at the right end of the taskbar. You’re welcome to drag it into a better position.
Right-click an open program’s taskbar icon, wherever it happens to be. From the shortcut menu, choose “Pin to taskbar.” In other words, the program’s icon might be on the taskbar now, because it’s running—but you’ve just told it to stay there even after you exit it.
Once an icon is on the taskbar, you can open it with a single click. By all means, stick your favorites there; over the years, you’ll save yourself thousands of unnecessary Start-menu trips.
Tip:
If you Shift-click a taskbar icon, you open another window for that program—for example, a new browser window, a new Microsoft Word document, and so on. (Clicking with your mouse’s scroll wheel, or the middle mouse button, does the same thing.) Add the Ctrl key to open the program as an administrator.
And if you Shift-right-click a taskbar icon, you see the same menu of window-management commands (Cascade, Restore, and so on) that you get when you right-click a blank spot on the taskbar.
All these tricks require a mouse or a trackpad.
If you change your mind about a program icon you’ve parked on the taskbar, it’s easy to move an icon to a new place—just drag it.
You can also remove one altogether. Right-click (or hold your finger down on) the program’s icon—in the taskbar or anywhere on your PC—and, from the shortcut menu, choose “Unpin from taskbar.”
Note:
The taskbar is really intended to display the icons of programs. If you try to drag a file or a folder, you’ll succeed only in adding it to a program’s jump list, as described next. If you want quick, one-click taskbar access to files, folders, and disks, though, you can have it—by using the Links toolbar (“Links Toolbar”).
Jump Lists
Jump lists are handy submenus that list frequently or recently opened files in each of your programs. For example, the jump list for the Edge browser shows the websites you visit most often; the jump list for Microsoft Word shows the documents you’ve edited lately.
The point is that you can reopen a file just by clicking its name. Jump lists can save you time when you want to resume work on something you had open recently but you’re not in the mood to burrow through folders to find its icon.
Often, jump lists also include shortcut-ish commands, like New Message (for an email program), Play/Pause (for a jukebox program), or “Close all windows” (for just about any program). As Microsoft puts it, it’s like having a separate Start menu for every single program.
To make jump lists appear in the taskbar, right-click a program’s icon. If you’re using a touchscreen computer, just swipe upward from the program’s icon. (This second, secret way actually works if you have a mouse or trackpad, too. Give the mouse a flick upward while you’re clicking.) In Figure 2-25, for example, you can see that Google Chrome’s jump list includes web pages you’ve recently visited and recently closed.
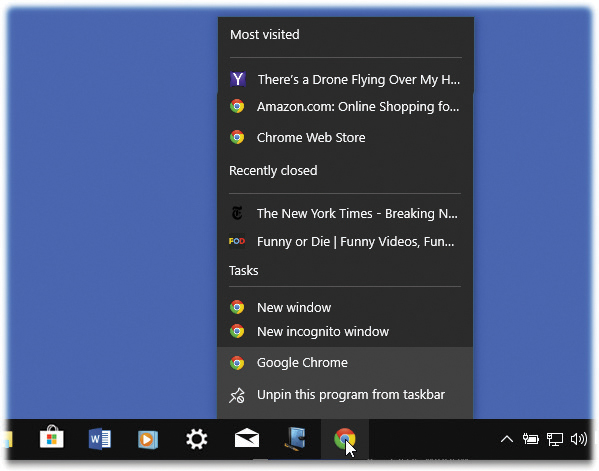
Figure 2-25. Here’s a good example of a taskbar jump list: the one that sprouts from the Google Chrome browser. It offers a list of websites you’ve visited frequently; a list of web windows you’ve recently closed; and some useful commands for getting going.
Pinning to Jump Lists
In general, jump lists maintain themselves. Windows decides which files you’ve opened or played most recently or most frequently, and builds the jump lists accordingly. New document listings appear, older ones vanish, all without your help.
But you can also install files manually into a program’s jump list—in Windows-ese, you can pin a document to a program’s jump list so it’s not susceptible to replacement by other items.
For example, you might pin the chapters of a book you’re working on to your Word jump list. To the File Explorer jump list, you might pin the folder and disk locations you access often.
You can pin a file or folder to a taskbar jump list in any of three ways:
From the Start menu (left side): Find an app or document listed in the left side of the Start menu. Right-click (or hold your finger down on) its name; from the shortcut menu, choose the pushpin icon (
 ).
).From the desktop or a File Explorer window: Drag a document (or its file shortcut) directly onto a blank spot on the taskbar. (You can drag it onto its “parent” program’s icon if you really want to, but the taskbar itself is a bigger target.)
As shown in Figure 2-26, a tooltip appears: Pin to Word 2016 (or whatever the parent program is). Release the mouse or your finger. You’ve just pinned the document to its program’s taskbar jump list.
(If you drag a folder—or a shortcut of one—onto the taskbar, it gets pinned in the File Explorer icon’s jump list.)
Note:
If the document’s parent program didn’t already appear on the taskbar, it does now. In other words, if you drag a Beekeeper Pro document onto the taskbar, Windows is forced to install the Beekeeper Pro program icon onto the taskbar in the process. Otherwise, how would you open the jump list?
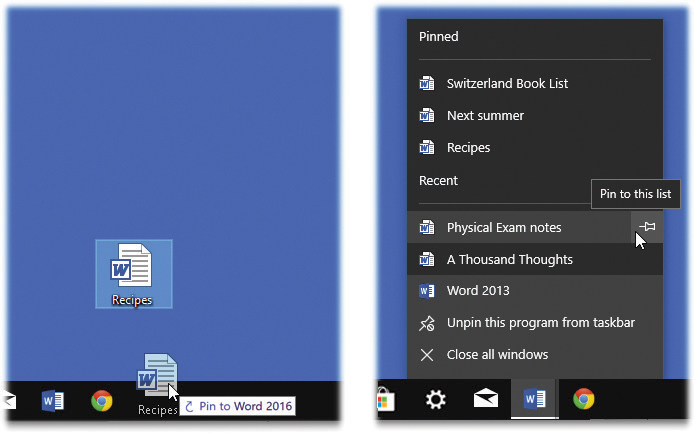
Figure 2-26. Left: Drag a document icon to the taskbar.
Right: Its name now appears in its parent program’s jump list.
If you spot a Recent document that‘s worth pinning, click the pushpin icon that appears when you point to it.
In an existing jump list, click the pushpin icon (Figure 2-26, right). Suppose, for example, the document already appears in a Recently Opened list. When you point to it with your cursor, a pushpin icon appears. By clicking it, you can move the document up into the Pinned list at the top of the jump list. Now it won’t be dislodged over time by other files you open.
(If you have only a touchscreen, you can still pin a document this way. Swipe upward on the app’s taskbar icon to open its shortcut menu. Hold your finger down on the document to make its shortcut menu appear; tap “Pin to this list.”)
If the file appears in another program’s jump list, then drag it onto the new program’s taskbar icon. For example, maybe you opened a document in WordPad (it’s in WordPad’s jump list), but you want to move it to Microsoft Word’s jump list.
To do that, drag the document’s name out of WordPad’s list and then drop it onto Word’s taskbar icon. It now appears pinned in both programs’ jump lists.
Removing things from your taskbar jump lists is just as easy. Open a program’s jump list, point to (or hold your finger down on) the pushpin next to anything in the Pinned list, and choose “Unpin from this list.”
Note:
Once it’s unpinned, the file’s name may jump down into the Recent section of the jump list, which is usually fine. If it’s not fine, you can erase it from there, too; right-click its name and, from the shortcut menu, choose “Remove from this list.” (Of course you’re not actually deleting the file.)
You can also erase your jump lists completely—for privacy, for example. Read on.
Jump List Caveats
Jump lists are great and all, but you should be aware of a few things:
Jump lists don’t know when you’ve deleted a document or moved it to another folder or disk; they continue to list the file even after it’s gone. In that event, clicking the document’s listing produces only an error message. And you’re offered the chance to delete the listing (referred to as “this shortcut” in the error message) so you don’t confuse yourself again the next time.
Some people consider jump lists a privacy risk, since they reveal everything you’ve been up to recently to whatever spouse or buddy happens to wander by. (You know who you are.)
In that case, you can turn off jump lists, or just the incriminating items, as described next.
Tip:
Of course, even if you turn off jump lists, there’s another easy way to open a document you’ve recently worked on—from within the program you used to create it. Many programs maintain a list of recent documents in their File menus.
Jump List Settings
There are all kinds of ways to whip jump lists into submission. For example:
Turn off jump lists. If the whole idea of Windows (or your boss) tracking what you’ve been working on upsets you, you can turn this feature off entirely. Open
→ →Personalization→Start. Turn off “Show recently opened items in Jump Lists on Start or the taskbar.” (The jump lists and icons still appear—but your files are no longer listed in these menus.)
Delete one item from a jump list. For privacy, for security, or out of utter embarrassment, you may not want some file or website’s name to show up in a jump list. Just right-click (or hold your finger down) and, from the shortcut menu, choose “Remove from this list.”
Clear a jump list completely. At other times, you may want to wipe out all your jump lists—and all your tracks. To do that, turn jump lists off (as described above) and back on again. You’ve just erased all the existing jump lists. Your jump lists are now ready to start memorizing new items.
Tip:
Jump-list items are draggable. For example, suppose you’re composing an email message, and you want to attach your latest book outline. If it’s in your Start menu, in a jump list, you can drag the document’s icon directly from the jump list into your email message to attach it. Cool.
The System Tray (Notification Area)
The system tray, at the right end of the taskbar, gives you quick access to little status indicators and pop-up menus that control your PC (Figure 2-27).
Note:
Most of the world calls this area the system tray. Microsoft calls it the notification area—but why use eight syllables when three will do?

Figure 2-27. You can point to a status icon’s name without clicking (to see its name) or click one to see its drop-down menu of options.
This area has been a sore spot with PC fans for years. Many a software installer inserts its own little icon into this area: fax software, virus software, palmtop synchronization software, and so on. So the tray eventually filled up with junky, confusing little icons that had no value to you—but made it harder to find the icons you did want to track.
All that is history now. Out of the box, only a handful of Windows icons appear here. Each one offers three displays: one when you point without clicking, one when you click or tap the icon, and a third when you right-click the icon (or hold your finger down on it).
Note:
The “point without clicking” thing works only if you have a mouse or trackpad. If you try it on a touchscreen, nothing will happen, and your friends will look at you funny.
Here’s what starts out on the system tray, left to right:
People (
 ). Here’s one-stop clicking for communications apps like Mail and Skype, as well as a place to pin your most frequently contacted contacts. See “People” for details.
∧. This icon is a pop-up menu that lists all the extra, junky system-tray icons that have been dumped there by your software programs (Figure 2-28, left).
Power (
 , portables only). Point to the tiny battery icon without clicking to view the time-remaining (and percentage-remaining) readout for your laptop or tablet battery.
Click or tap for a larger display of the same information (Figure 2-28, right).
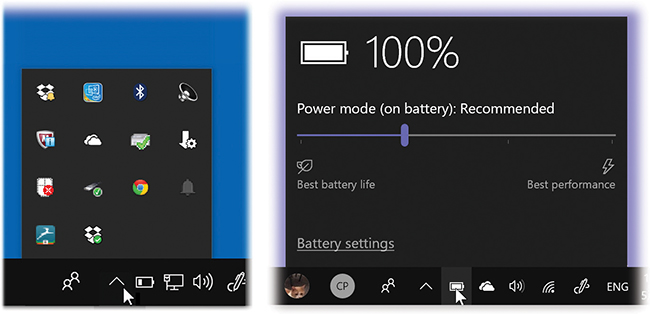
Figure 2-28. Left: Here are all the system-tray icons Windows is hiding.
Right: When you hit the battery icon, you get this handy panel, complete with a slider that lets you adjust the battery’s balance between power and longevity of charge.Finally, if you right-click the icon, you get access to the brightness control, Power Options control panel, and the Windows Mobility Center (see “Windows Mobility Center”).
Volume (
 ). Point to see a tooltip that says, for example, “Speakers: 67%” (of full volume). Click/tap for a volume slider that controls your PC’s speakers. Right-click for a shortcut menu that offers direct access to various Control Panel screens, like Sounds, Recording devices, and so on.
Network (
 or
or  ). Point to see the name of your current network and whether or not it’s connected to the Internet. Click/tap for a list of available networks; the wireless (Wi-Fi) ones in the list come with icons for signal strength and “locked” (password-protected) status. You can switch networks by clicking the name of one.
Right-click for a shortcut menu that offers direct access to a troubleshooting screen and to the Network & Internet settings.
Action Center (
 ). This humble, tiny icon is the front end for the Action Center: a huge, consolidated command center that’s described at the end of this chapter.
Touch keyboard (
 ). This button opens the onscreen typing keyboard, the one you need if you have a tablet that doesn’t have a keyboard. In other words, you can make the onscreen keyboard appear and disappear by clicking this button. Chapter 13 has the details.
Clock. Shows the current date and time. Point to see today’s full date, with day of the week (“Monday, May 14, 2018”). And this is awesome: Click for a pop-up clock and mini-calendar, which you can use to check your appointments (the little date numbers are clickable). Right-clicking the clock gives you an option to adjust the date and time, in addition to the same shortcut menu that appears when you right-click a blank spot on the taskbar.
Tip:
You can drag system-tray icons around to rearrange them—not just these starter icons, but any that you install, as described next. A vertical insertion-point line appears to show you where the icon will go when you release the mouse.
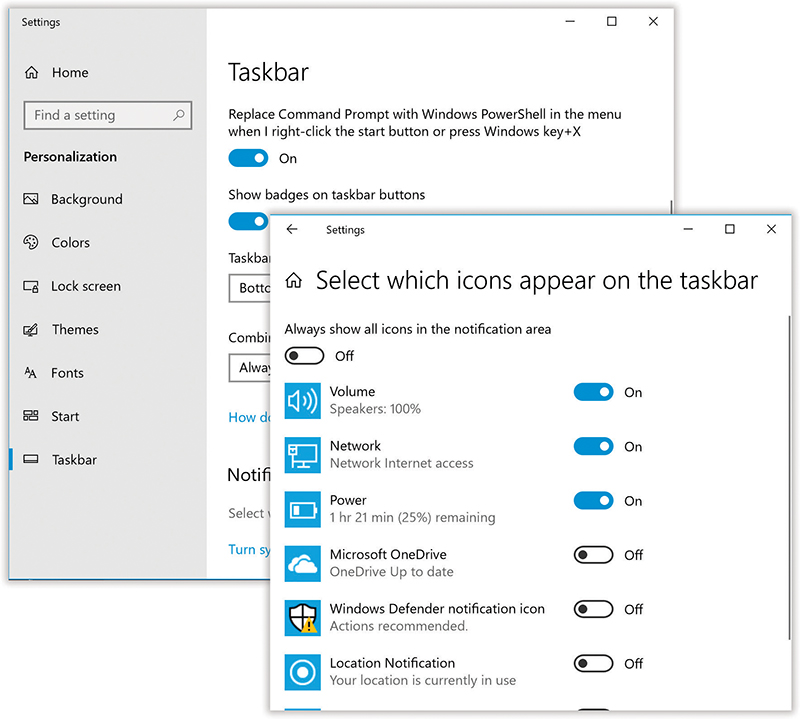
Keyboard Control
You have complete keyboard control over the system tray. Press ![]() +B to highlight the first icon—the ∧ button. Then press the arrow keys to “walk through” the other icons. Press the space bar to “click” whatever icon is highlighted, opening its menu. (Press the Menu key, if you have one, to “right-click” the icon.)
+B to highlight the first icon—the ∧ button. Then press the arrow keys to “walk through” the other icons. Press the space bar to “click” whatever icon is highlighted, opening its menu. (Press the Menu key, if you have one, to “right-click” the icon.)
Getting the Taskbar Out of Your Hair
The bottom of the screen isn’t necessarily everyone’s ideal location for the taskbar. Virtually all screens are wider than they are tall, so the taskbar eats into your limited vertical screen space. You have three ways out: Hide the taskbar, shrink it, or rotate it 90 degrees.
Auto-Hiding the Taskbar
To turn on the taskbar’s auto-hiding feature, right-click a blank spot on the taskbar; choose “Taskbar settings.” The dialog box (Figure 2-29, top) offers two “Automatically hide the taskbar” settings, one each for desktop and Tablet mode (“For Hybrid PCs Only: Tablet Mode (Continuum)”). Each makes the taskbar disappear whenever you’re not using it—a clever way to devote your entire screen to app windows and yet have the taskbar at your cursortip when needed.
When this feature is turned on, the taskbar disappears whenever you click elsewhere, or whenever your cursor moves away from it. Only a thin line at the edge of the screen indicates that you have a taskbar at all. As soon as your pointer moves close to that line, the taskbar joyfully springs back into view.
Changing the Taskbar’s Size
The taskbar can accumulate a lot of buttons and icons. As a result, you may want to enlarge the taskbar to see what’s what.
Note:
This trick requires a mouse or trackpad; you can’t do it on a touchscreen.
The draggy way. First, ensure that the taskbar isn’t locked (which means you can’t move or resize it). To do that, right-click (or hold your finger down on) a blank spot on the taskbar; from the shortcut menu, turn off “Lock the taskbar.”
Now position your pointer on the upper edge of the taskbar (or, if you’ve moved the taskbar, on whichever edge is closest to the center of the screen). When the pointer turns into a double-headed arrow, drag to make the taskbar thicker or thinner.
Note:
If you’re resizing a taskbar that’s on the top or bottom of the screen, it automatically changes its size in full taskbar-height increments. You can’t fine-tune the height; you can only double or triple it, for example.
If it’s on the left or right edge of your screen, however, you can resize the taskbar freely. If you’re not careful, you can make it look really weird.
The dialog-box way. In the Properties dialog box for the taskbar (right-click it; choose “Taskbar settings” from the shortcut menu), an option called “Use small taskbar buttons” appears. It cuts those inch-tall taskbar icons down to half size, for a more pre-Win7 look.
Moving the Taskbar to the Sides of the Screen
Yet another approach to getting the taskbar out of your way is to rotate it so that it sits vertically against a side of your screen. You can rotate it in either of two ways:
The draggy way. First, ensure that the taskbar isn’t locked (right-click a blank spot; from the shortcut menu, uncheck “Lock the taskbar”).
Now you can drag the taskbar to any edge of the screen, using any blank spot in the central section as a handle. (You can even drag it to the top of your screen, if you’re a rebel.) Let go when the taskbar leaps to the edge you’ve indicated with the cursor.
Tip:
No matter which edge of the screen holds your taskbar, your programs are generally smart enough to adjust their own windows as necessary. In other words, your Word document will shift sideways so it doesn’t overlap the taskbar you’ve dragged to the side of the screen.
The dialog-box way. Right-click a blank spot on the taskbar; from the shortcut menu, choose “Taskbar settings.” Use the “Taskbar location on screen” drop-down menu to choose Left, Right, Top, or Bottom. (You can do this even if the taskbar is locked.)
You’ll probably find that the right side of your screen works better than the left. Most programs put their document windows against the left edge of the screen, where the taskbar and its labels might get in the way.
Note:
When you position your taskbar vertically, what was once the right side of the taskbar becomes the bottom. In other words, the clock appears at the bottom of the vertical taskbar. So as you read references to the taskbar in this book, mentally substitute the phrase “bottom part of the taskbar” when you read references to the “right side of the taskbar.”
Taskbar Toolbars
You’d be forgiven if you’ve never even heard of taskbar toolbars; this is one obscure feature.
These toolbars are separate horizontal sections on the taskbar that offer special-function features. You can even build your own toolbars—for example, one stocked with documents related to a single project. (Somewhere, there’s a self-help group for people who spend entirely too much time fiddling with this kind of thing.)
To make a toolbar appear or disappear, right-click a blank spot on the taskbar and choose from the Toolbars submenu that appears (Figure 2-30). The ones with checkmarks are the ones you’re seeing now; you can click to turn them on and off.
Tip:
You can’t adjust the toolbars’ widths until you unlock the taskbar (right-click a blank spot and turn off “Lock the taskbar”). Now each toolbar is separated from the main taskbar by a “grip strip” (two thin vertical lines). Drag this strip to make the toolbar wider or narrower.
What follows is a rundown of the ready-made taskbar toolbars at your disposal.
Address Toolbar
This toolbar offers a duplicate copy of the address bar that appears in every File Explorer window, complete with a Recent Addresses pop-up menu—except that it’s always available, even if no File Explorer window happens to be open.
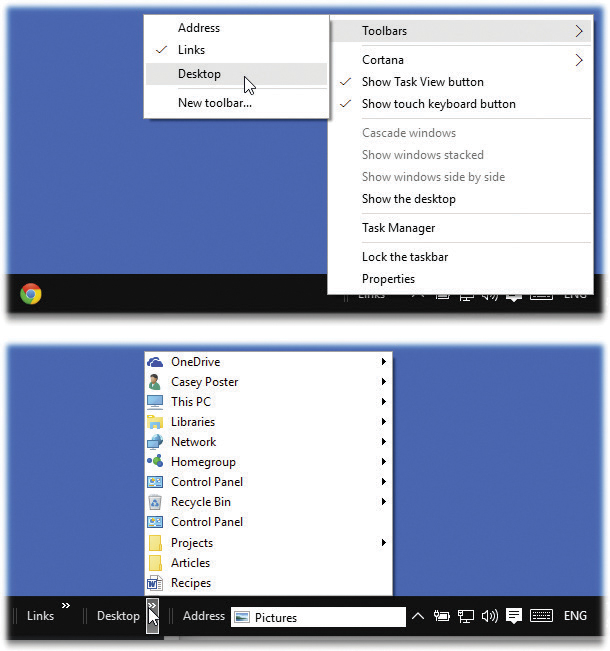
Figure 2-30. Top: Make toolbars appear by right-clicking a blank area on the taskbar, if you can find one.
Bottom: Toolbars eat into your taskbar space, so use them sparingly. (All three of the basic Windows 10 toolbars are shown open here: Address, Links, and Desktop.)
If you’ve added too many icons to the toolbar, a  button appears at its right end. Click it to expose a list of the commands or icons that didn’t fit.
Links Toolbar
From its name alone, you might assume that the purpose of this toolbar is to provide links to your favorite websites. And sure enough, that’s one thing it’s good for.
But in fact you can drag any icon at all onto this toolbar—files, folders, disks, programs, or whatever—to turn them into one-click buttons.
In other words, the Links toolbar duplicates the “park favorite icons” function of the Start menu’s right side, taskbar, and Quick Launch toolbar. But, in some ways, it’s better. It can display any kind of icon (unlike the regular taskbar). It’s always visible (unlike the Start menu). And it shows the icons’ names.
Here are a few possibilities of things to stash here, just to get your juices flowing:
Install icons of the three or four programs you use the most (or a few documents you work on every day).
Install the Recycle Bin’s icon, so you don’t have to mouse all the way over to…wherever you keep the real Recycle Bin.
Install icons for shared folders on the network. This arrangement saves several steps when you want to connect to them.
Install icons of websites you visit often so you can jump directly to them when you sit down in front of your PC each morning. (In Internet Explorer—though not in Edge—you can drag the tiny icon at the left end of the address bar directly onto the Links toolbar to install a web page there.)
You can drag these links around on the toolbar to put them into a different order, or remove a link by dragging it away—directly into the Recycle Bin, if you like. (They’re only shortcuts; you’re not actually deleting anything important.) To rename something here—a good idea, since horizontal space in this location is so precious—right-click it and choose Rename from the shortcut menu.
Tip:
Dragging a web link from the Links toolbar to the desktop or a File Explorer window creates an Internet shortcut file. When double-clicked, this special document connects to the Internet and opens the specified web page.
Desktop Toolbar
The Desktop toolbar (Figure 2-30, bottom) offers quick access to whichever icons are sitting on your desktop—the Recycle Bin, for example, and whatever else you’ve put there. As a convenience, it also lists a few frequently used places that aren’t on the desktop, including your personal folder, libraries, Network, Control Panel, and so on.
When it first appears, the Desktop toolbar takes the form of a » button at the right end of the taskbar. You can widen the Desktop toolbar if you like, making its buttons appear horizontally on the taskbar. But if you leave it compressed, then many of its icons sprout pop-up submenus that give you direct access to their contents. That’s a useful way to get at your stuff when your screen is filled with windows.
Redesigning Your Toolbars
To change the look of a toolbar, first unlock it. (Right-click it; from the shortcut menu, choose “Lock the taskbar,” if necessary, so that the checkmark disappears. Later, repeat this procedure to lock the taskbar again.)
Next, right-click any blank spot on the toolbar. The resulting shortcut menu offers these choices, which appear above the usual taskbar shortcut menu choices:
View lets you change the size of the icons on the toolbar.
Open Folder works only with the Quick Launch and Links toolbars.
It turns out that the icons on these toolbars reflect the contents of corresponding folders on your PC. To see one, right-click a blank spot on the toolbar itself; from the shortcut menu, choose Open Folder.
Why is that useful? Because it means you can add, rename, or delete icons en masse, by working in the folder instead of on the toolbar itself. Of course, you can also delete or rename any icon on these toolbars by right-clicking it and choosing Delete or Rename from the shortcut menu. But a window isn’t nearly as claustrophobic as the toolbar itself.
Show Text identifies each toolbar icon with a text label.
Show Title makes the toolbar’s name (such as “Quick Launch” or “Desktop”) appear on the toolbar.
Close Toolbar makes the toolbar disappear.
Tip:
How much horizontal taskbar space a toolbar consumes is up to you. Drag the border at the left edge of a toolbar to make it wider or narrower. That’s good to remember if, in fact, you can’t find a blank spot to right-click on. (Sub-tip: In a pinch, you can right-click the clock.) Don’t forget that you have to unlock the toolbar before you can change its size (right-click, and then choose “Lock the taskbar” so the checkmark disappears).
Build Your Own Toolbars
The Quick Launch and Links toolbars are such a delight that you may find that having only one isn’t enough. You may wish to create several different Links toolbars, each stocked with the icons for a different project or person. One could contain icons for all the chapters of a book you’re writing; another could list only your games.
Fortunately, it’s easy to create as many different custom toolbars as you like, each of which behaves exactly like the Links toolbar.
Windows creates toolbars from folders, so before creating a toolbar of your own, you must create a folder and fill it with the stuff you want to toolbar-ize.
Next, right-click a blank spot on the taskbar. From the shortcut menu, choose Toolbars→“New toolbar” to open the New Toolbar dialog box. Find and click the folder you want, and then click Select Folder.
Now there’s a brand-new toolbar on your taskbar, whose buttons list the contents of the folder you selected. Feel free to tailor it as described—by changing its icon sizes, hiding or showing the icon labels, or installing new icons onto it by dragging them from other File Explorer windows.
Notifications
A notification is an important status message. You might get one when a message comes in, a Facebook post goes up, an alarm goes off, a calendar appointment is imminent, or your battery is running low.
When some app is trying to get your attention, a message rectangle slides into view at the lower right of your screen (Figure 2-31, top). (Windows nerds love calling these things “toast,” because of the way they pop out of the side.)
If you don’t take action by clicking or tapping it, the message slides away again after a few seconds. On a touchscreen, you can also swipe it away with a finger.
Note:
Do these “toast” notification bubbles appear on the Lock screen, too? That’s up to you.
Open ![]() →
→![]() →System→“Notifications & actions.” Turn off “Show notifications on the lock screen.” Also consider turning off “Show reminders and incoming VoIP calls on the lock screen”—more urgent forms of alerts. Those messages no longer appear when the Lock screen is up.
→System→“Notifications & actions.” Turn off “Show notifications on the lock screen.” Also consider turning off “Show reminders and incoming VoIP calls on the lock screen”—more urgent forms of alerts. Those messages no longer appear when the Lock screen is up.
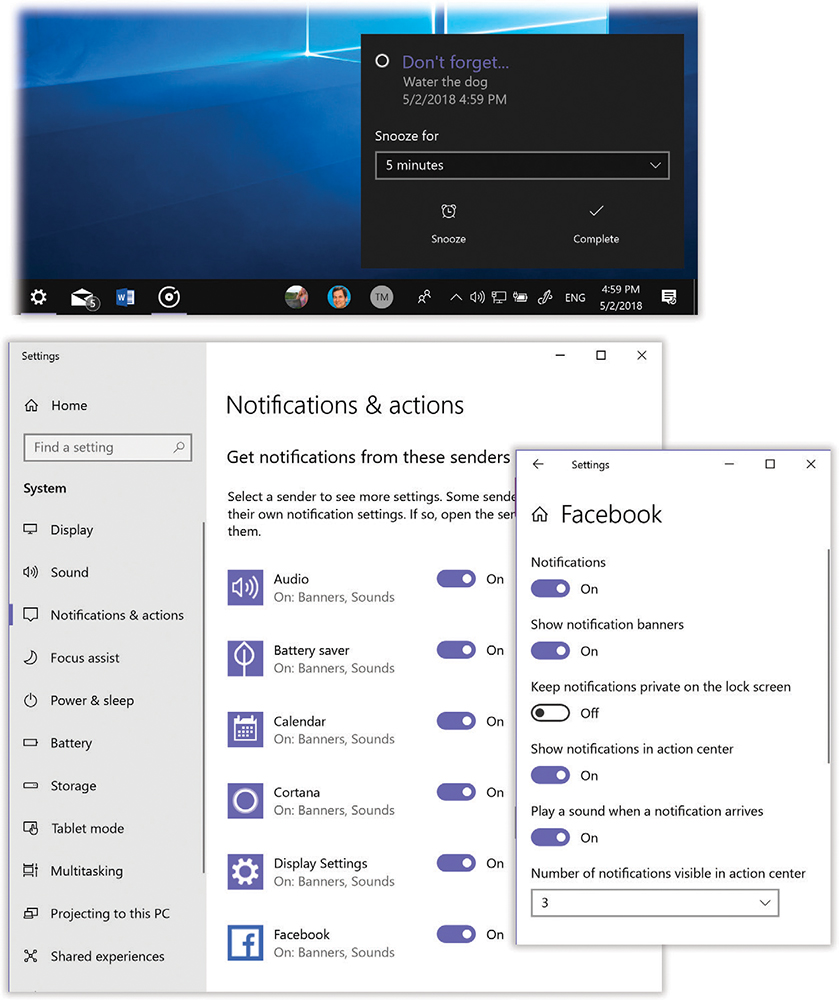
Figure 2-31. Top: This is a notification—an app trying to get your attention. It disappears after a moment, or you can flick it off to the right (or click the→that appears when your cursor comes near).
Bottom left: You have app-by-app control over which kinds of “toast” can pop up to get your attention. Each app lets you know how it intends to alert you: with a banner and/or a sound.
Bottom right: If you click an app’s name, you get this box, where you can tailor how that app gets your attention.
Customizing Notifications
You can (and should) specify which apps are allowed to junk up your screen. Open ![]() →
→![]() →System→“Notifications & actions” and scroll down to “Get notifications from these senders” to see the master list, with one entry for every app that might ever want your attention. (Or just tell Cortana, “Open notification settings.”)
→System→“Notifications & actions” and scroll down to “Get notifications from these senders” to see the master list, with one entry for every app that might ever want your attention. (Or just tell Cortana, “Open notification settings.”)
You’ll quickly discover that every app thinks it’s important; every app wants its notifications to blast into your face when you’re working.
You, however, may not agree. You may not consider it essential to know when your kid’s Plants vs. Zombies score has changed, for example.
So: Tap an app’s name to open its individual Notifications screen. Here you’ll find settings along these lines:
Notifications is a duplicate of the master on/off switch on the previous Settings screen. Turning this off turns off all notifications from this app.
Show notification banners. That’s a reference to the “toast” rectangles that slide onto your screen in real time. You can turn them off for this app.
Keep notifications private on the lock screen. This option, new in the April 2018 Update, prevents this app’s messages from appearing on the Lock screen, for your face-saving pleasure.
Show notifications in action center. The Action Center, described starting in “The Action Center”, collects all the notifications you’ve missed since you last looked. By turning off this switch, you’re saying, “I don’t care about this app. Don’t even bother showing me.”
Play a sound when a notification arrives. Some apps also ding or chime to get your attention when their notifications appear—unless you shut them up here.
Number of notifications visible in action center. Some apps, like Facebook and Twitter, could swamp your screen with updates without this control. It lets you set a maximum number of items that your Action Center will round up.
Priority of notifications in action center. You can choose, for this app, Top, High, or Normal, to indicate its placement in the notifications list.
Focus Assist: The Silence of the Toast
There are times when you might prefer not to be interrupted, distracted, or awakened by the appearance (and sound) of any app’s notification bubbles. Maybe you’re about to give a presentation and don’t want embarrassing reminders showing up.
Setting up Focus Assist
When you turn on Focus Assist, the PC is quiet and dark. It doesn’t ring, chirp, vibrate, light up, or display messages.
Yes, airplane mode does the same thing, but there’s a big difference: With Focus Assist on, the PC is still online. Calls, texts, emails, and other communications continue to chug happily away; they just don’t draw attention to themselves.
Focus Assist is what you want when you’re in bed each night. You don’t really want to be bothered with chirps for Facebook status updates and Twitter posts, but it’s fine for the phone to collect them for the morning.
Bedtime is why Focus Assist comes with two fantastic additional settings: one that turns it on and off automatically on a schedule, so that the computer goes dark each night at the same time you do, and another that lets you designate important people whose calls and texts are allowed to get through. You know—for emergencies. (Those are new features in Focus Assist, which was called Quiet Hours in earlier Windows 10 versions.)
To set up Focus Assist for the first time, open ![]() →
→![]() →System→“Focus assist” (Figure 2-32). Here you’ll discover there are two levels of Focus Assist (besides “Off”):
→System→“Focus assist” (Figure 2-32). Here you’ll discover there are two levels of Focus Assist (besides “Off”):
Priority only means that some notifications are still allowed to pop up and get your attention. Which ones? That’s up to you. Click “Customize your priority list” to see the options.
At the top, you’ll see three checkboxes that let notifications from your phone show up on your computer—one each for incoming calls, text messages, and reminders. To make this work, you have to link your phone to your PC (“Phone”); the phone must have the Cortana app installed, and iPhones need not apply.

Figure 2-32. Focus Assist lets you hush your PC’s dings and chirps when you need quiet. In the top half of this Settings panel, you choose the level of hushedness: Priority lets you choose which contacts and apps can send notifications; “Alarms only” lets through only the alarms you set. Below, you can set Focus Assist to kick on automatically, say, overnight, or when you’re giving a presentation, or when you’re playing a game, or just when you’re at home (if you’ve told Cortana where you live).
On this same screen, you can identify certain people whose calls and texts are allowed to pass through your Focus Assist blockade. (Use the “Add contacts” button to choose them; “Show notifications from pinned contacts on taskbar” automatically adds the speed-dial people you’ve added to the People button on your taskbar, as described in “The People Panel (My People)”.)
Whenever these very special folk contact you through Microsoft apps like Mail, Skype, Calling, and Messaging, you’ll get a notification, even if Focus Assist is turned on. You might, for example, permit calls from your spouse, boss, and children to reach you; you certainly wouldn’t want Focus Assist to block somebody trying to tell you that there’s been an accident, that you’ve overslept, or that you’ve just won the lottery.
But in addition to permitting certain people to get through, you can also designate certain apps’ notifications to get through. Maybe you’re a day trader, and you don’t want to miss a stock app’s alert that your portfolio is crashing. Or maybe you have some chat app whose pings you always want to answer. Use “Add an app” to set these up.
Alarms only. This is the more dramatic Focus Assist setting. It means that no notifications at all appear or make noise—except for alarms. Microsoft figures that if you set an alarm, you probably want it to go off, to prevent an oversleeping disaster.
Automatic rules
You’re welcome to turn on Focus Assist manually whenever you need some peace and quiet. But often, it’s more convenient to let Windows turn it on automatically. If you open ![]() →
→![]() →System→Focus Assist, you’ll see your options:
→System→Focus Assist, you’ll see your options:
During these times. Focus Assist can kick in during your sleeping hours, for example, using this switch. Click the displayed time interval to open the “During these hours” screen, where you can set up a start and stop time, specify Weekends, Weekdays, or Daily, and indicate which Focus Assist level (Priority or Alarms) you want.
When I’m duplicating my display. This phrase is code for, “When I’m giving an important presentation on a projector in front of 500 people and would rather not be humiliated by a text from my middle-schooler asking if I’ve seen her retainer.”
When I’m playing a game. Lord knows you wouldn’t want to be distracted when you’re neck-deep in Halo, would you?
When I’m at home. If you’ve told Cortana where you live, and your PC detects that you’re at that address, it can stifle notifications with the understanding that you’re no longer on the job and just want to be left alone.
Each of these headings offers a second line of light-gray text that opens a fine-tuning screen, where you can, for example, choose a mode for this…mode (Priority or Alarms Only). That screen also offers a “Show a notification in action center when focus assist is turned on automatically” checkbox. That’s handy; it produces a “toast” message on your screen whenever Focus Assist kicks in, so you don’t freak out wondering why you’re not getting your messages.
Using Focus Assist
Once you’ve set up Focus Assist in Settings, putting it into action is very easy. Start by clicking ![]() on the taskbar to open the Action Center (116). Click the “Focus assist” tile once for Priority Only mode, a second time for Alarms Only mode, and a third time to turn Focus Assist off.
on the taskbar to open the Action Center (116). Click the “Focus assist” tile once for Priority Only mode, a second time for Alarms Only mode, and a third time to turn Focus Assist off.
The Action Center
All right. Now you know how to dismiss, stifle, or respond to notification toast. But what if you miss one? Or you decide to act on it later?
All those “Hey you!” messages collect on a single screen called the Action Center (Figure 2-33). To make it appear, hit the ![]() icon on your system tray. Or press
icon on your system tray. Or press ![]() +A (for Action Center!). Or, on a touchscreen, swipe in from the right edge of the screen.
+A (for Action Center!). Or, on a touchscreen, swipe in from the right edge of the screen.
Tip:
If you have a touchscreen, you can swipe your finger inward from the right edge of the screen to open the Action Center. Much more fun.
The Action Center slides onto the screen like a classy black window shade, printed in white with every recent item of interest.
The Notifications List
At the top of the Action Center, you’ll find the notifications from all the apps you’ve permitted to alert you, grouped by app—the first lines of all your tweets, emails, antivirus-software whines, Microsoft Store updates, weather warnings, calendar alarms, and so on. Each is date-stamped.
Here’s the fun you can have with these things:
Tap the ∨ at far right to read more about it. For example, you can read the full body of a tweet, or read the rest of an email’s subject line. Basically, you get to read beyond the first line of whatever it was. Often, the ∨ button reveals useful buttons like Launch or Reply.
Click an item to open the relevant app. For example, click an appointment listed there to open its information panel in Calendar. Click the name of a software update to open the Microsoft Store program to read about it and download it. Click a message’s name to open Mail, where you can read the entire message.
Clear notifications. You can delete one message at a time (click the
, or swipe or drag to the right); delete all of one app’s notifications at a time (point to the app’s name, click the ); or clear all the current messages at once (hit “Clear all notifications” at the bottom of the column). In all cases, you’re not erasing anything meaningful—only dismissing the notification.
Tip:
If you have no interest in a certain app’s notifications showing up here, you can make them stop appearing for good, as described in “Customizing Notifications”.
Once you’ve had a look at the notifications that have piled up since you last checked, you can also hit “Clear all notifications” at the bottom of the column. That erases all the notifications, leaving the Action Center empty and ready for new messages.
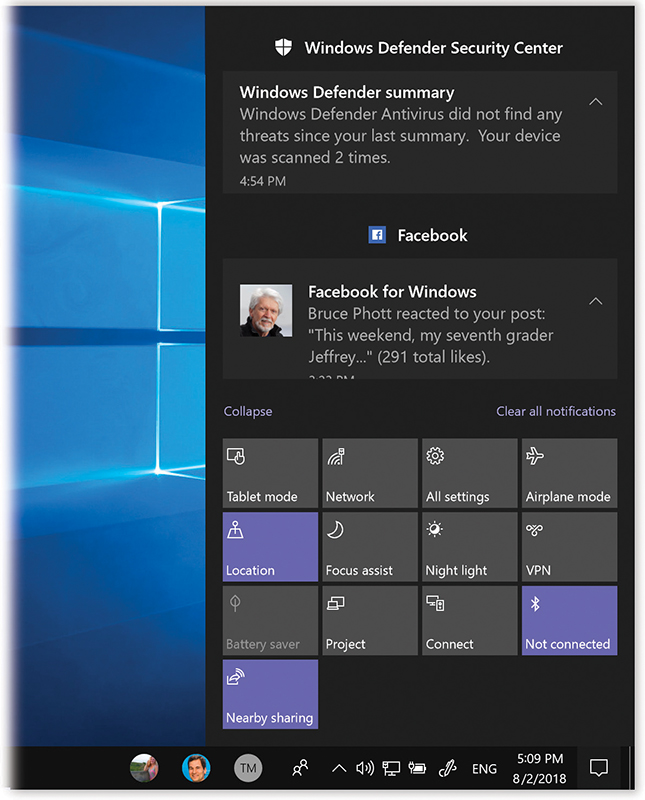
Figure 2-33. This is the Action Center. It’s where your apps send you memos to get your attention—about incoming messages, mail, tweets, Facebook posts, security issues, app updates, and so on.
At bottom: handy one-tap tiles for adjusting important PC settings.
The Quick Action Tiles
Below the list of notifications, another useful panel appears: the Quick Action tiles. These are one-touch buttons for important functions. Clearly, this feature is intended primarily for portable gadgets like tablets, phones, and laptops, but a few are useful no matter what you’ve got:
Tablet mode. If you have a touchscreen, you might enjoy this finger-friendly Windows 10 mode. It’s described in Chapter 12; you turn Tablet mode on and off by tapping here.
Network opens a menu of Wi-Fi networks (and others), for ease of switching (“Connecting to a Wi-Fi Hotspot”).
All settings is another way to open up the main Settings app. (The usual way is to choose
→.)Nearby sharing is Microsoft’s version of Apple’s AirDrop: It’s a quick, simple way to shoot links or files to other people sitting near you, without having to mess with passwords or setup (see “File Sharing 1: Nearby Sharing”). This tile is the on/off switch.
Airplane mode, of course, is just like airplane mode on a phone: It turns off all wireless transmission. No cellular, no Wi-Fi. Handy when the flight attendant instructs everyone to put their devices into airplane mode, of course, but also useful when you want to eke out as much battery life as possible.
Tip:
It’s perfectly OK to turn on airplane mode—and then to turn only Wi-Fi back on again, using its Quick Action tile. Wi-Fi is allowed in flight.
Location. A typical portable Windows machine always attempts to know where it is in the world. (You could argue that apps like Maps and Weather are more useful when they know where you are.) But sometimes it may make you a little uneasy that your PC is tracking your whereabouts. In those cases, use this switch to turn off the computer’s location tracking.
Focus Assist is Microsoft’s “do not disturb” mode; it’s described starting in “Focus Assist: The Silence of the Toast”.
Mobile hotspot. Tethering means using your cellularly equipped tablet or phone as a Wi-Fi hotspot—an Internet antenna—so that other devices nearby can get online. This tile, if you have it, serves as the on/off switch; see “The Mobile Hotspot”.
Brightness. Each time you tap this tile, the brightness cycles through four settings: 25%, 50%, 75%, and 100%. Screen brightness is the single biggest eater of battery power, so this is a quick and easy way to adjust the degree of battery drain.
Night light. Some studies have shown that spending time before bed bathed in the blue light of a computer, tablet, or phone screen can mess up your circadian rhythm and make it harder to fall asleep. You can therefore use this function to give your screen a warmer, less blue tint, either manually, using this tile, or on a bedtime schedule (for example, from 11 p.m. to 6 a.m.). See “Night Light” for details.
Bluetooth is a short-range wireless technology. It’s how you connect wireless keyboards, mice, and speakers, and this is the on/off switch.
VPN connects you to a virtual private network—a very secure way of connecting to your corporate network across the Internet. See “Virtual Private Networking”.
Battery saver is, of course, for portable gadgets. When it’s on, the screen dims, and the computer stops its continuous checking for email and other Internet data, all in an effort to eke out more useful time on your remaining charge. Ordinarily, Windows turns on “Battery saver” automatically when the battery falls below 20 percent of a full charge—but by hitting this tile, you can invoke it manually. Details are in “Battery Saver”.
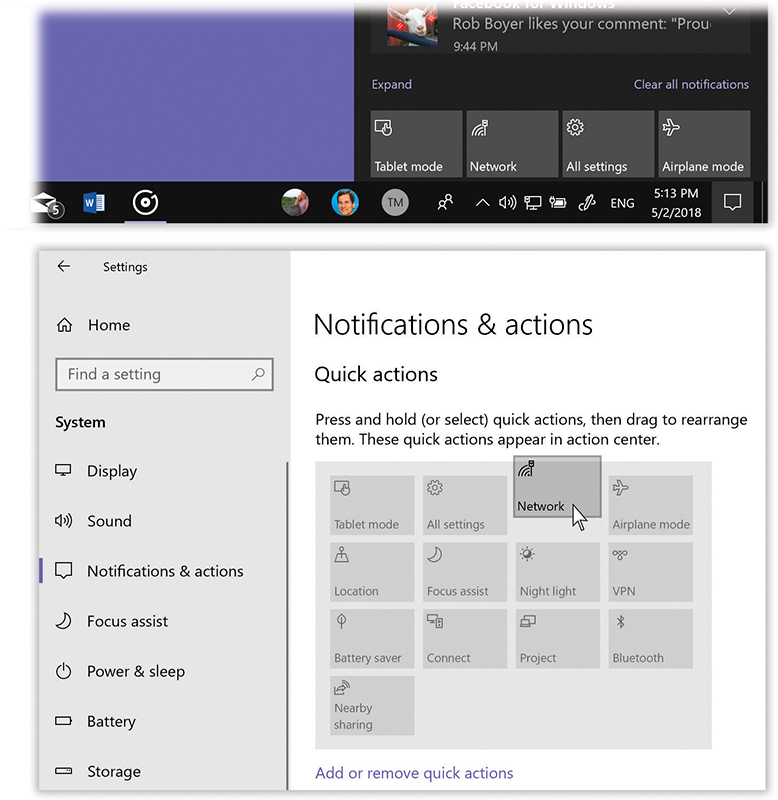
Figure 2-34. Top: When you’ve collapsed the tile farm, only one row of tiles remains—the top row. This is a very special row. They’re the four most important tiles, according to you.
Bottom: Here’s where you control which quick actions appear, and in which order (drag them around). Whatever the top row shows here becomes the “collapsed four” shown above.Project. That’s project, not project. In other words, it’s for when you’re connected to a second monitor or a projector, giving a presentation. When you click this tile, you’re offered a set of options for how you want the external screen configured (“Projecting to Your PC”).
Connect is where you set up wireless audio and video receivers. For example, it’s how you’d connect your tablet to a Bluetooth speaker, or your laptop to a Miracast receiver connected to your TV.
Although it might not be obvious, you have some control over the Quick Action tiles. You can exercise your good taste in either of two ways:
Collapse them. Let’s face it: Of the two parts of the Action Center (the notifications at top, the on/off tiles at bottom), the upper part is the one you’ll probably check more often. These messages come in all the time.
That’s why Microsoft set it up with a Collapse button, visible in Figure 2-33. When you click it, the Action Center hides all but the top row of tiles, as shown in Figure 2-34. All the rest of the Action Center space is devoted to your notifications.
Rearrange them. You can go nuts rearranging the Quick Action tiles as though they’re puzzle pieces; just drag them around. Whichever tiles appear on the top row here become the Collapsed Edition of the Quick Actions (Figure 2-34).
Delete them. You may never use, say, Night Light (“Night Light”) or, on your $4,000 64-core gaming desktop, airplane mode. So why should you have to stare at their on/off buttons on the Action Center all day?
In
→→System→“Notifications & actions”→“Add or remove quick actions,” you can turn off the tiles you never want to see.