
Chapter 14. Hardware & Drivers
If your Windows machine is a tablet, good for you. You probably won’t have to spend much time mucking around with peripherals and their drivers. But if you have a regular PC, adding new gear is part of the fun. Hard drives, flash drives, cameras, phones, printers, scanners, network cards, video cards, keyboards, monitors, game controllers, and other accessories all make life worth living.
Unfortunately, when you introduce a new piece of equipment to the PC, you must hook it up and install its driver, the software that lets a new gadget talk to the rest of the PC.
The driver issue was once a chronic, nagging worry for the average Windows fan. Drivers conflicted; drivers went missing; drivers went bad; drivers went out of date.
Fortunately, Microsoft has made strides in addressing the driver problem. Windows 10 comes with thousands upon thousands of drivers for common products already built in, and Microsoft deposits dozens more on your hard drive, behind the scenes, with every Windows update. Chances are good you’ll live a long and happy life without ever having to lose a Saturday manually configuring new gizmos, as your ancestors did.
Most of the time, you plug in some new USB gadget, and bam—it’s ready to use. You don’t have to install anything, walk through any wizards, or sacrifice any animals.
This chapter counsels you on what to do when the built-in, autorecognized drivers don’t do the trick.
Note:
Chapter 13 contains additional hardware-installation details specific to printers.
External Gadgets
Over the years, various engineering organizations have devised an almost silly number of connectors for printers, scanners, and other peripherals. The back, side, or front of your PC may include any of these connector varieties.
USB Ports
Man, you gotta love USBs (Universal Serial Bus). The more of these jacks (also called connectors or ports) you have, the better.
The USB port itself is a compact, thin, rectangular connector that’s easy to plug and unplug. It often provides power to the gadget, saving you one more cord and one more bit of clutter. And it’s hot-pluggable, so you don’t have to turn off the gadget (or the PC) before connecting or disconnecting it.
Tip:
Be careful, though, not to yank a USB flash drive or hard drive out of the PC when it might be in the middle of copying files.
USB accommodates a huge variety of gadgets: USB hard drives, scanners, mice, phones, keyboards, printers, palmtop cradles, digital cameras, camcorders, and so on.
Most modern PCs come with at least two USB ports, often on both the front and back panels.
Note:
Today’s USB gadgets and PCs offer USB 3.0 jacks—a faster, enhanced form of USB. You can still plug the older, slower USB 1.1 and 2 gadgets into USB 3.0 jacks, and vice versa—but you’ll get the older, slower speed.
USB-C
After 20 years of USB, the world’s electronics companies got together and (over the course of three years) designed its successor: USB-C. It’s fantastic.
This connector can carry power, video, audio, and data—simultaneously. It can, in other words, replace a laptop’s power cord, USB jacks, video output jack, and headphone jack.
A USB-C cable is identical top and bottom, so you can’t insert it the wrong way. It’s identical end for end, too, so it doesn’t matter which end you grab first. It feels more secure than USB when you insert it; you get a physical click instead of just relying on friction to hold it in.
USB-C can charge your gadget faster and transfer data faster than what’s come before, too. It’s tiny—about the same size as micro-USB—so the same cable can charge your phone and tablet and laptop. And the brand doesn’t matter. My Samsung USB-C cable can charge your Surface tablet and his Apple MacBook.
Second, you can already buy phones, tablets, and laptops that come with USB-C jacks—from Google, Microsoft, Nokia, Apple, and others.
Eventually, the USB-C payoff will be gigantic, convenient, and universal. In the meantime, we’re in for a couple of years of transition and fumbling with adapters that accommodate all our old USB gear: flash drives, hard drives, scanners, printers, cameras, and so on.
Other Jacks
At one time, the backs of PCs were pockmarked with all manner of crazy jacks: serial ports, PS/2 ports, SCSI ports, parallel ports, keyboard ports. Today, all these connectors are rapidly disappearing, thanks to the all-powerful superiority of USB and USB-C.
Here’s what else you may find on the modern PC, though:
Video (VGA), DVI, or DisplayPort. These are all ways to connect a second monitor or a projector. The older but widely compatible VGA is a narrow female connector with 15 holes along three rows. The DVI (digital visual interface) jack has 24 pins and is designed for modern LCD screens. And DisplayPort, which is intended to replace VGA and DVI (but retain compatibility via adapters), looks like a USB jack with one diagonally clipped corner.
HDMI. Handy! This kind of jack sends high-def video and audio to an HDTV set or an external monitor.
SD card reader. Pop the SD memory card out of your camera and straight into this slot to import the photos. Sweet.
Connecting New Gadgets
In books, magazines, and online chatter about Windows, you’ll frequently find people talk about installing a new component. In many cases, they aren’t talking about physically hooking it up to the PC—they’re talking about installing its driver software.
But remember the insanely complete collection of drivers—especially for USB gadgets—that comes with Windows. When you plug the thing into the PC for the first time, Windows autodetects its presence, digs into its trunk for the driver, and installs it automatically. A flurry of notifications appear.
If Windows can’t find the driver, then a dialog box appears, suggesting that you insert whatever software-installation disc came with the gadget.
And now, the fine print:
Usually plugging the device in is all it takes. Sometimes, though, you’re supposed to install the driver before connecting the gizmo (check the manual).
Usually the device should be turned off before you plug it in. Again, though, check the manual, because some devices are supposed to be switched on during the installation.
In either case, your gear is now completely installed—both its hardware and its software—and ready to use.
Troubleshooting Newly Installed Gear
If, when you connect a new component, Windows doesn’t display a “successfully installed” message, that means it probably can’t “see” your new device.
Before panicking, try restarting the PC. If you still have no luck, then try the Add Hardware wizard described in the box in “WORKAROUND WORKSHOP The Add Hardware Wizard”. (And if even that doesn’t work, contact the manufacturer.)
Bluetooth Gadgets
Bluetooth is a short-range, low-power, wireless cable-elimination technology. It’s designed to connect gadgets in pairings that make sense, like cellphone+earpiece, PC+wireless mouse, phone+portable speaker, or PC+cellphone.
Now, you wouldn’t want the guy in the next cubicle to be able to operate your PC using his Bluetooth keyboard. So the first step in any Bluetooth relationship is pairing, or formally introducing the two gadgets that will be communicating. Figure 14-1 shows how that goes.
To pair two gadgets, open ![]() →
→![]() →Devices. Make sure Bluetooth is On. (The only reason to turn it off is to save a tiny bit of battery power.) Select “Add Bluetooth or other device,” and then Bluetooth.
→Devices. Make sure Bluetooth is On. (The only reason to turn it off is to save a tiny bit of battery power.) Select “Add Bluetooth or other device,” and then Bluetooth.
The PC automatically starts searching for nearby Bluetooth gadgets within range (see Figure 14-1)—nearby mice, keyboards, cellphones, and so on. Usually, it finds the one you’re trying to pair. Just click the one you want, and then click Pair.
When it’s all over, the new gadget is listed in the panel, in the list of Bluetooth stuff you’ve previously introduced to this computer. (You can click it and then click “Remove device” to get rid of the pairing, when that day comes.)
Note:
In the April 2018 Update, Microsoft developed a special speed-pairing feature for Bluetooth mice. All you have to do is turn the mouse’s pairing mode on (there’s usually a special button for this)—and boom. A notification appears on your computer’s screen, offering a Connect button. You don’t have to visit Settings at all. At the outset, this feature works only with new Microsoft mice; Logitech auto-pairing is in the works.
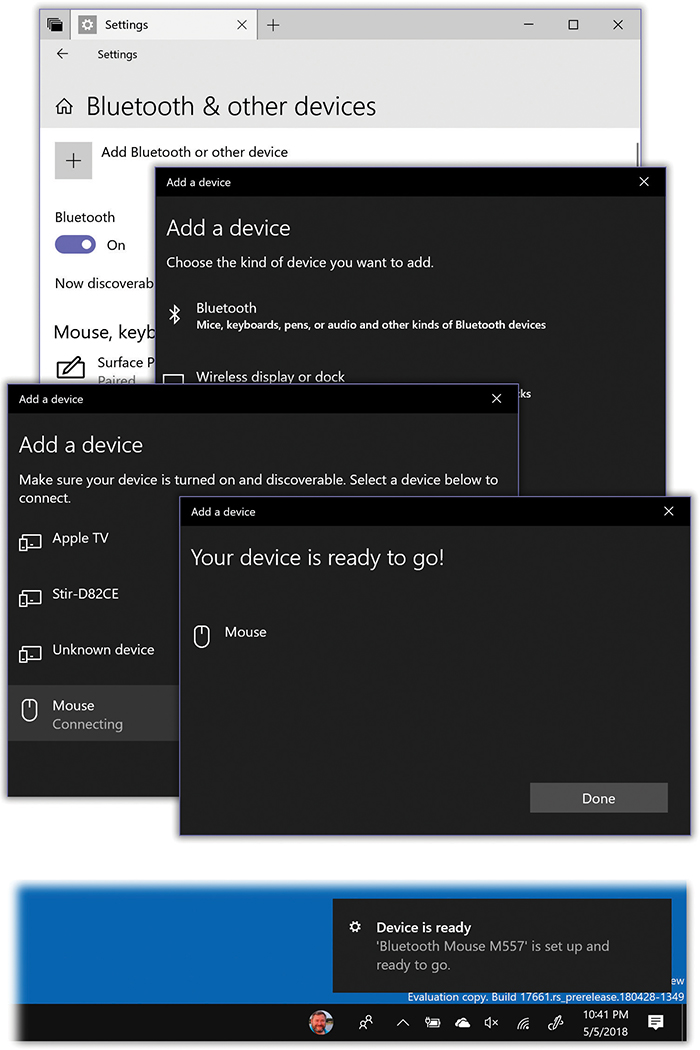
Figure 14-1. Top: To introduce a Bluetooth gadget to your PC, start in  →
→ →Devices. Choose “Add Bluetooth or other device.”
Second from top: Choose Bluetooth.
Third from top: Provided your wireless doodad is already in pairing mode (check its manual), you’ll see its name show up here. Choose it.
Bottom: Windows lets you know that the pairing worked—both in the dialog box and with a notification.
Driver Signing
Every now and then, when you try to install the software for one new gadget or another, you see a warning box that says “Windows can’t verify the publisher of this driver software.”
It’s not really as scary as it sounds. It’s just telling you that Microsoft has not tested this driver for Windows 10 compatibility and programming solidity. (Technically speaking, Microsoft has not put its digital signature on that driver; it’s an unsigned driver.)
Note:
In very rare circumstances, you may also see messages that say “This driver software has been altered” or “Windows cannot install this driver software.” In those cases, go directly to the hardware maker’s website to download the official driver software; Windows is trying to warn you that hackers may have gotten their hands on the driver version you’re trying to install.
In theory, you’re supposed to drop everything and contact the manufacturer or its website to find out if a Windows 10–certified driver is now available.
In practice, just because a driver isn’t signed doesn’t mean it’s no good; it may be that the manufacturer simply didn’t pony up the testing fee required by Microsoft’s Windows Hardware Quality Labs. After all, sometimes checking with the manufacturer isn’t even possible—for example, it may have gone to that great dot-com in the sky.
So most people just plow ahead. If the installation winds up making your system slower or less stable, you can always uninstall the driver, or rewind your entire operating system to its condition before you installed the questionable driver. (Use System Restore, described in “System Restore”, for that purpose. Windows automatically takes a snapshot of your working system just before you install any unsigned driver.)
The Device Manager
The Device Manager (Figure 14-2) is an extremely powerful tool that lets you troubleshoot and update drivers for gear you’ve already installed. It’s a master list of every component that makes up your PC: drives, keyboard, trackpad, screen, battery, and so on. It’s also a status screen that lets you know which drivers are working properly and which ones need some attention.
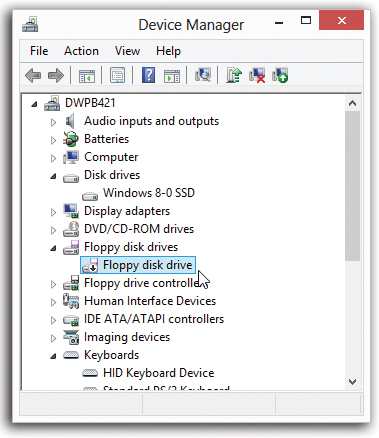
Figure 14-2. The Device Manager lists types of equipment; to see the actual model(s) in each category, you must expand each sublist by clicking the flippy triangle.
A device that’s having problems is easy to spot, thanks to the black down-arrows and yellow exclamation points.
You can see a disabled-driver logo ( ) on the “Floppy disk drive” entry in this illustration.
The quickest way to open the Device Manager is to right-click the ![]() button, which makes the secret Utilities menu appear; choose Device Manager.
button, which makes the secret Utilities menu appear; choose Device Manager.
You arrive at the screen shown in Figure 14-2.
The Curse of the Yellow ! Badge
A yellow circled exclamation point next to the name indicates a problem with the device’s driver. It could mean that either you or Windows installed the wrong driver, or that the device is fighting for resources with another component. It could also mean that a driver can’t find the equipment it’s supposed to control. That’s what happens to your webcam driver, for example, if you’ve detached the webcam.
The yellow badge may also be the result of a serious incompatibility between the component and your computer, or the component and Windows. In that case, a call to the manufacturer’s help line is almost certainly in your future.
Tip:
To find out which company created a certain driver, double-click the component’s name in the Device Manager. In the resulting Properties dialog box, click the General tab, where you see the name of the company, and the Driver tab, where you see the date the driver was created, the version of the driver, and so on.
Duplicate devices
If the Device Manager displays icons for duplicate devices (for example, two modems), then remove both of them. (To remove a device, click Uninstall in the dialog box shown in Figure 14-3.) If you remove only one, Windows will just find it the next time the PC starts up, and you’ll have duplicate devices again.
If Windows asks if you want to restart your computer after you remove the first icon, click No, and then delete the second one. Windows won’t ask again after you remove the second incarnation; you have to restart your computer manually.
When the PC starts up again, Windows finds the hardware device and installs it (only once this time). Open the Device Manager and make sure there’s only one of everything. If not, call the manufacturer’s help line.
Resolving resource conflicts
If the yellow-! problem isn’t caused by a duplicate component, then double-click the component’s name to find an explanation of the problem.
Turning Components Off
The Driver tab shown in Figure 14-3 contains another useful tool: the Disable button. It makes your PC treat the component in question as though it’s not even there.
You can use this function to test device conflicts. For example, when a yellow exclamation point indicates there’s a resource conflict, you can disable one of the two gadgets, which may clear up a problem with its competitor.
When you disable a component, a circled arrow appears next to the component’s listing in the Device Manager. To undo your action, click the device’s name and click the Enable button in the toolbar (formerly the Disable button).
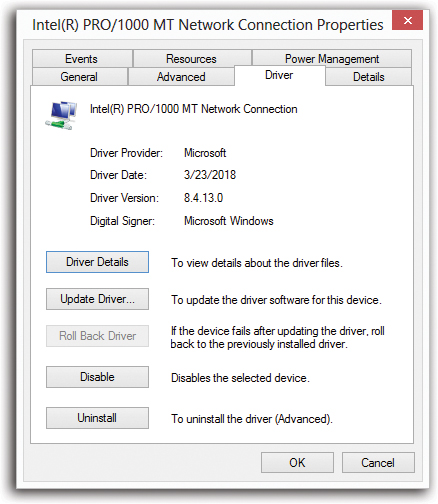
Figure 14-3. To get here, double-click a component listed in your Device Manager and then choose the Driver tab. Here you find four buttons and a lot of information. The Driver Provider information, for example, lets you know who’s responsible for your current driver—Microsoft or the maker of the component.
Hit the Driver Details button to find out where on your hard drive the actual driver file is. Or click Update Driver to install a newer version, the Roll Back Driver button to reinstate the earlier version, the Disable button to hide this component from Windows until you change your mind, or the Uninstall button to remove the driver from your system entirely—a drastic move.
(If the buttons here are dimmed, click the General tab, click “Change settings,” and then authenticate.)
Updating Drivers
If you get your hands on a new, more powerful (or more reliable) driver for a device, you can use the Device Manager to install it. (Newer isn’t always better, however; in the world of Windows, the rule “If it ain’t broke, don’t fix it” contains a grain of truth the size of Texas.)
Open the dialog box shown in Figure 14-3, and then hit the Update Driver button. The Update Device Driver wizard walks you through the process.
Along the way, the wizard offers to search for a better driver, or to display a list of drivers in a certain folder so you can make your own selection. In either case, you may have to restart the PC to put the newly installed driver into service.
Roll Back Driver
Suppose that you, the increasingly proficient PC fan, have indeed downloaded a new driver for some component—your scanner, say—and successfully installed it using the instructions in the previous paragraphs. Life is sweet—until you discover that your scanner no longer scans in color.
In this situation, you’d probably give quite a bit for the chance to return to the previous driver, which, though older, seemed to work better. That’s the beauty of the Roll Back Driver function. To find it, open the dialog box shown in Figure 14-3 and click Roll Back Driver.
Windows, forgiving as always, instantly undoes the installation of the newer driver and reinstates the previous driver.