
Organize Photos into (Smart) Albums
So much of the information about photography out there focuses (pun intended) on the art and practice of capturing images, but very little addresses what to do with the shots once they’re in captivity. The whole point of taking control of your digital photos is not just to find a place for them on your disk, but to work with them later—whether that’s editing a group of promising images the day they’re shot or assembling a slideshow three years later.
This is where the work you’ve done so far pays off. Armed with a photo library chock-full of metadata, you can locate images in a fraction of the time it would take to scan through them visually. I’ll show you how to search for specific metadata—such as keywords and ratings, and even camera-generated data such as aperture, shutter speed, and camera model—to track down shots. Then I’ll cover how to make that search capability work in your favor by building smart albums whose contents can change based on criteria you specify.
Locate Your Photos Using Search
When I want to track down photos, I usually start by performing a text search to locate keywords or other data, and then refine the results by specifying star ratings, labels, or flags. Knowing, for instance, that I tagged my Disney vacation photos with keywords, I would do a text search for Disneyland and then filter the results to reveal only images rated three stars or higher.
Sometimes I look for specific metadata, such as the camera type or a range of shutter speeds. That enables me to revisit only images shot on my iPhone, for example.
Here’s how to take advantage of some of the most useful search features in your photo management software.
Find Text
To perform a basic search for text that appears in nearly any metadata field (including keywords, titles, and captions), type a term into the program’s Search field.
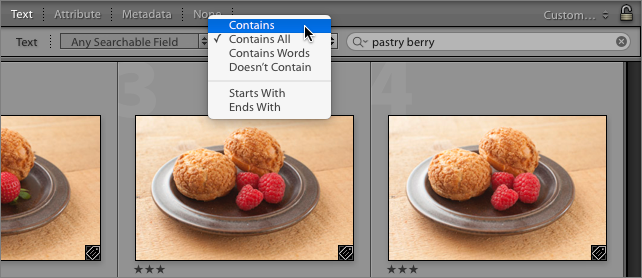
Lightroom Classic and Photoshop Elements also offer advanced constructions for performing text searches. In Lightroom Classic, you can exclude terms from a search by putting an exclamation point (!) before them. Typing pastry berry brings up all photos tagged with both “pastry” and “berry,” but typing pastry !berry displays photos tagged with “pastry” and hides those that also contain “berry.” To accomplish the same task in the Elements Organizer, you’d type pastry NOT berry.
Similarly, add a plus sign (+) before a word in Lightroom Classic to search for text that starts with that word, or append the plus sign after a word to locate text strings that end in those characters.
You can also control how the terms are handled in Lightroom Classic by choosing from the second pop-up menu in the Text filter bar (see Figure 58). For example, to find photos that contain “pastry” or “berry,” you choose Contains—instead of Contains All—from the menu.
Search by Rating or Label
After I narrow my results using a text search, I next naturally want to see which of those images I’ve rated higher than others. Lightroom Classic includes a rating filter in its filmstrip: click one to five stars to view photos with that rating (Figure 59). Lightroom CC’s rating filter is in the Refine Search options.
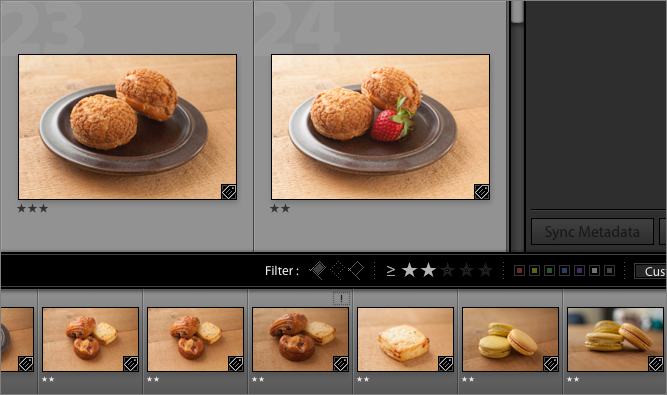
The symbol to the left of the stars indicates whether you will view images with the selected rating or higher (≥), with the selected rating or lower (≤), or with just the selected rating (=). You can also click a flag or label to further narrow the number of visible items (Click the word Filter to display these options).
Photoshop Elements includes a similar control located just above the thumbnails.
Photos doesn’t offer star ratings. If you once used star ratings in iPhoto, you can search for the rating keywords (such as 2 Star), which were created when you converted your library to Photos. Or, open the Favorites album to view photos marked as favorites.
Search by Date
Since each program organizes photos based on their capture dates, it’s easy to scroll back through your thumbnails to hit approximate dates. Or, use one of these alternatives to jump to the date you want:
Search by Date in Lightroom Classic
For a date search that’s faster than scrolling, expand the Folders pane and dig through the folder hierarchy to find specific years, months, and days.
Search by Date in Lightroom CC
Open the My Photos panel and expand the By Date category to drill down through years, months, and individual days.
Search by Date in Photos for Mac
Use the navigation buttons at the top-left corner of the Photos window to switch between different library views and zoom out on your photo collection: the Moments view reveals specific days, the Collections view covers a longer span of time, and the Years view presents an overview of several years.
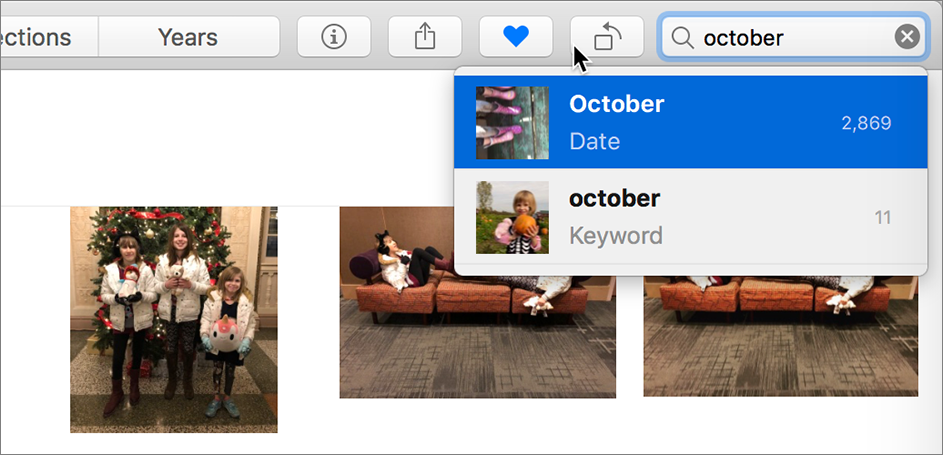
The software’s Search field can be helpful with some dates, too. Suppose you want to view all photos shot in October of any year: type October into the field and then browse the results (Figure 60).
Search by Date in Photoshop Elements
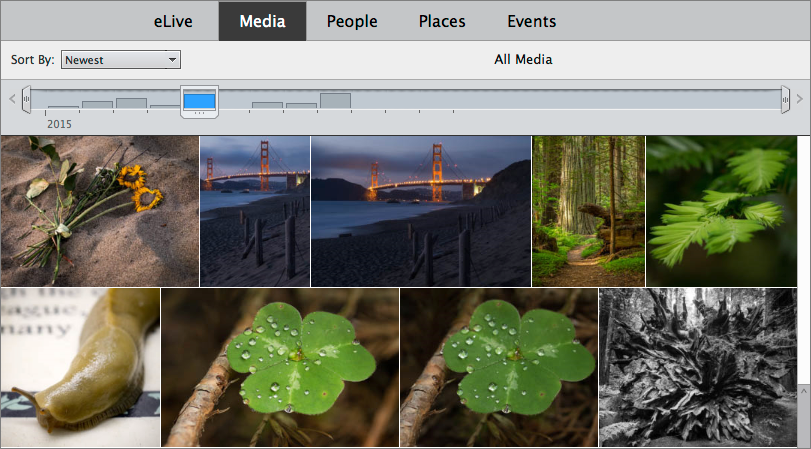
The Elements Organizer includes an interesting variation on scrolling through your photos: a timeline (choose View > Timeline to make it visible) that indicates groups of photos like a bar chart (Figure 61). Click a block to view the photos during that period, or drag the markers at the left and right edges of the Timeline to view only photos within that date range.
Find Metadata
Although it isn’t a common need, you can search for photos based on metadata generated by the camera. For instance, you might want to find vacation photos shot with a specific camera (such as the one your partner used), or want to find all photos shot at ISO 6400 or above so you can apply noise reduction to them.
Find Metadata in Lightroom Classic
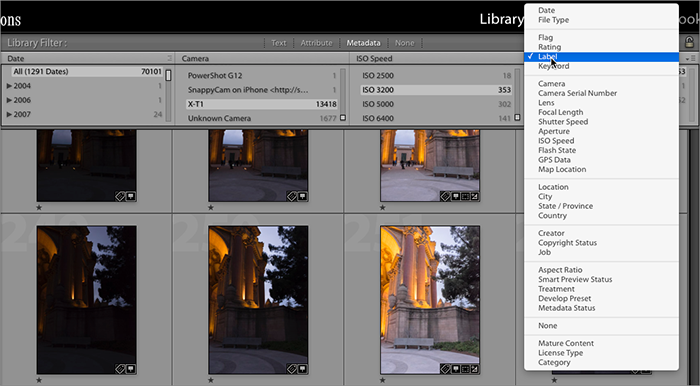
Lightroom Classic provides four panels of metadata from which to choose to narrow your search. Click Metadata in the Filter bar and then choose the metadata setting you want (Figure 62). Clicking a panel’s label reveals the types of metadata you can use.
Find Metadata in Lightroom CC
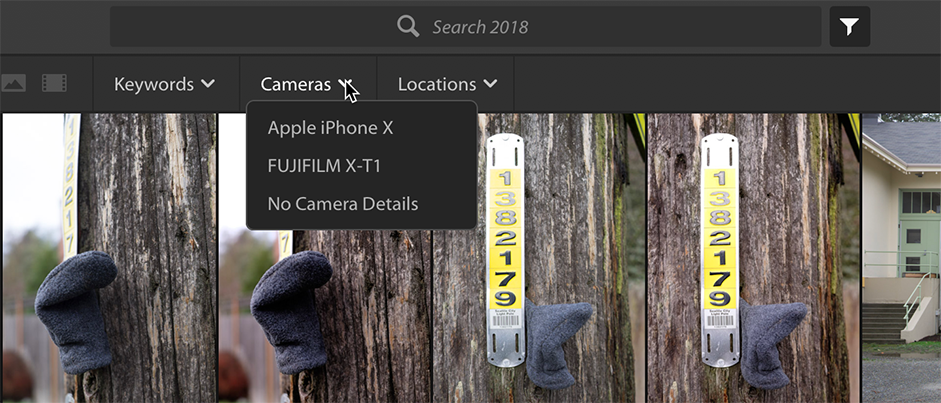
The metadata that’s exposed in Lightroom CC is limited to filtering by camera model and, if the data is available, location. In the Grid view, click the Refine Search button and choose from one of the pop-up menus under the Search field (Figure 63).
Find Metadata in Photos for Mac
Unfortunately, the option to find anything via specific metadata is nonexistent using the Search field. Typing a term brings up matches for data that you supply, such as keywords, titles, and descriptions, but you cannot, for example, reveal all photos captured by a particular camera. This is where smart albums, described just ahead, can be your friend.
Find Metadata in Photoshop Elements
In the Elements Organizer, choose Find > By Details (Metadata), specify which type of metadata to use and what information to look for, and then click the Search button. (This is also the route for building a smart album, which I cover next.)
Get Smart about Albums
Performing standalone searches is good when you’re looking for one or two photos, but it’s not as useful when you want to revisit (or create) an entire collection of photos.
Most applications have adopted the album metaphor to denote a virtual organizational space. The problem is, albums tend to be dumb containers—you manually update them by dragging items in or out. It’s enough work that I only sporadically use regular albums. Instead, I take advantage of the benefits of smart albums, whose contents change depending on the criteria I specify. For example, I created a smart album that collects all photos tagged with my daughter’s name and captured since her last birthday, and that I’ve rated three stars or higher. As I add more photos—and believe me, I will—they appear automatically in the smart album so I can view and share the best shots of her.
You can build smart albums using almost any criteria. Other examples could include a collection of all four-star-and-higher landscapes, photos shot this time last year, or images containing specific people.
Create Smart Albums
As we’ve come to expect, each application implements smart albums in a different way. Here’s a rundown of how to create them, taking into account some of the programs’ special features.
Smart Collections in Lightroom Classic
Lightroom Classic, which refers to albums as collections, includes a handful of pre-made smart collections such as Five Stars and Past Month. You’ll find them in the Collections pane inside a Smart Collections set. New smart collections can be placed anywhere in the Collections pane, however.
As an example, the following steps create a smart collection that displays three-star photos taken within the past 6 months:
In the Library module, choose Library > New Smart Collection. Or, click the New Collection (+) button at the top right corner of the Collections pane and choose Create Smart Collection. A new dialog appears.
Give the collection a title in the Name field.
In the Location area, select the checkbox and choose the Smart Collections set from the pull-down menu.
Make sure the Match pop-up menu is set to All, which dictates that every condition you set up must be true for a photo to appear. The alternative is to choose Any, which collects photos that match any of the conditions. There’s also a None option if you want to build a search that excludes the criteria you’re defining. Since we want to view images that are marked three stars or higher and were shot in the past six months, stick to All.
The first rule is automatically set to
[Rating], so click the third dot to the right of the[isgreaterthanorequalto]pop-up menu to define three stars.Click the Add
 button to the right of the rule to add a new one.
From the pop-up menu at left, change the second rule from
[Rating]to[Date]>[CaptureDate](Figure 64).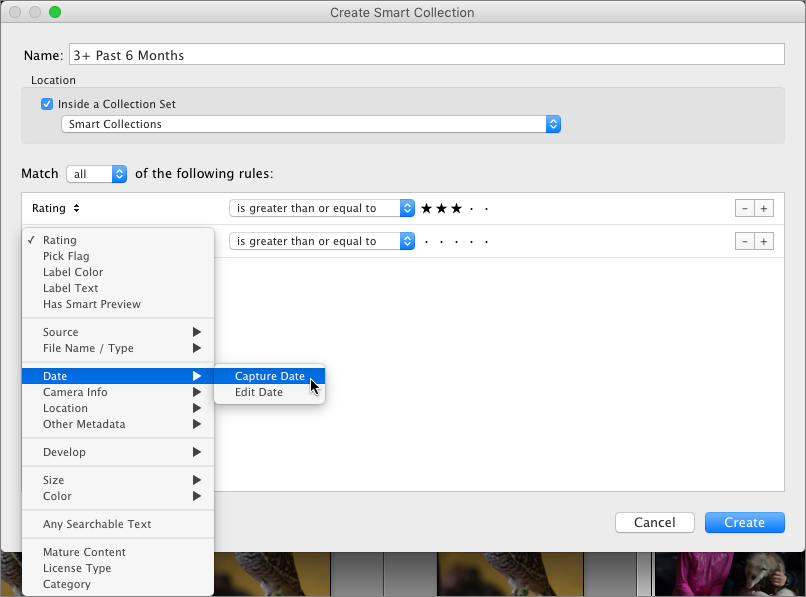
Figure 64: Defining smart collection criteria in Lightroom Classic. Click the pop-up menu to the right and choose
[isinthelast].Change the number in the field that appears to
6, and change the next pop-up menu from[days]to[months].Click Create to save the smart collection.
You can add additional rules to further define the smart collection. For example, if you want to exclude photos captured with an iPhone, do the following:
Double-click the smart collection in the Collections pane to edit it.
Click the Add
button to add a new rule.Change the first pop-up menu to
[CameraInfo]>[Camera].From the rule’s pop-up menu, choose
[doesn’tcontain], and typeiPhoneinto the field next to it.Click Save.
The iPhone photos no longer appear in the collection.
But wait, there’s more! Lightroom Classic supports nested conditions in smart collections. In the collection we just created, all rules needed to be met for an image to appear. But suppose you want to narrow those results to view images tagged with the keywords coffee or pastry? Do the following:
Double-click the smart collection to edit it.
Hold the Option key and click the Add button, which changes from a plus (+) to a pound sign (#).
Leave the first pop-up menu in the new rule set to
[Anyofthe followingaretrue].From the option pop-up menu, choose
[OtherMetadata]>[Keywords].Leave the middle pop-up menu set to
[contains]and enter your first keyword (in this example, it’scoffee).Click the Add
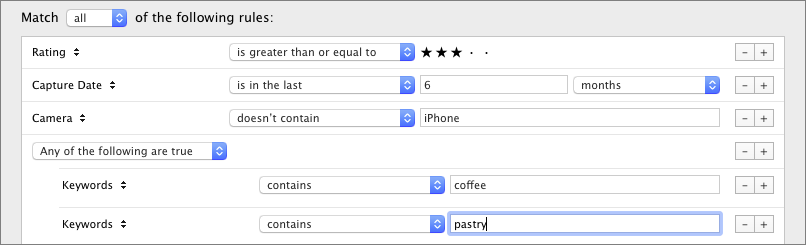
button to create a new rule, which is contained within the nested condition.Set the second nested rule to read:
[Keywords][contains]pastry.Your smart collection should look like the one in Figure 65. Click Save.
coffee or pastry.Smart Albums in Photos for Mac
Photos doesn’t expose as much metadata, so its smart albums aren’t capable of the granularity possible in Lightroom Classic. Still, they’re just as capable in most respects. Since Photos doesn’t support star ratings, we’ll set up a smart album that locates photos marked as favorites during the past 6 months. Follow these steps:
Choose File > New Smart Album (or press ⌘-Option-N).
In the dialog that appears, enter a name for the album.
The default first criterion is
[Photo][is][favorite], so leave that alone.Click the plus
 icon to add a new rule.
Choose
[Date Captured]from the second rule’s pop-up menu and specify that it[isinthelast]6[months].When the smart album contains more than one rule, the option to match any or all conditions appears; choose All (Figure 66). Notice that the number of results appears in the lower-left corner of the dialog.
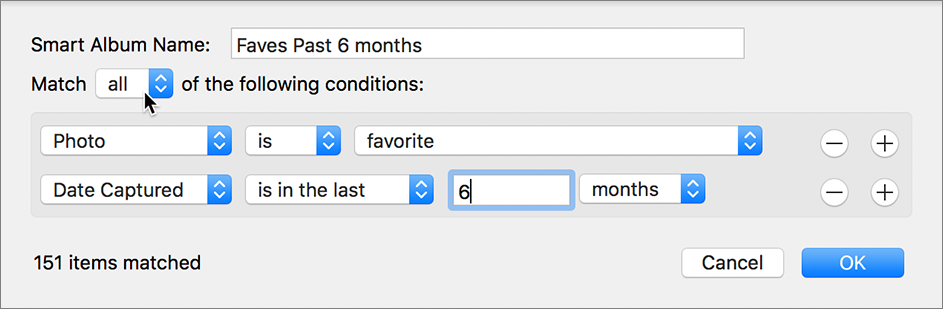
Figure 66: View your favorite photos from the past 6 months. Click OK to save the smart album and view its results.
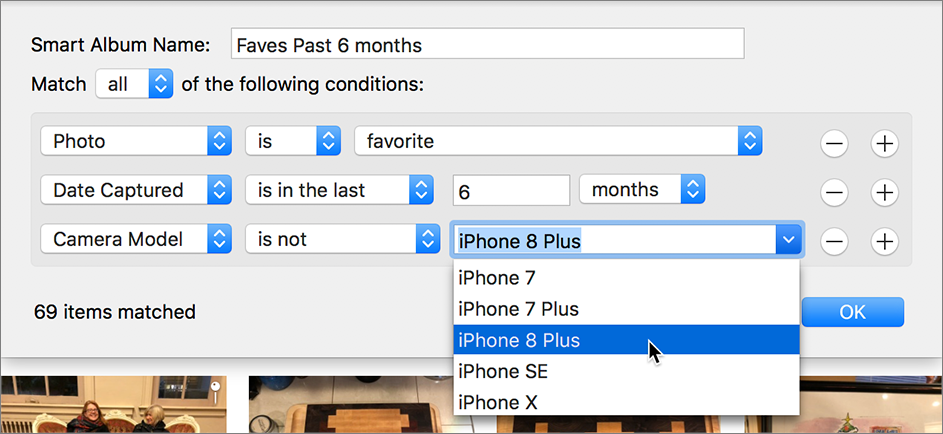
If you want to edit a smart album, such as to add another rule excluding iPhone images from the search, do this:
Right-click (Control-click) the smart album in the Albums view or the sidebar and choose Edit Smart Album.
Click the plus
icon to insert a new rule.In the first pop-up menu of the new rule, choose
[CameraModel].Set the next menu to
[isnot].Choose the camera from the third pop-up menu (Figure 67), and then click OK.
Saved Searches in Photoshop Elements
When it comes to smart albums, Photoshop Elements is a special case. You can create a saved search in the Elements Organizer, which queries metadata the same way a smart album does, but you can’t go back and edit it once it’s made. (Adobe even removed the name “smart album” from the application, and stuck with “saved search” instead.) It’s a little odd, and I’ve never figured out why Adobe doesn’t just implement smart albums like other applications do. Still, the functionality is there, but concealed.
Here’s how to create our example query to locate photos rated three stars or higher taken in the last 6 months:
In the Elements Organizer, choose Find > By Details (Metadata).
To ensure the search is looking for ratings and dates, select the radio button labeled “All of the following search criteria [AND].”
From the first pop-up menu, choose
[Rating].From the second pop-up menu, choose
[ishigherthan]. Elements does not include an option for “is equal to or greater than.”Set the third pop-up menu, the number of stars, to
[2](Figure 68).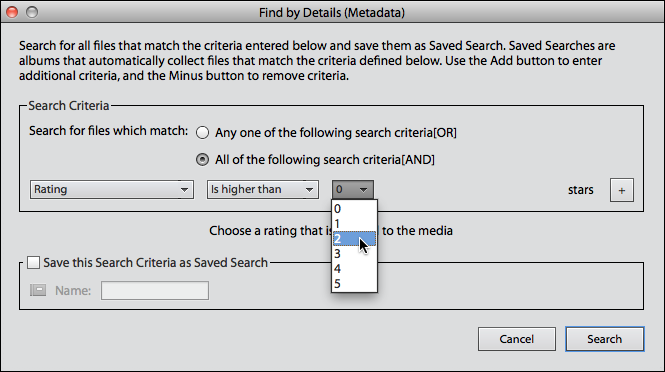
Figure 68: Choosing a star rating in the Elements Organizer. Click the Add
 button to add another rule to the search.
Choose
[CaptureDate]in the first pop-up menu of the new rule.From the second pop-up menu, choose
[iswithinthelast].Set the time to
6[months].To create a saved search, versus just performing a search, select the Save This Search Criteria as Saved Search checkbox and give it a name (Figure 69).
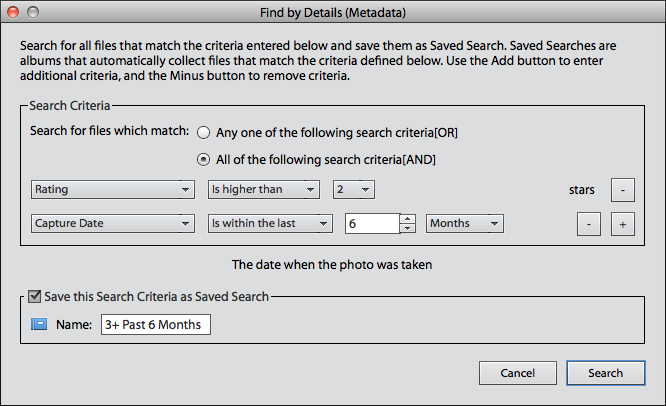
Figure 69: Save the criteria as a saved search so you can view its results again later. Click Search to view the results.
Ideally, at this point I’d tell you how to edit the saved search and add more criteria. But that would be too easy. Since you can’t edit a saved search, instead, do this:
Click the pop-up menu that’s part of the Search field and select Saved Searches (Figure 70). The search results appear in the browser.

Figure 70: The roundabout method of loading saved searches in Photoshop Elements. Choose the search you saved and click Open.
Click the Options menu at the top-right corner of the browser and choose Modify Search Criteria. The Find by Details (Metadata) dialog appears.
Click the Add
button in the last rule to add another one.Choose
[CameraMake]from the first pop-up menu.Set the next pop-up menu to
[Doesnotcontain].Enter
iPhonein the text field.To use this search later, select the Save This Search Criteria as Saved Search checkbox.
Enter a new name for the search; you’re actually creating a new saved search with the modified criteria, so choose a different name from what you used before. The Organizer will let you use the same name, but then you end up with two identically titled items in the Saved Searches dialog.
Remove Duplicate Photos
Organizing thousands of files invariably leads to duplicate photos (especially if they’ve migrated between applications and devices over the years). Although duplicates in general aren’t a problem—you should have plenty of storage to handle them—they can be annoying or distracting.
Getting rid of pesky dupes turns out to be a little more difficult than you might expect, but utilities exist to make it happen with only a little babysitting on your part.
Remove Duplicates in Lightroom Classic
Lightroom Classic itself doesn’t offer a method for finding duplicates, but its plugin architecture allows others to create tools that do. I like Teekesselchen for its speed and straightforwardness:
Select a collection or All Photographs to scan.
Choose Library > Plug-in Extras > Teekesselchen > Find Duplicates.
Click Find Duplicates to perform the search (Figure 71).
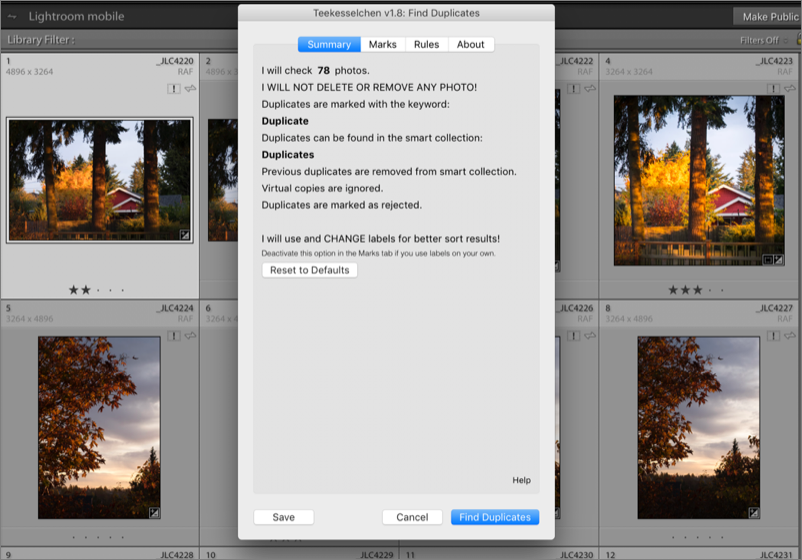
The duplicates it finds are tagged with the keyword Duplicate, marked as Rejected, and added to a new Smart Collection called Duplicates.
Nothing is actually deleted from your library, which is good, because you’ll want to go check the plugin’s work. It’s overzealous about what it treats as duplicates. For example, since I often shoot in Raw + JPEG format, it flags the JPEG versions of the pairs as duplicates.
You can change the criteria the plugin uses in the Marks and Rules tabs of the Teekesselchen dialog.
It also treats photos shot in burst mode as possible duplicates, because the timestamps are so close when you shoot in succession. Lightroom normally doesn’t examine time beyond full seconds, so a bracketed burst (where you’ve set the camera to capture three or more shots at different exposures) can all look like duplicates. To let Teekesselchen recognize sub-second timing, install the separate utility ExifTool and enable that feature in the Rules tab of the Teekesselchen dialog.
When you’re confident the duplicates have been found, select them in the Smart Collection and choose Photo > Delete Rejected Photos or Photo > Remove Photos from Catalog.
Remove Duplicates in Photos for Mac
The utility PowerPhotos can do a lot with your Photos library, from managing multiple libraries easily to merging existing libraries. One of its tools can find duplicates and assign a keyword or move them to an album so you can delete them later:
In PowerPhotos, select your Photos library (which may be the only option if you have just one).
Choose Library > Find Duplicates.
Click Begin Duplicate Search.
PowerPhotos displays results based on the selected Keepers criteria at the bottom of the screen (Figure 72). By default, it keeps the most recently-modified duplicate, but you can also choose which to keep based on other factors in the Keepers pop-up menu.
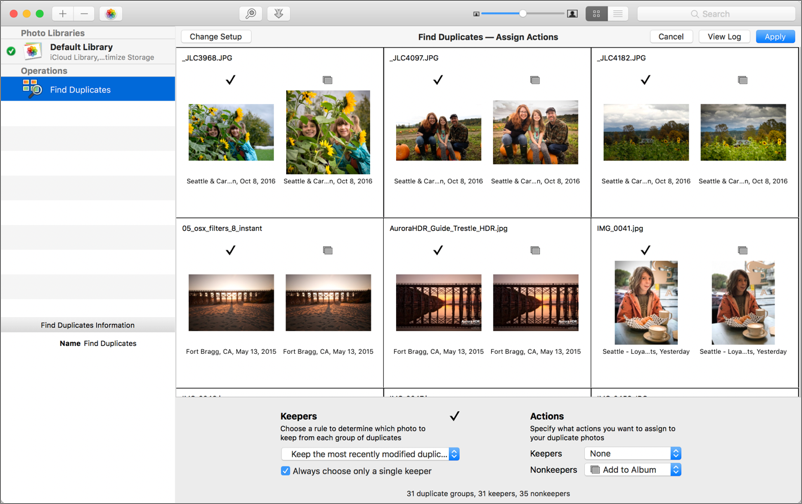
Figure 72: Finding duplicates in PowerPhotos. Under Actions, choose how duplicates are handled: placed into a new album or marked with a keyword.
Go through the possible duplicates and pick which versions to mark as keepers and which as “nonkeepers” (Figure 73).
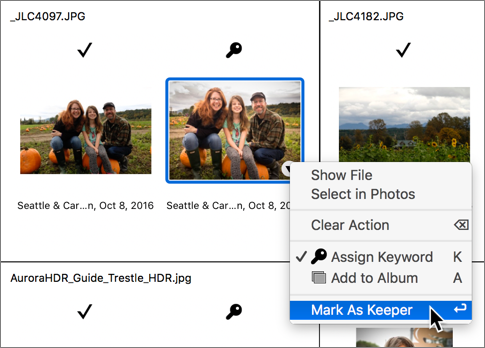
Figure 73: Mark which version to keep in PowerPhotos. Click Apply to process the photos.
To delete the duplicates in Photos for Mac, go to the Duplicates album or search for the
duplicatekeyword, and then delete the images.
Remove Duplicates in Photoshop Elements
The Elements Organizer takes a slightly different approach to locating duplicates, but it’s a feature that’s built right in. It finds photos that are visually similar, and gives you the opportunity to group them into stacks:
In the Media pane of the Organizer, choose Find > By Visual Searches > Duplicate Photos. The application displays similar photos in rows (Figure 74).
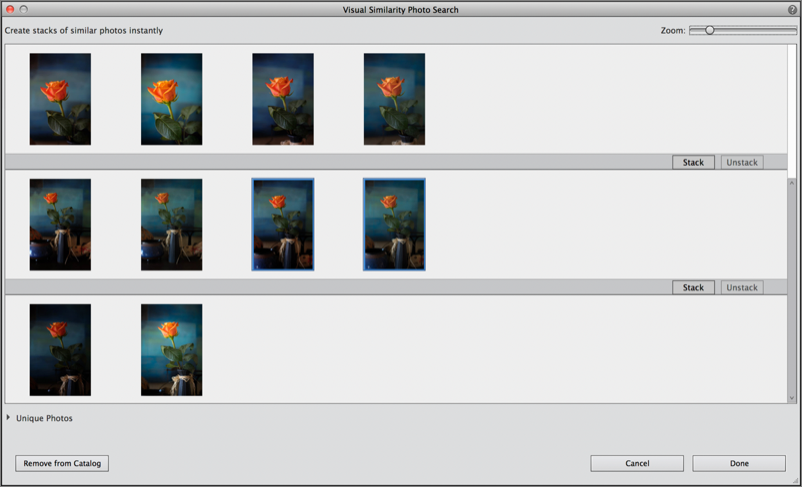
Figure 74: Photoshop Elements looks for duplicates and arranges them in stacks for review. Select the photos in each row that are likely duplicates, and click the Stack button.
Click Done when you’re finished.
Choose Find > All Stacks.
Double-click a stack to view the first photo in it.
Choose Edit > Stack > Expand Photos in Stack.
Scroll through the photos to determine which ones to keep and which to discard. You can tag the duplicates in the Information panel, or choose Edit > Delete from Catalog to remove one right away.