
Back Up and Archive
An old printed photo is often precious because it’s the only copy that exists. You may be able to make a new print from a negative, but what if the negative is no longer available? If the prints and negatives are accidentally thrown away or damaged, that particular image is gone.
In the digital age, that type of scarcity isn’t as much of a problem. You can easily make hundreds of digital copies of a photo, transmit it around the world with a click, or send the image file to a drugstore and have inexpensive prints made.
And yet, digital photos suffer from a different type of scarcity: no matter how easily they can be reproduced, bits are fragile in a way that paper or film isn’t. One drive failure can wipe out your photos—all of your photos—in an instant. If the read/write head of a drive starts chopping into the physical surface of the disk, or the bits on a solid state drive (SSD) get scrambled—or worse—those photos are toast.
The solution is to ensure you have a solid backup system in place—not just for your photos, but for all your important data. You want multiple copies that you can access easily and reliably.
You also want to make sure you can read the image files in the future. Unfortunately, as I discuss at the end of the chapter, that isn’t an easy guarantee given the change in software and hardware over the years.
Back Up Your Photos
As a photographer, you probably view your photo files as special collections of bits, but the truth is your computer sees them as just more data. That’s why it’s important that you have a system in place that backs up all your data, including photos.
I can’t cover all the ramifications of a good backup scheme here, but if you use a Mac, you’re in luck: Joe Kissell has already done that work. I highly recommend his ebook Take Control of Backing Up Your Mac (and not just because I’ve been fortunate enough to edit several iterations of the title). If you use Windows, the advice below applies just as well. Joe goes into much more detail, but here are the components of a solid backup system that you should be working with today:
A versioned backup: This backup scheme doesn’t just make a copy of your data, it also stores several past versions so you can go back and recover one saved earlier than the most recent version (for example, if you need a paragraph in a document from last week that you accidentally overwrote yesterday). The Time Machine feature in macOS is a versioned backup; it scans your computer every hour and makes a copy of files that have changed since the last time it ran. Another example is Dropbox, which stores a copy each time you save a file in your Dropbox folder.
A bootable duplicate: If your hard drive decides to head for the great spinning platter in the sky, how long will it take for you to get back to work? A bootable duplicate is a mirror of your hard disk you can swap in if the original fails. You can also make a bootable duplicate of an SSD startup drive.
An offsite backup: A dozen backups won’t mean anything if they’re all stacked near your computer when a fire or other disaster strikes. So in addition to having a versioned backup to quickly access files and a bootable duplicate to run the computer, make sure you have a copy of your data that resides somewhere besides where you normally use the computer. That could be an online backup such as Backblaze, or a duplicate drive you take to an office or the house of a trusted friend (or both).
But even if you already have this three-pronged backup system in place (how responsible of you!), I recommend maintaining at least two backup copies of just your photo library.
Yes, these are above and beyond normal backups. Why? First, because photos are the most precious data on my disk—and something I can’t recreate—I want to make sure I have a separate copy of my library. Most of the other data on my hard disk either runs the computer or is devoted to business or other files that can be replaced.
Second, photos occupy a lot of storage space. All my business and personal files fit into a comparatively small portion of my drive that gets backed up to Dropbox. But my photo library runs well over 1 terabyte, which is too large to effectively store remotely. (It’s not impossible, but since my house isn’t connected to an internet backbone, the transfer times are lengthy.) So, by nature of size alone, digital photos demand different treatment.
So why two copies? It’s important to have two so you can rotate them: take Duplicate_1 off-site and use Duplicate_2 for backups for a couple of weeks (or every month, depending on how often you update your photo library), and then take Duplicate_2 off-site and use Duplicate_1 as the active backup.
The photo management software you use will help dictate the best way to back up your library. If your library exists on an external hard disk, it’s easy to create a discrete backup by duplicating that disk; Lightroom Classic, Lightroom CC, Photos, and Photoshop Elements all support storing photos on an external disk.
Let’s look at how to back up the two important components of your photos: the image files themselves and their metadata. Since the metadata is tracked by the applications, the programs include features for backing up their catalog databases.
Back Up Image Files
If your photo library resides on an external drive connected to your computer, the easiest way to make a backup is to duplicate the disk’s contents. I use SuperDuper ($27.95), which makes a perfect copy of my media disk to a backup disk (Figure 82); another popular option is Carbon Copy Cloner ($39.99). Under Windows, look to Macrium Reflect Home Edition ($69.95) or Paragon Backup & Recovery Free (free). These utilities offer a “smart backup” feature that copies only new files in subsequent backup passes, saving a lot of time spent transferring data. They also support scheduled backups to automate the process.

What if your computer includes a capacious hard disk and your photo library is stored there along with all your other data? Your photos will be backed up along with the rest of your data (because you’ve read Joe’s book and implemented a system-wide backup system, right?).
To create an additional backup of your photos, use a synchronization application such as ChronoSync ($49.99) to sync just the photo folder or library file. (By default, all the photo management applications I cover store images in the Pictures folder located in your Home folder, but you can change that location.)
Back Up Metadata
Of course, all the work you’ve done so far in this book would fly out the window if you lose the metadata you’ve assigned to those photos. Lightroom Classic and Photoshop Elements include a way to back up the database that ties all the metadata and images together.
Lightroom Classic
Lightroom Classic asks to back up the catalog when you quit the application.
To change the frequency of when you’re prompted to back up, do the following:
Choose Lightroom > Catalog Settings.
Click the General tab if it’s not already active.
Under Backup, choose an option from the “Back up catalog” pop-up menu. I have it set to “Once a day, when exiting Lightroom,” but you can choose a more- or less-frequent time period (Figure 83). To access your backup settings and change the location of the backup file, choose “When Lightroom next exits;” that ensures the Back Up Catalog window appears the next time you exit the program.
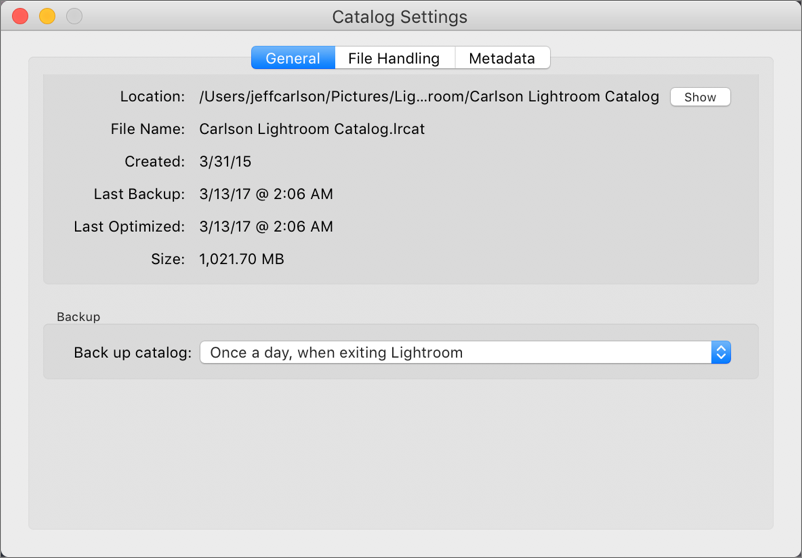
Figure 83: Choose when Lightroom backs up its catalog file. Close the Catalog Settings window.
If you want to change the location of the backup file, do this:
Quit Lightroom.
In the Back Up Catalog dialog that appears, click the Choose button associated with Backup Folder (Figure 84).

Figure 84: With these settings, Lightroom backs up its catalog once a day when you quit the application. Specify a location and click Choose.
Click “Back up” to back up the catalog.
Photoshop Elements
The Elements Organizer in Photoshop Elements includes a Backup Catalog feature as well as a regular reminder to use it. When the Organizer makes a backup, it includes everything—files and metadata. Here’s how to get started:
Choose File > Backup Catalog.
In the Backup Catalog to Hard Drive window that appears, choose Full Backup. (You must perform a full backup before you can make incremental ones.) Click Next.
Choose a destination drive, and optionally change the name or specific folder location of the backup (Figure 85). I recommend that you create a new folder for the destination, because of the way Elements handles incremental backups (just ahead).
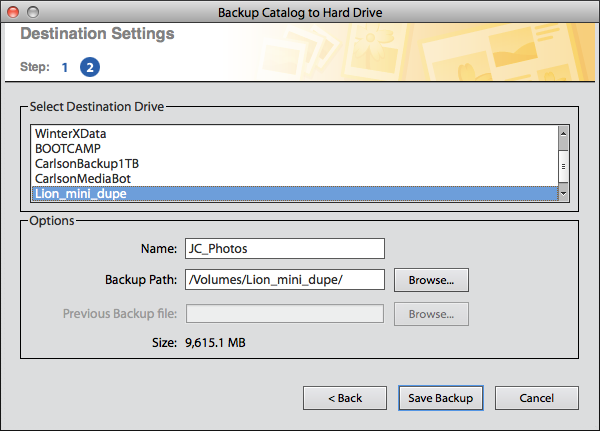
Figure 85: Specify a location for the catalog backup in the Elements Organizer. Click Save Backup.
The files and catalog data are saved.
The process of updating an existing backup is strangely kludgy:
Choose File > Backup Catalog.
In the window, choose Incremental Backup and then click Next.
Select the destination drive from the list provided.
For the Backup Path setting, click Browse and in the dialog that appears, create a new folder that’s separate from the original folder you made when performing the full backup. I suggest naming it something with an incremented number, like
CarlsonBackup02. The Organizer stores incremental files in separate folders—which you have to create.Click the Browse button next to Previous Backup File and locate the backup file you created earlier; it’s called
backup.tly.However, if you’ve already made an incremental backup, you need to choose the
backup.tlyfile either in the original backup folder or in the previous incremental backup folder you created! So if this is the fifth time you’ve made an incremental backup, you need to choose thebackup.tlyfile located in (to use my example) theCarlsonBackup04folder. Madness.Click the Save Backup button.
Lightroom CC and Photos for Mac
Since Lightroom CC and Photos store everything together in one package file, make sure that the file is getting backed up in your larger backup scheme, and synchronized to an external disk.
Online Backups
Earlier I mentioned online backup options such as Dropbox and Backblaze, but of course those aren’t the only options for photographs. Flickr, 500px, SmugMug, Google Photos, Amazon Prime Photos, and other photo-sharing sites let you upload photos for others to see. They seem like ideal solutions for storing off-site backups—they’re designed for photos! However, I don’t recommend them as genuine backup services.
Not long ago, I’d have argued that limited storage space was the primary restriction, but the big players now offer unlimited or very generous storage. Flickr, for example, offers 1 terabyte of photo storage for members, even those who sign up for free accounts. (If you had a Flickr Pro membership prior to May 20, 2013, you may still have unlimited storage grandfathered in.) Both SmugMug and 500px offer unlimited uploads for paid accounts.
Now, the problem is transferring all that data in a reasonable timeframe. Making a true backup of your photo library can require weeks of upload time (and potential trouble with your internet service provider, who may see your massive outflow of data as suspicious).
Also, although the sites do a fair job of extracting metadata such as keywords from the uploaded images, they don’t support ratings. And the sites generally support only JPEG files, leaving raw originals out of the backup. (See Go Mobile with Online Photo Services for more details.)
That said, I do believe that you should subscribe to at least one photo-sharing site, even at the free level, and think of it as the if-everything-else-burned-up-in-a-fire disaster alternative. Upload your favorite photos so others can view them (or choose who gets to access the shots using the site’s privacy features) and use it as an offsite backup for a limited collection of your library.
Archive Photos for the Future
When we think about keeping photos safe, we also need to look to the future. How will we view our photos in 5, 15, or 50 years? Our grandparents’ prints survive in our closets because they were printed on paper that, in general, has held up pretty well over the decades.
Digital technology, however, is a different case entirely. Did you ever store your photos on floppy disks, or maybe Zip disks? Today, you can’t read either medium without old drives or adapters to bridge the connectors used then—such as SCSI and parallel ports—with what ships now—like USB and Thunderbolt connectors.
Hard disks are the best mechanisms for storing your active library, and they turn out to be, for now at least, the best choice for archiving. Keep in mind that when I say “best,” I’m really saying, “the least painful option,” because hard disks are occasionally unreliable. In addition to wear and tear affecting their delicate components, they’re not ideally suited for long-term storage: they stick if not spun up occasionally. This means you can’t reliably store your library on a hard disk and put it on the shelf indefinitely.
CDs, DVDs, and Blu-ray optical discs all suffer from having comparatively little available storage and from plastic surfaces that degrade over time. Even discs that claim long lifespans haven’t been around long enough for us to know whether they’ll last 30–50 years, at which point drives that can read them likely won’t exist.
So, at least until someone cracks this storage nut, you’ll want to implement a rolling backup strategy. Transfer photos from older, smaller-capacity hard disks to newer, larger-capacity hard disks as technology improves and as you need more storage. And be sure to maintain redundant backups to ensure you don’t lose images on the way.
The rolling backup strategy applies to software, too. Even if you use Lightroom for years, there’s no guarantee you’ll be able to read a library created with a much older version of the software. So it’s also important to keep your backups up to date with your software’s current library format.
As I’ve reiterated throughout this book, the photos’ metadata is almost as important as the image files themselves. Ideally, your photo management software—which tracks that metadata—will continue to be updated and improved, but as history has shown, that isn’t always the case.
If you’re truly concerned about the possibility of losing metadata, Lightroom Classic offers an additional safeguard: write the metadata to the original image files. If Lightroom were to disappear or suddenly stop working forever, the essential information—mainly keywords and IPTC information—will transfer to whatever new software you use. That way, you’re not entirely dependent upon the application’s database for tracking metadata.
To marry your images and metadata, choose Lightroom > Catalog Settings, click the Metadata pane, and select the checkbox for Automatically Write Changes into XMP. The information is included in JPEG images and saved as XMP sidecar files for raw images. XMP sidecars are small text files that contain a photos’ metadata and are saved alongside the image files. Many applications, when importing images, will read the XMP file along with the image file and display the information together.
(You can also save metadata to image files manually by selecting one or more photos and then choosing Metadata > Save Metadata to File, or pressing ⌘-S. This feature is most helpful when you’re sharing photos with someone else who’s using Adobe Bridge or other software that recognizes XMP files.)
Admittedly, this is a step above normal operating procedure, since it essentially gives you a fallback position in case Lightroom were to suddenly vanish—which is very unlikely. But for the best approach going forward with Lightroom Classic, it’s a solid plan.
I don’t want to end this chapter on a sour note, so I’ll reiterate the most important point: you need a system in place that backs up all of your data, not just the photos—and does it regularly. And, because I’m paranoid, having an extra backup (or three) of your photo library is a great idea, too.