
Take Advantage of Software Intelligence
The system I describe in this book is designed to give you the most control over your photo library, enabling you to easily locate your images whenever you need them. It’s also designed to require as little of your time as possible, because we all know from experience that if organizing photos takes too much time, we’re far less likely to continue doing it.
Sometimes, though, even that is too much. The simple truth is that most people don’t organize their photo libraries beyond storing them or perhaps making an album or two.
And that’s okay.
Even I fall into this camp at times, not always properly tagging my photos after I import them due to lack of time or energy. (However, as I describe in Apply Metadata at Import, I do take advantage of import settings that perform a lot of the work for me.)
Clearly, I’m not alone, because the biggest push in photo organization recently has been identifying the contents of photos using machine learning, or artificial intelligence (AI). We’ve seen this already with facial-recognition features that find specific people in images. The newest AI features go even further, recognizing things like trees, snow, animals, and many other objects and scenes. Instead of trying to remember when you took a ski trip years ago, for example, you can quickly narrow the search by finding all photos with snow in them.
In this chapter, I show you how to use these AI-based features to locate your photos without relying on edited metadata. These features don’t eliminate the benefit of other organization strategies—you’ll still better take control of your photos by judging, assigning keywords, and organizing your photos using the advice throughout this book—but AI can give your searches an additional boost.
Photos for Mac and iOS
If you’re invested in Apple’s Photos ecosystem on the Mac and in iOS, you’ll be interested to know that the latest versions have made strides toward helping you locate photos using minimal work on your part.
Memories
I’ve always liked the idea of having a “photographic memory,” but in reality it would be annoyingly tedious: who wants to remember all the mediocre shots? For the Memories feature, Photos collects highlights for time periods or locations (chosen by the application without input from you). Select Memories in the sidebar to see what Photos has cooked up for you (Figure 6).

Double-click a memory to reveal the images and videos in it. At the top is a slideshow summary, followed by the photos and videos themselves. The app also identifies people, plots any location-tagged photos on a map, and offers related memories (Figure 7). For “Best of” memories, Photos most often selects shots you’ve marked as favorites, but not exclusively.

If a memory doesn’t strike your fancy, scroll to the bottom and click Delete Memory; the photos themselves aren’t removed. Or, if it’s a memory you want to come back to regularly, click Add to Favorite Memories to store it in the Favorite Memories album.
Unfortunately, you can’t edit a memory by removing or adding images. If you delete a photo from a memory, it’s actually deleted from your photo library! (So don’t do that.) If you like the collection, but want to fine-tune it, consider creating a new album containing the shots. Select the photos you want, or select nothing to build an album with all of the images, and choose File > New Album. In the dialog that appears, give the album a name and click OK.
Text Search in Photos
If you add keywords to your images, a text search is the quickest way to locate them. But even without adding keywords, you’ll probably first turn to the Search field thanks to the AI features in Photos.
Click the Search field in the top-right corner of the window, or press ⌘-F, and type a query, such as snow (Figure 8).

Photos brings up images that are tagged with keywords containing snow, as well as categories that it has created based on its AI, such as snowstorm.
Search options include:
Descriptions: Type any text that could appear in the title, description, or keywords fields.
People: Type the name of a person you’ve identified using the app’s facial recognition features (see Use Facial Recognition).
Dates: Type a date to view photos from that time period, such as
Nov 2012. Are you looking for a photo you know you shot in April but don’t recall the year? TypeAprilto view all photos shot in that month for all years.Locations: Type the name of a location to find photos tagged with GPS coordinates (like those shot with the iPhone).
Combinations: Combine terms to narrow your search, such as
Glendale 2014to bring up all photos shot in Glendale just for that year.
In my experience, the search results are usually about 80% correct—sometimes Photos will confuse a bright sand beach with snow, for instance, or make other near-misses. But the advantage is that you don’t have to work for any of those results. The application scans your library to find matches for the approximately 4,000 scenes and objects that it recognizes. (When you add a batch of new photos to your library, Photos spends time and processing power chewing on them just for this purpose, so don’t be surprised if Photos is consuming a lot of power in the background after import.)
Siri
In 10.12 Sierra and later on the Mac, Apple’s voice assistant stands ready to peruse your photos using the same search features found in the Search field. In fact, the Photos application doesn’t even need to be open to ask Siri to fetch images.
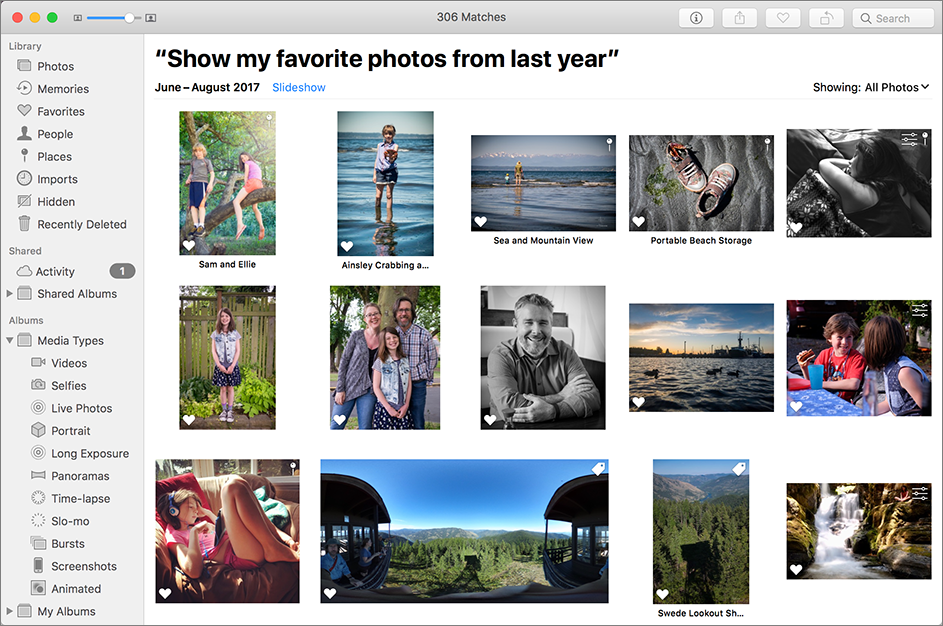
Activate Siri on your Mac and ask for photos containing keywords, categories, or other information (click Siri in the Dock or the menu bar, press the Siri button on a TouchBar-enabled MacBook Pro model, or hold ⌘-Space on your keyboard). For example, say, “Show my favorite photos from last year.” Siri opens the Photos app and displays the result (Figure 9). You can also combine parameters using natural language commands such as, “Find photos of coffee in California.”
As with other searches, Siri’s results can be hit or miss. I can say, “Show me photos from March 1, 2016” and get the correct results, but if I say, “Show me photos from this day one year ago,” I get a smattering of shots on and around that date. Apple is always working on Siri’s capabilities on their end, so I’m hopeful this type of recognition will improve over time.
Finding People
Before computers started looking for familiar objects in photos, they focused on people. Algorithms for identifying faces in images soon led to matching specific people, making it much easier to find all photos in which a person appears. The only work you need to expend is naming people in some of your photos so the application can find them in other shots (see Use Facial Recognition).
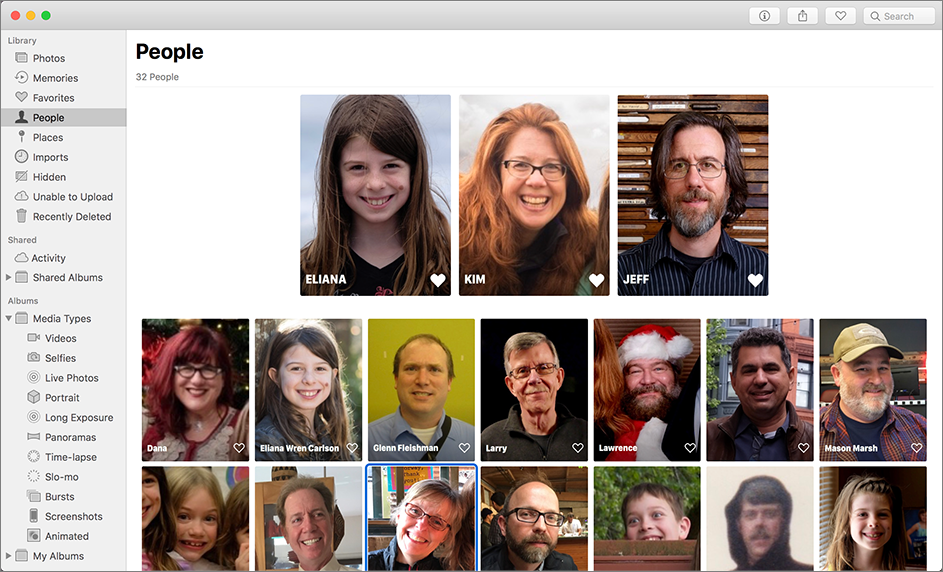
Click the People album in the sidebar. From the identified people that appear, double-click one to browse photos in which they appear (Figure 10).
After you’ve named someone, you can also type their name into the Search field to find photos that include them. For people you search for regularly, mark them as favorites so they always appear at the top of the People screen: when viewing the person’s photos, scroll to the bottom of the list and click Favorite This Person.
Lightroom CC
Adobe developed Lightroom CC as an online-native Lightroom experience. Its automatic synchronization of all your photos makes the images available on any device running a flavor of Lightroom. There’s another benefit, too: Adobe’s servers analyze the images for specific features using Adobe Sensei, a machine learning system that is the heart of Lightroom CC’s search features.
Text Search in Lightroom CC
Performing a search in Lightroom CC brings up results based on the Title, Caption, Location, and Keywords fields, as you would expect. But it also responds to names of objects and scenes within the photos, even if you didn’t enter any of that information yourself.
Click the Search field at the top of the window, or press ⌘/Ctrl-F, and type a query, such as snow (Figure 11).

snow in the metadata.Adobe Sensei also plays a part in editing photos. When you click the Auto button in the Edit panel, the application uses data gleaned from hundreds of thousands of similar scenes (landscapes, portraits, and so on) to come up with pleasing results. In some cases, Auto is quite good.
Unfortunately, search in Lightroom CC is based exclusively on Sensei, which means that if your computer is not online, you can’t search—even for keywords or titles you’ve applied. I’m hoping this is a temporary limitation that will be fixed in the near future.
Currently, Lightroom CC does not include other machine-learning features such as finding people or curating memories and videos.
Photoshop Elements
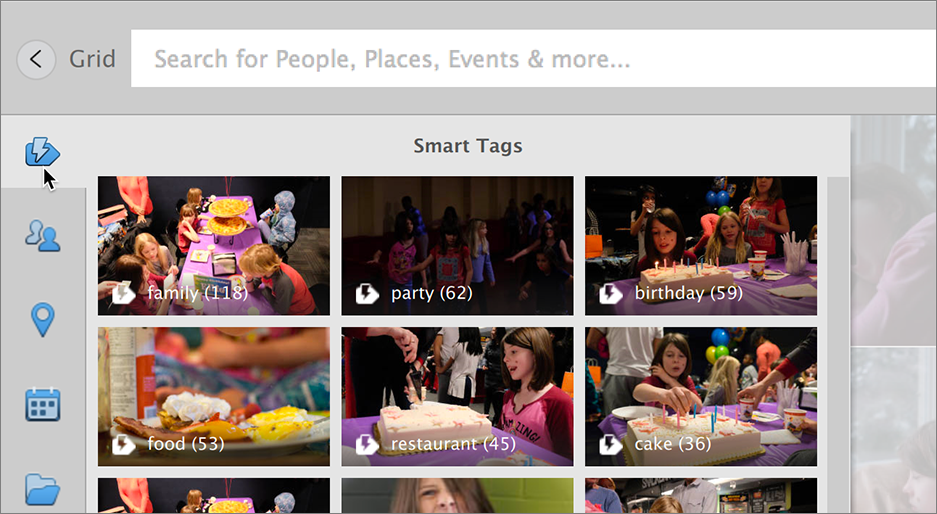
The Elements Organizer’s variation on machine learning is a feature called Smart Tags, which analyzes scenes and assigns keywords. To view them, perform a search by clicking the Search button at the top-right corner and then click the Smart Tags ![]() button (Figure 12).
button (Figure 12).
Google Photos
If you’re not invested in the Apple Photos ecosystem, Google Photos is a great service for making your library available on multiple devices. One reason to use it, as I explain in Go Mobile with Online Photo Services, is as an easy go-to backup of your images. (See that section for instructions on how to set up the service.) An even better reason is that Google Photos excels at making your photos searchable without any work on your part.
Unlike Apple’s approach, Google Photos does all of its image analysis in the cloud. JPEG versions of your photos are uploaded and scrutinized for content by the petaflops-worth of global processing power at Google’s disposal. It identifies objects and scenes, matches faces, and even does fun things like make animations out of bursts of photos captured together.
Truth be told, sometimes I’ll search for an image using Google Photos on my Mac or iOS device, and then use the filename of the result to locate the original shot in Photos or Lightroom. Or, if I want to share an older photo that’s stored in my Lightroom library (because it’s on an external drive at home, for example), I’ll download the Google Photos version and work with that.
Text Search in Google Photos
To locate photos on the Mac, access Google Photos via the web; in iOS, you need to run the dedicated Google Photos app. When you use the Search field in either system, you can type any term, select a person that appears in your library, choose from several automatic categories (such as Selfies), or choose a recent location (Figure 13).

Google Photos completely forgoes manually assigning keywords to images, but that’s okay. The object and scene recognition is generally good enough to perform general searches. The results include Google-generated keywords, locations, and albums at the top, with individual photos and videos to follow (Figure 14).

When you combine search terms, you can usually get results that match. For example, Jeff trees brings up photos where I appear (since I’ve already identified myself in photos as Jeff) in the same frame as one or more trees. This works for places, too, if a location has been set. Searching for waterfalls in Washington in my library displays matches.
However, it also presents some waterfall photos I’ve shot in Oregon, because those shots don’t include location metadata. In general, I’d say searches in Google Photos tend to over-deliver results that you can easily sort through, rather than exclude items.
Assistant
Similar to the Memories feature in Apple’s Photos application, Google Photos’ Assistant presents several novel ways to revisit your photos. It happens automatically, such as with the Rediscover This Day feature that collects media from one or more years ago (Figure 15). The Assistant also works on its own schedule—or rather, Google’s distributed computing schedule—so don’t be surprised to find an album of images from a year and a half ago suddenly appear in the Assistant.

Some of the creations are simply fun: movies built using media from a particular day, or themes such as “Smiles of 2016” that collects photos where people are smiling. Other creations handle post-processing tasks such as stitching panoramas from photos that were shot within a similar time period and have overlapping edges, or HDR (high dynamic range) composites generated by merging two or more identical shots that have varying exposure levels.
The items that appear in the Assistant are just suggestions and not permanent. If you want to keep one, click the Save to Library button. Or, click the X that appears when you position your pointer over an item to dismiss it.
At the top of the page, you can create a new album, shared album, collage, or animation, and then select the media to appear in it.
Albums
The Albums view of Google Photos includes collections you create yourself, as well as any Assistant-generated albums you’ve chosen to save.
It’s also the place to browse photos based on their contents. Specifically, click the Things album to view albums of auto-assigned categories, such as Flowers or Concerts (Figure 16).
