Assign Keywords and Other Metadata
When my wife and I moved into our house, we repainted most of the interior walls. It was a time-consuming task, but not because of how much wall space needed covering. Splashing color on the wall was the easy part. Taping around windows, preparing the room, and then touching up the edges and corners took much more time.
In Import Your Photos the Smart Way I talked about adding metadata during the import process because, to me, that’s the easiest way to apply it. Assigning keywords and other information during that initial stage takes some prep time, but when you click the Import button, the metadata is applied with a broad brush across all your incoming photos. (It’s like handing a paint roller to a capable assistant while you supervise, preferably with a beverage in hand.)
After import, though, you have touch-up work to do. To make your photos easily searchable later—the ultimate goal in our organization project—you need to apply more-specific metadata to individual photos. This might include identifying people and landmarks, or describing shots.
In this chapter, I look at how to choose good keywords and how to apply them smartly. I also discuss how to fix incorrect dates and times, apply geolocation information, and use facial-recognition tools.
Assign Metadata
Your camera embeds all sorts of metadata, such as the shutter speed, aperture, and focal length, into photos. You’ll rarely search for photos based on those criteria, though. What your photos really need is a sense of context—and only you can provide that.
Although you can add descriptive information in several ways—including image titles and captions—I’m focusing on keywords in this section to streamline the process. Writing a title and caption for every image would slow your progress—and increase the chance that you’d abandon the effort altogether—because you end up writing original content for each photo.
By focusing on keywords at this stage, you can refine the metadata in batches as you work, so you save time. Think of it as building a pyramid of image information (Figure 28).
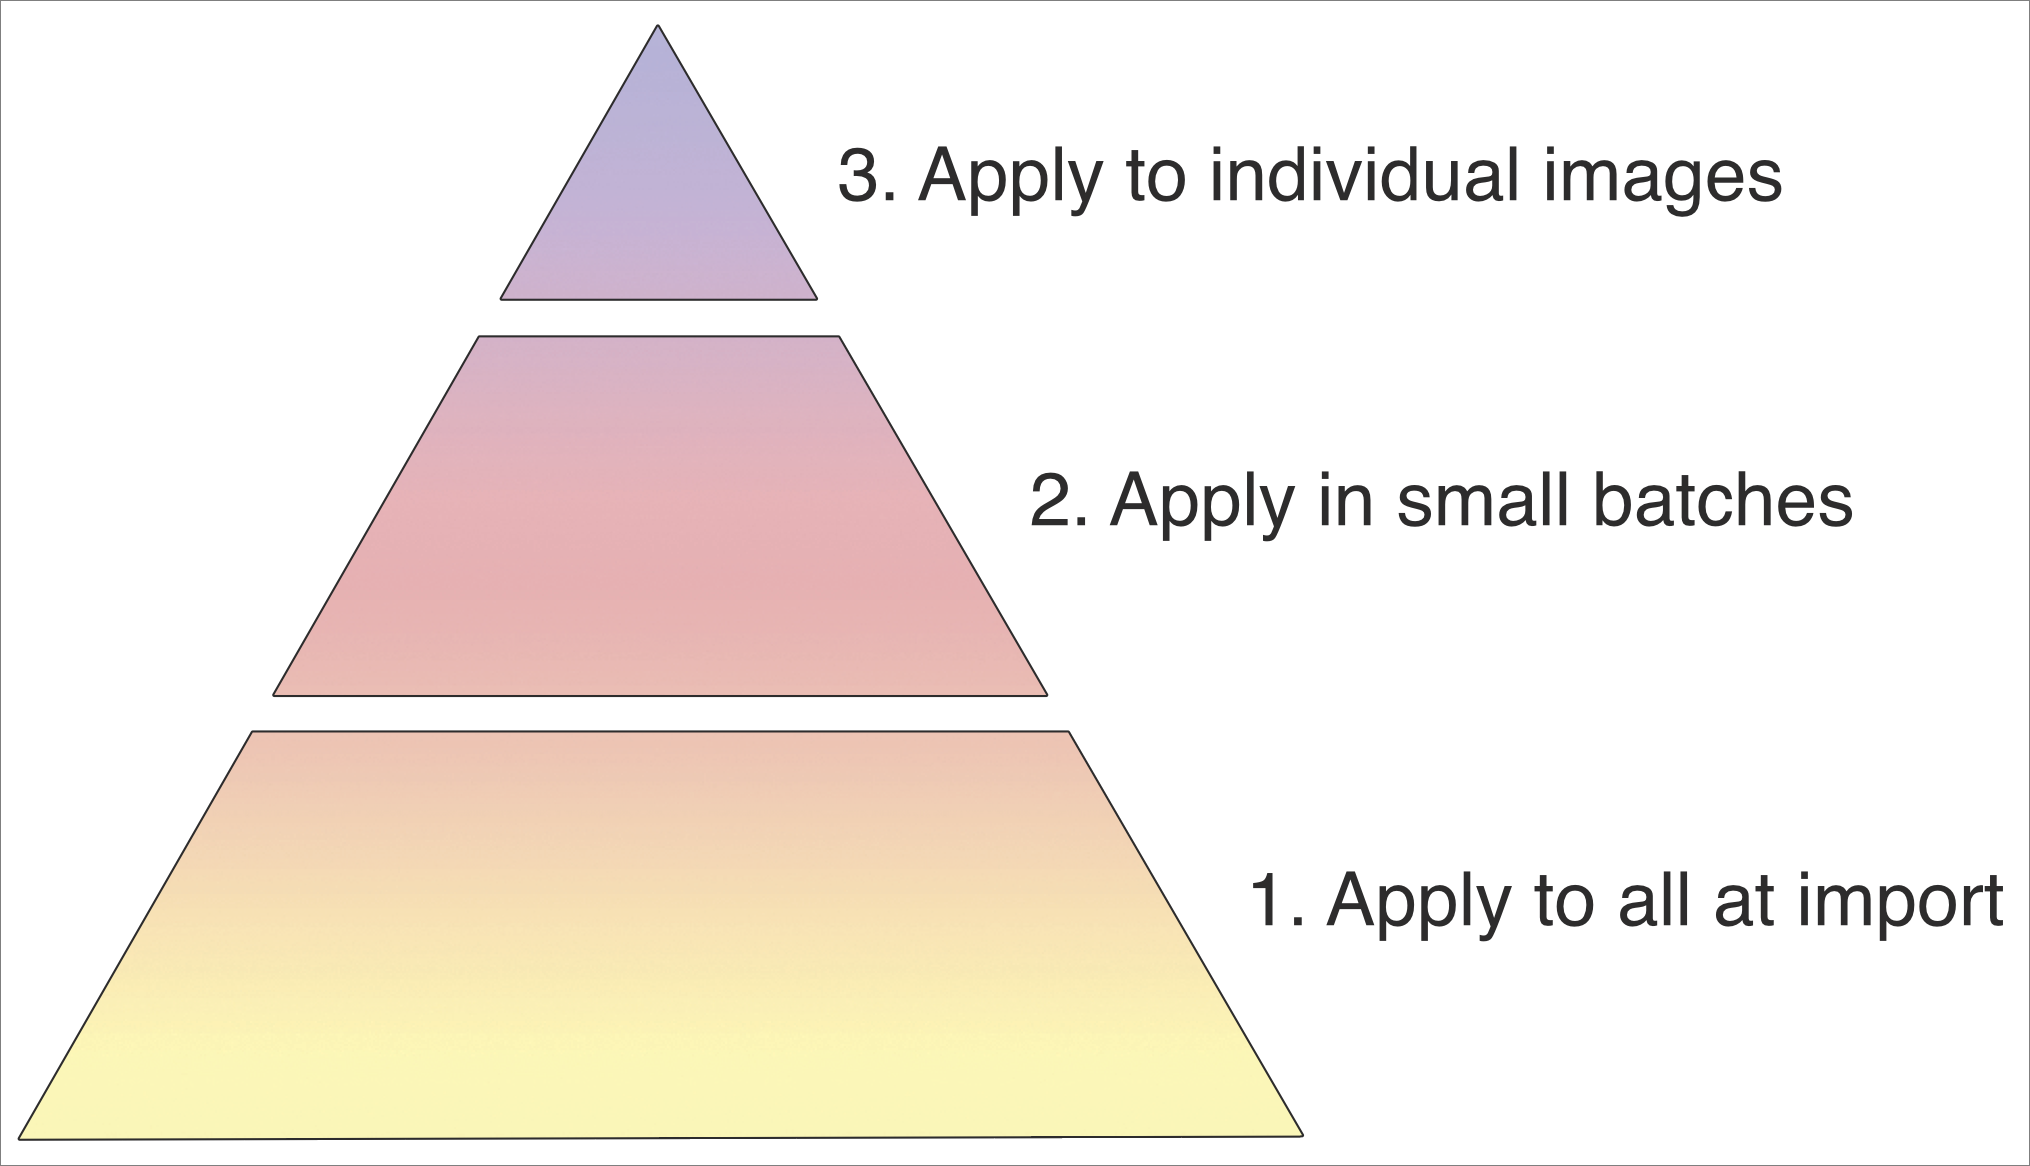
Build up, starting with keywords that apply in general, and then proceed to more specific keywords:
During the import stage, assign keywords that apply to every photo in a set, laying down a foundation of metadata.
In another pass, assign common keywords to smaller batches of images; for example, maybe all the imported photos were taken at Disneyland, but only a couple dozen are from the Tomorrowland section. You can add a
tomorrowlandkeyword to all those images in one step, versus tagging each shot as you encounter it.Lastly, customize select photos individually by writing titles and captions and applying any additional keywords. I tend to add this level of metadata only to images I rate highly or share online.
Choose Good Keywords
Keywords add searchable context to your shots—but which keywords should you use? Unfortunately, there’s no universal list of accepted terms. You have to anticipate what you or someone else will be searching for in the future. Generally, that falls into two categories:
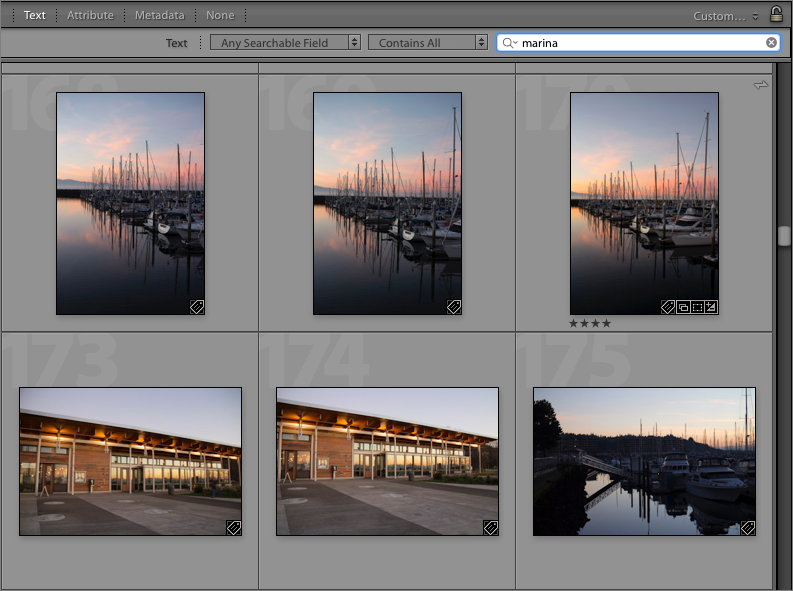
Keywords that describe the contents of a photo. For example, the photo in Figure 29 could include
boats,seattle,reflection,bay,fog, andshilsholemarina(the name of the setting). You may want to add further information such assunset,clouds,pinksky,dock, and others.
Figure 29: A sunset at Seattle’s Shilshole Bay Marina. Keywords that describe the type of photo. That could include
landscape(describing both the category and the orientation) in this case. Other images could includenature,macro,people, orblackandwhite(as well as variations such asbwandblackandwhite) that describe those characteristics of the photo independently from its contents. (Since nearly everything is shot in color, I wouldn’t tag something withcolor; black-and-white is its own photographic category.)
Feel free to be generous with your application of keywords. There’s no downside to applying multiple keywords to an image—so long as you have the time—and you can later use that data to pull results from simple text queries. Typing marina in a Search field, for example, narrows the selection of photos to those that contain the word in any metadata field—including keywords (Figure 30). Those keywords also travel with the photo when it’s uploaded to an online service such as Flickr or 500px, so anyone searching for that term will bring up your image.
You don’t need to go crazy and describe every last detail, however. For example, here are the keywords assigned to a photo of Apple CEO Tim Cook (and me—yes, I’m showing off) that’s available for licensing by Getty Images (Figure 31):
Event, History, Business, Finance, Technology, Horizontal, Waist Up, USA, New, California, Apple Computers, San Jose - California, Merchandise, Digital Tablet, iPad, Corporate Business, Tim Cook - Business Executive, iPad Mini

With a handful of keywords, the photographer (or editor) hit the important terms that customers, in this case primarily news outlets, would be searching for (though I’m a little put out that my name isn’t among them). If professional photo companies don’t need to append an extensive list of keywords to their images, the same applies for anyone’s personal library.
Apply Keywords
It’s easy enough to add keywords or other metadata to an individual photo: type it into the associated fields in the software’s Info or Metadata pane. But a better approach is to add the data to several photos simultaneously.
Adding Keywords in Lightroom Classic
In Lightroom Classic, add metadata in the Library module:
Select the photos you wish to edit.
Click the Keywording disclosure triangle to reveal the Keyword Tags field.
Type the words you want to add in the field labeled “Click here to add keywords,” and then press Return (Figure 32). You can also click any term in the Keyword Suggestions and Keyword Set areas.
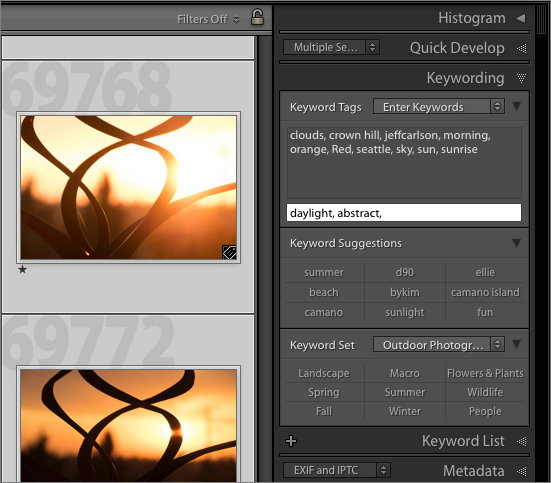
Figure 32: Adding keywords to selected images in Lightroom.
Adding Keywords in Lightroom CC
Keywording in Lightroom CC is pretty basic, but that makes it easier.
Select one or more photos in the Grid view.
Click the Keywords
 button to open the Keywords panel (or press the K key).
In the Add Keyword field, type the terms you want, separating each by a comma or by pressing Return (Figure 33).
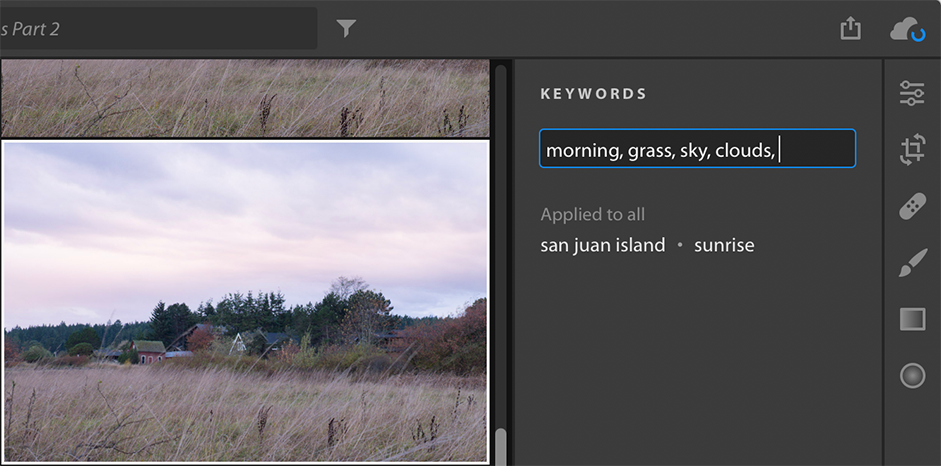
Figure 33: It’s much faster to write all your keywords in one line, separated by commas. Click the Keywords
button again to close the panel.
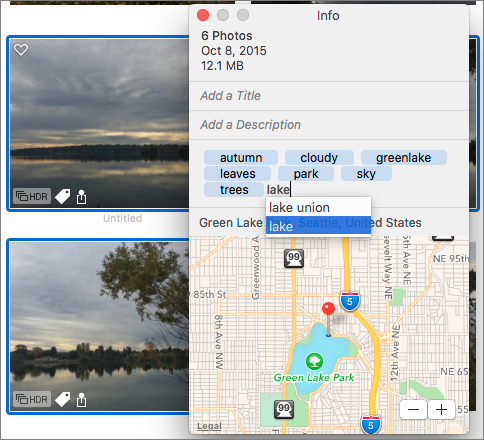
Adding Keywords in Photos for Mac
In Photos for Mac, you can quickly apply keywords in the Info window:
Select the photos you want to edit.
Choose Window > Info (⌘-I) to reveal the Info window.
In the Add a Keyword field, type the terms you want to add, separating each by a comma or by pressing Return (Figure 34).
Adding Keywords in Photoshop Elements
Keywording photos in Elements happens in the Elements Organizer application:
In the Elements Organizer, select the images you wish to edit.
Click the Keyword/Info button at the bottom right to reveal the Tags pane.
In the Image Tags area, type keywords in the Add Custom Keywords field, separating the terms with commas (Figure 35).
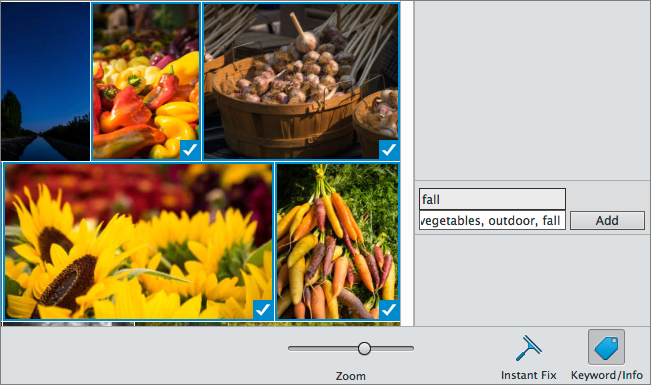
Figure 35: Adding keywords to a batch of images in the Elements Organizer. Press Return or click the Add button.
If you want to edit other metadata, click the Information button and then click Edit IPTC Information (this button appears when multiple images are selected). Enter the data you want in the Edit IPTC Information dialog and then click Save.
Fix Incorrect Dates
In Shoot Smart, I stressed the importance of making sure your camera’s clock is set to the correct time. If it’s offset—often because the Daylight Saving Time setting wasn’t set properly—you can end up with photos out of order in your library.
This inconvenience is common enough that photo management programs include features for dealing with it. Running through the applications, here’s how to wield a little control over time.
Lightroom Classic:
Select the photos you want to fix.
Choose Metadata > Edit Capture Time.
In the dialog that appears, choose a method of time-shifting: Adjust to a Specified Date and Time, Shift by Set Number of Hours (Time Zone Adjust), or Change to File Creation Date for Each Image (Figure 36).
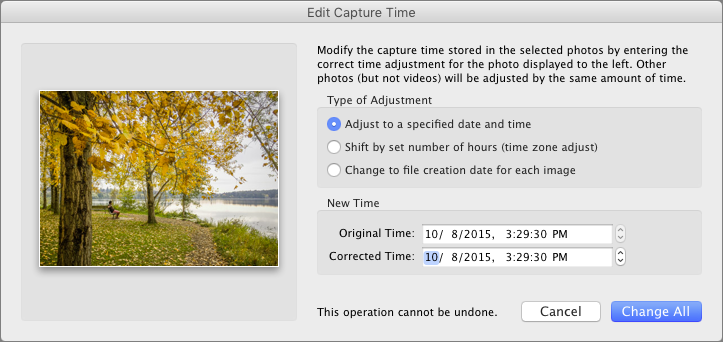
Figure 36: Correcting the capture time in Lightroom Classic. For the first or second option, the shots still retain their relative times. For example, if one photo has a capture time of 10:00 and the next photo was captured 1 minute later at 10:01, changing the first shot’s time to 9:50 would give the second photo the time of 9:51.
The third option—changing to the file creation date—reads the original timestamp from the file on disk.
In the bottom area, set the time you want. Click Change All.
Although the dialog ominously states that “This operation cannot be undone,” that’s not exactly true; it simply means that the Edit > Undo command won’t work. Choose Metadata > Revert Capture Time to Original to go back.
Lightroom CC:
Select the photos that need changing.
Click the Info
 button to open the Info panel.
Click the Shift Date Range
 button next to the Captured date value.
In the Shift Date Range dialog, set a new time or date (Figure 37); if multiple photos are selected, they’ll all shift relative to the value you enter.
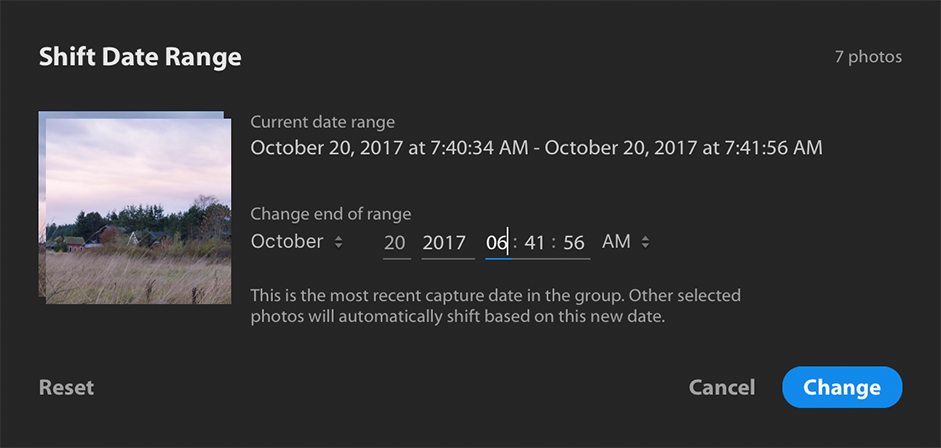
Figure 37: Shifting the capture time in Lightroom CC. Click Change.
Photos for Mac:
Select the photos you want to change.
Choose Image > Adjust Date and Time.
In the dialog that appears, make a change in the Adjusted field (Figure 38). If you were shooting in another time zone and want to adjust for that difference, you can use the map at the bottom of the pane to pick the right location.

Figure 38: Changing the time in Photos for Mac. Click Adjust to make the change.
Fixing dates in Photoshop Elements:
Select the photos you want to change.
Choose Edit > Adjust Date and Time of Selected Items.
In the dialog that appears, pick a method: Change to a Specified Date and Time; Change to Match File’s Date and Time; Shift to New Starting Date and Time (only if multiple photos are selected); or Shift by Set Number of Hours (Time Zone Adjust).
Click OK.
In the next dialog (which varies depending on which option you chose), enter a new time, date, or hour adjustment (Figure 39). If you opted to match the file’s date and time, there is no second dialog because the Organizer reads the information from the file on disk.
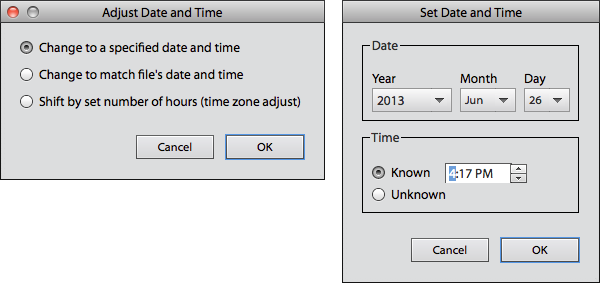
Figure 39: The Elements Organizer’s two-step dialog dance. Click OK to finish.
Apply Geotags
In Shoot Smart, I discussed capturing geolocation data to keep track of where your photos were taken. If you have a device that writes that information to the photos when they’re shot, such as an iPhone, the data is imported with the images. In most cases, though, you need to record the data separately and then add it to the images later.
Use a Geotagged Reference Photo
An easy way to save location data is to shoot a reference photo with a GPS-capable device like a smartphone and then apply the geolocation information to all the photos captured in the same area. You don’t get step-by-step location detail with this method, but in most cases you don’t need that level of granularity. Here’s how to copy location data to your images in each of the programs I’ve discussed.
Geotagging in Lightroom Classic
Lightroom Classic can pull the location data from a reference photo:
Select the photos you wish to tag, as well as the reference photo.
Click the reference photo to make it the target image; doing so identifies the photo as the source of the GPS data.
Click the Sync Metadata button or choose Metadata > Sync Metadata.
In the dialog that appears (Figure 40), locate the Camera Info section and select the checkbox for GPS.
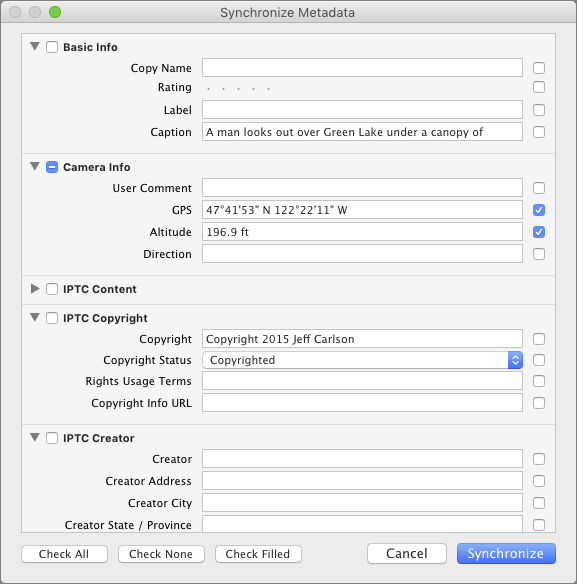
Figure 40: Lightroom Classic syncs selected metadata between photos. Click the Synchronize button to tag the other selected photos with the GPS data.
Geotagging in Lightroom CC
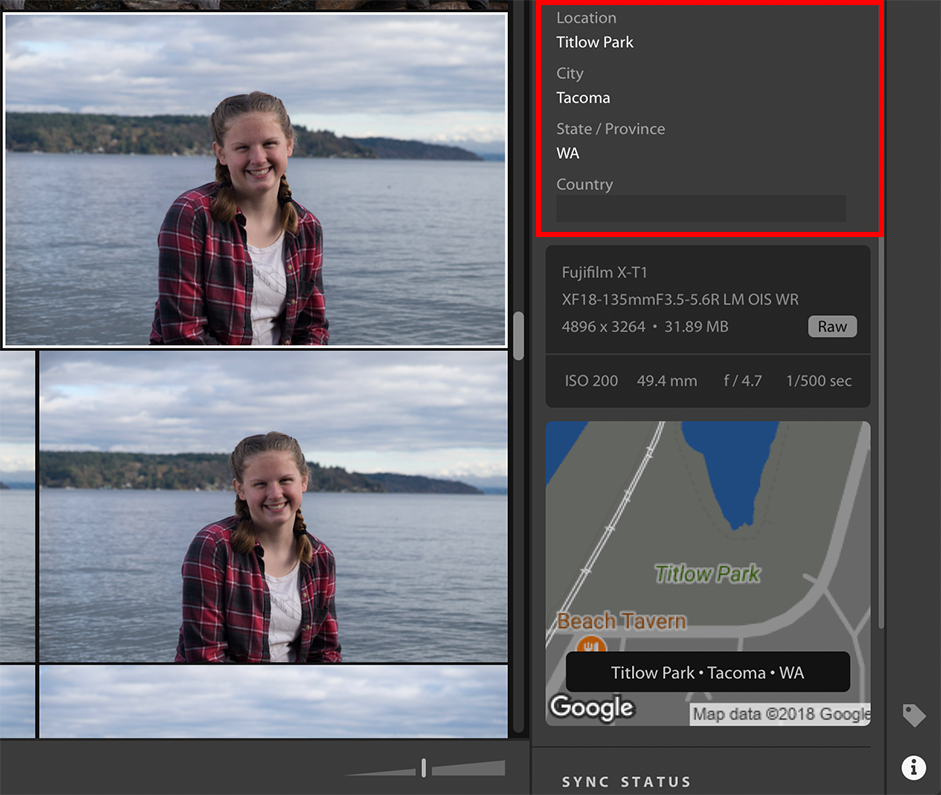
If a photo already has location information embedded in its metadata, Lightroom CC displays it in the Info panel. If not, you can enter the information manually—to a point. It won’t accept specific GPS information, but you can enter a city, state or province, and country. There’s also a Location field that can help refine the spot. Unfortunately, you can’t copy and paste location data between images the way Lightroom Classic can do.
Select one or more photos you wish to tag with the same location information.
Click the Info
button to open the Info panel.If you know the name of a specific location or landmark, such as a park, enter it in the Location field. By itself, it won’t bring up any results.
Enter the City, State/Province, and optionally Country in the appropriate fields (Figure 41). The location shows up on a map that appears at the bottom of the panel. If you put something into the Location field and Lightroom CC recognizes it, the map will give a more specific spot.
Geotagging in Photos for Mac
The location features in Photos are frustratingly limited, even in the updated Photos 3 that ships with macOS 10.13 High Sierra.
Photos leans heavily on Apple’s Maps information, enabling you to type the name of a location to pinpoint it, like so:
Select one or more photos that contain no location information in the Photos library. (You can also select photos that already have geotagged information if you want to change their locations.)
Choose Window > Info to view the Info window.
In the Assign a Location field, type the name of the place where the photos were captured and press Return.
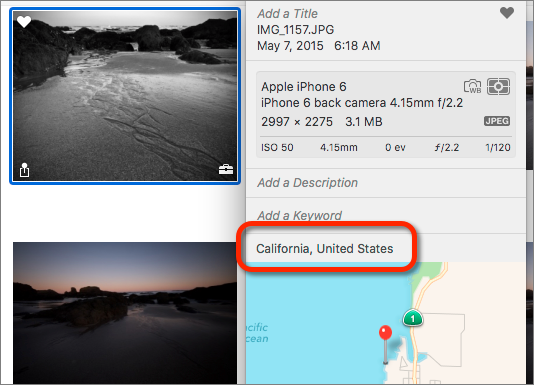
However, when copying a location from a photo that includes it (such as one shot using an iPhone) to one that does not, the app ignores the specific GPS data in favor of the name that appears in the Info window. That means a photo I captured on the beach near Fort Bragg, California, for example, shows up as “California, United States” (Figure 42).
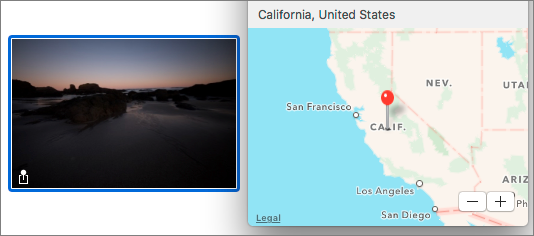
If I copy that and paste it to an untagged photo, Photos plants a marker in the middle of the state (Figure 43).
The rub is that the specific information is right there in the file; if I open the image in Preview, the coordinates show up. Photos just isn’t bothering to use it.
Geotagging in Photoshop Elements
Photoshop Elements doesn’t offer an easy way to copy and paste location data, but it is possible to geotag photos using the Organizer—it’s just a little more work.
Here’s how to do it in Photoshop Elements 14 and later:
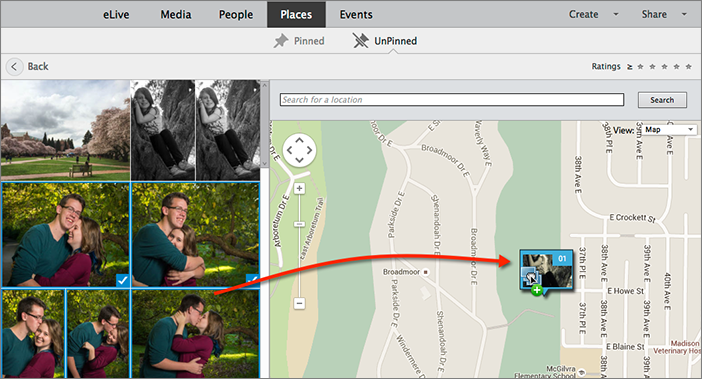
Click the Places button at the top of the screen.
Click Pinned to view photos that already contain location information, and find one that is in the same area as the photos you want to tag. Make sure it’s visible in the map.
Click the Unpinned button.
To the left of the map, select the photos you wish to tag.
Drag the selected images onto the photo pinned on the map (Figure 44).
Photoshop Elements versions 11-13 take a slightly different approach:
In the Organizer’s Media view, select your reference photo, as well as the images that will share its GPS data.
Click the Add Places button in the toolbar to bring up the Add Places window. A pin for the reference photo appears on the map.
Select the photos you wish to tag, and then drag them to the pin (Figure 45).
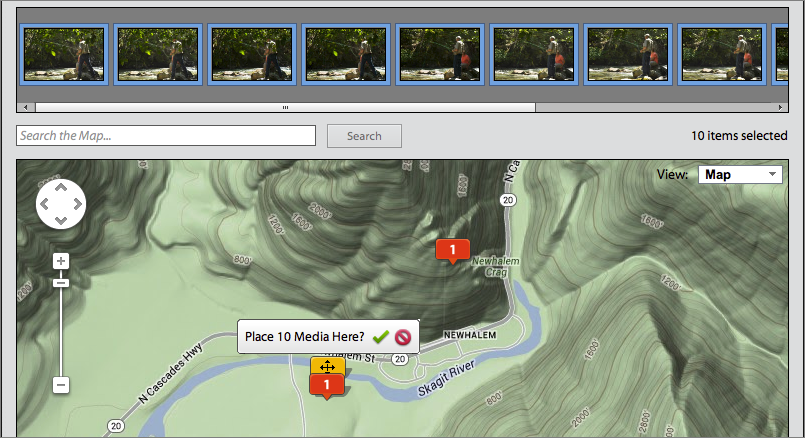
Figure 45: Drag photos to a location pin in Photoshop Elements. In the small dialog that appears above the pin, click the Apply button (the checkmark) to place the media at that spot.
Click Done.
Merge Tracking Data
Reference photos are an easy way to capture GPS data—if you remember to take the shots. Another option is to use a standalone GPS device or an app that tracks location using a smartphone’s GPS circuitry. The advantage with this approach is that you don’t have to remember to take out your phone and record a new photo at each new location—just turn on the device or app at the beginning of your outing, and then apply the data to the imported photos later.
Lightroom Classic can import files called tracklogs (recorded location data) in the GPX (GPS Exchange) format generated by devices and apps such as MotionX-GPS and Geotag Photos Pro. Consult the instructions for each to learn how to import the GPX files onto your computer; often it’s a matter of copying files from the device via USB, or emailing them to yourself from the mobile device.
Lightroom CC, Photos and Photoshop Elements don’t offer tracklog support, so you need to assign the location information with the help of additional software before importing the images (as I discuss shortly).
Merging Tracking Data in Lightroom Classic
Lightroom Classic boasts a straightforward method of marrying photos to GPS data:
In Lightroom Classic, select the photos you shot during the time you were tracking your location.
Switch to the Maps module.
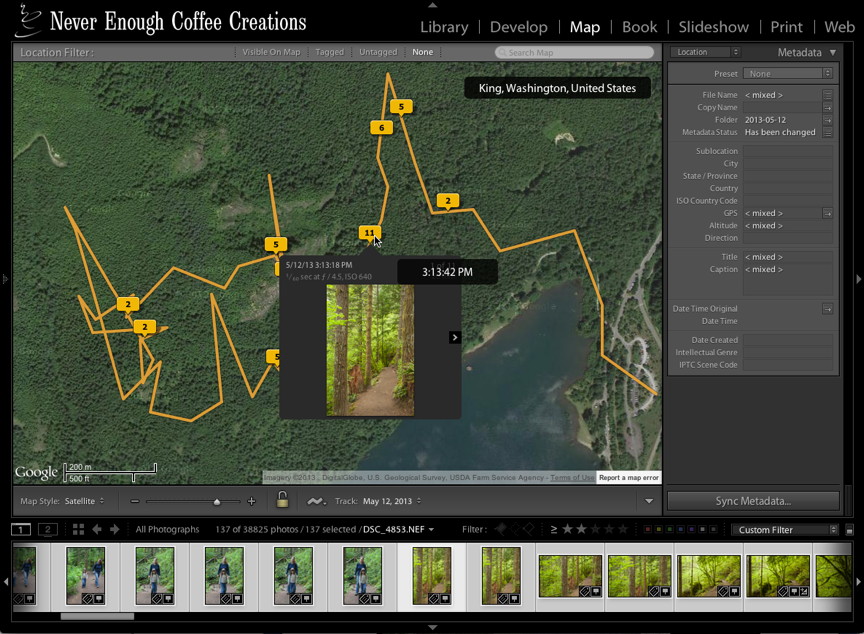
Choose Map > Tracklog > Load Tracklog, and locate the GPX file you recorded. An orange trail appears on the map showing the locations that you visited.
Choose Map > Tracklog > Auto-Tag Photos.
Lightroom Classic positions the photos on the track and saves the GPS data to each image (Figure 46).
Merging Tracking Data on a Mac
If you use Photos for Mac, Photoshop Elements, or Lightroom CC, you’ll need a third party utility to apply tracklog coordinates to photos. I recommend HoudahGeo ($39), which reads coordinates, assigns locations, and then exports the data in a variety of ways. HoudahGeo 5 under macOS 10.12 Sierra and later can peek directly into the Photos for Mac library and apply location data to photos that you’ve already imported.
For Photoshop Elements or Lightroom CC, you need to copy the image files from the memory card to your hard disk and process them in HoudahGeo before you import them into your chosen library application. You can do that in the Finder, or using the Image Capture application, which you’ll find in the /Applications folder. Then follow these steps:
If you use Photos for Mac, open HoudahGeo and select your Photos library to locate the shots you want to work on. If you just imported a batch, expand the Photos item and find Last Import under Albums.
If you use Photoshop Elements or Lightroom CC, locate the image files where you copied them in the Finder.
Drag the images to the main Drag Images Here pane.
Click the Import Track Logs button in the toolbar and locate the GPX file containing the location information. The application automatically associates the images with their locations.
Click the Process button on the toolbar to view the track and the photo locations on a map (Figure 47).
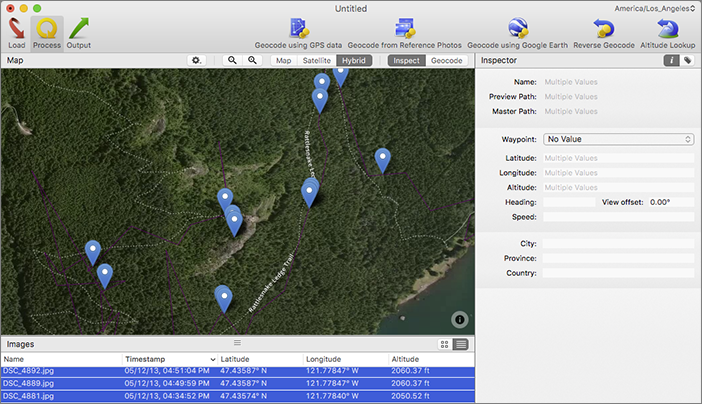
Figure 47: HoudahGeo associates the tracklog data with the photos’ timestamps. Click the Output button.
For Photos for Mac, click the Notify Photos Library button. In the dialog that appears, select the Coordinates checkbox (and others if they apply). Click OK to finish.
For Photoshop Elements or Lightroom CC, click the EXIF/XMP Export button.
In the dialog that appears, select the checkboxes for the data that you want to transfer (such as Coordinates and Altitude). Deselect the Create Copies checkbox (Figure 48).
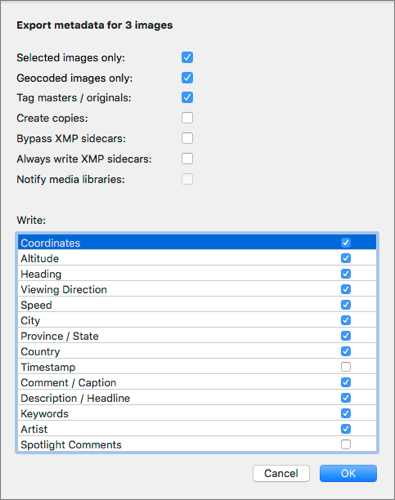
Figure 48: The EXIF/XMP Export options in HoudahGeo. Click OK. The image files are updated with the location data.
For Elements, open the Organizer and choose File > Get Photos and Videos > From Files and Folders (or click the Import button and choose the same item). Navigate to the folder containing the images and import them.
In Lightroom CC, click the Add Photos
 button, navigate to the folder containing the images, and import them. (See Import Your Photos the Smart Way.)
The photos are added to your library with the location data applied.
Merging Tracking Data in Windows
If you use Photoshop Elements or Lightroom CC under Windows, you’ll need to merge the tracklog coordinates and photos before importing the images. Although it’s an older application, I recommend downloading the free GeoSetter utility and using it to merge the coordinates:
Use the Explorer to copy images from the memory card to your hard disk, and launch GeoSetter.
In the address bar at the top of the window, navigate to the folder containing your photos.
Select the photo thumbnails in the Image Files pane.
Click the Synchronize with GPS Data Files
 button in the toolbar, or choose Images > Synchronize with GPS Data Files.
In the dialog that appears, specify the GPX file containing the location information.
Click OK. The application automatically associates the images with their locations (Figure 49).
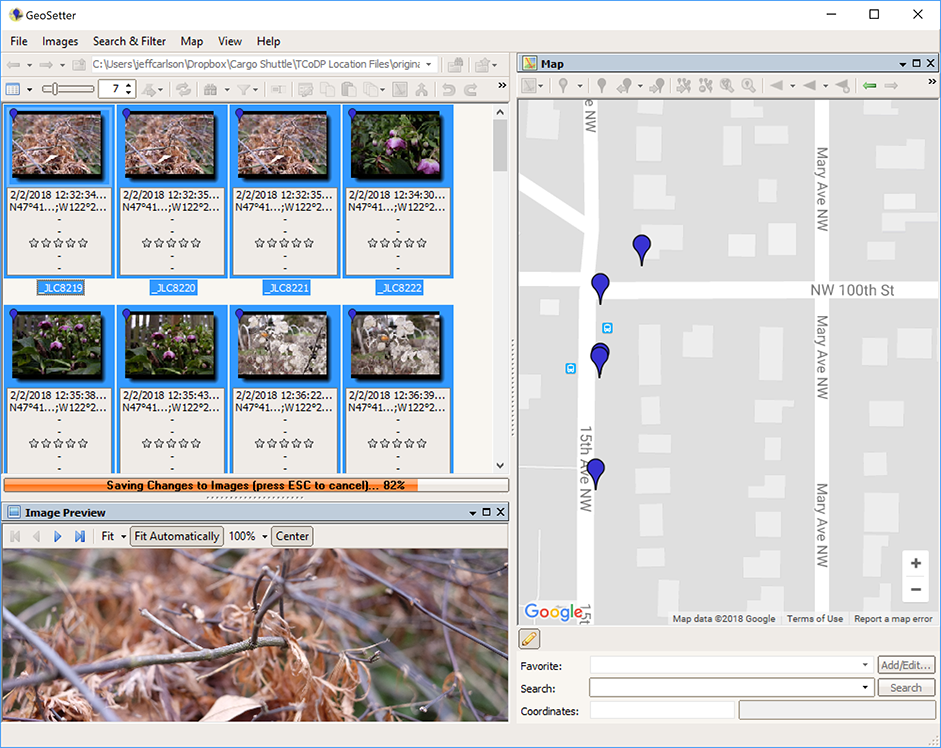
Figure 49: Applying location information in GeoSetter. Choose Images > Save Changes of Selected Images.
Open the Elements Organizer and choose File > Get Photos and Videos > From Files and Folders (or click the Import button and choose the same item). Navigate to the folder containing the images and import them.
Or, in Lightroom CC, click the Add Photos
button, navigate to the folder containing the images, and import them. (See Import Your Photos the Smart Way.)
The photos are added to your library with the location data applied.
Use Facial Recognition
Facial recognition seems like something out of science fiction, even though it’s been in use for years. The process works the same in most programs: the software detects shapes that are face-like (oval, flesh-colored, with similar areas for eyes, noses, and mouths) and then compares the shapes with other faces already in its library to guess at people’s identities. Modern facial recognition does a surprisingly good job at matching faces and falls into a workflow category that I love: the computer is doing the work.
Identify People in Your Photos
In an earlier edition of this book, I advocated disabling facial recognition, since it didn’t provide much more benefit than assigning keywords and tended to make the apps sluggish. Since then, Apple’s implementation in Photos for Mac is vastly better than iPhoto’s or Aperture’s ever was, and Adobe incorporated the feature in Lightroom Classic (but not yet Lightroom CC), making facial recognition a more useful part of the photo management workflow. I wouldn’t say it’s a necessary tool, since it does require some time to set up, but the dividends it pays later when you’re searching for people (especially in older photos that you may not have tagged) are worth it.
In each app, the computer finds photos that contain faces and asks you to identify the people. It then recognizes them in other images, making it easy to quickly bring up all photos in which a specific person appears, regardless of where in the library the images are stored.
Facial Recognition in Lightroom Classic
The People feature in Lightroom Classic is surprisingly hidden—perhaps to get it out of the way for people who don’t want to use it. Choose View > People, or press the O key, to view the People interface.
Lightroom finds faces and displays them under the Unnamed People heading. To identify someone, do the following:
Select a folder, collection, or subset of your catalog in the sidebar at the left side of the screen.
Select a person’s thumbnail and click the “?” label below it.
Type the person’s name and press Return (Figure 50).
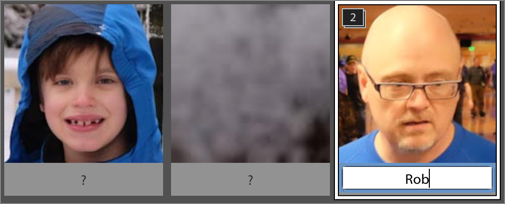
Figure 50: Identify a person in Lightroom.
Any photos that match the same person’s face are grouped in the Named area. You’ll no doubt find more unnamed pictures of the same person; when you identify them, Lightroom’s recognition improves.
Under the Named People heading, double-click a thumbnail to display every confirmed image of the person, followed by a list of suggested matches (Figure 51). Click any thumbnail to select the full photo, or double-click to open the photo.

Facial Recognition in Photos for Mac
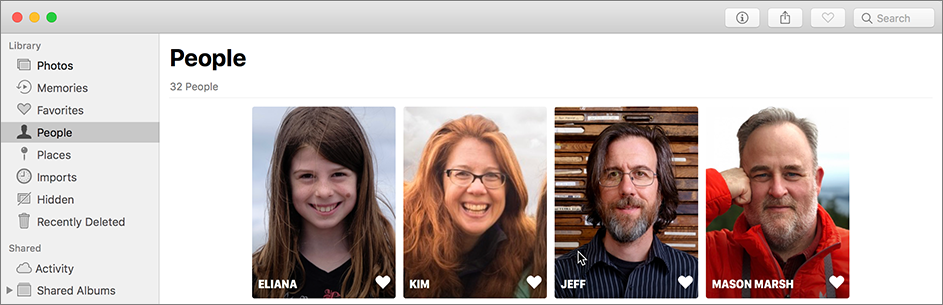
In Photos, people identified by facial recognition are found in the People album (Figure 52). Select People in the sidebar to view faces the application recognizes (in the top portion of the main pane), as well as unknown faces that need your input (at the bottom of the main pane).
To identify people that Photos has suggested, do this:
Position your pointer below a person’s thumbnail, which reveals the Name field.
Click the field and type a person’s name. Photos looks in your Contacts database for possible matches; select one and press Return.
If the person appears in other images, Photos brings up a dialog asking you to confirm it’s them (Figure 53). Mark the ones that are, and click Done.
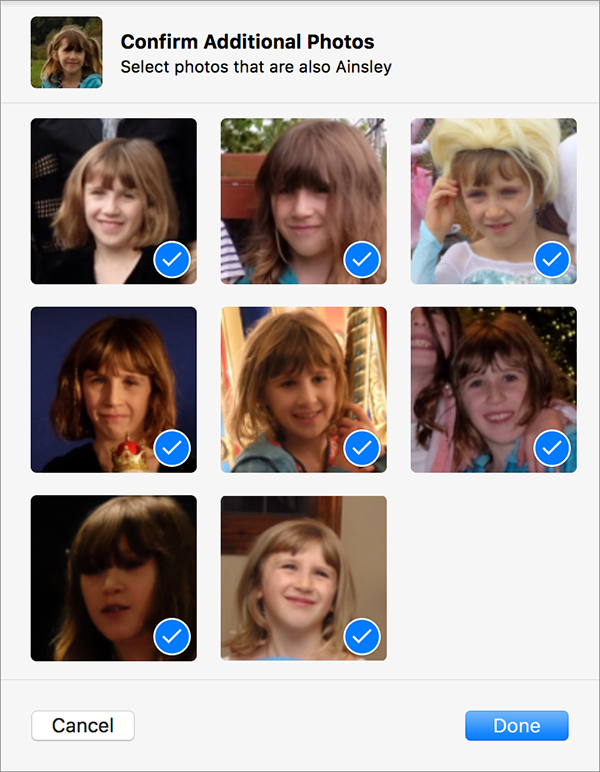
Figure 53: Checking for other person matches.
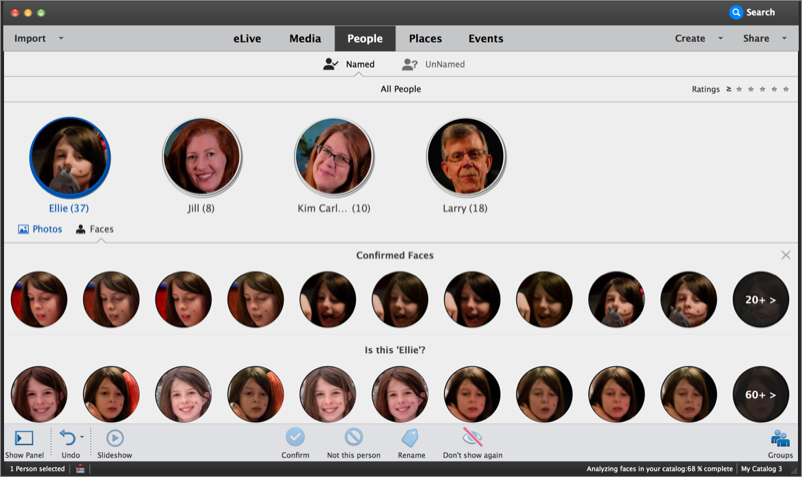
You can also identify that person in other photos later. Double-click a person’s thumbnail to view all the confirmed photos containing them (Figure 54). Double-click one to go to that particular photo. Click the Photos button in the top-right corner to view full photos, or click Faces to view thumbnails containing just the person’s face.

Photos initially shows a subset of all photos; click Show All (located below with slideshow) to reveal all matches. To find other possible matches, scroll to the bottom of the window and click Confirm Additional Photos.
Facial Recognition in Photoshop Elements
I must say, I like the way Photoshop Elements 14 and later handles faces in the Organizer compared to earlier versions. To identify people, do the following:
Click the People tab.
Switch to the UnNamed (sic) pane to see which faces Elements has located. In an attempt to not overwhelm you, only people who appear in several images appear. To see everyone, turn off the Hide Small Stacks option.
Select a person’s stack to reveal the photos in which they appear.
If any of the images are incorrectly identified, select those to exclude them.
Click the Add Name label and type the person’s name (Figure 55). Press Return or click the Accept (√) button. That person now appears in the Named pane.
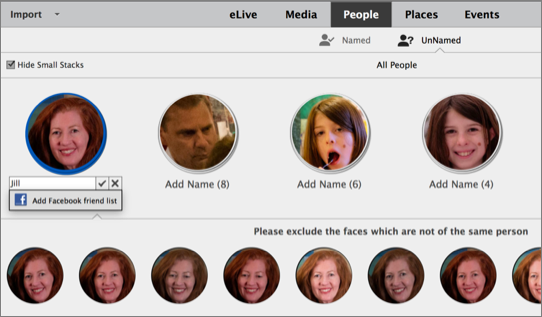
Figure 55: Name a person in Photoshop Elements.
To locate photos containing people you’ve identified, click the People tab and then the Named button. (Figure 56). Click the Photos button that appears when you select a person’s icon to jump directly to the photos in which they appear.