CHAPTER 6
Manage data access and protection
Networking revolutionized computing for organizations. Most modern devices no longer have DVDs, CDs, or floppy disk storage capabilities for data storage and retrieval. Nearly all of the resources needed at work or at home are shared via the Internet to the cloud or across a business network to file servers.
Like previous versions of Windows, Windows 10 offers the capability to share files and folders, and also access files that have been shared across the network. At home, you don’t require a server to share files, though in a corporate environment, sharing of files internally is normally provided and managed by Windows Server 2016 with the File Services role installed.
If you work in IT, you are often put in a position of significant trust by your employer. Your role might require you to provision shares and make files available to other users. This can be achieved by using share permissions and NTFS permissions. As an administrator, you are often entrusted with safeguarding the business data and preventing unauthorized access or data leakage. To perform your role effectively, you need to fully understand your options and learn the skills necessary to implement mechanisms to make files and folders accessible.
Skills in this chapter:
![]() Skill 6.1: Configure shared resources
Skill 6.1: Configure shared resources
![]() Skill 6.2: Configure file and folder access
Skill 6.2: Configure file and folder access
Skill 6.1: Configure shared resources
Windows 10 offers several methods of sharing, or giving access to others, including public folder sharing, HomeGroup sharing, and the traditional Any folder sharing. Each method of sharing will appeal to the specific audience, for example home users and small networks typically use HomeGroup or Public sharing, whereas in a Windows domain environment found in larger organizations, traditional folder sharing is more appropriate.
Sharing is not restricted to files and folders. This skill includes a review of file libraries and OneDrive, which enables your resources to be accessed over the Internet, and optionally synchronized between devices.
This section covers how to:
![]() Configure HomeGroup settings
Configure HomeGroup settings
![]() Configure libraries
Configure libraries
![]() Configure shared folder permissions
Configure shared folder permissions
![]() Configure shared printers
Configure shared printers
![]() Configure OneDrive
Configure OneDrive
Configure HomeGroup settings
A HomeGroup enables home users to easily share content such as documents, printers, and video with others on their home local network. A home network will normally be configured as a single read-only function, enabling individual users to share content that they want other members of the household to access.
To keep HomeGroups relatively simple to set up, they are limited in what they can offer, especially when compared to the permissions and restrictions that can be configured using Any folder sharing. Despite their simplicity, HomeGroups are password protected and are aimed at enabling sharing within a family home across multiple devices.
If the read-only limitation is too restrictive, this can be modified and family members can be granted write access.
 EXAM TIP
THERE CAN BE ONLY ONE HOMEGROUP PER NETWORK AND IPV6 IS REQUIRED, SO CHECK TO ENSURE THAT THIS HAS NOT BEEN DISABLED.
To create a HomeGroup, perform the following steps:
Sign on to your device with administrative privileges.
Click the Start button on your non-domain joined computer.
Type HomeGroup in the search box.
In the search results, click HomeGroup (Control Panel).
If a warning message appears indicating that you need to change the network location to Private, you should click the Change Network Location link, and then in the Networks charm, click Yes.
Click Create A HomeGroup.
In the Create A HomeGroup Wizard, click Next.
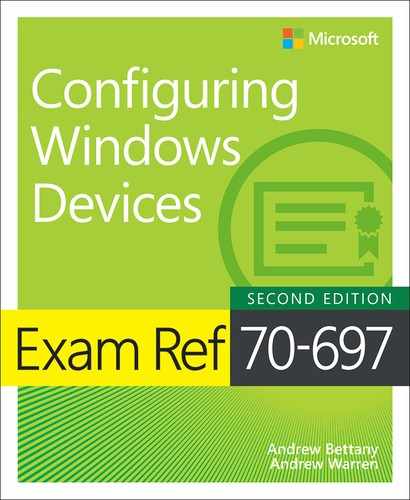
On the Share With Other HomeGroup Members page, as shown in Figure 6-1, click the libraries, folders, and devices that you want to share with the HomeGroup, and click Next. The wizard creates the HomeGroup, and creates a random password.
Make a note of the password provided, and then click Finish.
To join a HomeGroup that has already been created, you can follow these steps:
Sign on to your device with administrative privileges.
Click the Start button on your non-domain joined computer.
Type HomeGroup in the search box.
Click Join Now, then follow the HomeGroup Wizard, and then enter the HomeGroup password.
If you encounter any issues relating to the HomeGroup, you can start the HomeGroup troubleshooter, which will try to find and fix problems relating to viewing computers or shared files in a HomeGroup.
If you’re not familiar with HomeGroups, you need to create a HomeGroup in your lab environment, so that you can see how simple it is and how other computers can join it. You need to also explore the HomeGroup options offered in the Network And Sharing Center. As you will see, the HomeGroup is displayed as Joined within the Network And Sharing Center. To amend what is being shared, view the password, start the HomeGroup troubleshooter, or leave a HomeGroup, you can open HomeGroup in Control Panel or type HomeGroup in the search box and press Enter. Links to each of these actions can be found on the Change HomeGroup Settings page.
If you want to share files or folders that are not included in the libraries, you can share folders with the HomeGroup directly from File Explorer.
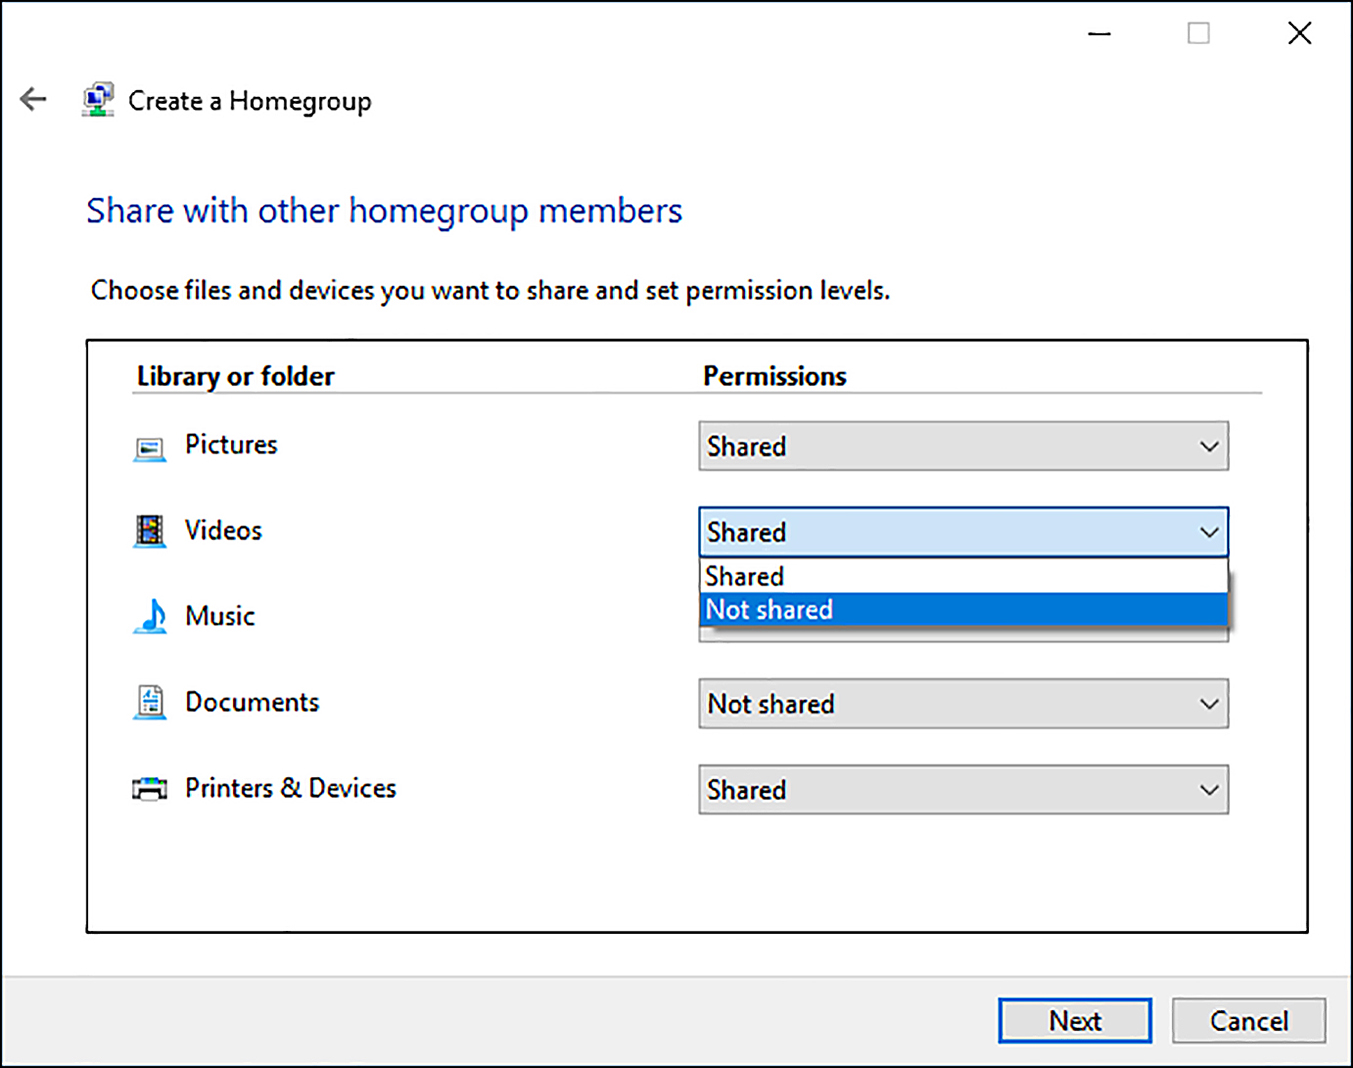
One method is to select the folder that you want to share, right-click, and select Give Access To, and choose the appropriate share option to View or View And Edit the HomeGroup, as shown in Figure 6-2. Notice that with the File Explorer Share menu displayed, the Give Access To options are visible.
Although HomeGroups are mostly used to share resources with all members of a HomeGroup, you can fine-tune this and select the Specific People option, which enables you to make available the shared resources to certain people only, as shown in Figure 6-2, with either Read or Read and Write permissions.
Configure libraries
Libraries are visible in File Explorer in Windows 10 (they were removed in Windows 8.1 File Explorer), and by default, you are provided with four default libraries: Documents, Music, Pictures, and Videos. You may also see Camera Roll and Saved Picture libraries if you have connected a camera or phone to your device.
Libraries represent a “collection” of files and folders, and are a special type of folder. Libraries enable users to aggregate files that are stored in multiple locations (and even on multiple computers), and pull them together to make them appear as though they are all stored in a library. They are designed to help you organize your files, which are scattered across your PC or network. Even though libraries show files and folders from multiple locations, the actual files are not moved or copied to the library, only a link (like a shortcut) is placed in the library.
In addition to the default libraries, you are able to add your own. Right-click Library in the left pane of File Explorer, and click New Library. Give your library a name and then open the library. To include folders, click folders in the right pane and then select the folders that you want.
To add additional locations in your library, follow these steps:
Open File Explorer.
If you don’t see libraries, click the View tab on the File Explorer ribbon, the click the Navigation Pane button and tick Show Libraries.
Click the Libraries icon on in the Navigation Pane.
Select the Documents library.
At the top of File Explorer, click Library Tools, and click Manage Library to open the Documents Library Locations dialog box.
Click Add to add another location to the library.
Navigate to the location of the files and folders you want to include and then click Include Folder.
If you want to change which folder is the default location for saving files, highlight the folder, and right-click Set As Default Save Location, as shown in Figure 6-3.
Click OK.

Windows 10 has a new File Explorer feature called Quick Access. On first glance, it might appear that Favorites has been replaced by Quick Access, but it actually combines the scope and functionality of the Favorites feature and Libraries, enabling you to pin folders and libraries to the Quick Access area.
Quick Access is the default view that appears whenever you open File Explorer whether directly or through another application, perhaps to open or save a file. In practice, this can offer significant productivity enhancements, if users are often opening and saving files regularly. If Quick Access is not required, File Explorer can be configured to open directly to This PC view instead of selecting the option within Folder Options, as shown in Figure 6-4.

Look closely at the Quick Access area in the left pane in File Explorer, as shown in Figure 6-4. You will notice that the Desktop and Pictures folders are pinned to the Quick Access area. The Work Folders (Local) folder does not have a small push pin next to the folder icon, and therefore it is shown in the Quick Access area because it has been recently accessed. To pin a new folder to the Quick Access area, you need to navigate to the folder anywhere in File Explorer, and then right-click the folder. In the context menu, select Pin To Quick Access. To remove a pinned folder from the Quick Access area, right-click the folder, and select Unpin From Quick Access.
At the bottom of the Folder Options dialog box, shown in Figure 6-4, are some new privacy settings, which enable users to remove the option to show recently used files and folders in Quick Access, and also an option to clear File Explorer History.
Configure shared folder permissions
When data is stored on a network server, you need to have access to the data over the network. You’ll see that NTFS permissions will protect the actual files and folders from unauthorized access, but it is Share permissions that are responsible for making data resources available to users over a corporate network.
Shares are managed by Server Message Block (SMB), and Share permissions and NTFS permissions are totally independent of each other. However, the effective access permissions on a shared folder are determined by taking into consideration both the Share permissions and the NTFS permissions. When you create a shared folder, there will be SMB Share permissions in place, which can be more restrictive than any existing NTFS permissions. For example a user accessing files through a share with read permission configured, which is providing network access to files protected by NTFS Full Control permission will be given only Read permission on the files.
Windows 10 supports SMB version 3.1.1 (Windows 8.1 supports SMB version 3.02). To establish the SMB version (dialect), which you are using, type the following two PowerShell cmdlets into an elevated PowerShell window:
PS C:> dir \localhostc$
PS C:> Get-SmbConnection -ServerName localhost
Windows will automatically negotiate between the connecting parties to ensure that the same (and latest) SMB version is used.
Sharing is not enabled by default, which minimizes the risk of a network attack, and each Windows machine must explicitly enable the ability to permit sharing, which can be controlled within the Network And Sharing Center by following these steps:
Open Control Panel, select Network And Internet.
Choose Network And Sharing Center.
On the left, choose Change Advanced Sharing Settings.
Windows will expand the network profiles in use (Private, Guest, or Public). For the network profiles that you want to enable file and printer sharing, select Turn On File And Printer Sharing.
Click Save Changes.
These settings are configurable by using Group Policy, as are the Network Discovery settings, which use the new Link Layer Topology Discovery (LLTD) protocol, enabling Windows to identify with other devices within the local subnet. Enabling network discovery on your devices modifies the Windows Firewall security settings so that your computer will become “discoverable” on the network by other Windows clients, and your computer can also see other computers and devices on the network.
The Network Discovery status is disabled by default, but an organization can manage the status of the LLTD Mapper (LLTDIO) and Responder (RSPNDR) via two Group Policy settings, which are located at: Computer ConfigurationPoliciesAdministrative TemplatesNetworkLink Layer Topology Discovery.
Sharing by using Public Folders
As you might presume, Public folder sharing involves the sharing of Public Folders, which are found in the %systemdrive%UsersPublic folder within File Explorer. There are several default Public Folders, including Public Documents, Public Music, Public Pictures, and Public Videos. Installed applications may also add new folders in this location, and you can also create your own. To use this method of sharing, you need to move any data to be shared to the appropriate Public folder. You could also copy the data, but this would then create potential issues with storing multiple documents as well as subsequent versioning issues.
Public Folders offer users an easy method of sharing data with anyone who has access to the device. By default, all local users have access to Public Folders, and users can configure network access to Public Folders within the Network And Sharing Center. Within a small business, this “open box” functionality can be a useful method of sharing files without the complexity of other methods of sharing. The disadvantage of using Public Folders is the limited ability to implement access control at a fine-grained level.
To turn on Public folder sharing over the network, open the Network And Sharing Center, click the Change Advanced Sharing Settings link and, in the All Networks profile, configure the Turn Public Folder Sharing on or off.
The default permissions for Public Folders enable local users to read, write, change, and delete any public files.
Configuring Any folder sharing
When you are using Any folder sharing, you can share files and folders using one of the following tools:
![]() Sharing Folders using File Explorer
Sharing Folders using File Explorer
![]() Sharing Folders using Computer Management Microsoft Management Console (MMC) snap-in
Sharing Folders using Computer Management Microsoft Management Console (MMC) snap-in
![]() Sharing Folders from the command line, using the Net Share and PowerShell commands
Sharing Folders from the command line, using the Net Share and PowerShell commands
Windows 10 permits a maximum of 20 concurrent users to access a shared resource when shared within a workgroup environment. In comparison, a Windows Server 2016 File Server has no limitation.
When sharing folders, using File Explorer, you are presented with two choices:
![]() Share Basic sharing, which is accomplished by using a wizard to share the folder
Share Basic sharing, which is accomplished by using a wizard to share the folder
![]() Advanced Sharing Traditional fine-grained folder sharing, which enables you to:
Advanced Sharing Traditional fine-grained folder sharing, which enables you to:
![]() Create the share name, which can be different from the actual folder name
Create the share name, which can be different from the actual folder name
![]() Enable the fine-grained setting of Share permissions
Enable the fine-grained setting of Share permissions
![]() Set the caching of the folder if you want to use Offline Files
Set the caching of the folder if you want to use Offline Files
The list of permissions set on each object is called an Access Control List (ACL). The default permissions settings for a newly created share will create an Access Control Entry (ACE) giving Everyone: Allow Read.
You can (and need to) edit the default Share permissions by adding users and groups to whom you want to give access, and by removing the built-in Everyone group. When the NTFS permissions (covered later) and Share permissions are evaluated together, the most restrictive of the permissions on either side is effective. Where a user is a member of several groups and has different permissions based on his membership, his overall Share permissions are cumulative.
To stop sharing a folder, you need to right-click the shared folder, click the Give Access To option, and then click Remove Access.
You gain more functionality when creating shares using the Computer Management MMC snap-in, but you also need to have administrative privileges to create them. The Computer Management MMC snap-in also enables administrators to create shared folders on remote computers.
To create a shared folder using Computer Management MMC, you should carry out the following steps:
Right click the Start button and select Computer Management (you can also type compmgmt.msc in the Search bar).
Expand System ToolsShared Folders and select Shares.
To create a new share, right-click the Shares icon and select New Share.
The Create A Shared Folder Wizard will launch, click Next.
Enter the Folder path or click Browse to find the folder you want to share.
Click Next.
Provide a share name and a description (optional).
You can modify the Offline settings, if required.
Click Next to display the Shared Folder Permissions options.
Choose the permissions that you require, and click Finish twice.
Sharing folders from the command line
If you have more than a few shares to create, it is more efficient using either PowerShell or the command prompt to create them. Net Share is a command-line tool, which has been used for many years and is very popular within logon scripts to establish mapped drives at logon.
The syntax is Net Share name=drive:path, which will create a simple share using the share name that you specify, and will grant all users the Read permission.
Additional parameters when creating a share include the following:
![]() /Grant:user permission Enables you to specify Read, Change, or Full Share permissions for the specified user.
/Grant:user permission Enables you to specify Read, Change, or Full Share permissions for the specified user.
![]() /Users:number Enables you to limit the number of users who can connect to the share.
/Users:number Enables you to limit the number of users who can connect to the share.
![]() /Remark:”text” Enables you to add a description to the share.
/Remark:”text” Enables you to add a description to the share.
![]() /Cache:option Enables you to specify the offline caching options.
/Cache:option Enables you to specify the offline caching options.
![]() sharename /Delete Deletes an existing share.
sharename /Delete Deletes an existing share.
For more information, type net share /? at the command prompt for the syntax and available switches. To view all shared folders on a device, you can run the net share command.
Sharing folders by using Windows PowerShell
A topic that is more likely to appear on the exam is the role of PowerShell, which can be used in scripts and offers additional capabilities for configuring and managing SMB shares locally and remotely.
An example SmbShare PowerShell command to create a new SMB share called Review, which shares the C:Work Files (Local)New York Launch - Highlights folder, can be created by typing:
New-SmbShare -Name Review -Path "C:Work Files (Local)New York Launch - Highlights"
To view all shared folders on a device, you can run the Get-SmbShare cmdlet. The cmdlets available within the SmbShare module are:
![]() Block-SmbShareAccess
Block-SmbShareAccess
![]() Get-SmbShare
Get-SmbShare
![]() Get-SmbShareAccess
Get-SmbShareAccess
![]() Grant-SmbShareAccess
Grant-SmbShareAccess
![]() New-SmbShare
New-SmbShare
![]() Remove-SmbShare
Remove-SmbShare
![]() Revoke-SmbShareAccess
Revoke-SmbShareAccess
![]() Set-SmbShare
Set-SmbShare
![]() Unblock-SmbShareAccess
Unblock-SmbShareAccess
For more information, you can type Get-Help SmbShare in a PowerShell prompt.
The Universal Naming Convention (UNC) address is sometimes used to access a shared folder over the network. UNC addresses contain the name of the host computer, preceded by two backward slashes (\), and the shared folder name, separated by a backward slash (). For example, the UNC name for the shared Review folder, shared on the computer named Server, would be: \ServerReview.
Access-based enumeration
Dynamic Access Control (DAC), which was covered in Chapter 5,”Configure storage,” offers administrators a robust method of controlling data access by using filters and claims. Nestled in between NTFS and DAC is access-based enumeration (ABE), a little known feature, which can be enabled as a feature within the File Server role on Windows Server 2008 or newer server operating systems.
ABE forces Windows to evaluate each and every shared object to ensure that resources are effectively hidden from users (for example, when viewing shared resources using File Explorer) unless they have at least the Read permission on the resource. When you provision a new shared folder from a file server, you will have the option to enable ABE on the share, as shown in Figure 6-5.

Although ABE is a server technology, you are able to configure advanced share properties such as ABE in Windows 10 by using Windows PowerShell. To enable ABE for a share named Work in Progress, you would use the cmdlet:
Set-SmbShare -Name "Work in Progress" -FolderEnumerationMode AccessBased
And then type Y to confirm.
Configure shared printers
Users who have experience of installing, sharing, and troubleshooting printing on Windows 7 or newer versions of Windows is familiar with the printing capabilities in Windows 10. This section includes a review of the key areas and also highlights the few additional features offered in Windows 10, which include Near Field Communication (NFC) support and Type 4 printer drivers.
It is useful to define the key terms used when dealing with printers:
![]() Printer and printing device This refers to a physical device, which is connected to the PC locally or via the network (can include wired, wireless, or Bluetooth), or available on a print server. On a single print device, you can configure multiple instances of the same printer within Windows. This is useful if you want to configure a printer to have different settings, such as user security; feature restrictions, such as color or monochrome printing, and available times or print priority for different users or groups.
Printer and printing device This refers to a physical device, which is connected to the PC locally or via the network (can include wired, wireless, or Bluetooth), or available on a print server. On a single print device, you can configure multiple instances of the same printer within Windows. This is useful if you want to configure a printer to have different settings, such as user security; feature restrictions, such as color or monochrome printing, and available times or print priority for different users or groups.
![]() Printer port This is typically used for older ports, which allow printers to be connected directly to the device, such as serial, parallel ports, and network printers. Unlike printers connected via a modern connection, such as USB, these types of printers will not be detected automatically by Windows 10 and will require manual configuration.
Printer port This is typically used for older ports, which allow printers to be connected directly to the device, such as serial, parallel ports, and network printers. Unlike printers connected via a modern connection, such as USB, these types of printers will not be detected automatically by Windows 10 and will require manual configuration.
![]() Printer driver Each printer must have a printer driver, which is used to enable Windows 10 to communicate with the device and render print jobs. Printer drivers are responsible for converting the print job into page description language (PDL), a format that is understood by the printer. The most common types of PDL are PostScript, Printer Control Language, and XML Paper Specification (XPS). Printer drivers are included with Windows 10, or they can be supplied by the printer manufacturer, or are available through Windows Update.
Printer driver Each printer must have a printer driver, which is used to enable Windows 10 to communicate with the device and render print jobs. Printer drivers are responsible for converting the print job into page description language (PDL), a format that is understood by the printer. The most common types of PDL are PostScript, Printer Control Language, and XML Paper Specification (XPS). Printer drivers are included with Windows 10, or they can be supplied by the printer manufacturer, or are available through Windows Update.
Type 4 print drivers
Traditionally, each printer manufacturer produces customized print drivers for each of their devices, which enables Windows to use the printer features. These print drivers must be shared with all clients on the network that use the printer. These are known as Type 3 print drivers and require administrative effort to ensure that both 32-bit and 64-bit drivers are up to date and available when required.
In Windows Server 2012 and Windows 8, Microsoft introduced a new type of print driver, which enabled the printer manufacturer to write a single Print Class Driver that offers support for common printing features and languages, such as PostScript, PCL, XML, and XPS, across many printer models. These print drivers are known as Type 4 (or V4) print drivers and are typically obtained through Windows Update or Windows Software Update Services (WSUS), and are not distributed across the network or maintained by the print server.
The Type 4 printer driver model provides the following benefits:
![]() No need for architecture-specific printer drivers
No need for architecture-specific printer drivers
![]() Type 4 drivers can support multiple printer models
Type 4 drivers can support multiple printer models
![]() Driver files are isolated on a per-driver basis, thereby reducing conflicts
Driver files are isolated on a per-driver basis, thereby reducing conflicts
![]() Driver packages can be smaller and can install faster
Driver packages can be smaller and can install faster
![]() Enables separation of the printer driver and the printer software
Enables separation of the printer driver and the printer software
Print management
Within an organization, most printing is centralized by using print servers to provide access to network printing devices. Windows 10 offers several tools to manage printing, including Devices And Printers, Print Management, and Windows PowerShell cmdlets. Table 6-1 describes various print management tasks that you can carry out with these tools.
TABLE 6-1 Print management tasks
Task |
Description |
Change printer properties, modify security, advanced properties |
You can configure printer properties, including printer common name, location, ports used, printer availability, which users can use the printer, and how print jobs are rendered, as shown in Figure 6-6. |
Configure sharing |
You can share a printer, appoint a friendly name, and make available additional drivers. |
Select the default printer |
In Windows 10, only one printer can be set as the default printer, and it will be marked with a green check mark in Devices And Printers. |
View and manage the print queue |
For any print job, you can view, pause, or cancel it through the print queue, which can be opened from Devices And Printers by right-clicking a printer and selecting the See What’s Printing option, or by double-clicking the printer icon. The print queue shows what is printing or is waiting to print, information such as job status, who is printing, and how many unprinted pages remain. You can also use the Window PowerShell Get-PrintJob cmdlet: Get-PrintJob -PrinterName Printer. |
Pause or resume printer |
If a printer is paused, all pending and new print jobs will be accepted, but they will wait in print queue. If the printer is resumed, paused print jobs will be sent to the printing device and printing will continue. |
Pause, resume, restart, or cancel print jobs |
All print jobs can be paused or resumed by right-clicking the print job in the print queue window, and then clicking Pause or Resume. To pause all print jobs, you need to pause the printer. Restarting a print job will enable the print job to be re-sent to the print device. To cancel a print job, right-click the print job you want to remove, and then click Cancel. To cancel all current print jobs, click the Printer menu, and then click Cancel All Jobs. |
Reorder print jobs in a print queue |
Where there are multiple print jobs, you can force a print job in the queue to be printed before others by increasing the priority number of the print job. Print jobs with higher priority print first. |
Restarting the Print Spooler Service |
This is used when troubleshooting printing. It’s very effective if other methods don’t work. Data loss can occur because the current print job might be lost. |
Review the Security tab on the printer Properties dialog box, shown in Figure 6-6. You will notice that printers behave just like other system objects, and you can choose the groups or users that are allowed or denied access to the printer.

There are three permissions that can be configured for printers:
![]() Print Connect to a printer; print; control the user’s own print jobs.
Print Connect to a printer; print; control the user’s own print jobs.
![]() Manage this printer Cancel documents; share and delete printers; change printer properties; change printer permissions.
Manage this printer Cancel documents; share and delete printers; change printer properties; change printer permissions.
![]() Manage documents Pause, resume, restart, and cancel all documents; control job settings for all documents.
Manage documents Pause, resume, restart, and cancel all documents; control job settings for all documents.
By default, the Everyone group can print to any printer, administrators can manage all printers and documents, and the Creator Owner special identity is the permission that allows users to manage their own print jobs.
Managing print server properties
Windows 10 clients can share printers that they are connected to and can also act as a print server. The Print Management MMC console, as shown in Figure 6-7, is included in the Administrative Tools of Windows 10 Pro and Enterprise editions, and enables you to connect to other print servers and manage them remotely. You can also launch the Print Management console by typing Printmanagement.msc in the Run or Search box on the taskbar.

The Print Management console enables the following printer-related management tasks:
![]() View printers and print servers
View printers and print servers
![]() Add and remove print servers
Add and remove print servers
![]() Add and delete printers
Add and delete printers
![]() Add and manage drivers
Add and manage drivers
![]() Deploy printers using Group Policy
Deploy printers using Group Policy
![]() Open and manage printer queues
Open and manage printer queues
![]() Initiate printer test pages
Initiate printer test pages
![]() View and modify status of printers
View and modify status of printers
![]() Create custom filters to view printers based on filters
Create custom filters to view printers based on filters
Although Windows 10 displays the option to deploy printers with a Group Policy object (GPO), this functionality will only work if you are connected to a domain environment. If connected to AD DS, the Deploy With Group Policy Wizard enables you to set the GPO name and control to which users or computers the printers can be deployed. This feature is outdated and most printers that are deployed within a domain environment will use Group Policy preferences, rather than the Print Management console.
Understanding NFC
Windows 10 has built-in support for near field communication (NFC), which is still an emerging technology based on short-range wireless radio technologies using radio frequency identification (RFID). NFC-enabled printing enables users to “tap” a device (such as a tablet or phone) onto a printer to connect to it. Where the components cannot be tapped together, NFC should still work if the devices are brought close together, within a maximum distance of 4 inches (10 centimeters).
NFC is similar to Bluetooth, but without the requirement to manually pair each component. NFC communication is triggered due to mutual physical proximity. NFC uses short-range radio waves for discovery and for transmitting data, and requires some form of NFC-enabled hardware, such as a smart tag, sticker, key fob, or wallet card, which may also be located inside a laptop or tablet. Many new mobile phones have NFC capabilities built into the devices, which enables NFC sharing of photos between NFC-connected devices.
Once an enterprise has made available NFC-enabled devices, administrators can perform the following management tasks:
![]() Add a NFC smart tag to their printer, or purchase printers with NFC built in.
Add a NFC smart tag to their printer, or purchase printers with NFC built in.
![]() Enable the following connection types to be used: Universal Naming Convention (UNC), Web Services on Devices (WSD), and Wi-Fi Direct.
Enable the following connection types to be used: Universal Naming Convention (UNC), Web Services on Devices (WSD), and Wi-Fi Direct.
![]() Optionally, use the PowerShell cmdlet Write-PrinterNfcTag to provision an NFC tag with information about a printer.
Optionally, use the PowerShell cmdlet Write-PrinterNfcTag to provision an NFC tag with information about a printer.
Although NFC built-in support is provided by Windows 10, this is available for OEMs and ISVs to produce NFC-enabled hardware.
NFC offers mobile devices significant opportunities to access resources by using proximity alone. Other emerging technologies include Windows 10 support for the Windows Sensor and Location platform, and support for the Windows Biometric Framework (WBF). These frameworks enable developers to utilize support for sensors, which can be attached or embedded within modern Windows devices (phone, tablets, Internet of Things, PCs), and includes capabilities such as:
![]() Speed, motion, acceleration, gyrometer
Speed, motion, acceleration, gyrometer
![]() GPS location, elevation, inclinometer, compass orientation
GPS location, elevation, inclinometer, compass orientation
![]() Humidity, temperature, light, atmospheric pressure
Humidity, temperature, light, atmospheric pressure
![]() Biometric human proximity, human presence
Biometric human proximity, human presence
Configure OneDrive
OneDrive is a cloud storage service provided by Microsoft that offers users the ability to store their data in the cloud (in their private OneDrive), and to optionally enable a trusted computer to hold and synchronize local copies of files and folders. In order to store data in OneDrive the user needs to use a Microsoft account. To share an item, you would select the file or files, and then click the Share option, as shown in Figure 6-8, and configure the sharing options. Notice that the web page is unavailable (dimmed) during the Share operation.

Items can be shared with someone as read-only or editable. With OneDrive, you can use the https://onedrive.live.com/ website to access your files from any browser, or work with the files directly via the OneDrive folder in File Explorer, as shown in Figure 6-9.

Microsoft provides all new users with a free 5 GB storage quota, and users can purchase additional storage, as shown in Table 6-2.
TABLE 6-2 Pricing plans for additional storage
OneDrive Plan |
Storage Amount |
Price* |
OneDrive Basic 5 GB |
5 GB |
Free |
OneDrive 50 GB |
50 GB |
$1.99/month* |
Office 365 Personal with Premium OneDrive Features |
1 TB |
$6.99/month** |
Office 365 Home with Premium OneDrive Features |
5 TB |
$9.99/month** |
Prices correct as of April 2018
* From early 2016 OneDrive discontinued the 100 GB and 200 GB paid plans for new users, but they are retained for existing customers.
** Includes Office 365
Because OneDrive is a cloud-based service, the features can be improved or deprecated easily. When supporting OneDrive for users you need to understand some of the limitations of OneDrive and some of the changes implemented since previous versions, including the following:
![]() Recycle Bin By default, items are stored for a minimum of 3 days and up to a maximum of 30 days. The capacity of the Recycle Bin is set to 10 percent of the total storage limit by default. This may have an impact on the 30-day retention period if the Recycle Bin is full old items will be deleted to make room for new items as they are added. You can access deleted files stored in the OneDrive Recycle Bin from within the OneDrive web portal and also in the File Explorer on a synchronized PC. Take care should you choose to use the Restore All Items or Empty Recycle Bin options as these tasks are irreversible.
Recycle Bin By default, items are stored for a minimum of 3 days and up to a maximum of 30 days. The capacity of the Recycle Bin is set to 10 percent of the total storage limit by default. This may have an impact on the 30-day retention period if the Recycle Bin is full old items will be deleted to make room for new items as they are added. You can access deleted files stored in the OneDrive Recycle Bin from within the OneDrive web portal and also in the File Explorer on a synchronized PC. Take care should you choose to use the Restore All Items or Empty Recycle Bin options as these tasks are irreversible.
![]() Folders and Files Using the OneDrive web portal both folders and files can be uploaded, copied, moved, or downloaded. Entire folders can be uploaded or downloaded with a limit of 4 GB or 65,000 individual files. Additionally you can upload folders and files to OneDrive by copying or moving them to your OneDrive desktop app, and these will be synchronized and appear in the OneDrive web portal. If you use a browser such as Google Chrome or Microsoft Edge which supports folder dragging/dropping you can drag folders directly into OneDrive.com.
Folders and Files Using the OneDrive web portal both folders and files can be uploaded, copied, moved, or downloaded. Entire folders can be uploaded or downloaded with a limit of 4 GB or 65,000 individual files. Additionally you can upload folders and files to OneDrive by copying or moving them to your OneDrive desktop app, and these will be synchronized and appear in the OneDrive web portal. If you use a browser such as Google Chrome or Microsoft Edge which supports folder dragging/dropping you can drag folders directly into OneDrive.com.
![]() Privacy Similar to other cloud storage services, files stored within OneDrive are subject to the usage policy that authorizes Microsoft to suspend or block any account that stores content that breaches its code of conduct. Prohibited content includes inappropriate images, such as nudity or pornography, and using the service to engage in activities that are false, misleading, illegal, and exploitative, and that generate spam, among several other actions. Full details of the code of conduct can be found here: https://www.microsoft.com/servicesagreement.
Privacy Similar to other cloud storage services, files stored within OneDrive are subject to the usage policy that authorizes Microsoft to suspend or block any account that stores content that breaches its code of conduct. Prohibited content includes inappropriate images, such as nudity or pornography, and using the service to engage in activities that are false, misleading, illegal, and exploitative, and that generate spam, among several other actions. Full details of the code of conduct can be found here: https://www.microsoft.com/servicesagreement.
![]() Synchronization In Windows 10, the synchronization engine employed to sync File Explorer and the OneDrive cloud storage service has been improved from earlier versions and uses the same engine as employed by OneDrive for Business. In Windows 10, users will only see the files and folders that have been explicitly chosen to be kept in sync. Any files that are not marked as requiring synchronization will not be visible within the OneDrive desktop app in File Explorer. Future planned improvements to the OneDrive service will include a new feature called “Files-On-Demand”, which will offer the ability to select, download and synchronize files held in OneDrive to the desktop app.
Synchronization In Windows 10, the synchronization engine employed to sync File Explorer and the OneDrive cloud storage service has been improved from earlier versions and uses the same engine as employed by OneDrive for Business. In Windows 10, users will only see the files and folders that have been explicitly chosen to be kept in sync. Any files that are not marked as requiring synchronization will not be visible within the OneDrive desktop app in File Explorer. Future planned improvements to the OneDrive service will include a new feature called “Files-On-Demand”, which will offer the ability to select, download and synchronize files held in OneDrive to the desktop app.
![]() File size and quantity Microsoft has increased the maximum size for files uploaded to OneDrive from 2 GB to 10 GB when using the website, and still limits the number of items (files and folders) stored in a single OneDrive account to 20,000.
File size and quantity Microsoft has increased the maximum size for files uploaded to OneDrive from 2 GB to 10 GB when using the website, and still limits the number of items (files and folders) stored in a single OneDrive account to 20,000.
Because OneDrive is fully integrated within Windows 10, you can access your OneDrive files seamlessly via your applications, such as Microsoft Office, if you configure the application to use your Microsoft account as the identity.
OneDrive options
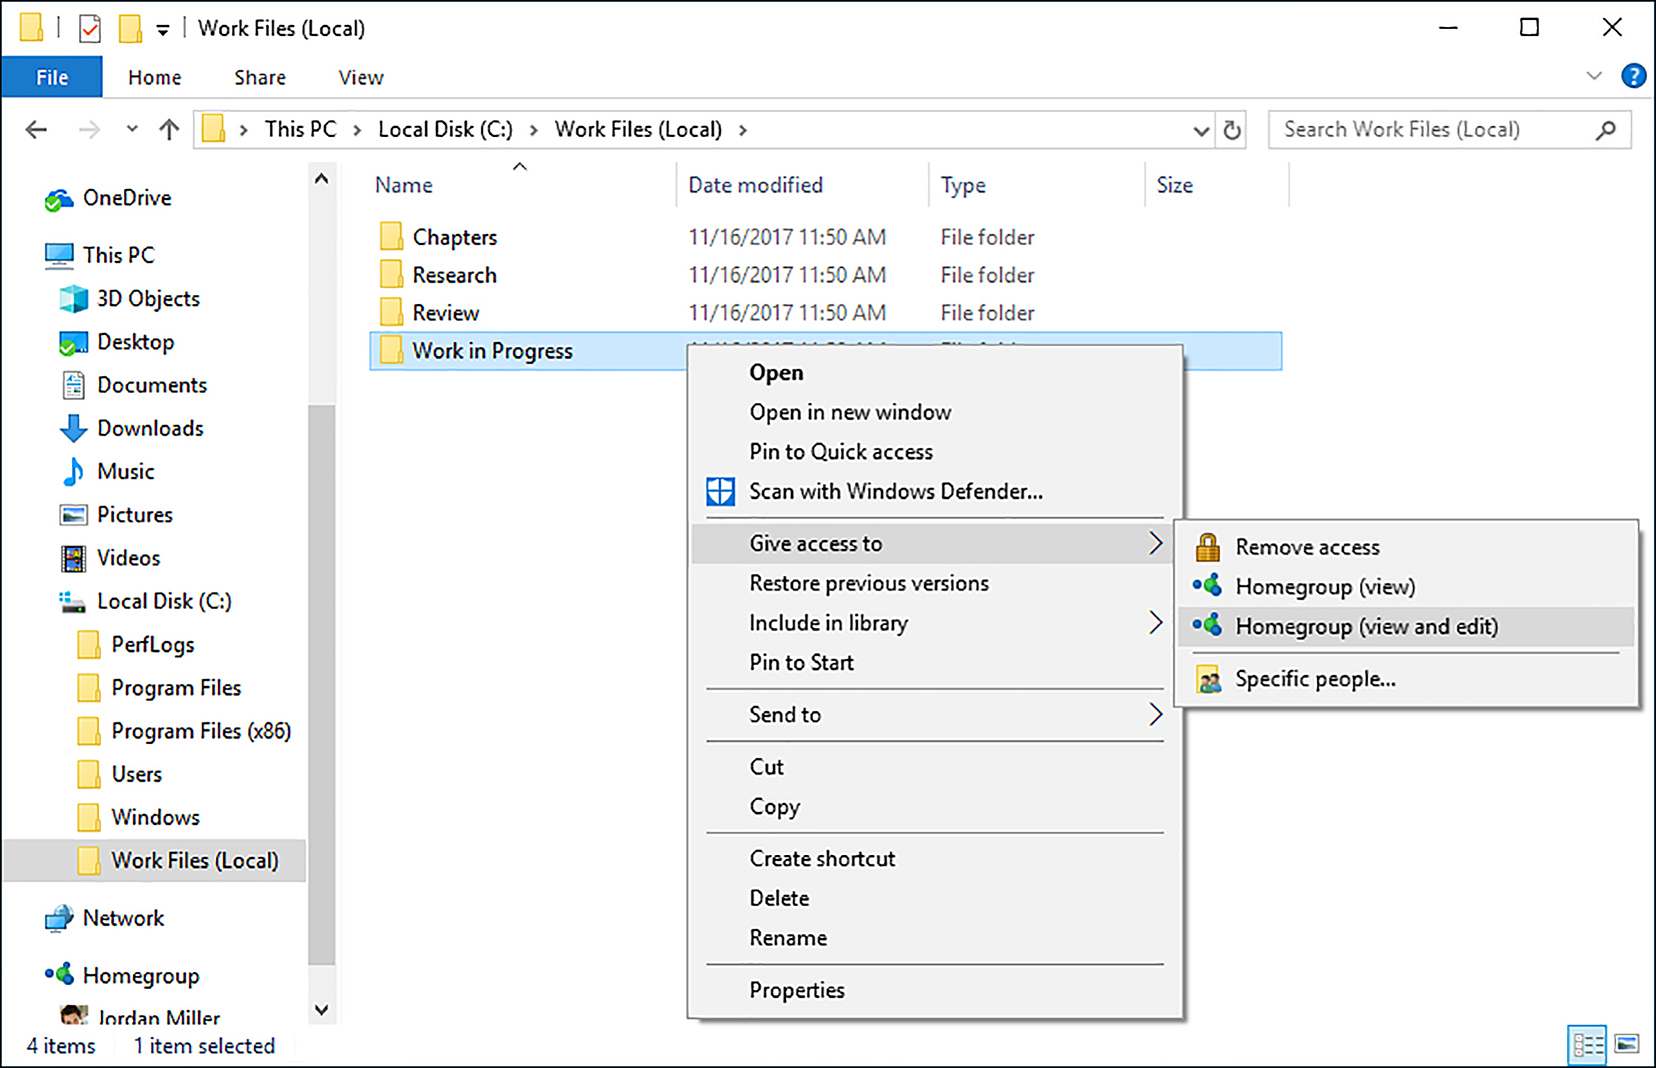
From the OneDrive web portal, users can fine-tune several settings to customize their user experience. Select the Options setting by clicking the cog icon, as shown in Figure 6-10.
Within the Options screen you have a dashboard with the following settings that relate to your OneDrive:
![]() Manage Storage This enables users to view their current storage plan and buy additional storage by upgrading, redeeming a OneDrive code or earning Referral Bonuses.
Manage Storage This enables users to view their current storage plan and buy additional storage by upgrading, redeeming a OneDrive code or earning Referral Bonuses.
![]() Plans and upgrades This enables users to upgrading their current plan.
Plans and upgrades This enables users to upgrading their current plan.
![]() Office file formats This enables users to choose a default format for Office documents, such as Microsoft Office Open XML Format (.docx, .pptx, .xlsx), or OpenDocumentFormat (.odt, .odp, ods).
Office file formats This enables users to choose a default format for Office documents, such as Microsoft Office Open XML Format (.docx, .pptx, .xlsx), or OpenDocumentFormat (.odt, .odp, ods).
![]() Photos This allows just users to let OneDrive to create albums you’re your uploaded photos automatically.
Photos This allows just users to let OneDrive to create albums you’re your uploaded photos automatically.
![]() Tagging This allows just users to select to allow OneDrive to automatically tag your photos by theme.
Tagging This allows just users to select to allow OneDrive to automatically tag your photos by theme.
![]() Notifications This enables OneDrive to send an email when people make changes to files that are being shared from their OneDrive account, or OneDrive recaps their photos.
Notifications This enables OneDrive to send an email when people make changes to files that are being shared from their OneDrive account, or OneDrive recaps their photos.
![]() Device backups This lets you see and optionally delete your device backups. Devices include PCs, phones, and tablets. The list will show the date of the device backup.
Device backups This lets you see and optionally delete your device backups. Devices include PCs, phones, and tablets. The list will show the date of the device backup.
![]() Search This allows just users to turn off allowing OneDrive to automatically show previous searches as suggested search terms, and delete all cached searches.
Search This allows just users to turn off allowing OneDrive to automatically show previous searches as suggested search terms, and delete all cached searches.
Administrators can block the use of OneDrive within Group Policy by navigating to Computer ConfigurationAdministrative TemplatesWindows ComponentsOneDrive and enabling the Prevent The Usage Of OneDrive For File Storage setting. This is will prevent File Explorer and apps from displaying OneDrive files and prevent synchronization of files with the cloud.
Sync settings
Within Windows 10, you can configure the built-in OneDrive client, as shown in Figure 6-11, to maintain the automatic synchronization of your files between Windows 10 and the cloud storage service. Launch the OneDrive client by right-clicking the OneDrive tray icon and selecting Settings. Alternatively, you can launch the OneDrive client by clicking the OneDrive tray icon and then selecting the icon with three vertical dots to the right of the folder icon.

During the out-of-box experience (OOBE), you may have given permission to Windows 10 to use your Microsoft account. Windows 10 will use this account to automatically configure the connection to OneDrive. If you change your Microsoft account, or want to access a different OneDrive, you will need to unlink the existing Microsoft account.
From the Account tab, you are able to disable OneDrive synchronization by selecting the Unlink this PC link. Once you have unlinked your account, you need to log out and sign back in to Windows 10. The files that were synchronized to your device will still be present, however, they will no longer be synchronized.
After unlinking your account, the OneDrive client service will still be running, but it will be dimmed in the notification area. You will be presented with the Welcome To OneDrive Get Started window each time you click the notification icon or click the OneDrive icon within File Explorer. Within Windows 10, you are able to link only one Microsoft account to OneDrive; this can be a different Microsoft account from the one used to sign in to the operating system.
Co-existence of OneDrive and OneDrive for Business
If you have an Office 365 work account, you can also add an OneDrive for Business. Windows 10 differentiates them by using a different color for each app.
To add an OneDrive for Business account follow these steps:
On the Account tab, click Add an Account.
On the Set Up OneDrive page, click Enter Your Business Email Account/
Follow the initial configuration wizard and click Next.
On the Sync your OneDrive files to this PC select files and folders that you want to synchronize to this device, and click Next.
Once the wizard is complete, click Open my OneDrive folder.
In the notification area, as shown in Figure 6-12, you can now see two OneDrive icons, one white, and one blue.
The blue one is the OneDrive for Business account.
In File Explorer you now see two OneDrive folder locations, with the name of the account shown.

When a OneDrive account is removed, but unlinking the account in the OneDrive settings, the synchronization is immediately stopped, but the files are not deleted and you should manually remove the local copy of the files if they are no longer required.
Fetch files on your PC by using OneDrive
With OneDrive configured on Windows 10, you can use the Let Me Use OneDrive To Fetch Any Of My Files On This PC feature to access all your files on that PC from another computer over the Internet. You must first enable the setting on the PC, within the OneDrive Settings as shown in Figure 6-11. Then sign in to the OneDrive website and browse to the PCs listed in the left pane. Once connected to a PC, you are also able to access network locations, mapped drives, and local drives on the PC, as shown in Figure 6-13. Files opened using this feature will be opened on the local PC, and not on the remote PC.

FIGURE 6-13 Using the OneDrive Fetch files feature to remotely access files on your PC over the Internet
Although the feature is heavily dependent on your Internet connection, the option to fetch and open any of your files on your PC is a useful feature of OneDrive, which may be covered in the exam.
Before you can connect to the PC, the following prerequisites must be in place on the PC that you want to access by using the Fetch files feature. You need to ensure that the PC that you want to access:
![]() Is turned on
Is turned on
![]() Is connected to the Internet
Is connected to the Internet
![]() Is running OneDrive Desktop app signed in using the same Microsoft account
Is running OneDrive Desktop app signed in using the same Microsoft account
![]() Has the Let Me Use OneDrive To Fetch Any Of My Files On This setting enabled
Has the Let Me Use OneDrive To Fetch Any Of My Files On This setting enabled
When you use the Fetch feature to fetch your files, you may be asked to enter a verification code to ensure that you have permission to access the PC.
Using OneDrive on other devices
You need to be aware that OneDrive is also supported on various platforms, in addition to Microsoft devices, as shown in Table 6-3.
TABLE 6-3 OneDrive-supported device platforms
Desktop |
Tablet |
Phone |
Xbox |
| Built-in: | Built-in: | Built-in: | Built-in: |
Windows 10 Windows 8.1 (32- or 64-bit versions) Windows RT 8.1 |
Windows 10 Windows 8.1 (32- or 64-bit versions) Windows RT 8.1 |
Windows Phone 7.5 or later |
Xbox One Say “Xbox, Bing” and then “OneDrive”, or browse apps to install OneDrive from the Store. |
| Supported: | Supported: | Supported: | Supported: |
Windows 7 Windows Vista Service Pack 2 and the Platform Update for Windows Vista* Download link |
Windows 7 Windows Vista Service Pack 2 and the Platform Update for Windows Vista* Download link |
|
Xbox 360 From Xbox Home, select Apps. Select Browse Apps, and then Social. Select OneDrive and install the app. |
| Non Windows Support: | Non Windows Support: | Non Windows Support: | Non Windows Support: |
OneDrive app for Mac Download link: |
OneDrive app for iOS 9.0 or later Download link: |
OneDrive mobile app for iOS 9.0 or later Download link: |
|
|
OneDrive app for Android Download link: |
OneDrive mobile app for Android Download link: |
|
* After November 1st 2017, OneDrive will be phasing out support for Windows Vista SP2 (All versions), Windows Server 2008 and Mac OS X 10.9.
Skill 6.2: Configure file and folder access
Administrators who store data on file servers need to ensure that it is accessible, and remains secure. In this skill you will review how to protect data using NTFS file permissions and the encryption options offered by using Encrypting File System.
Administrators can prevent users from over-burdening file servers by implementing Disk Quotas and auditing access to resources to ensure compliance, and can prevent unauthorized access. The File Server Resource Manager (FSRM) role service on Windows Server 2016 allows server administrators to manage and classify data stored on file servers.
User Account Control (UAC) introduced with Windows Vista continues to protect systems by limiting system access for users and protecting against malware attacks. The refinements to UAC will be reviewed here.
You’ll need to ensure that your understanding of NTFS permissions, inheritance, effective access, and taking ownership is robust because this knowledge will be assumed on the exam.
This section covers how to:
![]() Encrypt files and folders by using EFS
Encrypt files and folders by using EFS
![]() Configure NTFS permissions
Configure NTFS permissions
![]() Configure disk quotas
Configure disk quotas
![]() Configure file-access auditing
Configure file-access auditing
![]() Configure authentication and authorization
Configure authentication and authorization
Encrypt files and folders by using Encrypting File System
Encrypting File System (EFS) used with a Data Recovery Agent (DRA) is a very secure method to protect sensitive data by encrypting files and folders. Because EFS was first introduced in Windows 2000, EFS often suffers from being dismissed as being old or obsolete, and passed over in favor of BitLocker Drive Encryption or BitLocker To Go. Don’t be fooled, though, EFS offers functionality that BitLocker does not, and despite EFS having been available for many years, it still offers an incredibly secure method of enterprise-grade encryption.
It is important to use EFS and a DRA together. Without a DRA available within your organization, you may never regain access to an EFS-encrypted resource. The DRA will help to recover data if the encryption key is deleted, or if the machine has been lost or compromised.
EFS offers encryption at a file and folder level it cannot be used to encrypt an entire hard disk for this you would use BitLocker (covered in Chapter 5). Users can encrypt any file or folder that they have created on an NTFS-formatted hard disk by right-clicking the resource, and selecting Properties from the context menu that appears. In the Advanced Attributes dialog box (shown in Figure 6-14) select the option to Encrypt Contents To Secure Data.

Encryption should not be used without prior planning and establishing some safeguards to secure the encryption keys that are used. EFS protects data from unauthorized access and it is especially effective as a last line of defense from attacks, such as physical theft.
EFS uses Windows Public Key Infrastructure (PKI) and a fast encryption algorithm to protect files. The public and private keys generated during encryption ensure that only the user account that encrypted the file is able to decrypt it. Encrypted data can be decrypted only if the user’s personal encryption certificate is available, which is generated through the private key. Unless exported by the user, this key cannot be used by anyone else, and EFS prevents any access to the data. EFS will prevent attempts to copy or move encrypted data by anyone except users who have the proper credentials. If the user deletes his account or leaves the company, any encrypted resources will not be accessible, which could lead to data being lost. The only way to prevent data loss is to ensure that a DRA has previously been created, so that an administrator can use the DRA to decrypt the resource.
Here are some key points you need to learn about EFS:
![]() The process of encryption and decryption happens behind the scenes and is not visible to users.
The process of encryption and decryption happens behind the scenes and is not visible to users.
![]() Encryption occurs when you close files; decryption occurs when you open them.
Encryption occurs when you close files; decryption occurs when you open them.
![]() EFS is available only on NTFS volumes.
EFS is available only on NTFS volumes.
![]() EFS keys aren’t assigned to a computer; they are assigned to a specific user.
EFS keys aren’t assigned to a computer; they are assigned to a specific user.
![]() If a hacker gains access to the user’s PC while he is signed in, they will be able to access and open EFS protected files.
If a hacker gains access to the user’s PC while he is signed in, they will be able to access and open EFS protected files.
![]() The file owner can move or copy an EFS-protected file.
The file owner can move or copy an EFS-protected file.
![]() You can’t use EFS and compression together. It’s one or the other.
You can’t use EFS and compression together. It’s one or the other.
![]() If the file owner moves an EFS-protected file to a volume that does not support EFS (such as FAT32), the file will be decrypted.
If the file owner moves an EFS-protected file to a volume that does not support EFS (such as FAT32), the file will be decrypted.
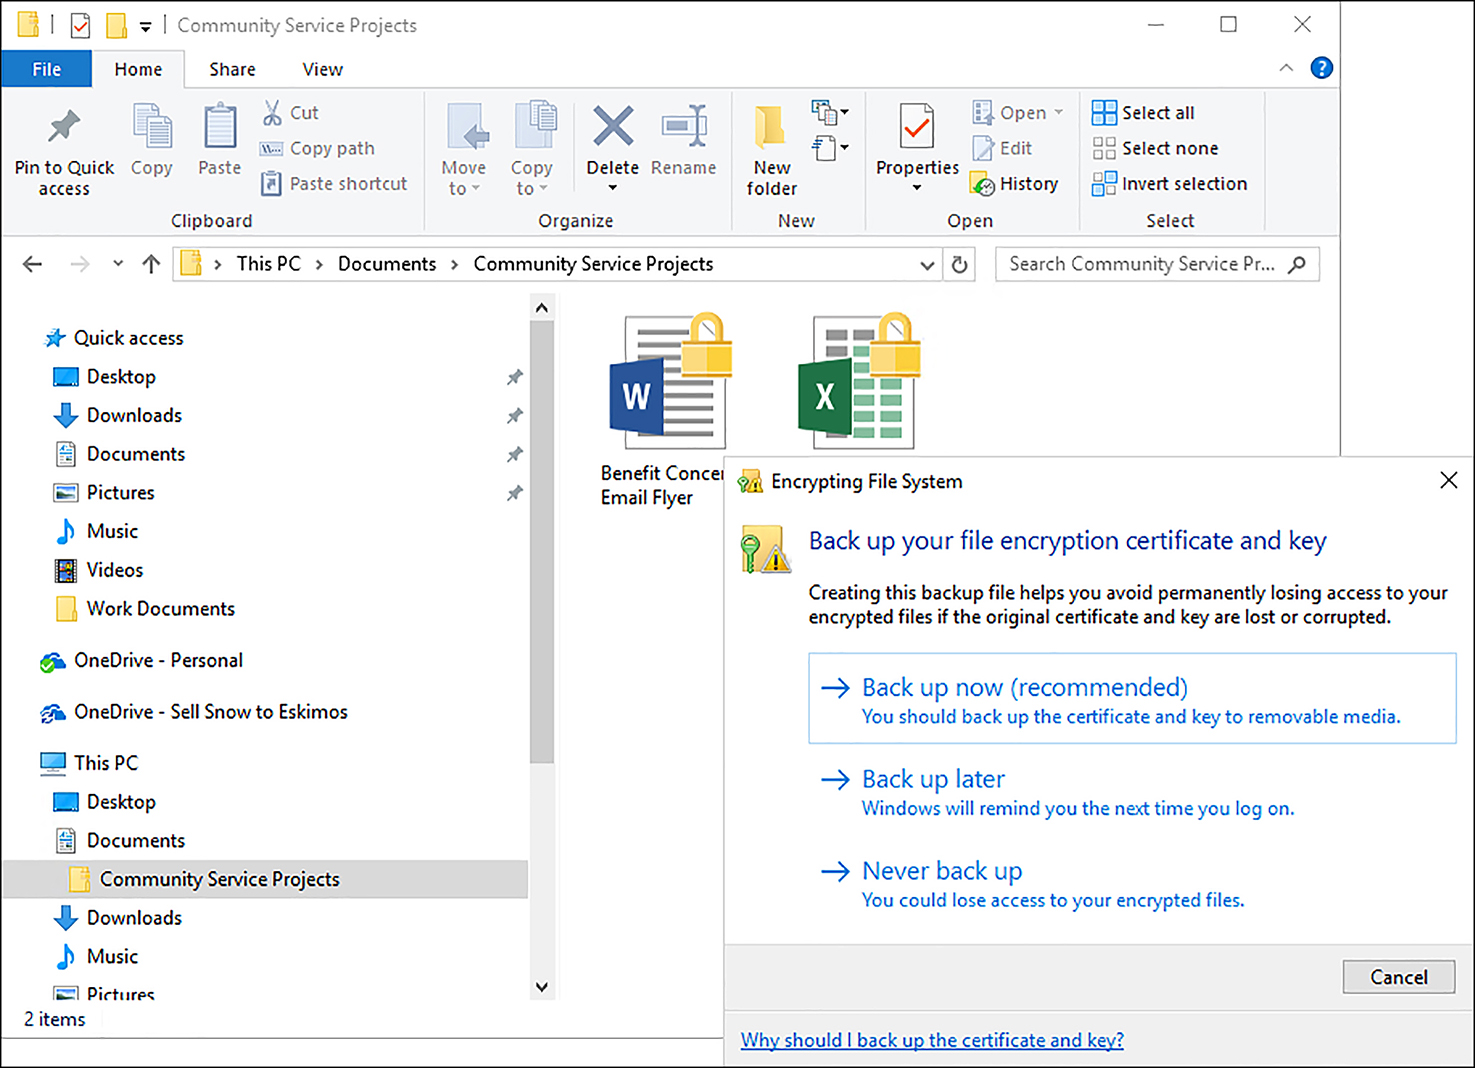
![]() Encrypted files and folders are no longer colored green in File Explorer, but now include a padlock icon on each file, as shown in Figure 6-15.
Encrypted files and folders are no longer colored green in File Explorer, but now include a padlock icon on each file, as shown in Figure 6-15.
![]() EFS uses Advanced Encryption Standard (AES), which uses a 256-bit key algorithm, a very credible industry standard of encryption.
EFS uses Advanced Encryption Standard (AES), which uses a 256-bit key algorithm, a very credible industry standard of encryption.
![]() EFS is only available on Windows 10 Pro, Enterprise, and Education editions.
EFS is only available on Windows 10 Pro, Enterprise, and Education editions.
By default, any user is able to use EFS to encrypt any file of which they have ownership. Unless company policy requires EFS, you need to consider disabling EFS within Group Policy, until a DRA is created.
It is very important that a DRA is in place before EFS is enabled, because without a DRA even an administrator is unable to recover EFS-protected files and folders. For the exam, you need to be able to configure a DRA using the command-line tool Cipher.exe. The process for creating a DRA certificate was outlined in Chapter 5, “Configure storage.”
One you have created a DRA, you should update the encryption of each currently encrypted file to have the new DRA applied by using cipher /u. You can continue to encrypt your files and folders within File Explorer using the Encrypt Contents To Secure Data option, shown in Figure 6-14. Once you have encrypted the file or folder, the resource will be encrypted and no longer are they colored green in File Explorer, but now include a padlock icon on each file, as shown in Figure 6-15.
Performing backup and recovery of EFS-protected files
Built into Windows is a wizard for users who want to use EFS to create a file encryption certificate and key, and back up these files.
Use the following steps to start the wizard and complete the process to configure an EFS certificate.
Open Control Panel and select User Accounts.
Click Manage Your File Encryption Certificates to open the Encrypting File System Wizard.
Click Next. The wizard asks for your file encryption certificate; you can select your existing certificate or you can create a new certificate.
Click Create A New Certificate, and then click Next.
Select A Self-signed Certificate Stored On My Computer and click Next.
Provide a backup location and password, and click Next.
On the Update your previously encrypted files page, tick All Logical Drives and click Next.
On the Your encrypted files have been updated page, click Close.
In addition to the Cipher.exe command-line tool, you can also use the Certificates MMC (CertMgr.msc) to manage or backup your personal EFS certificate. You can also import your certificates to a new computer that doesn’t already have your certificate. In the event of your certificate being lost, perhaps due to a failed computer or corrupted profile, you can import the DRA certificate onto a new computer, which would allow recovery of the encrypted files.
To import your EFS certificate into your personal certificate store via the Certificate Import Wizard, you should follow these steps:
Open Certificates MMC, by typing CertMgr.msc into the search box, and then press Enter.
Select the Personal folder.
Click Action, click All Tasks, and select Import.
Work through the Certificate Import Wizard to import the certificate.
Some of the most common parameters used with the Cipher.exe command include:
![]() /c Displays information about an encrypted file
/c Displays information about an encrypted file
![]() /d Decrypts specified files and directories
/d Decrypts specified files and directories
![]() /s:<directory> Performs the specified operation on all subdirectories in the specified directory
/s:<directory> Performs the specified operation on all subdirectories in the specified directory
![]() /u Updates all encrypted files on the local drives (useful if you need to update previously encrypted files with a new recovery certificate)
/u Updates all encrypted files on the local drives (useful if you need to update previously encrypted files with a new recovery certificate)
![]() /u /n Finds all encrypted files on a local drive
/u /n Finds all encrypted files on a local drive
![]() /? Displays help
/? Displays help
![]() /x Backs up the EFS certificate and keys to the specified file name
/x Backs up the EFS certificate and keys to the specified file name
![]() /r:<FileName> Generates an EFS recovery agent key and certificate, based on the user account, then writes them to a .pfx file (Personal Information Exchange file, which contains certificate and private key) and a .cer file (Security Certificate file, which contains only the certificate)
/r:<FileName> Generates an EFS recovery agent key and certificate, based on the user account, then writes them to a .pfx file (Personal Information Exchange file, which contains certificate and private key) and a .cer file (Security Certificate file, which contains only the certificate)
After you have encrypted your first file or folder, Windows 10 will prompt you to make a backup of the EFS certificate and key, as shown in Figure 6-15. This reminder will appear in the notification area and it will re-appear on a regular basis until you back up the EFS certificate and key, or choose to Never Back Up the files. You need to ensure you do take a backup and store this safely in a separate location from that of the files.
Credential roaming
Credential roaming is a feature built into Windows 10 that can roam usernames and passwords, which are securely stored within the Windows Credential Manager in a protected area called Windows Vault. Credential Manager is only available on non-domain joined PCs.
EFS certificates used in a domain environment and that are signed by a Certificate Authority (CA) or are self-signed can be added manually to the Credential Manager. These credentials can then roam between multiple devices that share the same Microsoft account. On trusted devices, these credentials are automatically synchronized when you sign in to the device using your Microsoft account.
To view your Credential Manager and its contents, click Control Panel, click User Accounts and then click Manage Your Credentials in the left pane. Alternatively, search for Credential via the Search bar.
In most cases when you navigate to a network resource or to a web server that prompts you for credentials, once you enter the username and password, you may have the option to select Remember My Credentials. If you agree to this Windows stores the credentials in Credential Manager. There are some exceptions to which credentials can be stored with Credential Manager if devices are also protected with Windows Defender Credential Guard.
Configure NTFS permissions
An object is computer terminology for a physical or logical resource such as a file, a folder, or even a printer. NTFS enables us to set permissions on objects, enabling us to control access to that object. The Access Control List (ACL) for a file is shown in Figure 6-16. The Security tab is selected, and you can see that the Users group has Read & Execute (Allow), List Folder Contents (Allow), Read (Allow), permissions set for the Work Files (Local) folder object.

For the exam, you need to be comfortable with the definitions of NTFS-related acronyms, as defined in Table 6-4.
TABLE 6-4 Definitions of ACL, ACE, DACL, and SACL
Name |
Acronym |
Description |
Access control list |
ACL |
A generic term that includes DACL and SACL displaying a list of users and groups who have permissions on the object |
Access control entry |
ACE |
Identifies the specific permissions granted to a user or group, and used in SACL to define auditing |
Discretionary access control list |
DACL |
List of ACEs that define users/groups that have permission to an object. |
System access control list |
SACL |
This is used for auditing. It contains ACEs that define which users access to this object will be monitor/audited. |
NTFS provides six basic (previously referred to as standard permissions) and fourteen advanced permissions (including Full Control) that can be configured. The six basic permissions that can be assigned to a file or a folder are listed in Table 6-5.
TABLE 6-5 Basic NTFS file and folder permissions
Basic Permission |
Description: when applied to a Folder |
Description: when applied to a File |
Full Control |
Permits the reading, writing, changing, and deletion of files and subfolders. Enables modification of permissions on folders |
Permits reading, writing, changing, and deletion of the file. Enables modification of permissions on files |
Modify |
Permits the reading, writing, changing, and deletion of files and subfolders. Does not permit the modification of permissions on folders |
Permits reading, writing, changing, and deletion of the file. Does not allow the modification of permissions on files |
Read & Execute |
Permits the content of the folder to be accessed and executed |
Permits the file to be accessed and executed |
List Folder Contents |
Permits the contents of the folder to be viewed |
N/A as cannot be applied to files |
Read |
Allows access to contents |
Permits access to contents. Differs from Read & Execute in that it does not permit files to be executed |
Write |
Enables adding of files and subfolders |
Enables a user to modify, but not delete, a file |
Permissions are normally set at a top-level permission, and can then include other lower-level permissions. For example, if Full Control, Modify, or Read & Execute permissions are configured, you will find that several other permissions are included as well. This behavior is shown in Table 6-6.
TABLE 6-6 Additional permissions set when configuring basic permissions
Basic Permission |
Additional permissions CONFIGURED |
Full Control |
Full Control, Modify, Read & Execute, List Folder Contents, Read, Write |
Modify |
Modify, Read & Execute, List Folder Contents, Read, Write |
Read & Execute |
Read & Execute, List Folder Contents, Read |
List Folder Contents |
List Folder Contents |
Read |
Read |
Write |
Write |
Behind the basic permissions is a matrix of advanced permissions, which can also be applied to files and folders. It is worthwhile to take a look at how the basic permissions are actually collections of the thirteen advanced permissions (the fourteenth setting is Full Control which encompasses the other 13). The matrix in Table 6-7 shows the relationship between basic and advanced permissions.
TABLE 6-7 Basic and advanced permissions matrix
Advanced Permission |
Full Control |
Modify |
Read & Execute |
List Folder Contents |
Read |
Write |
Traverse folder/execute file |
X |
X |
X |
X |
|
|
List folder/read data |
X |
X |
X |
X |
X |
|
Read attributes |
X |
X |
X |
X |
X |
|
Read extended attributes |
X |
X |
X |
X |
X |
|
Create files/write data |
X |
X |
|
|
|
X |
Create folders/ append data |
X |
X |
|
|
|
X |
Write attributes |
X |
X |
|
|
|
X |
Write extended attributes |
X |
X |
|
|
|
X |
Delete subfolders and files |
X |
|
|
|
|
|
Delete |
X |
X |
|
|
|
|
Read permissions |
X |
X |
X |
X |
X |
X |
Change permissions |
X |
|
|
|
|
|
Take ownership |
X |
|
|
|
|
|
Understand also what is meant when you see that some permissions are available while others unavailable, in the ACLs. This can be because some permissions have been explicitly set, while others are implied or inherited by virtue of their child relationship to a parent folder. Permissions can be one of 3 states: explicitly configured, not configured, or inherited, as shown in Table 6-8.
TABLE 6-8 NTFS permission states
Permission Type |
Description |
Check box status |
Explicit Allow |
The user is allowed the permission on the object |
Selected |
Explicit Deny |
The user is denied the permission on the object |
Selected |
Not configured |
Permissions that have not been assigned will have the effect of not allowing the user the permission on the object |
Clear |
Inherited Allow |
Allow permission is applied to the object by virtue of permissions given to their parent object |
Selected but dimmed |
Inherited Deny |
Deny permission is applied to the object by virtue of permissions given to their parent object |
Selected but dimmed |
Many advisers will state that a Deny permission will always take precedence over other permissions. This is normally true, as an Explicit Deny will always “win” when compared to other permissions. However, when you are troubleshooting permission-related issues, do not assume that Deny is always triumphant because an Explicit Allow will win over an Inherited Deny ACE.
Should you need to configure a lot of permissions or reset the system permissions back to default settings, the GUI is not always the most efficient option to use. In such cases, you need to consider using the command-line tool ICACLS.exe, which can be used to configure local NTFS permissions and can be used in scripts. PowerShell also enables you to script setting permissions on NTFS resources over the network.
You can use ICACLS to grant a permission, with the /grant switch. The most common use for ICACLS is to reset permissions. Using the reset command enables permission inheritance at the folder level and removes any custom permissions on all files, and subdirectories. The following example, which reset the permissions to the C:Work Files (Local) folder:
Icacls.exe "C:Work Files (Local)" /reset /T
PowerShell enables you to script the management of file and folder permissions using the two main cmdlets Get-Acl and Set-Acl. PowerShell enables an administrator to remotely configure settings across the network, using PowerShell Remoting.. For more information about the Get-Acl and Set-Acl cmdlets, type Get-Help Get-Acl, or type Get-Help Set-Acl.
Combining shared folders and NTFS file permissions
Using shared folders and NTFS permissions together requires some careful consideration because both the shared folder permissions and the file and folder permissions are combined when the user connects to the resource over the network. This situation only applies over the network because shared folder permissions are ineffective if a user accesses the resources locally or via Remote Desktop.
When you grant shared folder permissions to users accessing the resources over the network, the following rules apply:
![]() By default, the Everyone group is granted the Read shared folder permission.
By default, the Everyone group is granted the Read shared folder permission.
![]() Users will also require sufficient NTFS permissions for each resource in a shared folder.
Users will also require sufficient NTFS permissions for each resource in a shared folder.
![]() You need to combine NTFS permissions and shared folder permissions, with the resulting permission being the most restrictive.
You need to combine NTFS permissions and shared folder permissions, with the resulting permission being the most restrictive.
![]() Share permissions that are set on a folder apply to the folder and to all the files in the folder.
Share permissions that are set on a folder apply to the folder and to all the files in the folder.
![]() Share permissions are applied to all child subfolders and their files when the resources are accessed through the share.
Share permissions are applied to all child subfolders and their files when the resources are accessed through the share.
Even if Full Control NTFS file or folder permissions have been set for a folder, if the default shared folder permission is set (which is Read), the highest permission that any file or child object within that folder can have is the default Read permission, as the combined most restrictive permission is Read. Remember that NTFS file permissions always apply, but shared folder permissions only apply to shared folders and combine with NTFS to secure file resources when accessed over a network.
Understanding permissions inheritance
Permissions will “flow” from top to bottom and follow the folder hierarchy. By default, inheritance is enabled as this facilitates more efficient administration. NTFS enables you to disable inheritance from flowing from a parent folder to the child. To select the option to disable inheritance, click the Advanced option on the resource Security properties screen, and then click Disable Inheritance in the Advanced Security Settings For dialog box. You will then be offered the options shown in Figure 6-17.

In the Block Inheritance dialog box, there are two options, as follows:
![]() Convert Inherited Permissions Into Explicit Permissions On This Object Prevents inherited permissions from being able to “flow” from top folders to the subfolders. Current inherited permissions are changed by the system from implicit permissions to explicit permissions. This can result in hundreds or thousands of inherited permissions being changed into explicit permissions.
Convert Inherited Permissions Into Explicit Permissions On This Object Prevents inherited permissions from being able to “flow” from top folders to the subfolders. Current inherited permissions are changed by the system from implicit permissions to explicit permissions. This can result in hundreds or thousands of inherited permissions being changed into explicit permissions.
![]() Remove All Inherited Permissions From This Object Removes all permissions, and gives you a folder structure with no permissions set. Care needs to be taken with this option because option because it is very easy to remove all access, even system access, to the file structure.
Remove All Inherited Permissions From This Object Removes all permissions, and gives you a folder structure with no permissions set. Care needs to be taken with this option because option because it is very easy to remove all access, even system access, to the file structure.
Understanding Move, Copy, and permissions inheritance
When you need to move or copy a folder from one location to another, you need to understand how NTFS will perform the task with respect to how permissions on the resource are modified. Table 6-9 shows the behavior that NTFS adopts when copying files from one folder to another folder, and also between partitions.
TABLE 6-9 Resultant effect of moving or copying NTFS files
Action |
Effect |
Copy or Move a file or folder to a different volume |
Inherits the permissions from the destination (new location) folder |
Copy or Move a file or folder within the same NTFS volume |
Inherits the permissions from the new parent folder, and explicitly assigned permissions are retained and merged with those inherited |
Copy a file or folder to a non-NTFS volume |
The copy of the folder or file loses all permissions |
When you copy a file or folder within the same volume or between volumes, the user must have Read permission for the source folder and Write permission for the destination folder.
When you move a file or folder within the same volume or between volumes, you need to have both Write permission for the destination folder as well as Modify permission for the source file or folder. This is because Windows 10 will move the resources (Write) and then delete (Modify) the resources from the source folder once it has completed the copy to the destination folder.
Effective Access
You might be required to calculate the access that a user has to a resource. Within the Advanced options of an object’s Security settings, you will find the Effective Access tab (previously called Effective Permissions) as shown in Figure 6-18. If this action is performed on a domain joined device, you have the option to determine the effective permission a selected user, device, or group has on any object. When setting permissions in a corporate environment you should verify that NTFS permissions are applied correctly and use the Effective Access feature to ensure that the results are as expected.

For example, for a resource, if you assign a user the Read permission and assign the Modify permission to a group that the same user is a member of, the effective access permissions are a combination of the Read permission and Modify permission, which is Modify permission.
When you combine permissions that include Deny permissions, NTFS will evaluate the Deny permissions before the Allow permissions that are set on the same resource with explicit Deny taking precedence over all Allow permissions.
If Deny and Allow permissions are set at different levels within a folder structure, for example, if Deny is set at the top-level folder and an Allow permission is set at its subfolder, Allow can take precedence and override Deny because the Allow permission is explicit and not implicit.
Be careful when using the Effective Access tool to review permissions on folders that you own the permissions given to the Creator Owner of the object are not taken into account.
Taking ownership of resources
It is possible to remove access to a particular user or group on an object, such as a folder. Sometimes, this happens accidentally when configuring permissions, but typically, it will happen when the user who originally created the resource leaves the organization and the resource is then said to be ‘orphaned’.
In the Advanced Security Settings dialog box for an object, you will find the Effective Access tab and at the top of this screen, as shown in Figure 6-18, is an option to change the object owner. So long as you have administrative privileges, you can take ownership of the object and allocate it to another user or group. This operation can also be performed using the command-line tool icacls <file name> /reset, using an elevated command prompt.
Configure disk quotas
In addition to setting security permissions, compressing, and encrypting files and folders, NTFS also enables you to assign disk quotas for volumes. While disk space is inexpensive and restricting user storage space may seem unnecessary, some storage is more valuable than others. The increased availability of Storage Area Network (SAN) technology, with fast Non-Volatile Memory Express (NVMe) and Solid State Drive (SSD) drives and storage space being rented in the cloud, businesses are looking to reduce storage and the resultant backup costs. The NVMe and SSD drives are fast, but they also more expensive than traditional drives.
There is no business benefit in enabling users to store copious amounts of non-business data on company owned resources such as a laptop or desktop computer. This even more relevant when considering storage on the business cloud or file-server infrastructure, and therefore, its good practice to set modest limits on the amount of space that each user can use for cloud or server-based storage. Every administrator needs to have an appropriate size in mind, and if this was set, as an example, to 2 GB per user, then 95 percent of users would never exceed the limit. The few that do hit this limit are likely to be the type of user who may be storing their music or video collection on company space, and a disk quota would certainly prevent this type of behavior.
Disk quotas can be set for local storage on computers running Windows 10 by using the Graphical User Interface (GUI) of a local PC, or configured remotely via Group Policy. You can configure NTFS disk quotas on the disk volume using File Explorer, as follows:
In File Explorer, navigate to the volume to configure the disk quotas.
Right-click the volume, and click Properties.
Click the Quota tab.
If quotas have not been set before, click Show Quota Settings, and accept the UAC prompt.
Select the Enable Quota Management check box.
Once enabled, an administrator has several options, including:
Deny Disk Space To Users Exceeding Quota Limit
Limit Disk Space To (set the limit)
Set Warning Level To (set the limit)
Log Event When A User Exceeds Their Quota Limit
Log Event When A User Exceeds Their Warning Level
To apply the settings, click OK, and then click OK again to apply.
The system will now scan the volume for disk usage, which may take several minutes, depending on the size of the disk. You can review the quota entries for the volume by clicking the Quota Entries button at the bottom of the dialog box as shown in Figure 6-19.

EXAM TIP
Fsutil.exe is the command-line tool used to set quota limits. Review the options available using Fsutil, such as running Fsutil fsinfo statistics C: with administrative credentials.
Configuring disk quota policies
Rather than configure disk quotas on each system, you can configure and apply them using Group Policy. There are six GPO settings, which relate to disk quotas, in the Computer ConfigurationAdministrative Templates SystemDisk Quotas. These are summarized in Table 6-10.
Policy |
Description |
Enable disk quotas |
Turns Disk Quotas Management On or Off for all NTFS volumes on the computer and prevents users from changing the setting |
Enforce disk quota limit |
This determines whether disk quota limits are enforced. If quotas are enforced, users are denied disk space if they exceed the quota. This setting overrides settings on the Quota tab for the NTFS volume. |
Specify default quota limit and warning level |
Sets a default disk quota limit and warning level for all new users of the volume |
Log event when quota limit is exceeded |
Determines whether the system records an event in the Application log when users reach their limit, and prevents users from changing the logging options in the GUI |
Log event when quota warning level is exceeded |
Determines whether the system records an event in the Application log when users reach the warning level on a volume |
Apply policy to removable media |
Determines whether to extend disk quota policies to NTFS volumes on removable media |
The Disk Quota feature that is provided with Windows 10 is quite limited, and is only available on a per-volume basis. If you require more functionality to create quotas on your centralized file storage, the File Server Resource Manager (FSRM) that is available with Windows Server 2016, offers significant improvements in functionality over the Windows 10 Disk Quota feature. FSRM offers a set of features that enable you to manage and classify data, and report data that is stored on file servers by using the GUI or by using PowerShell.
EXAM TIP
The Resilient File System (ReFS), can be considered the next generation of NTFS does not support disk quotas.
Configure file access auditing
Several new corporate compliance regulations and laws, including the Sarbanes-Oxley Act (2002) in the USA, have created new requirements that CEOs of corporations are required to follow in order to ensure that all records and resources within a business are safeguarded, accounted for, and that access to sensitive or private data is tightly controlled.
Auditing of objects such as access to files and folders within NTFS, provides IT administrators with an in-depth tool that can monitor file and folder access in detail. Auditing complements the other measures implemented such as firewalls, and shared folder and NTFS permissions. This multilayered approach is an example of defense in depth, which should be taken to protect resources from unauthorized access and comply with the Sarbanes-Oxley Act requirements.
An example of defensive layering is as follows:
Inform all users about the current policies and security requirements on corporate resources and data
Set security on devices and servers using BitLocker Drive Encryption
Define and create groups; document and restrict membership to each group
Set permissions on the folders and files, and apply group access
Set auditing to monitor access to folders and file resources
Monitor log files and create alerts
Investigate security breaches and re-evaluate security measures if necessary
NTFS auditing is very detailed and can be used to record successful resource access and also attempted access that was prevented by NTFS permissions. NTFS auditing can record types of actions related to a file or folder, including file and folder access, or attempted access, modification and deletion.
The log file created will also record additional data including date, time, user account, location, and resource name.
To enable auditing, you need to enable it using one or more GPOs, which are found at Computer ConfigurationWindows SettingsSecurity SettingsLocal PoliciesAudit Policy. The GPO Audit Object Access is the most commonly used because it enables us to audit all system-wide objects, including files and folders. The GPO can be configured to monitor and log successful access attempts, or to log failed access attempts, or both, as shown in Figure 6-20.

Once the GPO has been enabled, the last part of the configuration is to set the level of auditing required on the individual object, such as the folder and its contents. NTFS inheritance rules will also apply auditing to all child objects unless you disable this feature.
To configure auditing on files and folders, carry out the following steps:
Open File Explorer.
Select the file or folder that you want to audit, and click Properties from the File Explorer ribbon.
In the Properties dialog box, click the Security tab, and then click Advanced.
In the Advanced Security Settings dialog box, click the Auditing tab.
Click Continue, accept the UAC prompt.
Click Add to add an auditing action.
In the Auditing Entry For dialog box, click Select A Principal, type the name of the user, group, or computer that needs to be monitored, and click OK.
In the Auditing Entry For dialog box, select the type of auditing required, All, Fail, or Success.
Choose the Basic Permissions that you require, as shown in Figure 6-21.
Click OK three times to exit and complete the configuration.

Another option within the Auditing configuration is to Show Advanced Permissions, which shows the special permissions that allow for very granular auditing, should this be required.
If you have enabled DAC policies within the domain, you can further refine the scope of the auditing entry by adding claims-based conditions, which appears in the lower part of the Auditing Entry screen.
After you enable audit logging, you need to test that auditing is occurring as expected. Attempt to access the resources being monitored, and then open the Security log in the Event Viewer and view the audited events. Depending on the level of granularity that you have specified, you may have a few entries or several dozen log entries. If you review the log entries, you should be able to find a log entry that corresponds to the event that you are monitoring.
You can use the Attach Task To This Event option in Event Viewer, from the Action pane. This can be a screen popup or a PowerShell script that alerts you when the event occurs.
Within Windows 10, you can also configure advanced audit policy that enables an even greater level of auditing. This level of auditing is very specialized and unlikely to be required, except in the most specialized cases. To review the options available, open the GPOs shown in Figure 6-22, found at Computer ConfigurationWindows SettingsSecurity SettingsAdvanced Audit Policy Configuration, and then expand System Audit Policies. Some of the nodes are related to server-side functions. The Object Access node, highlighted in the Figure 6-22, is relevant to auditing the file system and registry access.

Configure authentication and authorization
In Chapter 1, “Manage identity,” you reviewed the options in Windows 10 relating to authentication and authorization situations that are available to users of Windows 10. Based on the sign-on credentials and group membership held, Windows 10 will determine the type and scope of access the user has to system resources and the ability to make system-wide changes. As a general rule, an administrator on a Windows device will have a very high level of control over the entire system, whereas a standard user will have limited abilities only.
Configuring User Account Control
Once a user has gained access to the operating system following successful sign-on, the Windows 10 feature called User Account Control (UAC) prevents unauthorized changes to the system.
For new users of Windows 10, especially if they have previously used a version of Windows prior to Windows Vista, such as Windows XP, it’s important that they are introduced to the UAC feature and guided through the rationale for UAC. Older versions of Windows let users log on as administrators and enable them to retain full administrative authorization over all activities on the system until they log off.
Systems that suffer from malware attacks can easily be compromised because the malware can effectively use administrative access and wreak havoc on the system. This creates extra work for the helpdesk, increases support costs, and reduces productivity. UAC has been very successful in preventing users and malware from using administrative credentials to harm a system.
Administrators no longer have full access to the system. Rather than enabling administrators to implement system-wide changes, UAC presents a challenge pop-up prompt to the administrator to force them to confirm their actions. Similarly, a standard user who attempts to change system settings will receive a UAC prompt, which requires administrative credentials to be provided, or else denies them the ability to make the requested changes.
Since the introduction of UAC, Microsoft has fine-tuned the UAC process with the aim of making the use of UAC less frustrating for all users by reducing the number of application and system tasks that require elevation.
UAC offers various layers of protection, with the UAC prompt being the most visible to the user. The following features compliment UAC:
![]() File and Registry Redirection
File and Registry Redirection
![]() Installer Detection
Installer Detection
![]() UAC prompt
UAC prompt
![]() ActiveX Installer Service
ActiveX Installer Service
![]() Secure Desktop
Secure Desktop
![]() Application Information Service
Application Information Service
Standard users
Except for administrators, all users are standard users with few privileges and limited ability to make changes to the system, such as installing software or modifying the date and time. Standard user accounts are described as “operating with least privilege.” The list of system tasks that a standard user can perform include:
![]() Change the desktop background and modify display settings
Change the desktop background and modify display settings
![]() View firewall settings
View firewall settings
![]() Change the time zone
Change the time zone
![]() Add a printer
Add a printer
![]() Change their own user account password
Change their own user account password
![]() Configure accessibility options
Configure accessibility options
![]() Configure power options
Configure power options
![]() Connect to a wireless or LAN connection
Connect to a wireless or LAN connection
![]() Install drivers, either from Windows Update or those that are supplied with Windows 10
Install drivers, either from Windows Update or those that are supplied with Windows 10
![]() Install updates from Windows Update
Install updates from Windows Update
![]() Use Remote Desktop to connect to another computer
Use Remote Desktop to connect to another computer
![]() Pair and configure a Bluetooth device with the device
Pair and configure a Bluetooth device with the device
![]() Perform other troubleshooting, network diagnostic, and repair tasks
Perform other troubleshooting, network diagnostic, and repair tasks
![]() Play CD/DVD media
Play CD/DVD media
![]() Restore own files from File History
Restore own files from File History
![]() Use Remote Desktop to connect to another PC
Use Remote Desktop to connect to another PC
![]() View most settings, although they will require elevated permissions when attempting to change Windows settings
View most settings, although they will require elevated permissions when attempting to change Windows settings
UAC prevents you from making unauthorized or hidden (possibly malware-initiated) changes to your system that require administrator-level permissions. A UAC elevation prompt is displayed to notify you, as follows:
![]() Consent prompt This is displayed to administrators in Admin Approval Mode whenever an administrative task is requested. Click Yes to continue if you consent.
Consent prompt This is displayed to administrators in Admin Approval Mode whenever an administrative task is requested. Click Yes to continue if you consent.
![]() Credential prompt This is displayed if you are a standard user attempting to perform an administrative task. An administrator needs to enter their password into the UAC prompt to continue.
Credential prompt This is displayed if you are a standard user attempting to perform an administrative task. An administrator needs to enter their password into the UAC prompt to continue.
When an administrator provides permissions to a standard user using a UAC prompt, these are only temporarily operative and the permissions are returned back to a standard user level once the isolated task has finished.
Standard users can become frustrated when they are presented with the UAC prompt, and Microsoft has reduced the frequency and necessity for elevation. Listed are some common scenarios wherein a standard user would be prompted by UAC to provide administrative privileges. You will see that they are not necessarily daily tasks for most users:
![]() Add or remove a user account
Add or remove a user account
![]() Browse to another user’s directory
Browse to another user’s directory
![]() Change user account types
Change user account types
![]() Change Windows Firewall settings
Change Windows Firewall settings
![]() Configure Automatic Updates
Configure Automatic Updates
![]() Install a driver for a device unless it is supplied with Windows 10
Install a driver for a device unless it is supplied with Windows 10
![]() Install ActiveX controls
Install ActiveX controls
![]() Install or uninstall applications
Install or uninstall applications
![]() Modify UAC settings
Modify UAC settings
![]() Move or copy files to the Program Files or Windows folders
Move or copy files to the Program Files or Windows folders
![]() Restore system backup files
Restore system backup files
![]() Schedule Automated Tasks
Schedule Automated Tasks
Administrative users
Administrative users need to be limited to authorized personnel within the organization. In addition to the ability to perform all tasks that a standard user can, they also have the following far-reaching permissions:
![]() Read/Write/Change permissions for all resources
Read/Write/Change permissions for all resources
![]() All Windows permissions
All Windows permissions
From this, it looks like administrators have considerable power, which can potentially be hijacked by malware. Thankfully, administrators are still challenged with the UAC prompt, which pops up by default whenever they perform a task that requires administrative permissions, but they are not required to re-enter their administrative credentials. This is known as Admin Approval Mode.
A user who signs on to a system with administrative permissions will be granted two tokens one, which enables him or her to operate as a standard user, and another, which can be used when they perform a task that requires administrative permissions. Just as with the standard user, after the task is completed using elevated status, the account reverts to a standard-user privilege.
Types of elevation prompts
UAC has four types of dialog boxes, as shown in Table 6-11, with a description on how users need to respond to the prompt.
TABLE 6-11 UAC elevation prompts
Type of elevation prompt |
Description |
A Windows 10 setting or feature needs your permission to start. |
This item has a valid digital signature that verifies that Microsoft is the publisher of this item and it is usually safe to use the application. |
A non-Windows 10 application needs your permission to start. |
This application has a valid digital signature and it is usually safe to use the application. |
An application with an unknown publisher needs your permission to start. |
This application does not have a valid digital signature from its publisher. Use extra caution and verify that the application is safe before using. Search the Internet for the program’s name to determine if it is a known trustworthy application or malware. |
You have been blocked by your system administrator from running this application. |
This application has been blocked because it is known to be untrusted. To run this application, you need to contact your system administrator to remove the restriction, if appropriate. |
Within large organizations, nearly all users will be configured to sign in to their computer with a standard user account. On a managed system that has been provisioned and deployed by the IT department, standard user accounts should have little need to contact the helpdesk regarding UAC issues. They can browse the Internet, send email, and use applications without an administrator account. Home users and small businesses that lack a centralized IT resource to provision and manage their devices are often found to use administrative user accounts.
As with previous versions of Windows, an administrator can determine when the UAC feature will notify you if changes are attempted on your computer.
Search for UAC, and click Change User Account Control Settings to display the dialog box shown in Figure 6-23.

You need to review the information on this dialog box by moving the slider to each position in order to determine how the UAC feature will behave. The default is Notify Me Only When Applications Try To Make Changes To My Computer.
Table 6-12 shows the four settings that enable customization of the elevation prompt experience.
TABLE 6-12 User Account Control Settings
Prompt |
Description |
Never notify |
UAC prompting is disabled. |
Notify me only when applications try to make changes to my computer (do not dim my desktop) |
When an application makes a change, a UAC prompt appears, but if the user makes a change to system settings, the UAC prompt is not displayed. The desktop does not dim. |
Notify me only when applications try to make changes to my computer (default) |
When an application makes a change, a UAC prompt appears, but if the user makes a change to system settings, the UAC prompt is not displayed. Secure desktop feature is active. |
Always notify |
The user is always prompted when changes are made to the computer by applications or by the user. |
The settings enable changes to the UAC prompting behavior only, and do not elevate the status of the underlying user account.
In addition to the UAC settings within the Control Panel, there are many more UAC security settings that can be configured via Group Policy and can be found in Computer ConfigurationWindows SettingsSecurity SettingsLocal PoliciesSecurity Options.
EXAM TIP
You need to take time to review the UAC settings configurable by Group Policy, with particular attention to the settings that feature Admin Approval Mode.
Secure Desktop
Whenever UAC prompts the user for consent or elevated credentials, it first switches to a feature called Secure Desktop, which focuses only on the UAC prompt. In addition, Secure Desktop prevents other applications (including malware) from interacting with the user or influencing the user response to the UAC prompt.
While it is possible for malware to generate a screen that imitates the look of Secure Desktop, and even re-create the visual UAC prompt, it is not possible for malware to actually provide UAC with the correct credentials. If a system was infected with malware, it could try to bypass the UAC security setting, using a bogus credential prompt to harvest usernames and passwords from unsuspecting users, and then use these credentials on genuine UAC prompts. It is important, therefore, that administrators are vigilant against potential malware attacks, and all devices are set to ensure that their malware protection is configured to automatically update.
Thought experiments
In these thought experiments, demonstrate your skills and knowledge of the topics covered in this chapter. You can find the answers to these thought experiments in the next section.
Scenario 1
You are the IT manager for your organization, which uses Server 2016 and Windows 10 computers in a domain-joined environment. The financial accountant has asked you to explain a recent sharp increase in printing costs for one of the shared network printers in the office. You investigate and find that the increased costs relate to one of the color printers on the first floor of the office. You need to understand why the usage of this printer has increased 400 percent over the past month,
Answer the following questions regarding the investigation.
How can you find out which user or group is responsible for the increase in printing?
How would you restrict access to the printer out of normal office hours?
Some users require color printing, others require only monochrome printing. How would you approach this requirement?
Scenario 2
You’ve been asked to help provide assistance to the team designing a new interactive exhibition for a learning center for children aged 7-14 years. The objective is to make the learning experience modern and exciting, but at the same time remove any moveable components, which could fail or be broken, such as levers and switches. Your team has been investigating whether NFC or other sensors could help. Visitors will be provided with a NFC-enabled Windows 10 device to use while they visit the facility.
Answer the following questions about NFC.
How could NFC be suitable for the learning center?
What types of NFC hardware could respond to the Windows 10 device?
What other hardware-based tracking feature(s) supported by Windows 10 could be explored by the team?
Thought experiment answers
This section provides the solutions for the tasks included in the thought experiment.
Scenario 1
You should immediately enable object auditing in Group Policy and configure auditing on the color printer. Since the printer is shared on the network, the auditing is performed on the server. After a couple of days review, the Security logs within Event Viewer on the server will identify all of the jobs that have been sent to the printer. The event log will also help you to identify the name of the user or group that has been sending print jobs to the printer. You may also be able to extract from the logs the filename of the files that have been printed.
Within the color printer advanced properties dialog box, you can configure the time when the printer is available. Enter the required office hours in this dialog box to restrict usage to office hours.
You could create two identical printers, and name one Color and the other Monochrome. Add permissions to allow the group that need to print in color to be able to use both printers. Add permissions to restrict the group that don’t need to print in color to be able to use only the monochrome printer.
Scenario 2
You could use NFC smart tags within the learning center. Each exhibit could be given a prominent NFC smart tag, which visitors are invited to tap in order to activate the exhibit and/or the interactive audio-visual component on the device.
Answers may vary, but you can use a variety of NFC hardware, including smart tags, stickers, key fobs, or cards, or another Windows device with NFC hardware built in, such as a Windows phone or tablet.
Answers may vary, but you could use GPS location sensor tracking on the device to activate exhibits when the visitor carrying the device is located in a specific room or position.
Chapter summary
![]() Public Folders, HomeGroups, and Any folder sharing are useful for home-user and small networks, to enable easy file sharing. Folders can be shared with the default Share permission of Read on NTFS- formatted volumes.
Public Folders, HomeGroups, and Any folder sharing are useful for home-user and small networks, to enable easy file sharing. Folders can be shared with the default Share permission of Read on NTFS- formatted volumes.
![]() Access Based Enumeration prevents users who are not authorized to view files and folders from seeing them in NTFS.
Access Based Enumeration prevents users who are not authorized to view files and folders from seeing them in NTFS.
![]() Libraries and Quick Access enable users to locate frequently used files and folders quickly within File Explorer and applications.
Libraries and Quick Access enable users to locate frequently used files and folders quickly within File Explorer and applications.
![]() Printers can be shared over the network and secured in a similar manner to files and folders using NTFS security.
Printers can be shared over the network and secured in a similar manner to files and folders using NTFS security.
![]() NFC technology enables the transfer of small amounts of data between a device and a NFC-enabled object that are in close proximity, such as a smart tag. When such devices are used with a NFC-enabled device, such as a printer, users can connect without having to physically connect to the device using the network.
NFC technology enables the transfer of small amounts of data between a device and a NFC-enabled object that are in close proximity, such as a smart tag. When such devices are used with a NFC-enabled device, such as a printer, users can connect without having to physically connect to the device using the network.
![]() OneDrive offers users the ability to store, share, and synchronize files to a secure cloud-storage location linked to their Microsoft account, with 5 GB initial free storage capacity.
OneDrive offers users the ability to store, share, and synchronize files to a secure cloud-storage location linked to their Microsoft account, with 5 GB initial free storage capacity.
![]() Volumes formatted using NTFS enable users to configure file and folder security, EFS, disk quotas, and to enable auditing.
Volumes formatted using NTFS enable users to configure file and folder security, EFS, disk quotas, and to enable auditing.
![]() Utilizing NTFS inheritance can increase the efficiency of deploying security to folders and files organized in a logical hierarchy.
Utilizing NTFS inheritance can increase the efficiency of deploying security to folders and files organized in a logical hierarchy.
![]() NTFS file permissions protect files and folders locally and over the network.
NTFS file permissions protect files and folders locally and over the network.
![]() Files copied or moved to a different volume will inherit the permissions from the new location, whereas if the destination volume is the same, the explicit permissions are retained.
Files copied or moved to a different volume will inherit the permissions from the new location, whereas if the destination volume is the same, the explicit permissions are retained.
![]() Explicit Deny permissions will always overrule Allow permissions, although explicit Allow permissions will overrule an implied Deny permission.
Explicit Deny permissions will always overrule Allow permissions, although explicit Allow permissions will overrule an implied Deny permission.
![]() EFS on Windows 10 Pro, Enterprise, and Education editions, uses AES, a 256-bit key algorithm, to securely encrypt files stored on NTFS volumes.
EFS on Windows 10 Pro, Enterprise, and Education editions, uses AES, a 256-bit key algorithm, to securely encrypt files stored on NTFS volumes.
![]() Disk quotas are a simple method of restricting excess user-data usage on volumes.
Disk quotas are a simple method of restricting excess user-data usage on volumes.
![]() Auditing needs to be enabled in Group Policy, and then configured on the resource.
Auditing needs to be enabled in Group Policy, and then configured on the resource.
![]() User Account Control prevents unauthorized changes to Windows 10, and provides a safer environment for administrators to manage Windows 10.
User Account Control prevents unauthorized changes to Windows 10, and provides a safer environment for administrators to manage Windows 10.
![]() The Secure Desktop feature prevents malware from interfering with the user response to UAC prompts.
The Secure Desktop feature prevents malware from interfering with the user response to UAC prompts.