
7  Planning for Small Projects
Defining the work and identifying the resources necessary to complete the project are important. Planning allows you to define what you are going to do, when you are going to do it, and how the project goals will be accomplished. Unfortunately, planning is often viewed as tedious and time-consuming. The response to planning is often that there is no time to plan or that planning is not needed. Either of these responses will set the project manager up for problems later on in the project. Documenting planning activities provides the project manager the opportunity to communicate to project stakeholders, obtain support from team members, and set up a basis on which to analyze and manage the impacts of change.
For a small project, the planning cycle should be short. Scalability is especially important during planning. The effort required to plan the project depends on the type and amount of information and the level of detail that needs to be communicated. The duration required to plan depends on the length of time necessary to discover and document the information, as well as the time required to gain agreement with the sponsor on scope, schedule, and cost.
Planning Process Summary
The PMBOK® Guide, sixth edition, defines the planning process group as “those processes performed to establish the effort, define and refine the objectives, and develop the course of action required to attain those objectives.”1
Planning is an iterative process. It should be repeated as new information becomes available. Planning is critical for project success, because this is where the project manager defines and documents the project details. These details are then used as the means to manage the project. The planning process allows the project manager to collect requirements and develop all the necessary planning documents, including the project scope, work breakdown structure (WBS), project schedule, budget, risk response plan, and communications plan, all of which can then be incorporated into a formal project plan. Some people mistake the project schedule for the project plan, when in reality the project schedule is only one of the necessary planning documents.
Small projects might not require developing a formal project plan or fully developed planning documents. The SPM process uses a combination of fully developed planning documents and interim planning documents that allows for flexibility in the planning process.
Top-down planning is appropriate for small projects. Top-down planning is starting at the highest level and then adding additional levels as needed. The size of the project determines whether high-level planning at the deliverable level is sufficient or whether more detailed planning is required.
Planning Process Steps
Planning process steps include:
1. Prepare for planning activities.
2. Collect requirements.
3. Develop scope statement.
4. Develop a work breakdown structure (WBS).
5. Develop an activity list and milestone list.
6. Estimate effort and duration.
7. Develop a project schedule.
8. Develop a project budget.
9. Identify quality standards.
10. Identify and acquire resources.
11. Plan, identify, assess, and respond to risks.
12. Develop communications documents.
13. Develop procurement management plan.
14. Update assumptions log.
15. Develop a project management plan.
16. Obtain sponsor’s approval.
Step 1: Prepare for Planning Activities
The project manager begins the planning process by reviewing the project charter or project charter lite and any documents used as part of the preproject activities, such as the business case, statement of work, project request, or project proposal. If background information or other supporting documents are available, the project manager should review them as well. As you review these documents you should also begin to document assumptions. An assumption is a factor in the planning process that is considered to be true, real, or certain, without proof or demonstration.
This is also a good time for the project manager to review lessons learned from previous projects. Reviewing lessons learned prepares the project manager for problems that might occur on the current project. Early detection of problems or risks allows for more options in developing a risk-mitigation strategy. The project manager should prepare to incorporate lessons learned information into the planning sessions, especially the risk planning session.
The project manager should prepare to engage the project team. The people who will do the work should always be a part of the planning process because they have the information on how and when the work can be completed. Planning sessions are an excellent way to obtain input from the project team. The project manager should identify the participants, prepare a planning session agenda, provide advance copies of the project charter to all participants, and develop a WBS strawman to use to facilitate the planning discussion. (A strawman is a temporary document or item that is used as a starting point and is intended to be replaced when more information becomes available.) Separate planning sessions may be held for developing the WBS, estimating effort and duration, and identifying and assessing risk.
Reviewing Lessons Learned
• Obtain relevant lessons learned from previous projects by searching the database using key words or key data fields for specific categories.
• Lessons learned categories could include: project management, subdivided by knowledge area or process group; by project life cycle, such as requirements, design, development, testing; or by technical and business/operational.
• Review the observation of what occurred, the impact on the project (positive or negative), and the suggestions for what could be done going forward.

Finally, the project manager should be prepared to share with the team the decision-making process, scope change process, and issue escalation process. These processes should always be reviewed at the beginning of the project and should be thoroughly understood by all project team members.
Step 2: Collect Requirements
Collecting requirements is the process of determining and documenting stakeholders’ needs to meet the project objectives.2 A project requirement is a need or expectation for the project or product. Requirements represent how the deliverable will be accomplished. Collecting requirements is an important step in the planning process because missing or unclear requirements could lead to project failure.
For small projects, collecting requirements might consist of documenting the needs and expectations of the project sponsor. It might also involve obtaining information from other stakeholders through interviews or facilitated requirements-gathering sessions. Interviews can be structured or informal, consisting of prepared and spontaneous questions. To be most effective, the project manager should prepare the questions in advance and have a tool for documenting the responses. An interview schedule or discussion guide is a tool that can be used to document questions and track responses. A facilitated requirements-gathering session is used to bring key stakeholders together to define the requirements. During this session, the project manager identifies the project needs and reconciles stakeholder differences. This method is especially useful for information technology projects. Customer requirements should represent the voice of the customer, which can then be translated into the language of the project. For example, for an information technology project, customer requirements are translated into technical requirements. Requirements can be recorded in a document or spreadsheet, and they should be clear and unambiguous.
Types of Requirements
• Business—describes the higher-level needs of the organization
• Stakeholder—describes the needs of the stakeholder or stakeholder groups
• Solution—describes features, functions, and characteristics of the product, service, or result
• Transition and readiness—describes temporary capabilities (data conversion, training) needed to transition from the current state to the desired future state
• Project—describes the actions, processes, or other conditions the project needs to meet
• Quality—conditions or criteria needed to validate the successful completion of a project deliverable or fulfillment of other project requirements
REQUIREMENTS DOCUMENTATION EXAMPLE
The Project Management Overview course project that was initiated in chapter 6, was approved. The project manager, Symone Lewis, can now begin her planning activities. Her first step is to review the project charter and begin to document the requirements. She met with the project stakeholders and identified the requirements shown in figure 7.1. Since planning is iterative, Symone will revisit this requirements document as she continues her planning activities to incorporate additional details as they become available.
Step 3: Develop Scope Statement
“Define scope is the process of developing a detailed description of the project and product,”3 including requirements, which results in a project scope statement. A project scope statement is critical to the success of the project because it describes in detail the project’s deliverables and the work required to complete those deliverables. The scope statement takes the risks, assumptions, and constraints identified in the project charter and uses the concept of progressive elaboration to analyze them to completeness, while including additional risks, assumptions, and constraints. The scope statement serves as the foundation for the remaining planning activities and is used for project control.

Figure 7.1: Requirements documentation
According to the PMBOK® Guide, sixth edition, the project scope statement could include a detailed version of the following:
• Product scope description—Progressively elaborates the characteristics of the product, service, or result described in the project charter and requirements document.
• Deliverable—Any unique and verifiable product, result, or capability to perform a service that is required to be produced to complete a process, phase, or project. Deliverables also include ancillary results, such as project management reports and documentation. These deliverables may be described at a summary level or in great detail.
• Acceptance criteria—A set of conditions that is required to be met before deliverables are accepted.
• Project exclusion—Generally identifies what is excluded from the project. Explicitly stating what is out of scope for the project helps manage stakeholders’ expectations.
• Constraints—A limiting factor that affects the execution of a project or process. Constraints identified with the project scope statement list and describe the specific internal or external restrictions or limitations associated with the project scope that affect the execution of the project; for example, a predefined budget or any imposed dates or schedule milestones that are issued by the customer or performing organization. When a project is performed under an agreement, contractual provisions will generally be constraints. Information on constraints may be listed in the project scope statement or in a separate log.
• Assumptions—A factor in the planning process that is considered to be true, real, or certain, without proof or demonstration. Assumptions also describe the potential impact of those factors if they prove to be false. Project teams frequently identify, document, and validate assumptions as part of their planning process. Information on assumptions may be listed in the project scope statement or in a separate log.4
The project manager may choose to track assumptions and constraints in a separate log instead of incorporating them into the scope statement. The value of tracking them separately from the scope statement is that assumptions that are factors for planning purposes and that are considered to be true, real, or certain, but without proof, are progressively elaborated throughout the project. Eventually assumptions are validated and are then no longer assumptions. Some assumptions to consider relate to availability of resources, work schedules, priorities, and efficiency of decision makers/ approvers. Constraints that are a restriction or limitation that will affect the performance of the project or process may need to be addressed later in the project.
If a separate assumption and constraint log is used, it should contain the following:
• Category—If both assumptions and constraints are contained in the same log, this field will be used to identify assumptions from constraints.
• Description—Define the assumption or constraint.
• Owner—Assign assumption to someone for validation.
• Due date—Date assumption should be validated.
• Actions—Identify the activity required to validate the assumption or address the constraint.
• Status—Identify if the assumption or constraint is open or closed.
• Comments—Any clarification on the action or status of the assumption or constraint.
SCOPE STATEMENT EXAMPLE
Symone knows that scope information is contained in the project charter, which may be sufficient for some small projects. However, Symone decided for this project, it would be beneficial to have more information to allow the project team to perform detailed planning. Symone developed the scope statement shown in figure 7.2. Since she already created an assumption log (figure 6.2) during the initiation phase, when she developed the project charter, she chose not to include assumptions and constraints in her scope statement document.
Step 4: Develop a Work Breakdown Structure (WBS)
Step 4 of the SPM planning process is to develop a WBS. Developing a WBS is the process of identifying high-level deliverables and then decomposing them into smaller, more manageable components. The WBS can be a simple hierarchy showing only major or high-level deliverables, or it can be more detailed and contain lower-level deliverables. The intent is not to become too detailed but to make sure all the project components are included. In some cases one level of deliverables is all that is needed. Defining the deliverables, even on a small project, helps the project manager know what should and should not be included.
The WBS Defined
The WBS is a tool for breaking a project down into its component parts. Building a WBS helps to illustrate project scope, create schedule and cost estimates, assign resources, and provide a basis for control. As stated in the PMBOK® Guide, sixth edition, “the WBS is a hierarchical decomposition of the work to be executed by the project team to accomplish the project objectives and create the required deliverables. The WBS organizes and defines the total scope of the project and represents the work specified in the current approved statement of work.”5
For the SPM methodology, the hierarchy is deliverable-oriented. It provides a top-down decomposition of deliverables, where each descending level represents an increasingly detailed definition of the project work. Decomposition is the subdivision of project deliverables into smaller, more manageable components until the work and deliverables are defined to the work package level. For small projects the deliverables should be decomposed to a level of detail sufficient for the project.
Scope Statement

Figure 7.2: Scope statement
There are two approaches for developing a WBS: top-down and bottom-up. The top-down approach is useful when you have significant knowledge of the project deliverables. To use the top-down approach, the project manager begins with the project scope statement and identifies what the project will produce. The final project deliverable becomes the top level on the WBS. From there the project manager decomposes the project by incorporating the project life cycle and project deliverables. For example, a software development project would include the software development life cycle phases and a training project would include the instructional design process along with the associated deliverables. The life cycle phases and deliverables are then decomposed into more manageable components of deliverables until the desired level is reached. The final level should represent a tangible deliverable for which the work effort can be planned and controlled. Instead of using the project life cycle, the top-down approach can also be based on business areas, systems, and so on.
The bottom-up approach is useful when the project manager is not familiar with the type of project or the nature of the project life cycle is not well known. The bottom-up approach requires the project manager to conduct brainstorming activities to identify the project deliverables. The project team should generate a list of deliverables for the project. Using an affinity analysis technique, the deliverables should be arranged in related groupings and each grouping should be given a label. The groupings should then be arranged into a hierarchy with names given at each level. The bottom-up approach is easy to use for small projects because it allows for more flexibility and does not require a shared understanding of the project life cycle. The project team identifies the project deliverables, arranges them into related groupings, and then establishes a hierarchical structure.
The WBS for the Project Management Overview course, which was used as an example in chapters 4 and 6, is shown in figure 7.3.
Developing a Top-Down WBS
The following are steps for developing a WBS:
1. Begin by listing the end product. There is only one box at this level.
2. Identify major deliverables. For small projects this might represent the major components of the project.
2.1 Make sure major deliverables encompass all the work to be conducted on the project.
2.2 Establish a numbering scheme that shows the hierarchical relationship. As identified in figure 7.1, the major deliverables are Instructional Design Planning, 2.0 Course Design, 3.0 Course Development, 4.0 Pilot, and 5.0 Project Management.
3. Meet with stakeholders to review the major deliverables.
4. Decompose major deliverables to a level of detail sufficient for the project. For small projects, two levels might be all that is needed. Not all deliverables need to be symmetrical in terms of the number of levels developed. Some deliverables will have more levels than others. Deliverable 3.0 Course Development is decomposed into five deliverables: 3.1 Presentation Slides, 3.2 Participant’s Manual, 3.3 Facilitator’s Manual, 3.4 Assessment Exams, and 3.5 Laminated Wall Charts. Also note that deliverable 3.2 is further decomposed into three deliverables: 3.2.1 Narrative, 3.2.2 Examples, and 3.2.3 Binding. Deliverable 3.2 was the only deliverable that needed to be decomposed to a lower level; the other deliverables stopped at two levels.
5. Assign a coding scheme. The numbering scheme should represent the hierarchical structure.
6. Continue to work with the stakeholders to refine the WBS.
7. Assign responsibility for deliverables at the lowest level.

Figure 7.3: —Project Management Overview course
Note: The WBS does not necessarily designate sequence; however, deliverables can be arranged in sequential order if the first level of the WBS represents the project life cycle phases. The first level of the WBS could also represent major project activities.
Another way to develop a WBS is to have the team create it as part of a project planning session. Before the meeting the project manager can create a WBS strawman and distribute it to the team along with the project charter for review. During the meeting the project manager or meeting facilitator should:
1. Review the project charter with the team with a focus on the project scope.
2. Distribute sticky notes to team members.
3. Have the team list one deliverable per sticky note.
3.1.1 Place sticky notes on chart paper on the wall.
3.1.2 Organize the notes into high-level and lower-level deliverables.
4. Update the WBS by adding or removing deliverables (include a heading for out-of-scope deliverables). Recall the example of the Project Management Overview course that has been used previously in this book. To develop the WBS for the project of creating the class, the team brainstormed the deliverables. After all of the possible deliverables were identified, the team identified the five major deliverables and then organized the remaining subordinate deliverables. Some deliverables were discarded because they were duplicates or covered by the remaining deliverables. Some deliverables were added because, after organizing the structure, it became apparent what was missing. If out-of-scope deliverables are known at this time, a separate heading titled “Out of Scope” can be included without the relationship lines.
5. Have team members assign responsibility at the lowest level.
Guidelines for Developing a WBS
When developing a WBS, remember the following:
• Deliverables should be expressed as nouns.
• Each WBS element should represent a single tangible deliverable.
• If a deliverable is broken down, it should contain at least two sub or interim deliverables.
• The same deliverable may not be listed twice.
• Ownership should be assigned at the lowest level, and only one person should be assigned to the deliverable.
• You should stop breaking down the work when you reach a level low enough to estimate the effort and cost.
Using a WBS
The WBS helps the project manager focus on how to achieve project goals, and it can be used in numerous ways:
• To ensure that all of the work identified in the scope statement is included in the project
• To ensure that all of the requirements are defined and approved
• As a starting point for team members to define their tasks
• To show how much time it will take to complete each deliverable, and therefore how much time it will take to complete the project
• To show how much each deliverable will cost, and therefore how much the project will cost
• To ensure that there is a single point of accountability for each deliverable
• As a communication tool to show how the project deliverables are organized
• As a tool for identifying project risk.
WBS Outline
A WBS can be produced without a charting application. Although the graphical representation provided by an organization chart display is preferred because it is easy to read, a WBS can be produced in a text outline format (figure 7.4). The outline format shows the numbering scheme and the deliverables. Higher-level deliverables are shown as main headings, and lower-level deliverables are indented underneath them. The WBS outline can be contracted or expanded to fit the needs of the project. For example, you might display only the highest-level deliverable, the high-and low-level deliverables, or all levels of deliverables and tasks for specific deliverables.

Figure 7.4: WBS outline format
Step 5: Develop an Activity List and Milestone List
The activity list and milestone list are used to identify and organize project activities.
Activity List
The activity list includes the schedule activities required on the project. This document can also show who is responsible for completing the activity. Depending on the size of the small project, more detailed planning might be necessary. The activity list can also be expanded to show duration and effort, which will be discussed in the next sections. There might not be time or a need to create a detailed project schedule for small projects, and simple projects certainly don’t need a detailed project schedule. The activity list provides a quick means to define the project activities, allowing for a form of control. The project manager should develop an activity for each deliverable and then estimate the effort, duration, and cost for each deliverable. Again, the level of detail depends on the needs of the project.
Versions of the activity list are shown in figures 7.5 and 7.6. Both lists are partial lists from the example Project Management Overview course. Figure 7.5 shows deliverables and activities. Figure 7.6 is more detailed and includes resources, planned start and finish dates, and space for a short status statement.
Making the WBS Planning Session Fun
You can make the WBS planning session fun by:
• Color coding the WBS to represent specific areas, phases, or deliverables of the project by using different colored sticky notes
• Using color dots to represent resources instead of writing the resource name
• Using color markers to represent areas, phases, or deliverables
• Allowing team members to organize the deliverables into categories
• Providing trinkets for the team to play with during the session
Hours can be added to this document, but usually the timeframe is so short for small projects that start and end dates are enough detail. Simple projects, which have an even shorter duration, might not have an associated budget. However, even in the case of a simple project such as a three-week assignment where the costs are absorbed by the department, the project manager is still concerned about deliverable due dates.

Figure 7.5: Activity list—deliverables and activities
Milestone List
A milestone is a significant point or event in a project. The milestone list (figure 7.7) provides a view of key dates or events based on project activities. The activity list can include milestones, or a separate view can be used displaying on milestones. Since milestones by definition are zero duration, the work effort is scheduled using activities.
Step 6: Estimate Effort and Duration
An estimate by definition is a quantitative assessment of the likely amount or outcome. Preliminary time estimates provide information on how long the project will take. The time-estimating process includes effort and duration.

Figure 7.6: Detailed activity list

Figure 7.7: Milestone list
Estimating Effort
Effort is the number of units, usually expressed in hours or days, required to complete an activity or deliverable. Estimates should be realistic and reasonable. The use of historical information improves the accuracy of estimates. The project manager should involve the project team in estimating activities.
An estimating technique that can be used for small projects is three-point estimating. Three-point estimating improves the accuracy of a single-point estimate because it takes into consideration uncertainty and risk. This concept originated with the program evaluation and review technique (PERT) providing the beta distribution formula. Another commonly used formula is the triangular distribution. The three-point estimate (tE) includes three components6:
• Most likely (tM)—Based on the duration of the activity, given the resources likely to be assigned, their productivity, realistic expectations of availability for the activity, dependencies on other participants, and interruptions
• Optimistic (tO)—The activity duration based on analysis of the best-case scenario for the activity
• Pessimistic (tP)—The activity duration based on analysis of the worst-case scenario for the activity.
After the most likely, optimistic, and pessimistic estimates are determined, the expected duration, tE, can be calculated using either the triangular distribution or beta distribution formula.
• Triangular distribution: tE = (tO + tM + tP) / 3
• Beta distribution: tE = (tO + 4tM + tP) / 6
Of the numerous techniques for estimating effort, some are extremely detailed and provide more accuracy. For the purposes of the SPM process, however, we use bottom-up estimating as a quick and simple estimating technique.
Bottom-up estimating consists of starting at the lowest level of the project and working upward.
1. Start at the task level and identify how much time it will take to complete each task. Remember to include in your estimate how many times an activity will have to be repeated to get a more accurate estimate of the time required to complete the task. To keep the numbers manageable, use quarter-hour increments—0.25, 0.50, and 0.75. If you are managing your project using deliverables only, start with step 2.
2. Determine the time for completing the lowest-level deliverables by adding together the times required for the tasks that make up the individual deliverables.
3. Determine the time for completing the higher-level deliverables by adding together the time for completing the lower-level deliverables.
4. Determine the total project time by adding together the time for completing the highest-level deliverables.
Even if the project manager does not have to manage the costs associated with the project, he or she should still have some idea of the effort required to complete the work. A good visual for showing project effort for small projects is the WBS. The project manager can indicate the time required for all levels.
Estimating Duration
Duration is the number of work periods required to complete an activity or deliverable. After hour estimates are complete, the project manager can estimate duration.
Duration defines how long—in hours, weeks, months, and other units of time—the work will take. It includes the effort required to complete the work, along with other factors. For example, the reviewer of a document might require an hour to review the document but is given three days to complete the review. The effort is one hour, and the duration is three days.
To effectively estimate duration, you will need to know the skill set of the resource assigned to do the work. Remember that a less-skilled resource will require more time than an experienced resource.
As you estimate the effort and duration, remember to review and update the assumption log and lessons learned. See chapter 10 for a more detailed discussion on lessons learned.
Step 7: Develop a Project Schedule
Scheduling involves converting the work into sequenced tasks. The project schedule provides the planned start and end dates for tasks and milestones. A milestone is a significant event in the project, usually the completion of a major deliverable. Small projects planned at the deliverable level will show deliverable start and end dates. Milestones would still represent the completion of a series of major deliverables.
Developing a project schedule could become a burdensome task. Small projects can benefit from a simplified version of a project schedule. The schedule can be managed at a high level by including only deliverables or, if needed, key tasks associated with each deliverable. The project manager needs to decide what information will be shown on the project schedule. For example, is it necessary to show hours? For some smaller projects, start and end dates are adequate.
Other key scheduling terms are:
• Activity—A grouping of tasks. If planning is done at the deliverable level, each deliverable represents an activity.
• Activity sequence—The logical order of the activities or tasks.
• Parallel—An activity or task that can be done during the same timeframe as one or more other tasks or activities.
• Predecessor—An activity or task that must begin or end before another activity or task can begin or end.
• Successor—An activity or task that follows a predecessor activity or task. This is also known as a dependent activity or task.
• Milestones—Markers that show a point in time; they have zero duration.
The project schedule includes the start and finish dates, effort, expected duration, deliverables, and dependencies for project activities. If the start and finish dates are not realistic, the project is not likely to be finished as scheduled. The schedule development process must often be repeated before finalizing the project schedule. The project schedule should be reviewed and updated periodically to be meaningful.
The project schedule can be viewed using the following documents:
• Gantt chart—The Gantt chart, originally developed by Henry Gantt in 1915, illustrates project information using a bar chart format. The Gantt chart provides a visual outline of the amount of time a project will take. Project activities are displayed on a vertical axis against a horizontal timescale. The Gantt chart is an effective tool for small projects, especially when there is no need to show dependencies among activities because the dependencies are already understood.
• Spreadsheet view—A spreadsheet displays the project schedule using columns and rows.
• Milestone chart—A milestone chart shows only the most significant project events against a timescale in order to draw attention to the importance of the event. A milestone represents a point in time and can show the dates of key deliverables, project phases, major activities, or important events. Milestones should be displayed in the milestone chart in sequential order.
Depending on the project’s needs, the project schedule might reflect differing levels of detail or contain different elements. If task-level planning is required, the project manager should be careful not to plan too many short-duration tasks. Short-duration tasks should be combined using one week of effort as a guideline. Additional guidelines for defining tasks include:
• If a task is longer than two weeks, split it into more tasks.
• If a task contains multiple resources, develop a separate task for each resource.
Most small projects can be easily planned at the deliverable level, and the order in which the deliverables are listed designates the sequencing. Small projects can also be planned at the major activity level with deliverables as the next level. This approach eliminates the need for a project management application. Small project schedules can be developed using software like Microsoft Word or Excel. Figure 7.8 provides the project schedule created using Excel. This is only a portion of the activities. The full list of activities is provided in figure 7.6. Figure 7.9 and Figure 7.10 were created in Microsoft Project and are provided as a comparison. The Project view of the milestone chart is shown in figure 7.11.
Step 8: Develop a Project Budget
Small projects often do not require a budget if the funding is covered as part of operations. When funding is required, the project budget is developed by allocating cost estimates to project activities. A cost estimate is an approximation of the monetary resource required to complete the project. Cost estimates are usually expressed in units of currency to allow for easy comparison across projects. However, costs can also be expressed in units of measure such as days or hours. To estimate costs, the project manager has to approximate the monetary resources needed to complete project activities. This can be accomplished by referencing the WBS to identify the deliverables for the project and then determining the cost associated with completing each deliverable.

Figure 7.8: Project schedule—Excel version
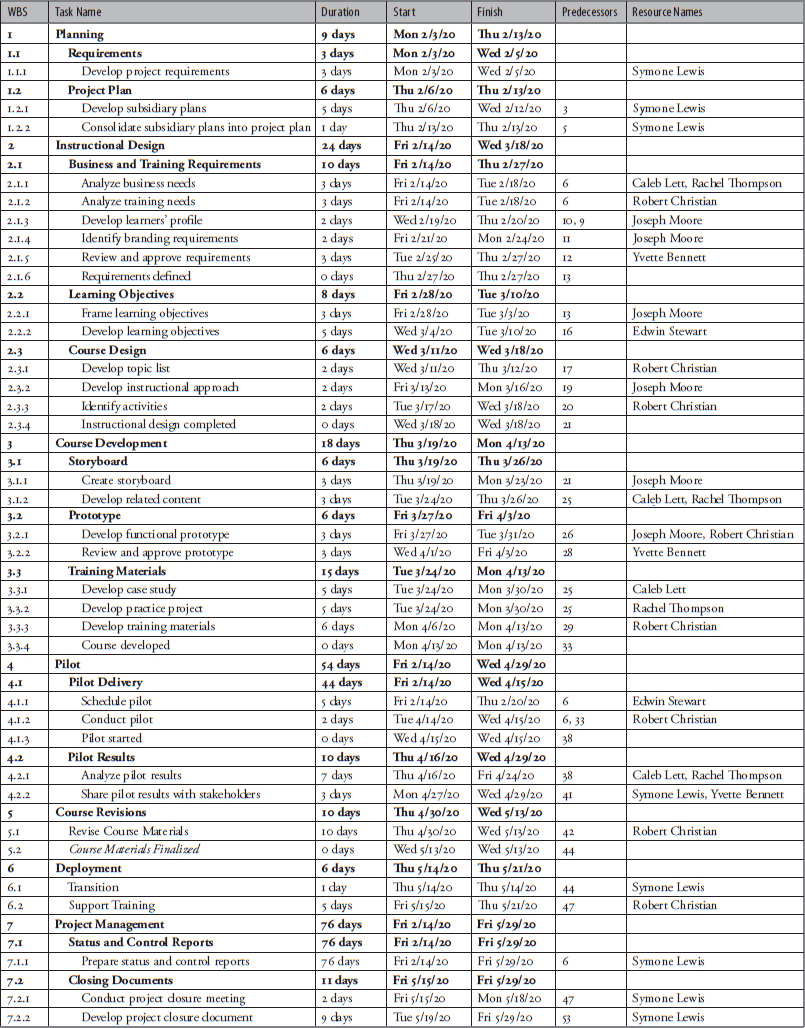
Figure 7.9: Project Schedule—task sheet view in Project

Figure 7.10: Project Schedule—Gantt chart view in Project
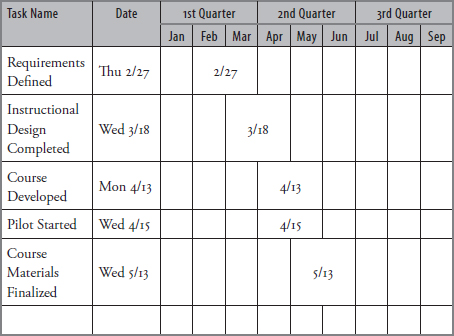
Figure 7.11: Milestone chart in Project
There are three levels of estimates: order-of-magnitude, budget, and definitive. Each of these estimates carries a different degree of accuracy and is used at different decision points in the project.
The order-of-magnitude estimate, also known as the rough order of magnitude (ROMf), is considered a ballpark estimate. It is stated early in the project and does not involve a lot of project details. This is a top-down estimate that usually takes into consideration the highest level of the WBS as a means to provide a quick calculation on whether to proceed with the project. The order-of-magnitude estimate should be accurate within a range of -25 percent to +75 percent.
Definitive, the final level, is a bottom-up estimate that includes detailed estimating techniques and is accurate within a range of −5 percent to +10 percent. Because of the time and effort associated with completing a definitive estimate, for small projects the order-of-magnitude and budget estimates are frequently used.
Type of Estimate |
Accuracy |
WBS Approach |
Order-of-Magnitude (ballpark) |
−25% to +75% |
Top-down |
Definitive (detailed) |
−5% to +10% |
Bottom-up |
The following are some of the common techniques for estimating costs7:
• Analogous estimating—Analogous estimating compares values of parameters, such as scope, cost, budget, and duration of existing projects to a similar project and accounts for the dissimilarities. Analogous estimating is less time-consuming and costly than the other estimating techniques; however, it is also less accurate.
• Parametric estimating—Parametric estimating uses historical information and mathematical relationships to calculate cost. The level of accuracy is based on the data used in the calculation.
• Bottom-up estimating—Bottom-up estimating is a method of estimating component work. The estimates are done at the lowest level of the WBS and then summarized or rolled up to the higher levels of the WBS. The accuracy of the bottom-up estimate is based on the accuracy of the lower-level estimates. The bottom-up estimate is the most accurate but is also the most time-consuming. Also, the bottom-up estimate can be used only if the detailed information is available. Small projects that are planned using historical information are able to take advantage of bottom-up estimating to obtain more accurate estimates. However, the very nature of small projects may not require the additional time and effort required to conduct bottom-up estimating.
• Three-point estimates—The three-point estimate (cE) includes three components: optimistic (cO), most likely (cM), and pessimistic (cP). The optimistic (cO) estimate is based on analysis of the best-case scenario for the activity. The most likely (cM) estimate is based on realistic effort assessment for the required work and expected expenses. The pessimistic (cP) estimate is based on analysis of the worst-case scenario for the activity. After these estimates are developed, the weighted average is calculated. The two common formulas for the three-point estimate are:
![]() Triangular distribution: cE = (cO + cM + cP) / 3
Triangular distribution: cE = (cO + cM + cP) / 3
![]() Beta distribution: cE = (cO + 4cM + cP) / 6
Beta distribution: cE = (cO + 4cM + cP) / 6
The project budget represents the cost baseline for the project and is used to keep the project under control. The budget should include the work effort (labor) to complete the project. Labor costs can be calculated by combining estimated hours to complete the tasks with individual resource rates. In addition to labor, the budget should include other resources required to complete the project, such as materials, equipment, supplies, license fees, training, travel, and meals. The budget can be prepared to show resource costs for each project activity. Also, the budget can be time-phased to show when the costs should be incurred. In the time-phased budget, costs are allocated to a specific time period, for example monthly, and then summarized for the project.
Budget Categories
• Labor
• Hardware
• Software
• Purchased services
• Travel
• Meals
As you develop the project budget, remember to review and update the assumption log and lessons learned. See chapter 10 for a more detailed discussion on lessons learned.
Step 9: Identify Quality Standards
Although quality applies to all projects, quality measures and techniques should be specific to the type of deliverables being produced. The project manager should work with project stakeholders to design quality into the deliverables rather than wait and find quality issues during inspection. Keep in mind: prevention-keeping errors out of the process is preferred over inspection-keeping errors out of the hands of the customer.
For small projects, the project manager should incorporate quality into the planning and designing of the project and product. The team should understand, evaluate, define, and manage requirements so that customer expectations are met. Use a quality management plan to document quality decisions on standards, roles and responsibilities, deliverables and processes subject to quality review, and the quality tools that will be used for the project.
Step 10: Identify and Acquire Resources
Project resources include team members, facilities, equipment, materials, supplies, and other resources necessary to complete the work. Resource planning is used to determine and identify an approach to ensure that sufficient resources are available, when needed.
For small projects, the project manager should use the WBS as a starting point to identify the team and physical resources needed for the project.
Step 11: Identify, Assess, and Respond to Risks
The PMBOK® Guide, sixth edition, defines individual project risk as “an uncertain event or condition that, if it occurs, has a positive or negative effect on project objectives.”8 Risks are events that may or may not occur. Positive effects of risks are considered opportunities for small projects; these new opportunities are usually handled as a separate project. For purposes of the SPM process, we will focus on the negative effects that risk events can have on a project. Risk planning consists of four activities: risk management planning, risk identification, risk analysis, and risk response planning.
Risk Management Planning
As stated in the PMBOK® Guide, sixth edition, “risk management planning is the process of deciding how to approach and plan the risk management activities for a project.”9 The risk management plan for small projects serves as a tool for the project manager to document and communicate risk management activities.
Because the risk management planning process for small projects is simplified with clearly defined tools, the risk management plan has only a few components. It is a narrative document that describes how risk identification, analysis, response planning, monitoring, and control will be structured.
The risk management plan for small projects includes the following:
• Methodology—Identifies the approach and tools that will be used to perform risk management on the project
• Roles and responsibilities—Identifies the project manager, project team, and other stakeholders and their corresponding roles and responsibilities during the risk-planning sessions
• Timing—Identifies when the risk identification session will occur and how often the risk management process will be revisited throughout the process
• Reporting—Defines how the results of the risk management process will be documented, analyzed, and communicated to the project team and other project stakeholders
• Tracking—Identifies how risk management activities will be recorded for the benefit of the current needs, future needs, and lessons learned
A risk management plan might not be required for small projects, but it would serve as a communication tool to inform stakeholders how risks will be handled. Another option is to define the risk management plan as part of the process and update the plan on the basis of the specific needs of the project.
Risk Identification
Risks should be identified. Risk identification involves determining which risks might affect the project and documenting them. Risk identification should occur at the beginning of the project or phase and should be repeated during the project or phase as risk factors change, new action strategies are considered, and new risks are identified. The project team can identify risk events at a brainstorming session.
Risk Categories
• Technical—scope, requirements, technology
• Management—project management, operations management, organization
• Commercial—contractual, internal procurement, suppliers and vendors
• External—legislation, site/facilities, environmental/ weather, competition
Participants at the brainstorming session should include the members of the project team. However, other stakeholders, technical experts, and people with similar experience should also be encouraged to participate. Normally it is recommended that someone other than the project manager facilitate the risk identification session; however, for small projects it is acceptable for the project manager to be the facilitator. A list of risk categories can be used to facilitate brainstorming. Some possible categories are organization (e.g., management approach, policy, structure, culture); project management (e.g., schedule, costs, quality, resources, requirements, controlling); implementation (e.g., testing, integration, training); and tools and technology.
Asking “what if” is important. For example, what if the resources are not available when needed, or what if the team is unable to complete a deliverable as scheduled? Risks should be documented on the risk register (figure 7.12), which is developed during the risk identification process and updated during risk analysis. During risk identification, risk descriptions, categories, and potential responses are added to the risk register.
The risk description should be clear enough for the project manager to monitor the risk if it does occur. A clear risk description can include an “if/then” statement that reads, “if” the risk occurs, “then” what will the impact be.
Risk Analysis
Risks should be analyzed. Risk analysis involves quantifying and prioritizing risks. A simplified process for analysis includes assessing the probability, impact, and priority of each risk using low, medium, and high ratings. Risks are normally prioritized in a team session but depending on the size of the project and the number of risks, the project manager might end up working alone.
• Risk probability is the likelihood that a risk will occur. Probability should be classified as low, medium, or high. Risks with zero probability of occurrence should be discarded. Risks with 100 percent probability of occurrence are not really risks because by definition a risk is the chance that an adverse event will occur, and without the element of chance, there is no risk. These items are actually assumptions and should be treated as such. Figure 7.13 provides a probability rating, occurrence, and meaning that can be used for small projects.10

Figure 7.12: Risk register

Figure 7.13: Probability rating
• Impact is the effect a risk has if it does occur. Impact should be classified as low, medium, or high. Risks with a zero impact should be discarded. Figure 7.14 provides the level of impact and meaning for small projects.11
• The risk priority is determined by combining the probability rating with the impact rating, as shown in Figure 7.15, or the graphical representation in Figure 7.16.12
• The owner is the person responsible for managing the risk. Each risk must belong to someone on the team. The person assigned accountability will make sure that the risk is monitored, and responses are carried out.
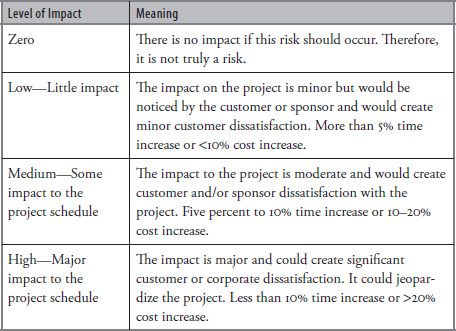
Figure 7.14: Impact levels
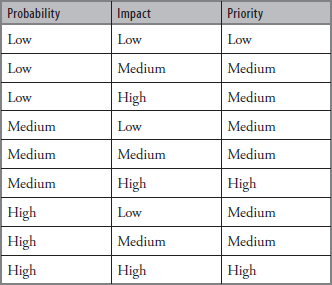
Figure 7.15: Risk priority

Figure 7.16: Probability impact risk matrix
After risk analysis is complete, the risk register should be updated to include the probability, impact, and priority of each risk. Risks can also be grouped by category or sorted by priority.13
Risk Response Planning
A negative risk is considered a threat to the project objectives. Risk response planning involves determining a proactive response to risks in order to remove threats to the project. The PMBOK® Guide, sixth edition, provides the five strategies for proactively responding to negative risks as escalate, avoid, transfer, mitigate, and accept.14
• Escalate—Escalation occurs when the threat is outside the scope of the project or that the proposed response would exceed the project manager’s authority. Escalated risks are managed at the program, portfolio, or organizational level. These risks are not monitored further by the project team, although they may be recorded in the risk register for information.
• Avoid—Risk avoidance involves making changes to the project approach, some aspect of the project management plan, or changing the project objective that is in jeopardy to eliminate the threat entirely, reducing its probability of occurrence to zero.
• Transfer—Risk transfer allows the project manager to shift all or some of the negative impact of a threat, along with the responsibility for managing the risk, to someone who is better able to manage it. Transference does not eliminate the risk; it just allows a third party to manage the risk. Risk transfer is effective for financial risk exposure and usually involves payment of a risk premium to the party taking on the risk.
• Mitigate—Risk mitigation is used to reduce the probability and/or impact of the threat. One way to mitigate a project risk is to introduce more processes or reviews.
• Accept—Risk acceptance means that you are willing to accept the consequences of the risk; but no proactive action is taken. Sometimes it is not possible to eliminate a threat because you cannot identify any suitable strategies and therefore you have to accept the risk. This active acceptance usually results in the development of a contingency plan. Also, at times, low-priority risks are just accepted. This passive acceptance requires no action; however, these risks should still be monitored for changes in probability or impact. If either the probability or impact changes, the risk should be reevaluated to determine the appropriate response strategy.
Figure 7.17 provides more definition on when to use the five risk response strategies for negative risks.

Figure 7.17: Risk responses
Although all risks should be documented and monitored, for small projects, responses are generally prepared for high-priority and sometimes medium-priority risks. The risk response register should be updated to include more detail for the high and medium risks (figure 7.18). Risk descriptions are updated with more definition, risk response strategies/plans are identified, and risk owners are assigned.
Step 12: Develop Communications Documents
Communications planning is the process of determining the information and communications needs of the project stakeholders. We communicate to inform, solve problems, and make decisions. Effective communication is vital to project success. Effective communication requires the project manager to identify stakeholders, understand their diverse needs, and then get the right information to the right people in a timely manner.
Stakeholder Register
A stakeholder is a person or organization that is actively involved in the project or whose interests may be positively or negatively affected by execution or completion of the project. A stakeholder may also exert influence over the project and its deliverables. It is important to identify the project stakeholders early in the project and to assess their level of interest, expectations, importance, and involvement in the project. A stakeholder analysis will reveal who the stake-holders are and how they should be managed.
Stakeholders can be identified by reviewing the project charter, organizational charts, and previous project plans as well as by talking with known stakeholders. Remember to include anyone who is in a decision-making or management role for the project. After you have identified the stakeholders, you will need to identify the potential impact or support each stakeholder could generate and each stakeholder’s expectations for project communications.
The stakeholder register includes:

Figure 7.18: Updated risk register
• Stakeholder name—Identify the stakeholder’s name and title.
• Department—Identify the stakeholder’s department name and position in the organization.
• Role—Identify the stakeholder’s role in the project.
• Contact information—List the stakeholder’s contact information.
• Requirements—List the stakeholder’s wants and needs for the project. Note whether approval is required.
• Expectations—List the stakeholder’s expectations for the project and from you as the project manager. Identify when and how to communicate with the stakeholder.
• Influence—List the stakeholder’s level and type of influence.
• Strategy—Document the strategy for managing the stakeholder.
• Issues/concerns—List any specific issues or concerns the stakeholder has expressed, especially if the stakeholder has asked for special attention.
Communications Matrix
The communications matrix (figure 7.19) describes the communications needs and expectations for the project. It identifies the purpose or description of communication, document or medium used, audience, and frequency.
Responsibility Assignment Matrix
The responsibility assignment matrix (RAM) (figure 7.20) is a good tool for identifying how and with whom to communicate. It is also a good communications tool because it identifies key stake-holders and their roles in the project. The project manager can see at a glance the type of responsibility each person has for each deliverable.
If the project has a small number of deliverables and a couple of stakeholders, the project manager may choose a more informal method of communicating responsibility.

Figure 7.19: Communications matrix
For small projects, the responsibility matrix can show all the project deliverables, or it can be scaled to show just the major deliverables.
Begin by listing the deliverables in the left column. List the key stakeholders or roles in the top row. Identify the type of responsibility each stakeholder or role has for each deliverable.
The following is a description of the types of responsibilities that can be included in the responsibility matrix. The project manager can create responsibilities if needed.
• A—approves. The person or role has decision-making authority on the quality of the deliverable. A deliverable might have multiple approvers or multiple levels of approval.
• C—creates. The person or role is responsible for creating the deliverable. Only one person or role should be assigned to create a deliverable. If multiple people work on a deliverable, only one person has the lead; the other people are support.
• I—informs. The person or role must be made aware of the progress of the deliverable.
• R—reviews. The person or role reviews the deliverable.
• S—supports. The person or role assists in developing the deliverable. The deliverable might have multiple support responsibilities.
Responsibility Assignment Matrix
Another version of the RAM uses the RACI to define the involvement of stakeholders in project activities.
• R—responsible. The person performing the work
• A—accountable. The person who is answerable to the project manager for the completion and quality of the work
• C—consult. The person who has knowledge and information necessary to complete the work
• I—inform. The person who should be notified about the status of the work
Project Notebook
The project notebook provides a practical way to organize and easily access project information. The intent is to ensure that the project manager has key project data available, and therefore the notebook should be small enough to be carried at all times. The project notebook should include the project charter, WBS, project schedule, project directory, status reports, risk response plan, and change requests.
Even with the use of a project notebook, an electronic filing system is used. The project manager should define the file structure and location early in the project and store the documents as they are completed. An Excel workbook could be used as a means to organize key project documents for easy references. A separate tab could be used for each of the key documents.
Step 13: Develop Procurement Management Plan
The procurement management process includes determining if goods and services are required from outside the project, and if so, what to acquire as well as how and when to acquire the goods and services.
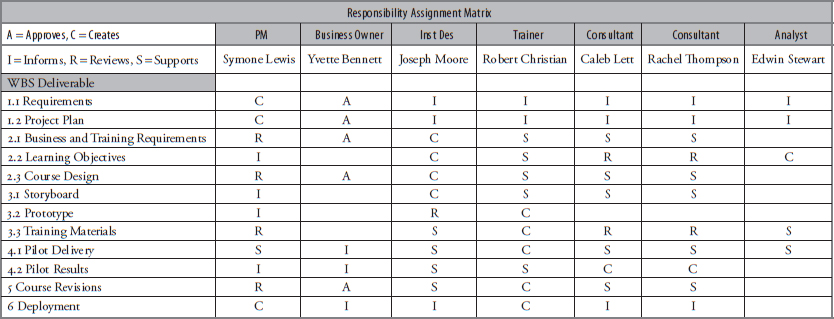
Figure 7.20: Responsibility assignment matrix
For small projects, the project manager may need to engage external resources to work on the project. Organizations often have an approved seller/vendor list and specific procedures that must be followed. The project manager should develop a procurement management plan to document how the procurement will be coordinated with the project schedule, the timetable for procurement activities, and how vendors will be selected and managed.
Step 14: Update Assumptions Log
The assumptions log should be updated during the planning process. The project manager should work with the project team to update the existing assumptions and constraints and include new assumptions and constraints that were identified during the planning activities.
Step 15: Develop a Project Management Plan
The project management plan is a formal, approved document that defines how the project is executed, monitored, and controlled. It may be a summary or a detailed plan and may contain some or all of the planning documents. Because planning is an iterative process, the project plan is often revised several times through drafts, reviews, and revisions. The final version of the project plan is approved by the project sponsor and baselined to preserve performance measurements. The baseline plan is the approved plan for the project work against which project execution is measured. Any deviations from this plan appear in the reports used to monitor and control project activities.
Barriers to Communication
A conversation consists of at least two parties, each of whom has individual wants and needs. If these wants and needs are not the same for both parties, they can present barriers to the message’s being received. Barriers to effective communication include:
• Not listening, or hearing only what you want to hear
• Sender and receiver having different perceptions
• Words meaning different things to different people
• Ignoring nonverbal cues
Small projects might not require a formal project plan. The subsidiary or standalone version of some or all of the plans is enough to manage the projects. Subsidiary plans are also baselined and used to track project performance. In the absence of a formal project plan, key planning documents are approved by the project sponsor.
The project management plan includes:
• Scope statement
• WBS
• Project schedule
• Project budget
• Quality standards and metrics
• Risk management plan
• Procurement strategy and bid documents
The project plan also includes the following project documents required for planning:
• Requirements documentation
• Assumptions and constraints log
• Deliverables list
• Risk register
• Stakeholder register
• Communications matrix
• Responsibility matrix
Step 16: Obtain Sponsor Approval
After you have completed your planning documents and reviewed them with the project team and other project stakeholders, you must obtain approval from the project sponsor. You are now ready to work on completing the deliverables.
![]()
LEADERSHIP CONNECTION
The project manager is responsible for creating an environment in which the members can share project information. Planning leadership activities include:
• Select the appropriate level of process, including the right tools and techniques, and make sure the team is aware of and follows the processes.
• Engage the right people at the right time.
• Define stakeholder expectations and determine how those expectations will be managed.
• Identify and plan for the use of resources.
• Hold a project kickoff meeting. Incorporate team-building activities to motivate the team to work together.
• Facilitate planning sessions.
![]()
KEYS FOR PLANNING SUCCESS
Keys for planning success include the following:
• Plan to plan and be prepared to replan.
• Involve the people who will be doing the work in planning the work.
• Use brainstorming sessions to engage the team.
• Use decision-making tools and techniques to facilitate the planning process. Remember that the earlier you identify a problem, the easier it is to solve.
• Include more than the project schedule in the project plan; include all the planning documents.
• Collect project requirements and define project scope.
• Document assumptions and constraints.
• Be aware of logical relationships and plan for them. By default, most relationships are finish-to-start, in which the successor depends on the finish of the predecessor. Other relationships to consider carefully are finish-to-finish (the finish of the successor depends on the finish of the predecessor) and start-to-start (the start of the successor depends on the start of the predecessor). A column can be added to the project schedule to indicate task or deliverable dependencies.
• If project management software is not available, perform planning for small projects by using word processing or spreadsheet software applications. A WBS can easily be drawn by hand or developed using an outline format.
• Negotiate for key project resources.
• Use lessons learned from previous projects at the start of new projects.
• Keep project documents in a project notebook, and set up an electronic filing system at the beginning of the project.
• Remember that if you do not plan, you will not have what you will need to keep the project in control.
• Obtain sponsor approval.
Planning Process Guide
Description
Planning is important to ensure that a project can be delivered on time, within budget, and according to specifications. The amount of planning performed should be commensurate with the scope of the project and the usefulness of the information developed. The planning process defines and refines objectives and plans the course of action required to attain the objectives and scope that the project was undertaken to address.
Purpose
The purpose of the planning process is to define the work and identify the resources necessary to complete the project.
Inputs
• Project charter
• Assumption log
Tools and Techniques
• Requirements gathering guidelines
• Scope statement template
• Assumptions and constraints log template
• WBS instructions
• Deliverable/task list template
• Project schedule guidelines
• Cost template
• Quality guidelines
• Risk identification and analysis guidelines
• Risk management plan template
• Risk identification guidelines (including risk categories, information gathering, and brainstorming techniques)
• Risk register template
• Risk analysis guidelines (including probability and impact scales, and probability and impact table)
• Risk response strategies guidelines
• Stakeholder register template
• Communication matrix template
• Responsibility matrix template
• Procurement management plan template
• Project plan template
Outputs
• Requirements documentation
• Scope statement
• WBS (graphical or outline)
• High-level deliverable list
• Detailed deliverable/activity list
• Project schedule
• Project budget
• Quality standards and metrics
• Risk register
• Stakeholder register
• Communications plan
• Procurement management plan
• Updated assumptions log
• Project plan
Procedures
1. Prepare for planning activities.
2. Collect requirements.
3. Develop scope statement (including assumptions and constraints).
4. Develop a WBS.
5. Develop an activity and milestone list.
6. Estimate effort and duration.
7. Develop a project schedule.
8. Develop a project budget.
9. Identify quality standards.
10. Identify and acquire resources.
11. Identify, analyze, and plan responses to risks.
12. Develop communications documents.
13. Define procurement strategy and develop bid documents.
14. Update assumptions log.
15. Develop a project plan.
16. Obtain sponsor approval.