
What’s New in Vegas 6
What’s New?
Welcome to the Vegas 6 segment of the Vegas Editing Workshop book.
Vegas, now in its sixth generation, has maintained a steady workflow throughout the growth of the application. In other words, techniques in earlier versions of Vegas are still applicable in the latest version of Sony Vegas software.
This book contains VEG files generated in various versions of Sony Vegas; this helps keep the projects applicable to users of older versions. You’ll find Vegas 6 not only is the most efficient version of Vegas yet; it also holds many new tools for editing and creating as outlined in this first chapter.
Sony Vegas Version 6.0 was launched recently, and as this book was finished, Sony had released Build 115, or Version 6b. You’ll want to be sure that you’ve installed Version 6b if you want to follow along with all the new features indicated in this chapter.
Before you install Vegas 6, it will require that you update Windows XP. You’ll need to load up the .NET 1.1 update, and you’ll also need to install DirectX 9. Vegas 6 will not install until you complete these two steps. Both are available from the Microsoft web site.
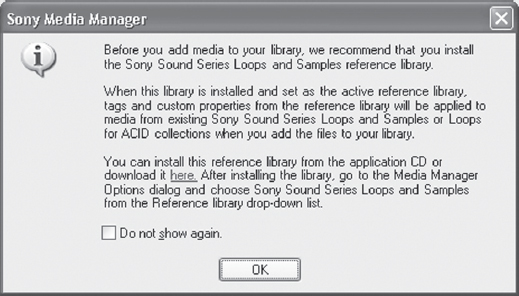
Once these files are installed, you’ll be able to install either the Vegas 6 software application or the updates for Vegas 6. When installing Vegas 6, you’ll note that by default Vegas 6 will install the Media Manager. You may or may not want to disable this; instructions for disabling the Media Manager and Microsoft SQL are found later in this chapter.

1.1 You’ll find the .NET installer at http://www.microsoft.com/net, and the DirectX installer can be found at http://www.microsoft.com/directx.

1.2 Vegas 6 hasn’t changed dramatically on the face of things, but look under the hood and you’ll be surprised!
The interface for Vegas 6 is little different than the interface for Vegas 5, with only slight cosmetic changes. However, the Preferences dialog in Vegas 6 has undergone significant changes in both look and features.
Preferences
There are new tabs found in the Preferences dialog, and a few options in various tabs have been moved to other locations. For example, the first tab that you might notice has changed is the Preview Device tab. Here is where you’ll set up Vegas 6 for access to the Blackmagic Design DeckLink card, dual-head display, or OHCI FireWire access for previewing your video externally. The DeckLink card is an easy install; however you’ll need to be sure your machine is up to the task of editing 4:2:2 uncompressed video. Finally, this is also where you’ll select the OHCI/Firewire device as your output option. This is what you’ll use if you’re doing standard DV.
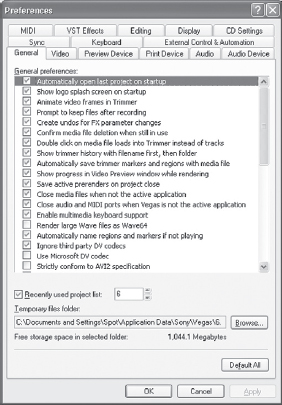
1.3 The new Preferences tabs offer many new choices. Notice that some preferences have been moved to the View menu.
Next to that, you’ll note the addition of the Print Device tab. This tab is where you’ll select the device that you’d like Vegas to use when printing to tape. Again, note the Blackmagic DeckLink in this window. If you don’t have a DeckLink installed, you won’t be able to access this option.
Note the addition of the VST Effects tab. This is where you’ll access VST plug-ins that you’d like to have accessible in Vegas. VST plug-ins significantly expand the number of tools that may be made available in Vegas 6. We’ll cover the VST features later in this chapter.
Up to Speed
Another difference that isn’t so visible is the multicore rendering engine. It’s been reworked, rebuilt, and all I can say is, “WOW!” Working on some of the new VASST projects, as well as doing work for television stations, I’ve noticed a render-speed decrease of up to 60 percent. It’s much, much faster than previous versions of Vegas. It’s wonderful seeing the Sony engineers take on the render-speed issue, because this has always been a primary complaint about Vegas. The only thing keeping the previous versions in serious running is the quality of the render. Vegas has always enjoyed a reputation for superclean lines in titles, transitions, and overlays. Now users get the superclean renders while enjoying the speed increase.
If the machine being used for rendering is a single- or dual-processor HT machine, you likely won’t see significant decreases in render time, and in fact, you may even see a slight increase in render time, depending entirely on how the computer system is configured.
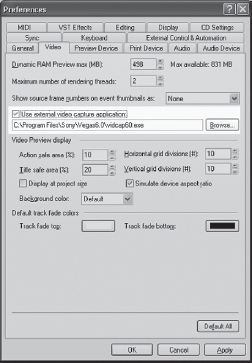
In the Video tab, you’ll notice a new field that allows for adjustment of threads for multithreaded rendering. It’s a good idea to leave this set to only 2 if you’re using an HT processor, but if you’ve got a dual multicore along the lines of the new AMD 275 processor or the new Intel Multicore processor, you’ll likely want to change this to its maximum allowable setting. In testing render times using one, two, three, and four multithread settings, I found that on a single HT processor machine, my renders actually ran slower than if the same machine was set to a value of one. Conversely, as this book was being finished, we acquired a dual AMD 275 processor machine on which shifting the multicore threads to a value of four decreased render time by approximately 10 percent.
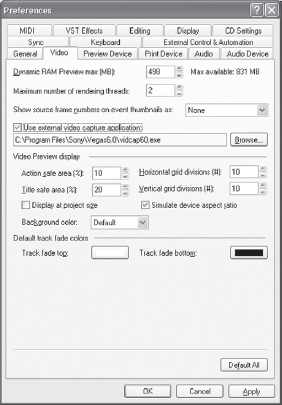
1.4 The Video tab of the Preferences dialog contains a new field that allows for adjustment of threads for multithreaded rendering.”
Next in the lineup is the nested projects feature. This is a huge addition to Sony Vegas. What this does is allows users to take individual project files (VEG files) and drop them on a single Timeline. Why would you want to do this? For a number of reasons. One might be that you’ve got several scenes that you’ve built in various instances of Vegas. In earlier versions, you need to render each segment as a file, then compile the file in a master Timeline. Or, you’d have elaborate copy/paste schemes and risk losing any track motion or other track-based behaviors. With Vegas 6, you simply grab a VEG file from the Explorer window and drag it to the Timeline. Vegas then renders a small file very quickly, and that acts as a reference file. This saves the hassle of multiple renders. Further, it avoids rendering a file twice, once as a scene and again as a scene in a longer, completed project. If you’ve decided to modify a segment of the production, when you modify the VEG file in its own application, the master Timeline containing several VEG files, the master Timeline is automatically updated. Another use for this feature is that you might have several people working on various pieces of a project. As they each update their portions of the project, the master Timeline is also updated. You can even color-correct or match images in the master project!
To import a nested VEG is very simple. Open a new project in Vegas 6. In the Explorer window, locate VEG files from your project. You may find it helpful to name projects with project names and chapter numbers, but you’ll likely find your own naming conventions once you start working with this feature.
Drag the VEG files from the Explorer window to the Timeline. Regardless of how many tracks of video and audio are included in the selected VEG file, it will show on the new Timeline as a single piece of media, much like an AVI, QuickTime, or other file format. Before you can actually play the file back cleanly, the application will render a temporary file that carries the extension of .sfap0, and this file will be rendered to the location that you’ve specified in the Project Properties dialog. It’s a good idea to render these temp files to a location other than the default C: drive. Rendering the file to the temp format will not take Vegas very long, depending on the contents of the VEG file being placed on the Timeline.
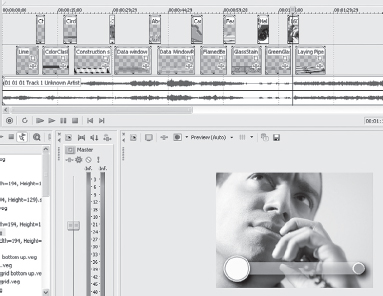
1.5 All the media on this Timeline except the audio and chapter headers is a VEG file. This is an assembled Timeline of chapters and scenes.

1.6 Drag VEG files from the Vegas Explorer to the Timeline, Vegas will treat them as though they were video files.
If you have auto-preview enabled, large uncompressed VEG files or files containing substantial numbers of tracks may appear to freeze when the VEG file is selected. Remember that the Explorer window is not buffered, and so you’ll want to just leave Vegas alone when it appears to lock up. Eventually, it will play the file, but you may cause the application to lock up if you get impatient and start pressing buttons.
Vegas 6 provides an option in Options>Preferences, General pane, that allows users to “Ignore fact chunk” with nested VEG files. You’ll want to enable this option only if you feel that the nested VEG file isn’t playing the audio back properly. If you experience difficulty with audio files in nested projects, open the Preferences dialog, check this box, and restart Vegas. You’ll want to delete the related SfapO file(s) as well, requiring Vegas to re-render the .sfap0 file(s).
Select another VEG file and repeat the process of dragging it to the Timeline.
Now that you’ve got two VEG files on the Timeline, drag them together to create a cross-fade just as you would with two video or audio files. Notice that the media behaves exactly as it would if it were a single video file. Add color-correction, special FX, or any other filter to the audio or video of the nested VEG file.
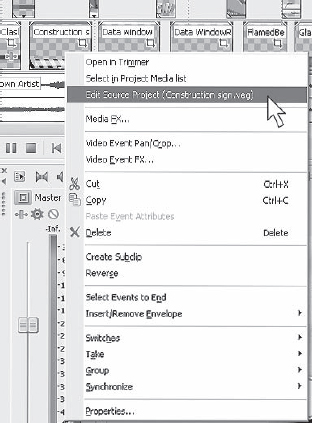
1.7 Right-click a VEG file on the Vegas Timeline to open a new instance of Vegas so that you can edit the VEG file.
A good workflow in Vegas 6 for long-form projects is to:
1. Create intros, outtros, and any chapter headers separately as individual VEG files.
2. Create any stock or reusable lower-thirds or overlays as separate VEG files.
3. Edit each chapter as a separate VEG file, potentially without any titling or text. This can help ensure consistency from chapter to chapter and also allows a single process filter to be applied to any text you might want to process, such as using the Broadcast filter on all text events.
4. Place all relevant VEG files on the Timeline, creating transitions from chapter headers, intros, or outtros on a master, nested Timeline.
One of the benefits of this workflow is also that all audio can be processed identically, helping to achieve a balanced, consistent audio output in Vegas. You can also drop your incident music in the chapter points, allowing it to fade from the chapter header into the file if you’d like to do so. Regardless, this is my personal workflow for most long-form projects in Vegas, as it allows me to have complete flexibility at all times.
Editing the VEG Files from a Nested Timeline
Files on a nested Timeline might require editing in place. For example, you might be working with stock lower-thirds that you’ve created for various projects in Vegas 6, or perhaps you’re using the lower-thirds tool found in Ultimate S 2.0. This is very easy to do in Vegas 6.
Right-click the VEG file to be edited and choose Edit Source Project from the submenu that appears. This will open a new instance of Sony Vegas 6. When the new instance of Vegas opens, you’ll edit the necessary areas and close the second instance of Vegas. When you close the second instance, Vegas will ask if you want to save the modified VEG file. Choose Yes from the options, and finish closing Vegas. The nested version of the VEG will be auto-updated.
One caveat to be aware of is that if you’re using a file that you’ve designated as a “stock” file, such as a lower-third, teaser, or overlay, when you edit the original VEG, the original file is modified. One workaround for this is to do a Save As when you have finished editing the lower-third. Give the file a new name and continue. This will NOT update the VEG from the nested project. However, you can then go to the Project Media window and locate the original VEG file. Right-click the VEG file you’d like to replace with the newly named version of the same VEG, and choose Replace from the submenu that appears. This will keep the old version of the VEG in its current location and allow you to browse for the new version to be used in its place.
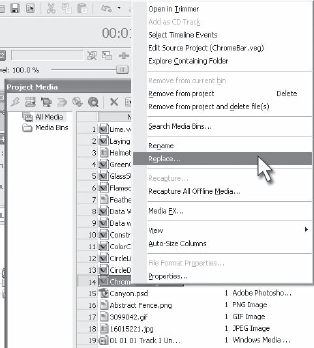
1.8 You can also choose Save As from the second instance of Vegas and then replace the VEG file in the Project Media window.
Track Flattening
Yet another use of this feature is to “flatten” intense composites or bring deep composites in as part of a bigger project without having to render out the composite. Personally, this is one of my favorite features. I’ve got a few lower-thirds that I’ve needed to render out in the past. Now, you can just drop the lower-thirds directly on the Timeline. Try this out by downloading some of the VEG files from the vasst.com site or by grabbing one of the lower-third VEG files found on the DVD in the back of this book. Drop them on top of existing projects. Import them one of three ways:
1. Choose File>Import>Media, and browse for the desired VEG file.
2. Drag a file from the Explorer window.
3. Double-click the file in the Explorer window.
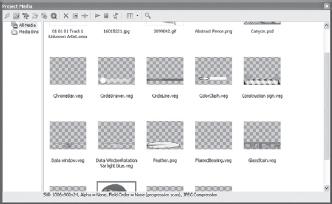
1.9 These are all VEG files that have transparency or alpha channels. Notice that the Project Media folder displays the alpha channel when appropriate.
Notice them in the Project Media window, (which was called Project Media in previous versions). You’ll see a thumbnail of your VEG file complete with any alpha channel that might exist.

1.10
Virtual Sound Technology
VST* is a plug-in format that often runs a little more smoothly than DirectX plug-ins but also offers a very wide array of access to various audio plug-ins that will benefit the audio user. In fact, there are a very large number of free VST plug-ins available on the web. I like the Kjaerhus audio plug-ins; they’ve got a Classic Series that are free, and they sound great.
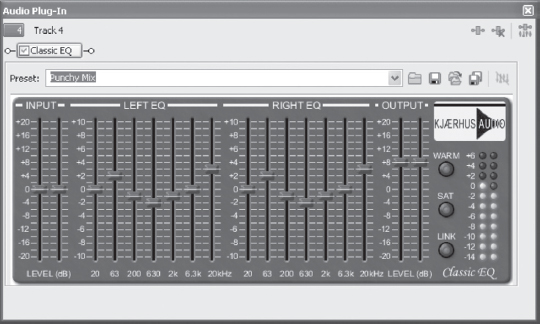
1.11 The free versions of the Kjearhus audio plug-ins may be found on the DVD in the back of this book.
To access the VST plugs, download or install them to a directory on your preferred hard drive. I install all my VST plug-ins to a folder on my C: drive labeled “VST” and that’s it. Vegas searches for a default directory of C:Program FilesVstplugins, so this is where you might prefer to install them.
Now, open Vegas, and go to Options>Preferences, VST Effects tab. Point the “Default VST search folder” to the folder you’ve installed or downloaded the files to if it’s a location other than the default location indicated above, and then click the Refresh button. This will instruct Vegas to search for whatever plug-ins you’ve installed, and they’ll show up in your Vegas Audio FX options in the folder marked “VST.” This search could take a while if you’ve got a fair number of plug-ins installed. If you’d like to have alternative VST plug-ins, perhaps in the event that you’d like to sort them by manufacturer, Vegas 6 allows for up to two separate, alternative locations for search for FX. VST plug-ins (in the Windows format) are Dynamic Link Libraries (DLL), and the free versions of most VST plug-ins do not have an installer, but rather a zip file containing the DLL. As mentioned, you’ll want to copy or install these DLL files to the C:Program FilesVstplugins location. Find free VST plug-ins on the DVD found in the back of this book, along with demo versions of other VST plug-ins.
You’ll apply VST FX just as you would other plug-ins. Double-click and click OK, or single click and select Add and then OK. Then adjust the parameters of the plug-in just as you would with any other plug-in. You can chain VST plug-ins right alongside DirectX plug-ins, and there are many automatable VST plug-ins available if you need to automate certain FX on the Timeline. Storing presets for VST plug-ins will be somewhat different, and these presets cannot be exported in the same manner as presets are exported using the Preset Manager.
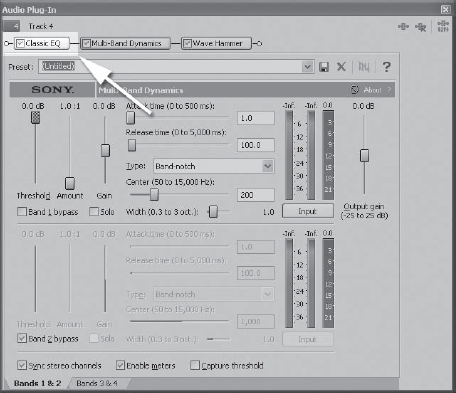
1.12 VST plug-ins can be placed in a chain with DirectX plug-ins, and they operate much like a DirectX plug-in does.
One thing to note about VST plug-ins: If a manufacturer offers both VST and DirectX installations of their plug-ins (many do), then you should install both. The reasoning behind this is that some DirectX plug-ins occasionally cause audio to drift, while the same application in VST form might not. The opposite may also apply; a VST plug-in may incur drift where its DirectX counterpart might not.

1.13 Find the VST plug-ins in the VST folder for FX.
Broadcast Wave Format
Vegas now supports BWF files, or Broadcast Wave files. While the average user might not find these valuable, filmmakers, radio stations, television broadcasters, and users of high-end recording devices will appreciate this new feature. The Broadcast Wave file format was developed to foster a format of audio interchangeability by EBU Project Group P/DAPA (Digital Audio Production and Archiving), with significant input from the audio industry. An easy way to think about BWF files is as standard wave files with a metadata layer.
The BWF file metadata contains several parts not found as part of the standard wave file format. Included are:
• Broadcast Extension Chunk
• Compulsory Chunk defined by Microsoft
• The Broadcast Wave file
• Audio Data
Broadcast Wave Files are the same as WAV formats that you’re likely already familiar with, except that a BWF file can contain metadata about the file, such as the author, the length of the file, and logging information that will allow the file to be logged for broadcast and copyright, or performance royalty needs. It also allows for timestamped files to be laid onto a Timeline in exact position. In order to add all this data to the file format, a new chunk, or layer of information is added to the wave file. BWF files also support the MPEG audio format, and an additional layer of information is added to the MPEG file where the BWF metadata resides. Only linear PCM and MPEG audio files may become BWF files. If the file is a not a PCM file, an additional chunk, known as a “fact chunk” will reside with the file.
The Broadcast Extension Chunk may contain:
• Description |
Title information |
• Originator |
Name of the author or producer |
• Reference |
A reference number issued by the author or recordist |
• Date and time |
When the file was created |
• Coding history |
A record of the signal coding, e.g. linear PCM, MPEG, etc. |
If you have BWF files, you can import them several different ways. Import them in alphabetical order, import them by timestamp, import files as a single Timeline track, or create a new track for each file imported. The latter is critical if you’ve got multitrack projects from recording devices that generate BWF files. You can find demo BWF files for import on the DVD in the back of this book.
To import a BWF file:
1. Choose File>Import>Broadcast Wave.
2. Browse to the device containing the Broadcast Wave or to the location that the Broadcast Wave is stored.
3. Determine whether you wish to add the file across tracks or across time.
4. Determine whether you wish to order tracks by timestamp or file name. (This applies only when you are adding across tracks, not adding across time.)
5. Determine whether you’d like to place the file based on where your cursor currently is placed or based on Ruler time.
BWF file import in Vegas 6 is limited to stereo/two-channel only. You’ll need to manually import multiple files if the project is a multitrack BWF file.
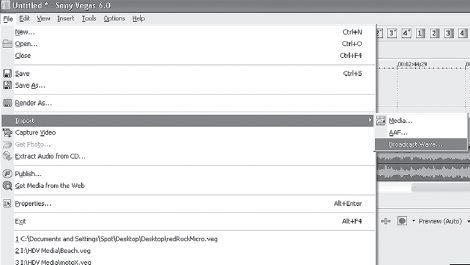
1.14 Import BWF files from File>Import.
Hallelujah! Track Motion presets have been restored; many users missed this feature in Vegas 5 software. These work just as they did in earlier versions of Vegas, except now Track Motion presets include 3D presets as well. This will aid users in creating their 3D masterpieces and allow the saving of the location of various settings.
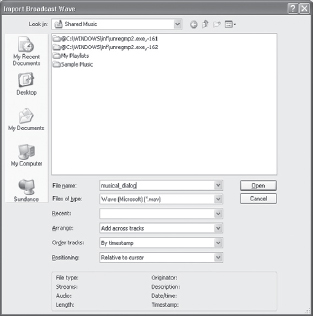
11.15 Choose the method you’d like to use to import BWF files and how you’d like them placed on the Timeline.
AAF Import/Export
No, this isn’t related to the band Alien Ant Farm. AAF, or Advanced Authoring Format, is one of a few current standards by which various DAWs and NLEs can share project files. Using AAF, basic project information may be shared. You can export a project from Vegas and open it in Final Cut Pro, Avid products, and a few other NLE systems via AAF, but it’s not a perfect transport format tool. Don’t expect things like composites, color-corrected video, or the majority of your transitions to open. It’s primarily a means of getting the media onto a new Timeline in exact placement with a few additional granules of sugar thrown on top for sweetness, but it’s not the total answer. We should see some improvements on this front at some near point from a variety of third parties.
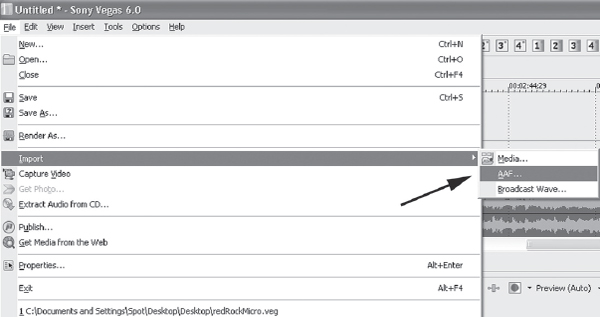
1.16 Browse for the AAF file that you’d like to import via the File>Import dialog.
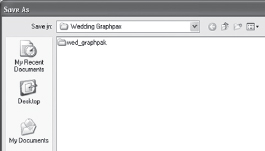
1.17 Choose File>Save As to create the AAF file for export.
To import an AAF project format, choose File>Import>AAF. Browse to the location of the AAF file that you’d like to import. This will import all media associated with that project file. Notice the use of the word “media.” Any non-media file, such as generated titles or masks that are from a specific application that is not in graphic format, will not be imported. Bars and tones are also not imported if they have been generated by an application-specific process.
Transitions (other than crossfades), color-correction, any special filters, audio processors, and composites will also not be imported, as this is not part of the AAF format. Basically, AAF allows an application to locate assets outside of the application.
This is one of the drawbacks of the AAF format. AAF is a cuts-only transportation format from one application to another. While more robust than a typical CMX EDL export/import format, it doesn’t provide perfect translation from one application to another. Let’s hope that Vegas supports the more robust MXF, although somewhat complementary to AAF, in the very near future.
To export an AAF for import into After Effects, SaDiE, Final Cut Pro, Avid Express, Cakewalk, or other AAF-supported applications, choose File>Save As. From “Save as type,” choose Edit Protocol Compliant AAF File.” Use this format for most exports. You’ll likely want to check the “Embed Wave/AIFC media” box for audio export in the Wave or AIFC codecs. You’ll also note that there is an Avid Legacy AAF File option. Use that for exporting to older Avid software tools. The “Embed Wave/AIFC media” checkbox is not available for the Avid Legacy AAF File option.
Another option to check is that the default checkbox in Options>Preferences, General tab, is enabled for “AAF Export - Use frame unit for audio.” Otherwise, audio is exported in sample units rather than frame units. Many NLE systems will not be able to read the AAF project file correctly if video is in frame units and audio is in sample units. Therefore, to ensure maximum compatibility, check this box.

1.18 Find the “AAF Export - Use frame unit for audio” option in Options>Preferences, General tab. Use this as a default for exporting AAF files.
Ever had video and audio drop out of sync? In previous versions of Sony Vegas, users needed to use the Trimmer or a scripting tool such as Ultimate S to resync audio or video that had lost its mate. Sony Vegas 6 offers a resync option to help users get frame-accurate audio to video (or video to audio).
What a great tool this is, in my opinion. Vegas will provide a display any time audio and video have become out of sync. You can resync by either slipping the audio back into place automatically or by telling the audio to be in sync from a particular point in the event or clip. Simply right-click and choose Synchronize.
Audio or video that has lost its synchronization is indicated by a red box in the event that will show how far out of sync the events are. If you don’t see this, you’ll need to choose View>Active Take (Ctrl+Shift+I).
Right-click the audio or video. Choose Synchronize, and you’ll be presented with two choices. Generally you’ll want to choose By Slipping, as this will slip the audio into place based on where the audio is. However, if you’ve looped or slip-edited the video file, you may want to select By Moving.
Choosing By Moving will move the right-clicked event to be synced with the other event related to the right-clicked event. Choosing By Slipping will slide the corresponding event to be synced with the right-clicked event. Files that have been slip-edited to the point that they’re looping the end of the event to near the in-point of the event may find that choosing By Moving.
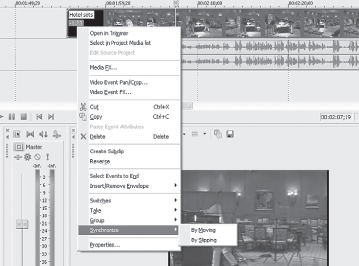
1.19 Right-click out-of-sync audio files to synchronize them with video.
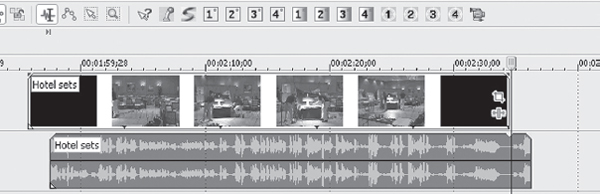
1.20 Here, the audio has been resynced by slipping. Notice that the audio is in sync but that the end of the audio file extends beyond the video and is looped.
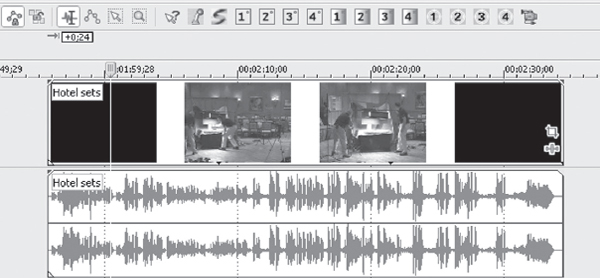
1.21 In this image, the audio has been resynced by moving rather than slipping. Notice that the audio is in line with the video clip.
Playhead Scrubbing
For those who like the way Adobe Premiere scrubs, Vegas now offers something similar, except it’s better than frame-accurate. Grab the playhead on the top of the Timeline and scrub. You’ll hear your audio scrub like an analog tape deck with no look-ahead or look-behind. This is most useful if you’re after a very specific frame of audio or a particular sample point and don’t want to drill in deep and visually locate it. The deeper you are zoomed in on the Vegas Timeline, the more detailed your audio scrubbing will be. You’ll also notice that the deeper you zoom in, the more responsive the playhead scrub becomes. Although this is a very nice improvement to Sony Vegas, I personally find the Contour Shuttle Pro or Bella DV keyboard to be better suited for this sort of scrubbing. With the wheels on these two devices, it’s quite easy to use the jog dial to scrub frame by frame.
Another addition is the slip-time indicator. This indicator will display any time value related to what you might be doing in Vegas 6. This display will indicate the length of time you’re moving media down the Timeline, creating a transition, cross-fade, or other movement on the Timeline. It’s a very useful visual display, particularly when rippling. The display will appear for selected and non-selected events, depending on what you might be editing. Although this is a small feature, it’s one I’ve become quite addicted to.
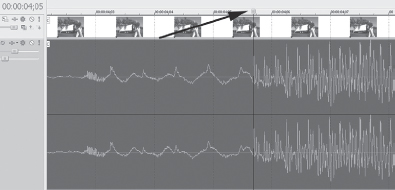
1.22 In this image you can see how deeply you can zoom in to get sample-accurate scrubbing.
Ripple Editing Changes
Users of previous versions of Sony Vegas will immediately notice the differences in ripple editing features. Earlier versions had a hole in the ripple process that confused some users as to what the ripple was actually doing or where it was taking place. In Version 6, Sony has created a workflow that whenever any piece of media is moved on its track, the events subsequent to the event being moved will move in tandem, immediately providing feedback as to where events will be moving. In this way, there should be no confusion as to where events are being moved. If two events are overlapped, the new ripple feature will display a cross-fade prior to the ripple edit actually taking place, allowing you to make decisions as to how you’d like the new ripple to function and where you’d like the overlap to take place.
You’ll also notice the slip-time indicator showing the amount of time that the ripple will cover and indicating the length of the cross-fade being inserted. These two time indicators will help you immediately realize the effect the ripple edit will have on the project.
There are still three ripple modes, but the difference in the way the ripple works is just perfect, especially for long-form editing.
My personal workflow is to place all my media on the Timeline with slugs to indicate text or other overlays. Then, I play back the Timeline. Once I locate an undesirable area, I’ll highlight that area as though a region was being created. With ripple enabled in All Tracks, Markers, and Regions, I’ll then simply press Ctrl+X, (which is mapped to a button on my Shuttle Pro), and this deletes all media in the selected area. Ripple then automatically pulls all events that are downstream so that the next events butt up against the edit point just created by the deleted media/split point. This is a terrific means of working with HDV and rough-cutting either long-form .m2t files or CineForm files, and cutting them down to size. From here, it’s an easy matter to export as an EDL, AAF, or finish edit inside of Sony Vegas.
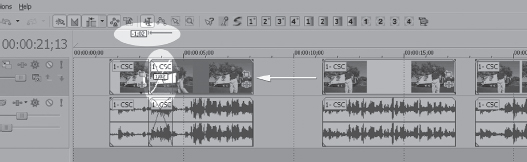
1.23 Notice the slip-time indicator and the cross-fade indicated prior to releasing the mouse, causing the ripple to take place.
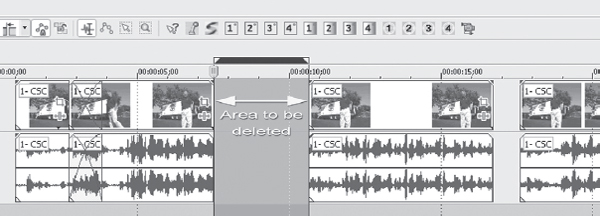
1.24 The area in the selection is to be deleted, and subsequent media or events will slide to the left, filling the deleted area.
Another workflow is to leave ripple off and simply make the cuts, leaving holes like you see in illustration V6.24. These holes can easily be cleared using either a scripting tool like Ultimate S 2.0, or you can double-click in the holes to create a region, enable ripple, and delete the hole. Ripple will fill the hole with the media that has slid down. If you intend on doing a lot of this style of cutting, you’ll want to use a script, as a script can literally ripple hundreds of files in one shot, whereas you’d have to find every single hole and delete and ripple each hole manually.
Media Manager
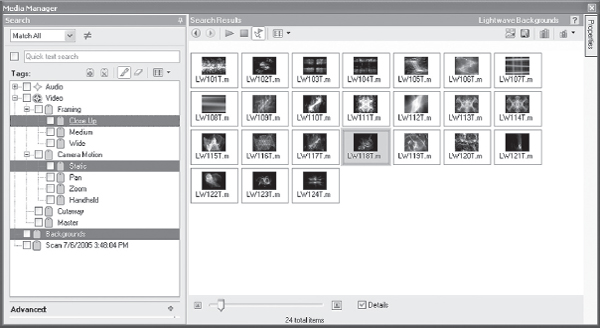
You may have noticed that on launch of Vegas 6, a small window opens up that says “Starting Database” or “Opening Media Library.” ACID 5 users have enjoyed this Media Manager format for several months now, so it was only logical that it would appear in Vegas at some near point in time. However, the Media Manager goes much deeper in Vegas. It displays thumbnails that Vegas auto-selects from the first frame of visible information, or you can set your own thumbnail. Sony engineers know that many video editors have black for the first frame or two of a video clip. Therefore, they built the system to look past the black for the first full frame of information, and the Media Manager displays that frame. To access a different frame that you’d prefer for display, right-click the thumbnail and select Choose Thumbnail. From the Media Manager, you can actually start to build the project before placing anything on the Timeline!
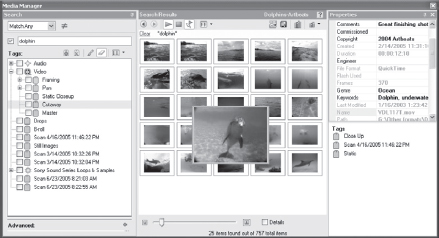
1.25 The new Media Manager in Sony Vegas 6. Notice the tags to the right that are associated with the file that is highlighted.
More important, the Media Manager allows metadata, or file information to be embedded inside the video file. Tags that indicate the type of shot, angle of shot, panning/zooming/static, closeup, medium, wide, author, keywords, dates, length, and much more are all part of the media management. You can search your entire database for a clip and find it in seconds. Or search the database for a number of clips that contain the same attributes, such as searching for all clips labeled “B-roll,” or “Closeup” or something similar. This does require some work at the capture and logging stage, but if you’re working with several projects at once, working on a SAN, or sharing a number of project files with other editors, this tool is indispensable. You can also recapture media from here, and open files in Windows Media Player for a fast playback preview of the file.
To use the Media Manager, first open it up. Then click the Media Library Actions button. This provides the option to create a new media library. Of course, you can also open existing libraries if you have any already created. You can download a sample ACID library from the Sony web site. This will show you how the metadata structure functions, even though the sample library is for ACID and not Vegas. I strongly urge you to download this library, as Sony has gone through the trouble of cataloging hundreds of thousands of files. It will not only demonstrate how tagging can function but also save you hundreds of hours of cataloging and tagging effort.
Choose New Media Library from the drop-down menu, and this will offer a dialog to browse for the location of the folder(s) that you’d like to insert in the library. Browse to the location of the folder you want to be the new library, and give the media library a name. Click the Create button, and your new library will be created.
A window will open, looking like the illustration in Figure 1.28. This window will be where you’ll set up most of the media library. Currently this library is empty, but we’ll fill it up with new media.
You’ll need to add files to this library, so select the Add Files to Media Library button. You’ll see the dialog below, and here is where you’ll add files to the library.
When the Add Files to Media Library window opens, you’ll need to browse to the location that you’d like to add media files from. After you’ve pointed to the library, it’s time to search the library. Notice you can choose a variety of file formats to either include or exclude. In this illustration, I’ve excluded the MIDI, Images, and Audio formats. Now click the Search button, and the Media Manager will begin searching the files you’ve got in the folder.
Depending on the number of files in the folder, this may take a few minutes, but it’s usually quite fast.
When the Media Manager is finished scanning the files, you’ll be able to view them in the new window that opens.
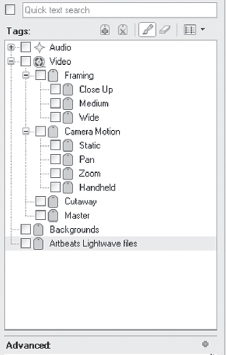
In this window, you’ll first likely want to insert the descriptor tags to the video file. Do this by holding Ctrl and clicking on each tag attribute related to your file. In this shot, I’ve selected Closeup, Static, and Backgrounds as my preferred tags. (I created the Backgrounds tag myself.) You can now drag the tags to the media file, and on the right side of the screen, your selected tags will show up. In the Properties dialog, you can add all sorts of other search information and sorting or assets information, including keywords. The more you input, the more powerful the search and media management options become. This will assist you in finding any related media by using the search tool. In the future, I expect stock footage libraries from footage providers to come with metatags as part of the library structure. Of course, merely the library name becomes part of the metadata, and that alone is quite helpful in locating media.
A standard Windows file system tree is single-rooted. It starts at one point and continues to split, but there is no cross-referencing. The Media Manager database allows you to cross-reference files, and cross-locate, ignore, or delimit searches. For example, pictures of animals can be classified by type (horse, bear, lion) or by country of origin (Australia, China, Africa) or by media type (B&W, color). This is virtually impossible to represent in a tree-type database structure without duplicating the asset. In this example, a single search could immediately locate B&W images of African animals. This is because during the tagging of media, you can cross-reference a bear that is in B&W and that comes from China.
Right-clicking in the Tags area allows you to create new tags. For example, I’ve added Backgrounds to my Media Manager system, since I do a lot of work with composites. This is very similar to the Photoshop browser that allows you to browse for images, except that Vegas’ method can be a lot more intelligent, provided that you insert good descriptions.
At the bottom of the preview pane, which is illustrated as thumbnails in this window, you’ll see a slider. This slider allows you to see the thumbnails at different sizes. Maybe you want to see more than eight images, or 10 images, or four images at time. Reducing the thumbnail size allows you to see more images. In Figure 1.33 you can see the entire Dolphins library in one view. Clicking on any asset or thumbnail will immediately show me all properties and metadata contents of that file. Hovering the cursor over a shot will temporarily zoom the shot to a larger view.
It’s strongly recommended that you download Sony’s Media Manager library, as this library will save you hundreds of hours of cataloging files for use in Sony Vegas. Sony has already handily cataloged all their files. Once you install their Media Manager library, any ACID loop or video libraries you might install will be prepped for cataloging and searching.
The Details button allows the file name and extension to be viewed. Unchecking this will show only the thumbnail in thumbnail view mode.
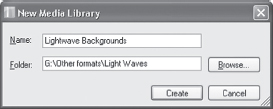
1.26 The first dialog in creating a new media library
You can insert metatags to multiple pieces of media at one time by holding Ctrl and clicking on all desired media, then clicking the tags you wish to use (again holding Ctrl to select multiple tags if desired), and dragging the tags to the media thumbnails. This adds the tags to multiple pieces of media at one shot, saving a lot of time, especially if you’ve got a group of similar shots or shots you’d like to make all B-roll or cutaways, or master shots, or anything else. If you don’t want to use keywords, create new metatags instead. It will still save you a lot of time.
1.27 For ease and speed when using Sony media libraries such as the Textures and Visions or Sony ACID libraries, be sure to download the Sony Media Manager library. It’s well worth the effort.
One thing to note about the Media Manager: Because of the way it is implemented and uses Windows resources, it can slow down your initial boot time of Vegas. If you know you’re not going to use it in a session, turn it off for faster boot speeds. Some system configurations do not do well with the Media Manager. Higher-end and better built systems will run the Media Manager with no challenges, but you’ll want to be aware of your system limitations. The Media Manager uses the SQL database system, and you can learn more about SQL tools at www.microsoft.com/sql/default.mspx. Bear in mind that Sony has made the search utility simple, and although the SQL functionality can be confusing, the Media Manager interface keeps it very simple.
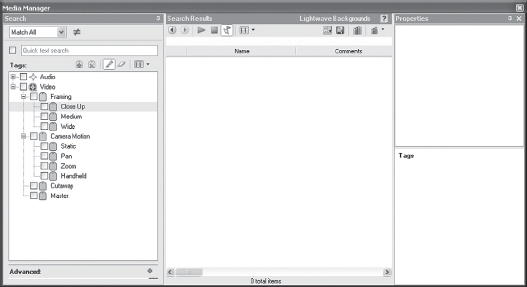
1.28 This is an empty media library, but it’s easy and fast to add media to it.
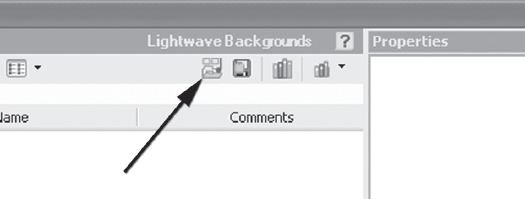
1.29 Click the Add Files to Media Library button; a new dialog opens.
Performing the Search
There are two types of searches: Match Any and Match All. Match Any will match any of the search terms in the search window. Therefore, it’s easy to have a huge list of found files, depending on what you might be searching for. The Match All search designation will locate only files matching the terms in the search window and will provide a smaller result in most cases.
Type in the word you’d like to search for, or check the tags that you’d like to limit the search to, and this will locate the files you’re looking for. Be sure to remember to clear the search parameters prior to any new search, because if you don’t, it’s highly likely that you’ll have legacy search parameters left in the search string, possibly returning more results than you bargained for, not to mention locating media that isn’t related to the most recent search.
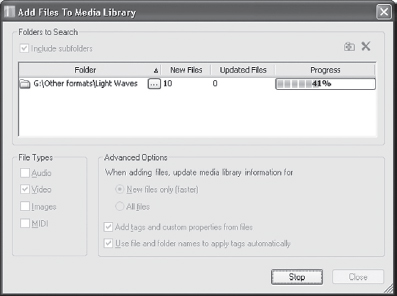
1.30 Allow the Media Manager a few minutes to search the files and catalog them.
1.31 If you don’t click the small thumbtack in the upper right of the Properties window, the Properties window will open when the cursor is over its tab and close when the cursor moves away. This is a handy way to access Properties while still maintaining a full view of the Media Manager.
This allows you to select a second, third, or other monitor to be used to monitor full-screen video, at a high resolution or full resolution (depending on your monitor’s capabilities), just like an external broadcast monitor. This is particularly useful for editing HDV without an HD/SDI monitoring system.
In Options>Preferences (or right-click the track header), you’ll notice a tab labeled Preview Devices. This allows you to decide if you’ll be monitoring through a DeckLink card, OHCI/1394 card, or to a secondary monitor.
Vegas will allow you to identify which monitor is your display monitor. For viewing 1080i information, you’ll need to have a monitor capable of 1900 × 1280 or more if you to see all the pixels in your image. However, if you don’t have a monitor that meets these requirements, no fear. Vegas will display and compensate for whatever lower resolution you might have. Therefore, if you only have a 1280 × 768 monitor, Vegas will properly scale the frame to fit within that resolution space. Further, Vegas now offers a deinterlace feature on the display monitor, allowing you to view sharp, clean video on the second monitor. You can also use color management and select one of several profiles. There are calibration tools available from third parties that will allow you to calibrate your monitor for video, or your monitor may have come with a calibration disk or profile. Do the calibration, set your own properties, and save those properties as a color profile. Since Vegas can have its own color profile, you can also have a different color profile for your graphics, web, or other applications and use a specific profile just for Vegas. Be sure to leave the “Recompress edited frames” checkbox selected.
You can drag tags to selected media, or you can drag media to the relevant tag. Either method accomplishes the same result, and which method you choose is dependent only on your workflow needs.
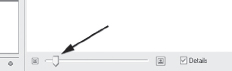
1.32 You can use this slider to resize the view size of thumbnails in the Media Manager.
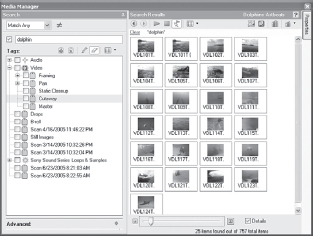
1.33 Resizing the thumbnails allows you to see as many thumbnails as you can fit on a screen. It’s great for being able to see lots of comparable images at once.
Insert still of my desktop setup. Notice that on the secondary monitor video is displayed fullscreen. This is a great way to be able to display HDV without having an HD/SDI monitor.
Be aware that if you use a secondary display for DV, the entire screen will not be filled, simply because of the frame size being smaller than the secondary monitor will display. You wouldn’t want the DV image to be scaled up, or it would be pixilated and look much like Vegas displays events in the Preview/Draft mode.
It’s a good practice to always clear the search by clicking the Clear button on the Media Manager search prior to any new searches. Otherwise, you might have data in the search parameters. Clearing the search parameters prior to any search will ensure a clean search.
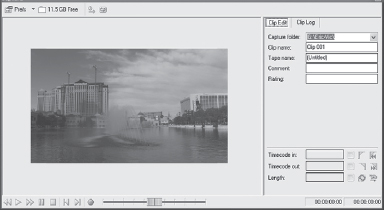
Capture Tools and Hardware
Vegas 6 can now capture with total support from the DeckLink cards from Blackmagic Design as well as capturing HDV directly from the Vidcap application. Vidcap. Further, Vegas 6 comes with the CineForm codec installed, so you won’t need to purchase this as a separate upgrade. However, keep in mind that the capture is capturing .m2t files, and you’ll want to either convert to CineForm or use another method for conversion to edit such as the 4:2:2 YUV codec which is what the DeckLink card will require, or perhaps you’ll convert to straight DV for your edit and then replace the edits with the .m2t files for HD rendering later on. This will provide a high-quality editing experience, particularly those with slower computers. I’ll submit that you might find the VASST Software tool named GearShift appropriately built for this conversion task. It can convert to a variety of codecs, frame rates, or a DV proxy for those editing on a slower computer, and with a one-button click, replace all media with the HD stream, saving a lot of time, effort, and potential headaches. We’ll have a quick look at GearShift later in this chapter.
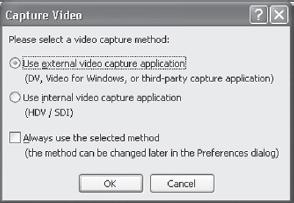
To capture DV in Vegas 6, choose File>Capture Video just as you’ve always done, or launch the capture utility just as you’ve always done.
This dialog opens up.
In this dialog, you’ll want to select the external capture application. This will open the DV capture application that you’re likely already familiar with. If you plan on using only this capture application, you might want to check the “Always use the selected method” box, and this will prevent this dialog from opening when you choose this capture option. You can always change this in Preferences later, should you start to work with HDV or HD/SDI or SD/SDI.
![]() Tip
Tip
Every time you add files to a Media Manager library, a Scan tag is applied. You can rename this tag. In this particular instance, I’ve renamed the Scan tag to the Artbeats Lightwaves. This helps when sorting through multiple libraries in one search.
For this explanation, we’ll be looking only at the new capture application. See the Capture Chapter for additional information on capturing DV in Sony Vegas.
In this new capture application, there are very few choices in the setup of the application. You’ll note that in the Preferences for the new capture application, there are only two basic options with very few options beneath.
The first option, for a Device, allows for capture input from either a DeckLink HD/SDI or DeckLink SD/SDI card, or from an HDV device such as the Sony Z1, HVR M10U, or FX1 camcorders or decks. There is also a choice of “none.”
Select the device that you’d like to use for capture. Sometimes, various HDV devices might not be seen immediately. You may need to cycle the device on/off/on in order for Vegas’ video capture application to see it correctly.
1. In the Control Panel, choose System, click the Hardware tab, and click Device Manager.
2. Click on the AVC devices, where you’ll see a connected device.
3. Right-click and choose Update Driver. You want to manually search for the new driver.
4. Browse to Sound, Video, Game controllers.
5. You want the SONY folder.
6. In the Sony folder, specify the DVHS driver.
7. Reboot the camera or HDV deck.
The other option in the setup of the HDV/SDI capture utility is to choose where you’ll store files. When you select this option, a dialog will open up providing additional Preference choices.
In the General tab, there are four choices. If the computer being used to capture HDV is a slower machine (3.0GHz or slower), it’s a good idea to disable all but the last choice in the dialog.
This will task the machine with less processing horsepower, even though these preferences may not seem to be significant.
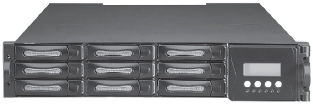
In the Disk Management tab, the only option available is to select a specific disk that you’d like to capture media to. The primary consideration here is to be certain that you’re never capturing to your system disk. This is particularly important with HDV or SDI capture, as dropped frames would be a virtual certainty if media is captured to the system drive. For adequate SDI capture, you’ll need a RAID 0 configuration. The RAID could be either SATA or SCSI, although SCSI is generally preferable, and a minimum of four drives, although a RAID of eight drives (10k speed) or more is a good idea. Blackmagic Design suggests you could possibly squeak by with only six 10k drives, but they don’t recommend it. Hardware controllers for the SATA RAID are highly recommended, although there may be a software RAID controller available that will provide the necessary throughput. SDI and HD require a fairly significant amount of bandwidth, and so the drive array will need to be up to speed. One significant benefit of working with uncompressed media is that it actually requires less processor power than DV or transport streams require, as there is no compression taking place. The challenge in working with uncompressed files lies with throughput, not with processor speed. If you visit the www.blackmagic-design.com web site, you’ll find a speed test utility that will let you know if your system is ready for processing uncompressed SD and uncompressed HD files. For SD file transfer and storage, 30MB per second is a safe benchmark data rate.
1.40 This is a new capture application found in Sony Vegas 6 and is used for capture of HDV or uncompressed footage via the Black Magic Design HDLink or SDLink cards.
1.41
You’ll need approximately 180GB of storage per hour of SD video. HD (without audio) is approximately 170MB per second, or roughly 600GB per hour of uncompressed HD storage. 1280 × 720p files require slightly less bandwidth and storage than 1920 × 1080 files, asking for an average of around 170MB per second. When working with uncompressed files on a marginal system, consider 24p as your frame rate, as this can significantly reduce throughput requirements, dropping the required data rate to just under 150MB per second. As you can see from these data rate requirements, you’ll not be able to get into uncompressed SD or HD very inexpensively. Check the Blackmagic Design web site for additional details on supported and recommended motherboards, processors, and RAM configurations.
Finally, in the Device tab, you’ll specify the default for capture, whether it’s a DeckLink card or an HDV device captured via 1394. When an HDV device is selected, the connected device will display, such as you see in this illustration showing the Sony HVR Z1U camcorder.
If you plan on using one of the Blackmagic Design cards, you’ll need the following:
i8You can download the system speed test software from the Blackmagic Design web site.
1.42 You can always change the capture options in Options>Preferences, Video tab.
The Blackmagic Design hardware cards that work in Vegas provide users with some options that previously weren’t very easy to work into the Vegas workflow. Most importantly, rather than working with DV, users can work with 4:2:2 uncompressed footage on the Timeline in Sony Vegas. Previously, to import uncompressed to the Vegas Timeline required capturing with a third-party application, importing to Vegas, rendering to the desired codec, then outputting via the third-party application. With the DeckLink card, you can import analog media or SDI media as uncompressed media. This means a deeper, richer picture, fewer artifacts, better color-correction processing, and a higher-quality output, depending on the originating camera or format.
Some loads of Windows XP may not see your HDV device immediately or may report missing drivers. You can install Windows XP Service Pack 2 (not recommended) or you can take the following steps to instruct Windows XP to recognize your camera.
Another benefit, especially for footage destined for broadcast, is that the signal can be transferred via SDI, or Serial Digital Interface. Coupled with a device like the Convergent Design SD Connect or HDV Connect, users can import uncompressed video directly from a BetaSP or HDCAM system and output right back to that same device via SDI.
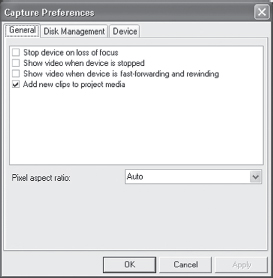
1.43 Capture Preferences, General tab
If you aren’t using BetaSP, SX, or HDCAM in your workflow and are primarily working with DV or HDV, you likely will find an SDI card to be unnecessary. If your only output format is MPEG-2 for DVD, SDI is of even lesser importance to most editors.
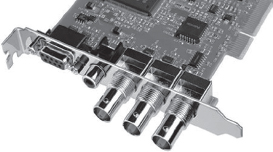
1.44 DeckLink: card
SDI requires a completely different setup on the equipment side than DV requires. For instance, most professional monitors don’t come with SDI input and output, so you’ll likely need to purchase an SDI plug-in card for the monitor. Additionally, you’ll need a BetaSP or SX deck that has SDI input. Any switchers you might use also require SDI input and output. SDI-capable equipment isn’t inexpensive and is really necessary for only a few areas of the video industry. Just being aware that Vegas can grow with you as your video skills and client base grows is a good thing.
HDV is the “next big thing” in the video production industry, and just like DV changed the industry back in 1996, HDV is doing the same thing today. Computers and hardware that are plenty fast for DV aren’t quite so optimal for HDV. HDV is to HD what DV is to SD. It’s a lower-cost, extremely high-quality format that is accessible to most shooters and editors today.
HDV is another way of talking about MPEG files presented from the HDV camcorder as .m2t files. These are Transport Stream (TS) files and are not really optimal for editing. Aside from the fact that .m2t files require a lot of computer horsepower, these files also fall apart fairly quickly. One recompression of .m2t files is about all you can expect to get away with before noticing artifacts in the media. You’ll see some marketing hype about “editing native HDV” and Vegas can do this too. But you won’t want to.
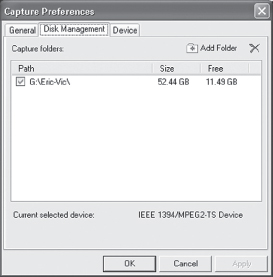
1.46 Capture Preferences, Disk Management tab
Even on a very fast computer, native HDV (.m2t files) will at best offer a frame rate playback of around 18fps. This isn’t suitable for editing by most standards, and so you’ll likely want to consider other alternatives. This is related exclusively to the decode and processing of HDV in the MPEG-2 format. HDV itself carries the same data rate as DV.
HDV-Type 1: 19Mbps (720p camcorders)
HDV-Type 2: 25Mbps (1080i camcorders)
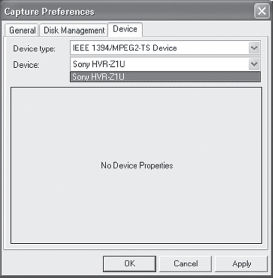
1.47 Capture Preferences, Device tab

1.48 In this illustration, you can see how a Dl, or Digital Intermediary can be a much more pleasant and efficient editing format than working with native HDV files.
Alternatives
Sony Vegas 6 comes with the CineForm codec as part of the application and HDV solution. This codec is one of the alternatives you’ll want to consider for a significantly better editing experience. What this codec does is to convert the longer GOP (Group of Pictures) 4:2:0 file that the camcorder delivers into a short 2-GOP 4:2:2 file. Not only does this maintain the integrity of the picture, it also carries a lighter load on the processor, therefore allowing playback at frame rates of 29.97 or 25fps, depending on whether the project is 50i or 60i.
To use the CineForm codec in Vegas, users have a couple of options. The first option is to take all .m2t files as captured to a bin, and place them on the Vegas Timeline. With all files to be used on the Timeline, regions may be created, and the Vegas Batch Render tool may be employed to render to the CineForm codec template provided in Vegas. This can be time-consuming and offers several opportunities to make a mistake that will be even more costly to time or to the workflow, not to mention the potential to compromise the video quality.
What can a Blackmagic Design card do for me? Should I be interested in using one?
Another option is to purchase the full HD Connect application from CineForm. This application will preclude the use of the Vegas capture tool, as you’ll use the CineForm application to capture HDV. Currently the cost of the full application is $199.
What the application will do is to convert the .m2t files to .avi files on the fly, so rather than capturing and rendering, you’ll simply capture, and the conversion is done during the capture process. The speed of the conversion will be dependent on the computer being used. On the dual AMD 275 system I recently built, conversion happens entirely in real time, so the capture process is identical to any other capture process. On a Sony VAIO 3.06 HT laptop, an hour of capture equals an hour of capture plus an additional 20 minutes for the conversion to take place. You can choose in the CineForm preferences whether you’ll be keeping the original .m2t file or not. I highly recommend you do, just in case of any number of possible problems. Even on a 3.0GHz system, the CineForm codec will allow for full frame rate playback of HD files. This is helpful to the laptop editor or desktop editor on a slower system.
Another alternative to editing .m2t files involves a third-party tool from VASST called GearShift. GearShift is really quite simple in what it does, but there is nothing simple about the amount of processing help and time-saving it brings to the HDV workflow.
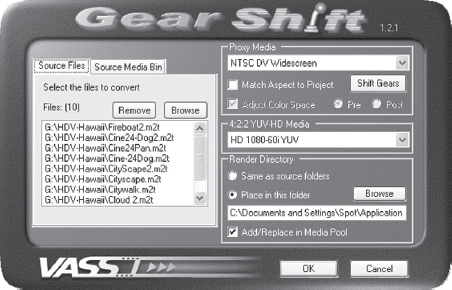
1.49 GearShift is a plug-in for Sony Vegas from VASST.
GearShift is a plug-in to Sony Vegas 5 and Vegas 6, and is found in Tools>Scripting menu.
What GearShift does is allows users to import .m2t files to bins and convert them to several different formats. Users can also place long .m2t With GearShift, you can convert .m2t files to both DV Proxy and 4:2:2 YUV files. If you’re working with the DeckLink card, you’ll need to use the 4:2:2 YUV file format for export from Vegas via SDI. GearShift will also convert files to the CineForm codec if you’d like to do this.
The DV Proxy files allow users of very slow computers or computers that don’t meet the CineForm spec to edit the HD files just as though they were DV files. GearShift applies the proper color-correction matrix to the DV files so that they are in the same ITU709 color space as the HD files, which allows users to work with the DV as though it was HD.
Note that the terms 50i and 60i are related to HD, not PAL or NTSC. This is because in the HD world, there is no difference between the color space and resolution of media played in the U.S. or overseas. The only difference between the continents and their media is the frame rate. With HD, televisions that support an HD signal can display either 50i or 60i, or the variants of these framerates. 24p, 25p, 30p, 50i, 50p, 60i, 60p are all frame rates and display formats that can be used in the HD space. When you see an image referred to as 1080 p30, this means it’s a 1080 horizontal resolution file at 30 progressively scanned frames per second. Eventually, we’ll get to the point of 1080 p60, which is technically the best display resolution and format that’s been accepted by the ATSC.
During the editing stage, you may want to be able to compare the HDV footage to the DV footage. GearShift makes this quite simple. After opening the GearShift application, clicking the Shift Gears button will replace the DV files with the HDV files or with the .m2t files depending on what selections you’ve made in the GearShift application.
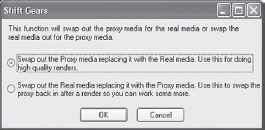
1.50 When you shift gears in GearShift, the application offers choices between replacing the DV proxies with HD and replacing the HD with the DV proxy. This allows fast swapping of media formats.
Another major benefit to the DV proxy format is that if you’re working with an external HD and a laptop, you’ll note that the requirement for file sizes is substantially smaller than if you’re working with the CineForm or Sony YUV codec. Working with the CineForm codec HD files, you’ll require approximately 40GB per hour. Working with the DV proxies, you’ll need only 13 GB per hour. This is good for the editor who doesn’t want to convert the .m2t files and only wants to do a single render format.
As you can see, there are several workflows for HDV in Sony Vegas; it all boils down to what works best for you. Regardless of the final format, it’s very likely you’ll want to convert to some form of intermediary, whether it’s using the CineForm codec or using DV proxies. The Sony YUV codec is great as well but involves very long conversions to a file format that while superior, is difficult to edit unless you’ve got a very fast RAID and very fast processor. Additionally, the 4:2:2 Sony YUV codec won’t provide a lot of benefit for the DV editor, except as an archiving format.
Intermediary formats to consider relating to final output:
.m2t (MPEG 2)–Use this format for print back to HDV tape or for final render to DVD-destined MPEG 2.This keeps the finished media in the 4:2:0 sampling and color space of HDV all the way through to delivery.
CineForm codec–Use this for archiving or for stepping between the HDV media and going to HDCAM, or for rendering to SD for delivery in BetaSP, BetaSX, or DV.
Sony 4:2:2 YUV codec–This codec is the only choice if you’re working with SD/SDI or HD/SDI files to be previewed via SDI. This codec is also used for printing to HDCAM from the Blackmagic Design DeckLink cards.
*VST is a trademark of Steinberg Media Technologies GmbH.