
24p HDCAM/DVCA Workflow for the Independent Filmmaker
by Dave Hill, Sony Pictures Digital
Overview
With the rapid and continued adoption of Sony HDCAM as the acquisition format of choice for the independent filmmaker, many people have asked how they could use Sony Vegas software as an editing tool for 24p HDCAM production.
Sony Vegas 6 delivers many exciting new features, including cost-effective tools for 24p HDCAM editing using DVCAM proxies.
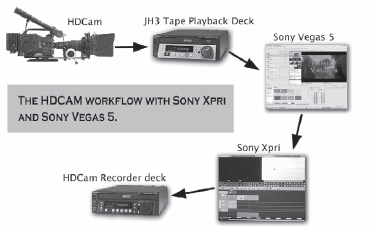
12.1 The 24p/XPRI workflow.
With Vegas 6 you can:
1. Connect Vegas 6 to a Sony JH-3 HDCAM deck and capture frame-accurate DVCAM downconverts over i-link. You can also make DV/DVCAM dubs from your HDCAM masters and capture using your DV deck or camcorder.
2. Remove 2–3 pulldown from the downconverted 60i DV clips.
3. Retain original 24p HDCAM timecode in the DVCAM downconverted video files.
4. Cut your project in a 24p Vegas timeline with perfect frame accuracy.
5. Create finished audio tracks in a 24p Vegas timeline.
6. Create finished HD composites and video fx, and export as 24p uncompressed .avi.
7. Export a frame-accurate 24p EDL for final finishing in Sony XPRI or other 24p HD editing systems. Finished audio and HD composites can be used natively in the finishing system, and HDCAM source clips will be recaptured as needed by the finishing system.
8. Even if you are not immediately delivering a 24p HDCAM master or doing a film-out, you can use this process to create extremely high-quality 24p DVDs, DVCAM or other SD masters, as well as 24fps web video.
Sony offers an extensive line of HDCAM cameras and decks, many of which are also available for rental.
HDCAM information can be found at http://bssc.sel.sony.com/Professional/webapp/SubCategory?m=0&p=2&sp=19&sm=0&s=&cpos
Setting Up a 24p Vegas Project
In order to ensure frame-accurate edits as well as a time-accurate soundtrack, you need to set up your Vegas project correctly before editing.
Set the trimmer time format to “SMPTE Film Sync IVTC (23.976 fps, video).” This allows you to set in/out marks in the trimmer using the original 24p source timecode. Timecode will still be properly tracked even if you do not set the trimmer time format to “SMPTE Film Sync IVTC (23.976 fps, video).”
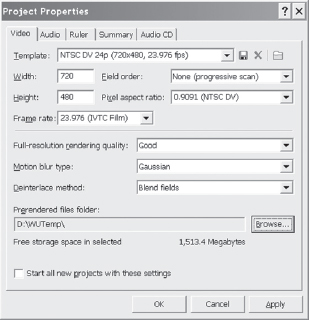
12.2 Set the project to NTSC DV 24p (or NTSC DV 24p Widescreen if the project is 16:9)
Confirm that “Quantize to frames” is on. Keep this on for all video editing. You can turn this off for fine-tuning the audio but remember to turn it back on when editing video.
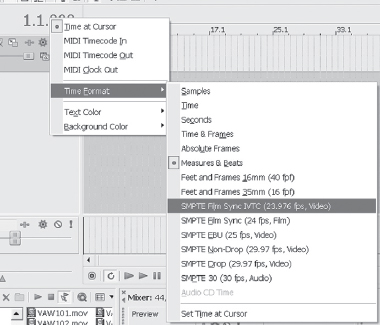
12.3 Set the project time format to “SMPTE Film Sync IVTC (23.976 fps, video)”
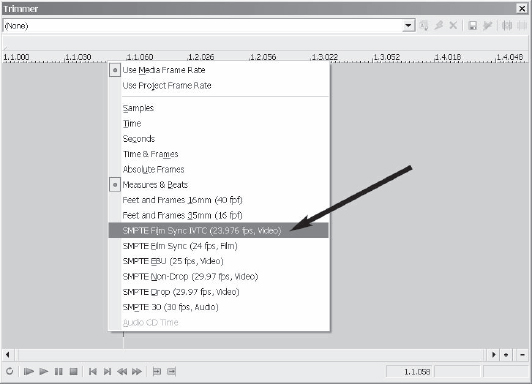
12.4 Set the Trimmer window to 23.976 so that you are trimming at the project and media frame rates.
You are now ready to capture your downconverted footage. It is recommended that you use the Sony Vegas capture tool for capturing your downconverted DV footage directly from the JH-3 deck or from DV/DVCAM dubs. Other capture tools may or may not work correctly and have not been tested.
As always, proper tape naming and clip naming is essential during the logging/capturing stage. You will need a reference back to the original master tapes, and failure to name the tape correctly at capture time can result in time-consuming and expensive searching at the online facility.
It is not recommended that you capture across scene breaks in the the original HDCAM tape. This may result in improper timecode or pulldown removal inside Vegas. For best results, log each scene in the Vegas capture tool, then batch capture.
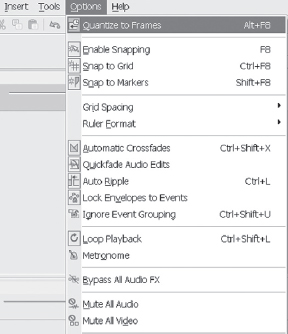
12.5 Enable “Quantize to Frames” from the Options menu.

12.6
Remove 2-3 Pulldown from the Downconverted 60i DV Clips
Once you have captured your downconverted DV clips in Vegas, you will need to remove the pulldown that is inserted by the HDCAM deck when creating 60i (29.97 interlaced) DV from 24p HDCAM original footage.
Load the captured clips into the Vegas Project Media (this happens automatically when you launch the capture application from within Vegas). In the Vegas Project Media, select all of the downconverted clips, then right-click and choose “File format properties.” The dialog box below will appear. Check the “Enable 2-3 pulldown” option, then choose OK.
If the JH-3 downconvert options were set properly (see section “Capturing 24p HDCAM footage as 24p DV using the Sony JH-3 deck”) the starting frame offset for all clips will be zero, pulldown will correctly removed, and timecode will be tracked correctly.
The pulldown flag will be stamped into the DV file, so you can open these files in any Vegas 6 or later project and it will be interpreted as a 24p DV clip. There is no need to close and reopen Vegas after setting the pulldown flag (above).
You can confirm that the footage has been flagged as 24p by checking the media properties for the DV clip. Format should be “DV (removing 2-3 pulldown)” as below:
If you are working from a film transfer or multi-generation dub, you can still convert the DV clip to 24p DV, but you may have to manually set the starting frame value (starting frame offset value, 0-4). This may require some trial and error to find the correct starting frame.
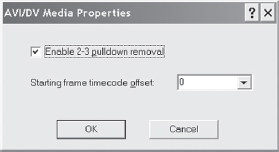
12.7 Enable 2-3 pulldown in the Project Media.
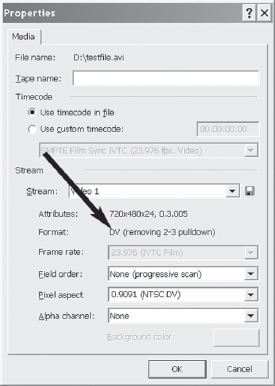
12.8 Verify that pulldown is being removed.
Editing with 24p DV Video Files
Vegas 4 shipped with many 24p DV editing features, and they are described at http://mediasoftware.sonypictures.com/support/productinfo/24p.pdf. If you followed all the steps above and are not planning on an HDCAM online session, you can edit your project and make a great-looking 24p DVD, create SD masters or web video with no additional steps beyond the normal editing process.
If you are planning on an HDCAM online session at some point (or need an EDL or XML project data export for any subsequent process), it is a good idea to confirm proper timecode handling before proceeding. The easiest way to this is to add the “Sony Timecode” filter to one or more of your 24p DV files.
In the Vegas 6 Project Media, select a 24p DV file, choose media FX, select “Sony timecode,” and choose the “SMPTE Film IVTC (23.976 fps)” preset.
NOTE: This must be done at the media level, from the Project Media and nowhere else.
If you chose to burn in timecode during the downconvert process, your video will look like Figure 12.10.
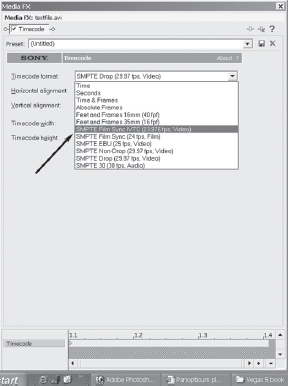
12.9 Insert the Sony Timecode filter to track time. Insert it in the Project Media to reflect the T/C from the media rather than the timeline.
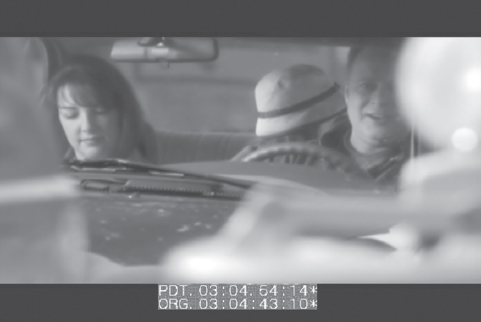
12.10
After applying the “Sony timecode” filter with the “SMPTE Film IVTC (23.976 fps)” preset, your video should look like Figure 12.12. Importantly, note that the “ORG” timecode burned onto the frame matches the timecode displayed by the “Sony timecode” filter.
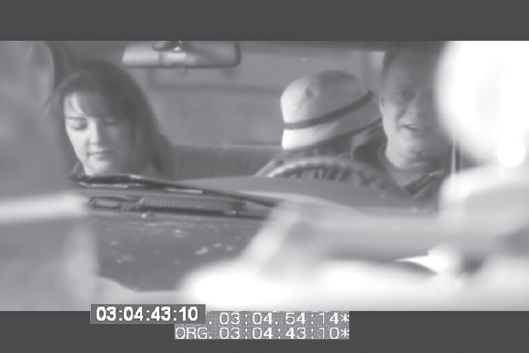
12.11
A script could be used to apply or remove this filter with the “SMPTE Film IVTC (23.976 fps)” preset to all items in the Project Media. Using Notepad, you can modify the scripts “Add Timecode To All Media.js” and “Remove Timecode To All Media.js.” Scripts can be found in :Program FilesSonyVegas 6.0Script Menu. In either script, change:
var presetName = “SMPTE Drop (29.97 fps)”;.
to
var presetName = SMPTE Film IVTC (23.976 fps)”;
Save the script with a new name containing the .js extension
Create Finished Audio Tracks in a 24p Vegas Timeline
If you are creating finished audio tracks for use in your final HD online session, you are strongly encouraged to check with the post facility for exact format requirements. Most facilities can accept 16/48 PCM .wav files for use in HDCAM sessions, which can be rendered from Vegas 6 using following settings:
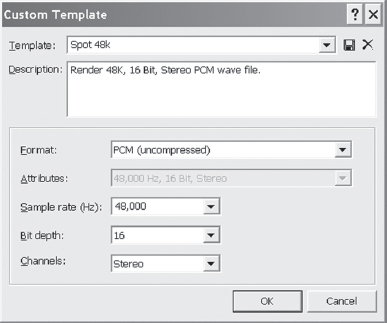
12.12 Set the project to NTSC DV 24p (or NTSC DV 24p Widescreen if the project is 16:9)
If you are cutting in a 24p Vegas timeline and doing a 24p HDCAM online, you will not need to worry about time-stretching your audio during the online session if your render out .wav files as above from a 24p Vegas timeline.
If you need to convert to Vegas 6 audio tracks to OMF, the following tool is recommended: http://www.cuibono-soft.com/Store/EDL_Convert_Pro_v3/edl_convert_pro_v3.html.
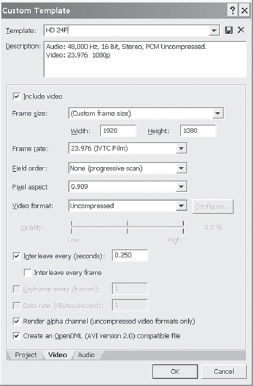
12.13 Use this render setting to output 24P HD avi files.
Create Finished Composites and Video fx, and Export as 24p HD Uncompressed .avi
If you are creating finished composites or graphics for use in your final HD online session, you are strongly encouraged to check with the post facility for exact format requirements. Most facilities can accept uncompressed 24p HD .avi files for use in HDCAM sessions, which can be rendered from Vegas 6 using following settings:

12.14 Use the EDL Export script to export a CMX 3600 list.
Exporting a 24p EDL
You have picture lock, the soundtrack is complete, and you are now ready to export your EDL. Choose Tools>Scripting>Export EDL, and save the file with the .edl extension.
You are strongly advised to send the EDL to your post house prior to arriving at the online session. They can verify the EDL, note any errors, and adjustments can be made prior to the actual online session.
24p EDLs created in Vegas 6 have been tested with Sony XPRI. Cuts and dissolves work correctly with one video track and two audio tracks in all tests. Speed changes, wipes, and other project data will not be exported with the EDL. Recommended practice for HDCAM online using Sony XPRI is:
Render mixed audio tracks from your Vegas project, for import into finishing system (Sony XPRI).
Render HD uncompressed graphics and video fx from your Vegas project, for import into finishing system (Sony XPRI).
Export 1 EDL per video track, for import into finishing system (Sony XPRI).
XML project interchange between Vegas 6 and Sony XPRI will be demonstrated at NAB 2004.
24p DVDs
You can make 24p DVDs from a 24p Vegas 6 timeline. See the Vegas 6 documentation for more information.
Exporting the Project to DV
You can render your 24p timeline as NTSC or PAL DV. See Chapter 8 for additional information.