
Getting Started with Vegas
Installing Vegas
Installing Vegas is no different from loading any application, but certain settings, steps, and habits can make operating Vegas more pleasant and efficient.
Before loading Vegas, make sure that any anti-virus software installed has been temporarily disabled. If a great deal of editing is to be done on this machine, it’s worth considering building a separate user profile that keeps the anti-virus off at all times during the capture, editing, rendering, and printing-to-tape processes. Anti-virus applications are notorious for stealing system resources at will and for popping up when least wanted.
Vegas can be loaded either from a boxed-product CD or from a downloaded executable file. If Vegas is being loaded from a CD that came in a box, place the CD into the CD drive, close it, and follow the instructions as they appear on the computer screen. Vegas auto-starts unless this feature has been disabled in the Control Panel.
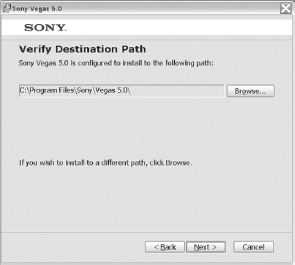
Complete the instructions given by Vegas’ installation dialog. Vegas can be installed to any drive; it’s generally best to install to the C: (or boot) drive, unless the application will be used on a network boot. (Special licensing is required to run Vegas on multiple machines at one time; with network rendering this will be important to observe.)
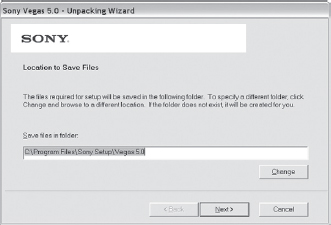
2.1 Vegas asks where it should be loaded/installed. In most cases, choose the boot drive.
2.2 Be sure to register Vegas so that Sony can notify you of updates and upgrades to the product and so that you gain access to the Get Media website.
Register Vegas when prompted to do so; by registering, you can access media for free that is on Sony’s Get Media website, which is updated regularly for Vegas users. This media is generally royalty-free and worth having, particularly at the cost of registering the Sony software.
Registration can be accomplished via the Internet, telephone, or another computer. Registration also gives users 60 days of free technical support and special discounts.
Following the installation of Vegas, install the Boris Grafitti application and the Magic Bullet software plug-ins to Vegas in order to have access to these plug-ins. They will require separate registrations. At the time of this writing, Magic Bullet and Red Giant were offering additional presets as a reward for registering their software.
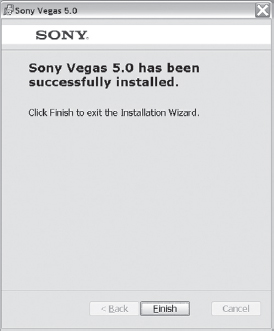
2.3 Vegas provides a successful registration screen after registration is completed.
When Vegas launches for the first time, it’s a blank screen with no media in it and makes no assumptions on how the user will be editing with Vegas.
The three primary levels at which audio, video, stills, and graphics are edited and processed are as follows:
• Event—can be viewed as individual pieces of media on a track. Many events can be on a single track.
• Track—is a single line on a project timeline, on which all events are placed. A project can have multiple tracks.
• Project—is a culmination of all tracks that contain events. (Filters may be inserted in the Project Media in addition to the above listed timeline options).
These terms shall be used throughout this book and the Vegas owner’s manual.
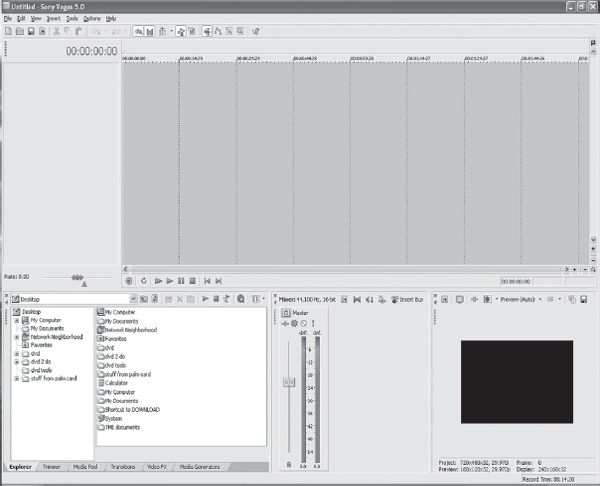
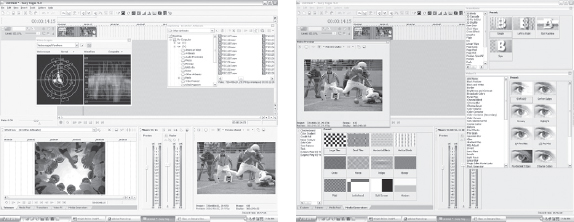
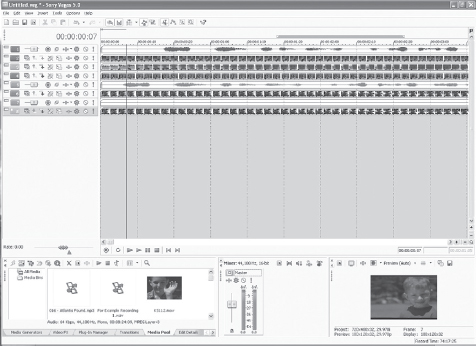
2.4 Opening the Main Window in Vegas for the first time.
Vegas is essentially broken up into three main workspaces:
• Track header/control
• Timeline/track view
• Docked windows
Track Control Pane
The Track Control pane is where track names are listed and track-focused effects are added. Users can also define special behaviors of the individual track, such as routing to external audio cards for sound control/mixing, and compositing behaviors for video. The Track Control pane is also where audio tracks and video tracks are inserted. Tracks can be inserted one of three different ways:
• Select INSERT | AUDIO TRACK or INSERT | VIDEO TRACK from the menu bar at the top of the screen
• Use a shortcut key: Ctrl+Q (audio tracks) or Ctrl+Shift+Q (video tracks)
• Drag media from the Explorer to the blank Timeline
The Track Control pane can be expanded or contracted, depending on the desired workspace and information space. This feature is particularly valuable on single-monitor systems where screen space is at a premium. Hovering the cursor over the line that divides the Track Control pane and the Timeline changes the cursor to a resize icon. Clicking the left mouse button when this icon appears allows the Track Control pane to be expanded or contracted.
2.5 Tracks can be inserted from the menu, as shown here, by dragging, or by using keyboard shortcuts.
2.6 The Track Control pane can be expanded or contracted, depending on the amount of space desired for viewing either the track pane or Timeline.
The Track Control pane can be completely removed by using the shortcut keys Shift+F12. This step removes the control pane completely, so be aware that it’s easy to forget that it’s been hidden. Using the Up Arrow and Down Arrow keys makes it fast and easy to move above or below a selected track. The currently selected track will be a darker shade than the tracks above or below. Multiple tracks can be selected by holding the Shift key and clicking each track chosen for selection. When multiple tracks are selected, any changes made to the controls on one track affects all tracks. This feature is useful when multiple audio tracks need to be raised or lowered in volume or for panning or bus routing. When multiple video tracks require changes to opacity or changes made in compositing modes, selecting multiple tracks is a fast way to affect all tracks simultaneously. Changes made to affect parameters will not affect multiple audio or video tracks, nor will track motion assigned to one track carry over to additional tracks when multiple tracks are selected.
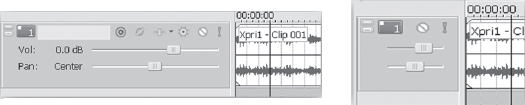
Each track can be given a name for reference purposes. The track name becomes the default prefix name of the media stored on the Timeline when the audio is recorded.
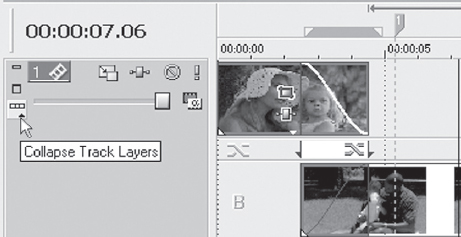
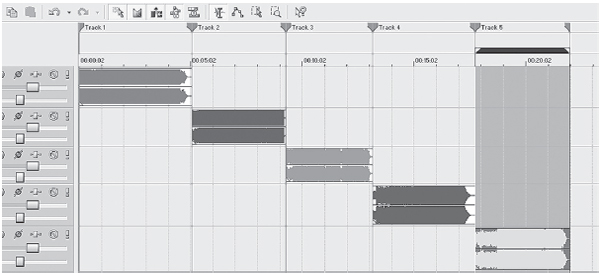
2.7 Track panes can also be expanded vertically, providing the traditional A/B roll view found in most other NLE systems. This feature uses twice the amount of screen space, which is the primary reason Vegas defaults to a collapsed track view. Expanding the view can help you become more familiar with editing in Vegas if you are coming from another NLE system. Simply right-click the track header, and choose Expand Track View from the submenu.
2.8 If a track is named before recording audio, the name on that track becomes part of the file naming process.
Adding a name value to a track after recording audio does not affect the filename properties of the audio. Adding a name value to a video track does not affect the name properties of the video on the named track. Adding a name value to audio ripped from a CD or imported does not change the name properties of the audio file.
![]() Tip
Tip
It’s often said in the digital world that “if it ain’t labeled, it don’t exist.” This is somewhat true in that cataloging media correctly at all levels is critical to locating and maintaining files. In today’s digital world, files accumulate very quickly. Be sure to get in the habit of good track, file, and project management.
The Track Control pane is also where volume, panning, and bus controls take place in an audio track, as well as track-level audio processing. Each track has an FX button on it, where either default processing or custom plug-ins can be inserted. (See Chapter 5 for more details on plug-ins.)
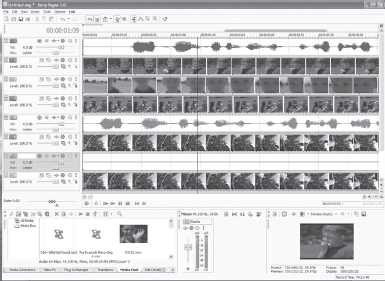
Timeline/Track View
The Timeline/track view is where the majority of the work takes place. This location is where all audio and all video are displayed, edited, and viewed during the editing process. The Timeline can be expanded or contracted both horizontally and vertically to suit the preferences of the user. This area displays all media found in the project and can be zoomed in for sample accurate or frame accurate edits or out for overall views of the entire project regardless of length.
In addition, the controls for starting and stopping cursor movement and playback in Vegas are found in the Timeline/track view.

2.9 The Transport bar controls shuttling the cursor on the Timeline.
These controls can also be controlled by these shortcuts:
• Record—Ctrl+R
• Loop—Q
• Play from Start—Shift+Spacebar
• Play—Spacebar
• Pause—Enter
• Rewind—W
• Go to End—Ctrl+End
These controls can also be programmed in third-party hardware, such as the Contour ShuttlePro.
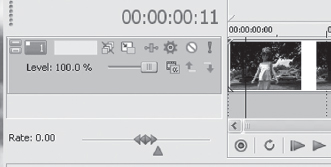
2.10 The Scrub tool can be locked at forward or reverse speeds. Double-click to restore playback to its normal rate.
Next to the Transport bar control is a small yellow triangle that is used as a shuttle/scrub control. While playing media from the Timeline, this control can be slid to the right to scrub through audio/video during playback. The indicator will stay at the faster or slower speed until the yellow triangle is double-clicked. Double-clicking will restore the speed to the normal playback rate.
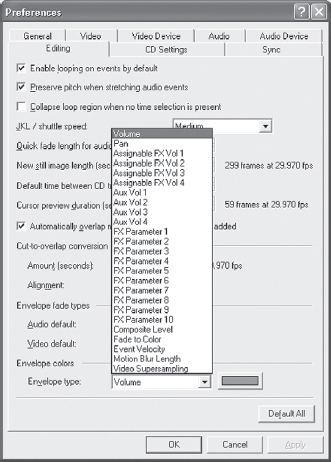
Scrub can also be achieved by pressing the J, K, or L keys during playback. J reverses audio and incrementally increases reverse speed if the key is continually held. K pauses playback, and L scrubs forward while incrementally increasing speed as the key is held. Speeds of up to 20x are possible within Vegas. To control the incremental speed adjustment and how fast it implements, choose OPTIONS | PREFERENCES | EDITING and select the JKL/Shuttle Speed option to suit personal preference.
The Contour ShuttlePRO, Space Station AV, and Bella Keyboard can all be used for incremental shuttle control. Setting the shuttle speed to High provides the greatest use of the shuttle wheels on these hardware tools.
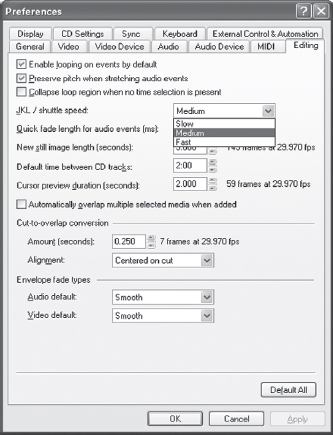
2.11 Setting the JKL/shuttle speed.
Above the Timeline is a series of tools on a toolbar that can be customized for individual use. These tools can be removed from the top of the toolbar by selecting OPTIONS | CUSTOMIZE TOOLBAR to add/remove them from the view. The toolbar space can also be double-clicked to call up the Customize Toolbar dialog.
![]()
2.12 The main toolbar in Vegas. Buttons can be added to this toolbar depending on editing needs.
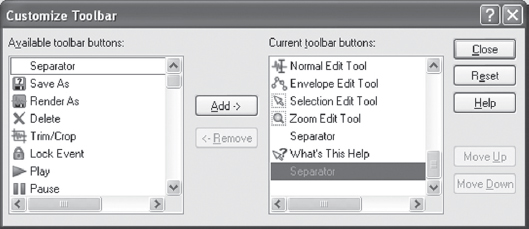
2.13 Use this dialog to add or subtrack tools from the toolbar.
In the Add/Remove Tools view, select tools for display and click the Add button. Choose the tools to remove from the toolbar and click the Remove button. Audio editors might not wish to see tools related to video, just as video editors might or might not wish to see tools relating to audio. These tools are shortcuts to common editing tasks. All of these tools found on the toolbar can be accessed using keyboard shortcuts as well.
The dockable workspaces are found at the bottom of the screen in a default setting. Because these areas are dockable, they can be arranged to suit any specific need or desired appearance for efficient workflow. This feature greatly benefits users who have multiple monitors, as both the Timeline can be stretched across multiple monitors and the docking windows can be stripped off and placed on any monitor. Vegas supports multiple monitors.
Vegas Windows
The three primary windows used in Vegas are the Explorer window, the Mixer window, and the Video Preview window. Clicking the View menu at the top of the toolbar opens several dockable windows. A checked box next to the window name means that the window is open.
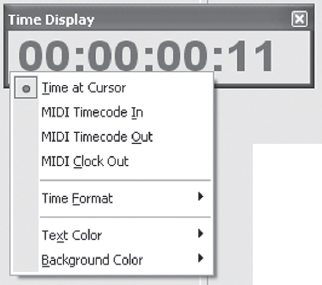
The exception to this rule is that the Timing window always defaults to the top-left of the Track View window. The Timing window can be docked or floated freely at any point, based on personal preference. As with all docking windows, the Time Display window can be expanded or contracted. Unlike other docking windows, however, the Time Display window can also be changed in background or number color by right-clicking the display and selecting Custom. This feature is significant in a dark studio where the time display needs to be large and not distracting.
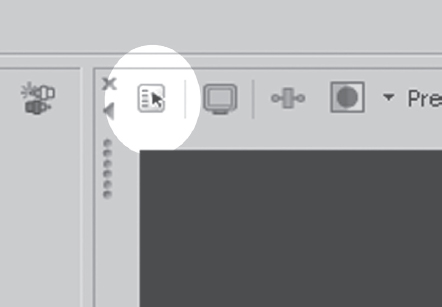
Expanding a View of a Docking Window and Undocking Windows
Docking windows have always been a challenge to view when several windows are accessible, but Vegas offers a great solution to the issue. Not only may docking windows be torn off and their locations saved as templates, but for the single-monitor user of Vegas, each docking window now has a button that expands the selected docking window to the full width of the docking area. Click the horizontal triangle on the upper-left corner of the docking window and watch the window expand to fill the entire docking area.

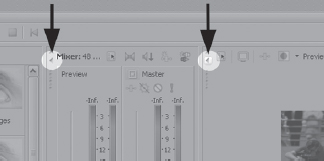
2.14, 2.15 Clicking the Expand button found on every docking window will expand or compress the docking view.
For users of earlier versions of Vegas, tearing a docking window off has sometimes been a bit of a challenge if the small handle area of the docking window isn’t accurately grasped. The most recent versions of Vegas make this much easier, with any area on the left hand side of a docking window being grasped, the docking window may be moved. Notice that in the new version of Vegas, the docking area has small indentations to better indicate the docking handle. To move a docking window into the docking window area without having the window actually dock, hold the Ctrl key while clicking on and moving the docking window. This will allow the docking window to rest wherever it’s released.
2.16 The Time Display window can be undocked and moved around the screen but cannot be removed.
For video editors, some of these windows can be irrelevant. For audio-only studio use, many of the dockable windows might be superfluous as well, so it can be more visually efficient to hide the video-related windows. This feature is valuable to both, as it allows for custom views to be created for each individual.
The following is a list of the dockable windows, their shortcuts, and a brief description:
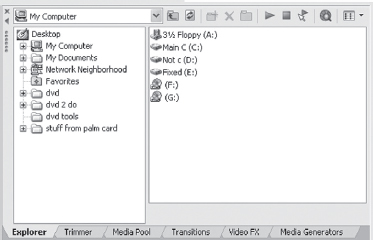
• The Explorer window (Alt+1) provides a view of all media on the computer system and network.
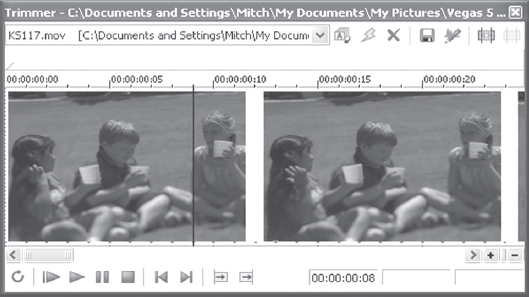
• The Trimmer window (Alt+2) allows media to be trimmed prior to placement on the Timeline.
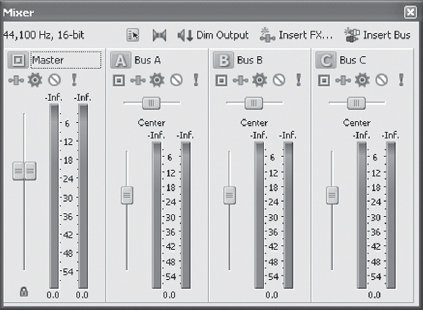
• The Mixer window (Alt+3) mixes audio, FX buses, and Bus send/returns.
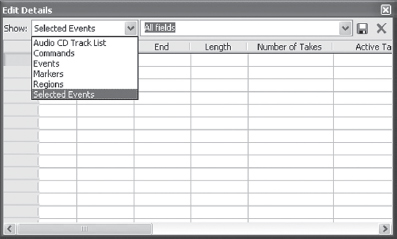
• The Edit Details window (Alt+4) displays all editing details pertaining to the current Timeline view. Resort, import, and view information in this window.
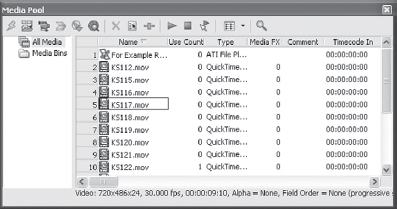
• The Project Media window (Alt+5) shows all media used in the current project, length of use, number of use, and allows for filters to be applied to large numbers of events.
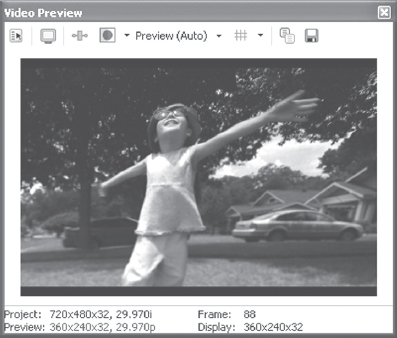
• The Video Preview window (Alt+6) provides preview of video on the Timeline.
• The Transitions window (Alt+7) displays all transitions on the system, with motion thumbnail views of how the transition will function.

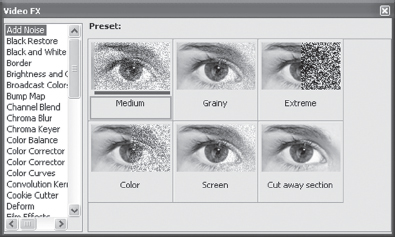
• The Video FX window (Alt+8) displays all filters on the system, with motion thumbnail views of how the filter will function.
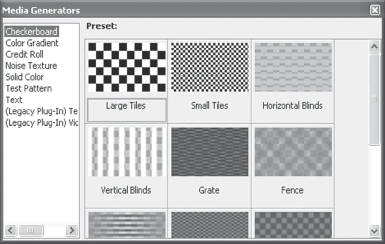
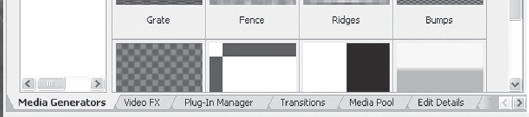
• The Media Generators window (Alt+9) generates media as simple as a title, or as complex as gradient or noise generation. Test patterns are also found here.
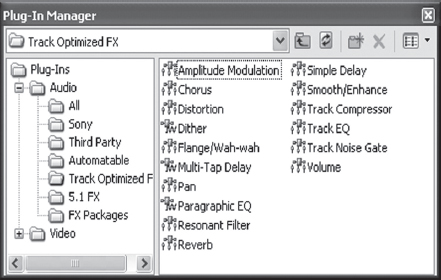
• The Plug-ins Manager window (Ctrl+Alt+1) displays selected video or audio plug-ins that exist on the system, viewable by menu choice.
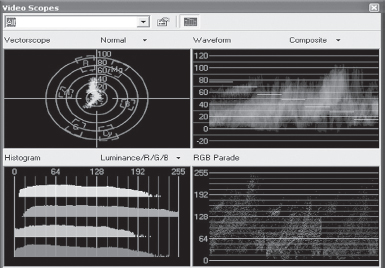
• Video displays and the Vectorscope may be opened from the Video Scopes window (Ctrl+Alt+2), providing color/luminance monitoring and matching tools.
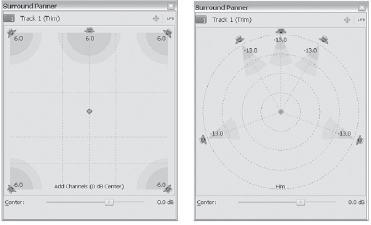
• The Surround Panner window (Ctrl+Alt+3) is used to create surround sound keyframes and monitor the aural position of audio in a 5.1 mix. Right-clicking the Surround Panner window offers additional options.
To move a dockable window, grab the vertical bar on the left side of the window you want to move and click with the mouse. Hold the mouse button down and drag the window to the desired space. Release the mouse button.
2.29 Use the docking handle to undock a tool from the docking pane. Press and hold Ctrl down while moving the window back to the docking area to prevent the window from redocking.
2.30 Multiple windows can be floated on the workspace. This feature is useful when working with two monitors.
Windows can be stripped from the lower section of Vegas and dropped anywhere onto the Timeline, another monitor, or above the main work area. If a window is dropped too close to the lower section, however, the window will attempt to dock itself. Holding the Ctrl key prevents this problem and allows for precise placement of floating/dockable windows.
As many windows as desired can be docked. If space is limited, some windows can dock on top of others. Windows can float or stay left in place and then selected with the tabs at the bottom of the docking area. Dockable windows can also be expanded or reduced in size.
To place a dockable window in the lower section of Vegas, drag the dockable window to the lower part of the screen and release. The window will automatically dock and fit within the window docking area.
2.18 When multiple windows are docked in the docking area, each window has a tab for fast access.
The entire docking area can be hidden and recalled by pressing F12. This action will entirely remove the docking windows from view. To restore the docking area to view, press F11 again.
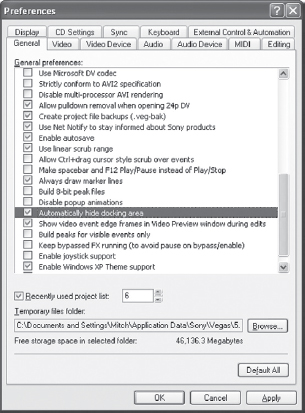
A useful feature in docking windows is that they can be automatically hidden. In the OPTIONS | PREFERENCES | GENERAL dialog, select “Automatically hide docking area.” This action works the way Windows does when it auto-hides the task-bar while working within the desktop or an application. Just like Windows, moving the cursor to the lower area brings the docking windows back to view. This feature is exceptionally useful for audio editors who prefer to focus on the tracks during recording and only call up plug-ins or editing tools when desired. Video editors will also find this useful during in-depth compositing or when desiring maximum frame view for multiple tracks.
2.32 Hiding the window area mades more Timeline space visible. Audio editors will find this feature particularly useful.
Saving Templates/Layouts in Vegas
Vegas allows for new layouts to be created and preserved, permitting users to create their own layouts for single-, dual-, or even triple-head monitor configurations. Up to ten different templates may be restored/saved in Vegas for each editor’s profile, or perhaps for each task. Each time Vegas opens, the saved layout will open as it was saved. Moreover, a template for each type of project may be created and opened, saving time. If various users are accessing Vegas 6 on the same computer, each user is capable of having their own personal layout template. To save a layout, create the layout appearance and save the template via the Ctrl+Alt+D then number keystrokes. This even allows for templates to be shifted during the editing process.
To save a workspace template in Vegas:
2. Layout the workspace the way you’d like to have it look and feel.
2. Press and hold Ctrl+Alt+D, then press a number key that you’d like to assign the layout to.
3. Repeat up to ten times, saving up to ten layout templates.
4. Recall layout templates by pressing Alt+number assigned to desired template.
Another power use of Vegas’ template–saving feature is that a template might be saved for documentary work, a template for voice-overs, perhaps a template for surround mixes, templates for compositing, etc. This feature is one that has been long in coming.
2.33, 2.34 Vegas can save custom layouts that are recalled using Alt+D+ (assigned keyboard number).
Multiple windows may now be floating to various locations on the screen, so setting up a template is always a great idea if you’d like Vegas to open with the same views each time. Consider having a template layout for times when audio editing is the focus instead of video editing being the focus, or for times when deep composites and track views require more screen space, or even using a template during rough cutting and another template for finishing work. Whatever you prefer, Vegas now provides it.
![]() Tip
Tip
By modifying Vegas’ internal preferences for Docking to TRUE, you can flip the docking area to the top of the computer monitor. This is great for situations where monitors sit high on a shelf, letting the Timeline be at the bottom of the monitor.
File Menu
Several choices under the File menu are available to help create a variety of settings, some of which are duplicates of the toolbar functions.
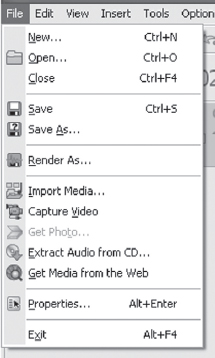
2.35 The File menu.
The Open dialog opens an existing Vegas project. Open can also be accessed by right-clicking the empty track window and selecting Open File or by pressing Ctrl+O. This step opens either a VEG file or media to go on the Timeline.
The Close dialog closes the current project. Vegas will prompt you to save, not save, or cancel. The Save dialog allows a project to be saved to a new name if it has not been named previously. The Save As dialog allows an existing project to be given a new name, which is useful for saving a number of edits that may need to be recalled at a later date.

2.36 The Timeline/project opens, and any media from the last project saved opens, unless this feature is disabled in the OPTIONS | PREFERENCES | GENERAL dialog.
![]() Tip
Tip
Saving the same project with different names allows you to save various versions or stages of a project, which lets you instantly recall various mixes and edits. This feature is valuable when a producer wishes to hear/see comparisons between project settings. Save files by time, date, or a mix of time, date, and unique name, for example, “less bass mix-04-15-03.”
The Import Media dialog allows for import of single or multiple files of any nature compatible with Vegas. Files imported are placed in the Project Media for later use. This feature is useful for setting up entire projects before editing begins.
The Capture Video dialog opens up the Vegas capture utility, allowing for the transfer of DV from a camera or DV deck to a hard drive. This dialog launches a separate application.
The Get Photo dialog communicates with a scanner that is connected to the computer, allowing images to be directly scanned into Vegas’ Project Media, saving users the time it takes to open a separate photo scanning or editing application. Vegas uses the scanning software found on the user’s computer.
The Extract Audio from CD dialog is what its name implies: a means of ripping audio from an existing CD. Audio is then placed in the Project Media. This step only extracts audio from an audio CD, not a CD of WAV or MP3 files. Those file types are opened via the CD/drive selection in the Explorer window.
The Get Media from the Web dialog is a fantastic tool for Vegas users. It’s a link to a website provided by Sony and their partners that gives users access to video, audio, and other media at no cost as a benefit for owning a registered copy of Vegas. Bed music and stock video files are regularly changed by Sony’s partners.
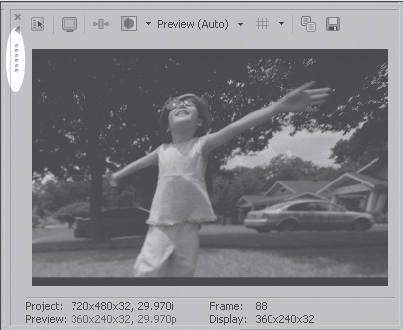
2.37 Access video properties by selecting the Video Properties button found on the Preview Window toolbar.
The Project Properties dialog is a series of choices that allows a user to create project settings related to any number of workflows. Media that is going to be edited just for the web should have project properties that relate to web-oriented video or audio. Recording studio setups might want to adjust properties only for audio and never see any of the video tools. The CD with this book has projects already set up for you to use if you wish.
As with most options in Vegas, the Project Properties dialog can be opened from multiple places. Selecting FILE | PROPERTIES is one method of opening the dialog. The Project Properties button found in the Preview pane of the docking Video Preview window also opens the dialog, as does the Audio Properties button found in the Mixer dialog. Pressing Alt+Enter also opens the Project Properties dialog.
The default setting of the Project Properties is for an NTSC-DV project, which is used for projects captured from a DV camera to be edited and printed back to a DV camera or to another tape machine through a DV camera, DV-to-analog converter, or other DV device. This setting optimizes Vegas’ preview and editing behaviors for the DV space. Other presets are there as well, including for PAL-DV, multimedia authoring, web-oriented editing, and MPEG-CD directed media projects. Any of these choices can be used as a starting point and then edited to suit specific needs.
![]() Tip
Tip
Be sure to set the timecode readout properties (right-click the time window) to PAL to see proper framerate playback.
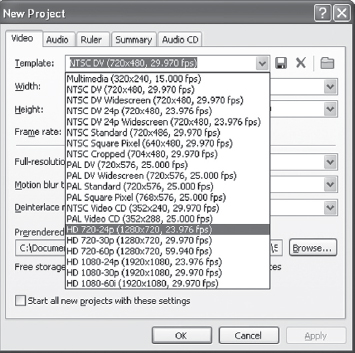
2.38 Using existing templates and creating new templates saves a lot of time when setting up an editing project.
Checking the “Start all new projects with these settings” box ensures that editors will have the same project settings each time they open Vegas for a new session. Having a series of project settings saved as templates is valuable, as it saves time and ensures correct settings in those hurried moments that are common in the studio, whether for audio or video work.
![]() Tip
Tip
Save VEG files for specific types of projects, such as a Timeline that opens with a station ID or corporate logo. Markers, chapter points, time counters, plug-ins, and other commonly used tools can be saved in a VEG file, ensuring that projects consistently open with all desired tools. This step also sets up a template that includes all consistent media. (See the DVD included with this book for VEG files.)
Setting Up Project Properties
Video project types are specified in the Video tab of the Project Properties. As a general rule, it’s best to use the template settings to ensure that projects flow with ease and are trouble-free. Advanced users might want to edit the settings for specific results related to third-party tools or applications.
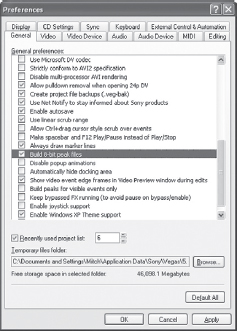
One major consideration with Vegas is to set the Prerendered Files folder to a new default. Vegas defaults to the C:Program FilesSonyVegas 6 folder. Prerendered files will rapidly fill the C: drive and are generally forgotten by most users, which can easily lead to problems. Click the Browse button, locate the second hard drive dedicated to media, and create a Prerendered Files folder on that drive. Point the default prerendered files to that folder on the media drive. This process will speed up prerenders and will ensure that media moved around from computer to computer (if the drive is external) will stay with the project at all times.
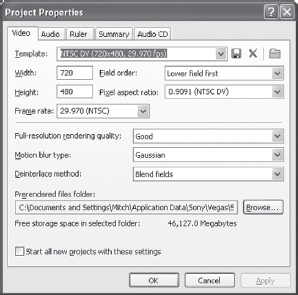
2.39 Video properties can be accessed from the FILE | PROPERTIES | VIDEO dialog or from the Properties button on the Preview Window toolbar.
Properties for an audio-only project are also set up here. Engineers wanting to work with high bit rates and sample rates will want to adjust these in Vegas. Default settings are 16 bit/44.1KHz, which are standard CD quality settings. Vegas is capable of working with 24 bit/96KHz files, although for the most part, only professional sound cards can work with these higher sampling rates.
Take note of the Master Bus Mode, which defaults to Stereo. This setting is where Vegas is adjusted to author 5.1 surround sound files. If the applicable hardware is available to the system, anyone can now author 5.1 surround files in Vegas. (AC-3 encoding is not included in Vegas, as it’s an additional purchase/ plug-in package.) Vegas will output elementary linear pulse code modulation (LPCM) files, which are acceptable by most DVD authoring packages. Users that do not have 5.1-compatible hardware are able to select the 5.1 surround option and can output a 5.1 file. No ability to monitor/master the audio exists, however, which can result in a potentially unbalanced mix.
Up to 26 buses can be assigned in Vegas. (These correspond to the letters of the alphabet.) Buses can be used for inserting effects, such as reverbs, delays, exciters, and other audio plug-ins from Sony or other Direct X plug-in developers, such as WAVES or iZotope. Buses can also be used for submixing. Vegas offers bus-to-bus routing, discussed in the audio chapter.
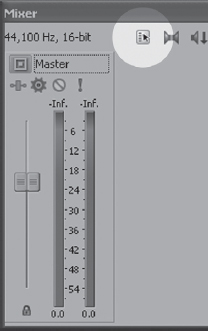
2.40 Audio project properties can be opened by clicking the Audio Properties button above the master volume controls.
2.41 This dialog sets preferences for how audio-time grids are displayed on the Timeline. This is valuable, even perhaps critical for users of ACID loops in Vegas.
Resample quality should generally be set to Best in the Project Properties Audio dialog. It defaults to Good.
This location is also where the default recording folder is specified in Vegas. Vegas sets the default audio recording to the C: Program FilesSonyVegas 6 directory. If recording long program material or multiple tracks, or audio is the primary use of Vegas, it is highly recommended that this setting be set to a secondary drive. Vegas will scan the specified drive and indicate how much memory is free on the identified drive.
![]() Tip
Tip
Remember that it’s important to have a second drive for media and that the drive controllers should be set to DMA in the Control Panel.
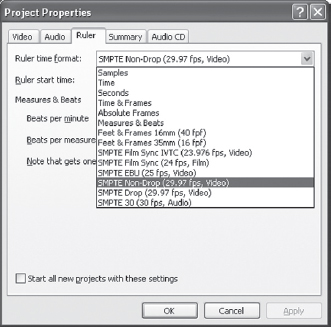
The Project Properties Ruler dialog box allows editors to specify how the Track View/Timeline appears. Audio editors will want SMPTE time for their house standard; DV editors can set this for 29.97 fps for grids defining their time space, and musicians can set this to beats or tempo.
![]() Tip
Tip
Video editors will find the Beats grid valuable if the tempo of bed music is known. This ruler grid can mark the beat of the bed music and assist in placing edits so that they are in time with the beat of the music.
Time display formatting can also be selected by right-clicking the Time Display window and selecting the desired time format, which can be toggled between different time formats. Toggling between beat and SMPTE time won’t change the timing of the audio or video; it merely allows for different grid views.
The Summary tab found in the Project Properties dialog allows users to log information about the overall project, such as engineer or copyrights. This information stays with the file in the event that the VEG is transferred to another system, user, or shared file so that the originator of the file is traceable. This data does not become part of the summary information embedded in streaming media, nor does it become part of Scott information embedded for radio play. Those summaries must be filled out separately.
The Audio CD tab in the Project Properties dialog has a form for inputting a Universal Product Code (UPC) or Media Catalog Numbers (MCN) that will be burned in the header of a Redbook-valid CD. Some compact disc players do not display this information, but the information is still embedded in the disc.
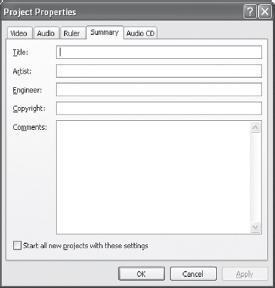
2.42 The Summary tab allows copyright information, engineer information, and other important information about the project to be stored. This feature is particularly important when tracking a project.
There is also an option for changing the first track number on a CD. This feature can potentially prevent a CD from playing on older or fewer-featured CD players even though the disc will be burned as a Redbook-valid CD. This option is only supported as a Disc-at-Once (DAO) burn as specified by Redbook guidelines. Track-at-Once (TAO) authored CDs ignore this setting.
Edit Menu
Next on the menu bar is the Edit menu. It contains several options for editing media, some of which are duplicated on the toolbar. First on the list is Undo and Redo. Vegas is unlimited in the number of times that you can undo or redo actions. After a project is saved or closed and reopened, however, the project starts with a new list of undo/redo, so a project is not forever undoable. Be sure of your choices before closing. These tools are also found on the toolbar, identified by the Undo and Redo icons.
The shortcut key combination Ctrl+Z triggers the Undo function, and Ctrl+Shift+Z triggers the Redo function.
2.43 CD properties include the ability to insert a UPC code onto the disc for media cataloging.
![]() Tip
Tip
If you have a Contour ShuttlePro or Space Station, these two shortcuts are handy to have programmed as button strokes.
Next on the list are the Cut, Copy, and Paste actions. These are the same as nearly all Windows applications. Cut (Ctrl+X) removes media from the Timeline, and Copy (Ctrl+C) copies the media on the Timeline. Regardless of whether Cut or Copy is used, the media is copied to the board, so that the Paste (Ctrl+V) function can be used to place the clipboard-stored media to another location.
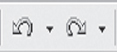
2.44 Undo can be accessed using the button or keyboard shortcut.
A feature found in Vegas 5 and 6, Paste Attributes, is useful for both audio and video editing. It allows you to copy switches, audio pitch shifting, playback rate, undersample rate, video event effects, and pan/crop settings from one event or media clip to others. As an example, suppose that there are ten tracks of audio, and in those tracks there are 40 events. A blur needs to be applied to half of those events randomly scattered throughout the Timeline. Rather than applying the blur to the entire track, click the event containing the correct blur settings and press Ctrl+C or go to the Copy button on the toolbar, (or right-click and select Copy or use the Edit/Copy function). Then select the event to which you wish to have the same blur settings applied. From the Edit menu, choose Paste Event Attributes. This step copies the blur and any other unique information contained in the media from which the attributes were copied and can be pasted on the next chosen event(s). Video editors find this method very efficient to pan/crop several still images at once or to copy effects settings to apply to several events at once. Paste Event Attributes can be applied to multiple events of the same type at the same time, so if one event contains the desired settings, those settings can be pasted over hundreds of similar events. Imagine being able to pan/ crop 500 still images at once or being able to apply a unique reverb setting to 30 instances of a particular kind of event at once. This result can also be accomplished in the Project Media via applying a Media FX to all occurrences of video or audio in the Project Media. Very powerful and useful indeed!
There is no shortcut key for Paste Event Attributes.
Delete is next on the menu and is used to remove an event permanently. Select the event you wish to remove and press the Delete key or choose it from the menu.
Post Edit Ripple is the next item in the menu. This feature is a long-awaited upgrade in the Vegas series. Editors can now choose the behaviors of Vegas ripple features to suit their own style of editing. Ripple editing allows you to insert or delete events on the Timeline. At the same time, ripple editing keeps events in front of and behind the deleted or inserted event in the same order and time space that the events occupied before the insertion or deletion of an event.
An example would be a long-form documentary that has been edited, containing many tracks of video information. A piece of the documentary is determined to be incorrect and must be deleted. Deleting the piece, without filling in the exact amount of time occupied by the deleted events, leaves a hole in the Timeline. Deleting the hole causes all events occurring after the deletion to slide in place, with nothing lost. The new ripple modes allow Vegas users to decide how they want those inserts/deletions and movements of events to take place. There is a project file called ripple.veg contained in the DVD with this book.)
The Select All choice on the Edit menu allows for all media on the Timeline to be selected. This feature is invaluable for moving an entire project up or down the Timeline or for selecting an entire project to be copied and pasted into another instance of Vegas. Selecting either EDIT | SELECT ALL or pressing Ctrl+A selects or highlights all media.
The Select Event Start/Select Event End feature jumps the cursor to the beginning or end of a selected event. This feature can also be accessed by using the shortcut keys [ (Select Event Start) or ] (Select Event End).
From the numeric keypad, press the 7 key for Select Event Start or 9 for Select Event End. Use 4 and 6 to move or trim an event edge forward or backward in time, and use 1 or 3 to move the event forward or backward by frames. When not in Event Edge Edit mode, 4 and 6 move the event by one pixel, and 1 and 3 move by one frame. Use 8 and 2 to move the selected event up or down vertically to the next track. Pressing 5 exits the keyboard trimming mode.
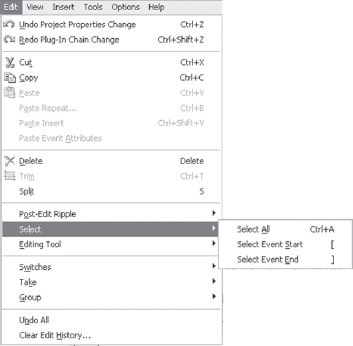
2.45 Selecting EDIT | SELECT puts the dursor where it should be with frame accuracy; however, most editors find it faster and easier to use the ten numeric keypad shortcuts.
On a standard laptop, Num Lock needs to be enabled to use the numeric keypad. Targus manufactures a numeric keypad that is connected to the laptop via USB for the road warrior editor. This feature allows for rapid location of event edit points, which when coupled with the new ripple features, makes for efficient editing using the keyboard.
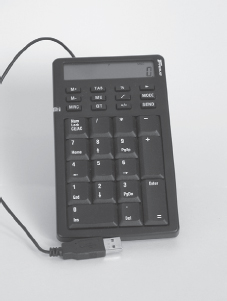
2.46 Using the Targus keypad with a laptop makes the laptop editing more efficient.
The Paste Repeat dialog allows an event or events that have been copied to the clipboard to be pasted multiple times.
To insert events at the cursor position on the Timeline and move media down the Timeline to accommodate the inserted events, copy (Ctrl+C) events to the clipboard, select the location that events are to be pasted, and press Ctrl+B or select EDIT | PASTE REPEAT. You will be prompted to input the number of times that the event should be pasted.
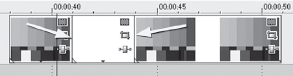
Events can be precisely separated in Paste Repeat mode, allowing for many elements, including images and video clips, to be spaced a prespecified distance. Input the length of time between events into this window. The spacing/length of time between pasted images can be determined in milliseconds, frames, seconds, minutes, hours, beats, or musical note values.
2.47 Use EDIT | PASTE INSERT to paste an event on the Timeline, while moving everything subsequent to the paste down the Timeline.
![]() Tip
Tip
Use the Musical Note Values feature when you want a repeating instance of an instrument. For instance, a fast way of building a rhythm would be to insert a sample of a kick drum on every downbeat and third beat and a snare drum on a different track hitting every second and fourth beat. Use the Tempo dialog found in the Project Properties to set the tempo and grid for the project. ACID Loops that match the tempo can also be inserted, making a fast music bed for either editors or musicians to work with. Video editors will find this method a visually and aurally compelling way to edit quickly, if bed music has not been completed but a tempo is known. This process is often called tempo-mapping and allows video editors to build rough video comps while a composer finishes a musical cue for the project.
The Trim feature is another excellent feature in Vegas. To delete all portions of the event outside the selected area, select a portion of an event by scrolling the mouse over the event(s), hold the right-click button down, and select EDIT | TRIM or press Ctrl+T.
This feature can be used on an individual event or on all events across the Timeline.
The Split tool splits a selected event/events at the point where the cursor is parked. If a selection is made on an event, only that event is split. If no selection is made, the split occurs across all events that fall under the cursor. Park the cursor at the desired point and select EDIT | SPLIT or press S. The event on the right side of the split is selected automatically, in the event that it should be deleted.
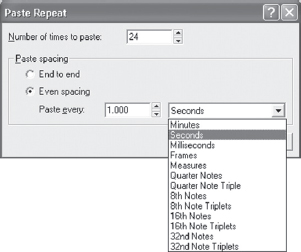
2.48 Repeating a copied image is definable in the EDIT | PASTE REPEAT dialog.
The Editing Tool dialog specifies what type of editing behavior the cursor shall have. These same choices are found on the toolbar mentioned earlier. Pressing Ctrl+D returns the cursor to the normal Selection Edit cursor mode, which is generally the most commonly used cursor mode. None of the other cursor editing modes have shortcut keys.
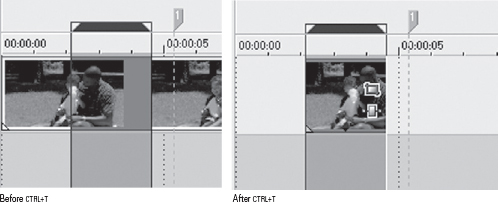
2.49 The Ctrl+T edit command deletes all events not inside the selected area. Coupled with the Ripple feature, this feature is very powerful.
Using the Switches dialog, users that have been using Vegas in earlier revisions will find that several right-click dialogs have been augmented by shortcut keys and by selecting EDIT | SWITCHES. Mute, Lock, Loop, Invert Phase, Normalize, Aspect Ratio, Reduce Interlace Flicker, and Resample have all been made accessible through the EDIT | SWITCHES menu selection. A Smart Resample, Force Resample, and Disable Resample selection have also been added. Smart Resample instructs Vegas to seek media that has been time-stretched, is a graphic-based event, or does not match the frame rate and the frame rate of the event is greater than 24 fps. Vegas then resamples media meeting those parameters. Force Resample instructs Vegas to resample all events regardless of their format or frame rate. Disable Resample prevents Vegas from resampling any events, regardless of whether they have been selected for resampling or not.
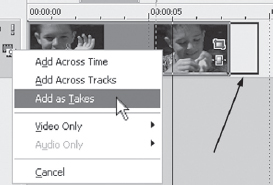
2.50 Although the new take being dragged to the existing event is longer or shorter than the event over which it is being laid, adding as a take trims the new media to fit the existing media. Shuffle through takes during playback by pressing T.
![]() Tip
Tip
If you are coming to Vegas from the AVID world, you can download a free tool from the www.vasst.com site that will permit you to do Overwrite edits.
Vegas’ Take feature allows you to place several takes on top of each other and allows those takes to be switched to view during playback in real time. For example, perhaps a multicamera shoot occurred, and the director or producer would like to see the scene with the different camera angles that were shot. Either multiple tracks must be used with muting on the fly, or takes are used, having all of the shots living in one event and switching on the fly. This workflow is more efficient in most instances. This process is also useful when a musician wants to perfect a particular part of a song and plays the piece over and over again. Each take can be placed, and different versions can be toggled through in real time by pressing T. Any event that has filters, effects, or other edits made to it can apply those filters, effects, or edits to the take.
The Group menu allows you to create a group of clips that are temporarily locked together so that when they are moved, they can be moved together without having to select multiple events each time. To implement this feature, select a number of events and press G or select EDIT | GROUP | CREATE NEW. This option locks the selected events together, so that when one is moved, all are moved. To remove an event from the group, select the event and press U. The event can also be removed from the group by selecting EDIT | GROUP | REMOVE FROM. All grouped items can be selected at once by using Select All. This option allows for an entire group to be deleted as a whole or to have other processing applied. Grouping is a very powerful tool, and one that is worth the time to get familiar with.
![]() Tip
Tip
Video editors that work with a formula-based editing situation, such as a wedding video editor, can build a template of empty events marking locations of where media should go, complete with transitions and filters. Video is then dropped onto the empty events as a take, and within minutes, a finished video is ready to print to tape. Studios doing preset-time voice-over work can find this useful as well, fitting 30-second or 60-second radio spots, complete with compression, EQ, and other filtering into an empty event to be replaced by new dialog. For recurring-format editing projects, this method is terrific for cutting repetitive actions to a minimum and keeping projects/productions in a consistent appearance or sound.
One great use of the Grouping feature is to select a number of events and group them.
Now hold Ctrl while dragging the left edge of the left-most event. Notice that all events stretch or shrink at equal values. If you need to match video or stills to a music selection, this is a fast way to accomplish this task.
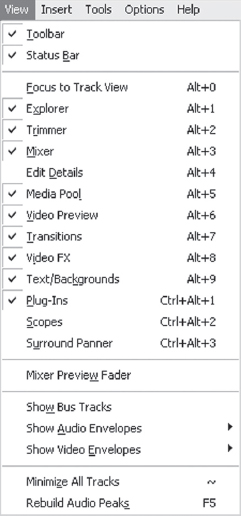
View Menu
The View menu is a series of check boxes that determines what dockable windows are available for immediate view.
Place a check mark in the box next to the name of each view to turn the view on or off.
The Mixer Preview Fader option adds another set of sliders to the menu and allows the previewing volume to be changed regardless of what level the Master Volume is set at. The Mixer Preview Fader option only affects media in the Trimmer and Explorer. This slider set does not affect the level of rendered files, whereas moving the master slider does affect the level of audio mixed from the Timeline.
The Show Bus Tracks option is a feature in Vegas 6. Buses can now be viewed as tracks, including volume and panning automation control. This feature provides much greater control over mixed tracks that use bus mixes, while also providing a visual reference for mix controls. Buses can now be automated to increase/decrease volume of an effect on the bus or to control panning. Coupled with the Automated Effects now found in Vegas, Vegas feels more like an actual hardware mixer.
The Show Audio Envelopes option hides or shows volume control views, depending on the current view state of the control. This new feature allows volume controls on all audio tracks to be hidden at once, cleaning up the screen view substantially in the event of a large mix.
The Show Video Envelopes option has the same control over the video envelopes: composite, track fade-to-color, track keyframes, and velocity envelopes.
2.51 Set the Vegas workspace to appear exactly as you would like it to appear.
The Minimize All Tracks option reduces all track views to a minimum size, immediately freeing up space for users to see previews, add full size tracks, or make a large number of tracks fit into a small area.
This option can be accessed via the ~ key. Pressing ~ again restores tracks to the previous view.
The Rebuild Audio Peaks option redraws/refreshes the wave file views on the Timeline. Vegas uses 16-bit peak samples, and on slower machines, you can speed up the system by turning off peak drawing in the OPTIONS | PREFERENCES | GENERAL dialog. This option, also accessed via the F5 key, causes all views to be redrawn.
2.52 View bus behavior in Vegas 6, allowing full automation attributes in a mix.

2.53 View bus behavior with the Minimize All Traccks option turned on.
Vegas stores graphic representations of wave files as .sfk files. These small files may be deleted at any time; however if they are deleted, Vegas will redraw the graphics, creating a new .sfk file. Delete .sfk files when deleting projects.
![]() Tip
Tip
If screen views will not be vertically zoomed in-depth, instruct Vegas to draw 8-bit file views. This option allows the process to become faster and increases responsiveness in Vegas. Change the screen draw by going to the OPTIONS | PREFERENCES | GENERAL dialog and scrolling down to the “Build 8-bit peak files.”
2.54 Instructing Vegas to draw 8-bit file views.
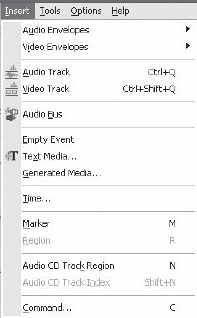
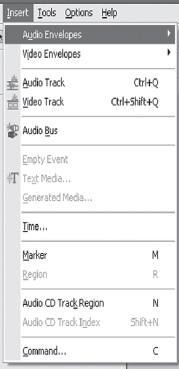
2.55 The Insert menu.
If you are struggling with your video preview edges, sometimes it’s easier to see the edges if you change the background color of the Preview window from the default gray to either black or white, depending on the video you are previewing. To do this, right-click in the Preview window and select Black or White from the menu. You can also simulate device aspect ratios in this dialog. This is very handy for knowing how your image will appear on a specific display such as a television or webstream.
Also, you can double-click the header bar of the Preview window to ensure that the Preview window is showing at the project property size. This is a quick method of ensuring that you aren’t working in lower resolutions than the project, and that you are seeing everything at accurate resolution in the Preview window.
The Audio Envelopes option in the Insert menu has two submenus: Volume (Shift+V) and Pan (Shift+P). These place volume lines and pan lines on the Timeline on selected tracks.
![]() Tip
Tip
Select all audio tracks before using Shift+V or the menu. This option places volume controls on all audio tracks, saving time. You can select all tracks by pressing Ctrl+A
The Video Envelopes option has three submenus: Composite Level, Fade to Color, and Velocity Envelope. Composite Level allows users to set the opacity of a track over time, by adding nodes or handles to the composite envelope and moving the envelope up or down on the Timeline at desired fade points. This feature reduces the opacity of the track, allowing video events below the affected track to become visible. Fade to Color adds an envelope to the selected track, giving control to the color to which a track will fade. The default color is black; however, any color can be selected in the OPTIONS | PREFERENCES | VIDEO dialog.
2.56 One great feature of Vegas allows users to define envelop colors.
The Velocity Envelopes option allows users to create an envelope that causes a video event to speed up or slow down. Inserting an envelope and creating handles on the envelope, and then either dragging the envelope upward speeds up the event or dragging the envelope downward slows down the event. If an envelope is dragged past the 0 percent speed point, the event reverses itself.
![]() Tip
Tip
For the surreal speed effect that looks natural but slightly dreamy, slow files to 80 percent of the original speed. The event won’t appear to be slow but will have a natural, dreamy slow motion applied to it. This feature is great for slowing down high-speed events.
An event that has the Velocity Envelope it set to -100 percent will play at normal speed, but in reverse. An event that has it set to +300 percent will play at three times normal speed.
![]() Tip
Tip
If you want speeds of greater than three times normal speed, right-click the event and select Properties. Input the additional speed in the Playback Rate window. Insert a Velocity Envelope. Files can be sped up to 12 times their normal speed by using a combination of the Velocity Envelope and the Playback Rate dialog!
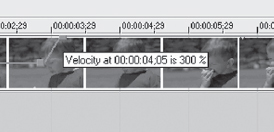
2.57 Velocity can be sped up incrementally and significantly in Vegas via the Velocity Envelope.
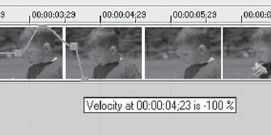
2.58 Velocity can also be slowed down overtime. This sort of effect is extremely popular in modern editing.
Always use either the Smart Resample or Force Resample feature with speed-altered events. The Reduce Interlace Flicker feature can be valuable with speed-altered media when flickers are seen in the previewed image.
Selecting the Audio Track option (Ctrl+Q) in the Insert menu inserts a new audio track on the Timeline beneath any audio track that is already in place. Dragging audio to a blank space in the Timeline workspace where no audio tracks currently exist creates a new audio track. Dragging an audio event to the Timeline allows an audio track to be created above or below existing audio or video events depending on where it is dropped.
Selecting the Video Track option (Ctrl+Shift+Q) in the Insert menu inserts a new video track on the empty Timeline or above existing video tracks. Dragging non-audio events to the Timeline also accomplishes the same task by creating a new video track for the non-audio event. Dragging a non-audio event to the Timeline allows you to create a new video track above or below an existing audio or video track, depending on where it is dropped.
The Audio Bus option (B) accesses the audio control or destination tracks. A hardware mixer has assignable buses, allowing the audio signal flow to be routed to a number of places before leaving the mixer. During this routing, the audio signal flow can be processed through a variety of tools, such as delays, reverbs, chorusing, flanging, or other processes. Buses can also be used as routing tools to hardware outputs. If a multichannel sound card is used, bus assignments are required to monitor the audio for multiple outputs beyond a simple stereo monitoring system. Up to 26 buses can be inserted in Vegas. Buses can also be used for submixing, assigning all mixes of a group to one location for final leveling. Automated muting or muting envelopes are now available in Vegas as well.
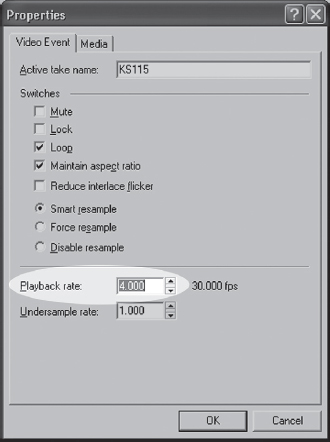
2.59 Adjust the rate of an entire clip with the Playback Rate list box found in the Properties Video Event dialog.
![]() Tip
Tip
Use bus assignments to route together all harmonies, all guitars, all basses, all drums, and all sound effects for submixing.
The Video Bus Track option (Ctrl+Shift+B) allows specific effects and processes to be controlled by envelope on the master video bus. Supersampling, MotionBlur, and Master Fade out to Transparent Black are all possible with envelope control in this window.
Selecting the Empty Event option in the Insert menu inserts a blank event on the Timeline. Empty events can be used as markers for specified lengths of time in current projects or used as placeholders for takes in projects requiring a consistent edit and workflow, allowing video or audio takes to be dropped on the empty event. Empty events can have filters, effects, or other attributes assigned to them that are maintained when a new event is dropped on the empty event as a take. Empty events can also be inserted by right-clicking an audio or video track and choosing the Empty Event dialog.
Selecting the Text Media option opens the titling dialog.
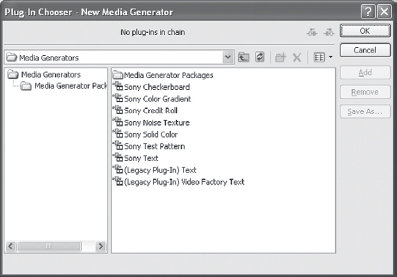
2.60 Select generated media types in this dialog.
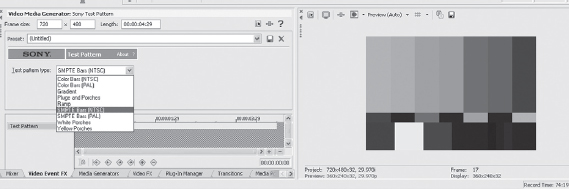
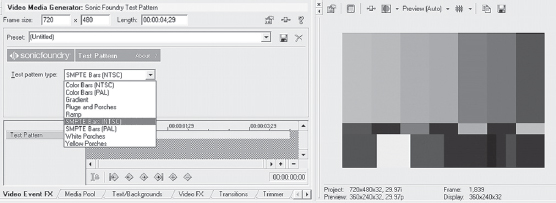
2.61, 2.62 Creating color bars is one of the functions of the Generated Media tool.
Selecting the Generated Media option in the Insert menu opens a dialog allowing users to create a variety of different forms of media appearances.
Gradients, solid colors, credit rolls, test patterns, and text can all be inserted via this dialog.
Selecting the Insert Time option in the Insert menu inserts time across the entire Timeline. If a cursor is placed in the middle of an event, that event is split and the portion of the event to the right, or later in time than the cursor, is moved according to the amount of time specified in the Insert Time dialog box.
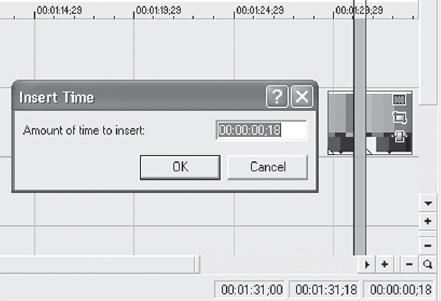
2.62 Insert blank time with the Time menu option.
Inserting a marker is possible by selecting Marker from the Insert menu; most users, however, find that inserting a marker is more efficient by pressing M. This option drops a vertical line at whatever point in time the cursor happens to be at when M is pressed or the menu option is selected.
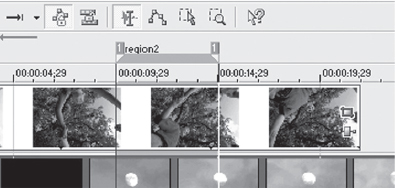
2.64 Regions can be created via a selection on the Timeline and pressing R.
Regions can be defined as a space between two markers or a selection created by dragging the mouse across the Timeline. Pressing R also activates the Regions option in the Insert menu.
CD regions/track numbers can be assigned via the Audio CD Track Region option on the Insert menu. CD regions, however, are also assignable by pressing N when a selected event or time frame is on the Timeline. This feature is how Vegas creates track numbers for compact audio discs.
2.65 Using the regions in a CD Project makes for fast track indexing.
Selecting the Audio CD Track Index option (Shift+N) allows for separations between a track number and an index in a track, similar to a chapter and subchapters in a book.
Selecting the Command option in the Insert menu creates metadata commands for streaming media. This menu selection brings up the Command Properties dialog box that gives a selection of different forms of metadata to be inserted into the Timeline for authoring of metadata-rich streaming media.

2.66 The Command tools allow for the insertion of metadata that create a more interactive experience for streaming media or distributed disc viewers/listners.
The Tools menu contains tools for rapidly creating final products, quick renders of edited media, and other highly useful tools. This menu is where the majority of work is done within Vegas outside of the trimming tools and actions.
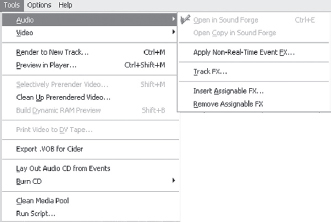
2.67 The Tools menu.
The Audio option in the Tools menu has a number of subchoices within it. These choices are also accessible via a right-click an audio event. The first choice, Open in Sound Forge, opens the actual event—audio, video, or both—in Sound Forge where destructive/permanent edits can be applied to the file. Open Copy in Sound Forge opens a copy of the audio event in Sound Forge, where a take is created that exactly replaces the original event on the Timeline. Pressing T lets users toggle back and forth between the original and edited audio. Any audio editor can be chosen as the preferred audio editor; however, the unique relationship between Sony products makes Sound Forge a worthwhile application to have in partnership with Vegas 6. To set the preferred audio editor, select OPTIONS | PREFERENCES | AUDIO and browse to the .EXE of the preferred audio editor. Audio opened in any audio editing application is replaced in Vegas as a take.
![]() Tip
Tip
Always open audio from AVI files as a copy rather than as a destructive file. This option generates a take and does not affect the original. As a result, you can always go back to the original. It also speeds up the save process, as Vegas isn’t generating a new video file for the original AVI.
The Apply Non-Real-Time Event FX option is great for slower computers or for applying processes that don’t work well in real time, such as Noise Reduction and Acoustic Mirror processes. These processes are so resource-intensive that only the fastest machines can carry the load. They also take resources away from other actions taking place on the Timeline.
When using the Apply Non-Real-Time Event FX option, remember that these effects are destructively assigned to the event, allowing the processor to be free of having to deal with the load of real-time effects. Users with slower computers or with little RAM in their machines generally find this feature beneficial as well, as it frees up system resources for processing more audio, video, or mixed events. When working with non–real-time effects, you’ll be prompted to provide a new name for the audio file so that the original is preserved. Vegas does not allow you to use the original filename, as the original file is currently open on the Timeline. The file with a new name is added as a take to the Timeline and can be compared against the original sound by pressing T. Users can toggle back and forth between the original and newly affected sound during playback.
While not readily evident, effects are broken down into various folders, including a folder called ALL. This folder allows for all Direct X plug-ins to be viewed at once. Other folders, however, show third-party effects, Sony-only effects, and FX chains, found in a folder labeled FX Packages. There is also an Automatable FX folder in which access to all FX that can be controlled with the FX automation envelopes are found. Only a limited number of Direct X FX can be automated. The folder Track Optimized contains a select group of FX, which are optimized for maximum processor performance.
Choosing the Track FX option in the Tools menu opens the effects found on the Track Control pane in Vegas. A Noise Gate, Equalizer, and Compressor are assigned by default to every audio track on the Timeline. These can be accessed via the Tools menu (TOOLS | TRACK FX) or by clicking the Track Effects button on the Track Control pane. These effects can be deleted, replaced, or augmented, depending on the user’s preference.
2.68 Each event has an FX button on it unless the button is removed in the OPTIONS | PREFERENCES dialog.
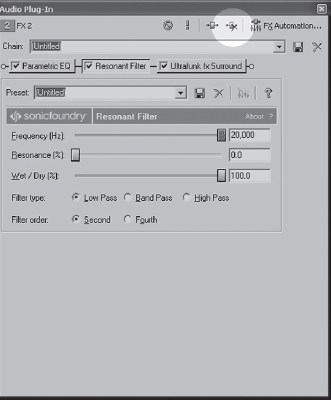
The Insert Assignable FX option automatically inserts a new bus in the mixer section of Vegas. Selecting this option calls a list of all available plug-ins, where as many as needed can be chosen as a chain of effects.
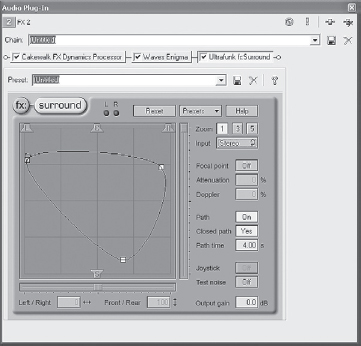
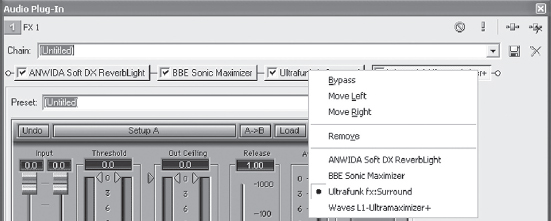
2.69 FX can be sequenced in any way desired.
2.70 FX can be removed at any time. FX can also be A/B compared by checking and unchecking the box next to the effect name.
![]() Tip
Tip
Use the Options>Bypass All Audio Effects to disable all audio effects on buses, tracks, and events.
Effects in the chain can be re-ordered by clicking and holding an effect on the chain, dragging it to the desired priority in the chain, and dropping it. Also, right-clicking any effect and selecting the Move Left or Move Right pop-up menu option reorders effects. Effects in the chain can be removed by selecting the Remove Assignable FX option from the Tools menu or by clicking the Remove button in the upper-right corner of the FX dialog box.
Inserting video effects works exactly the same as inserting an audio event effect, except that it is always non-destructive to insert a video event effect.
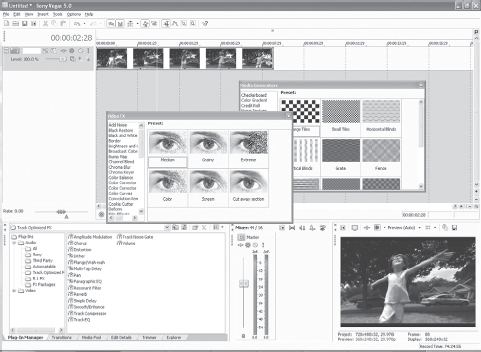
When the Video Effects option in the Tools menu is selected, all video effects are shown in a dialog box, allowing the user to choose multiple video effects. Effects in the chain can be reordered by clicking and holding an effect on the chain, dragging it to the desired priority in the chain, and dropping it. Also, right-clicking any effect and selecting the Move Left or Move Right pop-up menu option reorders effects.
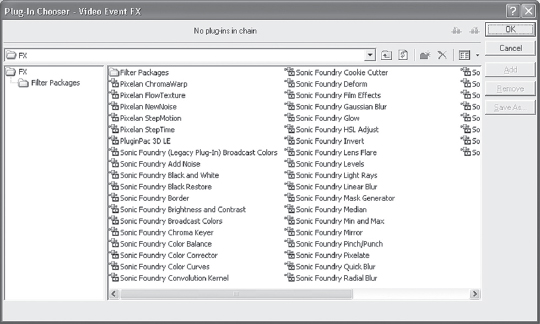
2.71 Video FX are selected the same way audio FX are. Chains of FX are stored in the Filter Packages folder.
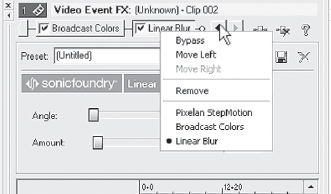
2.72 Reording video FX is a single button selection.
Clicking an effect on the Video FX chain and then clicking the FX Help button pops up a screen that demonstrates how the selected effect affects the video image. A short explanation of how each slider or button on the effect will behave is also included.
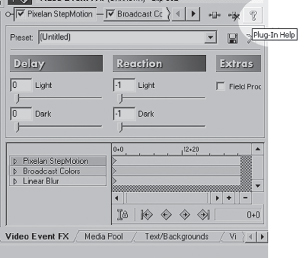
2.73 All aspects of Vegas 6 have a Help Icon or button associated with them.
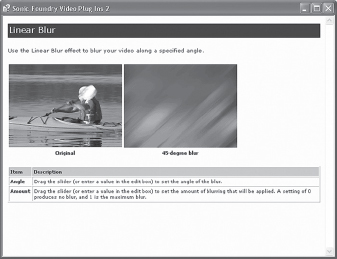
2.74 Calling up help by selecting the FX Help button opens a brief tutorial explaining how affects work.
This feature allows users to preview the event effect as a static image before it is applied to the event on the Timeline. It’s also a great way to learn the attributes of each video effect.
Effects in the chain can be removed by selecting the Remove pop-up menu option or by clicking the Remove button in the upper-right corner of the FX dialog box.
The Video FX dialog can also be accessed by right-clicking the event on the Timeline or by pressing the Video FX button found on each non-audio event.
2.75 Select the effect requiring removal of adjustment.
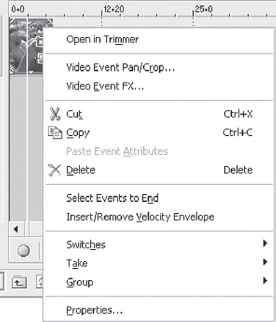
2.76 Right-clicking an event accesses a pop-up menu in which you can open the FX dialogs if the FX button has been removed from the event.
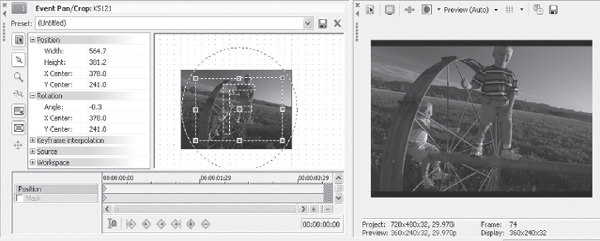
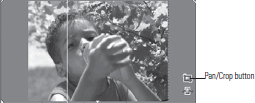
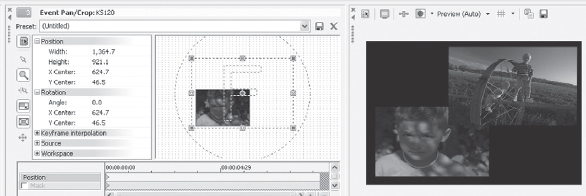
The Pan/Crop tool can be opened by selecting TOOLS | PAN/CROP. This tool is one of the most powerful and oft-used tools found in Vegas, particularly by users of still imagery. Selecting the Pan/Crop option opens a dialog on the Timeline, in which the event image can be cropped to meet the screen size, forced to match the aspect ratio of the project settings, or have zooms, pans, and other movements applied to otherwise static images. Images facing right or left, up or down can be reversed in view easily by right-clicking the Pan/Crop tool.
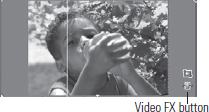
2.77 FX button found by default on all events.
2.78 Open the Pan/Crop dialog either by right-clicking the video event or by selecting the Pan/Crop button.
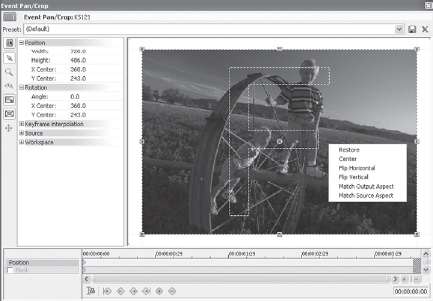
Right-clicking inside the Pan/Crop tool brings up a secondary dialog. Choosing Restore restores an event image to its prepanned/cropped status. Choosing Center centers the image around the small dot or center indicator found in the middle of the Pan/Crop tool. Moving the dot to another location in a cropped image, right-clicking, and choosing the Center option moves the cropped selection to a point where the dot will re-center itself.
Choosing the Flip Horizontal option in the Pan/Crop pop-up menu reverses the horizontal image. This option is indicated by the “F” (focus) in the middle of the event image in the Pan/Crop dialog. The “F” is backward if this choice is made.
2.79 Before cropping.
2.80 After cropping.
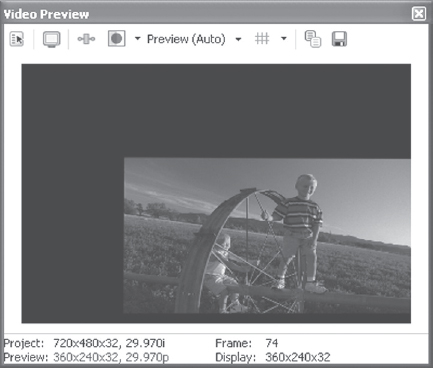
2.81 In Preview window, preview image is reversed horizontally.
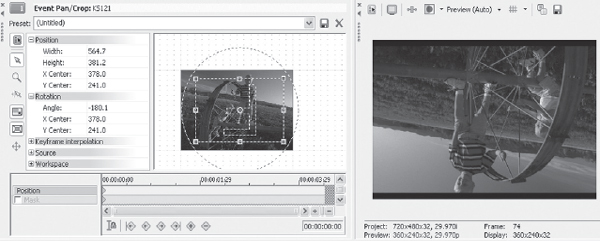
2.82 In Preview window. Preview image is reversed vertically.
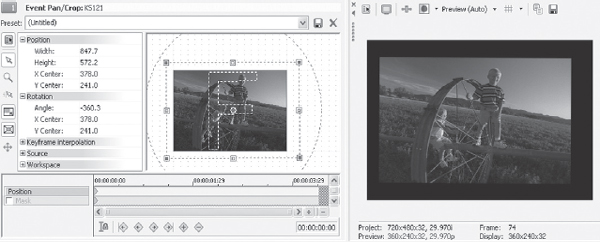
2.83 Image before matched aspect ratio is applied.

2.84 Image after match aspect ratio is applied.
2.85 The source aspect ratio can also be applied to a pan/crop.
Choosing the Flip Vertical option turns the image upside down in the Preview window.
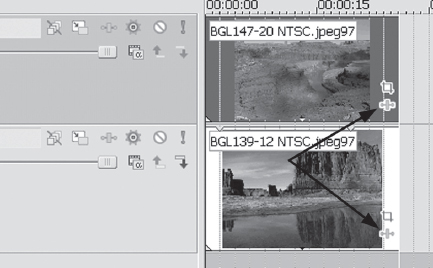
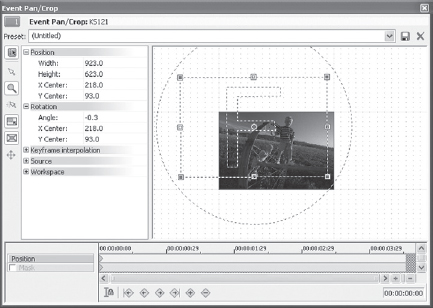
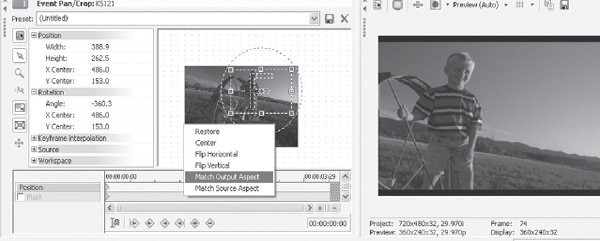
Choosing the Match Output Aspect option assigns the aspect ratio of the Project Properties to the image, regardless of the original aspect ratio of the event before panning or cropping the image.
The original aspect ratio of the image in the figure is 16:9 and does not match the project properties of this project. Choosing Match Output Aspect crops the image to match the 4:3 aspect ratio of the DV-NTSC Project Properties defined in the FILE | PROJECT PROPERTIES dialog.
Choosing the Match Source Aspect option matches the aspect ratio of the source, while maintaining any cropped status applied to the event image.
The Pan/Crop tool can be accessed by right-clicking the media or by choosing the Pan/Crop icon found on each non-audio event on the Timeline. (See the advanced editing and still image in Chapter 4 for more information about the Pan/Crop tool.)
Selecting TOOLS | VIDEO | TRACK FX opens the Video FX dialog box and allows the assignment of FX to an entire track of video on the Timeline, rather than just a video event on the Timeline. This action can also be chosen on the Track Control pane of the desired track.
2.86 The Pan/Crop button is found on all video/graphic events.
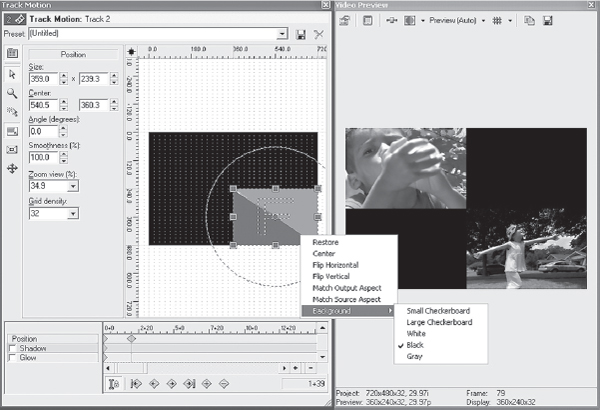
Choosing the Track Motion option in the Video Tools submenu opens the Track Motion dialog box. This dialog box allows users to create picture-in-picture imagery, motion of multiple layers of video, divided video screens, moving titles, and other motion imagery. This feature is another of Vegas’ most powerful and oft-used tools for the creation of composited media, in-depth motion, and other creative motion.
This tool is used to create the popular Brady Bunch screen format with multiple motion images applied to grids on a screen. A Brady Bunch-like VEG file is included on the CD accompanying this book.
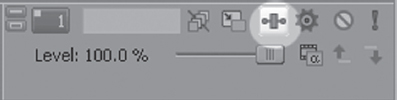
2.87 The Track FX button is found on all Track Control panes. If this button is not shown, drag the Track Control pane to the right into the Timeline. The button will become visible.
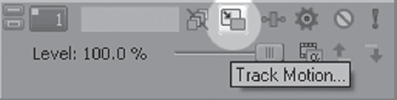
2.88 The Track Motion button is found on all video Track Control panes. If this button is not shown, drag the Track Control pane to the right into the Timeline. The button will become visible.
![]() Tip
Tip
Try using Pan/Crop to create overlays and Picture in Picture rather than Track Motion, as the image may be cleaner. Rather than cropping inward on an image, pull the crop indicators outward so they are larger than the image.
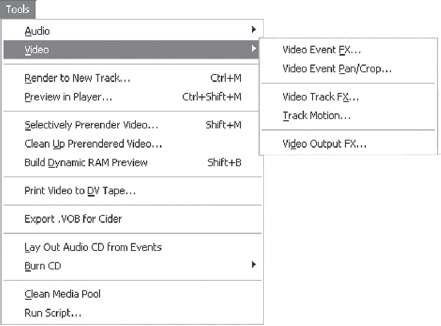
2.89 Selecting TOOLS | VIDEO also opens the Video Tools submenu.
2.90 Track motion is a fast way to split screens, build multiple video views, or move a picture in picture.
Two layers of video are placed in the Preview window with the Track Motion tool. By moving event images to grid points, exactly one-quarter of the screen can be filled with a video image. Shadows or glows can be applied to the event image. The Track Motion tool affects all media on the track to which it is applied. Motion can be keyframed for motion/movement. Shadows and glows can also be keyframed. (See Chapter 4 for more information on keyframing.)
Right-clicking in the Track Motion dialog opens several menus. Selecting Restore restores the Track Motion settings to a null position, removing any track motion applied, and thus restoring any event image to the original settings.
Choosing the Center option centers event imaging on the dot found in the middle of the Track Motion dialog with the same behavior as the Pan/Crop dialog. Moving the dot to the point that is desired as the center focus and then choosing the Center option moves the track motion box to so that it is centered over the dot.
Choosing the Flip Horizontal option reverses the horizontal image. This option is indicated by the “F” in the middle of the event image in the Track Motion dialog. The “F” is shown backward if this choice is made.
Choosing the Flip Vertical option turns an image upside down in the Preview window.
This option is indicated in the Track Motion window by the direction of the “F” shown in the window.
2.91 Right-clicking the Track Motion dialog opens several pop-up menus.
Choosing the Match Output Aspect option assigns the aspect ratio of the Project Properties to the image, regardless of the original aspect ratio of the event image.
Choosing the Match Source Aspect option matches the aspect ratio of the source, while maintaining any cropped or reduced-size status applied to the event image.
Selecting TOOLS | VIDEO OUTPUT FX applies effects to the entire project. This step is the final one in the event/track/project opportunity to apply effects to the video imagery. Regardless of how many effects are placed on an event or track, applying effects at the project level causes effects to be applied over the top of existing effects. Effects can also be applied at the project level by dragging an effect to the Preview window or by clicking the Video Output FX button in the Preview window.
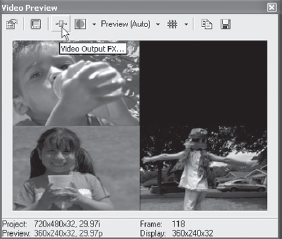
2.92 FX can be applied at the project level, affecting all media in the project.
The Render to New Track option (Ctrl+M) in the Tools menu is a valuable feature in Vegas. This feature allows edited media, regardless of the number of tracks, to be rendered to a new file that is placed on a new track at the top of the Timeline. Because the media is rendered, it plays back at full frame rate, full resolution at all times until it is filtered, edited, or has new media placed above it. This feature is useful when large composites are made and playback is slow, yet the events are finished in the editing process and the user doesn’t want to have it consistently slowing down the rest of the project. At the same time, if edits to the composited or filtered media beneath the new track might be needed in the future, the events are still in place beneath the newly rendered track, making it accessible at all times.
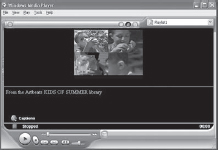
2.93 View streaming media (or other media formats) in their related players, complete with metadata.
The Preview in Player option in the Tools menu is a necessary tool for streaming media authors. This feature allows authors to preview selectable sections on the Timeline in a Windows Media Player, a REAL Media Player, or a QuickTime player complete with metadata embedded in the media stream. Files can be previewed at any speed, using templates or custom settings. In the past, authors of streaming media needed to render out entire files, and if dissatisfied with file quality, re-encode the file. Sony set the pace with this tool in their 2.0 version of Vegas, and the encode quality has only gotten better with time. This feature saves enormous amounts of time and effort as encoders can see exactly how the stream will appear in a player from any place in the Timeline.
![]() Tip
Tip
You can bypass all video effects in the Preview Window.
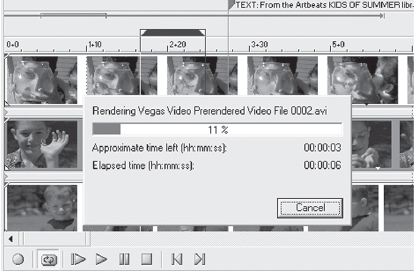
2.95 Prerendered video.
The Preview in Player tool isn’t limited to streaming media. AVI, MPEG, MP3, Ogg Vorbis, and other file formats can be previewed in any of the major players complete with any applicable embedded metadata. Synchronized multimedia integration language (SMIL) embedded in REAL media is viewable in the REAL player, along with URL flips, text information, or other call-outs.
The Selectively Prerender Video option (Shift+M) in the Tools menu is used to prerender video sections so that the user can see exactly what the rendered video will look like. When a section of video is prerendered, a new temp file is written to the hard drive/folder specified in the FILE | PROJECT PROPERTIES dialog. This drive should be the second hard drive on the system for maximum efficiency.
After a file has been prerendered, a small blue bar is displayed above the Timeline, indicating that the time section covered by the bar has a temporary prerendered file associated with it.
After an event time selection has been prerendered, moving, editing, removing, or any other edit applied to that time section invalidates the temporary file/ prerender, as the temp file is no longer accurate as to what is contained in the time/event selection.

2.95 Prerendered section.
Be sure prerendered video is going to the folder you specified in Project Properties. Otherwise temp files are being written to the default C:Program FilesSonyVegas 6, and your boot drive will rapidly become filled with temp files that aren’t readily apparent. This issue significantly affects performance in a generally undesirable manner, slowing down the entire application and system.
This tip is a great shortcut to program on a Contour Shuttle Pro or other hardware device, as it is typically used fairly often.
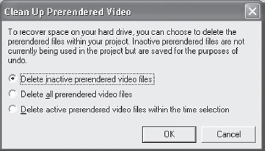
2.96 Remove unused prerenders with the Clean Up Prerendered Video dialog.
Selecting the Clean Up Prerendered Video option presents a dialog box asking which prerendered files should be cleaned up or deleted.
The default of “Delete inactive prerendered video files” is the most often required choice, but in the event that all prerendered files should be deleted or if a section has been prerendered several times, it might be best to clean up files related to a specific time selection only. After files are cleaned up/deleted, they cannot be recalled.
The Build Dynamic RAM Preview option (Shift+B) in the Tools menu works much the same as Selectively Prerender Video option, except that it does not write a temp file to a hard drive. Instead, it uses available RAM for the temp file. This render is faster and is deleted as soon as another prerender is called on or when an event is moved or edited. The amount of RAM available for a prerender is specified in the OPTIONS | PREFERENCES | VIDEO dialog. Approximately 60 percent of RAM installed in the machine can be made available for Vegas to prerender files with. The entire RAM space cannot be used, as the operating system, applications, and services require a minimal amount. This issue is why Vegas does not show all RAM installed in the machine as available.
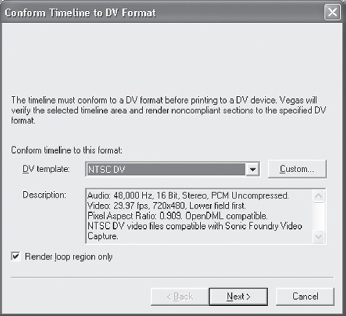
2.97 Print-to-tape presents faster options for placing media on a DV tape. This option renders only the modified sections of a project, preparing them to be printed to DV or analog tape faster than completing an entire render.
The Print Video to DV Tape option is just as it implies. This option prints the project on the Timeline to videotape without rendering the entire project as a new AVI. When Print Video to DV Tape is selected, Vegas renders all edited portions of the file to a temp prerendered track. It can give a warning that over 80 percent of the Timeline needs to be rendered. This issue is expected in longer or more intense projects with lots of filters, edits, transitions, or color correction.
The dialog box asks for preferred black leader and tail at the end of the print-to-tape. A minimum of three seconds of black at the beginning and end of the print are recommended to compensate for any camera compatibility issues. It also provides an option to print an SMPTE color bar pattern and test tone at the head of the file and provides options for length of color bar and test tones. Forty seconds or greater of color bar and test tone are considered standard. Check with your replicator or broadcaster for their requirements.
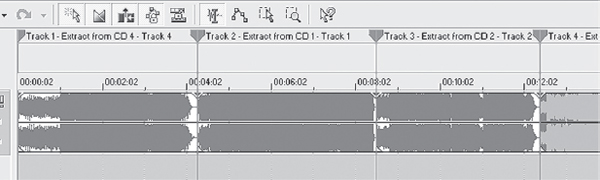
Selecting the Lay Out Audio CD From Events option instructs Vegas to look at audio events on the Timeline, insert index markers, and create necessary information to burn a successful audio CD. Make sure audio events are not touching on the Timeline, or Vegas will see the touching events as a single event.
Vegas auto-inserts two seconds at the head of the audio and two-second index spaces in order to create a Redbook-compliant CD master. This issue only applies to disc at once (DAO).
Selecting the Burn CD option opens a submenu that lays out either audio or video CDs for burning, displaying the following options:
• Track at Once Audio CD—burns one song at a time to an audio disc.
• Disc at Once Audio CD—burns an entire project at a time, including index markers. This option is the Redbook standard.
• Video CD—burns an MPEG-1 video CD. MPEG-1 is the VCD standard.
• Multimedia CD—burns an MPEG, REAL, WMV, QuickTime, or other multi-media form of CD. MPEG-1 files are not compliant.
Both of the video formats can be burned from a template, existing file, or Timeline-based file. Files not previously rendered require rendering before burning to disc, so Vegas prompts you through the required steps.
2.98 Vegas can automatically lay out a CD for burning. Using scripts can make this even faster. See the related scripts in the Tools>scripting menu.
Selecting the Clean Project Media option removes from the Project Media media references that are not active on the Timeline. This step should be done before saving a project with media. If files have been placed on the Timeline, they do not appear in the Project Media whether they were kept on the Timeline or not.
The Run Script option is a feature in Vegas that allows users to write custom macro scripts for batch processing events in nearly any way that a user can imagine or require. Need a script that tells Vegas to render an AVI, use the AVI as a master to render a QuickTime, Windows Media Video, and REAL file, beep twice, then render an MPEG-2 file with AC-3 audio? The Run Script option can make this happen if the scripting code is written correctly. An example of a script in Vegas looks like the following listing:
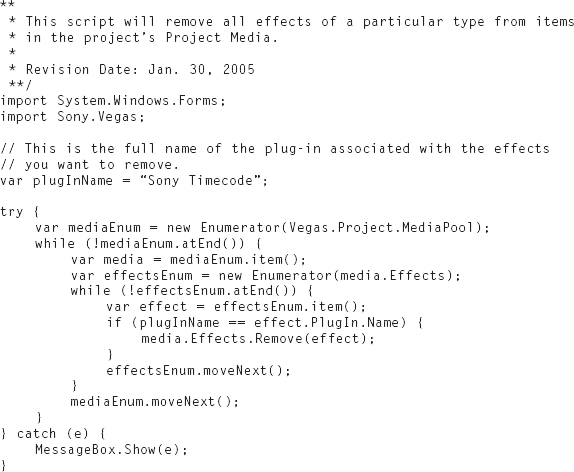
Custom scripts are found on the disc included with this book.
A button can be created on the toolbar making scripts immediately accessible. To insert a button, select TOOLS | SCRIPTS and locate the script for assignment to a button. Assign the script to one of the ten script location points.

2.100 Assign a script to a shortcut (a) which can be assigned to a button on the toolbar (b).
![]() Tip
Tip
Scripting can save hundreds if not thousands of keystrokes. Experiment with the scripting tools found on the disk in this book, and you’ll quickly see how time-saving scripting tools can be.
Using the Customize toolbar dialog, assign a key shortcut to a button on the toolbar. The script is now a one-button operation. Up to ten scripts can be loaded on the Timeline at one moment.
Ultimate S 2.0 is a scripting interface that may be purchased from a third party. Ultimate S 2.0 enables as many as 200 plus scripts to be accessed from the toolbar, including multicamera switching, automated lower thirds, audit tools, and other important functions. A trial version is found on the disk in the back of this book.
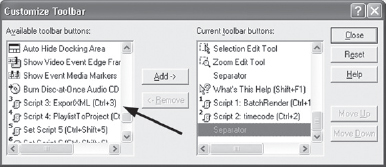
2.101 Loading scripts to a toolbar button makes running scripts fast and easy.
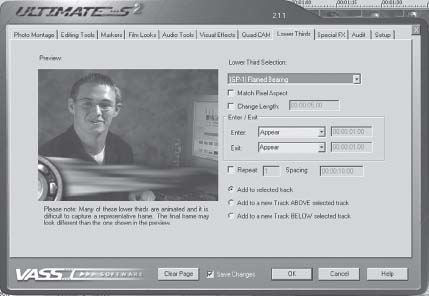
2.102 Ultimate S is a scripting tool that can enable real-time multicamera editing, create photo montages of up to 9,999 images complete with motion and matched to music beats, project setup, media management, compositing tools, automated lower thirds, and much, much more. Scripting tools such as this one are made for broadcast and event editors, and will not only save time, buy you’ll likely find them inspirational as well.
Options Menu
This series of menus are predominantly for setting behaviors and functions of Vegas to specific needs. Many are related to video-centric, and others are not.
The Quantize to Frames option generally should be checked for most video editing situations; it should be unchecked if Vegas is being used as an audio-only tool. This option forces video in an event to snap to a frame boundary, preventing a trim from occurring in the middle of a frame, regardless of the grid or time settings. Pressing Alt+F8 turns the Quantize to Frames action on or off.
Selecting the Enable Snapping option causes events to line up or snap to grid markers, other events, cursor positions, or inserted markers. This feature is useful when a user wants to ensure that timing is correct in the recording studio environment, that no frames are missed in the video editing environment, and that timing is accurate in placing events on the Timeline. Snapping can be enabled via the menu or by pressing F8 to turn this feature on or off. Turning Snapping off allows media to be slid around in time if necessary. Snapping is typically left on, except in instances where sound effects or video events should not fall on a marker, grid line, or inaccurate cursor placement.
The Snap to Grid (Ctrl+F8) and Snap to Markers (Shift+F8) choices are dependent on whether Enable Snapping (F8) is on or off. If snapping is turned on and either of these selections are enabled, events will snap to the marker or grid line to which they are dragged closest. If no grid line or marker is present, an event will snap to the closest event to its release point when dropped or moved on the Timeline.
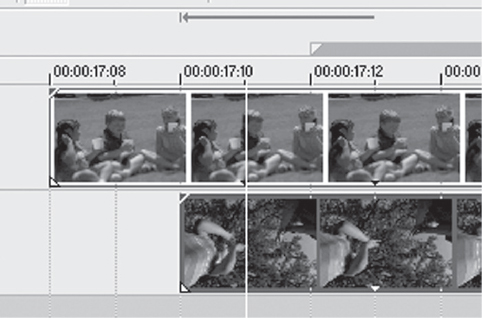
2.103 Notice the events snapped to frame-level grid lines.
Snapping can be enabled to music tempo, video frames at selectable frame rates, or absolute times.
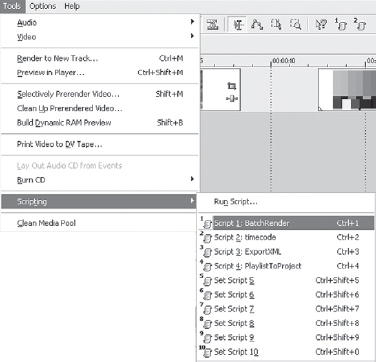
2.104 Assign grid spacing to personal preference or to a house standard.
Grid Spacing options allow for a variety of gridlines to be selected, which is dependent on the user’s working methods. This selection controls how tightly or closely spaced gridlines are placed on the Timeline.
Recording studios or musicians might want to use musically based timings, such as tempos and beats, to lay out a grid. Video editors might desire the grid to be frame-based at whatever frame rate they can be editing at, such as 25 fps for PAL or 29.97 drop-frame for NTSC DV. Musical grids can be laid out as tightly as 32nd note triplets, while video grids can be laid out as tightly as single frames. Grid layouts are very important if you intend on using ACID loops in Vegas, as they’ll assist in lining up audio files on the Timeline.
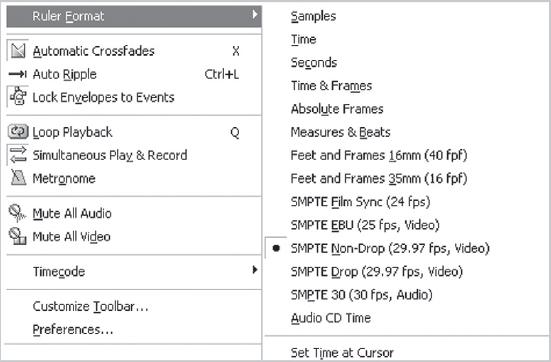
2.105 Set rulers for the manner in which the grid is viewed for snapping, alignment, or time selection.
Different from the Grid Spacing options, the Ruler Format options determine how grids are laid out. If different forms of ruler formats are chosen from the selection of grid spacing, such as choosing a frame-based ruler while a beat-mapped grid is selected, the grid lines disappear from the Timeline. Vegas cannot make a distinction between incompatible ruler and grid formats, leaving it to the user to define these settings. Studios recording music to picture will probably want to use the more common beat maps but can switch back and forth between grid forms, helping calculate tempo to time for musical cues.
The Automatic Crossfades option, selectable by menu or the X key, defaults to on. When two events cross over each other, Vegas creates a cross-fade, indicated by an “X” in the middle of the space in which they are crossed.
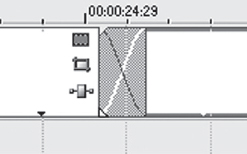
2.106 Crossfades are indicated by the “X” between events.
Automatic cross-fades are generally left on. Events crossed over each other with automatic cross-fades turned off become hard cuts.
Auto Ripple (Ctrl+L) is a powerful feature found in Vegas. This feature allows the trimming of an event edge. Subsequent events snap into place to fill the hole left by the trim, or if the event is pulled longer, Vegas auto-moves all events down the Timeline for the same duration as the pulled event’s time addition. If media is pasted in place and auto ripple is turned on, Vegas moves all subsequent events down the Timeline to accommodate the inserted event. By the same behavior, if an event is deleted, auto ripple slides all events forward in time to fill the space left by the deleted media, ensuring that whatever amount of time is added or deleted, it ripples in or out events following the changes.
This new feature also exhibits other behaviors, in that it can be track-dependent or project-dependent. Further, events can be shuffled on the Timeline, with all events moving with shuffled events.
Be aware that if inserting media underneath existing events with auto ripple enabled, all events are shifted in time for the length of the media event insert. If video events are on the Timeline, disable auto ripple before inserting media. Press Ctrl+L to enable/disable auto ripple.
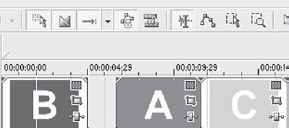
2.108 Layout of media before a ripple is executed.
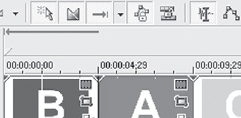
2.108 Layout of media after a ripple is executed.
Notice that when “A” is moved down the Timeline with auto-ripple turned on, “C” stays snapped to “A” and moves down the Timeline for the same duration as “A” was moved down the Timeline.
Selecting the Lock Envelopes to Event option causes volume controls, panning envelopes, bus envelopes, compositing envelopes, and velocity envelopes to move on the Timeline with their corresponding events. If 80 audio events are on the Timeline with 200 envelope changes, if this feature is disabled, and if any one of the events is moved, the audio fades will be incorrectly timed.
The Loop tool is another one of Vegas’ most-used tools and can be accessed through the menu or pressing Q. This feature allows users to draw a selection on the Marker bar and have the cursor loop over that selection over and over, while edits are being performed. Using this tool is an excellent way to tweak transitions, color correction, panning, track motion, and other edit effects and tools, while seeing the events change in real time on either the internal or external monitor.
![]() Tip
Tip
Use the Loop tool during editing of critical spaces while watching video on the computer monitor rather than the external monitor. As Vegas loops through the selection, it draws a RAM render automatically, increasing the resolution and frame rate as it loops. Let a section loop while having a cup of coffee or on a phone call, and within a few short moments, the entire section will be playing smoothly and clearly. Be sure to have enough RAM specified in the OPTIONS | PREFERENCES | VIDEO dialog.
The Simultaneous Play & Record option, if enabled, allows audio to be recorded at the same time as audio is being monitored. This feature is critical for a recording studio. The majority of sound cards are full-duplex, which means that they allow audio to pass in both directions at the same time. Most laptop sound cards are half-duplex, not allowing audio to be bi-directional. In this case, the feature requires disabling to avoid error messages. If a laptop is used for monitoring and recording, an external sound card/device is usually required via FireWire, USB, or CardBus.
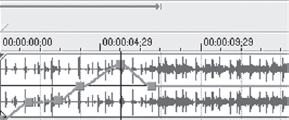
2.110 Original envelope
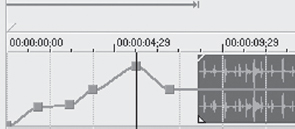
2.110 An event that is not locked to envelopes moves without affecting the position of volume/pan/FX.
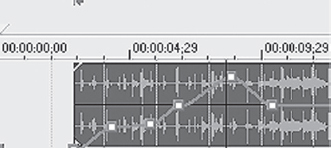
2.111 A locked envelope moves all markers; volume/pan/FX changes with it.
The Metronome feature is an audio metronome that can count time at the tempo and beat settings specified in the FILE | PROPERTIES | AUDIO dialog. This tool is handy for both musicians and video editors. The metronome is not recorded to hard disk if used during the recording process.
The Mute All Audio option is exactly as its name implies. All audio on the Timeline is muted/silenced. Deselect this feature or select a track directly to unmute audio.
Selecting the Mute All Video option has the same effect, with the exception that it causes all video tracks on the Timeline to go dark. Individual tracks can be unmuted and viewed or deselect this menu to bring video back to the screen.
Selecting the Timecode option calls up a submenu, asking what and where time-code is to be read/generated.
Timecode can be generated for MIDI devices. MIDI time code (MTC) is read by nearly all software applications and many hardware tools. MTC is used for synchronizing software applications together or synchronizing hardware and software together.
Vegas generates MTC each time playback is started.
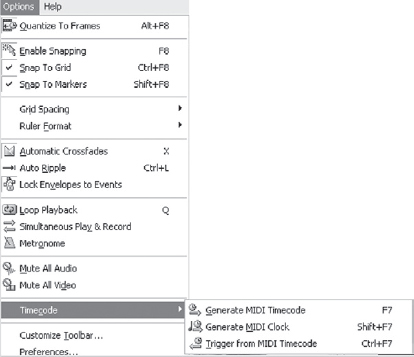
2.112 Select timecode options to fit hardware or house requirements.
Vegas also has the ability to generate Midi clock. The MIDI clock feature is different from MTC in that it also contains song pointer position (SPP) and carries tempo information as well. Musicians will want to use this feature, as it allows Vegas to carry increasing or decreasing tempos and the slaved application or hardware will then increase or decrease in tempo according to the tempo map laid out in Vegas.
![]() Tip
Tip
Registered users of Vegas can access Sony’s website and download the virtual MIDI router (VMR) utility at no cost or get it from the Vegas installation disk. The VMR utility allows VEgas to drive other timecode-capable applications such as ACID or triggering Sound Forge. This option is great for syncing a music bed that isn’t completed in ACID to the Vegas video Timeline.
Vegas can also be started/stopped via the Triggering option from timecode. An external device that generates timecode, or that feeds a generating device that can accept SMPTE timecode and convert it to MTC, can be a master device, and Vegas can be its slave.
Vegas users can customize the toolbar to suit their specific needs and desires for Vegas’ appearance with this toolbar. Video editors might wish to hide audio-only tools, just as audio-only studios might desire to hide the video tools found on the toolbar in Vegas. In any event, Vegas can be set up to look and feel the way any user chooses.
The OPTIONS | PREFERENCES dialog is the primary place in which the look and feel of Vegas can be set to individual preference.
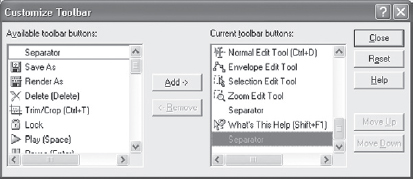
2.113 Adding a custom tool to the toolbar is the same for all tools as shown in the Scripting section.
Select preferences that suit your workflow. Experiment with settings that work best for you. Each tab has several options relating to General, Video, Audio, CD, Editing, Sync, Video Device, and a tab for Audio Hardware.
![]() Tip
Tip
Make sure that volume and pan envelopes are of greatly differing colors if the default colors are not used, so that they can be differentiated at a glance when mixing in Vegas. Applying color schemes that are similar in style, such as making all EQ gain envelopes varying colors of green, bandwidth envelopes varying colors of blue, and so on help in rapidly assessing a mix and determining what envelopes are performing various functions.
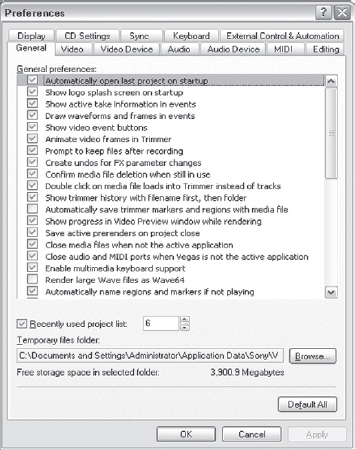
2.114 Set Vegas to feel the way you’d like it to feel in there Preferences dialog box.
Preferences in Vegas 5 were expanded significantly, including options for keymapping, human interface devices (HUI), and draggable cursors.
In the preferences dialogs, you’ll want to take note of the External control features, requiring a MIDI card, and the new scrubbable cursor features. We’ll look more closely at the External Control preferences in the Mixing section of Chapter 4.
Cursors and Selections
In Vegas versions 2-4, dragging the cursor on the Timeline created a selection. For most users, this has been a satisfactory workflow, while for others coming from various NLE workspaces, this has been confusing. Vegas 5 and 6 allow the cursor and playhead to be dragged across the Timeline without creating a selection.
To enable cursor dragging on the Timeline:
2. Open the Options>Preferences dialog box.
2. Check the Allow Edit Cursor to be Dragged check box at the bottom of the General dialog box.
3. Select Apply and close the Preferences dialog box.
![]() Tip
Tip
In Vegas 6, not only is creating a selection easier, but also arrows and a time indicator will display, showing the amount of space an event is moved, time of a crossfade or fade in, and amount of ripple action as well.
This allows the cursor to be dragged about the Timeline without creating a selection. Selections may still be created by clicking twice and dragging. One sure way to know if a selection will be created is to left-click on the cursor. If a double-ended arrow appears beneath the cursor, it’s a draggable cursor or playhead. If the double-ended arrow does not appear, it’s going to create a selection on the Timeline. This new function may take some getting used to, as it isn’t entirely intuitive like most of Vegas’ functions are.
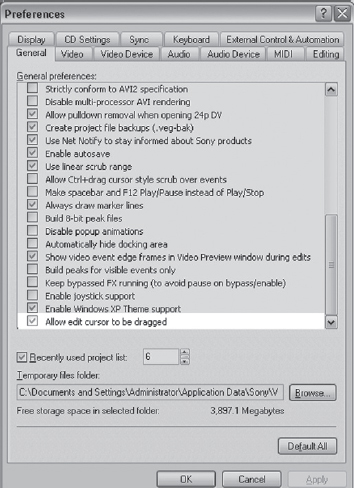
2.115 Select this check box if you wish to be able to drag the cursor across the Timeline without creating a selection. Leave it unchecked if you are satisfied with the method in which Vegas has worked in previous versions. It is checked by default in Vegas 6.
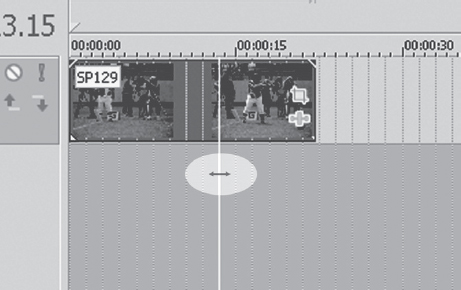
2.116 When you see this indicator, the cursor may be dragged across the Timeline without creating a selection.
One of the power tools of Vegas is to allow users as much customization as possible with the application. Layouts, appearances, key commands, and docking are just a few of the user-defined settings that may be customized by users. In the General preferences, click on the Keyboard tab. This dialog allows you to input a series of keystrokes, and on the right side of the tab, you can choose what actions you’d like that specific series of custom keystrokes to take.
XP Themes in Vegas
Vegas now allows for themes chosen in the XP Themes dialog to determine how Vegas appears. This allows users to create their own appearances for Vegas, suited best to their editing environment.
To modify an XP theme, open the Control Panel and select Display from the options. In the Display dialog you will find a Themes tab. In this tab are dropdown menus that will allow you to select pre-built themes for XP or view online themes that you can download. Generally, most editors prefer darker themes that are easier on the eyes in dimly lit editing rooms. A web site at http://www.themedoctor.com has a number of downloadable themes to create custom appearances for XP that will also affect how Vegas appears. You can also obtain more themes by purchasing Microsoft’s Microsoft Plus add-on for Windows XP.
In order to have Vegas accept custom themes for Windows XP, you’ll need to go to Options>Preferences, and tick the checkbox for Enable Windows XP Theme Support. Without this box ticked, Vegas will use it’s default colors. Notice that the icons in Vegas 5 and 6 are softer, a little larger, and less sharp in appearance from earlier versions of Vegas.
The icons will not change appearance with different themes applied to Vegas, only the colors, backgrounds, display and header fonts will change in appearance. Keep in mind that changing themes will often affect how some applications may appear, so choose your themes carefully if your editing system is also used for email or other common functions. Themes may be stored/saved and recalled for specific tasks when needed. To create a theme in Windows, right-click the desktop and choose Properties, and then select the Appearance tab. Choose Advanced, and use the drop down menu choices to select your system’s appearance settings. Save a theme after creating your custom settings by clicking the Themes tab at the far left of the Display Properties dialog, naming the Theme, and choosing Save As. This will store your theme in the Documents folder unless you choose a new location in which the theme should be stored.
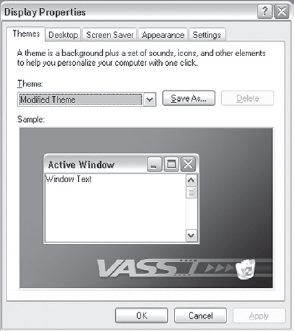
2.117 The Windows display properties may be accessed from Control Panel or right-clicking the desktop.
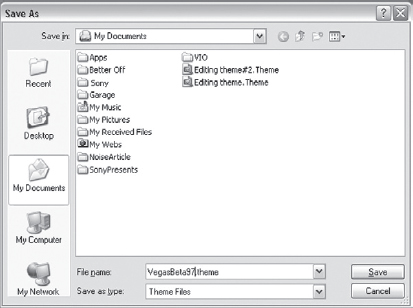
2.118 Save the theme, close Vegas and restart Vegas to see the new appearance.
Key Features!
Vegas also provides custom keyboard mapping.
This feature allows users to create their own custom keyboard shortcuts to increase efficiency in editing.
One of the hints that you are a Vegas power user is how much you use a keyboard instead of a mouse. You’ll nearly always be faster with a keyboard than a mouse, given the fewer number of hand movements. This is true with nearly any application, since both hands remain on the keyboard most of the time.
To unlock the power of Vegas’ customizable keyboard commands, open the Options>Preferences dialog. You’ll notice the Keyboard tab in the Preferences dialog. Select it.
When the dialog opens, the existing keyboard shortcuts are displayed. These may be changed to fit your particular needs.
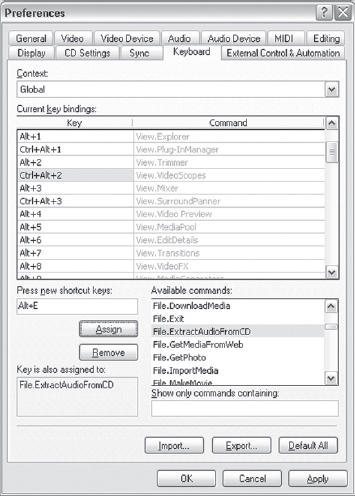
2.119 Vegas allows for cusltomized keyboard shortcuts. In this instance, Ctrl+E have been assigned to rip music from a CD.
To change a shortcut or to create a new one, place the cursor in the “press new shortcut key” box. If there is another command in the box, press the Shift, Ctrl, or Alt key and release the key. This will clear the box. Now press and hold the Shift, Ctrl, or Alt key while pressing it’s companion key desired for the shortcut. This will set the shortcut in the dialog box. However, the shortcut is not assigned to an action until an action is located in the Available Commands and selected.
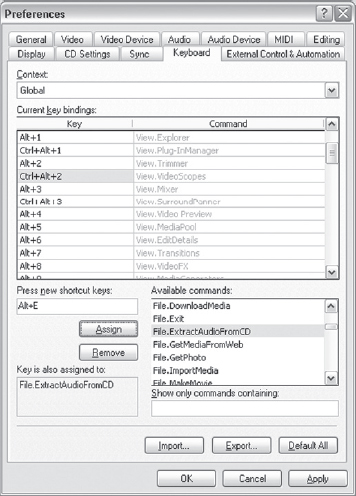
2.119 In this example, Alt+G has been assigned to open the Render As dialog.
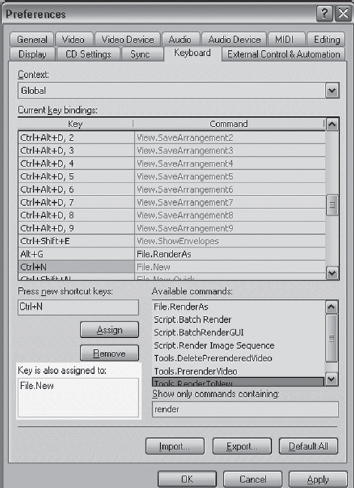
2.120 The “Key is Also Assigned To” box will light up and display any shared key commands as your only warning that you are about to change an existing keyboard command.
If a command does not appear in the Available Command window, then the option of assigning a keyboard shortcut is not available.
If a newly created shortcut is sharing a command with an existing shortcut, the Key is Also Assigned To box will indicate the shared command.
For those who operate Vegas on multiple computers such as a desktop and laptop system and who would like to share the key commands without having to take the time required to set up the second computer, Vegas allows a .ini file to be used to export the customized keyboard settings.
Select the Export button in the Keyboard dialog, and an export dialog box opens. Create a name for the .ini file, and save the file to a location where it can be later located. This can also be saved over a network to a different machine on the network.
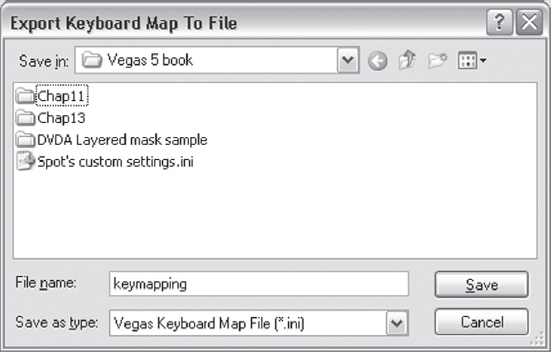
2.121 Key commands may be exported to another computer, saving time and matching the workflow of a desktop machine to a laptop or other computer on the network.
To import a customized key command set, select the Import button in the Keyboard dialog. Browse to the folder the .ini file was saved in, and select it. Press the Open button, and the custom key commands will be installed as part of Vegas 6 on the second machine.
Key commands may be returned to Default settings by selecting the Default All button in the Options>Preferences>Keyboard dialog. Keep in mind that selecting the Default All button will wipe out all customized key commands, and if they have not been saved to another location, any commands you’ve created will be gone.
Color My World
In Display Preferences for Vegas, you’ll find a dialog that allows the color of track headers, saturation of icon colors, bus or FX envelopes, and icon color tinting, further offering a custom look for your particular Vegas style. In the General preferences dialog, check the tickbox for Windows Theme support, and any theme you create for Windows XP will then be part of the Vegas color scheme. This is the means by which you can create a dark, smoked look for Vegas should you like that sort of appearance.
Flashy Titles
Titling is extremely important in any video production. Some would argue that titling sets up the viewer for what they are about to see, and therefore makes the difference between a good film and a great film. Titles can take a lot of artistic development time, and a lot of creative energy as well, and therefore titles are often farmed off to editors or artists that specialize in nothing but titling sequences. On of the formats for titling in video is Macromedia’s Flash format.
When importing Flash files into Vegas, they must be from Flash 5 or earlier. Flash MX files contain metadata types that Vegas cannot correctly read and import to the Timeline.
Vegas now supports Flash import, and .swf or .fla files may be dropped directly on the Vegas Timeline. While these files don’t always play back at full framerate, they provide unique opportunities for users to import powerful sequences of images. Flash files containing ActionScripts, audio, or motion video may not be inserted to the Timeline, nor may Flash files created in Flash MX. Only files created in Flash 5 or older may be loaded on to the Timeline.
Flash is also a powerful animation tool for product presentation, lower thirds, or for portraying a specific type of image from a website or other multimedia presentation. Many companies have Flash introductions or menus on their websites. These may now be set up and used with productions created in Vegas. Graphs, charts, and spectacular titles are all part of the Flash graphic format that may be imported to Vegas. Interactivity with Flash files will not carry over into Vegas.
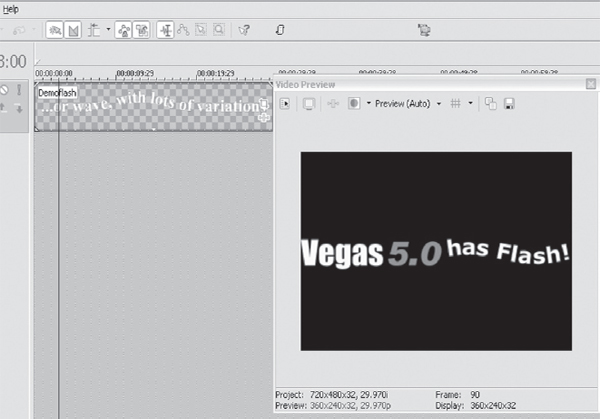
2.122 With Flash now importable to Vegas, the titling and animation possibilities are greatly expanded.
Flash is often being used for creating instructional media, giving an added edge when combined with video presentations. However, CoffeeCup Software and Swish are both available for creating excellent Flash files, and are substantially easier to learn and use. Learn more about these products at http://www.swishzone.com and http://www.wildform.com. You can also download demo files from these sites to practice working with the Vegas Timeline. Find the demoflash.swf file on the DVD in the back of this book. Drop it on the Timeline, laid over an existing video file, and you’ll see how clean the Flash file can be. If you are unsure of whether the Flash is showing at the project property size (it should always scale to the project property size) then double-click the header or title bar of the Preview window to set the Preview window display to the project properties. To get a better understanding of how this function works, reset the project properties to a new setting, such as changing the project properties to a PAL setting, and you’ll see the Flash project scale to the new project property settings.
At the time of this writing, Vegas was not scaling Flash media cleanly when the Pan/Crop tool is used to zoom in on the Flash file, suggesting that the vector information in Flash may be ignored. Create your Flash projects at full size and resolution for best results. Vegas will properly scale them to project resolution. In summary, this is only a problem when zooming in on the Flash file with the Pan/Crop or Track Motion tools.