
Color Correction and Manipulation
Understanding the Color Correction Tools in Vegas
Vegas has many color correction tools capable of repairing even the most difficult footage with greatly improved result. A color correction toolset, a secondary color correction toolset, waveform monitor (WFM), vectorscope, parade scope, histogram view, and optimized hue saturation luminosity (HSL), color curves, broadcast filter, and more make Vegas one of the more powerful color correction–capable NLEs available today. (See Figures 8.1, 8.2, 8.3, 8.4, and Color Plate 8.1.
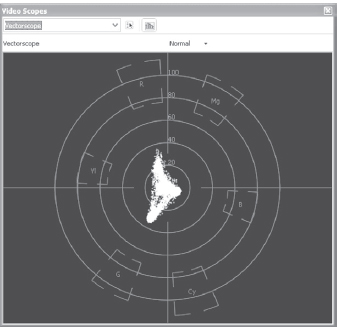
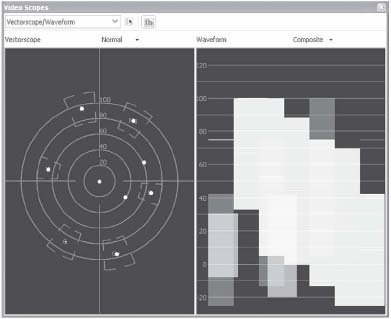
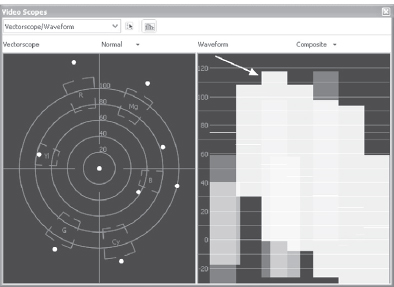
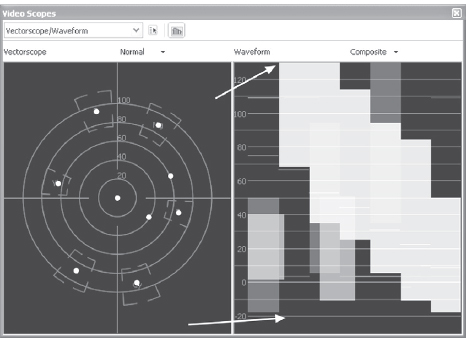
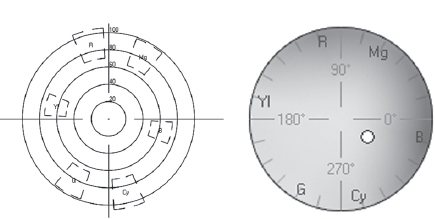
8.1 Vectorscope
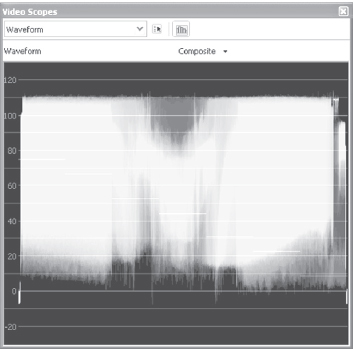
8.2 Waveform monitor.
Tools that can be used for color correction include:
• Black Restore
• Brightness and Contrast
• Broadcast Colors
• HSL plug-in
• Color Curves plug-in
• Color Balance
• Color Corrector
• Color Corrector–Secondary
• Gradient Mapping
• Pixelan Chromawarp (third party)
The new color correction tools found in Vegas provide the ability to set apart colors or a range of colors and to command isolated colors in order to suit emotional, artistic, accurate, or whimsical expressions.
Also, tools are available to maintain color shift from event to event in Vegas, which assists in matching shots from two different cameras or from DV to other video sources. Finally, Vegas provides tools that can limit or force colors to remain legal or become broadcast legal in Vegas.
These scopes and monitors are all tools to help identify color values and luminance values and to assist in color matching. Just having them doesn’t correct color; they are for reference. Although we’ll briefly discuss how to use them, this chapter is not intended to teach you how to read them and gain an in-depth understanding of how they work.1
This chapter, however, provides a basic overview of how these monitoring and display tools function within Vegas and the editing world.
Broken down to the most simplistic form, a waveform monitor is for reading luminance, or brightness, and most other tools are for reading chrominance, or color. Keep this information in mind while working with the tools. In the majority of color correction use, both the WFM and vectorscope are open at the same time, which is why menu choices for both are in the Video Scpes menu.
![]() Tip
Tip
Before starting any color correction processes, be sure you’ve got exposure set correctly. My method is to convert the image to greyscale using the B/W filter, and then using Levels to adjust the exposure. Once exposure is corect, then you’ll want to remove the B/W filter.
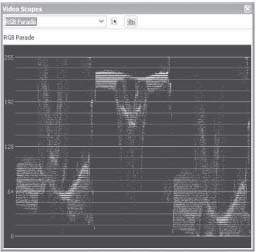
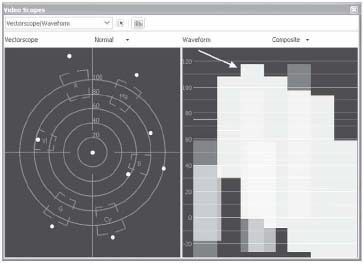
8.3 RGB Parade display.
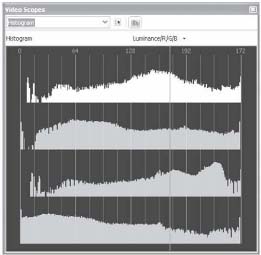
8.4 Histogram.
The Histogram tool is one of the most valuable tools in Vegas. A histogram gives a good indication of color balances overall, s sown in Figure 8.5.

8.5 The histogram on the left contains illegal colors; however, the histogram on the right is legal, using the Broadcast Colors filter.
A histogram also provides a very fast way to view illegal colors. Illegal colors are usually created by inserting text, adding color-altering filters, or using improper color correction. Use the Broadcast Colors filter to bring colors into legal status.
The parade display in Vegas shows which colors are within individual limits and also demonstrates the level of the total video output, as shown in Color Plate 8.2. This important tool can help you discover color distortion at output. A standard parade display shows level information on RGB, instead of showing the total level of the modulated video output.
Illegal colors are colors that are not compliant with NTSC standards. Illegal colors over-modulate the broadcast signal, causing distortion of video and audio. No one will put you in jail for using illegal colors, but the strain on the eyes and ears in most instances, will drive viewers crazy. If you’ve ever seen a low-budget car-lot advertisement on television with buzzing audio and distortion on the announcer’s sibilants, chances are great that the commercial contains illegal colors, most likely the whites used in titles. (Distortion is actually across the entire audio signal but seems more apparent with an overmodulated color signal.)
Color value in the NTSC world is measured in IRE. Color value in the RGB world is measured in RGB component values. For example, in the IRE world, extreme black is 8.5 IRE. Extreme black in the IRE world, however, is really just a very dark gray, measuring at 16.5 in the RGB world. Extreme white in the IRE world is 100 IRE. Again, this is really just very bright gray, measuring at 234 in the RGB world. RGB extreme black is 0, while extreme white is 255. Any color value in the RGB world that goes below 16 or above 234 is illegal by NTSC broadcast standards. Any color value in the IRE scale that goes below 8.5 IRE or above 100 IRE is also illegal.
Legal colors are related to NTSC broadcasting. Because most video equipment in the NTSC realm is calibrated or manufactured to the same specification, however, practicing legal color on DVDs, video tapes, and hard drives is a good practice. The Internet currently has no color limits.
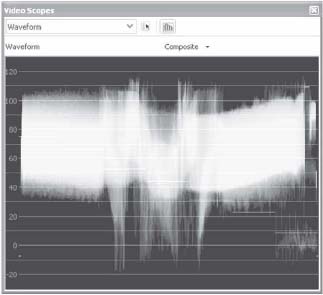
8.6 Shows the video event with illegal colors.
8.7 Standard SMPTE colorbars, inserted as generated media in Vegas 6. The white dots represent positions of the individual colors found in SMPTE colorbars (WFM in Composite mode, with indicators enlarged for illustration).
8.8 Shows colorbars with saturation in the Color Corrector tool at 1.500 (all other settings reset to null).
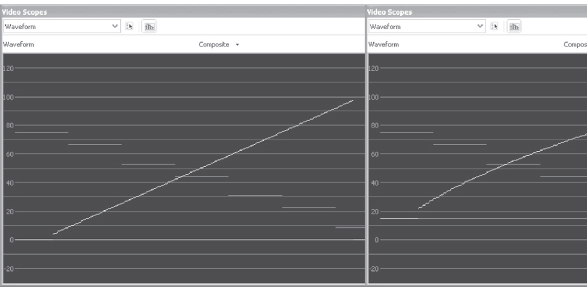
8.9 Shows ramp with gamma at 1.500. Notice that the curve of the waveform display has changed significantly in the right image (all other settings reset to null). The ramp is used to demonstrate gamma, as colorbars aren’t a good choice to express gamma.
8.10 Shows colorbars with gain at 1.500. Notice that the WFM breadth and height have expanded significantly (all other settings reset to null).
The parade display can be updated by enabling the “Update scopes while playing” button. Place the cursor over the highest part of a color display in the parade scope to display the RGB value of that color point.
Figure 8.6 demonstrates the waveform view of the same video event, which is showing illegal colors. This instance shows how the waveform monitor can demonstrate illegal or clipping colors.
Figure 8.7 shows the same event with the Broadcast Colors clamp set to Lenient. This tool brings the colors to a legal status, but the blue channel is still clipped.
Working from an SMPTE colorbar pattern, examine how various changes affect the display of the WFM/vectorscope. (The waveform monitor displays IRE in percentages, not IRE levels. Use the Broadcast Colors clamp/plug-n if a 8.5 IRE pedestal is required.)
![]()
The images shown in Figures 8.7 through 8.11 are in colorbars-scopes.veg on the DVD in this book.
These figures demonstrate how the sliders in the Primary Color Corrector tool affect the display of images and how they appear in the WFM/vectorscope. Knowing how each of these controls works is key to using the tools correctly and to achieving the desired image quality.
Pedestal, also called setup or lift, is a base line for indicating black. Without knowing exactly where black exists in relationship to other colors, it’s difficult to process colors accurately. Each video display (histogram, WFM, vectorscope, parade) has a Settings button in the upper center. Select options from Setting to determine a Studio RGB setup (RGB-16forblak,8.5IR for black, or none).
8.11 Shows color bars with offset at 50.0 Notice the positioning of the colorbars (all other settings reset to null).
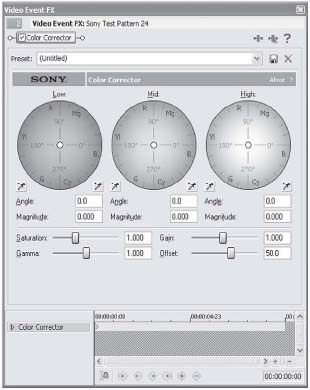
8.12 Color Corrector tool found in Vegas.
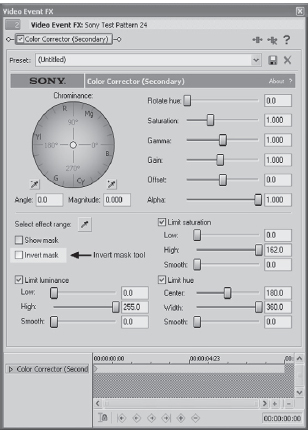
8.13 The updated Secondary Color Corrector tool found in Vegas 5 and 6. Note the Invert Mask feature.
These new tools allow concise and accurate color selection in Vegas to be isolated and managed. Each of the color wheels is controllable with a mouse or a joystick, making it easier to fine-tune each color. The color wheels match the position of colors on the WFM.
The Primary Color Corrector tool works much like an equalizer in an audio system. The three wheels control lows (blacks), mids (largest range of color information), and highs (whites). Thinking in this mode may help some editors work with the colors more comprehensively.
Shadows and contrasts fall into the category of black. Facial colors, clothing, paints, and predominantly everything focused on in a frame, all fall into the midrange color category. Whites are the sparkle and the high end of various hues of color, providing detail in most instances. Dulling the high end, as in audio, generally results in less clarity of a picture image. Sometimes illegal colors, however, function much like distortion and need to be reduced to bring colors to a more reasonable and appreciable level. Depending on how the image was captured/acquired and with what, resolution levels might not allow colors to be intensified without seriously degrading the image.
All plug-ins in Vegas are now dockable with scroll bars. This feature means that the workspace is less cluttered, yet all controls are accessible from within the docking space (see Color Plate 8.3). This process makes color correction more efficient when working on a single screen, such as a laptop, as all correction parameters are accessible without having thesceencoered with the correction tools.
8.14 Color wheel and vectorscope color distribution is the same.

8.15 The Define Effect Range is enabled by using the Eyedropper tool to select the color range to be affected.
It should also be understood that when working with most of the color correction tools, manipulating images in the midrange will usually have some impact on the blacks/lows, the whites/highs, or both.
We’ll use the color image in Color Plate 8.4 as a color correction starting point. This image is flat and dull. In reality, however, we know that the rocks of Moab should be red and vibrant, and the sky should be deep blue, with white clouds. A brightness/contrast filter could be applied to the image to bring up the brightness; however, that process would then brighten the shadow and landscape areas as well, causing detail to disappear. The overall image would appear washed out and soft in appearance. Using the Secondary Color Corector, colors can be selectively adjusted.
Open the rocks.veg file found on the DVD in this book.
![]()
Four views of the same event are provided in the rocks.veg file found on the DVD that accompanies this book. Version one has no color correction whatsoever. Version two has red added to create a richer and deeper color. Version three has the red added in version two, and the sky has been brought to a deeper color for greater depth. Finally, version four has green added to the trees to set them more in the foreground of the shot. In Color Plate 8.5, the left half of the screen is the original shot, and the right half is the color corrected shot.
Let’s look at how this was done.
Apply a secondary color corrector by selecting the Event FX button on the event, which opens up the Secondary Color Corrector dialog. First, select the color intended to be isolated and to be enhanced or edited. Use the Eyedropper tool found in the Secondary Color Corrector tool to select the rocks and define the effect range.
After the color range is selected, move the color wheel target around in the color wheel. This step causes colors in the Preview window to change with the rotation, demonstrating how the targeted colorspace is affected. Open the scopes view (Ctrl+Alt+2) and look at how the image shows up in the vectorscope.
With the orange of the rocks selected as the target color, move the target dot to an angle of 118.5 and the magnitude of .480. You can either key the numbers in the dialog box or drag the target dot to that quadrant/location. Adjust the Saturation slider to 1.00. The rocks take on a reddish/orange hue. Adjust the saturation to the point that it is satisfying to your eye. These numbers are relative to a computer monitor and not previewed on an external NTSC monitor.
After the color of the rocks is brought to a point where you are satisfied, click the Event FX button on the same event and insert another Secondary Color Corrector tool by clicking the tool and the Add button.
Use the Eyedropper tool again to select the blue in the sky. Now set the angle to 324.5 and the magnitude to 0.382. Adjust saturation to 1.00. Adjust the Limit Saturation/Low setting to 20.0 and the Limit Saturation/Smooth setting to 50.0. Finish the correction on the blue/sky area by adjusting the Offset setting to 6.5. Now the rocks and the sky should be a pleasing color and depth. Again, keep in mind that various monitors display the images differently, so check this image on an external monitor or adjust to your eye and satisfaction.
Notice that after the red and blue have been corrected, the trees in the foreground are darker and inconsistent in color with the rest of the image. Another Secondary Color Corrector tool is needed, so click the Event FX again, select Secondary Color Corrector tool, and click Add to insert it. Using the Eyedropper tool, select the green trees and bushes in the foreground. Set the angle to 211.0 and the magnitude to 0.485. Set the Saturation level to 1.070. In the Limit Luminance, set the High level to 76.0. Notice how the color of the green pops out to match the color levels of the rocks and sky.
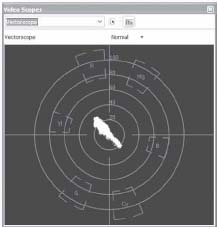
8.16 Original color in vectorscope.
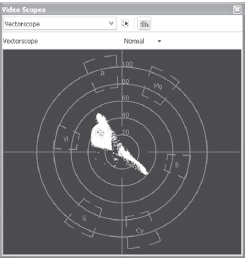
8.17 Color display for corrected version. Notice the extended blue, red, and yellow/green display.
On the timeline is a still frame event that must be color-matched as closely as possible to the video event preceding it. This process is difficult to do because of differences in resolution, location, and time of day. A reasonable compromise, however, can be made between the two images, making a transition between the two less objectionable. Secondary Color Corrector tools and Color Curves tools are used to bring the two events closer together in color value. The vector-scope is used to match the colors more closely together in terms of relevance. The rocks and sky are the two common subjects in the two events, so we’ll use those to make our corrections and changes (see Color Plate 8.6).
Finding a middle ground for the two images, particularly when the original video image is washed out (see Color Plate 8.7) and has been corrected to bring out more color, means that the still image event must be washed out and colors reduced to match the video event. Using the vectorscope, we can see a footprint of the two images. Because little can be done to realistically bring the video image up any further in resolution quality and color depth, the still image event must be corrected and brought to resemble the footprint displayed by the video event.
The Primary and Secondary Color Corrector tools are exceptionally powerful. However, don’t forget the other correction tools. Color Balance, Color Curves, HSL, and Saturation Adjust are all tools that are equally powerful. Color Plate 8.8 has a Secondary Color Corrector tool, Gaussian Blur, Color Curves, and Saturation Adjust on the image to bring it as close as possible to the video event transitioning into it. Select the Event FX button on the still image evet to see how the image is brought to corrected color values.
Open wedding.veg from the DVD found in this book.
![]()
In this wedding scene, we can see how the opening shot is lacking contrast, depth, and personality (see Color Plate 8.9). It’s also fairly dark, which would make most of us reach for the brightness/contrast tool.
Using the Primary Color Corrector tool, highlights and color can be brought out while maintaining warmth and personality. In this example, the face tones, the green in the trees, and the red in the bunting can be brought out, which will make for a warm and interesting image (see Color Plate 8.10).
When matching two events on a timeline, one technique is to do a screen capture of one of the two events, preferably the correctly colored event. Move the cursor to the second event so you can see it in the Preview window. Select SPLIT SCREEN | CLIPBOARD and draw a rectangle around the area of the second event on the timeline. The Screenshot will be shown next to the second event, making it easiertocolor match/correct the second event to the first event.

8.18 Use the Select Adjustment Color eyedropper to select colors to be restored/repaired.
On this same event, several individual Secondary Color Corrector tools can be used to bring out the same features while maintaining the mountain shadow in the background. This particular image has many approaches, depending on whether you are matching other imagery to the shot. In this case, many images needed the same level of color correction, so the Primary Color Corrector was applied to a single video track, affecting all events.
Another way the Primary Color Corrector tool is used is to sample low, mid, and highlight colors. Sometimes, this process is all that is needed to correct a color.
Select the Event FX in the first event on the wedding.veg timeline and insert a Color Corrector tool. Using the Eyedropper tool, choose Complementary Color from the Highlight tool and sample the color of the shirt collar from the man in the Preview window. Notice how this sets the neutral white for the entire shot. Using the Midrange Color Selector, use the Select Complementary Color eyedropper to sample the green in the evergreen bush. Sample a brighter portion of the green for best results. The color will immediately pop and balance the overall image. Because the colors are still not as saturated as they should be, increase saturation to a value of 2.00 and decrease gamma to a value of .900. These settings create a warm and pleasant color space without washing out the resolution of the shot (see Color Plate 8.11).
As you can see, the Primary Color Corrector tool is useful and powerful with the ability to repair or improve errors or difficult shot situations. For example, white balancing a camera is often overlooked, or in many cases, not possible with lower-quality DV cameras. Consequently, images might be too blue or green from fluorescent or mercury vapor lighting, yellow from tungsten lighting, or washed out from too much light.
Open colorfix.veg from the DVD found in this book.
![]()
Color Plate 8.12 shows how tools in Vegas can compensate for a forgotten white balance in a classroom containing fluorescent lighting. Skin tones, neutral whites, and color depth are all regained by using this tool.
To understand how this process works, insert a Color Corrector tool on the first event on the colorfix.veg file.
Using the Select Complementary Color eyedropper in the high tones, draw a square on one of the ceiling tiles on the upper part of the image in the Preview screen. The angle/magnitude settings should automatically set to approximately 130/0.584. Using the Select Complementary Color eyedropper on the High color wheel, select the ceiling where it’s slightly darker. A sample can also be taken from the lightest portion of skin. The angle/magnitude settings should automatically be approximately 130/0.450. The skin tones immediately become warm, the surrounding colors are no longer blue from the lack of white balance, and the image is much deeper and interesting to look at. This same method works equally well with footage shot under tungsten lights that is overly yellow in color. The Primary Color Corrector tool is powerful and may be turned to for quick color repair on almost any image.
Some images simply cannot be brought to a correctable state, however. Sometimes, poor quality shots must be used. In this case, adding noise, saturation, and generally unacceptable color management helps rather than trying to hide poor color balances in the image (see Color Plates 8.13 and 8.14).
Another use of the Color Corrector tool is to apply a color gradient over an image. In buildings with large walls or obstacles, it is sometimes difficult to get a good balance with lighting if it’s a live shot or a run-and-gun. Using a gradient over the image creates a balance and offers unlimited possibilities (see Color Plate 8.15). Used like a Neutral Density filter on a camera, gradients can be used to restore or enhance images.
When working with the Color Corrector filter/tool, remember this order of use:
1 Select the brightest point of an image with the High Complementary tool.
2. Select skin tones or mid-range colors with the Mid Complementary tool.
3. Select the darkest point of an image with the Low Complementary tool.
By doing so, color balancing is almost automatic, white balancing a shot that was incorrect is virtually hassle-free, and a great starting point is established for correcting colors.
This element can be built with any kind of image—simply create a gradient, such as the one in the gradient.veg file.
In Color Plate 8.16, notice how the warmer look of the original image seems to be flat on the left side, while the bluer image created by the gradient on the right side appears to have more depth.
In addition to using a gradient to correct a color space, gradients can be used to enhance an image overall. Warm images generally seem flatter, shallower than cooler, more contrasted images. Our eyes tend to believe that warmer colors have less detail.
Sony has a Gradient Filter plug-in that provides exceptionally fast and simple changes to the emotion of an image (see Color Plate 8.17).
Using Color Correction as FX
Color correction tools can also be used for artistic expression, creating certain moods and emotions that cannot be obtained with lighting or camera lens filters in a low- to mid-budget project, or in some cases, cannot be obtained in the real world at all.
Inserting or replacing colors that aren’t part of the original shot is fast and easy with Vegas. Using the Secondary Color Corrector tool, colors can be selectively replaced, graded, or enhanced.
In Color Plate 8.18, the original black-and-white photo is given a sense of warmth from the Secondary Color Corrector tool. A similar effect is possible with a Sepia filter or by layering a sepia-generated color on a track above and reducing the opacity. When you use the Secondary Color Corrector tool, however, you can insert keyframes, changing the transparency and chroma value of the overlaid color.
Color Plate 8.19 shows how colors may be desaturated using the Secondary Color Corrector tool. This particular image has the “Desaturate all but red” preset selected. We’ll see how this same effect can be managed with another tool later in this chapter.
Color Plate 8.20 demonstrates a shot taken with a low-end camera, which did not allow compensation for a bright sky. Using the Secondary Color Corrector tool, the sky was brought to a richer and more vibrant color. Without using a glass filter on the camera lens, this shot would have been difficult for even the most high-end camera.
As an example, the movie Pleasantville, along with various commercials on television, have made the all-black-and-white-except-one-color look very popular. This type of work is nearly impossible to create with only a camera without doing lots of preproduction work. In Vegas, it’s a few steps to create this look cleanly and quickly.
You can use a Saturation Adjust filter in Vegas to single out a color quickly, while desaturating all remaining colors. Color Plate 8.23 demonstrates the Saturation Adjust filter, applied in order to remove the color of the rocks and surrounding color. Only the climber’s clothing is in color. The Saturation Adjust filter works much like an audio equalizer, allowing colors to be selectively reduced or enhanced in order to create an artistically pleasing image. Of course, the Saturation Adjust filter may be applied to any image to bring down oversaturated colors, pop up undersaturatd colors, or bring an overall balance to images on the screen (see Color Plate 8.24).
![]() Tip
Tip
When using the Secondary Color Corrector tool in Vegas, use caution, as overextended colors can quickly become illegal, washed out, or destructive to detail in an image. Color correction is meant to be a corrective tool, not a fix-all for poor camera skills or poorly shot footage.
Using the Secondary Color Correction tool, Vegas users have been easily able to create the “Pleasantville” look that is so very popular, particularly with wedding videographers and editors. Vegas 6 and later versions make this even easier by adding an Invert Mask to the Secondary color corrector, making this effect possible without using a copy of the same event as a mask.
Open the Secondary Color Correction tool and apply it to an event, selecting the color you wish to remain, or pass through. Now simply slide the Saturation control completely to the left, or to none, and select the Invert Mask tick box. Notice that the image is now black and white/ and desaturated, but the color you selected is allowed to pass through.
The new Invert Mask option makes for very easy creation of the popular “Pleasantville” look that many videographers use. This is particularly effective in wedding videos, used to pass only red found in bouquets or perhaps the white found in the bride’s dress.
The wedding examples are just salvageable but can’t really be brought to full life, as the video camera was not white balanced, the backlight was brighter than the foreground, and the entire scene was shot in the shadow of a building. Sometimes footage can only be saved, not enhanced. Plan shooting schedules accordingly and remember that footage shot well saves a tremendous amount of time in the postproduction process.
Making Digital Video Look Film-Like
Notice that this section heading says “film-like” and not “like film.” Video cannot look just like film. It’s a different medium. It can be made softer, with adjusted gamma, grain, and color saturation, but it still will not look the same as 16mm or 35mm film. I’ll preface this section by saying that if you are interested only in shooting media that looks like it was shot on film, shoot on film. If you are interested in exploring how to make DV more palatable to the eye, read on.
Making DV look more film-like requires starting at the lens and shooting aspects of the production. Using nothing but prime lenses, using dolly shots rather than lens zooms, and shooting with lighting intended for film are all part of the process. Shooting through filters, such as the Tiffen Black Mist series filters, helps warm the image as well. Practice shooting in a progressive scan or frame-based mode rather than shooting interlaced images, and, if the camera is capable of multiple frame rates, shoot at 24p, shoot with a PAL 25 frames per second (fps) camera, or learn how to operate the camera properly in progressive scan mode. In progressive scan mode, the camera must be handled differently from when shooting in interlaced modes. Pans can easily become mush and blur in the hands of the inexperienced. Hand-held shots become a wash of colors in those same hands. Managing the camera correctly is half the battle in getting a good film-like appearance from the digital information.
Interlaced or Not?
One of the first exercises in the process of making DV look film-like is to deinterlace. We discussed interlacing in Chapter 3, but to revisit, interlacing is the process in which lines, known as fields, are drawn for every frame of video. NTSC-DV has a frame rate of 30 fps or 29.97 fps. PAL-DV has a frame rate of 25 fps. This information means that NTSC DV has 30 half frames of lower fields/lines and 30 half frames of upper fields/lines. PAL has 25 half frames of upper fields/lines and 25 half frames of lower fields/lines. These lines generally should be removed or blended to gain the smooth look of film. Video shot in progressive scan mode does not have these temporally offset fields. Be certain that when editing progressive scan footage in Vegas the project properties are set for Progressive Scan. If the setting is not correct, Vegas might insert the fields in transitions or other generated media.
Removing interlacing can be done within the project itself, by setting Vegas to the project settings of progressive scan versus interlaced. Several ways to accomplish a properly deinterlaced image are available. The first and fastest way is to set the project properties to Progressive Scan. To do so, open the FILE | PROPERTIES | ADVANCED dialog, and in the Deinterlace menu, select Blend Fields. This method is fast and easy and assures continuity.
Another way, or “look,” is to blend fields manually. This process creates a slightly softer image and may be preferable to your eye.
When manually deinterlacing, create a new project. Set the Project Properties to Progressive Scan, and insert a new video track (Ctrl+Shift+Q). Place events on the timeline. To deinterlace for a film-like appearance, duplicate the video track. Select an event on the top track, right-click, and then select PROPERTIES | FIELD ORDER | UPPER FIELD FIRST. Using the Track Opacity/Level slider on track 1, set opacity to 50 percent. On track 2, be certain that events are lower-field first. This process deinterlaces the footage by drawing all parts of the frame, rather than drawing only half the frame (see Color Plate 8.21).
There is no wrong way to achieve deinterlaced footage with Vegas to obtain a film-like appearance.
Another big difference between DV and film is the gamma curve. In Vegas, the gamma can be reduced using a color correction tool (see Color Plate 8.22). Increasing saturation is also good practice for obtaining a more film-like look.
You need to know a few things about shooting for a film-like appearance. First, if the video will ever be transferred to film, do not shoot with filters such as the Black Mist 2 from Tiffen. Shoot clean and with clarity. The same goes for using film-look plug-ins, such as grain. All of the digitally created film look is created in the transfer from DV to film. You need to understand going in that DV-to-film transfers are exceptionally expensive. An average 90-minute project will cost a minimum of $30,000 to transfer from DV to film, http://www.dvfilm.com has lots of information on how to make this happen if this is your end-goal. If video will be shown on a large screen, digitally projected, test the footage before sending out the entire project as an uncompressed file. Projection can create problems, such as pixilation or overblown colors, so the entire project should be checked over before public viewing. Rendering uncompressed footage, which is generally advisable for large-screen projections, can take a long time, particularly when motion blurs and super-sampling are applied. Be sure to have everything checked out before starting this process to avoid long periods wasted because of haste in the postproduction process.
Legal Colors
Video that will be broadcast or displayed on NTSC-display equipment must be brought within legal color guidelines to avoid clipped colors and clipped/distorted audio and to avoid embarrassment as a professional. The best means of handling illegal colors is to have color correction, titles, still images, and filtering monitored so that the video isn’t allowed to become illegal in the first place. Fulfilling this requirement, however, sometimes can be a challenge. Vegas provides a Broadcast Colors clamp that ensures that colors are legal. Although Vegas 2.0/3.0 had the Broadcast Colors clamp as well, Vegas brings a number of parameters to this tool that were previously unavailable. The Broadcast Colors plug-in can be considered in a similar light as a limiter in the audio world. The new tools can be considered more of a video compressor as the new tools allow some elasticity as to how Vegas treats illegal colors.
These options give editors many choices in working with color values. With technology changing rapidly in the broadcast industry, these limitations are less stringent, although the standards will most likely persevere for many years to come.
Rather than dropping the Broadcast Colors filter on an entire project, which would absolutely assure that the project is legal, consider inserting the plug-in on events that are demonstrably beyond legal colors. Use the histogram or waveform monitor to display and indicate luminance issues.
Inserting the Broadcast Colors filter on troublesome events rather than on an entire project will speed render times. More importantly, adding the filter to individual events will not clip or affect color values that may border on the edge of legal and then have a potentially negative impact on the overall picture if much of the project is at near-illegal levels.
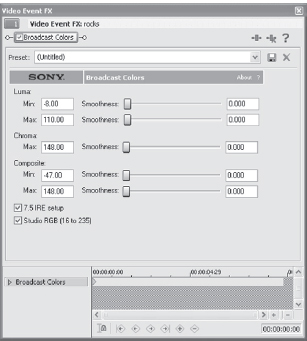
8.19 The new Broadcast Colors tool has a broad palette of options.
The Broadcast Colors plug-in presets bring colors to within 8.5–100 IRE levels or 16–234 RGB levels. Luma and chroma (light/color), however, are adjustable separately, as is the composite blending smoothness of luma/chroma.
Even though the Internet does not have color limitations, inserting a Broadcast Color, Black Restore, or Levels filters on events can indeed benefit video streams over the web. Encoding is an art form, have no doubt. The fewer color variations in a stream, the better the stream. Redundant frames are the key to good streams. The Levels plug-in can limit colors. This process would not be useful if the HSL and Restore Black filters were used to crush blacks and reduce color saturation. Be aware, however, that the Broadcast Colors plug-in will not ever add anything to colors but only assure that colors are within legal ranges.
Endnote
1 For more in-depth reading on WFM/vectorscopes, pick up Color Correction for Digital Video by Steve Hullfish and Jaime Fowler. Available from CMP Books.