
Capturing Video
Getting Media from the Camera to the Hard Drive
Capturing media from a camera is the first step in the video editing process. Vegas has a unique application that functions from within Vegas but can also function outside of Vegas as a separately accessible tool. A separate capture icon can be placed on the desktop if so desired. Browse for the VideoCap50.exe application or find it directly at C:Program FilesSonyVegas 6 for most installations. (You might need to search for the Vegas40.exe file if Vegas was not installed to the C: drive.) It is highly recommended that you launch the capture tool from within Vegas. If launched from Vegas, media captured in Video Capture is added automatically to the Media Pool in Vegas.
Transferring video from tape to a hard drive is called capturing. In the OHCI world, this process is different from the hardware-assisted capture card world as no compression or altering of the video takes place in the transfer. With M-JPEG cards or hardware-assisted cards, media is compressed or has header information that some editing applications can’t read. Fortunately, while Vegas can’t read every form of video file captured in the Microsoft Windows environments, it can read nearly every form of video file captured in the Windows environment if the proper video for Windows (VfW) codec is installed on the machine. For M-JPEG AVIs, you might need to download and install an M-JPEG codec. Matrox and Main Concept are good sources for these codecs. However, the Video Capture utility only controls cameras through the OHCI cards. Vegas cannot take advantage of hardware-assisted codecs, such as those offered by Matrox, Pinnacle, and Canopus, although Vegas can edit media captured with the capture utilities that come with those cards.
Video capture enables media from the camera to be placed on the hard drive. This process works with live or pre-recorded media. Vegas uses a standard called open host controller interface (OHCI) to control cameras and to facilitate the transfer of video from the camera to the hard drive. Vegas functions with some analog capture cards but consult your owners’ manual for more information. To control the start, stop, rewind, fast-forward, and record functions of a digital camera, however, the only card Vegas functions with is the OHCI standard. Cards manufactured by ADS, SIIG, Unibrain, as well as the new OHCI-compliant card from Canopus, the ADVC1394 card, are all compliant examples. Analog or non-OHCI cards do not have the ability to control a DV camera from within Vegas.
Vegas automatically senses the frame rate, image size, and any other information that might be part of the DV stream. No special settings are required for capturing DV from a DV camera via an OHCI card. Whether the media is PAL, NTSC, 24p, 16:9 anamorphic, or other supported format, it is captured, or transferred, from the camera with those attributes recognized.
Manual Capturing/Capturing Entire Tape
Connect the camera to the OHCI/FireWire card installed in the back of the computer. If a shortcut is not on the desktop, open Vegas and select FILE | CAPTURE VIDEO, which opens the Vegas Video Capture utility. The capture utility can also be opened from the Media Pool by clicking the Capture Video button.

3.1 Opening the Video Capture utility from the Media Pool. You may want to place the capture tool Icon on the main Vegas toolbar if you need to access capture regularly
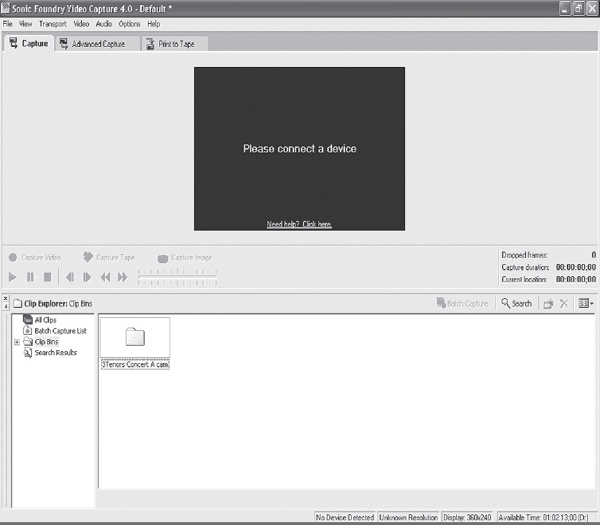
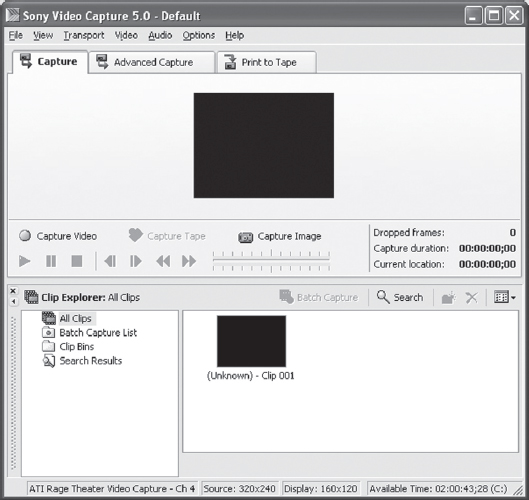
3.2 First capture window when the utility opens.
In some systems, the camera is not auto-detected. If this happens to you, go to CONTROL PANEL | SYSTEM | HARDWARE and look for the 1394 Bus Host controllers device line. Double-click the line, and the properties of the bus will open, showing the installed drivers. In some instances, a Microsoft driver and another driver, such as a TI, Lucent, or VIA driver will be present. Right-click any driver that is not a Microsoft driver and uninstall it. Repeat for all non-Microsoft drivers.
Some 1394 cards are installed as network cards, which can cause conflicts with the camera and bus operations. If this becomes an issue, open the network adapter hardware and disable the 1394 NIC/Network card. This process should not affect other networking tasks or abilities.
3.3 Open the M | HARDWARE tab to adjust 1394 and Network properties.
When Video Capture launches, select OPTIONS | PREFERENCES. Select the Disk Management tab. The default capture location for captured files is C:Documents and SettingsusernameMy Documents.
If the camera is turned off, Video Capture will prompt you to turn it on.
When the camera is turned on, Windows will automatically open screens asking what it should do with the camera. Cancel the Windows screens, as Video Capture is already open. If you select anything else, it may override the Video Capture drivers, and then you’ll need to start again by shutting down the newly launched application and recycling the camera power. If Video Capture and/or Windows doesn’t auto-sense the camera when it is turned on, be sure the camera is in videotape recorder (VTR) mode.
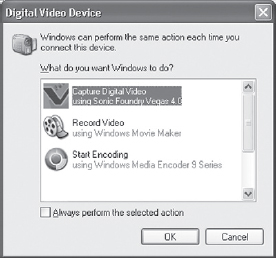
3.4 Windows automatically senses most DV cameras.
If a capture drive has not been specified, Video Capture will ask for a drive to be specified. Unless absolutely necessary, never capture media to the same hard drive as the operating system. Specify a hard drive and specify a disk overflow size that is at least three percent less than the overall drive size. This option will allow room for defragging drives and will prevent a drive from filling to total capacity, possibly rendering the drive incapable of being recovered in the event of a drive or system crash. Default overflow is 360MB. Larger drives can require a slightly larger overflow, such as 500MB.
Video Capture will prompt for a tape name with the Verify Tape Name dialog. This step is the first in proficient media asset management (MAM) or digital asset management (DAM). Enter the name of the tape you wish to capture. This tape name will be appended to filenames as they are captured, so be sure it’s correct. You will have one more opportunity to correct this easily later on. This process is known as logging.
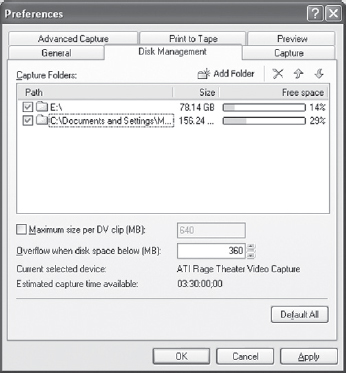
3.5 Specify capture drive. Notice that Vegas indicates capture time available based on selected hard space.
![]() Tip
Tip
Enter the name of the tape exactly as it’s written on the tape spine in the event that you want go back and recapture the media. This process avoids errors in logging and locating tape.
The Verify Tape Name dialog also provides choices as follows:
• “Don’t capture any clips right now”
• “Start capturing all clips from the current tape position”
• “Start capturing all clips from the beginning of the tape”
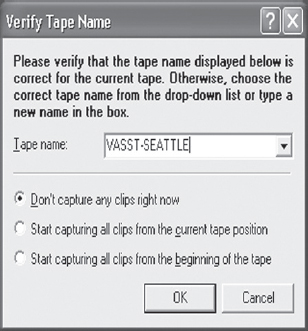
3.6 Be sure to label tapes correctly at capture to assure quick location of clips during editing.
For the moment, select “Don’t capture any clips right now” and click OK. Video Capture is now ready to capture video. Clicking the Play button or pressing the spacebar causes the camera to begin playing. Video is not captured until you click the Capture Video button or press Ctrl+R.
Video Capture can capture video from the camera/tape in several ways, including:
• Manual capture by starting and stopping (labor/time intensive)
• Capture from a specific location and detect or not detect scenes, starting and stopping with the control (users’ preference, can be labor/time intensive)
• Capture entire tape with scene detection (little effort)
• Batch capture logged clips (fair amount of effort to log clips; time saving/disk space saving in end view).
![]() Tip
Tip
For a rapid-start capture:
1. Connect camera to OHCI card.
2. Turn camera on.
3. Launch Video Capture.
4. Choose Capture Entire Tape.
Scene detection is a feature in which Video Capture sees breaks in the date and time stamps created when the camera is started and stopped during the recording process. Each time the camera is stopped, Video Capture sees the change in the date and time stamp and starts a new file. So if you’ve started and stopped the camera ten times while videotaping at an event and then connected the camera to the computer and opened Video Capture, Video Capture creates ten files in the media pool when it is activated. (Files are stored in the folder/drive specified in Disk Management. Media Pool creates a pointer to that file; files are not actually stored in Media Pool.)
![]() Tip
Tip
When using DV tape, be certain that timecode isn’t broken on the tape. Broken timecode often happens when re-using old videotape or when cameras aren’t allowed to run for a moment following shooting. This problem also happens when tape is viewed in the field and allowed to play past the end of timecode. Avoid this problem by:
• Always recording blank time completely over previously used videotape by recording with the lens cap on for the length of the tape.
• Allowing 5–10 seconds of tape to roll by when recording in the field, if you know you will be reviewing tape in the field.
Video Capture is capable of batch capturing an entire tape while left unattended. Click the Capture Entire Tape button. Video Capture will rewind the tape to its beginning/top and then start to capture the tape to the folders/drives specified in the Disk Management preferences. If the specified hard drive does not have enough space to store an entire tape, be certain to specify more than one drive. Video Capture will automatically roll files over to the next specified drive.
Hard drives formatted as FAT 32 drives may not have files larger than 4GB, or about 18 minutes in tape time. Video Capture will automatically find the best point to divide files in the event of FAT 32 drives. NTFS drives have a file size limitation of 4TB, which is roughly 330 hours of DV.
Begin capturing tape by either pressing Ctrl+R or clicking the Capture button in the capture tool. Video Capture will start capturing from the moment you click the button. If the camera or tape deck is OHCI/1394 standard, the device will start playing and transferring media from the tape to the hard drive. Clicking the Capture Entire Tape button instructs Video Capture to rewind to the beginning of the tape and start recording. Video Capture will auto-detect scenes in the tape and create new files for each scene. (Enable Scene Detection is enabled by default in the OPTIONS | PREFERENCES | CAPTURE dialog.)
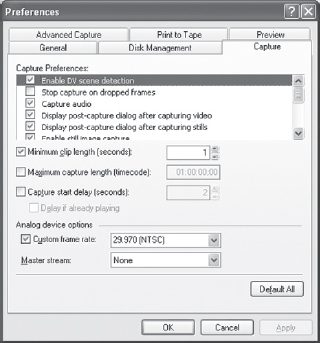
In the Video Capture OPTIONS | PREFERENCES | CAPTURE tab, set the minimum clip length to 5 or 10 seconds. This instructs Video Capture to ignore the OOPS!-type of files, in which a camera was inadvertently started and stopped, leaving small video clips on the tape. Of course, if working with animations or other projects that require short shots, you might wish to leave this set unchecked, which is the default setting.
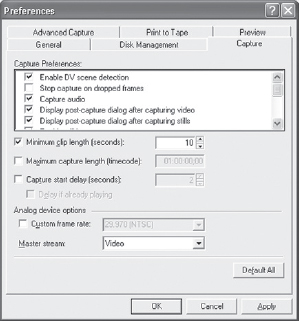
3.7 Setting the minimum clip length.
Animation-type capture is also possible by selecting a maximum capture length of only one or two frames. Experiment with clay models or action figures to get the hang of editing this type of captured media.

3.8 An analog camera or video deck, such as a VHS or Beta SP machine, uses composite S-Video, or component video output to a DVC, which converts the analog video to digital video so that the computer can see the video signal as data.
In the analog tape world, such as a VHS or Beta SP, a digital video converter (DVC) is required to convert analog to DV. Several converters are available in the market today, from the very high-end Laird Blue Flame to the Canopus ADVC 1394 card. YUV input, composite input, and S-Video input are all common input features, making it fairly simple to find a converter that meets your specifications.
If an analog machine is used with a converter or analog card, the machine must be turned on and play enabled before capturing video. Scene detection does not take place with analog tape machines passed through a converter. Machine control is not possible with analog machines, with the exception of some high-end converters that read DV control signals and translate them to RS-422 control signals to which some analog decks will respond. DV control can be disabled in the OPTIONS | PREFERENCES | GENERAL dialog. Typically, leaving DV control enabled does not affect a DV capture but can create some confusion if shifting between DV and non-DV sources.
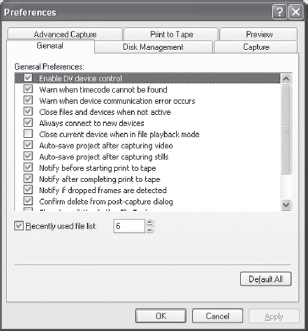
3.9 Disable the DV control when working with non-DV decks or analog capture cards.
When Video Capture has captured the entire tape or when you have manually captured all clips desired from the tape, Video Capture will prompt you to save the capture session. This feature is useful if there is any possibility that you will be going back to the tape to recapture at some future point. Lost video, accidentally deleted video, and failed hard drives are all reasons to recapture tape, so it is generally good practice to save the capture session.
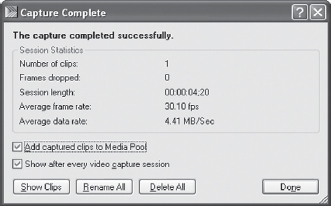
3.10 The post-capture dialog pvovides information about clip length, dropped frames (if any), location of media storage, frame and data rate, and check boxes to place media in the Vegas Media Pool. Unchecking the “Show after every video capture session” option will prevent this dialog from popping up after each capture.
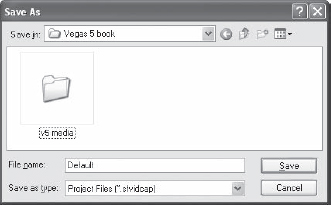
3.11 Store the capture session if any likelihood exists that the same tape will need to be recaptured later or if the session needs to be shared on a network.
After capturing video and closing the Video Capture application, the captured media will appear in the Media Pool in Vegas 6.
Video Capture has other tools available for logging and capturing in Vegas. Click the Advanced Capture tab. This tab opens a different view of Video Capture. Comments, ratings, length of clip, and in/out information can all be logged and added in this view. Use this feature to keep track of media and how it appears for rapid editing decisions later in the editing process. These comments appear in the Media Pool and can assist in making editing choices.
![]() Tip
Tip
See the Vegas 6 chapter for information on how to capture HDV media or media via the Black Magic Design Decklink hardware.
The Advanced Capture tab has dialogs that allow for more advanced file management. Open the Advanced Capture tab at the upper left of the capture utility. Detailed capture logging tools are located on the right side of the capture screen.
Using Batch Capture
Batch capture only functions with OHCI devices. To use the Batch Capture tools in Video Capture, click the Advanced Capture tab. Begin playing tape via the control seen on screen.
To mark the point on the tape where you want capture to begin, click the Mark In button.
To mark the place on the tape where capture should end, click the Mark Out button.
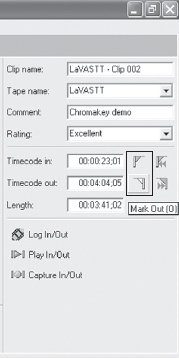
Video Capture will note the in/out times in the windows next to the Mark In/Out icons and will show the clip length in the Clip Length field.
3.12 Advanced capture tools offer efficient capture logging and automated capture tools, saving tremendous time in the editing/capturing process, in addition to saving disk space.
The Mark In/Mark Out dialogs contain two buttons for returning the tape to the in or out point. Selecting the “Cue To In” (shift+I) or “Cue To Out” (shift+O) buttons will cause the tape deck or camera (T/C) to auto-locate to the selected in or out points indicated in the In/Out dialog boxes.
To log the clip, click the Log In/Out button under the Length field. Video Capture creates a note based on the tape deck or camera in/out markers and displays the clip in the current bin in the right pane of the Clip Explorer. Change in/out markers as many times as necessary to correctly mark the clip. The clip is not logged until you click the Log In/Out button. Only the displayed time in the T/C in and T/C out fields are used to mark the clip for batching later on.
Mark as many clips as necessary. Multiple tapes can be logged at once. Be sure that tape names are changed in the logging dialog so that Video Capture knows when to prompt for a new tape to be put in the deck.
3.13 Use the Mark In (|)and Mark Out (0) buttons to mark timecode points for a batch capture of selective clips
As clips are marked for batch capture, an icon of the capture will appear in the list view/bin window. These icons have a red dot in the center, indicating that they are marked for capture. When all clips are logged, click the Batch Capture button found above the list view/bin window. Clips can be automatically marked for batch capture by selecting the OPTIONS | ADVANCED CAPTURE check box.
In this same dialog box, clips can be commented on and rated. Comments assigned to an individual clip can be viewed in the media pool after the clip is identified in Vegas. The Media Pool search tool allows Vegas to search for keywords based on these comments, so while this feature is convenient, it’s fairly indispensable for long-form work where rapid searches for specific clips are needed. It’s also good media management, even if it takes a bit of time to do.
Video can be graded on the quality of shot, helping to assign the priority clips for later identification and location.
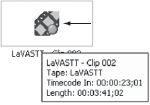
3.14 The red dot on the clip indicates that a clip is marked for batch capture.
The Capture and Advanced Capture dialogs provide the ability to create and use Clip Bins. Each master tape or B-Roll might have its own bin, and clips can be sorted in any fashion that makes sense to the project editor or producer. Remember how Radar O’Reilly stored the maps to the minefields on M.A.S.H. under “B” for “BOOM”? Each person has their own method of sorting and storing files. Media bins accommodate this. Right-click the Clip Bins folder, select Create New Bin, and name the bin with the filename information that relates to the part that the clips will play in the project. If the “Add Clips to Media Bin” check box is selected in the post-capture dialog, clips are auto-added to the media pool bins in Vegas, and bins from Video Capture can be dragged to the Media Pool in Vegas as well.
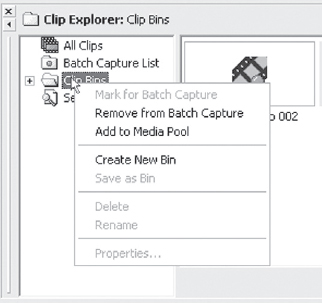
3.15 Right-click the Media Bin to create a new bin to aid in locating, managing, and logging media.
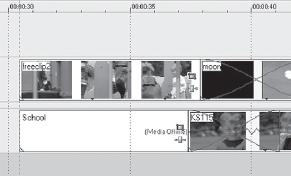
3.16 When video is lost, is moved to a different folder, or is corrupted, but is associated with an event on the Timeline, the event will provide a placeholder on the Timeline that can be replaced with a take or recaptured from the DV tape.
Bins from the Video Capture utility can be imported to the Media Pool in Vegas by creating the bin in Vegas before capturing media.
In the NLE world, if a clip is on the hard drive, it is considered to be online. If the clip disappears from the hard drive but is part of a project, it is considered to be offline, and Vegas shows the file as offline in the Media Pool, shown as grayed out or missing media with the text “Offline Media” in the lower-left corner of the Media Pool. Vegas provides the opportunity to recapture offline media by right-clicking the offline media and selecting “Recapture Offline DV Media.”
Recapturing media from the Media Pool launches the Video Capture application automatically, and you will be prompted to place the correct tape in the deck/camera if you have not already done so. This point is where careful logging/labeling is invaluable. Video Capture will seek out the timecode related to the clip that is marked for recapture and start the capture process with no assistance. The recaptured media will need to be directed to a folder on one of the drives.
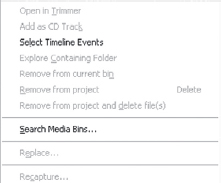
3.17 To recapture DV media with Video Capture, right-click in the Media Pool in Vegas and select “Recapture All Offline Media
Capturing Stills with Video Capture
The Video Capture tool allows stills to be captured and cataloged during the capture process. To capture stills, click the Capture Still button. Still images by default are stored as JPEG files unless otherwise specified in the OPTIONS | PREFERENCES | CAPTURE dialog. In this same dialog, Video Capture can be instructed to de-interlace video images and can be instructed to apply correct aspect ratio to still images. If the “Saved Captured Stills as JPEG” box is left unchecked, images are stored as uncompressed Bitmaps.
Stills captured to the clipboard can be opened in any photo editor for color correction, image correction, resizing, or other manipulation.
Many video cameras have the ability to capture stills as well. Still images are generally captured to videotape and can be narrated during the still capture on the video camera. Video Capture treats these still images as video because the tape is moving and the still image generation is created by the video camera. Default still-image length on most DV cameras is five seconds. If Scene Detection is enabled, Video Capture creates a new file for each still photo taken with the camera.
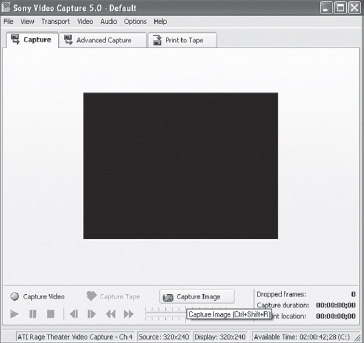
3.18 Still images can be captured directly with Video Capture 5.
In the very near future, most DV cameras in the consumer and semi-professional markets will sport not only IEEE-1394 and S-Video connectors but will also have USB mini connectors (Type B) as well. This option will occur because of increased manufacturer support of USB2 as a data transfer protocol. All DV cameras currently have a FireWire/IEEE-1394 connector on them. Sony cameras label this output as an i.Link connection. Having both USB2 (Type B) connectors and 1394 connectors means that cameras will be able to connect to any type of computer, regardless of hardware configuration. Both formats operate reasonably the same as the other.
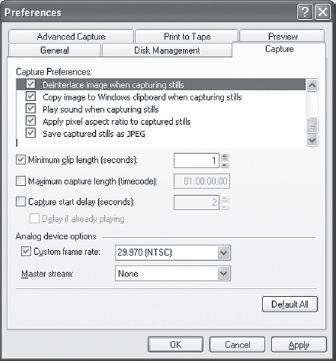
3.19 Specify preferences for managing still images in Video Capture and about viewing formats.
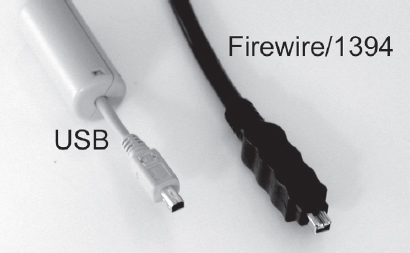
3.20 USB Type B connector and FireWire/1394 four-pin connector. Soon, all cameras will have both types of connectors.
![]() Tip
Tip
Never use USB 2 when FireWire is present. Vegas Capture doesn’t do very well with USB 2 camera dialogs. USB 2 uses more system resources than does iLink/IEEE1394.
Another major change coming in digital video is the advent of portable, battery-powered hard drives that will eventually be built directly into cameras. For the time being, these drives are belt-worn and have rechargeable batteries. Many of the units use the IBM TravelStar drives found in laptops. As drive speeds and sizes increase, these drives or similar storage mechanisms will be stored in the cameras themselves. The ADS Technology belt-clip drive is capable of holding up to five hours of DV media, with a built-in rechargeable battery. The drive housing has a built-in six-pin 1394 connector, which is connected to the FireWire output of the DV camera.
3.21 The ADS 3.5 drive kit has a self-powered housing with a six-pin FireWire connection.
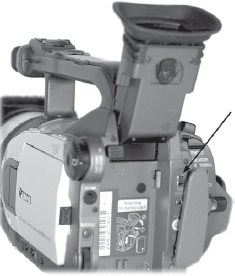
3.22 The four-pin FireWire output from the DV camera plugs directly into the FireWire input on the drive kit. Video captured directly to the drive kit will not require capture, as it is already in digital format on the drive and merely needs to be plugged into the computer/electric system.
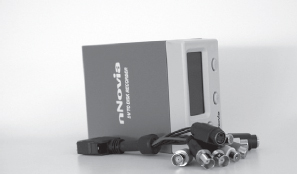
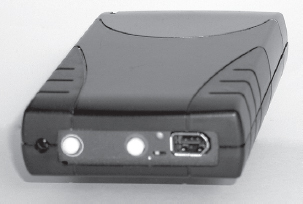
3.23 The Nnovia A2D can not only capture from a DV camera, but it also can capture video and audio directly from an analog camera, converting it to DV on the fly, removing the process of capture